SAR Index
From TrainzOnline
(Difference between revisions)
m |
m |
||
| Line 1: | Line 1: | ||
| − | <table width= | + | <table width=1000> |
<tr valign="top"> | <tr valign="top"> | ||
| − | <td align="center"><span style="background-color: blue; color: white; font-weight: 700; font-size: 21px"> SAR Peterborough Narrow Gauge Division </span></td> | + | <td align="center" width=800><span style="background-color: blue; color: white; font-weight: 700; font-size: 21px"> SAR Peterborough Narrow Gauge Division </span></td> |
| + | <td width=200> </td> | ||
</tr> | </tr> | ||
<tr valign="top"> | <tr valign="top"> | ||
<td align="center"><span style="font-weight: 700; font-size: 15px">Track Diagrams and Location Data</span></td> | <td align="center"><span style="font-weight: 700; font-size: 15px">Track Diagrams and Location Data</span></td> | ||
| + | <td> </td> | ||
</tr> | </tr> | ||
<tr valign="top"> | <tr valign="top"> | ||
<td align="center">[[Image:Location Index.png|link=|alt=Location Index]]<br>'''All links will open in this window'''</td> | <td align="center">[[Image:Location Index.png|link=|alt=Location Index]]<br>'''All links will open in this window'''</td> | ||
| + | <td align="center">[[image:Session Scenario Index.png|link=SAR Peterborough Base Session|alt=Scenarios]] [[image:SAR Tutorial.png|link=SAR Scenarios Tutorial|alt=Tutorial]]<td> | ||
</tr> | </tr> | ||
</table> | </table> | ||
| − | <table> | + | <table width=1000> |
<tr valign="top"> | <tr valign="top"> | ||
| − | <td> | + | <td width=800> |
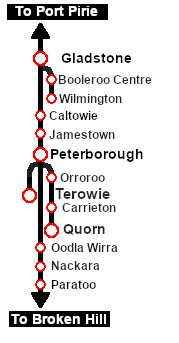
[[Image:SAR_PortPirie-BrokenHill_Line.png|link=SAR Port Pirie-Broken Hill|alt=Port Pirie-Broken Hill Line|Show Port Pirie-Broken Hill Line]] <span style="font-weight: 700;">Gladstone to Paratoo Section <span style="background-color: black; color: white;"> 127km - 79mi </span></span> | [[Image:SAR_PortPirie-BrokenHill_Line.png|link=SAR Port Pirie-Broken Hill|alt=Port Pirie-Broken Hill Line|Show Port Pirie-Broken Hill Line]] <span style="font-weight: 700;">Gladstone to Paratoo Section <span style="background-color: black; color: white;"> 127km - 79mi </span></span> | ||
<br> | <br> | ||
| Line 127: | Line 130: | ||
</table> | </table> | ||
</td> | </td> | ||
| − | <td align="center">[[image:SAR Nth Division Strip Map.png|link=|alt=SAR Northern Division Map | + | <td align="center" width=200>[[image:SAR Nth Division Strip Map.png|link=|alt=SAR Northern Division Map]]</td> |
| − | + | ||
</tr> | </tr> | ||
</table> | </table> | ||
Revision as of 22:11, 3 April 2021
| SAR Peterborough Narrow Gauge Division | ||
| Track Diagrams and Location Data | ||
 All links will open in this window |
  |
|
|
 |
|||||||||||||||||||||||||||||||||||||||||||||||||||||||||||||||||||||||||||||||||