Route and Session Basics
m (→Saving an Existing Route and Session) |
m (→Saving an Existing Route and Session) |
||
| (269 intermediate revisions by one user not shown) | |||
| Line 1: | Line 1: | ||
| − | + | <table width=1000> <!-- BEGIN Nav Buttons Table --> | |
| + | <tr valign="top"> | ||
| + | <td width=629> </td> | ||
| + | <td width=50> </td> | ||
| + | <td width=50> </td> | ||
| + | <td width=46> </td> | ||
| + | <td width=75> </td> | ||
| + | <td width=75>[[image:NextDown.png|link=#stepHierarchy|alt=Next Down|Next Down]]</td> | ||
| + | <td width=75>[[image:BackToBottom.png|link=#bottom|alt=Bottom|Bottom]]</td> | ||
| + | </tr> | ||
| + | </table> <!-- END Nav Buttons Table --> | ||
| + | <table width=1000> | ||
| + | <tr valign="top"> | ||
| + | <td> | ||
| + | The information in this Wiki Page applies to '''Trainz Plus''', '''TRS22''' and '''TRS19'''. This page is intended to provide you with an overview of the properties and features of '''Routes''' and '''Sessions''' when creating layouts for Trainz. More detailed descriptions of these various features plus instructions on getting you started with creating '''Routes''' and '''Sessions''' can be found in the Trainz Wiki '''How To Guides''' are provided at the end of this document.</td> | ||
| + | </tr> | ||
| + | </table> | ||
| + | <br> | ||
| + | <table> | ||
| + | <tr valign="top"> | ||
| + | <td> | ||
__TOC__ | __TOC__ | ||
| − | <table> <!-- BEGIN Nav Buttons Table --> | + | </td> |
| + | <td align="center"><span style="font-weight: 700; font-size: 17px; color: white; background-color: black;"> Workflow Diagrams </span><br> | ||
| + | [[image:RouteWorkflow.png|link=|alt=Route Workflow diagram]]<br> | ||
| + | [[image:SessionWorkflow.png|link=|alt=Session Workflow diagram]]</td> | ||
| + | </tr> | ||
| + | </table> | ||
| + | <br> | ||
| + | <table width=1000> <!-- BEGIN Nav Buttons Table --> | ||
<tr valign="top"> | <tr valign="top"> | ||
| − | <td width= | + | <td width=629><span id="stepHierarchy"></span> |
| + | ='''Trainz Worlds'''= | ||
| + | </td> | ||
| + | <td width=50> </td> | ||
| + | <td width=50> </td> | ||
<td width=46>[[image:BackToTop.png|link=#top|alt=Top|Top]]</td> | <td width=46>[[image:BackToTop.png|link=#top|alt=Top|Top]]</td> | ||
| − | <td width=75>& | + | <td width=75> </td> |
<td width=75>[[image:NextDown.png|link=#stepWhatRoute|alt=Next Down|Next Down]]</td> | <td width=75>[[image:NextDown.png|link=#stepWhatRoute|alt=Next Down|Next Down]]</td> | ||
<td width=75>[[image:BackToBottom.png|link=#bottom|alt=Bottom|Bottom]]</td> | <td width=75>[[image:BackToBottom.png|link=#bottom|alt=Bottom|Bottom]]</td> | ||
</tr> | </tr> | ||
</table> <!-- END Nav Buttons Table --> | </table> <!-- END Nav Buttons Table --> | ||
| − | + | ||
The virtual worlds that Trainz creates can be classified as:-<br> | The virtual worlds that Trainz creates can be classified as:-<br> | ||
| − | <table> | + | <table width=1000> |
<tr valign="top"> | <tr valign="top"> | ||
| − | <td>[[image:RouteSessionGamesMap.png|link=|alt= Route-Sessions-Games|480px]]</td> | + | <td>[[image:RouteSessionGamesMap.png|link=|alt=Route-Sessions-Games|480px]]</td> |
<td> | <td> | ||
| − | <table cellpadding= | + | <table cellpadding=2> |
<tr valign="top"> | <tr valign="top"> | ||
<td>[[image:DotPoint.JPG|link=]]</td> | <td>[[image:DotPoint.JPG|link=]]</td> | ||
| Line 23: | Line 54: | ||
</tr> | </tr> | ||
</table> | </table> | ||
| − | '''Routes''' are created in '''Surveyor''' and contain most (if not all) of what you will see in your virtual Trainz world. You can have | + | '''Routes''' are created in '''Surveyor''' and contain most (if not all) of what you will see in your virtual Trainz world. You can have many different routes, limited only by your storage space. They can be built to represent different geographical regions (real or imagined) and different periods of time (past, present, future). They also control the environment settings in your virtual world, such as your geographic location and altitude, the season of the year, lighting conditions and the weather. Each route can have multiple sessions.<br><br> |
| − | <table cellpadding= | + | <table cellpadding=2> |
<tr valign="top"> | <tr valign="top"> | ||
<td>[[image:DotPoint.JPG|link=]]</td> | <td>[[image:DotPoint.JPG|link=]]</td> | ||
| Line 30: | Line 61: | ||
</tr> | </tr> | ||
</table> | </table> | ||
| − | '''Sessions''' are also created in '''Surveyor''' but are designed to be run in '''Driver'''. | + | '''Sessions''' are also created in '''Surveyor''' but are designed to be run in '''Driver'''. They contain the instructions that will control your trains when they are operating in automatic or "AI" mode in your route. They also control the goods your trains will carry, load and unload at industries along the way. You can create different sessions for different aspects of your railway - freight, passenger, shunting or a mixture - or for different seasons of the year or times of the day. Sessions are where you can ''program'' the behaviour of objects in your virtual Trainz world. A session can also contain scenery items that are specific to a particular railway operation, season or time of day. Sessions also control the environment settings in your virtual world, such as lighting conditions and the weather. Each session can have multiple saved driver games.<br><br> |
| − | <table cellpadding= | + | <table cellpadding=2> |
<tr valign="top"> | <tr valign="top"> | ||
<td>[[image:DotPoint.JPG|link=]]</td> | <td>[[image:DotPoint.JPG|link=]]</td> | ||
| Line 41: | Line 72: | ||
</table> | </table> | ||
<br> | <br> | ||
| − | <table> <!-- BEGIN Nav Buttons Table --> | + | <table width=1000> <!-- BEGIN Nav Buttons Table --> |
<tr valign="top"> | <tr valign="top"> | ||
| − | <td width= | + | <td width=629><span id="stepWhatRoute"></span> |
| + | ='''What is a Route?'''= | ||
| + | </td> | ||
| + | <td width=50> </td> | ||
| + | <td width=50> </td> | ||
<td width=46>[[image:BackToTop.png|link=#top|alt=Top|Top]]</td> | <td width=46>[[image:BackToTop.png|link=#top|alt=Top|Top]]</td> | ||
<td width=75>[[image:NextUp.png|link=#stepHierarchy|alt=Next Up|Next Up]]</td> | <td width=75>[[image:NextUp.png|link=#stepHierarchy|alt=Next Up|Next Up]]</td> | ||
| Line 51: | Line 86: | ||
</table> <!-- END Nav Buttons Table --> | </table> <!-- END Nav Buttons Table --> | ||
| − | = | + | <table width=1000> |
| − | A route (also known as a "Layout") consists of most of what you will see on the screen when using '''Surveyor''' and '''Driver'''. Things such as the landform or terrain, most (if not all) of the scenery items, the ground textures, the effect layers (TurfFX and Clutter), plus some "environmental" features.<br> | + | <tr valign="top"> |
| + | <td colspan=2>A route (also known as a "Layout") consists of most of what you will see on the screen when using '''Surveyor''' and '''Driver'''. Things such as the landform or terrain, most (if not all) of the scenery items, the ground textures, the effect layers (such as TurfFX and Clutter), plus some "environmental" features.<br><br> | ||
| − | A route consists of two parts:- | + | A route consists of two parts:-</td> |
| − | + | </tr> | |
| − | + | </table> | |
| − | < | + | |
| − | <table | + | <table width=700> |
<tr valign="top"> | <tr valign="top"> | ||
| − | <td>[[image: | + | <td> |
| − | <td>'''When you save a Route, all | + | <table width=300> |
| + | <tr valign="top"> | ||
| + | <td width=25>[[image:Ablue.png|link=]]</td> | ||
| + | <td>'''Route Data''' and</td> | ||
| + | </tr> | ||
| + | <tr valign="top"> | ||
| + | <td>[[image:Bblue.png|link=]]</td> | ||
| + | <td>'''Route Layers'''</td> | ||
| + | </tr> | ||
| + | </table> | ||
| + | </td> | ||
| + | <td> | ||
| + | <table width=400 bgcolor=#000000 cellpadding=2> | ||
| + | <tr valign="top"> | ||
| + | <td> | ||
| + | <table bgcolor=#ffffff cellpadding=2> | ||
| + | <tr valign="top"> | ||
| + | <td width=35>[[image:Information.png|35px|link=]]</td> | ||
| + | <td>'''When you save a Route, all items in the Route Data and Route Layers will be saved'''</td> | ||
| + | </tr> | ||
| + | </table> | ||
| + | </td> | ||
| + | </tr> | ||
| + | </table> | ||
| + | </td> | ||
</tr> | </tr> | ||
</table> | </table> | ||
<br> | <br> | ||
| − | <span style="font-weight: 700; font-size: 17px; color: white; background-color: black;">& | + | [[image:Ablue.png|link=]] <span style="font-weight: 700; font-size: 17px; color: white; background-color: black;"> Route Data: </span> |
<br> | <br> | ||
| − | <table | + | <table width=1000 bgcolor="lightcyan" cellpadding=2> |
<tr valign="top"> | <tr valign="top"> | ||
| − | <td>[[image: | + | <td width=10>[[image:BlueDot10x10.png|link=]]</td> |
| − | <td>The '''Route Data''' stores all those features that are '''painted''' into a layout using a '''brush tool''' | + | <td>The '''Route Data''' stores all those features that are '''painted''' into a layout using a '''brush tool''' and all the '''Environmental Data''' including the '''World Origin''' (latitude, longitude, altitude)</td> |
| − | + | ||
| − | + | ||
| − | + | ||
| − | + | ||
</tr> | </tr> | ||
</table> | </table> | ||
| − | + | The '''Route Data''' includes the '''Terrain''', '''Textures''', '''Effect Layers''', '''Legacy Water''' and the '''Environmental''' features. | |
[[image:Woolshed_Route_Data.png|link=|alt=Route Data]] | [[image:Woolshed_Route_Data.png|link=|alt=Route Data]] | ||
| − | + | <table width=1000 bgcolor=#000000 cellpadding=2> | |
| − | + | ||
| − | + | ||
| − | + | ||
| − | + | ||
| − | + | ||
| − | + | ||
| − | <table | + | |
<tr valign="top"> | <tr valign="top"> | ||
| − | <td>[[image:DotPoint.JPG|link=]]</td> | + | <td> |
| + | <table bgcolor=#ffffff cellpadding=2> | ||
| + | <tr valign="top"> | ||
| + | <td colspan=2>'''Route Data''' contains:-</td> | ||
| + | </tr> | ||
| + | <tr valign="top"> | ||
| + | <td width=10>[[image:DotPoint.JPG|10px|link=]]</td> | ||
| + | <td>'''Landforms''' (Terrain) - baseboards and ground height</td> | ||
| + | </tr> | ||
| + | <tr valign="top"> | ||
| + | <td>[[image:DotPoint.JPG|10px|link=]]</td> | ||
| + | <td>'''Water''' height and spread for '''Legacy Water''' found in '''Surveyor Classic''' </td> | ||
| + | </tr> | ||
| + | <tr valign="top"> | ||
| + | <td>[[image:DotPoint.JPG|10px|link=]]</td> | ||
| + | <td>'''Ground Textures''' including the grid pattern which is a texture</td> | ||
| + | </tr> | ||
| + | <tr valign="top"> | ||
| + | <td>[[image:DotPoint.JPG|10px|link=]]</td> | ||
| + | <td>'''TurfFX, Clutter, Water, Color''' - found in the '''Effects Layers''' (the '''Color Effect Layer''' is <span style="background-color: yellow;">only available in '''Trainz Plus''' when using '''High Definition (HD)'''</span>)</td> | ||
| + | </tr> | ||
| + | <tr valign="top"> | ||
| + | <td>[[image:DotPoint.JPG|10px|link=]]</td> | ||
| + | <td>'''Environmental Settings''' - '''World Origin''' (latitude, longitude, altitude), '''Water Surface''' (rough/calm/etc), '''Snow Altitude''', '''Lighting''' (sun, ambient and water colours), '''Sky''' (clouds), '''Road Traffic''' (on/off), '''Date''' (day, month), '''Wind''' strength, '''Fog''' level, '''Weather''' (rain/fine/snow), '''Brightness''' level. You must edit and save the route for these settings to become part of the '''Route Data''' - see the Trainz Wiki page '''[[image:WikiLink.PNG|link=]] [[How_to_Use_Environment_Tools|How to Use the Environment Tools]]''' for more details.</td> | ||
| + | </tr> | ||
| + | </table> | ||
| + | </td> | ||
| + | </tr> | ||
| + | </table> | ||
| + | <br> | ||
| + | [[image:Bblue.png|link=]] <span style="font-weight: 700; font-size: 17px; color: white; background-color: black;"> Route Layers: </span> | ||
| + | <table width=1000 bgcolor="lightcyan" cellpadding=2> | ||
| + | <tr valign="top"> | ||
| + | <td width=10>[[image:BlueDot10x10.png|link=]]</td> | ||
<td>'''Route Layers''' are used to hold the scenery assets that you want to appear in all sessions created for the route</td> | <td>'''Route Layers''' are used to hold the scenery assets that you want to appear in all sessions created for the route</td> | ||
</tr> | </tr> | ||
| Line 97: | Line 179: | ||
<br> | <br> | ||
| − | All scenery assets are held in layers. '''Route Layers''' give you a way of organising or grouping the assets displayed in your route. | + | All scenery assets are held in layers. '''Route Layers''' (you can have many layers) give you a way of organising or grouping the assets displayed in your route. |
[[image:Woolshed_Route_Layers.png|link=|alt=Route Layers]] | [[image:Woolshed_Route_Layers.png|link=|alt=Route Layers]] | ||
| − | + | <table bgcolor=#000000 cellpadding=2> | |
| − | + | <tr valign="top"> | |
| − | '''Route Layers''' | + | <td> |
| − | + | <table bgcolor=#ffffff cellpadding=2> | |
| − | + | <tr valign="top"> | |
| − | + | <td colspan=2>'''Route Layers''' contain:-</td> | |
| − | + | </tr> | |
| − | + | <tr valign="top"> | |
| + | <td width=10>[[image:DotPoint.JPG|10px|link=]]</td> | ||
| + | <td>Track and Track Objects (such as signals, switches, bridges, tunnels, speed signs, etc)</td> | ||
| + | </tr> | ||
| + | <tr valign="top"> | ||
| + | <td>[[image:DotPoint.JPG|10px|link=]]</td> | ||
| + | <td>Most (or all) scenery items (e.g. buildings, trees, rocks, active industries/stations) and scenery splines (e.g. roads, fences, etc)</td> | ||
| + | </tr> | ||
| + | <tr valign="top"> | ||
| + | <td>[[image:DotPoint.JPG|10px|link=]]</td> | ||
| + | <td>Rolling Stock (including locos) - <span style="background-color: yellow; font-weight: 700;"> Note: </span> It is '''strongly recommended''' that all rolling stock be placed into a '''Session Layer'''</td> | ||
| + | </tr> | ||
| + | <tr valign="top"> | ||
| + | <td>[[image:DotPoint.JPG|10px|link=]]</td> | ||
| + | <td>Lineside and Fixed Cameras</td> | ||
| + | </tr> | ||
| + | <tr valign="top"> | ||
| + | <td>[[image:DotPoint.JPG|10px|link=]]</td> | ||
| + | <td>Trackmarks, Triggers, Direction and Priority Marks</td> | ||
| + | </tr> | ||
| + | </table> | ||
| + | </td> | ||
| + | </tr> | ||
| + | </table> | ||
<br> | <br> | ||
| − | <table bgcolor=#000000 width= | + | <table bgcolor=#000000 width=1000 cellpadding=2> |
<tr valign="top"> | <tr valign="top"> | ||
<td> | <td> | ||
| Line 116: | Line 221: | ||
<tr valign="top"> | <tr valign="top"> | ||
<td>[[image:NotePad.PNG|link=]]</td> | <td>[[image:NotePad.PNG|link=]]</td> | ||
| − | <td>Scenery objects can also be stored in a session. This can cause confusion if you load a route without loading a session and find that some scenery items are "missing". See [[image:PageLink.PNG|link=]] '''[[#Loading an Existing Route|Loading an Existing Route]]''' below for how to deal with this | + | <td>Scenery objects can also be stored in a session. This can cause confusion if you load a route without loading a session and find that some scenery items are "missing". See [[image:PageLink.PNG|link=]] '''[[#Loading an Existing Route|Loading an Existing Route]]''' below for how to deal with this situation.</td> |
</tr> | </tr> | ||
</table> | </table> | ||
| Line 123: | Line 228: | ||
</table> | </table> | ||
<br> | <br> | ||
| − | <table cellpadding= | + | <table cellpadding=2 bgcolor="Aquamarine"> |
<tr valign="top"> | <tr valign="top"> | ||
| − | <td>[[image:LinkWiki.PNG|link=]]</td> | + | <td width=50>[[image:LinkWiki.PNG|link=]]</td> |
<td> | <td> | ||
| − | A detailed description of '''Layers''' can be found on the '''Trainz Wiki Page [[How_to_Use_Layers|How to Use Layers]]'''<br> | + | A detailed description of '''Layers''' can be found on the '''Trainz Wiki Page''':- |
| + | <table> | ||
| + | <tr valign="top"> | ||
| + | <td width=10>[[image:BlackDot10x10.png|link=]]</td> | ||
| + | <td>'''[[How_to_Use_Layers|How to Use Layers]]'''<br> | ||
| + | </td> | ||
| + | </tr> | ||
| + | </table> | ||
</td> | </td> | ||
</tr> | </tr> | ||
</table> | </table> | ||
<br> | <br> | ||
| − | <table> <!-- BEGIN Nav Buttons Table --> | + | <table width=1000> <!-- BEGIN Nav Buttons Table --> |
<tr valign="top"> | <tr valign="top"> | ||
| − | <td width= | + | <td width=629><span id="stepLoadRoute"></span> |
| + | ='''Loading (and Creating) a Route'''= | ||
| + | </td> | ||
| + | <td width=50>[[image:SkipDown.png|link=#skipNewRoute|Skip Down]]</td> | ||
| + | <td width=50> </td> | ||
<td width=46>[[image:BackToTop.png|link=#top|alt=Top|Top]]</td> | <td width=46>[[image:BackToTop.png|link=#top|alt=Top|Top]]</td> | ||
<td width=75>[[image:NextUp.png|link=#stepWhatRoute|alt=Next Up|Next Up]]</td> | <td width=75>[[image:NextUp.png|link=#stepWhatRoute|alt=Next Up|Next Up]]</td> | ||
| Line 142: | Line 258: | ||
</table> <!-- END Nav Buttons Table --> | </table> <!-- END Nav Buttons Table --> | ||
| − | =''' | + | <table width=1000> |
| − | + | <tr valign="top"> | |
| − | + | <td colspan=2>The '''Main Menu''' screen is shown below. The first option (shown highlighted in the image) opens '''Driver/Surveyor''' with all its options including loading and creating a route.</td> | |
| − | [[image:TRS19MainScreen.png|link=|alt=TRS19 Main Screen options]] | + | </tr> |
| − | + | <tr valign="top"> | |
| − | In '''Driver/Surveyor''' a strip of thumbnails | + | <td width=480>[[image:TRS19MainScreen.png|link=|alt=TRS19 Main Screen options]]</td> |
| − | + | <td> | |
| − | [[image:TRS19SelectRoute.png|link=|alt=TRS19 Main Screen Route Selection]] | + | <br> |
| − | + | <table bgcolor=#000000 cellpadding=2> | |
| − | + | <tr valign="top"> | |
| − | + | <td> | |
| − | + | <table bgcolor=#ffffb0 cellpadding=2> | |
| + | <tr valign="top"> | ||
| + | <td width=25>[[image:NotePad.PNG|link=]]</td> | ||
| + | <td><span style="font-size: 17px; font-weight: 700;">Notes:'''</span><br> | ||
| + | ---- | ||
| + | <table> | ||
| + | <tr valign="top"> | ||
| + | <td colspan=2>'''Routes''':-</td> | ||
| + | </tr> | ||
| + | <tr valign="top"> | ||
| + | <td width=10>[[image:DotPoint.JPG|10px|link=]]</td> | ||
| + | <td>are saved as entries in the '''Trainz Database''', not as files on your hard drive. Loading a route will retrieve it from the database.</td> | ||
| + | </tr> | ||
| + | <tr valign="top"> | ||
| + | <td>[[image:DotPoint.JPG|10px|link=]]</td> | ||
| + | <td>can be loaded directly into '''Surveyor''' from '''Content Manager'''. See [[image:PageLink.PNG|link=]] '''[[#Loading a Route Into Surveyor From Content Manager|Loading a Route Into Surveyor From Content Manager]]''' below</td> | ||
| + | </tr> | ||
| + | <tr valign="top"> | ||
| + | <td>[[image:DotPoint.JPG|10px|link=]]</td> | ||
| + | <td>can be '''exported''' as files (in the '''Trainz .cdp''' file format) from '''Content Manager''' for backup or transfer.</td> | ||
| + | </tr> | ||
| + | </table> | ||
| + | </td> | ||
| + | </tr> | ||
| + | </table> | ||
| + | </td> | ||
| + | </tr> | ||
| + | </table> | ||
| + | <br> | ||
| + | <table bgcolor=#000000 cellpadding=2> | ||
| + | <tr valign="top"> | ||
| + | <td> | ||
| + | <table bgcolor=#ffffff cellpadding=2> | ||
| + | <tr valign="top"> | ||
| + | <td colspan=2><span style="font-weight: 700; font-size: 15px;">Steps:</span> To Load or Create a Route:-</td> | ||
| + | </tr> | ||
| + | <tr valign="top"> | ||
| + | <td width=25>[[image:DotPointBox.png|link=]]</td> | ||
| + | <td><span style="font-weight: 700; font-size: 15px; background-color: lightcyan;"> Left Click </span> on the large <span style="font-weight: 700; font-size: 15px;">Driver / Surveyor</span> graphic shown highlighted in white in the image on the left</td> | ||
| + | </tr> | ||
| + | </table> | ||
| + | </td> | ||
| + | </tr> | ||
| + | </table> | ||
| + | </td> | ||
| + | </tr> | ||
| + | <tr valign="top"> | ||
| + | <td colspan=2><br><br> | ||
| + | In the '''Driver/Surveyor''' screen a strip of thumbnails of all the Routes, installed and as well as available as '''DLC''', will be shown at the base of the screen. If there are too many to fit in the available space, just move the mouse pointer onto any thumbnail to reveal the scroll bar device as shown below.<br> | ||
| + | [[image:TRS19SelectRoute.png|link=|alt=TRS19 Main Screen Route Selection]]<br><br></td> | ||
| + | </tr> | ||
| + | <tr valign="top"> | ||
| + | <td colspan=2><span style="font-weight: 700; font-size: 15px; background-color: lightcyan;">Left Click and Drag</span> the scroll bar left or right to reveal the additional routes or use the '''Expand View''' button described below</td> | ||
| + | </tr> | ||
| + | </table> | ||
| + | <br> | ||
| + | <table width=1000 bgcolor=#000000 cellpadding=2> | ||
| + | <tr valign="top"> | ||
| + | <td> | ||
| + | <table bgcolor=#ffffff cellpadding=2> | ||
| + | <tr valign="top"> | ||
| + | <td width=10>[[image:DotPoint.JPG|10px|link=]]</td> | ||
| + | <td>A <span style="font-weight: 700; font-size: 15px; background-color: lightcyan;">Left Click</span> on the <span style="color: white; background-color: black; font-weight: 700; font-size: 15px;"> MAIN MENU </span> button (bottom left) will take you back to the starting or main screen.</td> | ||
| + | </tr> | ||
| + | <tr valign="top"> | ||
| + | <td>[[image:DotPoint.JPG|10px|link=]]</td> | ||
| + | <td>A <span style="font-weight: 700; font-size: 15px; background-color: lightcyan;">Left Click</span> on the <span style="color: white; background-color: black; font-weight: 700; font-size: 15px;"> Sort By A-Z </span> button (top near right) will give you a drop down menu of sorting options for the thumbnail list.</td> | ||
| + | </tr> | ||
| + | <tr valign="top"> | ||
| + | <td>[[image:DotPoint.JPG|10px|link=]]</td> | ||
| + | <td>A <span style="font-weight: 700; font-size: 15px; background-color: lightcyan;">Left Click</span> on the '''Expand View''' [[image:MainScreenDownArrow.png|link=]] button (top right) will expand the thumbnail list to fill the screen - <span style="font-weight: 700; font-size: 15px; background-color: lightcyan;">Left Click</span> it again to return the thumbnails to the strip at the bottom of the screen.</td> | ||
| + | </tr> | ||
| + | </table> | ||
| + | </td> | ||
| + | </tr> | ||
| + | </table> | ||
| + | <br> | ||
The thumbnail images are colour coded.<br> | The thumbnail images are colour coded.<br> | ||
| − | <table> | + | <table width=1000> |
<tr valign="top"> | <tr valign="top"> | ||
| − | <td | + | <td width=200><span style="background-color: #ffae00;">            </span> <span style="font-weight: 700; font-size: 15px;">Payware on DLC</span></td> |
| − | < | + | <td>Must be purchased and downloaded, but some may be free - depending on your membership options. If you click a thumbnail with this colour a <span style="color: white; background-color: black; font-weight: 700; font-size: 15px;"> DOWNLOAD </span> button will appear on the bottom right of the screen. If a price is included in the button then that is the purchase price (in $US)</td> |
| − | <td> | + | |
</tr> | </tr> | ||
<tr valign="top"> | <tr valign="top"> | ||
| − | <td | + | <td width=200><span style="background-color: #10c810;">            </span> <span style="font-weight: 700; font-size: 15px;">Payware installed</span></td> |
| − | <td>''' | + | <td>Already installed from the '''DLC'''. '''DLC''' items cannot be deleted. To remove them use the '''Uninstall''' option in the '''Content Store''' from the '''Launcher'''. You can reinstall them later without any additional cost</td> |
| + | </tr> | ||
| + | <tr valign="top"> | ||
| + | <td width=200><span style="background-color: #dbdbdb;">            </span> <span style="font-weight: 700; font-size: 15px;">Installed</span></td> | ||
<td>Downloaded from the Download Station ('''DLS''') or created by you. This includes any cloned '''DLC''' Routes and Sessions (see [[image:PageLink.PNG|link=]] '''[[#Cloning a Route/Session|Cloning a Route/Session]]''' below)</td> | <td>Downloaded from the Download Station ('''DLS''') or created by you. This includes any cloned '''DLC''' Routes and Sessions (see [[image:PageLink.PNG|link=]] '''[[#Cloning a Route/Session|Cloning a Route/Session]]''' below)</td> | ||
</tr> | </tr> | ||
<tr valign="top"> | <tr valign="top"> | ||
| − | <td | + | <td width=200><span style="background-color: #848dff;">            </span> <span style="font-weight: 700; font-size: 15px;">Multiplayer</span></td> |
| − | < | + | |
<td>For simultaneous development by multiple players. Special conditions apply</td> | <td>For simultaneous development by multiple players. Special conditions apply</td> | ||
</tr> | </tr> | ||
</table> | </table> | ||
<br> | <br> | ||
| + | <table width=1000> <!-- BEGIN Nav Buttons Table --> | ||
| + | <tr valign="top"> | ||
| + | <td width=629><span id="skipNewRoute"></span> | ||
=='''Creating a New Route'''== | =='''Creating a New Route'''== | ||
| − | + | </td> | |
| + | <td width=50>[[image:SkipDown.png|link=#skipWorldView|Skip Down]]</td> | ||
| + | <td width=50>[[image:SkipUp.png|link=#stepLoadRoute|Skip Up]]</td> | ||
| + | <td width=46> </td> | ||
| + | <td width=75> </td> | ||
| + | <td width=75> </td> | ||
| + | <td width=75> </td> | ||
| + | </tr> | ||
| + | </table> <!-- END Nav Buttons Table --> | ||
[[image:RouteButtonsCreate.png|link=|alt=Create a New Route]] | [[image:RouteButtonsCreate.png|link=|alt=Create a New Route]] | ||
| − | |||
| − | |||
<table width=1000> | <table width=1000> | ||
<tr valign="top"> | <tr valign="top"> | ||
| − | <td width= | + | <td colspan=2>In both '''Surveyor Classic''' (also known as '''S1.0''' or '''S10''') and in '''Surveyor 2.0''' (also known as '''S2.0''' or '''S20''') <span style="font-weight: 700; font-size: 15px; background-color: lightcyan;">Left Click</span> on <span style="background-color: black; color: white; font-weight: 700; font-size: 15px;"> CREATE ROUTE </span>. This will start Trainz '''Surveyor''' and create a new blank route with a single baseboard using the '''Default''' settings which are usually those that were used when you last created and saved a route. The default settings may include a ground texture other than the grid pattern, for example - thick grass.</td> |
| + | </tr> | ||
| + | <tr valign="top"> | ||
| + | <td width=490 align="center">[[image:S20_SurveyorScreen.png|490px|link=]]<br> | ||
| + | '''Surveyor 2.0 screen shown'''</td> | ||
<td> | <td> | ||
| − | <table | + | <table bgcolor=#000000 cellpadding=2> |
<tr valign="top"> | <tr valign="top"> | ||
<td> | <td> | ||
| − | <table bgcolor=# | + | <table bgcolor=#ffffb0 cellpadding=2> |
<tr valign="top"> | <tr valign="top"> | ||
| − | <td>[[image: | + | <td width=25>[[image:NotePad.PNG|link=]]</td> |
| − | <td> | + | <td><span style="font-size: 17px;">'''Notes: for Trainz Plus'''</span><br> |
| − | < | + | ---- |
| − | <tr> | + | </td> |
| − | <td>[[image: | + | </tr> |
| − | <td> | + | <tr valign="top"> |
| − | + | <td width=10>[[image:DotPoint.JPG|10px|link=]]</td> | |
| + | <td>the '''default''' grid resolution for a new route is '''HD (High Definition) Grid'''</td> | ||
| + | </tr> | ||
| + | <tr valign="top"> | ||
| + | <td>[[image:DotPoint.JPG|10px|link=]]</td> | ||
| + | <td>to convert your new '''HD resolution''' route to '''5m resolution''' or to '''10m resolution''', at any time, see [[image:WikiLink.PNG|link=]] '''[[How to Use S20 Tools#The Marquee Tool|The Marquee Tool]]''' for the details</td> | ||
| + | </tr> | ||
| + | <tr valign="top"> | ||
| + | <td>[[image:DotPoint.JPG|10px|link=]]</td> | ||
| + | <td>if you want to convert an existing '''5m resolution''' or '''10m resolution''' route entirely to '''HD resolution''' then see [[image:WikiLink.PNG|link=]] '''[[How to Use S20 Tools#stepUpgrading|Upgrading a Route to HD]]''' for the details</td> | ||
</tr> | </tr> | ||
</table> | </table> | ||
| Line 203: | Line 418: | ||
</tr> | </tr> | ||
</table> | </table> | ||
| + | <br> | ||
| + | <table bgcolor=#000000 cellpadding=2> | ||
| + | <tr valign="top"> | ||
| + | <td> | ||
| + | <table bgcolor=#ffffb0 cellpadding=2> | ||
| + | <tr valign="top"> | ||
| + | <td width=25>[[image:NotePad.PNG|link=]]</td> | ||
| + | <td><span style="font-size: 17px;">'''Notes: for TRS19 and TRS22'''</span><br> | ||
| + | ---- | ||
</td> | </td> | ||
| + | </tr> | ||
| + | <tr valign="top"> | ||
| + | <td width=10>[[image:DotPoint.JPG|10px|link=]]</td> | ||
| + | <td>the '''default''' grid resolution for a new route is '''10m'''</td> | ||
| + | </tr> | ||
| + | <tr valign="top"> | ||
| + | <td>[[image:DotPoint.JPG|10px|link=]]</td> | ||
| + | <td>using '''Surveyor 2.0''' (<span style="font-weight: 700; background-color: yellow;">in TRS22PE</span>) to convert your new '''10m resolution''' route to '''5m resolution''', at any time, see [[image:WikiLink.PNG|link=]] '''[[How to Use S20 Tools#The Marquee Tool|The Marquee Tool]]''' for the details</td> | ||
| + | </tr> | ||
| + | <tr valign="top"> | ||
| + | <td>[[image:DotPoint.JPG|10px|link=]]</td> | ||
| + | <td>in '''Surveyor Classic''' to convert your new '''10m resolution''' route to '''5m resolution''', at any time, you will need to individually convert each baseboard</td> | ||
</tr> | </tr> | ||
</table> | </table> | ||
| Line 209: | Line 445: | ||
</tr> | </tr> | ||
</table> | </table> | ||
| − | + | </td> | |
| − | + | </tr> | |
| + | </table> | ||
| + | <br> | ||
| + | <table width=1000> | ||
| + | <tr valign="top"> | ||
| + | <td width=500>[[image:RouteEditWindow_S20.png|link=]]</td> | ||
| + | <td> | ||
| + | <table width=500 cellpadding=2 bgcolor=#000000> | ||
| + | <tr valign="top"> | ||
| + | <td> | ||
| + | <table cellpadding=2 bgcolor=#ffffff> | ||
| + | <tr valign="top"> | ||
| + | <td>You can easily edit the route settings at any time after the route has been created. | ||
<table> | <table> | ||
<tr valign="top"> | <tr valign="top"> | ||
| − | <td | + | <td> |
| − | + | <table bgcolor=#ffffff cellpadding=2> | |
| + | <tr valign="top"> | ||
| + | <td colspan=2><span style="font-weight: 700; font-size: 15px;">Steps:</span> To edit the route details at any time:-</td> | ||
</tr> | </tr> | ||
<tr valign="top"> | <tr valign="top"> | ||
| − | <td><span style="color: white; background-color: black; font-weight: 700;"> | + | <td> |
| − | < | + | <table> |
| + | <tr valign="top"> | ||
| + | <td width=25>[[image:DotPointBox.png|link=]]</td> | ||
| + | <td>Open the [[image:EditMenu_S20.png|link=]] '''Edit''' menu from the top menu in Surveyor and select the <span style="font-weight: 700; font-size: 15px; color: white; background-color: black;"> Edit Route... </span> option<br> | ||
| + | The keyboard shortcut is <span style="font-weight: 700; font-size: 15px;"><span style="color: white; background-color: black;"> Ctrl </span> + <span style="color: white; background-color: black;"> E </span></span></td> | ||
</tr> | </tr> | ||
| + | </table> | ||
| + | </td> | ||
| + | <td>[[image:EditMenuOptions_S20.png|link=]]</td> | ||
| + | </tr> | ||
| + | </table> | ||
| + | </td> | ||
| + | </tr> | ||
| + | </table> | ||
| + | </td> | ||
| + | </tr> | ||
| + | </table> | ||
| + | </td> | ||
| + | </tr> | ||
| + | </table> | ||
| + | </td> | ||
| + | </tr> | ||
| + | </table> | ||
| + | <br> | ||
| + | <table> | ||
| + | <tr valign="top"> | ||
| + | <td width=495>It is '''recommended''' that you enter some details before you click the [[image:Tick.PNG|link=|alt=Tick]] icon to create the new route. A '''bare minimum''' is listed on the right that will save you some time and effort later, and you can always change them at any time.</td> | ||
| + | <td width=10> </td> | ||
| + | <td> | ||
| + | <table width=500 bgcolor=#000000 cellpadding=2> | ||
| + | <tr valign="top"> | ||
| + | <td> | ||
| + | <table width=496 bgcolor=#ffffff cellpadding=2> | ||
<tr valign="top"> | <tr valign="top"> | ||
| − | <td><span style="color: white; background-color: black; font-weight: 700;">& | + | <td width=175><span style="color: white; background-color: black; font-weight: 700; font-size: 15px;"> Route name: </span></td> |
| − | <td>Select a region from the drop down list | + | <td>Enter a name for your new Route (keep it simple but descriptive)<br></td> |
| + | </tr> | ||
| + | <tr valign="top"> | ||
| + | <td><span style="color: white; background-color: black; font-weight: 700; font-size: 15px;"> Geographical region: </span></td> | ||
| + | <td>Select a region from the drop down list</td> | ||
</tr> | </tr> | ||
</table> | </table> | ||
| − | + | </td> | |
| + | </tr> | ||
| + | </table> | ||
| + | </td> | ||
| + | </tr> | ||
| + | </table> | ||
| + | <br> | ||
<table width=1000> | <table width=1000> | ||
| − | <tr> | + | <tr valign="top"> |
| − | <td width= | + | <td width=500>[[image:RouteEditWindowExample_S20.png|link=]]<br><br> |
| − | < | + | A <span style="font-weight: 700; font-size: 15px; background-color: lightcyan;">Left Click</span> on the [[image:Tick.PNG|link=|alt=Tick]] icon at the bottom right of the window will apply the new data settings to the single flat baseboard that you have just created.<br> |
| − | <table | + | A <span style="font-weight: 700; font-size: 15px; background-color: lightcyan;">Left Click</span> on the [[image:Cross.PNG|link=|alt=Cross]] icon at the bottom right of the window will cancel the data entry and continue to use the '''default''' data settings (usually the settings entered for the last route you created) in the single flat baseboard currently on the screen. |
| + | <table bgcolor=#000000 cellpadding=2> | ||
<tr valign="top"> | <tr valign="top"> | ||
<td> | <td> | ||
| − | <table cellpadding= | + | <table bgcolor=#ffffb0 cellpadding=2> |
| + | <tr valign="top"> | ||
| + | <td width=25>[[image:NotePad.PNG|link=]]</td> | ||
| + | <td width=475><span style="font-size: 17px; font-weight: 700;">Notes: Baseboard Texture'''</span><br> | ||
| + | ----</td> | ||
| + | </tr> | ||
| + | <tr valign="top"> | ||
| + | <td colspan=2>When a baseboard is added it will be covered with the '''Default Ground Texture''' which is usually the last one that you used. Selecting a '''Region''' ('''Point''' <span style="font-weight: 700; font-size: 15px; color: white; background-color: red;"> 3 </span> in the '''Notes: Route Options''' on the right) will set the ground texture to be used in every baseboard added to the new route. Some regions have a standard grid pattern as their default ground texture - look on the '''DLS''' for region assets with '''TRS19 Grid''' in their titles. You can change the selected '''Region''' and its ground texture as often as you like but this will also change other properties of the route as described on the right.<br><br> | ||
| + | You can create your own '''Region''' with your preferred ground texture and other features - see the '''Trainz Wiki Page [[image:WikiLink.PNG|link=]] [[How to Create a Region Asset|How to Create a Region Asset]]''' for the details</td> | ||
| + | </tr> | ||
| + | </table> | ||
| + | </td> | ||
| + | </tr> | ||
| + | </table> | ||
| + | </td> | ||
| + | <td> | ||
| + | <table width=500 bgcolor=#000000> | ||
| + | <tr valign="top"> | ||
| + | <td> | ||
| + | <table cellpadding=2 bgcolor=#ffffb0 width=596> | ||
<tr valign="top"> | <tr valign="top"> | ||
<td>[[image:NotePad.PNG|link=]]</td> | <td>[[image:NotePad.PNG|link=]]</td> | ||
| − | <td><span style="font-size: 17px; font-weight: 700;">Notes:'''</span> | + | <td><span style="font-size: 17px; font-weight: 700;">Notes: Route Options'''</span> |
---- | ---- | ||
</td> | </td> | ||
</tr> | </tr> | ||
<tr valign="top"> | <tr valign="top"> | ||
| − | <td>[[image:DotPoint1.JPG|link=]]</td> | + | <td width=20>[[image:DotPoint1.JPG|link=]]</td> |
| − | <td> | + | <td>Enter a <span style="font-weight: 700; font-size: 15px; color: white; background-color: black;"> Route name </span> for the route - keep it simple but as descriptive as possible (without writing an essay). This will be the first thing that users will see when looking for a route to download from the DLS.</td> |
</tr> | </tr> | ||
<tr valign="top"> | <tr valign="top"> | ||
| − | <td>& | + | <td>[[image:DotPoint2.JPG|link=]]</td> |
| − | <td> | + | <td>Enter a <span style="font-weight: 700; font-size: 15px; color: white; background-color: black;"> Route description </span> for the route. At the starting stage this is basically a "memory jogger" for you so a basic description would be sufficient but before you release the finished route (e.g. to the '''DLS''') it should contain some critical information such as '''Trainz Plus only''', "high detail assets used" and the source(s) of any non-DLS dependencies</td> |
| + | </tr> | ||
| + | <tr valign="top"> | ||
| + | <td>[[image:DotPoint3.JPG|link=]]</td> | ||
| + | <td>Setting a <span style="color: white; background-color: black; font-weight: 700; font-size: 15px;"> Region </span> sets some basic features of the route - such as its latitude (used to determine the season of the year), the altitude (in metres) of the first baseboard, the number and types of moving road vehicles (if any) and the side of the road they drive on, to name a few. If none of the installed regions are suitable you can download others from the '''DLS''' or create a region of your own - see the '''Trainz Wiki Page [[image:WikiLink.PNG|link=]] [[How to Create a Region Asset|How to Create a Region Asset]]'''</td> | ||
| + | </tr> | ||
| + | <tr valign="top"> | ||
| + | <td>[[image:DotPoint4.JPG|link=]]</td> | ||
| + | <td>Create a <span style="color: white; background-color: black; font-weight: 700; font-size: 15px;"> Route thumbnail </span> image. At the starting stage this is less important but at some point, before the route is released, select a suitable camera view point and <span style="font-weight: 700; font-size: 15px; background-color: lightcyan;"> Left Click </span> on the <span style="font-weight: 700; font-size: 15px; color: white; background-color: black;"> Set Thumbnail </span> button. The thumbnail is an advertisement for the route and many potential users will judge the quality of your work by the thumbnail when deciding whether to download or not</td> | ||
| + | </tr> | ||
| + | <tr valign="top"> | ||
| + | <td>[[image:DotPoint5.JPG|link=]]</td> | ||
| + | <td>The <span style="color: white; background-color: black; font-weight: 700; font-size: 15px;"> Working scale </span> provides measurements that are comparable to model railroading dimensions, but the actual (physical) sizes of the layout and its assets are not altered or scaled down. It is only the '''Surveyor Ruler''' and its measurements that will be affected. The choices are between '''Real scale''' (which is the default), '''G scale''' (100m real scale = 4.4m G scale), '''HO scale''' (100m real scale = 1.1m HO scale) and many other options.</td> | ||
| + | </tr> | ||
| + | <tr valign="top"> | ||
| + | <td>[[image:DotPoint6.JPG|link=]]</td> | ||
| + | <td>The <span style="color: white; background-color: black; font-weight: 700; font-size: 15px;"> Working units </span> provides a choice between '''Metric''' (metres, kilometres) and '''Imperial''' (yards, miles) which only affects measurements used by rulers (in '''Surveyor 2.0''' separate metric and imperial rulers are available), track distances and train speeds ('''km/h''' or '''mph''').<br> | ||
| + | Note that '''track speed signs''' are always locked at either metric (km/h) or imperial (mph) - there are separate speed signs available for each. The signs will not be altered by this selection but their values will be converted. So a track speed sign that is set at 40 mph, for example, will still be displayed as '''40''' but it will be read as 64.3 km/h in '''Driver''' if the '''Working Units''' have been set to '''metric'''. So it will be less confusing if you use speed signs that are in the same working units as your route, for example use a metric sign showing '''65''' km/h instead of an imperial sign showing '''40''' mph.<br> | ||
| + | Altitudes are '''always measured and displayed''' using '''metric''' units (metres).</td> | ||
| + | </tr> | ||
| + | <tr valign="top"> | ||
| + | <td>[[image:DotPoint7.JPG|link=]]</td> | ||
| + | <td>The <span style="color: white; background-color: black; font-weight: 700; font-size: 15px;"> Route Edit Detail </span> <span style="background-color: yellow;">in '''Trainz Plus''' only</span>. This sets the minimum ground brush size when working with '''HD resolution'''. It can be swapped between the two settings at anytime when editing. See <span style="font-weight: 700; font-size: 15px; color: white; background-color: blue;"> SD/HD Options </span> below for more details</td> | ||
| + | </tr> | ||
| + | <tr valign="top"> | ||
| + | <td>[[image:DotPoint8.JPG|link=]]</td> | ||
| + | <td>The <span style="color: white; background-color: black; font-weight: 700; font-size: 15px;"> Draw distance cap </span> sets how far away from the camera that scenery objects will be drawn. A high setting, particularly the <span style="color: white; background-color: black; font-weight: 700; font-size: 15px;"> Disabled </span> option (which means no draw distance cap), could affect the game performance, including the '''fps''' rate (frames per second), on some systems</td> | ||
| + | </tr> | ||
| + | </table> | ||
| + | </td> | ||
| + | </tr> | ||
| + | </table> | ||
| + | </td> | ||
| + | </tr> | ||
| + | </table> | ||
| + | <br> | ||
| + | <table width=1000> | ||
| + | <tr valign="top"> | ||
| + | <td><span style="font-weight: 700; font-size: 15px; color: white; background-color: blue;"> SD/HD Options </span></td> | ||
| + | </tr> | ||
| + | <tr valign="top"> | ||
| + | <td>[[image:RouteEditDetailHD_S20.png|link=]]<br> | ||
| + | |||
| + | This option, <span style="background-color: yellow;">available in '''Trainz Plus''' only</span>, allows you to set the route detail when working in '''HD resolution''' to the default '''HD''' (High Definition) or to a lower '''SD''' (Standard Definition) which is easier to work with over larger areas.<br> | ||
| + | |||
| + | <table> | ||
| + | <tr valign="top"> | ||
| + | <td> | ||
| + | <table width=500 bgcolor=#000000 cellpadding=2> | ||
| + | <tr valign="top"> | ||
| + | <td> | ||
| + | <table bgcolor=#ffffff cellpadding=2> | ||
| + | <tr valign="top"> | ||
| + | <td colspan=2>The distinction between these two options is:-</td> | ||
| + | </tr> | ||
| + | <tr valign="top"> | ||
| + | <td><span style="font-weight: 700; font-size: 15px; color: white; background-color: black;"> HD </span></td> | ||
| + | <td>This is the full '''HD Mode''' where the minimum brush size is '''0.12m''' (12cm) - <span style="font-weight: 700; background-color: yellow;">HD Mode is only available in Trainz Plus</span></td> | ||
| + | </tr> | ||
| + | <tr valign="top"> | ||
| + | <td><span style="font-weight: 700; font-size: 15px; color: white; background-color: black;"> SD </span></td> | ||
| + | <td>This is a reduced '''HD Mode''' where the minimum brush size is '''2m'''</td> | ||
| + | </tr> | ||
| + | <tr valign="top"> | ||
| + | <td colspan=2>Both options are using '''HD''' resolution and have all the '''HD''' controls and features. Both <span style="font-weight: 700; font-size: 15px; color: white; background-color: black;"> SD </span> and <span style="font-weight: 700; font-size: 15px; color: white; background-color: black;"> HD </span> can be used in the same baseboard</td> | ||
| + | </tr> | ||
| + | </table> | ||
| + | </td> | ||
| + | </tr> | ||
| + | </table> | ||
| + | <table width=500> | ||
| + | <tr valign="top"> | ||
| + | <td colspan=2>The setting can be switched during editing without affecting or altering the existing terrain. For example:-</td> | ||
| + | </tr> | ||
| + | <tr valign="top"> | ||
| + | <td width=10>[[image:DotPoint.JPG|10px|link=]]</td> | ||
| + | <td>you can start editing the terrain using the '''HD Mode''' to give you the highest level of precision in one area of a baseboard</td> | ||
| + | </tr> | ||
| + | <tr valign="top"> | ||
| + | <td>[[image:DotPoint.JPG|10px|link=]]</td> | ||
| + | <td>then switch to '''SD Mode''' to work in another area of the same (or a different) baseboard at a lower level of precision - which would be faster than using the '''HD Mode'''</td> | ||
| + | </tr> | ||
| + | <tr valign="top"> | ||
| + | <td>[[image:DotPoint.JPG|10px|link=]]</td> | ||
| + | <td>then switch back to '''HD Mode''' to continue working in the same, or another, high precision area</td> | ||
| + | </tr> | ||
| + | </table> | ||
| + | </td> | ||
| + | <td> | ||
| + | <table width=500 bgcolor=#000000> | ||
| + | <tr valign="top"> | ||
| + | <td> | ||
| + | <table bgcolor=#ffffff> | ||
| + | <tr valign="top"> | ||
| + | <td colspan=2><span style="font-weight: 700; font-size: 15px;">Steps:</span> To switch between '''HD''' and '''SD''' modes at any time:-</td> | ||
| + | </tr> | ||
| + | <tr valign="top"> | ||
| + | <td> | ||
| + | <table> | ||
| + | <tr valign="top"> | ||
| + | <td> | ||
| + | <table> | ||
| + | <tr valign="top"> | ||
| + | <td width=20>[[image:DotPoint1.JPG|link=]]</td> | ||
| + | <td><span style="font-weight: 700; font-size: 15px; background-color: lightcyan;"> Left Click </span> on the '''Main Menu''' [[image:EditMenu_S20.png|link=]] '''Edit Menu''' and select the <span style="font-weight: 700; font-size: 15px; color: white; background-color: black;"> Edit Route... </span> option.<br><br> | ||
| + | The keyboard shortcut is <span style="font-weight: 700; font-size: 15px;"><span style="color: white; background-color: black;"> Ctrl </span> + <span style="color: white; background-color: black;"> E </span></span></td> | ||
</tr> | </tr> | ||
<tr valign="top"> | <tr valign="top"> | ||
<td>[[image:DotPoint2.JPG|link=]]</td> | <td>[[image:DotPoint2.JPG|link=]]</td> | ||
| − | <td> | + | <td><span style="font-weight: 700; font-size: 15px; background-color: lightcyan;"> Left Click </span> on either the <span style="font-weight: 700; font-size: 15px; color: white; background-color: black;"> SD </span> or the <span style="font-weight: 700; font-size: 15px; color: white; background-color: black;"> HD </span> button</td> |
</tr> | </tr> | ||
<tr valign="top"> | <tr valign="top"> | ||
<td>[[image:DotPoint3.JPG|link=]]</td> | <td>[[image:DotPoint3.JPG|link=]]</td> | ||
| − | <td> | + | <td><span style="font-weight: 700; font-size: 15px; background-color: lightcyan;"> Left Click </span> on the [[image:Tick.PNG|link=|alt=Tick]] icon to make the switch</td> |
</tr> | </tr> | ||
| + | </table> | ||
| + | </td> | ||
| + | </tr> | ||
| + | </table> | ||
| + | </td> | ||
| + | <td>[[image:EditMenuOptions_S20.png|link=]]</td> | ||
| + | </tr> | ||
| + | </table> | ||
| + | </td> | ||
| + | </tr> | ||
| + | </table> | ||
| + | </td> | ||
| + | </tr> | ||
| + | </table> | ||
| + | </td> | ||
| + | </tr> | ||
| + | </table> | ||
| + | <br> | ||
| + | <table width=1000> <!-- BEGIN Nav Buttons Table --> | ||
<tr valign="top"> | <tr valign="top"> | ||
| − | <td>[[image: | + | <td width=629><span id="skipWorldView"></span> |
| − | <td>The ''' | + | =='''The Surveyor World View'''== |
| + | </td> | ||
| + | <td width=50>[[image:SkipDown.png|link=#skipDefaultGroundTexture|Skip Down]]</td> | ||
| + | <td width=50>[[image:SkipUp.png|link=#skipNewRoute|Skip Up]]</td> | ||
| + | <td width=46> </td> | ||
| + | <td width=75> </td> | ||
| + | <td width=75> </td> | ||
| + | <td width=75> </td> | ||
| + | </tr> | ||
| + | </table> <!-- END Nav Buttons Table --> | ||
| + | |||
| + | <table width=1000 bgcolor=#000000 cellpadding=2> | ||
| + | <tr valign="top"> | ||
| + | <td> | ||
| + | <table width=996 bgcolor=#ffffb0 cellpadding=2> | ||
| + | <tr valign="top"> | ||
| + | <td width=25>[[image:NotePad.PNG|link=]]</td> | ||
| + | <td><span style="font-size: 17px;">'''Notes:'''</span><br> | ||
| + | ---- | ||
| + | The terms '''Grid Size''' and '''Grid Resolution''' when used in this document refer to the following:- | ||
| + | </td> | ||
| + | </tr> | ||
| + | <tr valign="top"> | ||
| + | <td width=10>[[image:DotPoint.JPG|10px|link=]]</td> | ||
| + | <td><span style="font-weight: 700; font-size: 15px;">Grid Size:</span> - the size of the yellow grid squares shown in an untextured baseboard. The grid squares are always '''10m x 10m''' in size regardless of the '''Working Scale''' (Real Scale, G Scale, HO Scale, etc) or the '''Working Units''' (metric or imperial). When a ruler object is used to measure the squares it will show their size using the selected '''Working Scale''' and '''Working Units'''</td> | ||
| + | </tr> | ||
| + | <tr valign="top"> | ||
| + | <td>[[image:DotPoint.JPG|10px|link=]]</td> | ||
| + | <td><span style="font-weight: 700; font-size: 15px;">Grid Resolution:</span> - a measure of the '''level of detail''' that can be shown when using the '''Ground Height''' and '''Ground Texture''' brush tools. | ||
| + | <table> | ||
| + | <tr valign="top"> | ||
| + | <td width=10>[[image:RedDot10x10.png|link=]]</td> | ||
| + | <td>A '''10m Grid Resolution''' will allow the use of a brush of radius 10m without restrictions anywhere in the baseboard. Smaller brushes can be used but with restrictions that will increase as the brush size is reduced.</td> | ||
| + | </tr> | ||
| + | <tr valign="top"> | ||
| + | <td width=10>[[image:RedDot10x10.png|link=]]</td> | ||
| + | <td>A '''5m Grid Resolution''' will allow the use of a brush of radius 5m without restrictions anywhere in the baseboard. Smaller brushes can be used but with restrictions that will increase as the brush size is reduced.</td> | ||
| + | </tr> | ||
| + | <tr valign="top"> | ||
| + | <td width=10>[[image:RedDot10x10.png|link=]]</td> | ||
| + | <td>A '''HD Grid Resolution''' will allow the use of a brush of radius as small as 0.12m (12cm) without any restrictions anywhere in the baseboard - <span style="font-weight: 700; background-color: yellow;">HD Grid Resolution is only available in Trainz Plus</span>.</td> | ||
</tr> | </tr> | ||
</table> | </table> | ||
| + | </td> | ||
</tr> | </tr> | ||
</table> | </table> | ||
| Line 266: | Line 742: | ||
</tr> | </tr> | ||
</table> | </table> | ||
| + | <br> | ||
| + | <table width=1000> | ||
| + | <tr valign="top"> | ||
| + | <td colspan=2>Depending on the '''Route Editor''' settings and the version of Trainz you are using, you may see or be affected by the following factors:-<br><br> | ||
| + | <span style="font-weight: 700; font-size: 15px;">Baseboards and Grid Squares:</span></td> | ||
| + | </tr> | ||
| + | <tr valign="top"> | ||
| + | <td width=550> | ||
| + | <table> | ||
| + | <tr valign="top"> | ||
| + | <td width=10>[[image:DotPoint.JPG|10px|link=]]</td> | ||
| + | <td>Each '''Baseboard''' is always '''720m x 720m''' (2362.2ft x 2362.2ft) regardless of the '''Working scale''' and '''Working units''' you have selected</td> | ||
| + | </tr> | ||
| + | <tr valign="top"> | ||
| + | <td>[[image:DotPoint.JPG|10px|link=]]</td> | ||
| + | <td>Baseboards without any applied ground texture will be covered with grid squares. Each yellow '''Grid Square''' is always '''10m x 10m''' (32.8ft x 32.8ft) regardless of the '''Working scale''' and '''Working units''' you have selected</td> | ||
| + | </tr> | ||
| + | <tr valign="top"> | ||
| + | <td colspan=2>But in both cases the distance measurement shown by a ruler object will depend on the '''Working scale''' and '''Working units''' selected</td> | ||
| + | </tr> | ||
| + | <tr valign="top"> | ||
| + | <td colspan=2><span style="font-weight: 700; font-size: 15px;">Grid Resolution:</span> See '''Notes:''' above</td> | ||
| + | </tr> | ||
| + | <tr valign="top"> | ||
| + | <td width=10>[[image:DotPoint.JPG|10px|link=]]</td> | ||
| + | <td>'''10m resolution''' - the default setting for new baseboards created using '''TRS19''' and '''TRS22''' <span style="font-weight: 700; font-size: 15px;">OR</span></td> | ||
| + | </tr> | ||
| + | <tr valign="top"> | ||
| + | <td>[[image:DotPoint.JPG|10px|link=]]</td> | ||
| + | <td>'''5m resolution''' - at '''4x''' the resolution of '''10m'''. You can have a mixture of '''10m''' and '''5m''' resolution baseboards in the same route <span style="font-weight: 700; font-size: 15px;">OR</span></td> | ||
| + | </tr> | ||
| + | <tr valign="top"> | ||
| + | <td>[[image:DotPoint.JPG|10px|link=]]</td> | ||
| + | <td>'''HD (High Definition) resolution''' - at '''6400x''' the resolution of '''10m''' and '''1600x''' the resoltion of '''5m''' this resolution is <span style="background-color: yellow;">only available in '''Trainz Plus'''</span>. It is the default setting for new baseboards created using '''Trainz Plus''' and it is '''NOT''' recommended that '''HD''' baseboards be mixed with '''10m/5m''' baseboards in the same route</td> | ||
| + | </tr> | ||
| + | <tr valign="top"> | ||
| + | <td colspan=2>Baseboards can be converted between these resolution settings at any time</td> | ||
| + | </tr> | ||
| + | <tr valign="top"> | ||
| + | <td colspan=2><span style="font-weight: 700; font-size: 15px;">Baseboard Altitude:</span></td> | ||
| + | </tr> | ||
| + | <tr valign="top"> | ||
| + | <td>[[image:DotPoint.JPG|10px|link=]]</td> | ||
| + | <td>The altitude (in metres) of the first baseboard will depend on the '''Geographic region''' you have selected but the default value is '''0m'''</td> | ||
| + | </tr> | ||
| + | <tr valign="top"> | ||
| + | <td colspan=2><span style="font-weight: 700; font-size: 15px;">Baseboard Texture:</span></td> | ||
| + | </tr> | ||
| + | <tr valign="top"> | ||
| + | <td>[[image:DotPoint.JPG|10px|link=]]</td> | ||
| + | <td>The baseboard will be covered with a texture, such as grass or a grid pattern. This is set by the '''Geographic region''' and the selection made in the '''Ground''' option from the [[image:SurveyorDisplayIcon.png|link=]] '''Surveyor Display Menu''' - see '''[[image:PageLink.PNG|link=]] [[#skipDefaultGroundTexture|Default Baseboard Ground Texture]]''' below</td> | ||
| + | </tr> | ||
| + | </table> | ||
| + | </td> | ||
| + | </tr> | ||
| + | </table> | ||
| + | <br> | ||
| + | ===<span style="color: white; background-color: green;"> In Surveyor Classic (S10) </span>=== | ||
| + | <table width=1000> | ||
| + | <tr valign="top"> | ||
| + | <td>'''Surveyor Classic''' or '''S10''' is the version of Surveyor found in '''TRS19''', '''TRS19PE''' and '''TRS22'''. It is one of two versions of Surveyor available in '''TRS22PE''' and '''Trainz Plus'''.<br> | ||
| + | |||
| + | In '''Surveyor Classic''' the baseboards are controlled using the '''Topology Tools'''. To open the tools fly-out either <span style="font-weight: 700; font-size: 15px; background-color: lightcyan;">Left Click</span> the '''Topology Tool Tab''' or press the <span style="font-weight: 700; font-size: 15px; color: white; background-color: black;"> F1 </span> key.<br> | ||
| + | [[image:Route Baseboard Tools.png|link=|alt=Topology Tools]] | ||
| + | </td> | ||
| + | <td width=450>[[image:Route_Baseboard.png|link=|alt=First baseboard|450px]]</td> | ||
| + | </tr> | ||
| + | </table> | ||
| + | <br> | ||
| + | <table width=1000> | ||
| + | <tr valign="top"> | ||
| + | <td> </td> | ||
| + | <td>The '''Key Topology Tools''', as shown in the diagram above, are:-</td> | ||
| + | </tr> | ||
| + | <tr valign="top"> | ||
| + | <td width=10>[[image:DotPoint.JPG|10px|link=]]</td> | ||
| + | <td><span style="font-weight: 700; font-size: 15px;">Add New Baseboard</span> - <span style="font-weight: 700; font-size: 15px; background-color: lightcyan;">Left Click</span> (it will stay active until another button is clicked) and then <span style="font-weight: 700; font-size: 15px; background-color: lightcyan;">Left Click</span> in a blank area outside the baseboard to add a new baseboard in that position. Each click will add a new baseboard at the same altitude as the first</td> | ||
| + | </tr> | ||
| + | <tr valign="top"> | ||
| + | <td>[[image:DotPoint.JPG|10px|link=]]</td> | ||
| + | <td><span style="font-weight: 700; font-size: 15px;">Delete Baseboard</span> - <span style="font-weight: 700; font-size: 15px; background-color: lightcyan;">Left Click</span> (it will stay active until another button is clicked) and then <span style="font-weight: 700; font-size: 15px; background-color: lightcyan;">Left Click</span> anywhere on a baseboard to delete that baseboard. You will get a warning dialogue window - <span style="font-weight: 700; background-color: yellow;"> you CANNOT undo this operation to restore a deleted baseboard </span></td> | ||
| + | </tr> | ||
| + | <tr valign="top"> | ||
| + | <td>[[image:DotPoint.JPG|10px|link=]]</td> | ||
| + | <td><span style="font-weight: 700; font-size: 15px;">Grid Resolution</span> - a pop-out menu will give you a choice of '''10m''' (the default) or '''5m'''. The option for the '''HD resolution''' is <span style="background-color: yellow;">only available in '''Trainz Plus'''</span>. This sets the '''resolution''' of the baseboard. It does not alter the size of the grid squares which is actually a painted '''texture''' and will always stay at 10m x 10m. | ||
| + | <table> | ||
| + | <tr valign="top"> | ||
| + | <td>[[image:DotPoint.JPG|10px|link=]]</td> | ||
| + | <td>With a 10m resolution the smallest area in which you can set a height is 10m x 10m</td> | ||
| + | </tr> | ||
| + | <tr valign="top"> | ||
| + | <td>[[image:DotPoint.JPG|10px|link=]]</td> | ||
| + | <td>With a 5m resolution that becomes 5m x 5m, so 4 different height values can be set in each 10m grid. This allows you to create more accurate topology features such as railway cuttings and embankments but it has a penalty, <span style="font-weight: 700; background-color: yellow;"> significantly larger route map files </span></td> | ||
| + | </tr> | ||
| + | <tr valign="top"> | ||
| + | <td>[[image:DotPoint.JPG|10px|link=]]</td> | ||
| + | <td>With HD resolution (<span style="background-color: yellow;">in '''Trainz Plus''' only</span>) the smallest area ('''resolution''') in which you can set a height is 0.125m x 0.125m. This allows you to create even more accurate topology features but it has a penalty, <span style="font-weight: 700; background-color: yellow;"> enormously larger route sizes </span> - on average '''5x''' or more larger than 10m resolution maps</td> | ||
| + | </tr> | ||
| + | <tr valign="top"> | ||
| + | <td>[[image:DotPoint.JPG|10px|link=]]</td> | ||
| + | <td>Each new baseboard you add will have its resolution set to the selected value. You can have different baseboards set to each resolution - for example: baseboards used by the track set at '''5m''' and those further out at '''10m''' | ||
| + | This control is also used to change an existing baseboard from one resolution to the other.</td> | ||
| + | </tr> | ||
| + | </table> | ||
| + | </td> | ||
| + | </tr> | ||
| + | <tr valign="top"> | ||
| + | <td width=10>[[image:DotPoint.JPG|10px|link=]]</td> | ||
| + | <td><span style="font-weight: 700; font-size: 15px;">Advanced</span> - this will open another window in the '''Topology Tab''' that will allow you to select a grey scale bit map image to set the height of each grid</td> | ||
| + | </tr> | ||
| + | </table> | ||
| + | <br> | ||
| + | <span id="BaseboardS20"></span> | ||
| + | ===<span style="color: white; background-color: blue;"> In Surveyor 2.0 (S20) </span>=== | ||
| + | |||
| + | <table width=1000> | ||
| + | <tr valign="top"> | ||
| + | <td>'''Surveyor 2.0''' or '''S20''' is an alternative version of Surveyor found in '''TRS22PE''' and '''Trainz Plus'''. '''Surveyor Classic''' is also available as an option in both '''TRS22PE''' and '''Trainz Plus'''.<br> | ||
| + | |||
| + | In '''Surveyor 2.0''' there is no separate '''Topology Tools''' fly-out. A single <span style="font-weight: 700; font-size: 15px; color: white; background-color: #797979;"> Tools Palette </span> replaces all the separate tools "fly-outs" found in the original '''Surveyor Classic'''.</td> | ||
| + | </tr> | ||
| + | </table> | ||
| + | <br> | ||
| + | <table width=1000> | ||
| + | <tr valign="top"> | ||
| + | <td>[[image:S20_MarqueeTool.png|link=|alt=Marquee Tool]]</td> | ||
| + | <td> | ||
| + | <table> | ||
| + | <tr valign="top"> | ||
| + | <td colspan=2><span style="font-weight: 700; font-size: 15px;">Steps:</span> To add new baseboards:-</td> | ||
| + | </tr> | ||
| + | <tr valign="top"> | ||
| + | <td width=20>[[image:DotPoint1.JPG|link=]] </td> | ||
| + | <td>select the [[image:S20_MarqueeToolIcon.png|link=|20px]] '''Marquee Tool''' from the <span style="font-weight: 700; font-size: 15px; color: white; background-color: #797979;"> Tools Palette </span> (or press the <span style="font-weight: 700; font-size: 15px; color: white; background-color: black;"> F </span> key).</td> | ||
| + | </tr> | ||
| + | <tr valign="top"> | ||
| + | <td colspan=2>Note that in '''S20''' you can add and delete multiple baseboards in a single step, not just one-at-a-time.</td> | ||
| + | </tr> | ||
| + | <tr valign="top"> | ||
| + | <td>[[image:DotPoint2.JPG|link=]] </td> | ||
| + | <td><span style="font-weight: 700; font-size: 15px; background-color: lightcyan;">Left Click and Drag</span> (using the Left mouse button) to draw out an area where the new baseboards will be added. This area can include the current baseboard.</td> | ||
| + | </tr> | ||
| + | </table> | ||
| + | </td> | ||
| + | </tr> | ||
| + | </table> | ||
| + | |||
| + | <table width=1000> | ||
| + | <tr valign="top"> | ||
| + | <td colspan=2>The Marquee area, shown with a green border in the image below right, shows the positions where 3 new baseboards will be created to add to the existing baseboard. The Marquee area has a '''Context Menu''' icon as shown in the image.</td> | ||
| + | </tr> | ||
| + | <tr valign="top"> | ||
| + | <td>[[image:DotPoint3.JPG|link=]] </td> | ||
| + | <td><span style="font-weight: 700; font-size: 15px; background-color: lightcyan;">Left Click</span> on the '''Context Menu''' icon or press the <span style="font-weight: 700; font-size: 15px; color: white; background-color: black;"> T </span> key to open up the '''Marquee Context Menu'''.<br> | ||
| + | <table> | ||
| + | <tr valign="top"> | ||
| + | <td>[[image:S20_MarqueeContextTool.png|link=]]</td> | ||
| + | <td>[[image:S20_MarqueeDrawnArea.png|link=|alt=Marquee drawn area]]</td> | ||
| + | </tr> | ||
| + | </table> | ||
| + | </td> | ||
| + | </tr> | ||
| + | </table> | ||
| + | |||
| + | <table width=1000 bgcolor=#000000 cellpadding=2> | ||
| + | <tr valign="top"> | ||
| + | <td> | ||
| + | <table width=996 bgcolor=#ffffff cellpadding=2> | ||
| + | <tr valign="top"> | ||
| + | <td colspan=2>The main '''Marquee Baseboard Operations''', as shown in the '''Marquee Context Menu''' above, are:-</td> | ||
| + | </tr> | ||
| + | <tr valign="top"> | ||
| + | <td> | ||
| + | <table> | ||
| + | <tr valign="top"> | ||
| + | <td width=250><span style="font-weight: 700; font-size: 15px; color: white; background-color: black;"> Set Marquee to Brush Height </span></td> | ||
| + | <td width=546>to create new baseboards in the selected area. The '''Brush Height''' is the value stored in the <span style="font-weight: 700; font-size: 15px; color: gold; background-color: black;"> Height </span> setting in the <span style="font-weight: 700; font-size: 15px; color: white; background-color: #797979;"> Tool Options Palette </span>. This value will be used to set the height of the new baseboards. Any part of the initial baseboard that is covered by the marquee will also have its height set to the brush height</td> | ||
| + | <td width=200 rowspan=3>[[image:S20_ToolHeight.png|link=|alt=Tool Height]]</td> | ||
| + | </tr> | ||
| + | <tr valign="top"> | ||
| + | <td><span style="font-weight: 700; font-size: 15px; color: white; background-color: black;"> Convert Baseboards to </span></td> | ||
| + | <td>a pop-out menu will give the options, '''10m''', or '''5m''' or (for <span style="background-color: yellow;">'''Trainz Plus''' only</span>) '''HD resolution'''. Selecting one of the options will create the new baseboards in the selected '''resolution'''. This tool is also used to convert existing baseboards from one resolution to the other. | ||
| + | <table> | ||
| + | <tr valign="top"> | ||
| + | <td> | ||
| + | <table bgcolor=#fcbcbc cellpadding=2> | ||
| + | <tr valign="top"> | ||
| + | <td>[[image:Stop.PNG|link=]]</td> | ||
| + | <td><span style="font-size: 15px; font-weight: 700;">WARNING:</span><br> | ||
| + | It is '''NOT RECOMMENDED''' that you mix '''HD resolution''' baseboards with '''5m''' or '''10m''' baseboards in the same route. It should be '''ALL HD''' or none.<br> | ||
| + | See [[image:WikiLink.PNG|link=]] '''[[How to Use S20 Tools#Upgrading a Route to HD|S20 Tools - Upgrading a Route to HD]]''' for more details.</td> | ||
| + | </tr> | ||
| + | </table> | ||
| + | </td> | ||
| + | </tr> | ||
| + | </table> | ||
| + | </td> | ||
| + | </tr> | ||
| + | <tr valign="top"> | ||
| + | <td><span style="font-weight: 700; font-size: 15px; color: white; background-color: black;"> Delete Baseboards in Marquee </span></td> | ||
| + | <td>to delete the selected baseboards. The '''Undo''' command <span style="font-weight: 700; font-size: 15px;"><span style="color: white; background-color: black;"> Ctrl </span> + <span style="color: white; background-color: black;"> Z </span></span> will restore the deleted baseboards</td> | ||
| + | </tr> | ||
| + | </table> | ||
| + | </td> | ||
| + | </tr> | ||
| + | </table> | ||
| + | </td> | ||
| + | </tr> | ||
| + | </table> | ||
| + | <br> | ||
| + | <table width=1000> <!-- BEGIN Nav Buttons Table --> | ||
| + | <tr valign="top"> | ||
| + | <td width=629><span id="skipDefaultGroundTexture"></span> | ||
| + | =='''Default Baseboard Ground Texture'''== | ||
| + | </td> | ||
| + | <td width=50>[[image:SkipDown.png|link=#skipLoadOldRoute|Skip Down]]</td> | ||
| + | <td width=50>[[image:SkipUp.png|link=#skipWorldView|Skip Up]]</td> | ||
| + | <td width=46> </td> | ||
| + | <td width=75> </td> | ||
| + | <td width=75> </td> | ||
| + | <td width=75> </td> | ||
| + | </tr> | ||
| + | </table> <!-- END Nav Buttons Table --> | ||
| + | |||
| + | <table width=1000> | ||
| + | <tr> | ||
| + | <td colspan=2>When a new route is created or a new baseboard is added in both '''Surveyor Classic''' and '''Surveyor 2.0''' it will be covered with the ground texture for the selected '''Region''' or the default texture/grid if no region has been set. This can be changed to a different texture (including to the standard '''TRS19/TRS22''' grid pattern).</td> | ||
| + | </tr> | ||
| + | <tr valign="top"> | ||
| + | <td width=360>[[image:MainMenuSetGroundTexture.png|link=]]</td> | ||
| + | <td> | ||
| + | <table bgcolor=#000000 cellpadding=2> | ||
| + | <tr valign="top"> | ||
| + | <td> | ||
| + | <table bgcolor=#ffffff cellpadding=2> | ||
| + | <tr valign="top"> | ||
| + | <td colspan=2><span style="font-weight: 700; font-size: 15px;;">Steps:</span> To disable the current default ground texture (easiest method):-</td> | ||
| + | </tr> | ||
| + | <tr valign="top"> | ||
| + | <td width=20>[[image:DotPoint1.JPG|link=]]</td> | ||
| + | <td>open the [[image:SurveyorDisplayIcon.png|link=]] '''Surveyor Display Menu'''</td> | ||
| + | </tr> | ||
| + | <tr valign="top"> | ||
| + | <td>[[image:DotPoint2.JPG|link=]]</td> | ||
| + | <td>select the <span style="font-weight: 700; font-size: 15px; color: white; background-color: black;"> Ground </span> option</td> | ||
| + | </tr> | ||
| + | <tr valign="top"> | ||
| + | <td>[[image:DotPoint3.JPG|link=]]</td> | ||
| + | <td>select the <span style="font-weight: 700; font-size: 15px; color: white; background-color: black;"> Grid </span> sub-option. This will use the current grid texture.</td> | ||
| + | </tr> | ||
| + | </table> | ||
| + | </td> | ||
| + | </tr> | ||
| + | </table> | ||
| + | </td> | ||
| + | </tr> | ||
| + | <tr> | ||
| + | <td colspan=2>A more complex solution is to edit an existing '''Region''' or create one of your own to add your preferred ground texture (such as the standard '''TRS22''' grid pattern) to each new route you create and every new baseboard that you add.</td> | ||
| + | </tr> | ||
| + | </table> | ||
| + | |||
| + | <table bgcolor=#000000 width=1000 cellpadding=2> | ||
| + | <tr valign="top"> | ||
| + | <td> | ||
| + | <table bgcolor=#ffffb0 width=996 cellpadding=2> | ||
| + | <tr valign="top"> | ||
| + | <td width=25>[[image:NotePad.PNG|link=]]</td> | ||
| + | <td><span style="font-size: 17px; font-weight: 700;">Notes:</span><br> | ||
| + | ---- | ||
| + | The '''Baseboard Ground Texture''', chosen from the '''Surveyor Display Menu''' or by specifying a '''Region''', will become the default for every new route you create and every new baseboard you add, until you change it to something else. | ||
| + | </td> | ||
| + | </tr> | ||
| + | </table> | ||
| + | </td> | ||
| + | </tr> | ||
| + | </table> | ||
| + | <br> | ||
| + | <table cellpadding=2 bgcolor="Aquamarine"> | ||
| + | <tr valign="top"> | ||
| + | <td width=50>[[image:LinkWiki.PNG|link=]]</td> | ||
| + | <td> | ||
| + | Information on creating and editing '''Region''' assets can be found on the '''Trainz Wiki''' at:- | ||
| + | <table> | ||
| + | <tr valign="top"> | ||
| + | <td width=10>[[image:BlackDot10x10.png|link=]]</td> | ||
| + | <td>'''[[How_to_Create_a_Region_Asset|How to Create a Region Asset]]''' | ||
| + | </td> | ||
| + | </tr> | ||
| + | </table> | ||
| + | </td> | ||
| + | </tr> | ||
| + | </table> | ||
| + | <br> | ||
| + | <table width=1000> <!-- BEGIN Nav Buttons Table --> | ||
| + | <tr valign="top"> | ||
| + | <td width=629><span id="skipLoadOldRoute"></span> | ||
=='''Loading an Existing Route'''== | =='''Loading an Existing Route'''== | ||
| + | </td> | ||
| + | <td width=50>[[image:SkipDown.png|link=#skipLoadRouteCM|Skip Down]]</td> | ||
| + | <td width=50>[[image:SkipUp.png|link=#skipDefaultGroundTexture|Skip Up]]</td> | ||
| + | <td width=46> </td> | ||
| + | <td width=75> </td> | ||
| + | <td width=75> </td> | ||
| + | <td width=75> </td> | ||
| + | </tr> | ||
| + | </table> <!-- END Nav Buttons Table --> | ||
| + | |||
You must first find and select the route to load from those already installed. At the top of the '''Driver/Surveyor''' screen the route search options are shown as a set of buttons. | You must first find and select the route to load from those already installed. At the top of the '''Driver/Surveyor''' screen the route search options are shown as a set of buttons. | ||
[[image:RouteSearchButtons.png|link=|alt=Route Search]] | [[image:RouteSearchButtons.png|link=|alt=Route Search]] | ||
| − | <table> | + | <table width=1000> |
<tr valign="top"> | <tr valign="top"> | ||
<td>'''Type:'''</td> | <td>'''Type:'''</td> | ||
| − | <td><span style="background-color: black; color: white; font-weight: 700;">& | + | <td><span style="background-color: black; color: white; font-weight: 700; font-size: 15px;"> ROUTES </span> is the default selection. No need to change this.</td> |
</tr> | </tr> | ||
<tr valign="top"> | <tr valign="top"> | ||
<td>'''Source:'''</td> | <td>'''Source:'''</td> | ||
| − | <td><span style="background-color: black; color: white; font-weight: 700;">& | + | <td><span style="background-color: black; color: white; font-weight: 700; font-size: 15px;"> PURCHASED </span> is the default selection, Click and change to <span style="background-color: black; color: white; font-weight: 700; font-size: 15px;"> MY CONTENT </span> for a route you have created (or already modified) or to <span style="background-color: black; color: white; font-weight: 700; font-size: 15px;"> INSTALLED </span> for one you have downloaded from the '''DLS'''.</td> |
</tr> | </tr> | ||
<tr valign="top"> | <tr valign="top"> | ||
<td>'''Region:'''</td> | <td>'''Region:'''</td> | ||
| − | <td><span style="background-color: black; color: white; font-weight: 700;">& | + | <td><span style="background-color: black; color: white; font-weight: 700; font-size: 15px;"> ALL </span> is the default selection. You can select a particular geographic region if required and '''IF''' the route had a geographic region set when it was created.</td> |
</tr> | </tr> | ||
<tr valign="top"> | <tr valign="top"> | ||
| Line 294: | Line 1,076: | ||
[[image:RouteSelectExisting.png|link=|alt=Existing Routes]] | [[image:RouteSelectExisting.png|link=|alt=Existing Routes]] | ||
| − | Click on the thumbnail for the route you want to load, then | + | <span style="font-weight: 700; font-size: 15px; background-color: lightcyan;">Left Click</span> on the thumbnail for the route you want to load, then <span style="font-weight: 700; font-size: 15px; background-color: lightcyan;">Left Click</span> on the <span style="background-color: black; color: white; font-weight: 700; font-size: 15px;"> EDIT ROUTE </span> button to load the route into '''Surveyor'''. |
[[image:RouteButtonsEdit.png|link=|alt=Edit Route]] | [[image:RouteButtonsEdit.png|link=|alt=Edit Route]] | ||
<br><br> | <br><br> | ||
| − | <table bgcolor=#000000 cellpadding=2 width= | + | <table bgcolor=#000000 cellpadding=2 width=1000> |
<tr valign="top"> | <tr valign="top"> | ||
<td> | <td> | ||
| Line 306: | Line 1,088: | ||
<td><span style="font-size: 17px; font-weight: 700;">Notes: Routes and Sessions - An Endless Source of Confusion</span> | <td><span style="font-size: 17px; font-weight: 700;">Notes: Routes and Sessions - An Endless Source of Confusion</span> | ||
---- | ---- | ||
| − | Scenery objects that have been placed in a session will '''NOT APPEAR''' if the route has been loaded into '''Surveyor''' without also loading the session | + | <table> |
| − | + | <tr valign="top"> | |
| − | If scenery objects have mysteriously vanished when you reload a route into '''Surveyor''' it is highly likely that those objects have been saved in a session. You must load the session into '''Surveyor''' to make them visible again | + | <td width=10>[[image:DotPoint.JPG|10px|link=]]</td> |
| − | + | <td>Scenery objects that have been placed in a session will '''NOT APPEAR''' if the route has been loaded into '''Surveyor''' without also loading the session</td> | |
| − | You can easily move most scenery objects from a session into a route if needed - see the Trainz Wiki Page '''[[image:WikiLink.PNG|link=]]& | + | </tr> |
| + | <tr valign="top"> | ||
| + | <td>[[image:DotPoint.JPG|10px|link=]]</td> | ||
| + | <td>If scenery objects have mysteriously vanished when you reload a route into '''Surveyor''' it is highly likely that those objects have been saved in a session. You must load the session into '''Surveyor''' to make them visible again</td> | ||
| + | </tr> | ||
| + | <tr valign="top"> | ||
| + | <td>[[image:DotPoint.JPG|10px|link=]]</td> | ||
| + | <td>You can easily move most scenery objects from a session into a route if needed - see the Trainz Wiki Page '''[[image:WikiLink.PNG|link=]] [[How_to_Use_Bulk_Asset_Update/Replace_Tool|How to Use the Bulk Asset Update/Replace Tool]]''' for more details</td> | ||
| + | </tr> | ||
| + | </table> | ||
</td> | </td> | ||
</tr> | </tr> | ||
| Line 317: | Line 1,108: | ||
</tr> | </tr> | ||
</table> | </table> | ||
| − | + | <br> | |
| + | <table width=1000> <!-- BEGIN Nav Buttons Table --> | ||
| + | <tr valign="top"> | ||
| + | <td width=629><span id="skipLoadRouteCM"></span> | ||
=='''Loading a Route Into Surveyor From Content Manager'''== | =='''Loading a Route Into Surveyor From Content Manager'''== | ||
| + | </td> | ||
| + | <td width=50>[[image:SkipDown.png|link=#skipLoadShutdown|Skip Down]]</td> | ||
| + | <td width=50>[[image:SkipUp.png|link=#skipLoadOldRoute|Skip Up]]</td> | ||
| + | <td width=46> </td> | ||
| + | <td width=75> </td> | ||
| + | <td width=75> </td> | ||
| + | <td width=75> </td> | ||
| + | </tr> | ||
| + | </table> <!-- END Nav Buttons Table --> | ||
| + | |||
'''Trainz''' provides a shortcut that allows you to load an existing route directly into '''Surveyor''' for editing from '''Content Manager'''.<br> | '''Trainz''' provides a shortcut that allows you to load an existing route directly into '''Surveyor''' for editing from '''Content Manager'''.<br> | ||
| − | <table> | + | <table width=1000> |
<tr valign="top"> | <tr valign="top"> | ||
<td>[[image:CMOpenRouteSurveyor.png|link=|Load a route from CM]]</td> | <td>[[image:CMOpenRouteSurveyor.png|link=|Load a route from CM]]</td> | ||
<td> | <td> | ||
| − | <table cellpadding= | + | <table bgcolor=#000000 cellpadding=2> |
| − | <tr> | + | <tr valign="top"> |
| − | <td | + | <td> |
| − | + | <table bgcolor=#ffffff cellpadding=2> | |
| + | <tr valign="top"> | ||
| + | <td><span style="font-size: 17px; font-weight: 700;">Steps:</span> To load a route from '''Content Manager''':- | ||
| + | <table> | ||
| + | <tr valign="top"> | ||
| + | <td width=20>[[image:DotPoint1.JPG|link=]]</td> | ||
| + | <td>in '''Content Manager''' select the filter '''Routes & Sessions'''</td> | ||
</tr> | </tr> | ||
<tr valign="top"> | <tr valign="top"> | ||
| − | <td>[[image: | + | <td>[[image:DotPoint2.JPG|link=]]</td> |
| − | <td><span style="font- | + | <td>select the route to be edited</td> |
| − | + | </tr> | |
| − | + | <tr valign="top"> | |
| − | + | <td>[[image:DotPoint3.JPG|link=]]</td> | |
| − | + | <td><span style="font-weight: 700; font-size: 15px; background-color: lightcyan;">Right Click</span> to open the '''Command Menu'''</td> | |
| − | + | </tr> | |
| + | <tr valign="top"> | ||
| + | <td>[[image:DotPoint4.JPG|link=]]</td> | ||
| + | <td>select '''Open...''', then select '''Edit Asset in Surveyor''' | ||
</td> | </td> | ||
</tr> | </tr> | ||
| − | < | + | </table> |
| − | + | </td> | |
| − | + | ||
</tr> | </tr> | ||
</table> | </table> | ||
| Line 348: | Line 1,160: | ||
</tr> | </tr> | ||
</table> | </table> | ||
| − | + | </td> | |
| + | </tr> | ||
| + | </table> | ||
| + | <br> | ||
| + | <table width=1000> <!-- BEGIN Nav Buttons Table --> | ||
| + | <tr valign="top"> | ||
| + | <td width=629><span id="skipLoadShutdown"></span> | ||
=='''Loading After an Unexpected Shutdown'''== | =='''Loading After an Unexpected Shutdown'''== | ||
| − | + | </td> | |
| + | <td width=50>[[image:SkipDown.png|link=#skipEditRoute|Skip Down]]</td> | ||
| + | <td width=50>[[image:SkipUp.png|link=#skipLoadRouteCM|Skip Up]]</td> | ||
| + | <td width=46> </td> | ||
| + | <td width=75> </td> | ||
| + | <td width=75> </td> | ||
| + | <td width=75> </td> | ||
| + | </tr> | ||
| + | </table> <!-- END Nav Buttons Table --> | ||
| + | |||
<table width=1000> | <table width=1000> | ||
| + | <tr valign="top"> | ||
| + | <td colspan=2>If you select a route for loading after an unexpected shutdown of '''Trainz''' then any route (or route and session) that was open and running in '''Trainz Surveyor''' or '''Driver''' will be left marked as '''Open for Edit'''. When you attempt to load this route into '''Surveyor''' or '''Driver''' you will see a message listing the route and session (if any) that were affected.</td> | ||
| + | </tr> | ||
<tr valign="top"> | <tr valign="top"> | ||
<td>[[image:RouteLoadAfterCTD.png|link=|alt=Load after CTD]]</td> | <td>[[image:RouteLoadAfterCTD.png|link=|alt=Load after CTD]]</td> | ||
| − | <td> | + | <td>The message is saying that the assets in the list '''may have been''' changed since the last time you loaded them and exited '''Trainz''' normally. For example if you had been editing the route and/or session and had experienced a crash to the desktop or had used Windows '''Task Manager''' to terminate the program.<br><br> |
| − | <table bgcolor=#000000 width= | + | <table bgcolor=#000000 width=620> |
<tr valign="top"> | <tr valign="top"> | ||
<td> | <td> | ||
| − | <table cellpadding= | + | <table cellpadding=2 bgcolor=#ffffb0 width=616> |
<tr valign="top"> | <tr valign="top"> | ||
<td>[[image:NotePad.PNG|link=]]</td> | <td>[[image:NotePad.PNG|link=]]</td> | ||
<td><span style="font-size: 17px; font-weight: 700;">Note:'''</span> | <td><span style="font-size: 17px; font-weight: 700;">Note:'''</span> | ||
---- | ---- | ||
| − | A similar message will appear when you load a '''Driver Game''' (see '''[[ | + | A similar message will appear when you load a '''Driver Game''' (see '''[[image:PageLink.PNG|link=]] [[#Saving and Loading Sessions in Driver|Saving and Loading Sessions in Driver]]''' below) after editing the original route or session that was used to create the '''Driver Session'''.<br> |
It is possible that the changes you have made may affect the operation of the '''Driver Session'''.</td> | It is possible that the changes you have made may affect the operation of the '''Driver Session'''.</td> | ||
| Line 374: | Line 1,204: | ||
</tr> | </tr> | ||
</table> | </table> | ||
| − | + | <br> | |
| − | + | ||
| − | + | ||
The options you will see are:-<br> | The options you will see are:-<br> | ||
| − | <table> | + | <table bgcolor=#000000 width=1000 cellpadding=2> |
<tr valign="top"> | <tr valign="top"> | ||
| − | <td><span style="color: white; background-color: black; font-weight: 700; font-size: 15px;">& | + | <td> |
| − | + | <table bgcolor=#ffffff width=996 cellpadding=2> | |
| − | <td>Use the edited/changed versions that are in the open database assets - there is a possibility that | + | <tr valign="top"> |
| + | <td width=125><span style="color: white; background-color: black; font-weight: 700; font-size: 15px;"> Use changes </span></td> | ||
| + | <td>Use the edited/changed versions that are in the open database assets. <span style="font-weight: 700; font-size: 15px; background-color: yellow;"> Note: </span> there is a possibility that these assets may have been damaged during the shutdown and may be corrupted</td> | ||
</tr> | </tr> | ||
<tr valign="top"> | <tr valign="top"> | ||
| − | <td><span style="color: white; background-color: black; font-weight: 700; font-size: 15px;">& | + | <td><span style="color: white; background-color: black; font-weight: 700; font-size: 15px;"> Revert changes </span></td> |
| − | + | ||
<td>Ignore the edited/changed versions and load the previous versions instead</td> | <td>Ignore the edited/changed versions and load the previous versions instead</td> | ||
</tr> | </tr> | ||
<tr valign="top"> | <tr valign="top"> | ||
| − | <td><span style="color: white; background-color: black; font-weight: 700; font-size: 15px;">& | + | <td><span style="color: white; background-color: black; font-weight: 700; font-size: 15px;"> Cancel </span></td> |
| − | + | ||
<td>Cancel the Load and return to the '''Surveyor/Driver''' menu screen</td> | <td>Cancel the Load and return to the '''Surveyor/Driver''' menu screen</td> | ||
| + | </tr> | ||
| + | <tr> | ||
| + | <td colspan=2>You could also use the '''Content Manager''' program (select <span style="color: white; background-color: black; font-weight: 700; font-size: 15px;"> Manage Content </span> from the '''Trainz Launcher''') to Submit the open route or route and session assets. This has the risk of replacing the last good copy of that asset or assets with a possibly faulty copy.</td> | ||
| + | </tr> | ||
| + | </table> | ||
| + | </td> | ||
</tr> | </tr> | ||
</table> | </table> | ||
| − | |||
<br> | <br> | ||
| − | + | <table width=1000> <!-- BEGIN Nav Buttons Table --> | |
| + | <tr valign="top"> | ||
| + | <td width=629><span id="skipEditRoute"></span> | ||
=='''Editing a Route'''== | =='''Editing a Route'''== | ||
| − | <table | + | </td> |
| + | <td width=50>[[image:SkipDown.png|link=#skipSetRouteTerrain|Skip Down]]</td> | ||
| + | <td width=50>[[image:SkipUp.png|link=#skipLoadShutdown|Skip Up]]</td> | ||
| + | <td width=46> </td> | ||
| + | <td width=75> </td> | ||
| + | <td width=75> </td> | ||
| + | <td width=75> </td> | ||
| + | </tr> | ||
| + | </table> <!-- END Nav Buttons Table --> | ||
| + | |||
| + | <table width=1000 bgcolor="lightcyan" cellpadding=2> | ||
<tr valign="top"> | <tr valign="top"> | ||
| − | <td>[[image: | + | <td width=10>[[image:BlueDot10x10.png|link=]]</td> |
<td>'''When a Route is loaded or a new Route is created all the assets you add will be automatically placed into a Route Layer'''</td> | <td>'''When a Route is loaded or a new Route is created all the assets you add will be automatically placed into a Route Layer'''</td> | ||
</tr> | </tr> | ||
</table> | </table> | ||
| + | <br> | ||
| + | <table width=1000> | ||
| + | <tr valign="top"> | ||
| + | <td>When you create a new route, or load an existing route without a session, and start adding scenery assets they will automatically be placed into a '''Route Layer'''. See '''[[image:WikiLink.PNG|link=]] [[How_to_Use_Layers|How to Use Layers]]''' for more details.<br><br> | ||
| − | + | Any ground textures, effect layers (e.g. TurfFX, Water, Clutter) you add, or terrain changes (including new baseboards) you make, will be added to the '''Route Data'''.</td> | |
| − | + | </tr> | |
| − | Any ground textures | + | </table> |
| − | + | <br> | |
| − | <table bgcolor=#ff0000 width= | + | <table bgcolor=#ff0000 width=1000> |
<tr valign="top"> | <tr valign="top"> | ||
<td> | <td> | ||
<table bgcolor=#fcbcbc> | <table bgcolor=#fcbcbc> | ||
<tr valign="top"> | <tr valign="top"> | ||
| − | <td>[[ | + | <td>[[image:Stop.PNG|link=]]</td> |
<td> | <td> | ||
| − | <span style="font-weight: 700; | + | <span style="font-weight: 700; font-size: 15px;">WARNING: Do not edit track in a Route that is occupied by consists in any of the Sessions based on the Route</span><br> |
| − | + | '''Moving or deleting a section of track in a Route that is occupied by a consist in a Session can cause the consist to become a "missing asset"'''. This can happen if you load the Route only and not the Session. If a consist becomes a "missing asset" then the only immediate solution is to use the '''Delete missing assets''' command from the '''Tools''' menu in '''Surveyor'''.<br> | |
| − | + | <span style="font-size: 15px; font-weight: 700;">Prevention:</span><br> | |
| − | + | if you have the consists placed in a Session then always '''load the Session''', not just the Route, and move or delete any consists '''BEFORE''' editing the track they are occupying. | |
| − | + | ||
| − | + | ||
</td> | </td> | ||
</tr> | </tr> | ||
| Line 435: | Line 1,282: | ||
<table width=1000> | <table width=1000> | ||
<tr valign="top"> | <tr valign="top"> | ||
| − | <td width= | + | <td> |
| − | + | <table width=520 bgcolor=#000000 cellpadding=2> | |
| − | You can edit the '''Route Characteristics''' at any time by selecting the | + | <tr valign="top"> |
| + | <td> | ||
| + | <table bgcolor=#ffffb0 cellpadding=2> | ||
| + | <tr valign="top"> | ||
| + | <td width=25>[[image:NotePad.PNG|link=]]</td> | ||
| + | <td>You can edit the '''Route Characteristics''' at any time by selecting the <span style="font-weight: 700; font-size: 15px; color: white; background-color: black;"> Edit Route... </span> option from the [[image:EditMenu_S20.png|link=]] '''Edit Menu''' <span style="font-weight: 700; font-size: 15px;">OR</span> simply by pressing the <span style="font-weight: 700; font-size: 15px;"><span style="color: white; background-color: black;"> Ctrl </span> + <span style="color: white; background-color: black;"> E </span></span> keys.<br> | ||
This will bring up the '''Edit Route''' dialogue window (shown below).</td> | This will bring up the '''Edit Route''' dialogue window (shown below).</td> | ||
| − | <td | + | </tr> |
| + | </table> | ||
| + | </td> | ||
| + | </tr> | ||
| + | </table> | ||
| + | </td> | ||
<td> | <td> | ||
| − | <table bgcolor=#000000 | + | <table width=480 bgcolor=#000000> |
<tr valign="top"> | <tr valign="top"> | ||
<td> | <td> | ||
| − | <table cellpadding= | + | <table width=476 cellpadding=2 bgcolor=#ffffb0> |
<tr valign="top"> | <tr valign="top"> | ||
<td>[[image:NotePad.PNG|link=]]</td> | <td>[[image:NotePad.PNG|link=]]</td> | ||
<td><span style="font-size: 17px; font-weight: 700;">Route Characteristics:-'''</span><br> | <td><span style="font-size: 17px; font-weight: 700;">Route Characteristics:-'''</span><br> | ||
---- | ---- | ||
| − | + | <table> | |
| − | + | <tr valign="top"> | |
| − | + | <td width=10>[[image:DotPoint.JPG|10px|link=]]</td> | |
| − | + | <td>'''Name''' and '''Description'''</td> | |
| − | + | </tr> | |
| + | <tr valign="top"> | ||
| + | <td>[[image:DotPoint.JPG|10px|link=]]</td> | ||
| + | <td>assigned '''Geographic Region''', which sets a number of different features</td> | ||
| + | </tr> | ||
| + | <tr valign="top"> | ||
| + | <td>[[image:DotPoint.JPG|10px|link=]]</td> | ||
| + | <td>'''Thumbnail''' image</td> | ||
| + | </tr> | ||
| + | <tr valign="top"> | ||
| + | <td>[[image:DotPoint.JPG|10px|link=]]</td> | ||
| + | <td>'''Working Scale''' and '''Working Units'''</td> | ||
| + | </tr> | ||
| + | <tr valign="top"> | ||
| + | <td>[[image:DotPoint.JPG|10px|link=]]</td> | ||
| + | <td>'''Draw Distance'''</td> | ||
| + | </tr> | ||
| + | </table> | ||
</td> | </td> | ||
</tr> | </tr> | ||
| Line 465: | Line 1,339: | ||
<table width=1000> | <table width=1000> | ||
<tr valign="top"> | <tr valign="top"> | ||
| − | <td width= | + | <td width=500>[[image:RouteEditWindowExample2_S20.png|link=]]</td> |
<td> | <td> | ||
| − | <table> | + | <table width=500> |
<tr valign="top"> | <tr valign="top"> | ||
| − | <td>[[image:DotPoint1.JPG|link=]]</td> | + | <td width=20>[[image:DotPoint1.JPG|link=]]</td> |
| − | <td> | + | <td><span style="color: white; background-color: black; font-weight: 700; font-size: 15px;"> Route name </span>. Editing this will change the route '''username''' in the '''config.txt''' file but it will not alter the route '''<kuid>''' value</td> |
</tr> | </tr> | ||
<tr valign="top"> | <tr valign="top"> | ||
<td>[[image:DotPoint2.JPG|link=]]</td> | <td>[[image:DotPoint2.JPG|link=]]</td> | ||
| − | <td> | + | <td><span style="color: white; background-color: black; font-weight: 700; font-size: 15px;"> Route description </span>. Edit to include additional information or describe changes that have been made</td> |
</tr> | </tr> | ||
<tr valign="top"> | <tr valign="top"> | ||
<td>[[image:DotPoint3.JPG|link=]]</td> | <td>[[image:DotPoint3.JPG|link=]]</td> | ||
| − | <td> | + | <td><span style="color: white; background-color: black; font-weight: 700; font-size: 15px;"> Region </span>. Changing the region (the '''Geographic region''') selected could affect other features such as the moving road traffic, season of the year (through the latitude tag) and altitude</td> |
</tr> | </tr> | ||
<tr valign="top"> | <tr valign="top"> | ||
<td>[[image:DotPoint4.JPG|link=]]</td> | <td>[[image:DotPoint4.JPG|link=]]</td> | ||
| − | <td> | + | <td><span style="color: white; background-color: black; font-weight: 700; font-size: 15px;"> Route thumbnail </span>. <span style="font-weight: 700; font-size: 15px; background-color: lightcyan;">Left Click</span> on the <span style="color: white; background-color: black; font-weight: 700; font-size: 15px;"> Set Thumbnail </span> button to take a snapshot using the current camera view which will be used as the new thumbnail. The image shown in the example on the left has been edited.</td> |
| − | + | ||
</tr> | </tr> | ||
<tr valign="top"> | <tr valign="top"> | ||
<td>[[image:DotPoint5.JPG|link=]]</td> | <td>[[image:DotPoint5.JPG|link=]]</td> | ||
| − | <td> | + | <td><span style="color: white; background-color: black; font-weight: 700; font-size: 15px;"> Working scale </span>. Changing this will only affect the measurement shown in the '''Surveyor Ruler''' tool</td> |
</tr> | </tr> | ||
<tr valign="top"> | <tr valign="top"> | ||
<td>[[image:DotPoint6.JPG|link=]]</td> | <td>[[image:DotPoint6.JPG|link=]]</td> | ||
| − | <td> | + | <td><span style="color: white; background-color: black; font-weight: 700; font-size: 15px;"> Working units </span>. Switching between '''Metric''' and '''Imperial''' will change how train speeds are calculated and displayed in Driver (in km/h or mph) and the units used by track speed signs</td> |
</tr> | </tr> | ||
<tr valign="top"> | <tr valign="top"> | ||
<td>[[image:DotPoint7.JPG|link=]]</td> | <td>[[image:DotPoint7.JPG|link=]]</td> | ||
| − | <td> | + | <td><span style="color: white; background-color: black; font-weight: 700; font-size: 15px;"> Route Edit Detail </span> <span style="background-color: yellow;">in '''Trainz Plus''' only</span>. This sets the minimum ground brush size when working with '''HD resolution'''. It can be swapped between the two settings at anytime when editing. See <span style="font-weight: 700; font-size: 15px; color: white; background-color: blue;"> SD/HD Options </span> below for more details</td> |
</tr> | </tr> | ||
| + | </table> | ||
| + | </td> | ||
| + | </tr> | ||
| + | <tr valign="top"> | ||
| + | <td colspan=2> | ||
| + | <table> | ||
<tr valign="top"> | <tr valign="top"> | ||
<td>[[image:DotPoint8.JPG|link=]]</td> | <td>[[image:DotPoint8.JPG|link=]]</td> | ||
| − | <td> | + | <td><span style="color: white; background-color: black; font-weight: 700; font-size: 15px;"> Draw distance cap </span> will affect how far away from the camera that scenery objects will be drawn. A high setting, particularly the <span style="color: white; background-color: black; font-weight: 700; font-size: 15px;"> Disabled </span> option (which means no draw distance cap), could affect the game performance, including the '''fps''' rate (frames per second), on some systems</td> |
| + | </tr> | ||
| + | <tr valign="top"> | ||
| + | <td>[[image:DotPoint9.JPG|link=]]</td> | ||
| + | <td><span style="font-weight: 700; font-size: 15px; background-color: lightcyan;">Left Click</span> on the [[image:Tick.PNG|link=|alt=Tick]] icon to save the entered values and exit back to Surveyor. <span style="font-weight: 700; font-size: 15px; background-color: lightcyan;">Left Click</span> on the [[image:Cross.PNG|link=|alt=Tick]] icon to cancel any entered values and exit back to Surveyor</td> | ||
</tr> | </tr> | ||
</table> | </table> | ||
| Line 506: | Line 1,389: | ||
</table> | </table> | ||
<br> | <br> | ||
| + | <table width=1000> | ||
| + | <tr valign="top"> | ||
| + | <td><span style="font-weight: 700; font-size: 15px; color: white; background-color: blue;"> SD/HD Options </span></td> | ||
| + | </tr> | ||
| + | <tr valign="top"> | ||
| + | <td>[[image:RouteEditDetailHD_S20.png|link=]]</td> | ||
| + | </tr> | ||
| + | </table> | ||
| + | <br> | ||
| + | <table width=1000> | ||
| + | <tr valign="top"> | ||
| + | <td>The '''Surveyor Route Editor''' will allow you to switch between two minimum brush sizes when working with '''HD resolution''' routes.</td> | ||
| + | </tr> | ||
| + | <tr valign="top"> | ||
| + | <td>This option, <span style="background-color: yellow;">available in '''Trainz Plus''' only</span>, allows you to set the brush detail to the default '''HD''' (High Definition) or to a lower '''SD''' (Standard Definition) which is easier to work with over larger areas. | ||
| + | <br> | ||
| + | <table> | ||
| + | <tr valign="top"> | ||
| + | <td> | ||
| + | <table width=500 bgcolor=#000000 cellpadding=2> | ||
| + | <tr valign="top"> | ||
| + | <td> | ||
| + | <table bgcolor=#ffffff cellpadding=2> | ||
| + | <tr valign="top"> | ||
| + | <td colspan=2>The distinction between these two options is:-</td> | ||
| + | </tr> | ||
| + | <tr valign="top"> | ||
| + | <td><span style="font-weight: 700; font-size: 15px; color: white; background-color: black;"> HD </span></td> | ||
| + | <td>This is the full '''HD Mode''' where the minimum brush size is '''0.12m''' (12cm). This is the default selection</td> | ||
| + | </tr> | ||
| + | <tr valign="top"> | ||
| + | <td><span style="font-weight: 700; font-size: 15px; color: white; background-color: black;"> SD </span></td> | ||
| + | <td>This is a reduced '''HD Mode''' where the minimum brush size is '''2m'''</td> | ||
| + | </tr> | ||
| + | <tr valign="top"> | ||
| + | <td colspan=2>Both modes:- | ||
| + | <table> | ||
| + | <tr valign="top"> | ||
| + | <td width=10>[[image:DotPoint.JPG|10px|link=]]</td> | ||
| + | <td>have all the normal '''HD''' controls and features</td> | ||
| + | </tr> | ||
| + | <tr valign="top"> | ||
| + | <td>[[image:DotPoint.JPG|10px|link=]]</td> | ||
| + | <td>will work anywhere within the grid squares of a '''HD resolution''' route and are not restricted to the grid lines or intersections</td> | ||
| + | </tr> | ||
| + | <tr valign="top"> | ||
| + | <td>[[image:DotPoint.JPG|10px|link=]]</td> | ||
| + | <td>can be used in different areas of the same baseboard</td> | ||
| + | </tr> | ||
| + | </table> | ||
| + | </td> | ||
| + | </tr> | ||
| + | </table> | ||
| + | </td> | ||
| + | </tr> | ||
| + | </table> | ||
| + | <table width=500> | ||
| + | <tr valign="top"> | ||
| + | <td colspan=2>The setting can be switched during editing without affecting or altering the existing terrain. For example:-</td> | ||
| + | </tr> | ||
| + | <tr valign="top"> | ||
| + | <td width=10>[[image:DotPoint.JPG|10px|link=]]</td> | ||
| + | <td>you can start editing the terrain using the '''HD Mode''' to give you the highest level of precision in one area of a baseboard</td> | ||
| + | </tr> | ||
| + | <tr valign="top"> | ||
| + | <td>[[image:DotPoint.JPG|10px|link=]]</td> | ||
| + | <td>then switch to '''SD Mode''' to work in another area of the same (or a different) baseboard at a lower level of precision - which would be faster than using the '''HD Mode'''</td> | ||
| + | </tr> | ||
| + | <tr valign="top"> | ||
| + | <td>[[image:DotPoint.JPG|10px|link=]]</td> | ||
| + | <td>then switch back to '''HD Mode''' to continue working in the same, or another, high precision area</td> | ||
| + | </tr> | ||
| + | </table> | ||
| + | </td> | ||
| + | <td> | ||
| + | <table width=500 bgcolor=#000000> | ||
| + | <tr valign="top"> | ||
| + | <td> | ||
| + | <table bgcolor=#ffffff> | ||
| + | <tr valign="top"> | ||
| + | <td colspan=2><span style="font-weight: 700; font-size: 15px;">Steps:</span> To switch between '''HD''' and '''SD''' modes at any time:-</td> | ||
| + | </tr> | ||
| + | <tr valign="top"> | ||
| + | <td> | ||
| + | <table> | ||
| + | <tr valign="top"> | ||
| + | <td> | ||
| + | <table> | ||
| + | <tr valign="top"> | ||
| + | <td width=20>[[image:DotPoint1.JPG|link=]]</td> | ||
| + | <td><span style="font-weight: 700; font-size: 15px; background-color: lightcyan;"> Left Click </span> on the '''Main Menu''' [[image:EditMenu_S20.png|link=]] '''Edit Menu''' and select the <span style="font-weight: 700; font-size: 15px; color: white; background-color: black;"> Edit Route... </span> option<br> | ||
| + | '''Shortcut:''' Press <span style="font-weight: 700; font-size: 15px;"><span style="color: white; background-color: black;"> Ctrl </span> + <span style="color: white; background-color: black;"> E </span></span></td> | ||
| + | </tr> | ||
| + | <tr valign="top"> | ||
| + | <td colspan=2>This will open the '''Route Editor''' dialogue window which, <span style="background-color: yellow;">in '''Trainz Plus''' only</span>, has an additional control, the '''Route Edit Detail'''</td> | ||
| + | </tr> | ||
| + | <tr valign="top"> | ||
| + | <td colspan=2>[[image:RouteEditDetailHD_S20.png|link=]]</td> | ||
| + | </tr> | ||
| + | <tr valign="top"> | ||
| + | <td>[[image:DotPoint2.JPG|link=]]</td> | ||
| + | <td><span style="font-weight: 700; font-size: 15px; background-color: lightcyan;"> Left Click </span> on either the <span style="font-weight: 700; font-size: 15px; color: white; background-color: black;"> SD </span> or the <span style="font-weight: 700; font-size: 15px; color: white; background-color: black;"> HD </span> button</td> | ||
| + | </tr> | ||
| + | <tr valign="top"> | ||
| + | <td>[[image:DotPoint3.JPG|link=]]</td> | ||
| + | <td><span style="font-weight: 700; font-size: 15px; background-color: lightcyan;"> Left Click </span> on the [[image:Tick.PNG|link=|alt=Tick]] icon at the bottom right of the dialogue window to make the switch</td> | ||
| + | </tr> | ||
| + | </table> | ||
| + | </td> | ||
| + | </tr> | ||
| + | </table> | ||
| + | </td> | ||
| + | <td>[[image:EditMenuOptions_S20.png|link=]]</td> | ||
| + | </tr> | ||
| + | </table> | ||
| + | </td> | ||
| + | </tr> | ||
| + | </table> | ||
| + | <br> | ||
| + | <table bgcolor=#000000 cellpadding=2> | ||
| + | <tr valign="top"> | ||
| + | <td> | ||
| + | <table bgcolor=#ffffb0 cellpadding=2> | ||
| + | <tr valign="top"> | ||
| + | <td width=25>[[image:NotePad.PNG|link=]]</td> | ||
| + | <td>When using <span style="font-weight: 700; font-size: 15px; color: white; background-color: black;"> SD </span> mode brush sizes less than '''2m''' will be ignored and a '''2m''' brush size will be used instead. Larger brush sizes can be set and used</td> | ||
| + | </tr> | ||
| + | </table> | ||
| + | </td> | ||
| + | </tr> | ||
| + | </table> | ||
| + | </td> | ||
| + | </tr> | ||
| + | </table> | ||
| + | </td> | ||
| + | </tr> | ||
| + | </table> | ||
| + | <br> | ||
| + | <table width=1000> <!-- BEGIN Nav Buttons Table --> | ||
| + | <tr valign="top"> | ||
| + | <td width=629><span id="skipSetRouteTerrain"></span> | ||
| + | =='''Adding Terrain Height, Textures, Effect Layers in a Route'''== | ||
| + | </td> | ||
| + | <td width=50>[[image:SkipDown.png|link=#skipAddRouteAssets|Skip Down]]</td> | ||
| + | <td width=50>[[image:SkipUp.png|link=#skipEditRoute|Skip Up]]</td> | ||
| + | <td width=46> </td> | ||
| + | <td width=75> </td> | ||
| + | <td width=75> </td> | ||
| + | <td width=75> </td> | ||
| + | </tr> | ||
| + | </table> <!-- END Nav Buttons Table --> | ||
| + | <table width=1000 bgcolor="lightcyan" cellpadding=2> | ||
| + | <tr valign="top"> | ||
| + | <td width=10>[[image:BlueDot10x10.png|link=]]</td> | ||
| + | <td>'''Terrain''', '''Textures''', '''Effect Layers''' can only be added to a route not a session</td> | ||
| + | </tr> | ||
| + | <tr valign="top"> | ||
| + | <td>[[image:BlueDot10x10.png|link=]]</td> | ||
| + | <td>The height of the terrain can be adjusted to represent hills, valleys, plains, slopes</td> | ||
| + | </tr> | ||
| + | <tr valign="top"> | ||
| + | <td>[[image:BlueDot10x10.png|link=]]</td> | ||
| + | <td>The Terrain can be painted with textures to represent real ground surfaces</td> | ||
| + | </tr> | ||
| + | <tr valign="top"> | ||
| + | <td>[[image:BlueDot10x10.png|link=]]</td> | ||
| + | <td>Effect Layers (grasses, rocks, water, etc) can be added to the terrain to enhance its appearence. The types of effect layers that are available will depend on your '''Trainz''' version, '''GPU''' and '''Operating System'''</td> | ||
| + | </tr> | ||
| + | </table> | ||
| + | <br> | ||
| + | <table width=1000 bgcolor=#000000 cellpadding=2> | ||
| + | <tr valign="top"> | ||
| + | <td> | ||
| + | <table width=996 bgcolor=#ffffff cellpadding=2> | ||
| + | <tr valign="top"> | ||
| + | <td colspan=2> | ||
| + | <table> | ||
| + | <tr valign="top"> | ||
| + | <td width=35>[[image:Information.png|35px|link=]]</td> | ||
| + | <td> | ||
| + | <table> | ||
| + | <tr valign="top"> | ||
| + | <td width=10>[[image:DotPoint.JPG|10px|link=]]</td> | ||
| + | <td>The '''Ground Height''' and '''Ground Texture''' are kept in special layers that cannot be renamed, moved, deleted or merged with other layers</td> | ||
| + | </tr> | ||
| + | <tr valign="top"> | ||
| + | <td>[[image:DotPoint.JPG|10px|link=]]</td> | ||
| + | <td>The '''Effect Layers''' (TurfFX, Clutter, Water and Color) are found:- | ||
| + | <table> | ||
| + | <tr valign="top"> | ||
| + | <td width=10>[[image:RedDot10x10.png|link=]]</td> | ||
| + | <td>in the '''Advanced Topology Tools''' (press the <span style="font-weight: 700; font-size: 15px; color: white; background-color: black;"> F1 </span> key and open the <span style="font-weight: 700; font-size: 15px; color: white; background-color: black;"> Advanced </span> tab) in '''Surveyor Classic'''</td> | ||
| + | </tr> | ||
| + | <tr valign="top"> | ||
| + | <td>[[image:RedDot10x10.png|link=]]</td> | ||
| + | <td>as layers in the <span style="font-weight: 700; font-size: 15px; color: white; background-color: #797979;"> Layers Palette </span> in '''Surveyor 2.0'''</td> | ||
| + | </tr> | ||
| + | </table> | ||
| + | They can be deleted and renamed but cannot be moved or merged with other layers</td> | ||
| + | </tr> | ||
| + | </table> | ||
| + | </td> | ||
| + | </tr> | ||
| + | </table> | ||
| + | </td> | ||
| + | </tr> | ||
| + | </table> | ||
| + | </td> | ||
| + | </tr> | ||
| + | </table> | ||
| + | <br> | ||
| + | ===<span style="color: white; background-color: green;"> In Surveyor Classic (S10) </span>=== | ||
| + | |||
| + | <table width=1000> | ||
| + | <tr valign="top"> | ||
| + | <td>In '''Surveyor Classic (S10)''' the tools and objects are in tabbed icons on the right of the screen which can be opened by a <span style="font-weight: 700; font-size: 15px; background-color: lightcyan;"> Left Click </span> on the icon or by pressing its '''Function Key'''</td> | ||
| + | </tr> | ||
| + | </table> | ||
| + | |||
| + | <table width=1000 bgcolor=#000000 cellpadding=2> | ||
| + | <tr valign="top"> | ||
| + | <td> | ||
| + | <table width=996 bgcolor=#ffffff cellpadding=2> | ||
| + | <tr valign="top"> | ||
| + | <td width=22>[[image:ClassicTerrainF1Tool.png|link=]]</td> | ||
| + | <td width=30><span style="font-weight: 700; font-size: 15px; color: white; background-color: black;"> F1 </span></td> | ||
| + | <td>The '''Terrain Height''', '''Legacy Water''' and '''Effect Layers''' are added and manipulated by tools in the '''Topology''' icon (the <span style="font-weight: 700; font-size: 15px; color: white; background-color: black;"> F1 </span> key). For the '''Effect Layers''' you will also need to open the <span style="font-weight: 700; font-size: 15px; color: white; background-color: black;"> Advanced </span> tab</td> | ||
| + | </tr> | ||
| + | <tr valign="middle"> | ||
| + | <td>[[image:ClassicTextureF2Tool.png|link=]]</td> | ||
| + | <td><span style="font-weight: 700; font-size: 15px; color: white; background-color: black;"> F2 </span></td> | ||
| + | <td>The '''Ground Texture''' is added and manipulated by tools in the '''Paint''' icon (the <span style="font-weight: 700; font-size: 15px; color: white; background-color: black;"> F2 </span> key)</td> | ||
| + | </tr> | ||
| + | <tr valign="top"> | ||
| + | <td colspan=3>Opening each tool will reveal a selection list of assets and/or a set of tools for applying and manipulating the selected feature</td> | ||
| + | </tr> | ||
| + | </table> | ||
| + | </td> | ||
| + | </tr> | ||
| + | </table> | ||
| + | <br> | ||
| + | ===<span style="color: white; background-color: blue;"> In Surveyor 2.0 (S20) </span>=== | ||
| + | |||
| + | <table width=1000> | ||
| + | <tr valign="top"> | ||
| + | <td>In '''Surveyor 2.0 (S20)''' there is a single set of common tools that can add and manipulate objects of any type. Select a tool by a <span style="font-weight: 700; font-size: 15px; background-color: lightcyan;"> Left Click </span> on its icon in the <span style="font-weight: 700; font-size: 15px; color: white; background-color: #797979;"> Tools Palette </span> or by pressing its key. You can also select multiple objects, that can be of different types, and manipulate them (move, rotate, delete) as if they were a single object.</td> | ||
| + | </tr> | ||
| + | </table> | ||
| + | |||
| + | <table width=1000 bgcolor=#000000 cellpadding=2> | ||
| + | <tr valign="top"> | ||
| + | <td> | ||
| + | <table width=996 bgcolor=#ffffff cellpadding=2> | ||
| + | <tr valign="top"> | ||
| + | <td width=40>[[image:S20_BrushToolIcon.png|link=]]</td> | ||
| + | <td width=20><span style="font-weight: 700; font-size: 15px; color: white; background-color: black;"> W </span></td> | ||
| + | <td>The '''Brush Tool''' in the <span style="font-weight: 700; font-size: 15px; color: white; background-color: #797979;"> Tools Palette </span> sets the '''Terrain Height''', paints the '''Ground Textures''' and adds/edits '''Effect Layers''' (including '''Water'''). The textures and effect layers are selected using the <span style="font-weight: 700; font-size: 15px; color: white; background-color: #797979;"> Filter Palette </span> and the <span style="font-weight: 700; font-size: 15px; color: white; background-color: #797979;"> Assets Palette </span></td> | ||
| + | </tr> | ||
| + | <tr valign="top"> | ||
| + | <td colspan=3>There is a '''Wiki Page''' that covers in great detail the use of the '''Surveyor 2.0''' tools at [[image:WikiLink.PNG|link=]] '''[[How to Use S20 Tools|How to Use S20 Tools]]''' with specific sections dealing with '''[[How_to_Use_S20_Tools#Ground_Height|Ground Height]]''', '''[[How_to_Use_S20_Tools#Ground_Texture|Ground Terrain]]''' and '''[[How_to_Use_S20_Tools#Effect_Layers|Effect Layers]]'''</td> | ||
| + | </tr> | ||
| + | </table> | ||
| + | </td> | ||
| + | </tr> | ||
| + | </table> | ||
| + | <br> | ||
| + | <table width=1000 bgcolor=#000000 cellpadding=2> | ||
| + | <tr valign="top"> | ||
| + | <td> | ||
| + | <table width=996 bgcolor=#ffffb0 cellpadding=2> | ||
| + | <tr valign="top"> | ||
| + | <td width=25>[[image:NotePad.PNG|link=]]</td> | ||
| + | <td><span style="font-weight: 700; font-size: 15px;">Effect Layers</span></td> | ||
| + | </tr> | ||
| + | <tr valign="top"> | ||
| + | <td colspan=2> | ||
| + | <table> | ||
| + | <tr valign="top"> | ||
| + | <td colspan=2>The '''Effect Layers''' are '''TurfFX''' (grasses, bushes, crops, etc), '''Clutter''' (small ground cover such as grasses and stones), '''Water''' and '''Color'''</td> | ||
| + | </tr> | ||
| + | <tr valign="top"> | ||
| + | <td width=10>[[image:DotPoint.JPG|10px|link=]]</td> | ||
| + | <td>The '''TurfFX Effect Layer''' is only available if you have an '''NVidia Graphics Card''' (e.g. a '''GTX''' or '''RTX''') and '''Windows OS''' (Win 10 or 11)</td> | ||
| + | </tr> | ||
| + | <tr valign="top"> | ||
| + | <td>[[image:DotPoint.JPG|10px|link=]]</td> | ||
| + | <td>The '''Color Effect Layer''' is only available in '''Trainz Plus''' when using the '''High Definition (HD)''' mode</td> | ||
| + | </tr> | ||
| + | </table> | ||
| + | </td> | ||
| + | </tr> | ||
| + | </table> | ||
| + | </td> | ||
| + | </tr> | ||
| + | </table> | ||
| + | <br> | ||
| + | <table width=1000> <!-- BEGIN Nav Buttons Table --> | ||
| + | <tr valign="top"> | ||
| + | <td width=629><span id="skipAddRouteAssets"></span> | ||
| + | =='''Adding Assets to a Route'''== | ||
| + | </td> | ||
| + | <td width=50>[[image:SkipDown.png|link=#skipEditEnvironmentRoute|Skip Down]]</td> | ||
| + | <td width=50>[[image:SkipUp.png|link=#skipSetRouteTerrain|Skip Up]]</td> | ||
| + | <td width=46> </td> | ||
| + | <td width=75> </td> | ||
| + | <td width=75> </td> | ||
| + | <td width=75> </td> | ||
| + | </tr> | ||
| + | </table> <!-- END Nav Buttons Table --> | ||
| + | |||
| + | <table width=1000 bgcolor="lightcyan" cellpadding=2> | ||
| + | <tr valign="top"> | ||
| + | <td width=10>[[image:BlueDot10x10.png|link=]]</td> | ||
| + | <td>'''Assets''' include all visible objects (trees, buildings, roads, tracks, signals, rolling stock, etc) and invisible objects (track triggers, track marks, etc) that can be added to your route</td> | ||
| + | </tr> | ||
| + | <tr valign="top"> | ||
| + | <td>[[image:BlueDot10x10.png|link=]]</td> | ||
| + | <td>Objects added to your route will be present in all sessions created using that route</td> | ||
| + | </tr> | ||
| + | </table> | ||
| + | <br> | ||
| + | ===<span style="color: white; background-color: green;"> In Surveyor Classic (S10) </span>=== | ||
| + | |||
| + | <table width=1000> | ||
| + | <tr valign="top"> | ||
| + | <td>In '''Surveyor Classic (S10)''' the tools and objects are in tabbed icons on the right of the screen which can be opened by a <span style="font-weight: 700; font-size: 15px; background-color: lightcyan;"> Left Click </span> on the icon or by pressing its '''Function Key'''.</td> | ||
| + | </tr> | ||
| + | </table> | ||
| + | |||
| + | <table width=1000 bgcolor=#000000 cellpadding=2> | ||
| + | <tr valign="top"> | ||
| + | <td> | ||
| + | <table width=996 bgcolor=#ffffff cellpadding=2> | ||
| + | <tr valign="middle"> | ||
| + | <td width=22>[[image:ClassicObjectsF3Tool.png|link=]]</td> | ||
| + | <td width=30><span style="font-weight: 700; font-size: 15px; color: white; background-color: black;"> F3 </span></td> | ||
| + | <td>Scenery objects (e.g. buildings) and splines (e.g. roads) are added and manipulated by tools in the '''Objects''' icon (the <span style="font-weight: 700; font-size: 15px; color: white; background-color: black;"> F3 </span> key)</td> | ||
| + | </tr> | ||
| + | <tr valign="middle"> | ||
| + | <td>[[image:ClassicTracksF4Tool.png|link=]]</td> | ||
| + | <td><span style="font-weight: 700; font-size: 15px; color: white; background-color: black;"> F4 </span></td> | ||
| + | <td>Railroad tracks and track objects (e.g. signals, switches, etc) are added and manipulated by tools in the '''Tracks''' icon (the <span style="font-weight: 700; font-size: 15px; color: white; background-color: black;"> F4 </span> key)</td> | ||
| + | </tr> | ||
| + | <tr valign="middle"> | ||
| + | <td>[[image:ClassicRollingStockF7Tool.png|link=]]</td> | ||
| + | <td><span style="font-weight: 700; font-size: 15px; color: white; background-color: black;"> F7 </span></td> | ||
| + | <td>Rolling stock (locomotives, wagons) are added and manipulated by tools in the '''Trains''' icon (the <span style="font-weight: 700; font-size: 15px; color: white; background-color: black;"> F7 </span> key)</td> | ||
| + | </tr> | ||
| + | <tr valign="top"> | ||
| + | <td colspan=3>Opening each tool will reveal a selection list of assets and a set of tools for applying and manipulating the selected asset</td> | ||
| + | </tr> | ||
| + | </table> | ||
| + | </td> | ||
| + | </tr> | ||
| + | </table> | ||
| + | <br> | ||
| + | ===<span style="color: white; background-color: blue;"> In Surveyor 2.0 (S20) </span>=== | ||
| + | |||
| + | <table width=1000> | ||
| + | <tr valign="top"> | ||
| + | <td>In '''Surveyor 2.0 (S20)''' there is a single set of common tools that can add and manipulate objects of any type. Select a tool by a <span style="font-weight: 700; font-size: 15px; background-color: lightcyan;"> Left Click </span> on its icon in the <span style="font-weight: 700; font-size: 15px; color: white; background-color: #797979;"> Tools Palette </span> or by pressing its key. You can also select multiple objects, that can be of different types, and manipulate them (move, rotate, delete) as if they were a single object.</td> | ||
| + | </tr> | ||
| + | </table> | ||
| + | |||
| + | <table width=1000 bgcolor=#000000 cellpadding=2> | ||
| + | <tr valign="top"> | ||
| + | <td> | ||
| + | <table width=996 bgcolor=#ffffff cellpadding=2> | ||
| + | <tr valign="top"> | ||
| + | <td width=40>[[image:S20_PlacementToolIcon.png|link=]]</td> | ||
| + | <td width=20><span style="font-weight: 700; font-size: 15px; color: white; background-color: black;"> E </span></td> | ||
| + | <td>The '''Placement Tool''' adds '''ALL''' objects (scenery, splines, track and track objects, rolling stock) selected using the <span style="font-weight: 700; font-size: 15px; color: white; background-color: #797979;"> Filter Palette </span> and the <span style="font-weight: 700; font-size: 15px; color: white; background-color: #797979;"> Assets Palette </span></td> | ||
| + | </tr> | ||
| + | <tr valign="top"> | ||
| + | <td>[[image:S20_FreeMoveToolIcon.png|link=]]</td> | ||
| + | <td><span style="font-weight: 700; font-size: 15px; color: white; background-color: black;"> S </span></td> | ||
| + | <td>The '''Free Move Tool''' moves '''ALL''' objects, either individually or as a group, to anywhere on the surface</td> | ||
| + | </tr> | ||
| + | <tr valign="top"> | ||
| + | <td>[[image:S20_FineAdjustmentToolIcon.png|link=]]</td> | ||
| + | <td><span style="font-weight: 700; font-size: 15px; color: white; background-color: black;"> D </span></td> | ||
| + | <td>The '''Fine Adjustment Tool''' moves and rotates '''ALL''' objects, either individually or as a group, in small movements to anywhere on, below or above the surface</td> | ||
| + | </tr> | ||
| + | <tr valign="top"> | ||
| + | <td colspan=3>There is a '''Wiki Page''' that covers in great detail the use of the '''Surveyor 2.0''' tools at [[image:WikiLink.PNG|link=]] '''[[How to Use S20 Tools|How to Use S20 Tools]]'''</td> | ||
| + | </tr> | ||
| + | </table> | ||
| + | </td> | ||
| + | </tr> | ||
| + | </table> | ||
| + | <br> | ||
| + | <table width=1000> <!-- BEGIN Nav Buttons Table --> | ||
| + | <tr valign="top"> | ||
| + | <td width=629><span id="skipEditEnvironmentRoute"></span> | ||
| + | =='''Editing the Environment of a Route'''== | ||
| + | </td> | ||
| + | <td width=50>[[image:SkipDown.png|link=#skipEffectLayers|Skip Down]]</td> | ||
| + | <td width=50>[[image:SkipUp.png|link=#skipAddRouteAssets|Skip Up]]</td> | ||
| + | <td width=46> </td> | ||
| + | <td width=75> </td> | ||
| + | <td width=75> </td> | ||
| + | <td width=75> </td> | ||
| + | </tr> | ||
| + | </table> <!-- END Nav Buttons Table --> | ||
| + | |||
| + | <table width=1000> | ||
| + | <tr valign="top"> | ||
| + | <td width=350> | ||
| + | You can edit the '''Environment Controls''' of a Route by selecting the <span style="font-weight: 700; font-size: 15px; color: white; background-color: black;"> Edit Environment... </span> option from the [[image:EditMenu_S20.png|link=]] '''Edit Menu'''.<br> | ||
| + | This will bring up the '''Edit Environment''' dialogue window, more commonly called the '''Environment Tools'''.<br> | ||
| + | For more details on editing the '''Environment''' see the '''Trainz Wiki Page''' at '''[[image:WikiLink.PNG|link=]] [[How_to_Use_Environment_Tools|The Environment Tools]]'''</td> | ||
| + | <td width=170>[[image:EnvironmentEditLaunch.png|link=|alt=Environment edit]]</td> | ||
| + | <td> | ||
| + | <table bgcolor=#000000 width=480> | ||
| + | <tr valign="top"> | ||
| + | <td> | ||
| + | <table cellpadding=2 bgcolor=#ffffb0 width=476> | ||
| + | <tr valign="top"> | ||
| + | <td>[[image:NotePad.PNG|link=]]</td> | ||
| + | <td><span style="font-size: 17px; font-weight: 700;">Environment Controls in a Route:-</span><br> | ||
| + | ---- | ||
| + | <table> | ||
| + | <tr valign="top"> | ||
| + | <td width=10>[[image:DotPoint.JPG|10px|link=]]</td> | ||
| + | <td>lighting conditions</td> | ||
| + | </tr> | ||
| + | <tr valign="top"> | ||
| + | <td>[[image:DotPoint.JPG|10px|link=]]</td> | ||
| + | <td>weather and cloud cover</td> | ||
| + | </tr> | ||
| + | <tr valign="top"> | ||
| + | <td>[[image:DotPoint.JPG|10px|link=]]</td> | ||
| + | <td>water color and water surface (rough, calm, etc) for '''Legacy Water''' only</td> | ||
| + | </tr> | ||
| + | <tr valign="top"> | ||
| + | <td>[[image:DotPoint.JPG|10px|link=]]</td> | ||
| + | <td>wind speed (for '''SpeedTree''' assets only)</td> | ||
| + | </tr> | ||
| + | <tr valign="top"> | ||
| + | <td>[[image:DotPoint.JPG|10px|link=]]</td> | ||
| + | <td>fog and snow</td> | ||
| + | </tr> | ||
| + | <tr valign="top"> | ||
| + | <td>[[image:DotPoint.JPG|10px|link=]]</td> | ||
| + | <td>season (by the date and latitude)</td> | ||
| + | </tr> | ||
| + | <tr valign="top"> | ||
| + | <td>[[image:DotPoint.JPG|10px|link=]]</td> | ||
| + | <td>road traffic ('''on''' or '''off''' only)</td> | ||
| + | </tr> | ||
| + | <tr valign="top"> | ||
| + | <td>[[image:DotPoint.JPG|10px|link=]]</td> | ||
| + | <td>world origin (latitude, longitude, altitude)</td> | ||
| + | </tr> | ||
| + | </table> | ||
| + | </td> | ||
| + | </tr> | ||
| + | </table> | ||
| + | </td> | ||
| + | </tr> | ||
| + | </table> | ||
| + | </td> | ||
| + | </tr> | ||
| + | </table> | ||
| + | |||
| + | <table width=1000> | ||
| + | <tr valign="top"> | ||
| + | <td> | ||
| + | <table width=500 bgcolor=#000000 cellpadding=2> | ||
| + | <tr valign="top"> | ||
| + | <td> | ||
| + | <table bgcolor=#ffffb0 cellpadding=2> | ||
| + | <tr valign="top"> | ||
| + | <td>[[image:NotePad.PNG|link=]]</td> | ||
| + | <td><span style="font-size: 17px; font-weight: 700;">Notes:'''</span><br> | ||
| + | ---- | ||
| + | It is possible (and sometimes even expected) that a Route and its Sessions will have different environmental settings - for example the Route may have been created for the summer season but one Session may be set in winter and will require an overcast sky, snow, fog and generally lower light levels. See the '''Trainz Wiki Page''' at '''[[image:WikiLink.PNG|link=]] [[How_to_Use_Environment_Tools|The Environment Tools]]''' for more details. | ||
| + | </td> | ||
| + | </tr> | ||
| + | </table> | ||
| + | </td> | ||
| + | </tr> | ||
| + | </table> | ||
| + | </td> | ||
| + | <td> | ||
| + | <table width=500 bgcolor=#000000 cellpadding=2> | ||
| + | <tr valign="top"> | ||
| + | <td> | ||
| + | <table bgcolor=#ffffff cellpadding=2> | ||
| + | <tr valign="top"> | ||
| + | <td width=35>[[image:Information.png|35px|link=]]</td> | ||
| + | <td>When a route is created all the '''Environmental Settings''' will be set to their default values and they will remain at those values when the route is saved unless they are changed.</td> | ||
| + | </tr> | ||
| + | <tr valign="top"> | ||
| + | <td> </td> | ||
| + | <td>Most '''Environmental Settings''' are found in both the '''Route''' and the '''Session'''. An edited setting in the '''Session''' (e.g. '''Weather''') will always take priority over the same setting, edited or default, in the '''Route'''. See [[image:PageLink.PNG|link=]] '''[[#skipEditEnvironmentSession|Edit the Environment of a Session]]''' for the details.</td> | ||
| + | </tr> | ||
| + | </table> | ||
| + | </td> | ||
| + | </tr> | ||
| + | </table> | ||
| + | </td> | ||
| + | </tr> | ||
| + | </table> | ||
| + | <br> | ||
| + | <table width=1000> <!-- BEGIN Nav Buttons Table --> | ||
| + | <tr valign="top"> | ||
| + | <td width=629><span id="skipEffectLayers"></span> | ||
| + | =='''Edit Effect Layers'''== | ||
| + | </td> | ||
| + | <td width=50>[[image:SkipDown.png|link=#stepWhatSession|Skip Down]]</td> | ||
| + | <td width=50>[[image:SkipUp.png|link=#skipEditEnvironmentRoute|Skip Up]]</td> | ||
| + | <td width=46> </td> | ||
| + | <td width=75> </td> | ||
| + | <td width=75> </td> | ||
| + | <td width=75> </td> | ||
| + | </tr> | ||
| + | </table> <!-- END Nav Buttons Table --> | ||
| + | |||
| + | <table width=1000 bgcolor="lightcyan" cellpadding=2> | ||
| + | <tr valign="top"> | ||
| + | <td width=10>[[image:BlueDot10x10.png|link=]]</td> | ||
| + | <td>The '''Edit Effect Layers''' menu option allows you to add, remove and edit the special effect layers</td> | ||
| + | </tr> | ||
| + | </table> | ||
| + | <br> | ||
| + | <table width=1000> | ||
| + | <tr valign="top"> | ||
| + | <td> | ||
| + | <table width=400 bgcolor=#000000 cellpadding=2> | ||
| + | <tr valign="top"> | ||
| + | <td> | ||
| + | <table bgcolor=#ffffff cellpadding=2> | ||
| + | <tr valign="top"> | ||
| + | <td colspan=2>'''Effect Layers''' contain:-</td> | ||
| + | </tr> | ||
| + | <tr valign="top"> | ||
| + | <td>[[image:DotPoint.JPG|10px|link=]]</td> | ||
| + | <td>'''TurfFX''' - 3D animated grasses including crops (e.g. wheat)</td> | ||
| + | </tr> | ||
| + | <tr valign="top"> | ||
| + | <td>[[image:DotPoint.JPG|10px|link=]]</td> | ||
| + | <td>'''Clutter''' - rocks, stones, small clumps of plants (grasses, flowers, etc)</td> | ||
| + | </tr> | ||
| + | <tr valign="top"> | ||
| + | <td>[[image:DotPoint.JPG|10px|link=]]</td> | ||
| + | <td>'''Water''' - a layer of water that covers the entire route but its height can be set to different values to be hidden or revealed throughout the route. It is possible to set a slope on the water (perfect for a water skiing scene 😀)</td> | ||
| + | </tr> | ||
| + | <tr valign="top"> | ||
| + | <td>[[image:DotPoint.JPG|10px|link=]]</td> | ||
| + | <td>'''Color''' - a transparent "skin" that covers the ground texture throughout the entire route. Different parts of this layer can be given different colors or "tints" to alter the appearance of the texture below. This is only available for <span style="font-weight: 700; background-color: yellow;"> Trainz Plus subscribers when using HD terrain </span></td> | ||
| + | </tr> | ||
| + | <tr valign="top"> | ||
| + | <td colspan=2>You can have multiple effect layers of each type (except the color layer) in a route.</td> | ||
| + | </tr> | ||
| + | </table> | ||
| + | </td> | ||
| + | </tr> | ||
| + | </table> | ||
| + | </td> | ||
| + | <td> | ||
| + | <table width=600 bgcolor=#000000 cellpadding=2> | ||
| + | <tr valign="top"> | ||
| + | <td> | ||
| + | <table bgcolor=#ffffb0 cellpadding=2> | ||
| + | <tr valign="top"> | ||
| + | <td width=25>[[image:NotePad.PNG|link=]]</td> | ||
| + | <td><span style="font-size: 17px; font-weight: 700;">Notes:'''</span><br> | ||
| + | ---- | ||
| + | </td> | ||
| + | </tr> | ||
| + | <tr valign="top"> | ||
| + | <td>[[image:DotPoint.JPG|10px|link=]]</td> | ||
| + | <td>Currently, there are differences in the '''Effect Layers''' between '''Windows''' and '''MacOS''' versions of '''Trainz'''. Some of these differences are hardware ('''GPU''') dependant. This means that some of the effect layers or features will not work on the '''MacOS''' platform.</td> | ||
| + | </tr> | ||
| + | <tr valign="top"> | ||
| + | <td>[[image:DotPoint.JPG|10px|link=]]</td> | ||
| + | <td>'''TurfFX''' is hardware dependent and requires an '''Nvidia''' graphics card. '''TurfFX''' is an '''Nvidia''' software product and is not from '''N3V'''.</td> | ||
| + | </tr> | ||
| + | <tr valign="top"> | ||
| + | <td>[[image:DotPoint.JPG|10px|link=]]</td> | ||
| + | <td>The latest versions of '''Trainz''' are starting to eliminate these differences and, for performance improvements, are moving the implementation of some effect layers from the '''CPU''' to the '''GPU'''.</td> | ||
| + | </tr> | ||
| + | </table> | ||
| + | </td> | ||
| + | </tr> | ||
| + | </table> | ||
| + | </td> | ||
| + | </tr> | ||
| + | </table> | ||
| + | <br> | ||
=='''Merging Routes'''== | =='''Merging Routes'''== | ||
| − | <table | + | <table width=1000 bgcolor="lightcyan" cellpadding=2> |
<tr valign="top"> | <tr valign="top"> | ||
| − | <td>[[image: | + | <td width=10>[[image:BlueDot10x10.png|link=]]</td> |
<td>'''Two (or more) separate routes can be joined together (merged) to create a new route'''</td> | <td>'''Two (or more) separate routes can be joined together (merged) to create a new route'''</td> | ||
</tr> | </tr> | ||
</table> | </table> | ||
| − | + | <br> | |
There are some important restrictions on the merging of two routes:- | There are some important restrictions on the merging of two routes:- | ||
| − | + | <table width=1000> | |
| − | + | <tr valign="top"> | |
| − | + | <td width=10>[[image:DotPoint.JPG|10px|link=]]</td> | |
| − | + | <td>'''Payware (DLC)''' routes cannot be merged with '''Freeware (DLS)''' or other '''Payware''' routes</td> | |
| + | </tr> | ||
| + | <tr valign="top"> | ||
| + | <td>[[image:DotPoint.JPG|10px|link=]]</td> | ||
| + | <td>The '''Session Data''' and '''Session Layers''' in the first route can be saved in the merger (if required) but those in the other route cannot</td> | ||
| + | </tr> | ||
| + | <tr valign="top"> | ||
| + | <td>[[image:DotPoint.JPG|10px|link=]]</td> | ||
| + | <td>There may be a significant height difference between the two routes and this may not be easy to overcome</td> | ||
| + | </tr> | ||
| + | <tr valign="top"> | ||
| + | <td>[[image:DotPoint.JPG|10px|link=]]</td> | ||
| + | <td>The orientation of the two routes (East-West or North-South) cannot be changed (it is '''possible''' but will usually require a lot of time, effort and patience)</td> | ||
| + | </tr> | ||
| + | </table> | ||
<br> | <br> | ||
| − | <table | + | <table width=1000 bgcolor="Aquamarine"> |
<tr valign="top"> | <tr valign="top"> | ||
| − | <td>[[image:LinkWiki.PNG|link=]]</td> | + | <td width=50>[[image:LinkWiki.PNG|link=]]</td> |
<td> | <td> | ||
| − | A detailed description of the process of '''Merging Routes''' can be found on the '''Trainz Wiki Page [[How_to_Merge_Routes|How to Merge Routes]]'''<br> | + | A detailed description of the process of '''Merging Routes''' can be found on the '''Trainz Wiki Page''':- |
| + | <table> | ||
| + | <tr valign="top"> | ||
| + | <td width=10>[[image:BlackDot10x10.png|link=]]</td> | ||
| + | <td>'''[[How_to_Merge_Routes|How to Merge Routes]]'''<br> | ||
| + | </td> | ||
| + | </tr> | ||
| + | </table> | ||
</td> | </td> | ||
</tr> | </tr> | ||
</table> | </table> | ||
<br> | <br> | ||
| − | <table> <!-- BEGIN Nav Buttons Table --> | + | <table width=1000> <!-- BEGIN Nav Buttons Table --> |
<tr valign="top"> | <tr valign="top"> | ||
| − | <td width= | + | <td width=629><span id="stepWhatSession"></span> |
| + | ='''What is a Session?'''= | ||
| + | </td> | ||
| + | <td width=50> </td> | ||
| + | <td width=50>[[image:SkipUp.png|link=#skipEffectLayers|Skip Up]]</td> | ||
<td width=46>[[image:BackToTop.png|link=#top|alt=Top|Top]]</td> | <td width=46>[[image:BackToTop.png|link=#top|alt=Top|Top]]</td> | ||
<td width=75>[[image:NextUp.png|link=#stepLoadRoute|alt=Next Up|Next Up]]</td> | <td width=75>[[image:NextUp.png|link=#stepLoadRoute|alt=Next Up|Next Up]]</td> | ||
| Line 540: | Line 2,039: | ||
</table> <!-- END Nav Buttons Table --> | </table> <!-- END Nav Buttons Table --> | ||
| − | + | <table width=1000 bgcolor="lightcyan" cellpadding=2> | |
| − | + | ||
| − | <table | + | |
<tr valign="top"> | <tr valign="top"> | ||
| − | <td>[[image: | + | <td width=10>[[image:BlueDot10x10.png|link=]]</td> |
<td>'''A Session is always a part of an existing Route - you cannot have a Session that does not belong to a Route'''</td> | <td>'''A Session is always a part of an existing Route - you cannot have a Session that does not belong to a Route'''</td> | ||
</tr> | </tr> | ||
<tr valign="top"> | <tr valign="top"> | ||
| − | <td>[[image: | + | <td>[[image:BlueDot10x10.png|link=]]</td> |
<td>'''If you create a Route without a Session then ALL the active industries and rolling stock, time, environmental conditions, etc, will revert to their original (default) values. There will be no AI drivers and drivers will have a very limited set of available commands for manual driving'''</td> | <td>'''If you create a Route without a Session then ALL the active industries and rolling stock, time, environmental conditions, etc, will revert to their original (default) values. There will be no AI drivers and drivers will have a very limited set of available commands for manual driving'''</td> | ||
</tr> | </tr> | ||
</table> | </table> | ||
| − | In general, while a route provides the physical structures (or "hardware"), a session provides the services (or "software"). While you can easily have a route without a session, it could be a very limited (or even a boring) experience.<br> | + | <br> |
| + | <table width=1000> | ||
| + | <tr valign="top"> | ||
| + | <td colspan=2>In general, while a route provides the physical structures (or "hardware"), a session provides the services (or "software"). While you can easily have a route without a session, it could be a very limited (or even a boring) experience.<br><br> | ||
| − | A single route can have multiple sessions, or none, but a session must always belong to a route. To put it into '''Trainz''' terminology, a session has a route as a '''''dependency'''''.<br> | + | A single route can have multiple sessions, or none, but a session must always belong to a route. To put it into '''Trainz''' terminology, a session has a route as a '''''dependency'''''.<br><br> |
A session consists of two parts:- | A session consists of two parts:- | ||
| − | + | </td> | |
| − | + | </tr> | |
| − | < | + | </table> |
| − | <table | + | |
| + | <table width=700> | ||
<tr valign="top"> | <tr valign="top"> | ||
| − | <td>[[image: | + | <td> |
| − | <td>'''When you save a Session, all | + | <table width=300> |
| + | <tr valign="top"> | ||
| + | <td width=25>[[image:Ablue.png|link=]]</td> | ||
| + | <td>'''Session Data''' and</td> | ||
| + | </tr> | ||
| + | <tr valign="top"> | ||
| + | <td>[[image:Bblue.png|link=]]</td> | ||
| + | <td>'''Session Layers'''</td> | ||
| + | </tr> | ||
| + | </table> | ||
| + | </td> | ||
| + | <td> | ||
| + | <table width=400 bgcolor=#000000 cellpadding=2> | ||
| + | <tr valign="top"> | ||
| + | <td> | ||
| + | <table bgcolor=#ffffff cellpadding=2> | ||
| + | <tr valign="top"> | ||
| + | <td width=35>[[image:Information.png|35px|link=]]</td> | ||
| + | <td>'''When you save a Session, all items in the Session Data and Session Layers will be saved'''</td> | ||
| + | </tr> | ||
| + | </table> | ||
| + | </td> | ||
| + | </tr> | ||
| + | </table> | ||
| + | </td> | ||
</tr> | </tr> | ||
</table> | </table> | ||
<br> | <br> | ||
| − | <span style="font-weight: 700; font-size: 17px; color: white; background-color: black;">& | + | [[image:Ablue.png|link=]] <span style="font-weight: 700; font-size: 17px; color: white; background-color: black;"> Session Data: </span> |
| − | '''Session Data''' are often the "invisibles" that control the operation of a session. Session rules, driver orders and loco assignments, commodities (loaded, unloaded and carried) and most of the '''Environmental Settings''' are examples of '''Session Data'''. | + | <table width=1000> |
| + | <tr valign="top"> | ||
| + | <td>'''Session Data''' are often the "invisibles" that control the operation of a session. Session rules, driver orders and loco assignments, commodities (loaded, unloaded and carried) and most of the '''Environmental Settings''' are examples of '''Session Data'''.</td> | ||
| + | </tr> | ||
| + | </table> | ||
[[image:Woolshed_Session_Data.png|link=|alt=Session Data]] | [[image:Woolshed_Session_Data.png|link=|alt=Session Data]] | ||
| − | + | <table width=1000 bgcolor=#000000 cellpadding=2> | |
| − | + | ||
| − | + | ||
| − | + | ||
| − | + | ||
| − | + | ||
| − | + | ||
| − | + | ||
| − | + | ||
| − | + | ||
| − | + | ||
| − | + | ||
| − | <table | + | |
<tr valign="top"> | <tr valign="top"> | ||
| − | <td> | + | <td> |
| − | <td>'''Session | + | <table bgcolor=#ffffff cellpadding=2> |
| + | <tr valign="top"> | ||
| + | <td colspan=2>'''Session Data''' contains:-</td> | ||
</tr> | </tr> | ||
<tr valign="top"> | <tr valign="top"> | ||
| − | <td>[[image:DotPoint.JPG|link=]]</td> | + | <td width=10>[[image:DotPoint.JPG|10px|link=]]</td> |
| − | <td>'''Session Layers can be left empty | + | <td>'''Drivers''' (names, AI commands and assigned locos)</td> |
| + | </tr> | ||
| + | <tr valign="top"> | ||
| + | <td>[[image:DotPoint.JPG|10px|link=]]</td> | ||
| + | <td>'''Driver Commands''' - those available for AI and manual driving</td> | ||
| + | </tr> | ||
| + | <tr valign="top"> | ||
| + | <td>[[image:DotPoint.JPG|10px|link=]]</td> | ||
| + | <td>'''Session Rules'''</td> | ||
| + | </tr> | ||
| + | <tr valign="top"> | ||
| + | <td>[[image:DotPoint.JPG|10px|link=]]</td> | ||
| + | <td>'''Industry Settings''' (commodities consumed and produced)</td> | ||
| + | </tr> | ||
| + | <tr valign="top"> | ||
| + | <td>[[image:DotPoint.JPG|10px|link=]]</td> | ||
| + | <td>'''Consist Settings''' (commodities carried)</td> | ||
| + | </tr> | ||
| + | <tr valign="top"> | ||
| + | <td>[[image:DotPoint.JPG|10px|link=]]</td> | ||
| + | <td>'''Consist Locations''' - this is stored in the session even if the consists are placed in the route</td> | ||
| + | </tr> | ||
| + | <tr valign="top"> | ||
| + | <td>[[image:DotPoint.JPG|10px|link=]]</td> | ||
| + | <td>'''Switch Settings''' (left/right) - but the '''default''' switch direction is stored in the route. See '''[[image:PageLink.PNG|link=]] [[#SwitchDirections|Setting Switch Directions in Routes and Sessions]]''' for more information on this</td> | ||
| + | </tr> | ||
| + | <tr valign="top"> | ||
| + | <td>[[image:DotPoint.JPG|10px|link=]]</td> | ||
| + | <td>'''Environmental Settings''' - '''Water Surface''' (rough/calm/etc), '''Snow Altitude''', '''Lighting''' (sun, ambient and water colours), '''Sky''' (clouds), '''Road Traffic''' (on/off), '''Date''' (day, month), '''Wind''' strength, '''Fog''' level, '''Weather''' (rain/fine/snow), '''Brightness''' level. You must edit and save the session for these settings to become part of the '''Session Data''' - see '''[[image:WikiLink.PNG|link=]] [[How_to_Use_Environment_Tools|How to Use Environment Tools]]''' for more details. If both a route and a session have saved '''Environmental Settings''', which do not have to be the same, then those in the session will be used. If the session does not have any saved '''Environmental Settings''' then those in the route will be used | ||
| + | </td> | ||
| + | </tr> | ||
| + | </table> | ||
| + | </td> | ||
| + | </tr> | ||
| + | </table> | ||
| + | <br> | ||
| + | [[image:Bblue.png|link=]] <span style="font-weight: 700; font-size: 17px; color: white; background-color: black;"> Session Layers: </span><table width=1000 bgcolor="lightcyan" cellpadding=2> | ||
| + | <br> | ||
| + | <tr valign="top"> | ||
| + | <td width=10>[[image:BlueDot10x10.png|link=]]</td> | ||
| + | <td>'''Session Layers''' are used to hold the scenery assets that you want to only appear in that particular Session and not in all Sessions. The '''Session Layers''' can be left empty and the '''Route Layers''' can contain all the scenery assets</td> | ||
</tr> | </tr> | ||
</table> | </table> | ||
| Line 601: | Line 2,160: | ||
'''Session Layers''' give you a way of organising or grouping the assets displayed in your session.<br> | '''Session Layers''' give you a way of organising or grouping the assets displayed in your session.<br> | ||
| − | <table width= | + | <table width=1000> |
<tr valign="top"> | <tr valign="top"> | ||
| − | <td width= | + | <td width=500> |
| − | + | <table width=500 bgcolor=#000000 cellpadding=2> | |
| − | + | ||
| − | + | ||
| − | + | ||
| − | + | ||
| − | + | ||
| − | + | ||
<tr valign="top"> | <tr valign="top"> | ||
<td> | <td> | ||
| − | + | <table bgcolor=#ffffff cellpadding=2> | |
| − | <table bgcolor=# | + | |
<tr valign="top"> | <tr valign="top"> | ||
| − | <td>[[image: | + | <td>'''Session Layers''' can contain any assets that will be unique to that Session:-</td> |
| − | <td><span style=" | + | </tr> |
| − | + | <tr valign="top"> | |
| − | + | <td> | |
| + | <table> | ||
| + | <tr valign="top"> | ||
| + | <td width=10>[[image:DotPoint.JPG|10px|link=]]</td> | ||
| + | <td>Scenery</td> | ||
| + | </tr> | ||
| + | <tr valign="top"> | ||
| + | <td>[[image:DotPoint.JPG|10px|link=]]</td> | ||
| + | <td>Rolling Stock (including locos) - <span style="background-color: yellow; font-weight: 700;"> Note: </span> It is '''strongly recommended''' that all rolling stock be placed into a '''Session Layer'''</td> | ||
| + | </tr> | ||
| + | <tr valign="top"> | ||
| + | <td>[[image:DotPoint.JPG|10px|link=]]</td> | ||
| + | <td>Trackmarks, Triggers, Direction and Priority Markers</td> | ||
| + | </tr> | ||
| + | </table> | ||
</td> | </td> | ||
| + | </tr> | ||
| + | </table> | ||
| + | </td> | ||
| + | </tr> | ||
| + | </table> | ||
| + | </td> | ||
| + | <td> | ||
| + | <table bgcolor=#000000 width=500 cellpadding=2> | ||
| + | <tr valign="top"> | ||
| + | <td> | ||
| + | <table bgcolor=#fcbcbc cellpadding=2> | ||
| + | <tr valign="top"> | ||
| + | <td>[[image:Stop.PNG|link=]]</td> | ||
| + | <td><span style="font-size: 15px; font-weight: 700;">WARNING:</span><br> | ||
| + | While it is possible to add '''track''' and '''track objects''' (bridges, tunnels, turntables, signals, switches, etc) to '''Session Layers''' it is '''NOT RECOMMENDED'''. These assets should always be placed into '''Route Layers Group''' and, preferably, into the '''route-layer''' itself.</td> | ||
</tr> | </tr> | ||
</table> | </table> | ||
| Line 630: | Line 2,211: | ||
</table> | </table> | ||
<br> | <br> | ||
| − | <table cellpadding= | + | <table cellpadding=2 bgcolor="Aquamarine"> |
<tr valign="top"> | <tr valign="top"> | ||
| − | <td>[[image:LinkWiki.PNG|link=]]</td> | + | <td width=50>[[image:LinkWiki.PNG|link=]]</td> |
<td> | <td> | ||
| − | A detailed description of '''Layers''' can be found on the '''Trainz Wiki Page [[How_to_Use_Layers|How to Use Layers]]'''<br> | + | A detailed description of '''Layers''' can be found on the '''Trainz Wiki Page''':- |
| + | <table> | ||
| + | <tr valign="top"> | ||
| + | <td width=10>[[image:BlackDot10x10.png|link=]]</td> | ||
| + | <td>'''[[How_to_Use_Layers|How to Use Layers]]'''<br> | ||
| + | </td> | ||
| + | </tr> | ||
| + | </table> | ||
</td> | </td> | ||
</tr> | </tr> | ||
</table> | </table> | ||
<br> | <br> | ||
| − | <table bgcolor=#000000 width=1000> | + | <table bgcolor=#000000 width=1000 cellpadding=2> |
<tr valign="top"> | <tr valign="top"> | ||
<td> | <td> | ||
| − | <table bgcolor=#ffffb0> | + | <table bgcolor=#ffffb0 cellpadding=2> |
<tr valign="top"> | <tr valign="top"> | ||
<td>[[image:NotePad.PNG|link=]]</td> | <td>[[image:NotePad.PNG|link=]]</td> | ||
| Line 650: | Line 2,238: | ||
Examples of assets that would be placed in a '''Session Layer''' instead of a '''Route Layer''' would include:- | Examples of assets that would be placed in a '''Session Layer''' instead of a '''Route Layer''' would include:- | ||
| − | + | <table> | |
| − | + | <tr valign="top"> | |
| − | + | <td width=10>[[image:DotPoint.JPG|10px|link=]]</td> | |
| − | + | <td>products waiting at a factory for pickup in an industrial session that would not be present in a weekend or holiday passenger session</td> | |
| − | + | </tr> | |
| − | + | <tr valign="top"> | |
| + | <td>[[image:DotPoint.JPG|10px|link=]]</td> | ||
| + | <td>signallers holding lanterns in a night session only or standing alongside manual track switch levers in a daylight shunting session</td> | ||
| + | </tr> | ||
| + | <tr valign="top"> | ||
| + | <td>[[image:DotPoint.JPG|10px|link=]]</td> | ||
| + | <td>trackmarks and triggers that are only required in one session but not in all sessions</td> | ||
| + | </tr> | ||
| + | <tr valign="top"> | ||
| + | <td>[[image:DotPoint.JPG|10px|link=]]</td> | ||
| + | <td>crowds of onlookers alongside the track in a session recreating an historic steam train run, together with</td> | ||
| + | </tr> | ||
| + | <tr valign="top"> | ||
| + | <td>[[image:DotPoint.JPG|10px|link=]]</td> | ||
| + | <td>historic rolling stock in a special vintage train session running on a modern route | ||
| + | </td> | ||
| + | </tr> | ||
| + | </table> | ||
</td> | </td> | ||
</tr> | </tr> | ||
| Line 663: | Line 2,268: | ||
</table> | </table> | ||
<br> | <br> | ||
| − | <table> <!-- BEGIN Nav Buttons Table --> | + | <table width=1000> <!-- BEGIN Nav Buttons Table --> |
<tr valign="top"> | <tr valign="top"> | ||
| − | <td width= | + | <td width=629><span id="stepLoadSession"></span> |
| + | ='''Loading (and Creating) a Session'''= | ||
| + | </td> | ||
| + | <td width=50>[[image:SkipDown.png|link=#skipLoadOldSession|Skip Down]]</td> | ||
| + | <td width=50> </td> | ||
<td width=46>[[image:BackToTop.png|link=#top|alt=Top|Top]]</td> | <td width=46>[[image:BackToTop.png|link=#top|alt=Top|Top]]</td> | ||
<td width=75>[[image:NextUp.png|link=#stepWhatSession|alt=Next Up|Next Up]]</td> | <td width=75>[[image:NextUp.png|link=#stepWhatSession|alt=Next Up|Next Up]]</td> | ||
| Line 672: | Line 2,281: | ||
</tr> | </tr> | ||
</table> <!-- END Nav Buttons Table --> | </table> <!-- END Nav Buttons Table --> | ||
| − | |||
| − | |||
=='''Creating a New Session'''== | =='''Creating a New Session'''== | ||
| − | <table | + | <table width=1000 bgcolor="lightcyan" cellpadding=2> |
<tr valign="top"> | <tr valign="top"> | ||
| − | <td>[[image: | + | <td width=10>[[image:BlueDot10x10.png|link=]]</td> |
| − | <td> | + | <td>To create a new Session you must first create a new Route or load an existing Route</td> |
</tr> | </tr> | ||
</table> | </table> | ||
| − | + | <br> | |
| − | + | <table bgcolor=#000000 cellpadding=2> | |
| − | <table | + | |
<tr valign="top"> | <tr valign="top"> | ||
| − | <td | + | <td> |
| − | + | <table bgcolor=#ffffb0 cellpadding=2> | |
<tr valign="top"> | <tr valign="top"> | ||
| − | <td | + | <td>[[image:NotePad.PNG|link=]]</td> |
| − | <td> | + | <td>A route can have many individual sessions so a new session can be added to a route that already has sessions</td> |
| − | + | ||
| − | + | ||
| − | + | ||
| − | + | ||
</tr> | </tr> | ||
</table> | </table> | ||
| − | + | </td> | |
| − | + | ||
| − | + | ||
| − | + | ||
</tr> | </tr> | ||
| − | < | + | </table> |
| − | + | ||
<br> | <br> | ||
| − | <table bgcolor=#000000 | + | <table width=1000 bgcolor=#000000 cellpadding=2> |
<tr valign="top"> | <tr valign="top"> | ||
<td> | <td> | ||
| − | <table bgcolor=# | + | <table width=996 bgcolor=#ffffff cellpadding=2> |
<tr valign="top"> | <tr valign="top"> | ||
| − | <td | + | <td colspan=2><span style="font-weight: 700; font-size: 15px;">Steps:</span> To add a new session to an existing route:-</td> |
| − | + | ||
| − | + | ||
| − | + | ||
| − | </td> | + | |
</tr> | </tr> | ||
| − | </ | + | <tr valign="top"> |
| − | </td> | + | <td width=20>[[image:DotPoint1.JPG|link=]]</td> |
| + | <td>Locate (but do not load) the route as described in the section '''[[image:PageLink.PNG|link=]] [[#Loading an Existing Route|Loading an Existing Route]]''' above</td> | ||
</tr> | </tr> | ||
| − | </ | + | <tr valign="top"> |
| + | <td>[[image:DotPoint2.JPG|link=]]</td> | ||
| + | <td>Once you have selected the route from its thumbnail, <span style="font-weight: 700; font-size: 15px; background-color: lightcyan;">Left Click</span> on the <span style="background-color: black; color: white; font-weight: 700; font-size: 15px;"> VIEW SESSIONS </span> button<br> | ||
| − | + | [[image:RouteButtonsView.png|link=|alt=View Sessions]]</td> | |
| − | + | </tr> | |
| − | + | <tr valign="top"> | |
| − | + | <td>[[image:DotPoint3.JPG|link=]]</td> | |
| − | + | <td>Then <span style="font-weight: 700; font-size: 15px; background-color: lightcyan;">Left Click</span> on the <span style="background-color: black; color: white; font-weight: 700; font-size: 15px;"> CREATE SESSION </span> button. If no other session exists for this route then this will be the only choice available to you<br> | |
| − | + | ||
| − | + | ||
| − | [[image:SessionButtonsCreate.png|link=|alt=Create Session]] | + | [[image:SessionButtonsCreate.png|link=|alt=Create Session]]</td> |
| + | </tr> | ||
| + | </table> | ||
</td> | </td> | ||
</tr> | </tr> | ||
| + | </table> | ||
| + | <br> | ||
| + | <table width=1000> <!-- BEGIN Nav Buttons Table --> | ||
<tr valign="top"> | <tr valign="top"> | ||
| − | <td | + | <td width=629><span id="skipLoadOldSession"></span> |
| + | =='''Loading an Existing Session'''== | ||
| + | </td> | ||
| + | <td width=50>[[image:SkipDown.png|link=#skipLoadSessionCM|Skip Down]]</td> | ||
| + | <td width=50>[[image:SkipUp.png|link=#stepLoadSession|Skip Up]]</td> | ||
| + | <td width=46> </td> | ||
| + | <td width=75> </td> | ||
| + | <td width=75> </td> | ||
| + | <td width=75> </td> | ||
</tr> | </tr> | ||
| − | </table> | + | </table> <!-- END Nav Buttons Table --> |
| − | |||
| − | |||
| − | |||
There are two different ways to load existing sessions into '''Surveyor'''.<br> | There are two different ways to load existing sessions into '''Surveyor'''.<br> | ||
| − | <table width= | + | <table bgcolor=#0000ff width=1000 cellpadding=2> |
<tr valign="top"> | <tr valign="top"> | ||
| − | <td colspan=2 bgcolor=#000000><span style="font-size: 17px; font-weight:700; color: white;">& | + | <td> |
| + | <table bgcolor=#ffffff cellpadding=2> | ||
| + | <tr valign="top"> | ||
| + | <td colspan=2> | ||
| + | <table width=990> | ||
| + | <tr valign="top"> | ||
| + | <td colspan=2> | ||
| + | <table> | ||
| + | <tr valign="top"> | ||
| + | <td width=25>[[image:Ablue.png|link=]]</td> | ||
| + | <td bgcolor=#000000><span style="font-size: 17px; font-weight:700; color: white;"> Search For the Session </span></td> | ||
| + | </tr> | ||
| + | </table> | ||
| + | </td> | ||
</tr> | </tr> | ||
<tr valign="top"> | <tr valign="top"> | ||
<td>The easiest way to load an existing session is to use the search tools at the top of the '''Driver/Surveyor''' screen. | <td>The easiest way to load an existing session is to use the search tools at the top of the '''Driver/Surveyor''' screen. | ||
| − | [[image:SessionSearchButtons.png|link=|alt=Session Search]] | + | [[image:SessionSearchButtons.png|link=|alt=Session Search]]</td> |
| − | + | </tr> | |
| − | < | + | |
<tr valign="top"> | <tr valign="top"> | ||
| − | <td> | + | <td> |
| − | <td><span style="background-color: black; color: white; font-weight: 700;">& | + | <table width=990> |
| + | <tr valign="top"> | ||
| + | <td> | ||
| + | <table width=500> | ||
| + | <tr valign="top"> | ||
| + | <td><span style="color: white; background-color: black; font-weight: 700; font-size: 15px;"> Type: </span> </td> | ||
| + | <td><span style="background-color: black; color: white; font-weight: 700; font-size: 15px;"> ROUTES </span> is the default selection. <span style="font-weight: 700; font-size: 15px; background-color: lightcyan;">Left Click</span> on the button to change it to <span style="background-color: black; color: white; font-weight: 700; font-size: 15px;"> SESSIONS </span>.</td> | ||
</tr> | </tr> | ||
<tr valign="top"> | <tr valign="top"> | ||
| − | <td> | + | <td><span style="color: white; background-color: black; font-weight: 700; font-size: 15px;"> Source: </span> </td> |
| − | <td><span style="background-color: black; color: white; font-weight: 700;">& | + | <td><span style="background-color: black; color: white; font-weight: 700; font-size: 15px;"> PURCHASED </span> is the default selection, <span style="font-weight: 700; font-size: 15px; background-color: lightcyan;">Left Click</span> on the button to change it to <span style="background-color: black; color: white; font-weight: 700; font-size: 15px;"> MY CONTENT </span> for a session you have created (or already modified) or to <span style="background-color: black; color: white; font-weight: 700; font-size: 15px;"> INSTALLED </span> for one you have downloaded from the '''DLS'''.</td> |
</tr> | </tr> | ||
<tr valign="top"> | <tr valign="top"> | ||
| − | <td> | + | <td><span style="color: white; background-color: black; font-weight: 700; font-size: 15px;"> Gameplay: </span> </td> |
| − | <td><span style="background-color: black; color: white; font-weight: 700;">& | + | <td><span style="background-color: black; color: white; font-weight: 700; font-size: 15px;"> ALL </span> is the default selection. There is no need to change this</td> |
</tr> | </tr> | ||
<tr valign="top"> | <tr valign="top"> | ||
| − | <td> | + | <td><span style="color: white; background-color: black; font-weight: 700; font-size: 15px;"> Search: </span> </td> |
<td>If required you can narrow down the list of sessions by typing the first few letters of its name.</td> | <td>If required you can narrow down the list of sessions by typing the first few letters of its name.</td> | ||
| + | </tr> | ||
| + | </table> | ||
| + | </td> | ||
| + | <td> | ||
| + | <table bgcolor=#ffffb0 cellpadding=2> | ||
| + | <tr valign="top"> | ||
| + | <td width=25>[[image:NotePad.PNG|link=]]</td> | ||
| + | <td><span style="font-size: 17px; font-weight: 700;">Notes:'''</span><br> | ||
| + | ---- | ||
| + | <table> | ||
| + | <tr valign="top"> | ||
| + | <td colspan=2>'''Sessions''':-</td> | ||
| + | </tr> | ||
| + | <tr valign="top"> | ||
| + | <td width=10>[[image:DotPoint.JPG|10px|link=]]</td> | ||
| + | <td>are saved as entries in the '''Trainz Database''', not as files on your hard drive. Loading a session will retrieve it from the database.</td> | ||
| + | </tr> | ||
| + | <tr valign="top"> | ||
| + | <td>[[image:DotPoint.JPG|10px|link=]]</td> | ||
| + | <td>can be loaded directly into '''Surveyor''' from '''Content Manager'''. See [[image:PageLink.PNG|link=]] '''[[#Loading a Session Into Surveyor From Content Manager|Loading a Session Into Surveyor From Content Manager]]''' below.</td> | ||
| + | </tr> | ||
| + | <tr valign="top"> | ||
| + | <td>[[image:DotPoint.JPG|10px|link=]]</td> | ||
| + | <td>can be '''exported''' as files (in the '''Trainz .cdp''' file format) from '''Content Manager''' for backup or transfer.</td> | ||
| + | </tr> | ||
| + | </table> | ||
| + | </td> | ||
| + | </tr> | ||
| + | </table> | ||
| + | </td> | ||
</tr> | </tr> | ||
</table> | </table> | ||
| Line 778: | Line 2,431: | ||
The same colour coding system used in the route thumbnails also applies to session thumbnails.<br> | The same colour coding system used in the route thumbnails also applies to session thumbnails.<br> | ||
| − | <table width= | + | <table width=990> |
<tr valign="top"> | <tr valign="top"> | ||
| − | <td | + | <td width=200><span style="background-color: #ffae00;">            </span> <span style="font-weight: 700; font-size: 15px;">Payware on DLC</span></td> |
| − | < | + | <td>Must be purchased and downloaded, but some may be free - depending on your membership options. If you click a thumbnail with this colour a <span style="color: white; background-color: black; font-weight: 700; font-size: 15px;"> DOWNLOAD </span> button will appear on the bottom right of the screen. If a price is included in the button then that is the purchase price (in $US)</td> |
| − | <td> | + | |
</tr> | </tr> | ||
<tr valign="top"> | <tr valign="top"> | ||
| − | <td | + | <td width=200><span style="background-color: #10c810;">            </span> <span style="font-weight: 700; font-size: 15px;">Payware installed</span></td> |
| − | <td>''' | + | <td>Already installed from the '''DLC'''. '''DLC''' items cannot be deleted. To remove them use the '''Uninstall''' option in the '''Content Store''' from the '''Launcher'''. You can reinstall them later without any additional cost</td> |
| + | </tr> | ||
| + | <tr valign="top"> | ||
| + | <td width=200><span style="background-color: #dbdbdb;">            </span> <span style="font-weight: 700; font-size: 15px;">Installed</span></td> | ||
<td>Downloaded from the Download Station ('''DLS''') or created by you. This includes any cloned '''DLC''' Routes and Sessions (see [[image:PageLink.PNG|link=]] '''[[#Cloning a Route/Session|Cloning a Route/Session]]''' below)</td> | <td>Downloaded from the Download Station ('''DLS''') or created by you. This includes any cloned '''DLC''' Routes and Sessions (see [[image:PageLink.PNG|link=]] '''[[#Cloning a Route/Session|Cloning a Route/Session]]''' below)</td> | ||
</tr> | </tr> | ||
<tr valign="top"> | <tr valign="top"> | ||
| − | <td | + | <td width=200><span style="background-color: #848dff;">            </span> <span style="font-weight: 700; font-size: 15px;">Multiplayer</span></td> |
| − | < | + | |
<td>For simultaneous development by multiple players. Special conditions apply</td> | <td>For simultaneous development by multiple players. Special conditions apply</td> | ||
</tr> | </tr> | ||
</table> | </table> | ||
<br> | <br> | ||
| − | Click on the thumbnail for the session you want to load and then | + | <span style="font-weight: 700; font-size: 15px; background-color: lightcyan;">Left Click</span> on the thumbnail for the session you want to load and then <span style="font-weight: 700; font-size: 15px; background-color: lightcyan;">Left Click</span> on the <span style="background-color: black; color: white; font-weight: 700; font-size: 15px;"> EDIT SESSION </span> button. This will load '''BOTH''' the route and the session into '''Surveyor'''. |
[[image:SessionButtonsEdit2.png|link=|alt=Edit Session]] | [[image:SessionButtonsEdit2.png|link=|alt=Edit Session]] | ||
| − | <table bgcolor=# | + | <table bgcolor=#ffffb0 width=990 cellpadding=2> |
| − | + | ||
| − | + | ||
| − | + | ||
<tr valign="top"> | <tr valign="top"> | ||
<td>[[image:NotePad.PNG|link=]]</td> | <td>[[image:NotePad.PNG|link=]]</td> | ||
<td> | <td> | ||
| − | If the <span style="background-color: black; color: white; font-weight: 700; font-size: 15px;">& | + | If the <span style="background-color: black; color: white; font-weight: 700; font-size: 15px;"> EDIT SESSION </span> option is not present then the selected session is a saved '''Driver Game''' (a "game" saved when in '''Driver''') and cannot be edited. See the section '''[[image:PageLink.PNG|link=]] [[#Saving and Loading Sessions in Driver|Saving and Loading Sessions in Driver]]''' below. |
| + | </td> | ||
| + | </tr> | ||
| + | </table> | ||
</td> | </td> | ||
</tr> | </tr> | ||
| Line 815: | Line 2,469: | ||
</table> | </table> | ||
<br> | <br> | ||
| − | <table width= | + | <table width=1000> |
<tr valign="top"> | <tr valign="top"> | ||
| − | <td | + | <td align="center"><span style="font-weight: 700; font-size: 17px;">OR</span></td> |
</tr> | </tr> | ||
| + | </table> | ||
| + | <br> | ||
| + | <table bgcolor=#0000ff width=1000 cellpadding=2> | ||
<tr valign="top"> | <tr valign="top"> | ||
| − | <td>Select the route as described in the section '''[[ | + | <td> |
| + | <table bgcolor=#ffffff cellpadding=2> | ||
| + | <tr valign="top"> | ||
| + | <td> | ||
| + | <table width=990> | ||
| + | <tr valign="top"> | ||
| + | <td colspan=2> | ||
| + | <table> | ||
| + | <tr valign="top"> | ||
| + | <td width=25>[[image:Bblue.png|link=]]</td> | ||
| + | <td bgcolor=#000000><span style="font-size: 17px; font-weight:700; color: white;"> Select the Route First </span></td> | ||
| + | </tr> | ||
| + | </table> | ||
| + | </td> | ||
| + | </tr> | ||
| + | <tr valign="top"> | ||
| + | <td> | ||
| + | <table> | ||
| + | <tr valign="top"> | ||
| + | <td colspan=2><span style="font-weight: 700; font-size: 15px;">Steps:</span></td> | ||
| + | </tr> | ||
| + | <tr valign="top"> | ||
| + | <td width=20>[[image:DotPoint1.JPG|link=]]</td> | ||
| + | <td>Select the route as described in the section '''[[image:PageLink.PNG|link=]] [[#Loading an Existing Route|Loading an Existing Route]]''' above. Then <span style="font-weight: 700; font-size: 15px; background-color: lightcyan;">Left Click</span> on the <span style="background-color: black; color: white; font-weight: 700; font-size: 15px;"> VIEW SESSIONS </span> button. | ||
[[image:RouteButtonsView.png|link=|alt=View Sessions]] | [[image:RouteButtonsView.png|link=|alt=View Sessions]] | ||
| − | This will display a list of thumbnails for all the sessions in that route. Select the session thumbnail you need and then | + | This will display a list of thumbnails for all the sessions in that route.</td> |
| + | </tr> | ||
| + | <tr valign="top"> | ||
| + | <td>[[image:DotPoint2.JPG|link=]]</td> | ||
| + | <td> Select the session thumbnail you need and then <span style="font-weight: 700; font-size: 15px; background-color: lightcyan;">Left Click</span> on the <span style="background-color: black; color: white; font-weight: 700; font-size: 15px;"> EDIT SESSION </span> button. | ||
[[image:SessionButtonsEdit2.png|link=|alt=Edit Session]] | [[image:SessionButtonsEdit2.png|link=|alt=Edit Session]] | ||
| − | + | </td> | |
| − | + | </tr> | |
| − | + | </table> | |
| − | < | + | <br> |
| − | < | + | <table bgcolor=#ffffb0 width=1000 cellpadding=2> |
| − | < | + | |
| − | <table bgcolor=#ffffb0 width= | + | |
<tr valign="top"> | <tr valign="top"> | ||
<td>[[image:NotePad.PNG|link=]]</td> | <td>[[image:NotePad.PNG|link=]]</td> | ||
<td> | <td> | ||
| − | If the <span style="background-color: black; color: white; font-weight: 700; font-size: 15px;">& | + | If the <span style="background-color: black; color: white; font-weight: 700; font-size: 15px;"> EDIT SESSION </span> option is not present then the selected session is a saved '''Driver Game''' (a "game" saved when in '''Driver''') and cannot be edited. See the section '''[[image:PageLink.PNG|link=]] [[#Saving and Loading Sessions in Driver|Saving and Loading Sessions in Driver]]''' below. |
</td> | </td> | ||
</tr> | </tr> | ||
| Line 846: | Line 2,528: | ||
</td> | </td> | ||
</tr> | </tr> | ||
| + | </table> | ||
| + | </td> | ||
| + | </tr> | ||
| + | </table> | ||
| + | <br> | ||
| + | <table width=1000 cellpadding=2> | ||
<tr valign="top"> | <tr valign="top"> | ||
| − | <td | + | <td>Both [[image:Ablue.png|link=]] and [[image:Bblue.png|link=]] will load the route and session into '''Surveyor'''.</td> |
</tr> | </tr> | ||
</table> | </table> | ||
| − | + | <br> | |
| + | <table width=1000> <!-- BEGIN Nav Buttons Table --> | ||
| + | <tr valign="top"> | ||
| + | <td width=629><span id="skipLoadSessionCM"></span> | ||
=='''Loading a Session Into Surveyor From Content Manager'''== | =='''Loading a Session Into Surveyor From Content Manager'''== | ||
| + | </td> | ||
| + | <td width=50>[[image:SkipDown.png|link=#skipLoadDriver|Skip Down]]</td> | ||
| + | <td width=50>[[image:SkipUp.png|link=#skipLoadOldSession|Skip Up]]</td> | ||
| + | <td width=46> </td> | ||
| + | <td width=75> </td> | ||
| + | <td width=75> </td> | ||
| + | <td width=75> </td> | ||
| + | </tr> | ||
| + | </table> <!-- END Nav Buttons Table --> | ||
| + | |||
'''Trainz''' provides a shortcut that allows you to load an existing session directly into '''Surveyor''' for editing from '''Content Manager'''.<br> | '''Trainz''' provides a shortcut that allows you to load an existing session directly into '''Surveyor''' for editing from '''Content Manager'''.<br> | ||
| − | <table> | + | <table width=1000> |
<tr valign="top"> | <tr valign="top"> | ||
<td>[[image:CMOpenSessionSurveyor.png|link=|Load a session from CM]]</td> | <td>[[image:CMOpenSessionSurveyor.png|link=|Load a session from CM]]</td> | ||
<td> | <td> | ||
| − | <table cellpadding= | + | <table bgcolor=#000000 cellpadding=2> |
| − | <tr> | + | <tr valign="top"> |
| − | <td | + | <td> |
| − | + | <table bgcolor=#ffffff cellpadding=2> | |
| + | <tr valign="top"> | ||
| + | <td><span style="font-size: 17px; font-weight: 700;">Steps:</span> To load a session into Surveyor:- | ||
| + | <table> | ||
| + | <tr valign="top"> | ||
| + | <td width=20>[[image:DotPoint1.JPG|link=]]</td> | ||
| + | <td>in '''Content Manager''' select the filter '''Routes & Sessions'''</td> | ||
</tr> | </tr> | ||
<tr valign="top"> | <tr valign="top"> | ||
| − | <td>[[image: | + | <td>[[image:DotPoint2.JPG|link=]]</td> |
| − | <td> | + | <td>select the session to be loaded and edited in '''Surveyor'''</td> |
| − | + | ||
| − | + | ||
| − | + | ||
| − | + | ||
| − | + | ||
| − | </td> | + | |
</tr> | </tr> | ||
| − | <tr> | + | <tr valign="top"> |
| − | <td | + | <td>[[image:DotPoint3.JPG|link=]]</td> |
| − | ----</td> | + | <td><span style="font-weight: 700; font-size: 15px; background-color: lightcyan;">Right Click</span> to open the '''Command Menu'''</td> |
| + | </tr> | ||
| + | <tr valign="top"> | ||
| + | <td>[[image:DotPoint4.JPG|link=]]</td> | ||
| + | <td>select <span style="font-weight: 700; font-size: 15px; color: white; background-color: black;"> Open... </span>, then select <span style="font-weight: 700; font-size: 15px; color: white; background-color: black;"> Edit Asset in Surveyor </span></td> | ||
| + | </tr> | ||
| + | </table> | ||
| + | Both the route and the session will be loaded into '''Surveyor''' for editing.</td> | ||
</tr> | </tr> | ||
</table> | </table> | ||
| − | |||
</td> | </td> | ||
</tr> | </tr> | ||
</table> | </table> | ||
| − | + | </td> | |
| + | </tr> | ||
| + | </table> | ||
| + | <br> | ||
| + | <table width=1000> <!-- BEGIN Nav Buttons Table --> | ||
| + | <tr valign="top"> | ||
| + | <td width=629><span id="skipLoadDriver"></span> | ||
=='''Loading a Session into Driver From Surveyor'''== | =='''Loading a Session into Driver From Surveyor'''== | ||
| − | To start '''Driver''' simply select a session as described above in '''Loading an Existing Session''' and | + | </td> |
| + | <td width=50>[[image:SkipDown.png|link=#skipLoadDriverCM|Skip Down]]</td> | ||
| + | <td width=50>[[image:SkipUp.png|link=#skipLoadSessionCM|Skip Up]]</td> | ||
| + | <td width=46> </td> | ||
| + | <td width=75> </td> | ||
| + | <td width=75> </td> | ||
| + | <td width=75> </td> | ||
| + | </tr> | ||
| + | </table> <!-- END Nav Buttons Table --> | ||
| + | |||
| + | To start '''Driver''' simply select a session as described above in '''Loading an Existing Session''' and <span style="font-weight: 700; font-size: 15px; background-color: lightcyan;">Left Click</span> on the <span style="font-weight: 700; background-color: black; color: white; font-size: 15px;"> DRIVE SESSION </span> button.<br> | ||
[[image:DriverButtons.png|link=|alt=Driver Game]]<br> | [[image:DriverButtons.png|link=|alt=Driver Game]]<br> | ||
| Line 890: | Line 2,613: | ||
This will load both the session and the route into '''Driver'''.<br> | This will load both the session and the route into '''Driver'''.<br> | ||
| − | You can save your "game play" in '''Driver''' at anytime. See '''[[ | + | You can save your "game play" in '''Driver''' at anytime. See '''[[image:PageLink.PNG|link=]] [[#Saving and Loading Sessions in Driver|Saving and Loading Sessions in Driver]]''' below. |
| − | + | <br> | |
| + | <table width=1000> <!-- BEGIN Nav Buttons Table --> | ||
| + | <tr valign="top"> | ||
| + | <td width=629><span id="skipLoadDriverCM"></span> | ||
=='''Loading a Session into Driver From Content Manager'''== | =='''Loading a Session into Driver From Content Manager'''== | ||
| + | </td> | ||
| + | <td width=50>[[image:SkipDown.png|link=#skipEditSession|Skip Down]]</td> | ||
| + | <td width=50>[[image:SkipUp.png|link=#skipLoadDriver|Skip Up]]</td> | ||
| + | <td width=46> </td> | ||
| + | <td width=75> </td> | ||
| + | <td width=75> </td> | ||
| + | <td width=75> </td> | ||
| + | </tr> | ||
| + | </table> <!-- END Nav Buttons Table --> | ||
| + | |||
'''Trainz''' provides a shortcut that allows you to load an existing session directly into '''Driver''' from '''Content Manager'''.<br> | '''Trainz''' provides a shortcut that allows you to load an existing session directly into '''Driver''' from '''Content Manager'''.<br> | ||
| − | <table> | + | <table width=1000> |
<tr valign="top"> | <tr valign="top"> | ||
<td>[[image:CMOpenSessionDriver.png|link=|Load a session from CM]]</td> | <td>[[image:CMOpenSessionDriver.png|link=|Load a session from CM]]</td> | ||
<td> | <td> | ||
| − | <table cellpadding= | + | <table bgcolor=#000000 cellpadding=2> |
| − | <tr> | + | <tr valign="top"> |
| − | <td | + | <td> |
| − | + | <table bgcolor=#ffffff cellpadding=2> | |
| + | <tr valign="top"> | ||
| + | <td><span style="font-size: 17px; font-weight: 700;">Steps:</span> To load a session into Driver from '''Content manager''':- | ||
| + | <table> | ||
| + | <tr valign="top"> | ||
| + | <td width=20>[[image:DotPoint1.JPG|link=]]</td> | ||
| + | <td>in '''Content Manager''' select the filter '''Routes & Sessions'''</td> | ||
</tr> | </tr> | ||
<tr valign="top"> | <tr valign="top"> | ||
| − | <td>[[image: | + | <td>[[image:DotPoint2.JPG|link=]]</td> |
| − | <td><span style="font- | + | <td>select the session to drive</td> |
| − | + | </tr> | |
| − | + | <tr valign="top"> | |
| − | + | <td>[[image:DotPoint3.JPG|link=]]</td> | |
| − | + | <td><span style="font-weight: 700; font-size: 15px; background-color: lightcyan;">Right Click</span> to open the '''Command Menu'''</td> | |
| − | + | </tr> | |
| + | <tr valign="top"> | ||
| + | <td>[[image:DotPoint4.JPG|link=]]</td> | ||
| + | <td>select <span style="font-weight: 700; font-size: 15px; color: white; background-color: black;"> Open... </span>, then select <span style="font-weight: 700; font-size: 15px; color: white; background-color: black;"> Open Asset in Driver </span></td> | ||
| + | </tr> | ||
| + | </table> | ||
| + | Both the session and its parent route will be loaded into '''Driver''' and the simulation will be started. | ||
</td> | </td> | ||
</tr> | </tr> | ||
| − | < | + | </table> |
| − | + | </td> | |
| − | + | ||
</tr> | </tr> | ||
</table> | </table> | ||
| − | |||
</td> | </td> | ||
</tr> | </tr> | ||
</table> | </table> | ||
| − | + | <br> | |
| + | <table width=1000> <!-- BEGIN Nav Buttons Table --> | ||
| + | <tr valign="top"> | ||
| + | <td width=629><span id="skipEditSession"></span> | ||
=='''Editing a Session'''== | =='''Editing a Session'''== | ||
| − | <table | + | </td> |
| + | <td width=50>[[image:SkipDown.png|link=#skipAddSessionAssets|Skip Down]]</td> | ||
| + | <td width=50>[[image:SkipUp.png|link=#skipLoadDriverCM|Skip Up]]</td> | ||
| + | <td width=46> </td> | ||
| + | <td width=75> </td> | ||
| + | <td width=75> </td> | ||
| + | <td width=75> </td> | ||
| + | </tr> | ||
| + | </table> <!-- END Nav Buttons Table --> | ||
| + | |||
| + | <table width=1000 bgcolor=#ff0000 cellpadding=2> | ||
<tr valign="top"> | <tr valign="top"> | ||
| − | <td>[[image: | + | <td> |
| − | <td>''' | + | <table width=996 bgcolor=#fcbcbc cellpadding=2> |
| + | <tr valign="top"> | ||
| + | <td>[[image:Stop.PNG|link=]]</td> | ||
| + | <td><span style="font-size: 15px; font-weight: 700;">WARNING:</span><br> | ||
| + | When a '''Session''' is loaded into Surveyor or a new '''Session''' is created all the assets you add will be '''AUTOMATICALLY placed into a Session Layer'''. To place them in a different layer, for example a '''Route Layer''', change the '''Active Layer''' to the required layer before adding them to the route. See the '''Trainz Wiki Page [[image:WikiLink.PNG|link=]] [[How_to_Use_Layers|How to Use Layers]]''' for more details.</td> | ||
</tr> | </tr> | ||
</table> | </table> | ||
| − | + | </td> | |
| − | + | </tr> | |
| − | + | </table> | |
| − | Any changes made to the '''Session Rules''' (including drivers and their commands), the '''Environment Tools''', '''Industry''' or '''Rolling Stock''' settings, will be added to the '''Session Data'''.<br> | + | <br> |
| − | + | <table width=1000> | |
| − | There are | + | <tr valign="top"> |
| − | + | <td>Any changes made to the '''Session Rules''' (including drivers and their commands), the '''Environment Tools''', '''Industry''' or '''Rolling Stock''' settings, will be added to the '''Session Data'''.<br> | |
| + | <br> | ||
| + | There are other changes that will also be added to the '''Session Data'''.</td> | ||
| + | </tr> | ||
| + | </table> | ||
| + | <br> | ||
<table width=1000> | <table width=1000> | ||
<tr valign="top"> | <tr valign="top"> | ||
<td width=350> | <td width=350> | ||
---- | ---- | ||
| − | You can edit the '''Session Characteristics''' at any time by selecting the | + | You can edit the '''Session Characteristics''' at any time by selecting the <span style="font-weight: 700; font-size: 15px; color: white; background-color: black;"> Edit Session... </span> option from the [[image:EditMenu_S20.png|link=]] '''Edit Menu''' or by simply pressing <span style="font-weight: 700; font-size: 15px;"><span style="color: white; background-color: black;"> Ctrl </span> + <span style="color: white; background-color: black;"> R </span></span>.<br> |
This will bring up the '''Edit Session''' dialogue window which is more commonly called the '''Session Editor''' (shown below).<br> | This will bring up the '''Edit Session''' dialogue window which is more commonly called the '''Session Editor''' (shown below).<br> | ||
| − | For more details on editing a Session see the '''Trainz Wiki Page''' at '''[[image:WikiLink.PNG|link=]]& | + | For more details on editing a Session see the '''Trainz Wiki Page''' at '''[[image:WikiLink.PNG|link=]] [[How_to_Use_Session_Editor|The Session Editor]]''' - screenshot shown below.</td> |
<td width=170>[[image:SessionEdit.png|link=|alt=Session edit]]</td> | <td width=170>[[image:SessionEdit.png|link=|alt=Session edit]]</td> | ||
<td> | <td> | ||
| Line 950: | Line 2,718: | ||
<tr valign="top"> | <tr valign="top"> | ||
<td> | <td> | ||
| − | <table cellpadding= | + | <table cellpadding=2 bgcolor=#ffffb0 width=476> |
<tr valign="top"> | <tr valign="top"> | ||
| − | <td>[[image:NotePad.PNG|link=]]</td> | + | <td width=25>[[image:NotePad.PNG|link=]]</td> |
| − | <td><span style="font-size: | + | <td width=455><span style="font-size: 15px; font-weight: 700;">Session Characteristics:-'''</span><br> |
---- | ---- | ||
| − | + | <table> | |
| − | + | <tr valign="top"> | |
| − | + | <td width=10>[[image:DotPoint.JPG|10px|link=]]</td> | |
| − | + | <td>'''Name''' and '''Description'''</td> | |
| − | + | </tr> | |
| − | + | <tr valign="top"> | |
| − | + | <td>[[image:DotPoint.JPG|10px|link=]]</td> | |
| + | <td>'''Session Rules''' which set:- | ||
| + | <table> | ||
| + | <tr valign="top"> | ||
| + | <td width=10>[[image:RedDot10x10.png|link=]]</td> | ||
| + | <td>drivers and their consists</td> | ||
| + | </tr> | ||
| + | <tr valign="top"> | ||
| + | <td>[[image:RedDot10x10.png|link=]]</td> | ||
| + | <td>driver commands</td> | ||
| + | </tr> | ||
| + | <tr valign="top"> | ||
| + | <td>[[image:RedDot10x10.png|link=]]</td> | ||
| + | <td>time of day/night</td> | ||
| + | </tr> | ||
| + | <tr valign="top"> | ||
| + | <td>[[image:RedDot10x10.png|link=]]</td> | ||
| + | <td>events</td> | ||
| + | </tr> | ||
| + | <tr valign="top"> | ||
| + | <td>[[image:RedDot10x10.png|link=]]</td> | ||
| + | <td>and much, much more</td> | ||
| + | </tr> | ||
| + | </table> | ||
| + | </td> | ||
| + | </tr> | ||
| + | </table> | ||
</td> | </td> | ||
</tr> | </tr> | ||
| Line 976: | Line 2,770: | ||
<td> | <td> | ||
<table> | <table> | ||
| + | <tr> | ||
| + | <td colspan=2><br><br></td> | ||
| + | </tr> | ||
<tr valign="top"> | <tr valign="top"> | ||
| − | <td>[[image:DotPoint1.JPG|link=]]</td> | + | <td width=20>[[image:DotPoint1.JPG|link=]]</td> |
| − | <td> | + | <td>You can edit the '''Name''' of the Session. This will change the session '''username''' in the '''config.txt''' file but it will not alter the session '''<kuid>''' value</td> |
| − | You can edit the '''Name''' of the Session. This will change the session '''username''' in the '''config.txt''' file but it will not alter the session '''<kuid>''' value</td> | + | |
</tr> | </tr> | ||
<tr valign="top"> | <tr valign="top"> | ||
| Line 993: | Line 2,789: | ||
</tr> | </tr> | ||
</table> | </table> | ||
| + | <br> | ||
| + | <table width=1000> <!-- BEGIN Nav Buttons Table --> | ||
| + | <tr valign="top"> | ||
| + | <td width=629><span id="skipAddSessionAssets"></span> | ||
| + | =='''Adding Assets to a Session'''== | ||
| + | </td> | ||
| + | <td width=50>[[image:SkipDown.png|link=#skipEditEnvironmentSession|Skip Down]]</td> | ||
| + | <td width=50>[[image:SkipUp.png|link=#skipEditSession|Skip Up]]</td> | ||
| + | <td width=46> </td> | ||
| + | <td width=75> </td> | ||
| + | <td width=75> </td> | ||
| + | <td width=75> </td> | ||
| + | </tr> | ||
| + | </table> <!-- END Nav Buttons Table --> | ||
| + | |||
| + | <table width=1000 bgcolor="lightcyan" cellpadding=2> | ||
| + | <tr valign="top"> | ||
| + | <td width=10>[[image:BlueDot10x10.png|link=]]</td> | ||
| + | <td>'''Assets''' include all visible objects (trees, buildings, roads, tracks, signals, rolling stock, etc) and invisible objects (track triggers, track marks, etc) that can be added to your session</td> | ||
| + | </tr> | ||
| + | <tr valign="top"> | ||
| + | <td>[[image:BlueDot10x10.png|link=]]</td> | ||
| + | <td>Any objects added to a session will only be available in that session</td> | ||
| + | </tr> | ||
| + | </table> | ||
| + | <br> | ||
| + | ===<span style="color: white; background-color: green;"> In Surveyor Classic (S10) </span>=== | ||
| + | <table width=1000> | ||
| + | <tr valign="top"> | ||
| + | <td>In '''Surveyor Classic (S10)''' the tools and objects are in tabbed icons on the right of the screen which can be opened by a <span style="font-weight: 700; font-size: 15px; background-color: lightcyan;"> Left Click </span> on the icon or by pressing its '''Function Key'''</td> | ||
| + | </tr> | ||
| + | </table> | ||
| + | |||
| + | <table width=1000 bgcolor=#000000 cellpadding=2> | ||
| + | <tr valign="top"> | ||
| + | <td> | ||
| + | <table width=996 bgcolor=#ffffff cellpadding=2> | ||
| + | <tr valign="middle"> | ||
| + | <td width=22>[[image:ClassicObjectsF3Tool.png|link=]]</td> | ||
| + | <td width=30><span style="font-weight: 700; font-size: 15px; color: white; background-color: black;"> F3 </span></td> | ||
| + | <td>Scenery objects (e.g. buildings) and splines (e.g. roads) are added and manipulated by tools in the '''Objects''' icon (the <span style="font-weight: 700; font-size: 15px; color: white; background-color: black;"> F3 </span> key)</td> | ||
| + | </tr> | ||
| + | <tr valign="middle"> | ||
| + | <td>[[image:ClassicTracksF4Tool.png|link=]]</td> | ||
| + | <td><span style="font-weight: 700; font-size: 15px; color: white; background-color: black;"> F4 </span></td> | ||
| + | <td>Railroad tracks and track objects (e.g. signals, switches, etc) are added and manipulated by tools in the '''Tracks''' icon (the <span style="font-weight: 700; font-size: 15px; color: white; background-color: black;"> F4 </span> key)</td> | ||
| + | </tr> | ||
| + | <tr valign="middle"> | ||
| + | <td>[[image:ClassicRollingStockF7Tool.png|link=]]</td> | ||
| + | <td><span style="font-weight: 700; font-size: 15px; color: white; background-color: black;"> F7 </span></td> | ||
| + | <td>Rolling stock (locomotives, wagons) are added and manipulated by tools in the '''Trains''' icon (the <span style="font-weight: 700; font-size: 15px; color: white; background-color: black;"> F7 </span> key)</td> | ||
| + | </tr> | ||
| + | <tr valign="top"> | ||
| + | <td colspan=3>Opening each tool will reveal a selection list of assets and a set of tools for applying and manipulating the selected asset</td> | ||
| + | </tr> | ||
| + | </table> | ||
| + | </td> | ||
| + | </tr> | ||
| + | </table> | ||
| + | <br> | ||
| + | ===<span style="color: white; background-color: blue;"> In Surveyor 2.0 (S20) </span>=== | ||
| + | |||
| + | <table width=1000> | ||
| + | <tr valign="top"> | ||
| + | <td>In '''Surveyor 2.0 (S20)''' there is a single set of common tools that can add and manipulate objects of any type. Select a tool by a <span style="font-weight: 700; font-size: 15px; background-color: lightcyan;"> Left Click </span> on its icon in the <span style="font-weight: 700; font-size: 15px; color: white; background-color: #797979;"> Tools Palette </span> or by pressing its key. You can also select multiple objects, that can be of different types, and manipulate them (move, rotate, delete) as if they were a single object.</td> | ||
| + | </tr> | ||
| + | </table> | ||
| + | |||
| + | <table width=1000 bgcolor=#000000 cellpadding=2> | ||
| + | <tr valign="top"> | ||
| + | <td> | ||
| + | <table width=996 bgcolor=#ffffff cellpadding=2> | ||
| + | <tr valign="top"> | ||
| + | <td width=40>[[image:S20_PlacementToolIcon.png|link=]]</td> | ||
| + | <td width=20><span style="font-weight: 700; font-size: 15px; color: white; background-color: black;"> E </span></td> | ||
| + | <td>The '''Placement Tool''' adds '''ALL''' objects (scenery, splines, track and track objects, rolling stock) selected using the <span style="font-weight: 700; font-size: 15px; color: white; background-color: #797979;"> Filter Palette </span> and the <span style="font-weight: 700; font-size: 15px; color: white; background-color: #797979;"> Assets Palette </span></td> | ||
| + | </tr> | ||
| + | <tr valign="top"> | ||
| + | <td>[[image:S20_FreeMoveToolIcon.png|link=]]</td> | ||
| + | <td><span style="font-weight: 700; font-size: 15px; color: white; background-color: black;"> S </span></td> | ||
| + | <td>The '''Free Move Tool''' moves '''ALL''' objects, either individually or as a group, to anywhere on the surface</td> | ||
| + | </tr> | ||
| + | <tr valign="top"> | ||
| + | <td>[[image:S20_FineAdjustmentToolIcon.png|link=]]</td> | ||
| + | <td><span style="font-weight: 700; font-size: 15px; color: white; background-color: black;"> D </span></td> | ||
| + | <td>The '''Fine Adjustment Tool''' moves and rotates '''ALL''' objects, either individually or as a group, in small movements to anywhere on, below or above the surface</td> | ||
| + | </tr> | ||
| + | <tr valign="top"> | ||
| + | <td colspan=3>There is a '''Wiki Page''' that covers in great detail the use of the '''Surveyor 2.0''' tools at [[image:WikiLink.PNG|link=]] '''[[How to Use S20 Tools|How to Use S20 Tools]]'''</td> | ||
| + | </tr> | ||
| + | </table> | ||
| + | </td> | ||
| + | </tr> | ||
| + | </table> | ||
| + | <br> | ||
| + | <span id="SwitchDirections"></span> | ||
| + | <table width=1000 bgcolor=#000000 cellpadding=2> | ||
| + | <tr valign="top"> | ||
| + | <td> | ||
| + | <table width=996 bgcolor=#ffffe0 cellpadding=2> | ||
| + | <tr valign="top"> | ||
| + | <td width=25>[[image:PencilTips.PNG|link=]]</td> | ||
| + | <td><span style="font-weight: 700; font-size: 15px;">Setting Different Switch Directions in Routes and Sessions</span></td> | ||
| + | </tr> | ||
| + | <tr valign="top"> | ||
| + | <td colspan=2> | ||
| + | <table bgcolor=#ffffff cellpadding=2> | ||
| + | <tr valign="top"> | ||
| + | <td colspan=2><span style="font-weight: 700; font-size: 15px;">Steps:</span> To Save the Default Switch Direction in the Route:-</td> | ||
| + | </tr> | ||
| + | <tr valign="top"> | ||
| + | <td width=20>[[image:DotPoint1.JPG|link=]]</td> | ||
| + | <td>Set the switch to the desired direction for the route. If the switch is already in that direction then change something in the route (e.g. move a tree a few centimetres) to make sure that the route has been edited</td> | ||
| + | <td rowspan=3>[[image:RouteSARSaveExistingNoSession.png|link=]]</td> | ||
| + | </tr> | ||
| + | <tr valign="top"> | ||
| + | <td>[[image:DotPoint2.JPG|link=]]</td> | ||
| + | <td>Save (<span style="font-weight: 700; font-size: 15px;"><span style="color: white; background-color: black;"> Ctrl </span> + <span style="color: white; background-color: black;"> S </span></span> or select <span style="font-weight: 700; font-size: 15px; color: white; background-color: black;"> Save </span> from the [[image:SurveyorSystemIcon.png|link=]] '''System Menu''')</td> | ||
| + | <!-- extra row in rowspan --> | ||
| + | </tr> | ||
| + | <tr valign="top"> | ||
| + | <td>[[image:DotPoint3.JPG|link=]]</td> | ||
| + | <td>In the '''Save Dialogue Window''', make sure that the options | ||
| + | <table> | ||
| + | <tr valign="top"> | ||
| + | <td> | ||
| + | <table> | ||
| + | <tr valign="top"> | ||
| + | <td width=10>[[image:DotPoint.JPG|10px|link=]]</td> | ||
| + | <td>'''Overwrite existing route and'''</td> | ||
| + | </tr> | ||
| + | <tr valign="top"> | ||
| + | <td>[[image:DotPoint.JPG|10px|link=]]</td> | ||
| + | <td>'''Do not save session'''</td> | ||
| + | </tr> | ||
| + | </table> | ||
| + | ...are selected and then save</td> | ||
| + | </tr> | ||
| + | </table> | ||
| + | </td> | ||
| + | <!-- extra row in rowspan --> | ||
| + | </tr> | ||
| + | </table> | ||
| + | <br> | ||
| + | <table bgcolor=#ffffff cellpadding=2> | ||
| + | <tr valign="top"> | ||
| + | <td colspan=2><span style="font-weight: 700; font-size: 15px;">Steps:</span> To Save a Different Switch Direction in a Session:-</td> | ||
| + | </tr> | ||
| + | <tr valign="top"> | ||
| + | <td width=20>[[image:DotPoint1.JPG|link=]]</td> | ||
| + | <td>Set the switch to the desired direction for the Session</td> | ||
| + | <td rowspan=3>[[image:SessionSARSaveExistingNoRoute.png|link=]]</td> | ||
| + | </tr> | ||
| + | <tr valign="top"> | ||
| + | <td>[[image:DotPoint2.JPG|link=]]</td> | ||
| + | <td>Save (<span style="font-weight: 700; font-size: 15px;"><span style="color: white; background-color: black;"> Ctrl </span> + <span style="color: white; background-color: black;"> S </span></span> or select <span style="font-weight: 700; font-size: 15px; color: white; background-color: black;"> Save </span> from the [[image:SurveyorSystemIcon.png|link=]] '''System Menu''')</td> | ||
| + | <!-- extra row in rowspan --> | ||
| + | </tr> | ||
| + | <tr valign="top"> | ||
| + | <td>[[image:DotPoint3.JPG|link=]]</td> | ||
| + | <td>The Save Dialogue Window '''SHOULD''' only contain the options | ||
| + | <table> | ||
| + | <tr valign="top"> | ||
| + | <td> | ||
| + | <table> | ||
| + | <tr valign="top"> | ||
| + | <td width=10>[[image:DotPoint.JPG|10px|link=]]</td> | ||
| + | <td>'''Overwrite existing session'''</td> | ||
| + | </tr> | ||
| + | <tr valign="top"> | ||
| + | <td>[[image:DotPoint.JPG|10px|link=]]</td> | ||
| + | <td>'''Create new session'''</td> | ||
| + | </tr> | ||
| + | </table> | ||
| + | Select one of the options and then save</td> | ||
| + | <!-- extra row in rowspan --> | ||
| + | </tr> | ||
| + | </table> | ||
| + | </td> | ||
| + | </tr> | ||
| + | </table> | ||
| + | </td> | ||
| + | </tr> | ||
| + | </table> | ||
| + | </td> | ||
| + | </tr> | ||
| + | </table> | ||
| + | <br> | ||
| + | <table width=1000> <!-- BEGIN Nav Buttons Table --> | ||
| + | <tr valign="top"> | ||
| + | <td width=629><span id="skipEditEnvironmentSession"></span> | ||
| + | =='''Editing the Environment of a Session'''== | ||
| + | </td> | ||
| + | <td width=50>[[image:SkipDown.png|link=#stepSaving|Skip Down]]</td> | ||
| + | <td width=50>[[image:SkipUp.png|link=#skipAddSessionAssets|Skip Up]]</td> | ||
| + | <td width=46> </td> | ||
| + | <td width=75> </td> | ||
| + | <td width=75> </td> | ||
| + | <td width=75> </td> | ||
| + | </tr> | ||
| + | </table> <!-- END Nav Buttons Table --> | ||
| + | |||
| + | <table width=1000 bgcolor="lightcyan" cellpadding=2> | ||
| + | <tr valign="top"> | ||
| + | <td width=10>[[image:BlueDot10x10.png|link=]]</td> | ||
| + | <td>Environmental settings in a Session will have priotity over those in a Route</td> | ||
| + | </tr> | ||
| + | </table> | ||
| + | <br> | ||
<table width=1000> | <table width=1000> | ||
<tr valign="top"> | <tr valign="top"> | ||
<td width=350> | <td width=350> | ||
| − | + | You can edit the '''Environment Controls''' of a Session by selecting the <span style="font-weight: 700; font-size: 15px; color: white; background-color: black;"> Edit Environment... </span> option from the [[image:EditMenu_S20.png|link=]] '''Edit Menu'''.<br> | |
| − | You can edit the '''Environment Controls''' of a Session by selecting the | + | |
This will bring up the '''Edit Environment''' dialogue window, more commonly called the '''Environment Tools'''.<br> | This will bring up the '''Edit Environment''' dialogue window, more commonly called the '''Environment Tools'''.<br> | ||
| − | For more details on editing the '''Environment''' see the '''Trainz Wiki Page''' at '''[[image:WikiLink.PNG|link=]]& | + | For more details on editing the '''Environment''' see the '''Trainz Wiki Page''' at '''[[image:WikiLink.PNG|link=]] [[How_to_Use_Environment_Tools|The Environment Tools]]'''<br> |
| + | The only difference between the '''Environment Controls''' in a '''Route''' and a '''Session''' is that the route has the '''World Origin''' control.</td> | ||
<td width=170>[[image:EnvironmentEditLaunch.png|link=|alt=Environment edit]]</td> | <td width=170>[[image:EnvironmentEditLaunch.png|link=|alt=Environment edit]]</td> | ||
<td> | <td> | ||
| Line 1,006: | Line 3,011: | ||
<tr valign="top"> | <tr valign="top"> | ||
<td> | <td> | ||
| − | <table cellpadding= | + | <table cellpadding=2 bgcolor=#ffffb0 width=476> |
<tr valign="top"> | <tr valign="top"> | ||
<td>[[image:NotePad.PNG|link=]]</td> | <td>[[image:NotePad.PNG|link=]]</td> | ||
| − | <td><span style="font-size: 17px; font-weight: 700;">Environment Controls:-</span><br> | + | <td><span style="font-size: 17px; font-weight: 700;">Environment Controls ina Session:-</span><br> |
---- | ---- | ||
| − | + | <table> | |
| − | + | <tr valign="top"> | |
| − | + | <td width=10>[[image:DotPoint.JPG|10px|link=]]</td> | |
| − | + | <td>lighting conditions</td> | |
| − | + | </tr> | |
| − | + | <tr valign="top"> | |
| − | + | <td>[[image:DotPoint.JPG|10px|link=]]</td> | |
| − | + | <td>weather and cloud cover</td> | |
| + | </tr> | ||
| + | <tr valign="top"> | ||
| + | <td>[[image:DotPoint.JPG|10px|link=]]</td> | ||
| + | <td>water color and water surface (rough, calm, etc) for '''Legacy Water''' only</td> | ||
| + | </tr> | ||
| + | <tr valign="top"> | ||
| + | <td>[[image:DotPoint.JPG|10px|link=]]</td> | ||
| + | <td>wind speed (for '''SpeedTree''' assets only)</td> | ||
| + | </tr> | ||
| + | <tr valign="top"> | ||
| + | <td>[[image:DotPoint.JPG|10px|link=]]</td> | ||
| + | <td>fog and snow</td> | ||
| + | </tr> | ||
| + | <tr valign="top"> | ||
| + | <td>[[image:DotPoint.JPG|10px|link=]]</td> | ||
| + | <td>season (by the date and latitude)</td> | ||
| + | </tr> | ||
| + | <tr valign="top"> | ||
| + | <td>[[image:DotPoint.JPG|10px|link=]]</td> | ||
| + | <td>road traffic ('''on''' or '''off''' only)</td> | ||
| + | </tr> | ||
| + | </table> | ||
</td> | </td> | ||
| + | </tr> | ||
| + | </table> | ||
| + | </td> | ||
| + | </tr> | ||
| + | </table> | ||
| + | </td> | ||
| + | </tr> | ||
| + | </table> | ||
| + | <table bgcolor=#000000 width=1000 cellpadding=2> | ||
| + | <tr valign="top"> | ||
| + | <td> | ||
| + | <table bgcolor=#ffffb0 width=996 cellpadding=2> | ||
| + | <tr valign="top"> | ||
| + | <td>[[image:NotePad.PNG|link=]]</td> | ||
| + | <td><span style="font-size: 17px; font-weight: 700;">Notes: Environment Settings in Routes and Sessions</span><br> | ||
| + | ---- | ||
| + | It is possible (and often even expected) that a Route and its Sessions will have different environmental settings - for example the Route may have been created for the summer season but one Session may be set in winter and will require an overcast sky, snow, fog and generally lower light levels. See the '''Trainz Wiki Page''' at '''[[image:WikiLink.PNG|link=]] [[How_to_Use_Environment_Tools|The Environment Tools]]''' for more details.<br><br> | ||
| + | <span style="font-weight: 700; font-size: 15px;">There is an order of priority with the Environmental Settings in Routes and Sessions</span> | ||
| + | <table> | ||
| + | <tr valign="top"> | ||
| + | <td width=20>[[image:DotPoint1RedC.png|link=]]</td> | ||
| + | <td>If an Environmental Control (e.g. '''Weather''' or '''Date''') is set in both the '''Route''' and the '''Session''', then the '''Session''' setting will take priority over the setting in the '''Route'''</td> | ||
| + | </tr> | ||
| + | <tr valign="top"> | ||
| + | <td>[[image:DotPoint2RedC.png|link=]]</td> | ||
| + | <td>If an Environmental Control is set in the '''Route''' but '''NOT''' in the '''Session''', then the '''Route''' setting will take priority</td> | ||
| + | </tr> | ||
| + | <tr valign="top"> | ||
| + | <td>[[image:DotPoint3RedC.png|link=]]</td> | ||
| + | <td>if an Environmental Control is '''NOT''' set in both the '''Route''' and the '''Session''', then the '''default value''' for that setting will be used. The default value for the '''Date''' is today's date</td> | ||
| + | </tr> | ||
| + | <tr valign="top"> | ||
| + | <td colspan=2>The '''World Origin''' is only found in a '''Route'''. If the '''World Origin''' is not set in the '''Route''' then its default setting of '''52.45°N 13.3°E''' ('''Berlin, Germany''') will be used</td> | ||
</tr> | </tr> | ||
</table> | </table> | ||
| Line 1,029: | Line 3,089: | ||
</table> | </table> | ||
<br> | <br> | ||
| − | <table> <!-- BEGIN Nav Buttons Table --> | + | <table width=1000> <!-- BEGIN Nav Buttons Table --> |
<tr valign="top"> | <tr valign="top"> | ||
| − | <td width= | + | <td width=629><span id="stepSaving"></span> |
| + | ='''Saving a Route and a Session'''= | ||
| + | </td> | ||
| + | <td width=50>[[image:SkipDown.png|link=#skipSaveNew|Skip Down]]</td> | ||
| + | <td width=50>[[image:SkipUp.png|link=#skipEditEnvironmentSession|Skip Up]]</td> | ||
<td width=46>[[image:BackToTop.png|link=#top|alt=Top|Top]]</td> | <td width=46>[[image:BackToTop.png|link=#top|alt=Top|Top]]</td> | ||
<td width=75>[[image:NextUp.png|link=#stepLoadSession|alt=Next Up|Next Up]]</td> | <td width=75>[[image:NextUp.png|link=#stepLoadSession|alt=Next Up|Next Up]]</td> | ||
| Line 1,038: | Line 3,102: | ||
</tr> | </tr> | ||
</table> <!-- END Nav Buttons Table --> | </table> <!-- END Nav Buttons Table --> | ||
| − | |||
| − | |||
'''Routes''' and '''Sessions''' are saved from the '''System Menu''' on the '''Surveyor''' screen. | '''Routes''' and '''Sessions''' are saved from the '''System Menu''' on the '''Surveyor''' screen. | ||
| − | <table> | + | <table width=1000> |
<tr valign="top"> | <tr valign="top"> | ||
<td>[[image:RouteSaveMenu.png|link=|alt=Save]]</td> | <td>[[image:RouteSaveMenu.png|link=|alt=Save]]</td> | ||
| Line 1,049: | Line 3,111: | ||
<table> | <table> | ||
<tr valign="top"> | <tr valign="top"> | ||
| − | <td>[[image:DotPoint.JPG|link=]]</td> | + | <td width=10>[[image:DotPoint.JPG|10px|link=]]</td> |
| − | <td>Selecting <span style="color: white; background-color: black; font-weight: 700; font-size: 15px;">& | + | <td>Selecting <span style="color: white; background-color: black; font-weight: 700; font-size: 15px;"> Save </span> or pressing <span style="font-weight: 700; font-size: 15px;"><span style="color: white; background-color: black;"> Ctrl </span> + <span style="color: white; background-color: black;"> S </span></span> will save the route, or the route and the session, with the previously entered name(s) when they were loaded or created. You will be asked to confirm both the names (and can change them if you wish) and the '''Save''' command.<br><br></td> |
</tr> | </tr> | ||
<tr valign="top"> | <tr valign="top"> | ||
| − | <td>[[image:DotPoint.JPG|link=]]</td> | + | <td>[[image:DotPoint.JPG|10px|link=]]</td> |
| − | <td>Selecting <span style="color: white; background-color: black; font-weight: 700; font-size: 15px;">& | + | <td>Selecting <span style="color: white; background-color: black; font-weight: 700; font-size: 15px;"> Save As... </span> will save the route, or the route and the session, with the previously entered name(s) when they were loaded or created. You will be asked to confirm both the names (and can change them if you wish) and the '''Save As''' command.<br><br></td> |
| + | </tr> | ||
| + | <tr valign="top"> | ||
| + | <td colspan=2> | ||
| + | <table bgcolor=#000000 cellpadding=2> | ||
| + | <tr valign="top"> | ||
| + | <td> | ||
| + | <table bgcolor=#ffffb0 cellpadding=2> | ||
| + | <tr valign="top"> | ||
| + | <td width=25>[[image:NotePad.PNG|link=]]</td> | ||
| + | <td><span style="font-size: 17px; font-weight: 700;">Notes:'''</span><br> | ||
| + | ---- | ||
| + | <table> | ||
| + | <tr valign="top"> | ||
| + | <td colspan=2>'''Routes and Sessions''':-</td> | ||
| + | </tr> | ||
| + | <tr valign="top"> | ||
| + | <td width=10>[[image:DotPoint.JPG|10px|link=]]</td> | ||
| + | <td>are saved as entries in the '''Trainz Database''', not as files on your hard drive. Loading a route or a session will retrieve it from the database.</td> | ||
| + | </tr> | ||
| + | <tr valign="top"> | ||
| + | <td>[[image:DotPoint.JPG|10px|link=]]</td> | ||
| + | <td>can be loaded directly into '''Surveyor''' from '''Content Manager'''. See [[image:PageLink.PNG|link=]] '''[[#Loading a Route Into Surveyor From Content Manager|Loading a Route Into Surveyor From Content Manager]]''' and [[image:PageLink.PNG|link=]] '''[[#Loading a Session Into Surveyor From Content Manager|Loading a Session Into Surveyor From Content Manager]]''' below.</td> | ||
| + | </tr> | ||
| + | <tr valign="top"> | ||
| + | <td>[[image:DotPoint.JPG|10px|link=]]</td> | ||
| + | <td>can be '''exported''' as files (in the '''Trainz .cdp''' file format) from '''Content Manager''' for backup or transfer.</td> | ||
| + | </tr> | ||
| + | </table> | ||
| + | </td> | ||
| + | </tr> | ||
| + | </table> | ||
| + | </td> | ||
| + | </tr> | ||
| + | </table> | ||
| + | </td> | ||
</tr> | </tr> | ||
</table> | </table> | ||
| Line 1,061: | Line 3,158: | ||
</table> | </table> | ||
<br> | <br> | ||
| − | <table cellpadding= | + | <table cellpadding=2 bgcolor=#ffffb0 width=1000> <!-- BEGIN Notes Table --> |
<tr valign="top"> | <tr valign="top"> | ||
| − | <td>[[image:NotePad.PNG|link=]]</td> | + | <td width=25>[[image:NotePad.PNG|link=]]</td> |
| − | <td><span style="font-size: 17px; font-weight: 700;">Notes on Saving: | + | <td width=975><span style="font-size: 17px; font-weight: 700;">Notes on Saving DLS/DLC Routes and Sessions:</span><br> |
---- | ---- | ||
| − | < | + | </td> |
| + | </tr> | ||
<tr valign="top"> | <tr valign="top"> | ||
| − | <td> | + | <td> </td> |
| − | <td> | + | <td> |
| − | + | <table> | |
| − | + | <tr valign="top"> | |
| + | <td colspan=2><span style="font-weight: 700; font-size: 15px;"><span style="color: white; background-color: black;"> DLS </span> Routes and Sessions can be modified and saved as new routes and sessions</span></td> | ||
</tr> | </tr> | ||
<tr valign="top"> | <tr valign="top"> | ||
| − | <td>[[image: | + | <td width=25>[[image:DotPoint1Blue.png|link=]]</td> |
| − | <td> | + | <td><span style="font-weight: 700; font-size: 15px;">Modifying and Creating:-</span><br> |
| − | + | <table> | |
| − | + | <tr valign="top"> | |
| − | + | <td width=10>[[image:DotPoint.JPG|10px|link=]]</td> | |
| − | + | <td>if you have modified a '''DLS''' route then you can delete the original route if you no longer need it and your modified version will not be affected</td> | |
</tr> | </tr> | ||
<tr valign="top"> | <tr valign="top"> | ||
| − | <td>[[image:DotPoint.JPG|link=]]</td> | + | <td>[[image:DotPoint.JPG|10px|link=]]</td> |
| − | <td> | + | <td>if you have modified a '''DLS''' session then you can delete the original session if you no longer need it and your modified version will not be affected. However, if you delete the original '''DLS''' route then your modified session <span style="font-weight: 700; font-size: 15px; color: white; background-color: red;"> will not work </span></td> |
| − | <span style=" | + | |
</tr> | </tr> | ||
<tr valign="top"> | <tr valign="top"> | ||
| − | <td>[[image:DotPoint.JPG|link=]]</td> | + | <td>[[image:DotPoint.JPG|10px|link=]]</td> |
| − | <td> | + | <td>you can create a completely new and original session for a '''DLS''' route but it <span style="font-weight: 700; font-size: 15px; color: white; background-color: red;"> will not work </span> if the original '''DLS''' route is deleted</td> |
</tr> | </tr> | ||
<tr valign="top"> | <tr valign="top"> | ||
| − | <td>[[image:DotPoint.JPG|link=]]</td> | + | <td>[[image:DotPoint.JPG|10px|link=]]</td> |
| − | <td> | + | <td>the original '''DLS''' routes and sessions will not be altered or replaced by your modified versions</td> |
| − | + | </tr> | |
| − | + | </table> | |
| − | + | </td> | |
| − | + | ||
| − | + | ||
| − | + | ||
</tr> | </tr> | ||
<tr valign="top"> | <tr valign="top"> | ||
| − | <td>[[image:DotPoint.JPG|link=]]</td> | + | <td width=25>[[image:DotPoint2Blue.png|link=]]</td> |
| − | <td> | + | <td><span style="font-weight: 700; font-size: 15px;">Saving:-</span><br> |
| + | <table> | ||
| + | <tr valign="top"> | ||
| + | <td width=10>[[image:DotPoint.JPG|10px|link=]]</td> | ||
| + | <td>when saved, modified '''DLS''' routes and sessions will become '''Your Content''' and can be found using the <span style="color: white; background-color: black; font-weight: 700; font-size: 15px;"> MY CONTENT </span> search option in '''Surveyor/Driver'''</td> | ||
| + | </tr> | ||
| + | </table> | ||
| + | </td> | ||
| + | </tr> | ||
| + | <tr valign="top"> | ||
| + | <td width=25>[[image:DotPoint3Blue.png|link=]]</td> | ||
| + | <td><span style="font-weight: 700; font-size: 15px;">Uploading:-</span><br> | ||
| + | <table> | ||
| + | <tr valign="top"> | ||
| + | <td width=10>[[image:DotPoint.JPG|10px|link=]]</td> | ||
| + | <td>you can only upload your modified '''DLS''' route and session to the '''DLS''' if you have the <span style="font-weight: 700; text-decoration: underline;">permission</span> of the original creator</td> | ||
| + | </tr> | ||
| + | <tr valign="top"> | ||
| + | <td width=10>[[image:DotPoint.JPG|10px|link=]]</td> | ||
| + | <td>if you have created a completely original session based on a '''DLS''' route then you can upload the session as it is your creation</td> | ||
| + | </tr> | ||
| + | </table> | ||
| + | </td> | ||
| + | </tr> | ||
| + | </table> | ||
| + | </td> | ||
| + | </tr> | ||
| + | <tr valign="top"> | ||
| + | <td> </td> | ||
| + | <td> | ||
| + | <table> | ||
| + | <tr valign="top"> | ||
| + | <td colspan=2><span style="font-weight: 700; font-size: 15px;"><span style="color: white; background-color: black;"> DLC </span> Routes and Sessions can also be modified and saved as new routes and sessions <span style="color: red;">ONLY if the creators of the original DLC content have allowed it</span></span> - see [[image:PageLink.PNG|link=]] '''[[#Cloning a Route/Session|Cloning a Route/Session]]''' below for more details</td> | ||
| + | </tr> | ||
| + | <tr valign="top"> | ||
| + | <td width=25>[[image:DotPoint1Blue.png|link=]]</td> | ||
| + | <td><span style="font-weight: 700; font-size: 15px;">Modifying and Creating:-</span><br> | ||
| + | <table> | ||
| + | <tr valign="top"> | ||
| + | <td>[[image:DotPoint.JPG|10px|link=]]</td> | ||
| + | <td>some '''DLC''' routes and sessions are encrypted and cannot be modified - that is a decision made by the content creator</td> | ||
| + | </tr> | ||
| + | <tr valign="top"> | ||
| + | <td>[[image:DotPoint.JPG|10px|link=]]</td> | ||
| + | <td>your modified '''DLC''' route or session will become an ''alias'' of the original and will need the original route and session to be present on your system to work</td> | ||
| + | </tr> | ||
| + | <tr valign="top"> | ||
| + | <td>[[image:DotPoint.JPG|10px|link=]]</td> | ||
| + | <td>if you delete or disable the original '''DLC''' route or session then your modified versions <span style="font-weight: 700; font-size: 15px; color: white; background-color: red;"> will not work </span></td> | ||
| + | </tr> | ||
| + | <tr valign="top"> | ||
| + | <td>[[image:DotPoint.JPG|10px|link=]]</td> | ||
| + | <td>you can create a completely new and original session for a '''DLC''' route but it <span style="font-weight: 700; font-size: 15px; color: white; background-color: red;"> will not work </span> if the original '''DLC''' route is deleted or disabled</td> | ||
| + | </tr> | ||
| + | <tr valign="top"> | ||
| + | <td>[[image:DotPoint.JPG|10px|link=]]</td> | ||
| + | <td>the original '''DLC''' routes and sessions will not be altered or replaced by your modified versions</td> | ||
| + | </tr> | ||
| + | </table> | ||
| + | </td> | ||
| + | </tr> | ||
| + | <tr valign="top"> | ||
| + | <td width=25>[[image:DotPoint2Blue.png|link=]]</td> | ||
| + | <td><span style="font-weight: 700; font-size: 15px;">Saving:-</span><br> | ||
| + | <table> | ||
| + | <tr valign="top"> | ||
| + | <td width=10>[[image:DotPoint.JPG|10px|link=]]</td> | ||
| + | <td>when saved, a modified '''DLC''' route or session will become '''Your Content''' and can be found using the <span style="color: white; background-color: black; font-weight: 700; font-size: 15px;"> MY CONTENT </span> search option in '''Surveyor/Driver'''</td> | ||
| + | </tr> | ||
| + | <tr valign="top"> | ||
| + | <td>[[image:DotPoint.JPG|10px|link=]]</td> | ||
| + | <td>the original '''DLC''' route and session will not be altered or replaced by your modified versions</td> | ||
| + | </tr> | ||
| + | </table> | ||
| + | </td> | ||
| + | </tr> | ||
| + | <tr valign="top"> | ||
| + | <td width=25>[[image:DotPoint3Blue.png|link=]]</td> | ||
| + | <td><span style="font-weight: 700; font-size: 15px;">Uploading:-</span><br> | ||
| + | <table> | ||
| + | <tr valign="top"> | ||
| + | <td>[[image:DotPoint.JPG|10px|link=]]</td> | ||
| + | <td>you can upload your modified '''DLC''' route or session to the '''DLS''' but it can only be used by those who also have the same original (unmodified) '''DLC''' version installed</td> | ||
| + | </tr> | ||
| + | </table> | ||
| + | </td> | ||
</tr> | </tr> | ||
</table> | </table> | ||
| Line 1,108: | Line 3,288: | ||
</tr> | </tr> | ||
</table> <!-- END Notes Table --> | </table> <!-- END Notes Table --> | ||
| − | + | <br> | |
| + | <table width=1000> <!-- BEGIN Nav Buttons Table --> | ||
| + | <tr valign="top"> | ||
| + | <td width=629><span id="skipSaveNew"></span> | ||
=='''Saving a New Route and Session'''== | =='''Saving a New Route and Session'''== | ||
| + | </td> | ||
| + | <td width=50>[[image:SkipDown.png|link=#skipSaveExistingRoute|Skip Down]]</td> | ||
| + | <td width=50>[[image:SkipUp.png|link=#stepSaving|Skip Up]]</td> | ||
| + | <td width=46> </td> | ||
| + | <td width=75> </td> | ||
| + | <td width=75> </td> | ||
| + | <td width=75> </td> | ||
| + | </tr> | ||
| + | </table> <!-- END Nav Buttons Table --> | ||
| + | |||
If you have created a new route and select '''Save''' or '''Save As...''', then you will be presented with the following '''Save Route Dialogue Windows'''. | If you have created a new route and select '''Save''' or '''Save As...''', then you will be presented with the following '''Save Route Dialogue Windows'''. | ||
| − | <table width= | + | <table width=1000> |
<tr valign="top"> | <tr valign="top"> | ||
<td>[[image:RouteSARSaveNew.png|link=|alt=First Save]]</td> | <td>[[image:RouteSARSaveNew.png|link=|alt=First Save]]</td> | ||
| Line 1,121: | Line 3,314: | ||
</table> | </table> | ||
<br> | <br> | ||
| − | = | + | <table width=1000> <!-- BEGIN Nav Buttons Table --> |
| − | < | + | |
<tr valign="top"> | <tr valign="top"> | ||
| − | <td>[[image: | + | <td width=629><span id="skipSaveExistingRoute"></span> |
| − | <td> | + | =='''Saving an Existing Route'''== |
| + | </td> | ||
| + | <td width=50>[[image:SkipDown.png|link=#skipSaveExistingRouteSession|Skip Down]]</td> | ||
| + | <td width=50>[[image:SkipUp.png|link=#skipSaveNew|Skip Up]]</td> | ||
| + | <td width=46> </td> | ||
| + | <td width=75> </td> | ||
| + | <td width=75> </td> | ||
| + | <td width=75> </td> | ||
</tr> | </tr> | ||
| − | </table> | + | </table> <!-- END Nav Buttons Table --> |
| − | <table> | + | |
| + | If you have loaded the route only and not the session and '''<u>HAVE NOT</u>''' edited any '''Session Data''' or '''Session Layers''', then selecting '''Save''' will produce the following '''Save Route Dialogue Window'''. | ||
| + | <table width=1000> | ||
<tr valign="top"> | <tr valign="top"> | ||
| − | <td>[[image:RouteSARSaveExistingNoSession.png|link=|alt=Save Route with no Session]]<td> | + | <td>[[image:RouteSARSaveExistingNoSession.png|link=|alt=Save Route with no Session]]</td> |
<td> | <td> | ||
<table bgcolor=#eeeeee width=800> | <table bgcolor=#eeeeee width=800> | ||
| Line 1,140: | Line 3,341: | ||
<td>[[image:Gears.PNG|link=]]</td> | <td>[[image:Gears.PNG|link=]]</td> | ||
<td><span style="font-size: 17px; font-weight: 700;">Settings:'''</span><br> | <td><span style="font-size: 17px; font-weight: 700;">Settings:'''</span><br> | ||
| − | [[image: | + | <span style="font-weight: 700; font-size: 15px;"><span style="color: white; background-color: black;"> Option </span> [[image:Ablue.png|link=]] Overwrite Route Only</span>. This is the '''default''' selection so there is nothing to change. |
| − | :[[image:White_Select_Dot.png|link=]]& | + | :[[image:White_Select_Dot.png|link=]] '''Overwrite existing route and:''' |
| − | ::[[image:White_Select_Dot.png|link=]]& | + | ::[[image:White_Select_Dot.png|link=]] '''Do not save session''' |
| − | :: | + | ::[[image:BlackDot10x10.png|link=]] the route will be saved ('''overwritten''' using its current name) but no session will be saved. |
| − | [[image: | + | <span style="font-weight: 700; font-size: 15px;"><span style="color: white; background-color: black;"> Option </span> [[image:Bblue.png|link=]]  Overwrite Route and Create a New Session</span>. Tick the box [[image:Grey_Select_Dot.png|link=]] '''Create new session'''. |
| − | :[[image:White_Select_Dot.png|link=]]& | + | :[[image:White_Select_Dot.png|link=]] '''Overwrite existing route and:''' |
| − | ::[[image:White_Select_Dot.png|link=]]& | + | ::[[image:White_Select_Dot.png|link=]] '''Create new session:''' |
| − | :: | + | ::[[image:BlackDot10x10.png|link=]] enter a name for the session (the suggested name '''Default''' is '''NOT''' recommended). |
| − | :: | + | ::[[image:BlackDot10x10.png|link=]] the route will be saved ('''overwritten''' using its current name). |
| − | :: | + | ::[[image:BlackDot10x10.png|link=]] a new session will be created using the name you enter and it will be added to the route. |
| − | :: | + | ::[[image:BlackDot10x10.png|link=]] because you did not originally load a session, the new session will be saved with '''default''' values for all its settings. |
| − | [[image: | + | <span style="font-weight: 700; font-size: 15px;"><span style="color: white; background-color: black;"> Option </span> [[image:Cblue.png|link=]] Create a New Route and a "Default Session"</span>. Tick the box [[image:Grey_Select_Dot.png|link=]] '''Save new route and session'''. |
| − | :[[image:White_Select_Dot.png|link=]]& | + | :[[image:White_Select_Dot.png|link=]] '''Save new route and session:''' |
| − | :: | + | ::[[image:BlackDot10x10.png|link=]] enter a new name for the route. The route will be saved with its new name. |
| − | :: | + | ::[[image:BlackDot10x10.png|link=]] the original route will not be changed. |
| − | :: | + | ::[[image:BlackDot10x10.png|link=]] a new session will be created using the name '''Default''' and it will be added to the new route. |
| − | :: | + | ::[[image:BlackDot10x10.png|link=]] because you did not originally load a session, the new session will be saved with the '''default''' values for all its settings. |
</td> | </td> | ||
| + | </tr> | ||
| + | <tr valign="top"> | ||
| + | <td colspan=2 align="right">After you have made your selections, <span style="font-weight: 700; font-size: 15px; background-color: lightcyan;">Left Click</span> on [[image:Tick.PNG|link=|25px]] to '''Accept''' or [[image:Cross.PNG|link=|25px]] to '''Cancel'''</td> | ||
</tr> | </tr> | ||
<tr valign="top"> | <tr valign="top"> | ||
| Line 1,168: | Line 3,372: | ||
</table> | </table> | ||
<br> | <br> | ||
| − | + | If you have loaded the route only and not the session and '''<u>HAVE</u>''' edited '''Session Data''' or '''Session Layers''', then selecting '''Save''' will produce the following '''Save Route Dialogue Window'''. | |
| − | + | <table width=1000> | |
| − | + | ||
| − | + | ||
| − | + | ||
| − | + | ||
| − | <table> | + | |
<tr valign="top"> | <tr valign="top"> | ||
| − | <td>[[image:RouteSARSaveExistingNewSession.png|link=|alt=Save Route with Session]]<td> | + | <td>[[image:RouteSARSaveExistingNewSession.png|link=|alt=Save Route with Session]]</td> |
<td> | <td> | ||
<table bgcolor=#eeeeee width=800> | <table bgcolor=#eeeeee width=800> | ||
| Line 1,186: | Line 3,385: | ||
<td>[[image:Gears.PNG|link=]]</td> | <td>[[image:Gears.PNG|link=]]</td> | ||
<td><span style="font-size: 17px; font-weight: 700;">Settings:'''</span><br> | <td><span style="font-size: 17px; font-weight: 700;">Settings:'''</span><br> | ||
| − | [[image: | + | <span style="font-weight: 700; font-size: 15px;"><span style="color: white; background-color: black;"> Option </span> [[image:Ablue.png|link=]] Overwrite Route and Create a New Session</span>. This is the '''default''' selection so there is nothing to change. |
| − | :[[image:White_Select_Dot.png|link=]]& | + | :[[image:White_Select_Dot.png|link=]] '''Overwrite existing route and:''' |
| − | ::[[image:White_Select_Dot.png|link=]]& | + | ::[[image:White_Select_Dot.png|link=]] '''Create new session:''' |
| − | :: | + | ::[[image:BlackDot10x10.png|link=]] enter a name for the session (the suggested name '''Default''' is '''NOT''' recommended). |
| − | :: | + | ::[[image:BlackDot10x10.png|link=]] the route will be saved ('''overwritten''' using its current name). |
| − | :: | + | ::[[image:BlackDot10x10.png|link=]] a new session will be created using the name you enter and it will be added to the route. The new session will have the settings and changes you have made. |
| − | [[image: | + | <span style="font-weight: 700; font-size: 15px;"><span style="color: white; background-color: black;"> Option </span> [[image:Bblue.png|link=]] Overwrite Route Only</span>. Tick the box [[image:Grey_Select_Dot.png|link=]] '''Do not save session'''. |
| − | :[[image:White_Select_Dot.png|link=]]& | + | :[[image:White_Select_Dot.png|link=]] '''Overwrite existing route and:''' |
| − | ::[[image:White_Select_Dot.png|link=]]& | + | ::[[image:White_Select_Dot.png|link=]] '''Do not save session''' |
| − | :: | + | ::[[image:BlackDot10x10.png|link=]] the route will be saved ('''overwritten''' using its current name) but no session will be saved. |
| − | :: | + | ::[[image:BlackDot10x10.png|link=]] if you have edited the session and later exit the program without saving those edits (you will be prompted to save the session) then any changes you have made to the session will be lost. |
| − | [[image: | + | <span style="font-weight: 700; font-size: 15px;"><span style="color: white; background-color: black;"> Option </span> [[image:Cblue.png|link=]] Create a New Route and a "Default Session"</span>. Tick the box [[image:Grey_Select_Dot.png|link=]] '''Save new route and session'''. |
| − | :[[image:White_Select_Dot.png|link=]]& | + | :[[image:White_Select_Dot.png|link=]] '''Save new route and session:''' |
| − | :: | + | ::[[image:BlackDot10x10.png|link=]] enter a new name for the route. The route will be saved with its new name. |
| − | :: | + | ::[[image:BlackDot10x10.png|link=]] the original route will not be changed. |
| − | :: | + | ::[[image:BlackDot10x10.png|link=]] a new session will be created using the name '''Default''' and it will be added to the new route. The new session will have the settings and changes you have made. |
</td> | </td> | ||
| + | </tr> | ||
| + | <tr valign="top"> | ||
| + | <td colspan=2 align="right">After you have made your selections, <span style="font-weight: 700; font-size: 15px; background-color: lightcyan;">Left Click</span> on [[image:Tick.PNG|link=|25px]] to '''Accept''' or [[image:Cross.PNG|link=|25px]] to '''Cancel'''</td> | ||
</tr> | </tr> | ||
<tr valign="top"> | <tr valign="top"> | ||
| Line 1,213: | Line 3,415: | ||
</table> | </table> | ||
<br> | <br> | ||
| − | + | <table bgcolor=#000000 width=1000 cellpadding=2> | |
| − | + | ||
| − | + | ||
| − | + | ||
| − | + | ||
| − | + | ||
| − | + | ||
| − | + | ||
| − | + | ||
| − | + | ||
| − | + | ||
| − | <table bgcolor=#000000 width= | + | |
<tr valign="top"> | <tr valign="top"> | ||
<td> | <td> | ||
| − | <table bgcolor=#ffffb0 width= | + | <table bgcolor=#ffffb0 width=996 cellpadding=2> |
<tr valign="top"> | <tr valign="top"> | ||
<td>[[image:NotePad.PNG|link=]]</td> | <td>[[image:NotePad.PNG|link=]]</td> | ||
<td><span style="font-size: 17px; font-weight: 700;">Notes:'''</span><br> | <td><span style="font-size: 17px; font-weight: 700;">Notes:'''</span><br> | ||
| − | ---- | + | ----</td> |
| − | If you have edited any session '''Data''' or '''Layers''' but have selected the option '''Do not save | + | </tr> |
| − | </td> | + | <tr valign="top"> |
| + | <td width=10>[[image:DotPoint.JPG|10px|link=]]</td> | ||
| + | <td>If you have edited any session '''Data''' or '''Layers''' but have selected the option '''Do not save session''' then later, before you exit the program, you will be prompted to save the edited session by the appearance of the '''Save Session''' dialogue box (see below).</td> | ||
| + | </tr> | ||
| + | <tr valign="top"> | ||
| + | <td width=10>[[image:DotPoint.JPG|10px|link=]]</td> | ||
| + | <td>If you decide to create a new session and leave its name as '''Default''' then a new '''Default Session''' will be created to add to any others also named '''Default''' that may already be present in a route and this '''will''' cause confusion. This is why it is not a good idea to use '''Default''' as a session name.</td> | ||
</tr> | </tr> | ||
</table> | </table> | ||
| Line 1,239: | Line 3,436: | ||
</tr> | </tr> | ||
</table> | </table> | ||
| + | <br> | ||
| + | <table width=1000> <!-- BEGIN Nav Buttons Table --> | ||
| + | <tr valign="top"> | ||
| + | <td width=629><span id="skipSaveExistingRouteSession"></span> | ||
| + | =='''Saving an Existing Route and Session'''== | ||
</td> | </td> | ||
| + | <td width=50>[[image:SkipDown.png|link=#skipSaveExistingSessionOnly|Skip Down]]</td> | ||
| + | <td width=50>[[image:SkipUp.png|link=#skipSaveExistingRoute|Skip Up]]</td> | ||
| + | <td width=46> </td> | ||
| + | <td width=75> </td> | ||
| + | <td width=75> </td> | ||
| + | <td width=75> </td> | ||
| + | </tr> | ||
| + | </table> <!-- END Nav Buttons Table --> | ||
| + | |||
| + | <table width=1000> | ||
| + | <tr valign="top"> | ||
| + | <td>If you have loaded a route and a session and have edited the route <span style="font-weight: 700; font-size: 15px;">OR</span> both the route <span style="font-weight: 700; font-size: 15px;">AND</span> the session, then selecting '''Save''' will produce the following '''Save Route Dialogue Window'''.</td> | ||
| + | </tr> | ||
| + | </table> | ||
| + | |||
| + | <table width=1000> | ||
| + | <tr valign="top"> | ||
| + | <td>[[image:RouteSessionSARSaveExisting.png|link=|alt=Save Route and Session]]</td> | ||
<td> | <td> | ||
<table bgcolor=#eeeeee width=800> | <table bgcolor=#eeeeee width=800> | ||
| Line 1,249: | Line 3,469: | ||
<td>[[image:Gears.PNG|link=]]</td> | <td>[[image:Gears.PNG|link=]]</td> | ||
<td><span style="font-size: 17px; font-weight: 700;">Settings:'''</span><br> | <td><span style="font-size: 17px; font-weight: 700;">Settings:'''</span><br> | ||
| − | [[image: | + | <span style="font-weight: 700; font-size: 15px;"><span style="color: white; background-color: black;"> Option </span> [[image:Ablue.png|link=]] Overwrite Route and Session</span>. This is the '''default''' selection so there is nothing to change. |
| − | :[[image:White_Select_Dot.png|link=]]& | + | :[[image:White_Select_Dot.png|link=]] '''Overwrite existing route and:''' |
| − | ::[[image:White_Select_Dot.png|link=]]& | + | ::[[image:White_Select_Dot.png|link=]] '''Overwrite existing session:''' |
| − | :: | + | ::[[image:BlackDot10x10.png|link=]] both the route and the session will be saved ('''overwritten''' using their current names). |
| − | [[image: | + | <span style="font-weight: 700; font-size: 15px;"><span style="color: white; background-color: black;"> Option </span> [[image:Bblue.png|link=]] Overwrite Existing Route and Create a New Session</span>. Tick the box [[image:Grey_Select_Dot.png|link=]] '''Create new session'''. |
| − | :[[image:White_Select_Dot.png|link=]]& | + | :[[image:White_Select_Dot.png|link=]] '''Overwrite existing route and:''' |
| − | ::[[image:White_Select_Dot.png|link=]]& | + | ::[[image:White_Select_Dot.png|link=]] '''Create new session:''' |
| − | :: | + | ::[[image:BlackDot10x10.png|link=]] enter a new name for the session. |
| − | :: | + | ::[[image:BlackDot10x10.png|link=]] the route will be saved ('''overwritten''' using its current name). |
| − | :: | + | ::[[image:BlackDot10x10.png|link=]] a new session will be created using the name you enter and it will be added to the existing route. |
| − | :: | + | ::[[image:BlackDot10x10.png|link=]] the original session will not be changed. |
| − | [[image: | + | <span style="font-weight: 700; font-size: 15px;"><span style="color: white; background-color: black;"> Option </span> [[image:Cblue.png|link=]] Overwrite Route Only</span>. Tick the box [[image:Grey_Select_Dot.png|link=]] '''Do not save session'''. |
| − | :[[image:White_Select_Dot.png|link=]]& | + | :[[image:White_Select_Dot.png|link=]] '''Overwrite existing route and:''' |
| − | ::[[image:White_Select_Dot.png|link=]]& | + | ::[[image:White_Select_Dot.png|link=]] '''Do not save session''' |
| − | :: | + | ::[[image:BlackDot10x10.png|link=]] the route will be saved ('''overwritten''' using its current name) but no session will be saved. |
| − | :: | + | ::[[image:BlackDot10x10.png|link=]] if you have edited the session and later exit the program without saving those edits (you will be prompted to save the session) then any changes you have made to the session will be lost. |
| − | [[image: | + | <span style="font-weight: 700; font-size: 15px;"><span style="color: white; background-color: black;"> Option </span> [[image:Dblue.png|link=]] Create a New Route and a New Session</span>. Tick the box [[image:Grey_Select_Dot.png|link=]] '''Save new route and session'''. |
| − | :[[image:White_Select_Dot.png|link=]]& | + | :[[image:White_Select_Dot.png|link=]] '''Save new route and session:''' |
| − | :: | + | ::[[image:BlackDot10x10.png|link=]] enter a new name for the route. |
| − | :: | + | ::[[image:BlackDot10x10.png|link=]] the route will be saved with its new name. |
| − | :: | + | ::[[image:BlackDot10x10.png|link=]] a new session will be created using the same name as the original session and it will be added to the new route. |
| − | :: | + | ::[[image:BlackDot10x10.png|link=]] the original session and route will not be changed. |
</td> | </td> | ||
| + | </tr> | ||
| + | <tr valign="top"> | ||
| + | <td colspan=2 align="right">After you have made your selections, <span style="font-weight: 700; font-size: 15px; background-color: lightcyan;">Left Click</span> on [[image:Tick.PNG|link=|25px]] to '''Accept''' or [[image:Cross.PNG|link=|25px]] to '''Cancel'''</td> | ||
</tr> | </tr> | ||
<tr valign="top"> | <tr valign="top"> | ||
| Line 1,281: | Line 3,504: | ||
</tr> | </tr> | ||
</table> | </table> | ||
| − | <table> | + | <br> |
| + | <table bgcolor=#000000 width=1000 cellpadding=2> | ||
<tr valign="top"> | <tr valign="top"> | ||
| − | <td>[[image:DotPoint.JPG|link=]]</td> | + | <td> |
| − | <td>If you have | + | <table bgcolor=#ffffb0 width=996 cellpadding=2> |
| + | <tr valign="top"> | ||
| + | <td>[[image:NotePad.PNG|link=]]</td> | ||
| + | <td><span style="font-size: 17px; font-weight: 700;">Notes:'''</span><br> | ||
| + | ----</td> | ||
| + | </tr> | ||
| + | <tr valign="top"> | ||
| + | <td width=10>[[image:DotPoint.JPG|10px|link=]]</td> | ||
| + | <td>If you have edited any session '''Data''' or '''Layers''' but have selected the option '''Do not save session''' then later, before you exit the program, you will be prompted to save the edited session by the appearance of the '''Save Session''' dialogue box (see below).</td> | ||
| + | </tr> | ||
| + | <tr valign="top"> | ||
| + | <td>[[image:DotPoint.JPG|10px|link=]]</td> | ||
| + | <td>If you decide to create a new session and leave its name as '''Default''' then a new '''Default Session''' will be created to add to any others also named '''Default''' that may already be present in a route and this '''will''' cause confusion. This is why it is not a good idea to use '''Default''' as a session name.</td> | ||
| + | </tr> | ||
| + | <tr valign="top"> | ||
| + | <td>[[image:DotPoint.JPG|10px|link=]]</td> | ||
| + | <td>There is a <span style="font-weight: 700; color: red;">BUG</span> in '''Trainz Plus''' and '''TRS22''' that will treat changing the name of a '''Track Object''' (e.g. a signal, track mark, switch, etc) as a change to the session and not to the route. If you have not edited anything else in the route then you will see the '''Session Save''' dialogue window (see [[image:PageLink.PNG|link=]] '''[[#skipSaveExistingSessionOnly|Saving an Edited Session Only]]''' below) to save the session and not the route. The workaround is to make a change to the route (e.g. move a tree a few centimetres) and select save again.</td> | ||
</tr> | </tr> | ||
</table> | </table> | ||
| − | <table> | + | </td> |
| + | </tr> | ||
| + | </table> | ||
| + | <br> | ||
| + | <table width=1000> <!-- BEGIN Nav Buttons Table --> | ||
| + | <tr valign="top"> | ||
| + | <td width=629><span id="skipSaveExistingSessionOnly"></span> | ||
| + | |||
| + | =='''Saving an Edited Session Only'''== | ||
| + | </td> | ||
| + | <td width=50>[[image:SkipDown.png|link=#skipSaveUDS|Skip Down]]</td> | ||
| + | <td width=50>[[image:SkipUp.png|link=#skipSaveExistingRouteSession|Skip Up]]</td> | ||
| + | <td width=46> </td> | ||
| + | <td width=75> </td> | ||
| + | <td width=75> </td> | ||
| + | <td width=75> </td> | ||
| + | </tr> | ||
| + | </table> <!-- END Nav Buttons Table --> | ||
| + | |||
| + | <table width=1000 bgcolor="lightcyan" cellpadding=2> | ||
| + | <tr valign="top"> | ||
| + | <td width=10>[[image:BlueDot10x10.png|link=]]</td> | ||
| + | <td>If you have only edited the session then you will be given the option to save the '''Session''' only</td> | ||
| + | </tr> | ||
| + | </table> | ||
| + | <br> | ||
| + | <table width=1000> | ||
| + | <tr valign="top"> | ||
| + | <td>If you have loaded a route and a session and have edited the session ('''Data''' or '''Layers''') only and not the route, or have already saved the route but not the session, then selecting '''Save''' will produce the following '''Save Session Dialogue Window'''.</td> | ||
| + | </tr> | ||
| + | </table> | ||
| + | |||
| + | <table width=1000> | ||
<tr valign="top"> | <tr valign="top"> | ||
| − | <td>[[image:SessionSARSaveExistingNoRoute.png|link=|alt=Save Session]]<td> | + | <td>[[image:SessionSARSaveExistingNoRoute.png|link=|alt=Save Session]]</td> |
<td> | <td> | ||
<table bgcolor=#eeeeee width=800> | <table bgcolor=#eeeeee width=800> | ||
| Line 1,299: | Line 3,571: | ||
<td>[[image:Gears.PNG|link=]]</td> | <td>[[image:Gears.PNG|link=]]</td> | ||
<td><span style="font-size: 17px; font-weight: 700;">Settings:'''</span><br> | <td><span style="font-size: 17px; font-weight: 700;">Settings:'''</span><br> | ||
| − | [[image: | + | <span style="font-weight: 700; font-size: 15px;"><span style="color: white; background-color: black;"> Option </span> [[image:Ablue.png|link=]] Overwrite the Session Only</span>. This is the '''default''' selection so there is nothing to change. |
| − | :[[image:White_Select_Dot.png|link=]]& | + | :[[image:White_Select_Dot.png|link=]] '''Overwrite existing session''' |
| − | : | + | :[[image:BlackDot10x10.png|link=]] the session will be saved ('''overwritten''' using its current name). |
| − | : | + | :[[image:BlackDot10x10.png|link=]] the original route will not be changed. |
| − | [[image: | + | <span style="font-weight: 700; font-size: 15px;"><span style="color: white; background-color: black;"> Option </span> [[image:Bblue.png|link=]] Create a New Session</span>. Tick the box [[image:Grey_Select_Dot.png|link=]] '''Create new session'''. |
| − | :[[image:White_Select_Dot.png|link=]]& | + | :[[image:White_Select_Dot.png|link=]] '''Create new session:''' |
| − | : | + | :[[image:BlackDot10x10.png|link=]] you can enter a new name for the session or use the suggested name which will include the date, time and session runtime. |
| − | : | + | :[[image:BlackDot10x10.png|link=]] a new session will be created using the name you enter and it will be added to the existing route. |
| − | : | + | :[[image:BlackDot10x10.png|link=]] the original route and session will not be changed. |
</td> | </td> | ||
| + | </tr> | ||
| + | <tr valign="top"> | ||
| + | <td colspan=2 align="right">After you have made your selections, <span style="font-weight: 700; font-size: 15px; background-color: lightcyan;">Left Click</span> on [[image:Tick.PNG|link=|25px]] to '''Accept''' or [[image:Cross.PNG|link=|25px]] to '''Cancel'''</td> | ||
</tr> | </tr> | ||
<tr valign="top"> | <tr valign="top"> | ||
| Line 1,319: | Line 3,594: | ||
</table> | </table> | ||
<br> | <br> | ||
| + | <table width=1000> <!-- BEGIN Nav Buttons Table --> | ||
| + | <tr valign="top"> | ||
| + | <td width=629><span id="skipSaveUDS"></span> | ||
=='''Saving a Route and Session Using the UDS'''== | =='''Saving a Route and Session Using the UDS'''== | ||
| − | + | </td> | |
| + | <td width=50>[[image:SkipDown.png|link=#stepExit|Skip Down]]</td> | ||
| + | <td width=50>[[image:SkipUp.png|link=#skipSaveExistingSessionOnly|Skip Up]]</td> | ||
| + | <td width=46> </td> | ||
| + | <td width=75> </td> | ||
| + | <td width=75> </td> | ||
| + | <td width=75> </td> | ||
| + | </tr> | ||
| + | </table> <!-- END Nav Buttons Table --> | ||
| − | <table bgcolor=#ff0000 cellpadding=2 width= | + | <table width=1000 bgcolor="lightcyan" cellpadding=2> |
| + | <tr valign="top"> | ||
| + | <td width=10>[[image:BlueDot10x10.png|link=]]</td> | ||
| + | <td>The '''UDS''' feature is available in '''TRS19 Platinum Edition''', '''Trainz Plus''', '''TRS22''' and '''TRS22 Platinum'''</td> | ||
| + | </tr> | ||
| + | </table> | ||
| + | |||
| + | <table width=1000> | ||
| + | <tr valign="top"> | ||
| + | <td>The '''UDS''' ('''<u>U</u>'''nified '''<u>D</u>'''river '''<u>S</u>'''urveyor) Interface allows you to quickly switch from '''Driver''' to '''Surveyor''' and back to '''Driver''' again without having to restart the session from the beginning. You can edit a route and session while in '''Surveyor''' and then switch back to '''Driver''' to continue the session where you left it.</td> | ||
| + | </tr> | ||
| + | </table> | ||
| + | <br> | ||
| + | <table bgcolor=#ff0000 cellpadding=2 width=1000> | ||
<tr valign="top"> | <tr valign="top"> | ||
<td> | <td> | ||
<table bgcolor=#fcbcbc> | <table bgcolor=#fcbcbc> | ||
<tr valign="top"> | <tr valign="top"> | ||
| − | <td>[[ | + | <td>[[image:Stop.PNG|link=]]</td> |
<td><span style="font-size: 15px; font-weight: 700;">WARNING:</span><br> | <td><span style="font-size: 15px; font-weight: 700;">WARNING:</span><br> | ||
| − | This powerful ability does come with a warning. If you save the edited session before switching back into '''Driver''' then all the moving consists will be saved in their new positions. Other changes, such as the status of '''Session Rules''', will also be saved in their new states. See the '''Trainz Wiki Page [[image:WikiLink.PNG|link=]]& | + | This powerful ability does come with a warning. If you save the edited session before switching back into '''Driver''' then all the moving consists will be saved in their new positions. Other changes, such as the status of '''Session Rules''', will also be saved in their new states. See the '''Trainz Wiki Page [[image:WikiLink.PNG|link=]] [[How_to_Use_the_UDS_Interface|How to Use the UDS Interface]]''' for more details. |
</td> | </td> | ||
</tr> | </tr> | ||
| Line 1,338: | Line 3,637: | ||
</table> | </table> | ||
<br> | <br> | ||
| − | + | <table width=1000> | |
| − | + | ||
| − | <table | + | |
<tr valign="top"> | <tr valign="top"> | ||
| − | <td> | + | <td>Most of the problems users seem to be experiencing with the '''UDS''', judging from the posts in the Trainz Forums, is when saving their edited '''Driver''' session after switching to '''Surveyor''' mode.</td> |
| − | + | ||
| − | + | ||
| − | + | ||
| − | + | ||
| − | + | ||
</tr> | </tr> | ||
</table> | </table> | ||
<br> | <br> | ||
| − | <table bgcolor=#000000 | + | <table width=1000 bgcolor=#000000 cellpadding=2> |
<tr valign="top"> | <tr valign="top"> | ||
<td> | <td> | ||
| − | <table bgcolor=#ffffb0> | + | <table width=996 bgcolor=#ffffb0 cellpadding=2> |
<tr valign="top"> | <tr valign="top"> | ||
| − | <td>[[ | + | <td width=25>[[image:NotePad.PNG|link=]]</td> |
| − | <td><span style="font-size: 17px | + | <td><span style="font-size: 17px;">'''Notes:'''</span><br> |
---- | ---- | ||
| − | |||
</td> | </td> | ||
</tr> | </tr> | ||
<tr valign="top"> | <tr valign="top"> | ||
| − | <td | + | <td>[[image:DotPoint.JPG|10px|link=]]</td> |
| − | < | + | <td>Using '''Driver Mode''' involves driving consists (either manually or through the AI) and activating rules. '''These will change the session parameters'''</td> |
| + | </tr> | ||
<tr valign="top"> | <tr valign="top"> | ||
| − | <td>[[ | + | <td>[[image:DotPoint.JPG|10px|link=]]</td> |
| − | <td> | + | <td>'''Overwriting the Session will save the consist in their new positions and the Session Rules in their new (completed/not completed) conditions'''</td> |
| − | </td> | + | |
</tr> | </tr> | ||
| − | </ | + | <tr valign="top"> |
| − | </td> | + | <td>[[image:DotPoint.JPG|10px|link=]]</td> |
| + | <td>When you are in '''Driver Mode''' at least one of the consists will probably be moving. Some of the Session rules may have already been completed while others may still be running or waiting for events (e.g. triggers to be activated)</td> | ||
| + | </tr> | ||
| + | <tr valign="top"> | ||
| + | <td>[[image:DotPoint.JPG|10px|link=]]</td> | ||
| + | <td>If, after switching to '''Surveyor Mode''', you then choose to save using the '''Overwrite existing session''' option then you will be replacing your original starting Session with a new one with the consists saved in their new positions and the Session rules saved in their new states. So when you later load and restart the Session things will not be the same as they were in the original or starting Session.</td> | ||
</tr> | </tr> | ||
</table> | </table> | ||
| Line 1,378: | Line 3,674: | ||
</table> | </table> | ||
<br> | <br> | ||
| − | + | <span style="font-size: 17px; background-color: yellow; font-weight: 700"> Unless you have a particular reason for overwriting the original Session then the recommended save options are:-</span><br> | |
| − | + | <table width=1000> | |
| − | <span style="font-size: 17px; | + | |
| − | <table width= | + | |
<tr valign="top"> | <tr valign="top"> | ||
<td colspan=2>[[Image:line740.png|link=]]</td> | <td colspan=2>[[Image:line740.png|link=]]</td> | ||
</tr> | </tr> | ||
<tr valign="top"> | <tr valign="top"> | ||
| − | <td colspan=2><span style="font-weight: 700; font-size: 17px;">Option </span>[[image: | + | <td colspan=2><span style="font-weight: 700; font-size: 17px;">Option </span>[[image:Ablue.png|link=]] <span style="font-weight: 700; font-size: 17px;">Do Not Save the Session</span></td> |
</tr> | </tr> | ||
| + | <tr valign="top"> | ||
| + | <td> | ||
| + | <table width=290> | ||
<tr valign="top"> | <tr valign="top"> | ||
<td width=20> </td> | <td width=20> </td> | ||
| − | <td>[[image:UDS-DoNotSaveSession.png|link=]]< | + | <td width=270>[[image:UDS-DoNotSaveSession.png|link=]]</td> |
| − | + | </tr> | |
| + | </table> | ||
</td> | </td> | ||
| + | <td> | ||
| + | <table bgcolor=#000000 cellpadding=2> | ||
| + | <tr valign="top"> | ||
| + | <td> | ||
| + | <table bgcolor=#ffffff cellpadding=2> | ||
| + | <tr valign="top"> | ||
| + | <td colspan=2><span style="font-weight: 700; font-size: 15px;">Steps:</span> To save the '''Route''' only:-</td> | ||
</tr> | </tr> | ||
| + | <tr valign="top"> | ||
| + | <td width=20>[[image:DotPointBox.png|link=]]</td> | ||
| + | <td><span style="font-weight: 700; font-size: 15px; background-color: lightcyan;">Left Click</span> the checkbox <span style="font-weight: 700; font-size: 15px; color: white; background-color: black;"> Do not save session </span> </td> | ||
| + | </tr> | ||
| + | </table> | ||
| + | </td> | ||
| + | </tr> | ||
| + | </table> | ||
| + | This will save the '''Route''' only, using its existing name and it will overwrite the original route. This will save any edits that you have made to the '''Route''' but not to the '''Session'''. | ||
| + | </td> | ||
| + | </tr> | ||
| + | </table> | ||
| + | |||
| + | <table width=1000> | ||
<tr valign="top"> | <tr valign="top"> | ||
<td colspan=2>[[Image:line740.png|link=]]</td> | <td colspan=2>[[Image:line740.png|link=]]</td> | ||
</tr> | </tr> | ||
<tr valign="top"> | <tr valign="top"> | ||
| − | <td colspan=2><span style="font-weight: 700; font-size: 17px;">Option </span>[[image: | + | <td colspan=2><span style="font-weight: 700; font-size: 17px;">Option </span>[[image:Bblue.png|link=]] <span style="font-weight: 700; font-size: 17px;">Create a New Session</span></td> |
</tr> | </tr> | ||
| + | <tr valign="top"> | ||
| + | <td> | ||
| + | <table width=290> | ||
<tr valign="top"> | <tr valign="top"> | ||
<td width=20> </td> | <td width=20> </td> | ||
| − | <td>[[image:UDS-CreateNewSession.png|link=]]< | + | <td>[[image:UDS-CreateNewSession.png|link=]]</td> |
| − | This will save the | + | </tr> |
| + | </table> | ||
| + | </td> | ||
| + | <td> | ||
| + | <table bgcolor=#000000 cellpadding=2> | ||
| + | <tr valign="top"> | ||
| + | <td> | ||
| + | <table bgcolor=#ffffff cellpadding=2> | ||
| + | <tr valign="top"> | ||
| + | <td colspan=2><span style="font-weight: 700; font-size: 15px;">Steps:</span> To save the '''Route''' and a '''NEW Session''':-</td> | ||
| + | </tr> | ||
| + | <tr valign="top"> | ||
| + | <td width=20>[[image:DotPoint1.JPG|link=]]</td> | ||
| + | <td><span style="font-weight: 700; font-size: 15px; background-color: lightcyan;">Left Click</span> the checkbox <span style="font-weight: 700; font-size: 15px; color: white; background-color: black;"> Create new session </span> </td> | ||
| + | </tr> | ||
| + | <tr valign="top"> | ||
| + | <td>[[image:DotPoint2.JPG|link=]]</td> | ||
| + | <td>Enter a name for the new session</td> | ||
| + | </tr> | ||
| + | </table> | ||
| + | </td> | ||
| + | </tr> | ||
| + | </table> | ||
| + | This will save the '''Route''' using its existing name and it will overwrite the original route. It will also save the '''Session''' using the name you enter in the text box below the checkbox ('''Stage 3''' in the example shown). The original '''Session''' will not be altered. This is useful when you want to test out changes to consists, industry settings, Rules, driver commands, etc but do not want to destroy the original '''Session'''. | ||
</td> | </td> | ||
</tr> | </tr> | ||
| Line 1,410: | Line 3,755: | ||
</tr> | </tr> | ||
</table> | </table> | ||
| − | If you | + | |
| + | <table width=1000> | ||
| + | <tr valign="top"> | ||
| + | <td> | ||
| + | If you have '''NOT''' edited anything while in '''Surveyor''' and select <span style="font-weight: 700; color: white; background-color: black; font-size: 15px;"> Save </span> then you will be shown the '''Save Driver Session''' dialogue window to save the session in its current state as a '''Driver Game''' (also called a '''Game''' or '''Driver Game'''). This is exactly the same as pressing <span style="font-weight: 700; font-size: 15px;"><span style="color: white; background-color: black;"> Ctrl </span> + <span style="color: white; background-color: black;"> S </span></span> while in '''Driver'''.<br> | ||
[[image:RouteSARSaveDriverSession.png|link=|alte=Save Driver Session]]<br> | [[image:RouteSARSaveDriverSession.png|link=|alte=Save Driver Session]]<br> | ||
| − | The '''Driver Game''' will appear in the '''Select Session''' menu for the route. Loading it will resume '''Driver''' at the point where it was saved. | + | The '''Driver Game''' will appear in the '''Select Session''' menu for the route. Loading it will resume '''Driver''' at the point where it was saved.</td> |
| + | </tr> | ||
| + | </table> | ||
| + | |||
<br> | <br> | ||
| − | <table> <!-- BEGIN Nav Buttons Table --> | + | <table width=1000> <!-- BEGIN Nav Buttons Table --> |
<tr valign="top"> | <tr valign="top"> | ||
| − | <td width= | + | <td width=629><span id="stepExit"></span> |
| + | ='''Exiting Surveyor'''= | ||
| + | </td> | ||
| + | <td width=50> </td> | ||
| + | <td width=50>[[image:SkipUp.png|link=#skipSaveUDS|Skip Up]]</td> | ||
<td width=46>[[image:BackToTop.png|link=#top|alt=Top|Top]]</td> | <td width=46>[[image:BackToTop.png|link=#top|alt=Top|Top]]</td> | ||
<td width=75>[[image:NextUp.png|link=#stepSaving|alt=Next Up|Next Up]]</td> | <td width=75>[[image:NextUp.png|link=#stepSaving|alt=Next Up|Next Up]]</td> | ||
| − | <td width=75>[[image:NextDown.png|link=# | + | <td width=75>[[image:NextDown.png|link=#stepExitDriver|alt=Next Down|Next Down]]</td> |
<td width=75>[[image:BackToBottom.png|link=#bottom|alt=Bottom|Bottom]]</td> | <td width=75>[[image:BackToBottom.png|link=#bottom|alt=Bottom|Bottom]]</td> | ||
</tr> | </tr> | ||
</table> <!-- END Nav Buttons Table --> | </table> <!-- END Nav Buttons Table --> | ||
| − | = | + | <table width=1000 bgcolor="lightcyan" cellpadding=2> |
| − | If you exit '''Surveyor''' after editing without saving then you will be prompted to '''Save'''.<br> | + | <tr valign="top"> |
| + | <td width=10>[[image:BlueDot10x10.png|link=]]</td> | ||
| + | <td>If you exit '''Surveyor''' after editing without saving then you will be prompted to '''Save'''.</td> | ||
| + | </tr> | ||
| + | </table> | ||
| + | |||
| + | <table> | ||
| + | <tr valign="top"> | ||
| + | <td>[[image:MainMenuExitSurveyor.png|link=]]</td> | ||
| + | <td> | ||
| + | <table bgcolor=#000000 cellpadding=2> | ||
| + | <tr valign="top"> | ||
| + | <td> | ||
| + | <table bgcolor=#ffffff cellpadding=2> | ||
| + | <tr valign="top"> | ||
| + | <td><span style="font-size: 17px; font-weight: 700;">Steps:</span><br> | ||
<table> | <table> | ||
<tr valign="top"> | <tr valign="top"> | ||
| − | <td align="center"><span style="font-weight: 700;">Unsaved <span style="color: white; background-color: black;">& | + | <td width=20>[[image:DotPoint1.JPG|link=]]</td> |
| − | <td align="center"><span style="font-weight: 700;">Unsaved <span style="color: white; background-color: black;">& | + | <td>Open the '''Main Menu'''</td> |
| + | </tr> | ||
| + | <tr valign="top"> | ||
| + | <td>[[image:DotPoint2.JPG|link=]]</td> | ||
| + | <td>select the <span style="font-weight: 700; font-size: 15px; color: white; background-color: black;"> Exit Surveyor </span> option</td> | ||
| + | </tr> | ||
| + | <tr> | ||
| + | <td colspan=2>Another option is to exit '''Trainz''' completely</td> | ||
| + | </tr> | ||
| + | <tr valign="top"> | ||
| + | <td>[[image:DotPoint3.JPG|link=]]</td> | ||
| + | <td>select the <span style="font-weight: 700; font-size: 15px; color: white; background-color: black;"> Exit Game </span> option</td> | ||
| + | </tr> | ||
| + | <tr> | ||
| + | <td colspan=2>Regardless of which option you take, if you have unsaved work you will be prompted to save before you exit</td> | ||
| + | </tr> | ||
| + | </table> | ||
| + | </td> | ||
| + | </tr> | ||
| + | </table> | ||
| + | </td> | ||
| + | </tr> | ||
| + | </table> | ||
| + | </td> | ||
| + | </tr> | ||
| + | </table> | ||
| + | <br> | ||
| + | <table width=1000> | ||
| + | <tr valign="top"> | ||
| + | <td align="center"><span style="font-weight: 700; font-size: 15px;">Unsaved <span style="color: white; background-color: black;"> Route </span></span></td> | ||
| + | <td align="center"><span style="font-weight: 700; font-size: 15px;">Unsaved <span style="color: white; background-color: black;"> Session </span></span></td> | ||
</tr> | </tr> | ||
<tr valign="top"> | <tr valign="top"> | ||
| Line 1,436: | Line 3,837: | ||
</tr> | </tr> | ||
</table> | </table> | ||
| − | <table> | + | <table bgcolor=#000000 width=1000 cellpadding=2> |
<tr valign="top"> | <tr valign="top"> | ||
| − | <td> | + | <td> |
| − | <td> | + | <table bgcolor=#ffffff width=996 cellpadding=2> |
| + | <tr valign="top"> | ||
| + | <td colspan=2><span style="font-weight: 700; font-size: 15px;">Options:</span></td> | ||
</tr> | </tr> | ||
<tr valign="top"> | <tr valign="top"> | ||
| − | <td>[[image: | + | <td width=25>[[image:Ablue.png|link=]]</td> |
| − | <td> | + | <td> <span style="font-weight: 700; color: white; background-color: black; font-size: 15px;"> Don't Save </span> will exit '''Surveyor''' to either the '''Main Menu Screen''' or to your OS Desktop without saving. Any changes you have made will be lost.</td> |
</tr> | </tr> | ||
<tr valign="top"> | <tr valign="top"> | ||
| − | <td>[[image: | + | <td>[[image:Bblue.png|link=]]</td> |
| − | <td> | + | <td> <span style="font-weight: 700; color: white; background-color: black; font-size: 15px;"> Save </span> will exit '''Surveyor''' to either the '''Main Menu Screen''' or to your OS Desktop after saving. You will be prompted to select what to save as described in the section '''[[image:PageLink.PNG|link=]] [[#Saving a Route and a Session|Saving a Route and a Session]]''' above</td> |
| + | </tr> | ||
| + | <tr valign="top"> | ||
| + | <td>[[image:Cblue.png|link=]]</td> | ||
| + | <td> <span style="font-weight: 700; color: white; background-color: black; font-size: 15px;"> Cancel </span> will cancel the '''Exit''' command and return you to '''Surveyor'''.</td> | ||
| + | </tr> | ||
| + | </table> | ||
| + | </td> | ||
</tr> | </tr> | ||
</table> | </table> | ||
<br> | <br> | ||
| − | <table> <!-- BEGIN Nav Buttons Table --> | + | <table width=1000> <!-- BEGIN Nav Buttons Table --> |
<tr valign="top"> | <tr valign="top"> | ||
| − | <td width= | + | <td width=629><span id="stepExitDriver"></span> |
| + | ='''Exiting Driver'''= | ||
| + | </td> | ||
| + | <td width=50> </td> | ||
| + | <td width=50> </td> | ||
<td width=46>[[image:BackToTop.png|link=#top|alt=Top|Top]]</td> | <td width=46>[[image:BackToTop.png|link=#top|alt=Top|Top]]</td> | ||
<td width=75>[[image:NextUp.png|link=#stepExit|alt=Next Up|Next Up]]</td> | <td width=75>[[image:NextUp.png|link=#stepExit|alt=Next Up|Next Up]]</td> | ||
| − | <td width=75>[[image:NextDown.png|link=# | + | <td width=75>[[image:NextDown.png|link=#stepCloning|alt=Next Down|Next Down]]</td> |
<td width=75>[[image:BackToBottom.png|link=#bottom|alt=Bottom|Bottom]]</td> | <td width=75>[[image:BackToBottom.png|link=#bottom|alt=Bottom|Bottom]]</td> | ||
</tr> | </tr> | ||
</table> <!-- END Nav Buttons Table --> | </table> <!-- END Nav Buttons Table --> | ||
| − | + | <table width=1000 bgcolor="lightcyan" cellpadding=2> | |
| − | <table bgcolor= | + | |
<tr valign="top"> | <tr valign="top"> | ||
| − | <td>[[image: | + | <td width=10>[[image:BlueDot10x10.png|link=]]</td> |
| − | <td> | + | <td>If you exit '''Driver''' after running a session you will be prompted to '''Save''' a Driver Game.</td> |
</tr> | </tr> | ||
| + | </table> | ||
| + | |||
| + | <table> | ||
<tr valign="top"> | <tr valign="top"> | ||
| − | <td>[[image: | + | <td>[[image:MainMenuExitDriver.png|link=]]</td> |
| − | <td> | + | <td> |
| + | <table bgcolor=#000000 cellpadding=2> | ||
| + | <tr valign="top"> | ||
| + | <td> | ||
| + | <table bgcolor=#ffffff cellpadding=2> | ||
| + | <tr valign="top"> | ||
| + | <td><span style="font-size: 17px; font-weight: 700;">Steps:</span> | ||
| + | <table> | ||
| + | <tr valign="top"> | ||
| + | <td width=20>[[image:DotPoint1.JPG|link=]]</td> | ||
| + | <td>Open the '''Main Menu'''</td> | ||
</tr> | </tr> | ||
<tr valign="top"> | <tr valign="top"> | ||
| − | <td>[[image: | + | <td>[[image:DotPoint2.JPG|link=]]</td> |
| + | <td>select the <span style="font-weight: 700; font-size: 15px; color: white; background-color: black;"> Exit Driver </span> option</td> | ||
| + | </tr> | ||
| + | <tr> | ||
| + | <td colspan=2>Another option is to exit '''Trainz''' completely</td> | ||
| + | </tr> | ||
| + | <tr valign="top"> | ||
| + | <td>[[image:DotPoint3.JPG|link=]]</td> | ||
| + | <td>select the <span style="font-weight: 700; font-size: 15px; color: white; background-color: black;"> Exit Game </span> option</td> | ||
| + | </tr> | ||
| + | <tr> | ||
| + | <td colspan=2>Regardless of which option you take, if your '''Session Data''' has changed then you will be prompted to save before you exit</td> | ||
| + | </tr> | ||
| + | </table> | ||
| + | </td> | ||
| + | </tr> | ||
| + | </table> | ||
| + | </td> | ||
| + | </tr> | ||
| + | </table> | ||
| + | </td> | ||
| + | </tr> | ||
| + | </table> | ||
| + | <br> | ||
| + | |||
| + | [[image:DriverExitSessionSave.png|link=]]<br> | ||
| + | |||
| + | <table bgcolor=#000000 width=1000 cellpadding=2> | ||
| + | <tr valign="top"> | ||
| + | <td> | ||
| + | <table bgcolor=#ffffff width=996 cellpadding=2> | ||
| + | <tr valign="top"> | ||
| + | <td colspan=2><span style="font-weight: 700; font-size: 15px;">Options:</span></td> | ||
| + | </tr> | ||
| + | <tr valign="top"> | ||
| + | <td width=25>[[image:Ablue.png|link=]]</td> | ||
| + | <td> <span style="font-weight: 700; color: white; background-color: black; font-size: 15px;"> Don't Save </span> will exit '''Driver''' to either the '''Main Menu Screen''' or to your OS Desktop without saving. The current state of the session (positions and movements of the consists, commodity levels, time of day, etc) will be lost.</td> | ||
| + | </tr> | ||
| + | <tr valign="top"> | ||
| + | <td>[[image:Bblue.png|link=]]</td> | ||
| + | <td> <span style="font-weight: 700; color: white; background-color: black; font-size: 15px;"> Save </span> will exit '''Driver''' to either the '''Main Menu Screen''' or to your OS Desktop sfter saving. You will be prompted to enter a name for your saved '''Driver Game'''. See the section '''[[image:PageLink.PNG|link=]] [[#Saving Driver Games|Saving Driver Games]]''' below for more details.</td> | ||
| + | </tr> | ||
| + | <tr valign="top"> | ||
| + | <td>[[image:Cblue.png|link=]]</td> | ||
| + | <td> <span style="font-weight: 700; color: white; background-color: black; font-size: 15px;"> Cancel </span> will cancel the '''Exit''' command and return you to '''Driver'''.</td> | ||
| + | </tr> | ||
| + | </table> | ||
| + | </td> | ||
| + | </tr> | ||
| + | </table> | ||
| + | <br> | ||
| + | <table width=1000> <!-- BEGIN Nav Buttons Table --> | ||
| + | <tr valign="top"> | ||
| + | <td width=629><span id="stepCloning"></span> | ||
| + | ='''Cloning a Route/Session'''= | ||
| + | </td> | ||
| + | <td width=50>[[image:SkipDown.png|link=#skipCloneSurveyor|Skip Down]]</td> | ||
| + | <td width=50> </td> | ||
| + | <td width=46>[[image:BackToTop.png|link=#top|alt=Top|Top]]</td> | ||
| + | <td width=75>[[image:NextUp.png|link=#stepExitDriver|alt=Next Up|Next Up]]</td> | ||
| + | <td width=75>[[image:NextDown.png|link=#stepGames|alt=Next Down|Next Down]]</td> | ||
| + | <td width=75>[[image:BackToBottom.png|link=#bottom|alt=Bottom|Bottom]]</td> | ||
| + | </tr> | ||
| + | </table> <!-- END Nav Buttons Table --> | ||
| + | |||
| + | <table width=1000 bgcolor="lightcyan" cellpadding=2> | ||
| + | <tr valign="top"> | ||
| + | <td width=10>[[image:BlueDot10x10.png|link=]]</td> | ||
| + | <td>A '''Clone''' is an exact or duplicate copy of an asset. Some '''Payware''' routes and sessions cannot be cloned</td> | ||
| + | </tr> | ||
| + | <tr valign="top"> | ||
| + | <td>[[image:BlueDot10x10.png|link=]]</td> | ||
<td>Cloned routes and sessions can be edited and saved as '''Your Content'''</td> | <td>Cloned routes and sessions can be edited and saved as '''Your Content'''</td> | ||
</tr> | </tr> | ||
| Line 1,479: | Line 3,976: | ||
Cloning a Route or a Session allows you to work on a duplicate copy of the original. All changes that you make will be saved in the cloned copy leaving the original copy unchanged.<br> | Cloning a Route or a Session allows you to work on a duplicate copy of the original. All changes that you make will be saved in the cloned copy leaving the original copy unchanged.<br> | ||
| − | <table bgcolor=#ff0000> | + | <table bgcolor=#ff0000 cellpadding=2> |
<tr valign="top"> | <tr valign="top"> | ||
<td> | <td> | ||
| − | <table bgcolor=#fcbcbc> | + | <table bgcolor=#fcbcbc cellpadding=2> |
<tr valign="top"> | <tr valign="top"> | ||
<td>[[image:Stop.PNG|link=]]</td> | <td>[[image:Stop.PNG|link=]]</td> | ||
| Line 1,493: | Line 3,990: | ||
</table> | </table> | ||
<br> | <br> | ||
| − | <table bgcolor=#000000 | + | <table width=1000 bgcolor=#000000 cellpadding=2> |
<tr valign="top"> | <tr valign="top"> | ||
<td> | <td> | ||
| − | <table bgcolor=#ffffb0> | + | <table width=996 bgcolor=#ffffb0 cellpadding=2> |
<tr valign="top"> | <tr valign="top"> | ||
| − | <td>[[image:NotePad.PNG|link=]]</td> | + | <td width=25>[[image:NotePad.PNG|link=]]</td> |
| − | <td><span style="font-size: 17px | + | <td><span style="font-size: 17px;">'''Notes:'''</span><br> |
---- | ---- | ||
| − | < | + | </td> |
| + | </tr> | ||
<tr valign="top"> | <tr valign="top"> | ||
| − | <td>[[image: | + | <td width=25>[[image:Ablue.png|link=]]</td> |
<td>'''Freeware routes''', that have been downloaded and installed from the '''DLS''', can be cloned and saved as new routes.<br> | <td>'''Freeware routes''', that have been downloaded and installed from the '''DLS''', can be cloned and saved as new routes.<br> | ||
| − | + | <table> | |
| − | + | <tr valign="top"> | |
| + | <td width=10>[[image:DotPoint.JPG|10px|link=]]</td> | ||
| + | <td>They are saved with a new '''<kuid>''' that will include your personal identity code, so they will become '''Your Content''' and can be found using the <span style="color: white; background-color: black; font-weight: 700; font-size: 15px;"> MY CONTENT </span> search option</td> | ||
</tr> | </tr> | ||
<tr valign="top"> | <tr valign="top"> | ||
| − | <td>[[image:DotPoint.JPG|link=]]</td> | + | <td>[[image:DotPoint.JPG|10px|link=]]</td> |
| − | <td> | + | <td>The original route from the '''DLS''' will not be altered or replaced by your new version</td> |
| − | + | ||
| − | + | ||
| − | + | ||
| − | + | ||
</tr> | </tr> | ||
<tr valign="top"> | <tr valign="top"> | ||
| − | <td>[[image:DotPoint.JPG|link=]]</td> | + | <td>[[image:DotPoint.JPG|10px|link=]]</td> |
| − | <td> | + | <td>You can delete the original '''DLS''' route if you wish and your cloned version will NOT be affected</td> |
| − | + | ||
</tr> | </tr> | ||
</table> | </table> | ||
</td> | </td> | ||
| + | </tr> | ||
| + | <tr valign="top"> | ||
| + | <td>[[image:Bblue.png|link=]]</td> | ||
| + | <td>'''Payware Routes''', that have been downloaded and installed from the '''DLC''', can also be cloned as new routes '''if the creators of the routes allow it'''.<br> | ||
| + | <table> | ||
| + | <tr valign="top"> | ||
| + | <td>[[image:DotPoint.JPG|10px|link=]]</td> | ||
| + | <td>Some '''Payware''' routes are encrypted and cannot be cloned</td> | ||
| + | </tr> | ||
| + | <tr valign="top"> | ||
| + | <td>[[image:DotPoint.JPG|10px|link=]]</td> | ||
| + | <td>When an approved '''DLC''' route is cloned it will be given a new '''<kuid>''' that will include your personal identity code, so it will become '''Your Content''' and can be found using the <span style="color: white; background-color: black; font-weight: 700; font-size: 15px;"> MY CONTENT </span> search option</td> | ||
| + | </tr> | ||
| + | <tr valign="top"> | ||
| + | <td>[[image:DotPoint.JPG|10px|link=]]</td> | ||
| + | <td>The original '''Payware''' route will not be altered or replaced by your new version</td> | ||
| + | </tr> | ||
| + | <tr valign="top"> | ||
| + | <td>[[image:DotPoint.JPG|10px|link=]]</td> | ||
| + | <td>If you delete or disable the original '''DLC''' route then your cloned route <span style="color: white; background-color: red; font-weight: 700; font-size: 15px;"> will NOT work </span></td> | ||
| + | </tr> | ||
| + | <tr valign="top"> | ||
| + | <td>[[image:DotPoint.JPG|10px|link=]]</td> | ||
| + | <td>You can upload, depending on '''permissions''', your edited clone of a '''Payware''' route to the '''DLS''' but it can only be used by other users who also have the same original (unedited) '''DLC Payware''' route installed</td> | ||
</tr> | </tr> | ||
</table> | </table> | ||
</td> | </td> | ||
| + | </tr> | ||
| + | <tr valign="top"> | ||
| + | <td>[[image:Cblue.png|link=]]</td> | ||
| + | <td>'''Sessions''' that have been downloaded and installed from the '''DLS''' (freeware) or '''DLC''' (payware) follow the same rules as described for '''DLS''' and '''DLC''' routes above<br> | ||
| + | <table> | ||
| + | <tr valign="top"> | ||
| + | <td>[[image:DotPoint.JPG|10px|link=]]</td> | ||
| + | <td>Some '''Payware''' sessions are encrypted and cannot be cloned</td> | ||
| + | </tr> | ||
| + | <tr valign="top"> | ||
| + | <td>[[image:DotPoint.JPG|10px|link=]]</td> | ||
| + | <td>When an approved '''DLC''' session is cloned it will be given a new '''<kuid>''' that will include your personal identity code, so it will become '''Your Content''' and can be found using the <span style="color: white; background-color: black; font-weight: 700; font-size: 15px;"> MY CONTENT </span> search option</td> | ||
| + | </tr> | ||
| + | <tr valign="top"> | ||
| + | <td>[[image:DotPoint.JPG|10px|link=]]</td> | ||
| + | <td>The original '''DLC''' or '''DLS''' session will not be altered or replaced by your new version</td> | ||
| + | </tr> | ||
| + | <tr valign="top"> | ||
| + | <td>[[image:DotPoint.JPG|10px|link=]]</td> | ||
| + | <td>You can, if you decide, safely delete the original '''DLS''' session but not the original '''DLS''' route</td> | ||
| + | </tr> | ||
| + | <tr valign="top"> | ||
| + | <td>[[image:DotPoint.JPG|10px|link=]]</td> | ||
| + | <td>If you delete or disable the original '''DLC''' session or the original '''DLC''' route then your cloned session <span style="color: white; background-color: red; font-weight: 700; font-size: 15px;"> will NOT work </span></td> | ||
| + | </tr> | ||
| + | <tr valign="top"> | ||
| + | <td>[[image:DotPoint.JPG|10px|link=]]</td> | ||
| + | <td>You can upload, depending on '''permissions''', your edited clone of a '''Payware''' session to the '''DLS''' but it can only be used by other users who also have the same original (unedited) '''DLC Payware''' installed.</td> | ||
</tr> | </tr> | ||
</table> | </table> | ||
| + | </td> | ||
| + | </tr> | ||
| + | </table> | ||
| + | </td> | ||
| + | </tr> | ||
| + | </table> | ||
| + | <br> | ||
| + | <table width=1000> <!-- BEGIN Nav Buttons Table --> | ||
| + | <tr valign="top"> | ||
| + | <td width=629><span id="skipCloneSurveyor"></span> | ||
| + | =='''Cloning Using Surveyor'''== | ||
| + | </td> | ||
| + | <td width=50>[[image:SkipDown.png|link=#skipCloneCM|Skip Down]]</td> | ||
| + | <td width=50>[[image:SkipUp.png|link=#stepCloning|Skip Up]]</td> | ||
| + | <td width=46> </td> | ||
| + | <td width=75> </td> | ||
| + | <td width=75> </td> | ||
| + | <td width=75> </td> | ||
| + | </tr> | ||
| + | </table> <!-- END Nav Buttons Table --> | ||
| − | + | '''Routes''' and '''Sessions''' that have been loaded into '''Surveyor''' can be cloned using the <span style="color: white; background-color: black; font-weight: 700; font-size: 15px;"> Save As... </span> command from the '''Surveyor''' <span style="color: white; background-color: black; font-weight: 700; font-size: 15px;"> System Menu </span><br> | |
| − | '''Routes''' and '''Sessions''' that have been loaded into '''Surveyor''' can be cloned using the <span style="color: white; background-color: black; font-weight: 700; font-size: 15px;">& | + | |
<table> | <table> | ||
<tr valign="top"> | <tr valign="top"> | ||
| Line 1,539: | Line 4,105: | ||
Enter a new name or edit the original name (as shown above) for your cloned route or session.<br> | Enter a new name or edit the original name (as shown above) for your cloned route or session.<br> | ||
| − | <table bgcolor=#000000 width= | + | <table bgcolor=#000000 width=1000 cellpadding=2> |
<tr valign="top"> | <tr valign="top"> | ||
<td> | <td> | ||
| − | <table bgcolor=# | + | <table bgcolor=#ffffff cellpadding=2> |
| + | <tr> | ||
| + | <td colspan=2><span style="font-weight: 700; font-size: 15px;">Options:</span></td> | ||
| + | </tr> | ||
<tr valign="top"> | <tr valign="top"> | ||
| − | <td>[[image: | + | <td width=25>[[image:Ablue.png|link=]]</td> |
| − | <td> | + | <td>If the first option ([[image:White_Select_Dot.png|link=]] '''Save new route and session''') is selected then the '''Route will be cloned''' using your new or edited name. The '''Session will be also cloned''' using its original name but it will use the newly cloned Route as a '''dependency''' instead of the original Route. |
| − | + | ||
<table> | <table> | ||
<tr valign="top"> | <tr valign="top"> | ||
| − | <td>[[image:DotPoint.JPG|link=]]</td> | + | <td width=10>[[image:DotPoint.JPG|10px|link=]]</td> |
| − | <td> | + | <td>If the original route is '''Freeware''' (e.g. from the '''DLS''') and you do not want to keep it then it can be safely deleted, which will also delete the original session but the new cloned route and session will remain active on your system</td> |
| − | + | ||
| − | + | ||
| − | </td> | + | |
</tr> | </tr> | ||
<tr valign="top"> | <tr valign="top"> | ||
| − | <td>[[image:DotPoint.JPG|link=]]</td> | + | <td>[[image:DotPoint.JPG|10px|link=]]</td> |
| − | <td> | + | <td><span style="background-color: yellow;"> If the original route is '''Payware''' (e.g. from the '''DLC''') then deleting or disabling it will disable your cloned route and session. When '''Payware''' is cloned it must remain active on your system for the clone to work. </span> |
| − | + | ||
| − | + | ||
</td> | </td> | ||
</tr> | </tr> | ||
</table> | </table> | ||
</td> | </td> | ||
| + | </tr> | ||
| + | <tr valign="top"> | ||
| + | <td>[[image:Bblue.png|link=]]</td> | ||
| + | <td>If the second option ([[image:White_Select_Dot.png|link=]] '''Save new session''') is selected then only the '''Session will be cloned''' using your new or edited name (make sure that you change the "Default" to something else) but it will still use the original (uncloned) Route as a '''dependency''' - so it is vital that you '''DO NOT DELETE''' the original route. | ||
| + | <table> | ||
| + | <tr valign="top"> | ||
| + | <td width=10>[[image:DotPoint.JPG|10px|link=]]</td> | ||
| + | <td>If the original session is '''Freeware''' then it can be safely deleted if you no longer need it</td> | ||
| + | </tr> | ||
| + | <tr valign="top"> | ||
| + | <td>[[image:DotPoint.JPG|10px|link=]]</td> | ||
| + | <td><span style="background-color: yellow;"> If the original session is '''Payware''' then deleting or disabling it will also disable your cloned session </span></td> | ||
</tr> | </tr> | ||
</table> | </table> | ||
| Line 1,569: | Line 4,144: | ||
</tr> | </tr> | ||
</table> | </table> | ||
| + | </td> | ||
| + | </tr> | ||
| + | </table> | ||
| + | <br> | ||
| + | <table width=1000> <!-- BEGIN Nav Buttons Table --> | ||
| + | <tr valign="top"> | ||
| + | <td width=629><span id="skipCloneCM"></span> | ||
| + | =='''Cloning Using Content Manager'''== | ||
| + | </td> | ||
| + | <td width=50>[[image:SkipDown.png|link=#stepGames|Skip Down]]</td> | ||
| + | <td width=50>[[image:SkipUp.png|link=#skipCloneSurveyor|Skip Up]]</td> | ||
| + | <td width=46> </td> | ||
| + | <td width=75> </td> | ||
| + | <td width=75> </td> | ||
| + | <td width=75> </td> | ||
| + | </tr> | ||
| + | </table> <!-- END Nav Buttons Table --> | ||
| − | = | + | [[image:DotPoint1.JPG|link=]] <span style="color: white; background-color: black; font-weight: 700; font-size: 17px;"> Select the Route or Session to Clone </span> |
| − | <span style="color: white; background-color: black; font-weight: 700; font-size: 17px;">& | + | |
<br> | <br> | ||
| − | <table> | + | <table width=1000> |
<tr valign="top"> | <tr valign="top"> | ||
<td>[[image:RouteClone.png|link=|alt=Cloning a route]]</td> | <td>[[image:RouteClone.png|link=|alt=Cloning a route]]</td> | ||
<td> | <td> | ||
| − | <table cellpadding= | + | <table bgcolor=#000000 cellpadding=2> |
| − | <tr> | + | <tr valign="top"> |
| − | <td | + | <td> |
| − | + | <table bgcolor=#ffffff cellpadding=2> | |
| + | <tr valign="top"> | ||
| + | <td><span style="font-size: 17px; font-weight: 700;">Steps:</span> | ||
| + | <table> | ||
| + | <tr valign="top"> | ||
| + | <td width=25>[[image:DotPoint1Blue.png|link=]]</td> | ||
| + | <td>In '''Content Manager''' select the filter '''Routes & Sessions'''</td> | ||
</tr> | </tr> | ||
<tr valign="top"> | <tr valign="top"> | ||
| − | <td>[[image: | + | <td>[[image:DotPoint2Blue.png|link=]]</td> |
| − | <td><span style="font- | + | <td>select the route or session to be cloned</td> |
| − | + | </tr> | |
| − | + | <tr valign="top"> | |
| − | + | <td>[[image:DotPoint3Blue.png|link=]]</td> | |
| − | + | <td>then either:-<br> | |
| − | + | <span style="font-weight: 700; font-size: 15px;">Options:-</span><br> | |
| + | <table> | ||
| + | <tr valign="top"> | ||
| + | <td width=25>[[image:Ablue.png|link=]]</td> | ||
| + | <td>from the '''Content Menu''' select <span style="font-weight: 700; font-size: 15px; color: white; background-color: black;"> Clone </span> <span style="font-weight: 700; font-size: 15px;">OR</span></td> | ||
| + | </tr> | ||
| + | <tr valign="top"> | ||
| + | <td width=25>[[image:Bblue.png|link=]]</td> | ||
| + | <td>press <span style="font-weight: 700; font-size: 15px;"><span style="color: white; background-color: black;"> Ctrl </span> + <span style="color: white; background-color: black;"> D </span></span></td> | ||
| + | </tr> | ||
| + | </table> | ||
</td> | </td> | ||
</tr> | </tr> | ||
| − | < | + | </table> |
| − | <td | + | </td> |
| − | + | </tr> | |
| + | </table> | ||
| + | </td> | ||
</tr> | </tr> | ||
</table> | </table> | ||
| Line 1,604: | Line 4,213: | ||
[[image:RouteCloneTask.png|link=|alt=Clone task completed]]<br> | [[image:RouteCloneTask.png|link=|alt=Clone task completed]]<br> | ||
| − | In the image above the original Route has been cloned and given a new ''' | + | In the image above the original Route has been cloned and given a new '''<kuid>''' value.<br> |
<br> | <br> | ||
The newly cloned Route will be shown in '''Content Manager''' as a '''New Asset''' that is '''Open for Editing'''.<br> | The newly cloned Route will be shown in '''Content Manager''' as a '''New Asset''' that is '''Open for Editing'''.<br> | ||
| − | <table | + | <table bgcolor=#000000 cellpadding=2> |
| − | <tr | + | <tr valign="top"> |
| − | + | <td> | |
| − | + | <table bgcolor=#ffffff cellpadding=2> | |
| − | < | + | |
<tr valign="top"> | <tr valign="top"> | ||
| − | |||
<td><span style="font-size: 17px; font-weight: 700;">Steps:</span><br> | <td><span style="font-size: 17px; font-weight: 700;">Steps:</span><br> | ||
| − | + | <table> | |
| − | + | <tr valign="top"> | |
| + | <td width=25>[[image:DotPoint1Blue.png|link=]]</td> | ||
| + | <td>close the '''Task Window'''</td> | ||
| + | </tr> | ||
| + | <tr valign="top"> | ||
| + | <td>[[image:DotPoint2Blue.png|link=]]</td> | ||
| + | <td>select the '''Open for Editing''' filter.</td> | ||
| + | </tr> | ||
| + | </table> | ||
</td> | </td> | ||
</tr> | </tr> | ||
| − | < | + | </table> |
| − | + | </td> | |
| − | + | ||
</tr> | </tr> | ||
</table> | </table> | ||
| Line 1,628: | Line 4,242: | ||
[[image:RouteCloneNewAsset.png|link=|alt=New Asset]] | [[image:RouteCloneNewAsset.png|link=|alt=New Asset]] | ||
<br><br> | <br><br> | ||
| − | <span style="color: white; background-color: black; font-weight: 700; font-size: 17px;">& | + | [[image:DotPoint2.JPG|link=]] <span style="color: white; background-color: black; font-weight: 700; font-size: 17px;"> Rename the Clone (an Optional Step) </span> |
<br> | <br> | ||
You can give the cloned Route or Session a new name and a new description. Note that these changes will not appear until after the '''New Asset''' has been submitted.<br> | You can give the cloned Route or Session a new name and a new description. Note that these changes will not appear until after the '''New Asset''' has been submitted.<br> | ||
| − | <table cellpadding= | + | |
| − | <tr> | + | <table bgcolor=#000000 cellpadding=2> |
| − | <td | + | <tr valign="top"> |
| − | --- | + | <td> |
| + | <table bgcolor=#ffffff cellpadding=2> | ||
| + | <tr valign="top"> | ||
| + | <td><span style="font-size: 17px; font-weight: 700;">Steps:</span> | ||
| + | <table> | ||
| + | <tr valign="top"> | ||
| + | <td width=25>[[image:DotPoint1Blue.png|link=]]</td> | ||
| + | <td><span style="font-weight: 700; font-size: 15px; background-color: lightcyan;">Right Click</span> the '''New Asset'''</td> | ||
</tr> | </tr> | ||
<tr valign="top"> | <tr valign="top"> | ||
| − | <td>[[image: | + | <td>[[image:DotPoint2Blue.png|link=]]</td> |
| − | <td><span style="font- | + | <td>select <span style="font-weight: 700; font-size: 15px; color: white; background-color: black;"> Open... </span></td> |
| − | + | </tr> | |
| − | + | <tr valign="top"> | |
| − | + | <td>[[image:DotPoint3Blue.png|link=]]</td> | |
| − | The config.txt file will open in your default text editor. You can then edit both the '''Title''' (username) and the '''Description''' of the Route or Session. | + | <td>select <span style="font-weight: 700; font-size: 15px; color: white; background-color: black;"> Edit Config File Text </span></td> |
| − | + | </tr> | |
| − | + | </table> | |
| − | + | The config.txt file will open in your default text editor. You can then edit both the '''Title''' (username) and the '''Description''' of the Route or Session<br> | |
| − | + | <table> | |
| − | + | <tr valign="top"> | |
| − | + | <td width=25>[[image:DotPoint4Blue.png|link=]]</td> | |
| + | <td>locate the line that starts with '''username'''</td> | ||
| + | </tr> | ||
| + | <tr valign="top"> | ||
| + | <td>[[image:DotPoint5Blue.png|link=]]</td> | ||
| + | <td>edit the text on that line between the '''Quote''' (") marks (but do not delete the quote marks) to change it to the new name of this Route/Session</td> | ||
| + | </tr> | ||
| + | <tr valign="top"> | ||
| + | <td>[[image:DotPoint6Blue.png|link=]]</td> | ||
| + | <td>locate the line that starts with '''description'''</td> | ||
| + | </tr> | ||
| + | <tr valign="top"> | ||
| + | <td>[[image:DotPoint7Blue.png|link=]]</td> | ||
| + | <td>edit the text on that line between the '''Quote''' (") marks (but do not delete the quote marks) to edit the description of this Route/Session</td> | ||
| + | </tr> | ||
| + | <tr valign="top"> | ||
| + | <td>[[image:DotPoint8Blue.png|link=]]</td> | ||
| + | <td>save (usually <span style="font-weight: 700; font-size: 15px;"><span style="color: white; background-color: black;"> Ctrl </span> + <span style="color: white; background-color: black;"> S </span></span>)</td> | ||
| + | </tr> | ||
| + | <tr valign="top"> | ||
| + | <td>[[image:DotPoint9Blue.png|link=]]</td> | ||
| + | <td>exit the text editor</td> | ||
| + | </tr> | ||
| + | </table> | ||
</td> | </td> | ||
</tr> | </tr> | ||
| − | < | + | </table> |
| − | + | </td> | |
| − | + | ||
</tr> | </tr> | ||
</table> | </table> | ||
<br> | <br> | ||
| − | <span style="color: white; background-color: black; font-weight: 700; font-size: 17px;">& | + | [[image:DotPoint3.JPG|link=]] <span style="color: white; background-color: black; font-weight: 700; font-size: 17px;"> Submit the Clone (a Necessary Step) </span> |
<br> | <br> | ||
| − | <table | + | <table width=1000 bgcolor="lightcyan" cellpadding=2> |
<tr valign="top"> | <tr valign="top"> | ||
| − | <td>[[image: | + | <td width=10>[[image:BlueDot10x10.png|link=]]</td> |
| − | <td>When submitted a cloned '''DLC''' Route or Session will be described as '''Payware, Modified'''</td> | + | <td>When submitted a cloned '''DLC''' Route or Session will be described as '''Payware, Modified''' while a cloned '''DLS''' Route or Session will be described as '''Modified'''</td> |
</tr> | </tr> | ||
</table> | </table> | ||
| − | <table cellpadding= | + | |
| − | <tr> | + | <table width=1000 bgcolor=#000000 cellpadding=2> |
| − | <td | + | <tr valign="top"> |
| − | --- | + | <td> |
| + | <table width=996 bgcolor=#ffffff cellpadding=2> | ||
| + | <tr valign="top"> | ||
| + | <td><span style="font-size: 17px; font-weight: 700;">Steps:</span> | ||
| + | <table> | ||
| + | <tr valign="top"> | ||
| + | <td width=25>[[image:DotPoint1Blue.png|link=]]</td> | ||
| + | <td><span style="font-weight: 700; font-size: 15px; background-color: lightcyan;">Right Click</span> on the '''New Asset'''</td> | ||
</tr> | </tr> | ||
<tr valign="top"> | <tr valign="top"> | ||
| − | <td>[[image: | + | <td>[[image:DotPoint2Blue.png|link=]]</td> |
| − | <td><span style="font- | + | <td>select the option <span style="font-weight: 700; font-size: 15px; color: white; background-color: black;"> Submit Edits </span></td> |
| − | + | </tr> | |
| − | + | </table> | |
| − | The '''New Asset''' entry will vanish from the '''Open for Editing''' display. Open the '''Content Manager''' filter '''Today''' to check that it has been correctly submitted. If you have renamed the clone | + | The '''New Asset''' entry will vanish from the '''Open for Editing''' display. Open the '''Content Manager''' filter '''Today''' to check that it has been correctly submitted. If you have renamed the clone then it should appear using its new name. |
</td> | </td> | ||
</tr> | </tr> | ||
| − | < | + | </table> |
| − | + | </td> | |
| − | + | ||
</tr> | </tr> | ||
</table> | </table> | ||
<br> | <br> | ||
| − | <table bgcolor=#000000 width= | + | <table bgcolor=#000000 width=1000 cellpadding=2> |
<tr valign="top"> | <tr valign="top"> | ||
<td> | <td> | ||
| − | <table bgcolor=#ffffb0> | + | <table bgcolor=#ffffb0 cellpadding=2> |
<tr valign="top"> | <tr valign="top"> | ||
| − | <td>[[image:NotePad.PNG|link=]]</td> | + | <td width=25>[[image:NotePad.PNG|link=]]</td> |
<td><span style="font-size: 17px; font-weight: 700;">Notes:'''</span><br> | <td><span style="font-size: 17px; font-weight: 700;">Notes:'''</span><br> | ||
---- | ---- | ||
| − | You can rename a cloned Route or a cloned Session in '''Surveyor''' but the clone would still have to be submitted in '''Content Manager''' first using its original name and then loaded into '''Surveyor'''. You would then have two Routes or Sessions with the same name to select from - one would be the original and the other the clone, and telling them apart may not be simple. You can use the '''Driver/Surveyor''' main screen <span style="background-color: black; color: white; font-weight: 700;">& | + | You can rename a cloned Route or a cloned Session in '''Surveyor''' but the clone would still have to be submitted in '''Content Manager''' first using its original name and then loaded into '''Surveyor'''. You would then have two Routes or Sessions with the same name to select from - one would be the original and the other the clone, and telling them apart may not be simple. You can use the '''Driver/Surveyor''' main screen <span style="background-color: black; color: white; font-weight: 700; font-size: 15px;"> MY CONTENT </span> '''source filter''' to locate and load the correct cloned Route or Session because the clone will have your '''<kuid>''' code and not its original code. |
<table> | <table> | ||
<tr valign="top"> | <tr valign="top"> | ||
| Line 1,698: | Line 4,347: | ||
<td> | <td> | ||
Load the cloned Route or Session into '''Surveyor''', then | Load the cloned Route or Session into '''Surveyor''', then | ||
| − | + | <table> | |
| − | + | <tr valign="top"> | |
| + | <td width=10>[[image:DotPoint.JPG|10px|link=]]</td> | ||
| + | <td>to rename a route open the [[image:EditMenu_S20.png|link=]] '''Edit''' menu and select the <span style="font-weight: 700; font-size: 15px; color: white; background-color: black;"> Edit Route... </span> option, <span style="font-weight: 700; font-size: 15px;">OR</span> press <span style="font-weight: 700; font-size: 15px;"><span style="color: white; background-color: black;"> Ctrl </span> + <span style="color: white; background-color: black;"> E </span></span> - see [[image:PageLink.PNG|link=]] '''[[#Editing a Route|Editing a Route]]''' above</td> | ||
| + | </tr> | ||
| + | <tr valign="top"> | ||
| + | <td>[[image:DotPoint.JPG|10px|link=]]</td> | ||
| + | <td>to rename a session open the '''Edit''' menu and select '''Edit Session''', or press <span style="font-weight: 700; font-size: 15px;"><span style="color: white; background-color: black;"> Ctrl </span> + <span style="color: white; background-color: black;"> R </span></span> - see [[image:PageLink.PNG|link=]] '''[[#Editing a Session|Editing a Session]]''' above</td> | ||
| + | </tr> | ||
| + | </table> | ||
Both will also allow you to edit the '''Name''' and '''Description''' of the cloned '''Route/Session'''. | Both will also allow you to edit the '''Name''' and '''Description''' of the cloned '''Route/Session'''. | ||
</td> | </td> | ||
| Line 1,711: | Line 4,368: | ||
</table> | </table> | ||
<br> | <br> | ||
| − | <table> <!-- BEGIN Nav Buttons Table --> | + | <table width=1000> <!-- BEGIN Nav Buttons Table --> |
<tr valign="top"> | <tr valign="top"> | ||
| − | <td width= | + | <td width=629><span id="stepGames"></span> |
| + | ='''Saving and Loading Driver Games in Driver'''= | ||
| + | </td> | ||
| + | <td width=50>[[image:SkipDown.png|link=#skipSaveDriver|Skip Down]]</td> | ||
| + | <td width=50>[[image:SkipUp.png|link=#skipCloneCM|Skip Up]]</td> | ||
<td width=46>[[image:BackToTop.png|link=#top|alt=Top|Top]]</td> | <td width=46>[[image:BackToTop.png|link=#top|alt=Top|Top]]</td> | ||
<td width=75>[[image:NextUp.png|link=#stepCloning|alt=Next Up|Next Up]]</td> | <td width=75>[[image:NextUp.png|link=#stepCloning|alt=Next Up|Next Up]]</td> | ||
| Line 1,721: | Line 4,382: | ||
</table> <!-- END Nav Buttons Table --> | </table> <!-- END Nav Buttons Table --> | ||
| − | + | <table width=1000 bgcolor="lightcyan" cellpadding=2> | |
| − | + | ||
| − | <table | + | |
<tr valign="top"> | <tr valign="top"> | ||
| − | <td>[[image: | + | <td width=10>[[image:BlueDot10x10.png|link=]]</td> |
<td>'''Driver Games (sometimes called "Saved Games" or "Driver Sessions") are "Game States" saved while in Driver Mode'''</td> | <td>'''Driver Games (sometimes called "Saved Games" or "Driver Sessions") are "Game States" saved while in Driver Mode'''</td> | ||
</tr> | </tr> | ||
</table> | </table> | ||
| − | <table width= | + | <br> |
| + | <table width=1000 bgcolor=#000000 cellpadding=2> | ||
| + | <tr valign="top"> | ||
| + | <td> | ||
| + | <table width=996 bgcolor=#ffffb0 cellpadding=2> | ||
| + | <tr valign="top"> | ||
| + | <td width=25>[[image:NotePad.PNG|link=]]</td> | ||
| + | <td><span style="font-size: 17px; font-weight: 700;">Notes:'''</span><br> | ||
| + | ---- | ||
| + | <table> | ||
| + | <tr valign="top"> | ||
| + | <td colspan=2>'''Driver Games''':-</td> | ||
| + | </tr> | ||
| + | <tr valign="top"> | ||
| + | <td width=10>[[image:DotPoint.JPG|10px|link=]]</td> | ||
| + | <td>like routes and sessions, are saved as entries in the '''Trainz Database''', not as files on your hard drive. Loading a driver game will retrieve it from the database.</td> | ||
| + | </tr> | ||
| + | <tr valign="top"> | ||
| + | <td>[[image:DotPoint.JPG|10px|link=]]</td> | ||
| + | <td>can be loaded directly into '''Driver''' from '''Content Manager''' in exactly the same way that '''Sessions''' can be loaded directly into '''Driver''' from '''Content Manager'''</td> | ||
| + | </tr> | ||
| + | <tr valign="top"> | ||
| + | <td>[[image:DotPoint.JPG|10px|link=]]</td> | ||
| + | <td>can be '''exported''' as files (in the '''Trainz .cdp''' file format) from '''Content Manager''' for backup or transfer.</td> | ||
| + | </tr> | ||
| + | </table> | ||
| + | </td> | ||
| + | </tr> | ||
| + | </table> | ||
| + | </td> | ||
| + | </tr> | ||
| + | </table> | ||
| + | <br> | ||
| + | <table width=1000> <!-- BEGIN Nav Buttons Table SKIPS NO SECTIONS --> | ||
| + | <tr valign="top"> | ||
| + | <td width=629><span id="skipSaveDriver"></span> | ||
| + | =='''Saving Driver Games'''== | ||
| + | </td> | ||
| + | <td width=50>[[image:SkipDown.png|link=#skipLoadDriverGames|Skip Down]]</td> | ||
| + | <td width=50>[[image:SkipUp.png|link=#stepGames|Skip Up]]</td> | ||
| + | <td width=46> </td> | ||
| + | <td width=75> </td> | ||
| + | <td width=75> </td> | ||
| + | <td width=75> </td> | ||
| + | </tr> | ||
| + | </table> <!-- END Nav Buttons Table --> | ||
| + | |||
| + | <table width=1000> | ||
<tr valign="top"> | <tr valign="top"> | ||
| − | <td width= | + | <td width=845> |
'''Driver Games''' save the "state of play" in '''Driver''' - the position of consists, the commodities and levels in rolling stock and industries, the state of the Driver Command queues, Session Rules, clock time, etc. Once saved, the '''Driver Game''' can be loaded back into '''Driver''' to continue the play at the point where it was saved.<br> | '''Driver Games''' save the "state of play" in '''Driver''' - the position of consists, the commodities and levels in rolling stock and industries, the state of the Driver Command queues, Session Rules, clock time, etc. Once saved, the '''Driver Game''' can be loaded back into '''Driver''' to continue the play at the point where it was saved.<br> | ||
| − | When you are in '''Driver''' select <span style="color: white; background-color: black; font-weight: 700; font-size: 15px;">& | + | When you are in '''Driver''' select <span style="color: white; background-color: black; font-weight: 700; font-size: 15px;"> Save </span> from the '''System Menu''' or press <span style="font-weight: 700; font-size: 15px;"><span style="color: white; background-color: black;"> Ctrl </span> + <span style="color: white; background-color: black;"> S </span></span>.<br> |
| − | This will display the '''Save Driver Session''' dialogue window showing the name of the current session with a date and time stamp (shown left below). If you | + | This will display the '''Save Driver Session''' dialogue window showing the name of the current session with a date and time stamp (shown left below). If you <span style="font-weight: 700; font-size: 15px; background-color: lightcyan;">Left Click</span> pn the Tick then this will be the name used for the saved game. Alternatively, you could enter your own unique name (shown right below).<br> |
The space below the entered name will display any other saved driver games for that session. | The space below the entered name will display any other saved driver games for that session. | ||
| Line 1,750: | Line 4,456: | ||
</tr> | </tr> | ||
</table> | </table> | ||
| + | <br> | ||
| + | <table width=1000> <!-- BEGIN Nav Buttons Table SKIPS NO SECTIONS --> | ||
| + | <tr valign="top"> | ||
| + | <td width=629><span id="skipLoadDriverGames"></span> | ||
=='''Loading Driver Games'''== | =='''Loading Driver Games'''== | ||
| − | + | </td> | |
| − | + | <td width=50>[[image:SkipDown.png|link=#skipEditDriver|Skip Down]]</td> | |
| − | + | <td width=50>[[image:SkipUp.png|link=#skipSaveDriver|Skip Up]]</td> | |
| + | <td width=46> </td> | ||
| + | <td width=75> </td> | ||
| + | <td width=75> </td> | ||
| + | <td width=75> </td> | ||
| + | </tr> | ||
| + | </table> <!-- END Nav Buttons Table --> | ||
| − | + | <table width=1000> | |
| + | <tr valign="top"> | ||
| + | <td>Saved driver games will be shown with their sessions for a selected route. The section '''[[image:PageLink.PNG|link=]] [[#Loading an Existing Session|Loading an Existing Session]]''' shows two different methods of displaying saved sessions and their driver games. <br> | ||
| + | '''Method''' [[image:Ablue.png|link=]] will display '''ALL''' the saved sessions and driver games which may be a very long list.<br> | ||
| + | '''Method''' [[image:Bblue.png|link=]] will display '''ALL''' the saved sessions and driver games for a selected route, which should be a much shorter list.<br> | ||
| + | |||
| + | If using '''Method''' [[image:Ablue.png|link=]] select the route first and then click the <span style="background-color: black; color: white; font-weight: 700; font-size: 15px;"> VIEW SESSIONS </span> button. This will display a list of thumbnails for all the sessions and driver games in that route.</td> | ||
| + | </tr> | ||
| + | </table> | ||
[[image:DriverLoadDriverSession.png|link=|alt=Load Driver Game]]<br> | [[image:DriverLoadDriverSession.png|link=|alt=Load Driver Game]]<br> | ||
| − | <table bgcolor=#000000 | + | <table width=1000 bgcolor=#000000> |
<tr valign="top"> | <tr valign="top"> | ||
<td> | <td> | ||
| Line 1,770: | Line 4,494: | ||
</tr> | </tr> | ||
<tr valign="top"> | <tr valign="top"> | ||
| − | <td>[[image:DotPoint.JPG|link=]]</td> | + | <td width=10>[[image:DotPoint.JPG|10px|link=]]</td> |
<td>Where a route has multiple sessions and driver games they will all be shown by their thumbnails with no way of telling which driver games belong to which session.</td> | <td>Where a route has multiple sessions and driver games they will all be shown by their thumbnails with no way of telling which driver games belong to which session.</td> | ||
</tr> | </tr> | ||
<tr valign="top"> | <tr valign="top"> | ||
| − | <td>[[image:DotPoint.JPG|link=]]</td> | + | <td>[[image:DotPoint.JPG|10px|link=]]</td> |
| − | <td>It can also be difficult to tell which thumbnail is a session and which is a '''Driver Game''', especially if you have removed the date/time stamp '''Trainz''' automatically adds to the name of a '''Driver Game'''. A simple way to tell is to | + | <td>It can also be difficult to tell which thumbnail is a session and which is a '''Driver Game''', especially if you have removed the date/time stamp '''Trainz''' automatically adds to the name of a '''Driver Game'''. A simple way to tell is to <span style="font-weight: 700; font-size: 15px; background-color: lightcyan;">Left Click</span> on a thumbnail to see if the <span style="color: white; background-color: black; font-weight: 700; font-size: 15px;"> EDIT SESSION </span> button is still visible. If it is not, because driver games cannot be edited, then the thumbnail is for a '''Driver Game'''. |
</td> | </td> | ||
</tr> | </tr> | ||
| Line 1,785: | Line 4,509: | ||
Where there is only one session in a route, the session will be the first thumbnail shown in the list followed by the driver games. Note that the session is selected by default.<br> | Where there is only one session in a route, the session will be the first thumbnail shown in the list followed by the driver games. Note that the session is selected by default.<br> | ||
| − | Select (hightlight) the '''Driver Game''' you want to load and | + | Select (hightlight) the '''Driver Game''' you want to load and then <span style="font-weight: 700; font-size: 15px; background-color: lightcyan;">Left Click</span> on the <span style="font-weight: 700; background-color: black; color: white; font-size: 15px;"> DRIVE SESSION </span> button.<br> |
[[image:DriverButtonsNoEdit.png|link=|alt=Driver Game]]<br> | [[image:DriverButtonsNoEdit.png|link=|alt=Driver Game]]<br> | ||
| Line 1,791: | Line 4,515: | ||
This will load the '''Driver Game''', the session and the route into '''Driver'''.<br> | This will load the '''Driver Game''', the session and the route into '''Driver'''.<br> | ||
| − | <table bgcolor=#ff0000 width= | + | <table bgcolor=#ff0000 width=1000> |
<tr valign="top"> | <tr valign="top"> | ||
<td> | <td> | ||
| Line 1,798: | Line 4,522: | ||
<td>[[image:Stop.PNG|link=]]</td> | <td>[[image:Stop.PNG|link=]]</td> | ||
<td>If you load a '''Driver Game''' after you have edited the original route or session that was used to create it, then you will receive a message warning you that changes have been made to the original assets. The changes could affect the operation of the '''Driver Game'''. | <td>If you load a '''Driver Game''' after you have edited the original route or session that was used to create it, then you will receive a message warning you that changes have been made to the original assets. The changes could affect the operation of the '''Driver Game'''. | ||
| + | <table bgcolor=#ffffb0 cellpadding=2> | ||
| + | <tr valign="top"> | ||
| + | <td width=25>[[image:NotePad.PNG|link=]]</td> | ||
| + | <td>If you have opened the '''Driver Game''' in '''Driver''' directly from '''Content Manager''' then you will not be given this warning</td> | ||
| + | </tr> | ||
| + | </table> | ||
</td> | </td> | ||
</tr> | </tr> | ||
<tr valign="top"> | <tr valign="top"> | ||
| − | <td>& | + | <td> </td> |
<td> | <td> | ||
<table> | <table> | ||
<tr valign="top"> | <tr valign="top"> | ||
<td width=480>[[image:DriverLoadWarning.png|link=|alt=Warning assets have changed|480px]]</td> | <td width=480>[[image:DriverLoadWarning.png|link=|alt=Warning assets have changed|480px]]</td> | ||
| − | <td> | + | <td><span style="font-weight: 700; font-size: 15px;">Options:-</span><br> |
| − | <span style="color: white; background-color: black; font-weight: 700; font-size: 15px;">& | + | <table> |
| − | <span style="color: white; background-color: black; font-weight: 700; font-size: 15px;">& | + | <tr valign="top"> |
| + | <td width=25>[[image:Ablue.png|link=]]</td> | ||
| + | <td> <span style="color: white; background-color: black; font-weight: 700; font-size: 15px;"> Cancel </span> - the '''Driver Game''' will NOT be loaded, <span style="font-weight:700; font-size: 15px;">OR</span></td> | ||
| + | </tr> | ||
| + | <tr valign="top"> | ||
| + | <td width=25>[[image:Bblue.png|link=]]</td> | ||
| + | <td> <span style="color: white; background-color: black; font-weight: 700; font-size: 15px;"> Ok </span> - load the '''Driver Game''' wirh the changes</td> | ||
| + | </tr> | ||
| + | </table> | ||
<br> | <br> | ||
If the changes to the route or session have been:- | If the changes to the route or session have been:- | ||
| − | + | <table> | |
| − | + | <tr valign="top"> | |
| + | <td width=10>[[image:DotPoint.JPG|10px|link=]]</td> | ||
| + | <td>minor and non-operational, such as scenery assets (trees, buildings, etc) then the '''Driver Game''' can be safely loaded.</td> | ||
| + | </tr> | ||
| + | <tr valign="top"> | ||
| + | <td>[[image:DotPoint.JPG|10px|link=]]</td> | ||
| + | <td>more significant operational changes, such as triggers, trackmarks, active industries, consists, tracks, etc, then it may '''NOT''' be wise to load and run the '''Driver Game'''.</td> | ||
| + | </tr> | ||
| + | </table> | ||
<br> | <br> | ||
| − | '''Only you can be the judge''' | + | '''Only you can be the judge but I would err on the side of caution''' |
</td> | </td> | ||
</tr> | </tr> | ||
| Line 1,825: | Line 4,571: | ||
</table> | </table> | ||
<br> | <br> | ||
| − | <table> <!-- BEGIN Nav Buttons Table --> | + | <table width=1000> <!-- BEGIN Nav Buttons Table SKIPS NO SECTIONS --> |
<tr valign="top"> | <tr valign="top"> | ||
| − | <td width= | + | <td width=629><span id="skipEditDriver"></span> |
| + | =='''Editing Driver Games'''== | ||
| + | </td> | ||
| + | <td width=50>[[image:SkipDown.png|link=#stepDeleting|Skip Down]]</td> | ||
| + | <td width=50>[[image:SkipUp.png|link=#skipLoadDriverGames|Skip Up]]</td> | ||
| + | <td width=46> </td> | ||
| + | <td width=75> </td> | ||
| + | <td width=75> </td> | ||
| + | <td width=75> </td> | ||
| + | </tr> | ||
| + | </table> <!-- END Nav Buttons Table --> | ||
| + | |||
| + | <table width=1000> | ||
| + | <tr valign="top"> | ||
| + | <td>It is possible to load and edit a saved '''Driver Game''' in versions of '''Trainz''' that have the '''UDS''' ('''<u>U</u>'''nified '''<u>D</u>'''river '''<u>S</u>'''urveyor) interface - these versions are '''TRS19 Platinum''', '''Trainz Plus''', '''TRS22''' and '''TRS22 Platinum'''. However, when you save your edit, it will '''NOT''' be saved as an update to the loaded '''Driver Game'''. Instead it will be saved as a '''Session'''. You can select to create a new session or to overwrite the original session.</td> | ||
| + | </tr> | ||
| + | </table> | ||
| + | <br> | ||
| + | The '''Session''' will be saved with all the:- | ||
| + | <table width=1000> | ||
| + | <tr valign="top"> | ||
| + | <td width=10>[[image:DotPoint.JPG|10px|link=]]</td> | ||
| + | <td>consists in their positions and states (stationary or moving) at the time of the save</td> | ||
| + | </tr> | ||
| + | <tr valign="top"> | ||
| + | <td>[[image:DotPoint.JPG|10px|link=]]</td> | ||
| + | <td>industries and rolling stock in their conditions (e.g. product levels) at the time of the save</td> | ||
| + | </tr> | ||
| + | <tr valign="top"> | ||
| + | <td>[[image:DotPoint.JPG|10px|link=]]</td> | ||
| + | <td>switches in their state at the time of the save, and</td> | ||
| + | </tr> | ||
| + | <tr valign="top"> | ||
| + | <td>[[image:DotPoint.JPG|10px|link=]]</td> | ||
| + | <td>session rules in their state (completed or not completed) at the time of the save</td> | ||
| + | </tr> | ||
| + | </table> | ||
| + | <br> | ||
| + | <table width=1000> <!-- BEGIN Nav Buttons Table SECTION w SKIPS --> | ||
| + | <tr valign="top"> | ||
| + | <td width=629><span id="stepDeleting"></span> | ||
| + | ='''Deleting Routes and Sessions'''= | ||
| + | </td> | ||
| + | <td width=50> </td> | ||
| + | <td width=50>[[image:SkipUp.png|link=#skipEditDriver|Skip Up]]</td> | ||
<td width=46>[[image:BackToTop.png|link=#top|alt=Top|Top]]</td> | <td width=46>[[image:BackToTop.png|link=#top|alt=Top|Top]]</td> | ||
<td width=75>[[image:NextUp.png|link=#stepGames|alt=Next Up|Next Up]]</td> | <td width=75>[[image:NextUp.png|link=#stepGames|alt=Next Up|Next Up]]</td> | ||
| − | <td width=75>& | + | <td width=75> </td> |
<td width=75>[[image:BackToBottom.png|link=#bottom|alt=Bottom|Bottom]]</td> | <td width=75>[[image:BackToBottom.png|link=#bottom|alt=Bottom|Bottom]]</td> | ||
</tr> | </tr> | ||
</table> <!-- END Nav Buttons Table --> | </table> <!-- END Nav Buttons Table --> | ||
| − | ='''Deleting | + | <table width=1000 bgcolor="lightcyan" cellpadding=2> |
| − | + | <tr valign="top"> | |
| − | All the '''Surveyor''' and '''Driver''' screens for loading routes and sessions have a <span style="font-weight: 700; background-color: black; color: white; font-size: 15px;">& | + | <td width=10>[[image:BlueDot10x10.png|link=]]</td> |
| + | <td>'''Deleting a Route will delete that Route, all its Sessions and all its Driver Games (if any)'''</td> | ||
| + | </tr> | ||
| + | <tr valign="top"> | ||
| + | <td>[[image:BlueDot10x10.png|link=]]</td> | ||
| + | <td>'''Deleting a Session will delete that Session and its Driver Games (if any). It will NOT delete the Route it was created from. It will NOT delete other Sessions created for that Route. It will NOT delete any other Driver Games created for those other Sessions'''</td> | ||
| + | </tr> | ||
| + | <tr valign="top"> | ||
| + | <td>[[image:BlueDot10x10.png|link=]]</td> | ||
| + | <td>'''Deleting a Driver Game will only delete that Driver Game. It will NOT delete the Route or Session it was created from or any other Driver Games from that Session'''</td> | ||
| + | </tr> | ||
| + | </table> | ||
| + | <br> | ||
| + | All the '''Surveyor''' and '''Driver''' screens for loading routes and sessions have a <span style="font-weight: 700; background-color: black; color: white; font-size: 15px;"> DELETE ... </span> button as an option.<br> | ||
<table bgcolor=#ff0000> | <table bgcolor=#ff0000> | ||
| Line 1,844: | Line 4,647: | ||
<table bgcolor=#fcbcbc> | <table bgcolor=#fcbcbc> | ||
<tr valign="top"> | <tr valign="top"> | ||
| − | <td>& | + | <td> </td> |
<td><span style="font-size: 15px; font-weight: 700;">WARNING:</span></td> | <td><span style="font-size: 15px; font-weight: 700;">WARNING:</span></td> | ||
</tr> | </tr> | ||
<tr valign="top"> | <tr valign="top"> | ||
| − | <td>[[ | + | <td>[[image:Stop.PNG|link=]]</td> |
| − | <td>'''If you delete a Route you will also delete all Sessions | + | <td>'''If you delete a Route you will also delete all the Sessions and Driver Games created using that Route''' |
</td> | </td> | ||
</tr> | </tr> | ||
<tr valign="top"> | <tr valign="top"> | ||
<td>[[image:Stop.PNG|link=]]</td> | <td>[[image:Stop.PNG|link=]]</td> | ||
| − | <td>'''If you delete a Session you will also delete all Driver Games created using that Session | + | <td>'''If you delete a Session you will also delete all the Driver Games created using that Session |
</td> | </td> | ||
</tr> | </tr> | ||
| Line 1,862: | Line 4,665: | ||
</table> | </table> | ||
<br> | <br> | ||
| − | <table | + | <table width=1000> |
<tr valign="top"> | <tr valign="top"> | ||
| − | <td> | + | <td>If you need a more selective way of deleting routes, sessions and driver games, then use '''Content Manager''' from the '''Trainz''' Launch Screen. Select the Filter '''Routes & Sessions'''.<br> |
| − | + | ||
| − | + | ||
| − | + | ||
| − | + | ||
| − | If you need a more selective way of deleting routes, sessions and driver games, then use '''Content Manager''' from the '''Trainz''' Launch Screen. Select the Filter '''Routes & Sessions'''.<br> | + | |
[[image:RouteSessionCMList.png|link=|alt=CM list of routes and sessions]]<br> | [[image:RouteSessionCMList.png|link=|alt=CM list of routes and sessions]]<br> | ||
| Line 1,875: | Line 4,673: | ||
The '''Type''' column will identify each entry as a route, session or '''Misc'''. '''Misc''' in this case means a saved '''Driver Game'''.<br> | The '''Type''' column will identify each entry as a route, session or '''Misc'''. '''Misc''' in this case means a saved '''Driver Game'''.<br> | ||
| − | You can delete routes and/or sessions individually but if you delete a route by itself then its dependant sessions and driver games will be shown as <span style="color: red; font-weight: 700;">faulty</span> with <span style="color: red; font-weight: 700;">Missing dependencies</span>. Likewise, if you delete a session by itself then its dependant driver games will be shown as <span style="color: red; font-weight: 700;">faulty</span> with <span style="color: red; font-weight: 700;">Missing dependencies</span>.< | + | You can delete routes and/or sessions individually but if you delete a route by itself then its dependant sessions and driver games will be shown as <span style="color: red; font-weight: 700;">faulty</span> with <span style="color: red; font-weight: 700;">Missing dependencies</span>. Likewise, if you delete a session by itself then its dependant driver games will be shown as <span style="color: red; font-weight: 700;">faulty</span> with <span style="color: red; font-weight: 700;">Missing dependencies</span>.</td> |
| + | </tr> | ||
| + | </table> | ||
<br> | <br> | ||
| − | <table> <!-- BEGIN Nav Buttons Table --> | + | <table width=1000> <!-- BEGIN Nav Buttons Table NO SKIPS --> |
<tr valign="top"> | <tr valign="top"> | ||
| − | <td width= | + | <td width=629><span id="bottom"></span> |
| + |   | ||
| + | </td> | ||
| + | <td width=50> </td> | ||
| + | <td width=50> </td> | ||
<td width=46>[[image:BackToTop.png|link=#top|alt=Top|Top]]</td> | <td width=46>[[image:BackToTop.png|link=#top|alt=Top|Top]]</td> | ||
<td width=75>[[image:NextUp.png|link=#stepDeleting|alt=Next Up|Next Up]]</td> | <td width=75>[[image:NextUp.png|link=#stepDeleting|alt=Next Up|Next Up]]</td> | ||
| − | <td width=75>& | + | <td width=75> </td> |
| − | <td width=75>& | + | <td width=75> </td> |
</tr> | </tr> | ||
</table> <!-- END Nav Buttons Table --> | </table> <!-- END Nav Buttons Table --> | ||
| Line 1,889: | Line 4,693: | ||
---- | ---- | ||
='''Trainz Wiki'''= | ='''Trainz Wiki'''= | ||
| − | <table cellpadding= | + | <table width=1000 cellpadding=2> |
| + | <tr valign="top"> | ||
| + | <td> | ||
| + | <table width=500 cellpadding=2> | ||
<tr valign="top"> | <tr valign="top"> | ||
<td>[[image:TrainzWiki.png|link=]]</td> | <td>[[image:TrainzWiki.png|link=]]</td> | ||
<td> | <td> | ||
<span style="font-size: 17px;">'''Route and Session Building Guides'''</span><br> | <span style="font-size: 17px;">'''Route and Session Building Guides'''</span><br> | ||
| − | *'''<span class=" | + | *'''<span class="plain;s">[http://online.ts2009.com/mediaWiki/index.php/HowTo How to Guides]</span>''' |
*'''[[HowTo/Create_a_Route_in_10_Minutes|Create a Route in 10 Minutes]]''' | *'''[[HowTo/Create_a_Route_in_10_Minutes|Create a Route in 10 Minutes]]''' | ||
*'''[[How_to_Make_Good_Scenery|How to Make Good Scenery]]''' | *'''[[How_to_Make_Good_Scenery|How to Make Good Scenery]]''' | ||
| Line 1,901: | Line 4,708: | ||
</tr> | </tr> | ||
<tr valign="top"> | <tr valign="top"> | ||
| − | <td>& | + | <td> </td> |
<td> | <td> | ||
<span style="font-size: 17px;">'''More Tutorials and Guides to Using Trainz'''</span><br> | <span style="font-size: 17px;">'''More Tutorials and Guides to Using Trainz'''</span><br> | ||
| − | *'''<span class=" | + | *'''<span class="plain;s">[http://online.ts2009.com/mediaWiki/index.php/HowTo How to Guides]</span>''' |
*'''[[Driver Commands List]]''' | *'''[[Driver Commands List]]''' | ||
*'''[[Session Rule List with Parameters|Session Rules List (Alphabetical) with Parameters]]''' | *'''[[Session Rule List with Parameters|Session Rules List (Alphabetical) with Parameters]]''' | ||
*'''[[Session Rules By Categories With Properties|Session Rules List (Categories) With Parameters]]''' | *'''[[Session Rules By Categories With Properties|Session Rules List (Categories) With Parameters]]''' | ||
| + | </td> | ||
| + | </tr> | ||
| + | </table> | ||
| + | </td> | ||
| + | <td> | ||
| + | <table width=500 cellpadding=4 bgcolor="Aquamarine"> | ||
| + | <tr valign="top"> | ||
| + | <td width=50>[[image:LinkWiki.PNG|link=]]</td> | ||
| + | <td> | ||
| + | <span style="font-size: 17px;">'''Related Links'''</span><br> | ||
| + | *'''[[How_to_Create_a_Region_Asset|How to Create a Region Asset]]''' | ||
| + | *'''[[How_to_Merge_Routes|How to Merge Routes]]''' | ||
| + | *'''[[How_to_Use_Layers|How to Use Layers]]''' | ||
| + | *'''[[How_to_Use_S20_Palettes|How to Use Surveyor 2.0 Palettes]]''' | ||
| + | *'''[[How_to_Use_S20_Tools|How to Use Surveyor 2.0 Tools]]''' | ||
| + | </td> | ||
| + | </tr> | ||
| + | </table> | ||
</td> | </td> | ||
</tr> | </tr> | ||
</table> | </table> | ||
---- | ---- | ||
| − | This page was created by Trainz user '''<span class=" | + | This page was created by Trainz user '''<span class="plain;s">[http://online.ts2009.com/mediaWiki/index.php/User:Pware pware]</span>''' in September 2021 and was last updated as shown below. |
---- | ---- | ||
[[Category:How-to guides]] | [[Category:How-to guides]] | ||
Latest revision as of 23:33, 9 July 2025
| The information in this Wiki Page applies to Trainz Plus, TRS22 and TRS19. This page is intended to provide you with an overview of the properties and features of Routes and Sessions when creating layouts for Trainz. More detailed descriptions of these various features plus instructions on getting you started with creating Routes and Sessions can be found in the Trainz Wiki How To Guides are provided at the end of this document. |
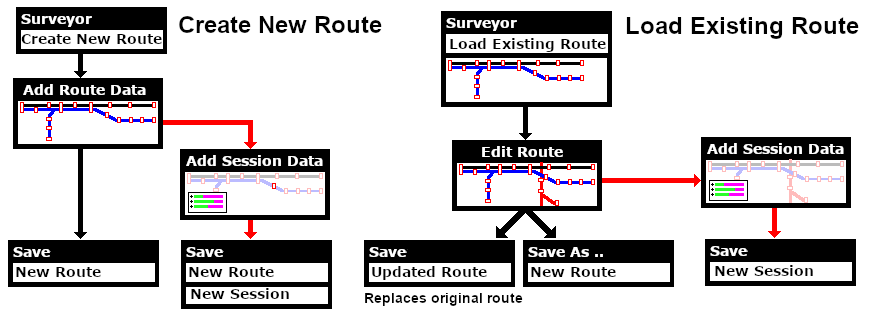
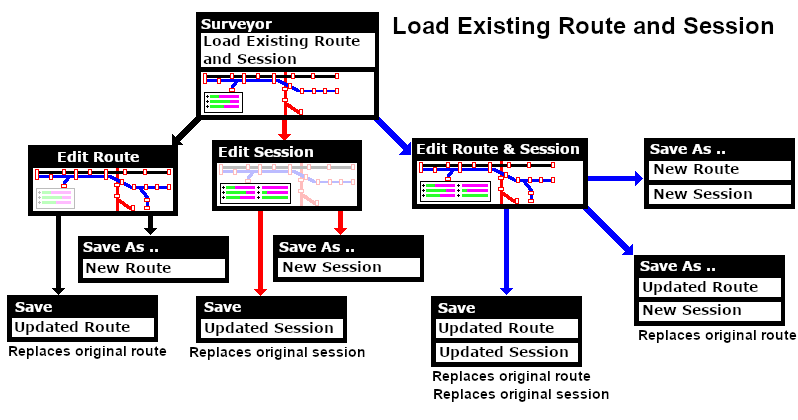
[edit] Trainz Worlds |
The virtual worlds that Trainz creates can be classified as:-
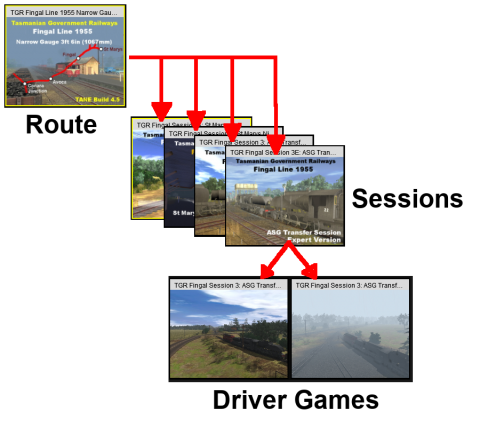 |
Routes are created in Surveyor and contain most (if not all) of what you will see in your virtual Trainz world. You can have many different routes, limited only by your storage space. They can be built to represent different geographical regions (real or imagined) and different periods of time (past, present, future). They also control the environment settings in your virtual world, such as your geographic location and altitude, the season of the year, lighting conditions and the weather. Each route can have multiple sessions.
Sessions are also created in Surveyor but are designed to be run in Driver. They contain the instructions that will control your trains when they are operating in automatic or "AI" mode in your route. They also control the goods your trains will carry, load and unload at industries along the way. You can create different sessions for different aspects of your railway - freight, passenger, shunting or a mixture - or for different seasons of the year or times of the day. Sessions are where you can program the behaviour of objects in your virtual Trainz world. A session can also contain scenery items that are specific to a particular railway operation, season or time of day. Sessions also control the environment settings in your virtual world, such as lighting conditions and the weather. Each session can have multiple saved driver games.
|
[edit] What is a Route? |
| A route (also known as a "Layout") consists of most of what you will see on the screen when using Surveyor and Driver. Things such as the landform or terrain, most (if not all) of the scenery items, the ground textures, the effect layers (such as TurfFX and Clutter), plus some "environmental" features. A route consists of two parts:- |
|
|
![]() Route Data:
Route Data:
| The Route Data stores all those features that are painted into a layout using a brush tool and all the Environmental Data including the World Origin (latitude, longitude, altitude) |
The Route Data includes the Terrain, Textures, Effect Layers, Legacy Water and the Environmental features.
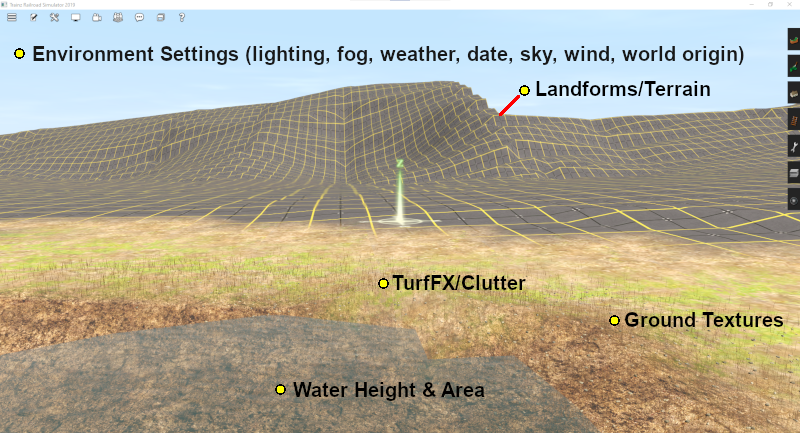
|
||||||||||||
![]() Route Layers:
Route Layers:
| Route Layers are used to hold the scenery assets that you want to appear in all sessions created for the route |
All scenery assets are held in layers. Route Layers (you can have many layers) give you a way of organising or grouping the assets displayed in your route.
|
||||||||||||
|
 |
A detailed description of Layers can be found on the Trainz Wiki Page:-
|
[edit] Loading (and Creating) a Route |
| The Main Menu screen is shown below. The first option (shown highlighted in the image) opens Driver/Surveyor with all its options including loading and creating a route. | |||||||||||||||||
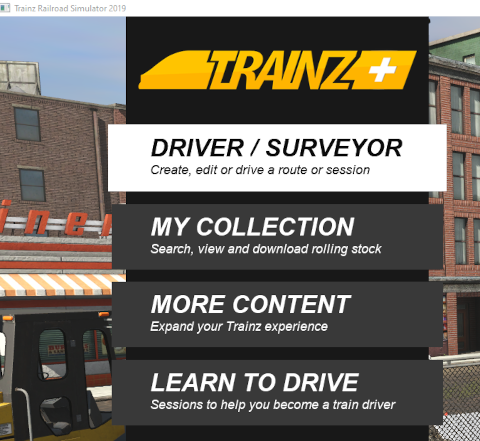 |
|
||||||||||||||||
In the Driver/Surveyor screen a strip of thumbnails of all the Routes, installed and as well as available as DLC, will be shown at the base of the screen. If there are too many to fit in the available space, just move the mouse pointer onto any thumbnail to reveal the scroll bar device as shown below.  |
|||||||||||||||||
| Left Click and Drag the scroll bar left or right to reveal the additional routes or use the Expand View button described below | |||||||||||||||||
|
The thumbnail images are colour coded.
| Payware on DLC | Must be purchased and downloaded, but some may be free - depending on your membership options. If you click a thumbnail with this colour a DOWNLOAD button will appear on the bottom right of the screen. If a price is included in the button then that is the purchase price (in $US) |
| Payware installed | Already installed from the DLC. DLC items cannot be deleted. To remove them use the Uninstall option in the Content Store from the Launcher. You can reinstall them later without any additional cost |
| Installed | Downloaded from the Download Station (DLS) or created by you. This includes any cloned DLC Routes and Sessions (see |
| Multiplayer | For simultaneous development by multiple players. Special conditions apply |
[edit] Creating a New Route |
![]()
| In both Surveyor Classic (also known as S1.0 or S10) and in Surveyor 2.0 (also known as S2.0 or S20) Left Click on CREATE ROUTE . This will start Trainz Surveyor and create a new blank route with a single baseboard using the Default settings which are usually those that were used when you last created and saved a route. The default settings may include a ground texture other than the grid pattern, for example - thick grass. | |||||||||||||||||||
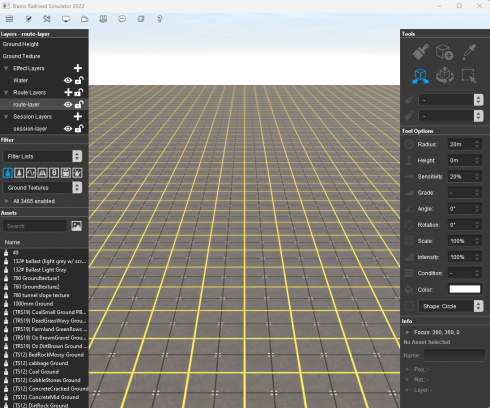 Surveyor 2.0 screen shown |
|
||||||||||||||||||
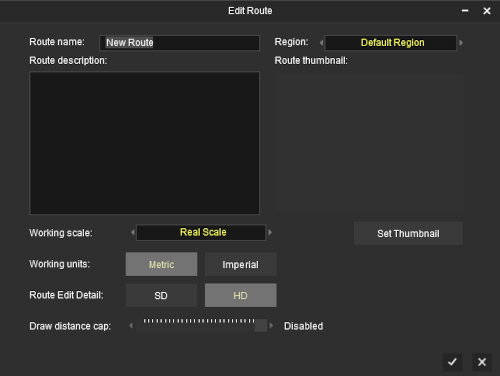 |
|
|||||||||
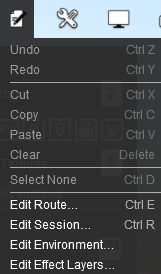
| It is recommended that you enter some details before you click the |
|
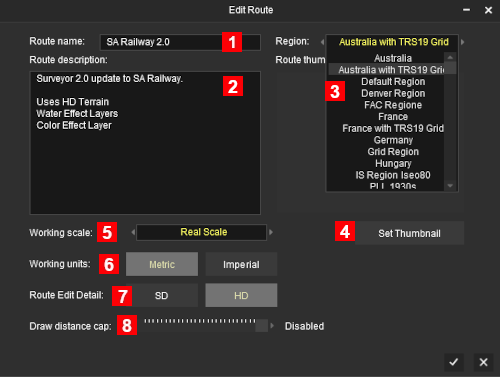 A Left Click on the
|
|
||||||||||||||||||||||||
| SD/HD Options | |||||||||||||||||||||||||||||||
This option, available in Trainz Plus only, allows you to set the route detail when working in HD resolution to the default HD (High Definition) or to a lower SD (Standard Definition) which is easier to work with over larger areas.
|
|||||||||||||||||||||||||||||||
[edit] The Surveyor World View |
|
| Depending on the Route Editor settings and the version of Trainz you are using, you may see or be affected by the following factors:- Baseboards and Grid Squares: |
||||||||||||||||||||||||
|
||||||||||||||||||||||||
[edit] In Surveyor Classic (S10)
| Surveyor Classic or S10 is the version of Surveyor found in TRS19, TRS19PE and TRS22. It is one of two versions of Surveyor available in TRS22PE and Trainz Plus. In Surveyor Classic the baseboards are controlled using the Topology Tools. To open the tools fly-out either Left Click the Topology Tool Tab or press the F1 key. |
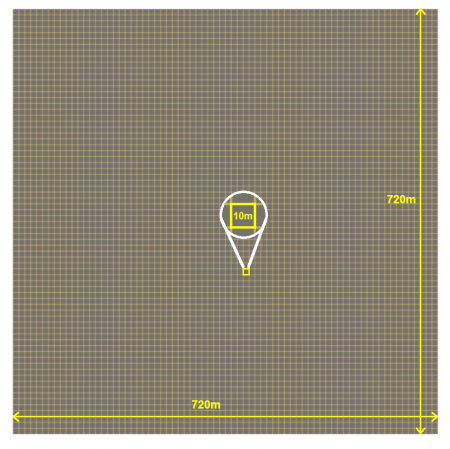 |
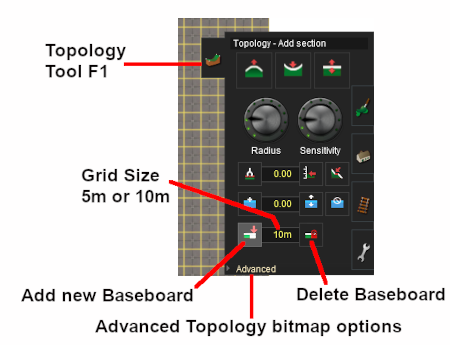
| The Key Topology Tools, as shown in the diagram above, are:- | |||||||||
| Add New Baseboard - Left Click (it will stay active until another button is clicked) and then Left Click in a blank area outside the baseboard to add a new baseboard in that position. Each click will add a new baseboard at the same altitude as the first | |||||||||
| Delete Baseboard - Left Click (it will stay active until another button is clicked) and then Left Click anywhere on a baseboard to delete that baseboard. You will get a warning dialogue window - you CANNOT undo this operation to restore a deleted baseboard | |||||||||
Grid Resolution - a pop-out menu will give you a choice of 10m (the default) or 5m. The option for the HD resolution is only available in Trainz Plus. This sets the resolution of the baseboard. It does not alter the size of the grid squares which is actually a painted texture and will always stay at 10m x 10m.
|
|||||||||
| Advanced - this will open another window in the Topology Tab that will allow you to select a grey scale bit map image to set the height of each grid |
[edit] In Surveyor 2.0 (S20)
| Surveyor 2.0 or S20 is an alternative version of Surveyor found in TRS22PE and Trainz Plus. Surveyor Classic is also available as an option in both TRS22PE and Trainz Plus. In Surveyor 2.0 there is no separate Topology Tools fly-out. A single Tools Palette replaces all the separate tools "fly-outs" found in the original Surveyor Classic. |
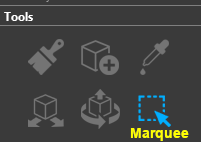 |
|
||||||||
| The Marquee area, shown with a green border in the image below right, shows the positions where 3 new baseboards will be created to add to the existing baseboard. The Marquee area has a Context Menu icon as shown in the image. | |||
Left Click on the Context Menu icon or press the T key to open up the Marquee Context Menu.
|
|||
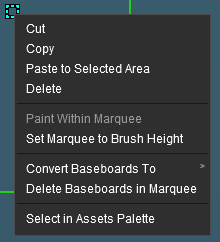
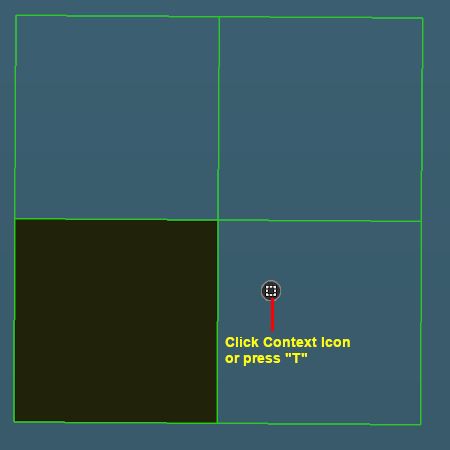
|
|||||||||||||
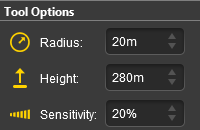
[edit] Default Baseboard Ground Texture |
| When a new route is created or a new baseboard is added in both Surveyor Classic and Surveyor 2.0 it will be covered with the ground texture for the selected Region or the default texture/grid if no region has been set. This can be changed to a different texture (including to the standard TRS19/TRS22 grid pattern). | ||||||||||
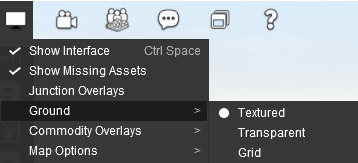 |
|
|||||||||
| A more complex solution is to edit an existing Region or create one of your own to add your preferred ground texture (such as the standard TRS22 grid pattern) to each new route you create and every new baseboard that you add. | ||||||||||
|
|
Information on creating and editing Region assets can be found on the Trainz Wiki at:-
|
[edit] Loading an Existing Route |
You must first find and select the route to load from those already installed. At the top of the Driver/Surveyor screen the route search options are shown as a set of buttons.
![]()
| Type: | ROUTES is the default selection. No need to change this. |
| Source: | PURCHASED is the default selection, Click and change to MY CONTENT for a route you have created (or already modified) or to INSTALLED for one you have downloaded from the DLS. |
| Region: | ALL is the default selection. You can select a particular geographic region if required and IF the route had a geographic region set when it was created. |
| Search: | You can narrow down the list of routes by typing the first few letters of its name (e.g. SA) as shown in the image above. |
This will produce a display of thumbnails at the bottom of the screen.
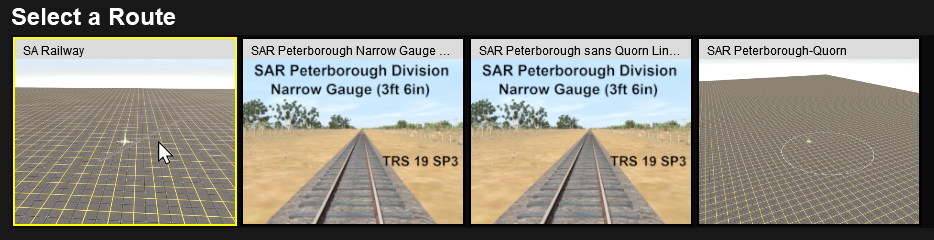
Left Click on the thumbnail for the route you want to load, then Left Click on the EDIT ROUTE button to load the route into Surveyor.
![]()
|
[edit] Loading a Route Into Surveyor From Content Manager |
Trainz provides a shortcut that allows you to load an existing route directly into Surveyor for editing from Content Manager.
 |
|
[edit] Loading After an Unexpected Shutdown |
| If you select a route for loading after an unexpected shutdown of Trainz then any route (or route and session) that was open and running in Trainz Surveyor or Driver will be left marked as Open for Edit. When you attempt to load this route into Surveyor or Driver you will see a message listing the route and session (if any) that were affected. | ||||
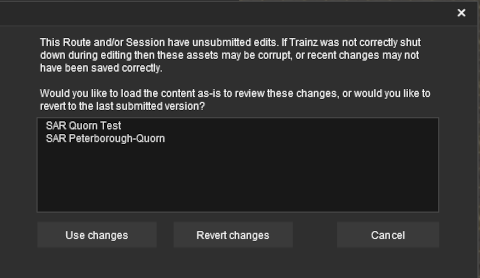 |
The message is saying that the assets in the list may have been changed since the last time you loaded them and exited Trainz normally. For example if you had been editing the route and/or session and had experienced a crash to the desktop or had used Windows Task Manager to terminate the program.
|
|||
The options you will see are:-
|
||||||||
[edit] Editing a Route |
| When a Route is loaded or a new Route is created all the assets you add will be automatically placed into a Route Layer |
| When you create a new route, or load an existing route without a session, and start adding scenery assets they will automatically be placed into a Route Layer. See Any ground textures, effect layers (e.g. TurfFX, Water, Clutter) you add, or terrain changes (including new baseboards) you make, will be added to the Route Data. |
|
|
|
 |
|
||||||||||||||
|
|||||||||||||||
| SD/HD Options |
| The Surveyor Route Editor will allow you to switch between two minimum brush sizes when working with HD resolution routes. | ||||||||||||||||||||||||||||||||||||||||||||
| This option, available in Trainz Plus only, allows you to set the brush detail to the default HD (High Definition) or to a lower SD (Standard Definition) which is easier to work with over larger areas.
|
||||||||||||||||||||||||||||||||||||||||||||
[edit] Adding Terrain Height, Textures, Effect Layers in a Route |
| Terrain, Textures, Effect Layers can only be added to a route not a session | |
| The height of the terrain can be adjusted to represent hills, valleys, plains, slopes | |
| The Terrain can be painted with textures to represent real ground surfaces | |
| Effect Layers (grasses, rocks, water, etc) can be added to the terrain to enhance its appearence. The types of effect layers that are available will depend on your Trainz version, GPU and Operating System |
|
||||||||||||
[edit] In Surveyor Classic (S10)
| In Surveyor Classic (S10) the tools and objects are in tabbed icons on the right of the screen which can be opened by a Left Click on the icon or by pressing its Function Key |
|
|||||||||
[edit] In Surveyor 2.0 (S20)
| In Surveyor 2.0 (S20) there is a single set of common tools that can add and manipulate objects of any type. Select a tool by a Left Click on its icon in the Tools Palette or by pressing its key. You can also select multiple objects, that can be of different types, and manipulate them (move, rotate, delete) as if they were a single object. |
|
||||||
|
||||||||||
[edit] Adding Assets to a Route |
| Assets include all visible objects (trees, buildings, roads, tracks, signals, rolling stock, etc) and invisible objects (track triggers, track marks, etc) that can be added to your route | |
| Objects added to your route will be present in all sessions created using that route |
[edit] In Surveyor Classic (S10)
| In Surveyor Classic (S10) the tools and objects are in tabbed icons on the right of the screen which can be opened by a Left Click on the icon or by pressing its Function Key. |
|
||||||||||||
[edit] In Surveyor 2.0 (S20)
| In Surveyor 2.0 (S20) there is a single set of common tools that can add and manipulate objects of any type. Select a tool by a Left Click on its icon in the Tools Palette or by pressing its key. You can also select multiple objects, that can be of different types, and manipulate them (move, rotate, delete) as if they were a single object. |
|
||||||||||||
[edit] Editing the Environment of a Route |
|
You can edit the Environment Controls of a Route by selecting the Edit Environment... option from the |
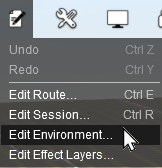 |
|
|
|
[edit] Edit Effect Layers |
| The Edit Effect Layers menu option allows you to add, remove and edit the special effect layers |
|
|
||||||||||||||||||||||
[edit] Merging Routes
| Two (or more) separate routes can be joined together (merged) to create a new route |
There are some important restrictions on the merging of two routes:-
| Payware (DLC) routes cannot be merged with Freeware (DLS) or other Payware routes | |
| The Session Data and Session Layers in the first route can be saved in the merger (if required) but those in the other route cannot | |
| There may be a significant height difference between the two routes and this may not be easy to overcome | |
| The orientation of the two routes (East-West or North-South) cannot be changed (it is possible but will usually require a lot of time, effort and patience) |
|
A detailed description of the process of Merging Routes can be found on the Trainz Wiki Page:-
|
[edit] What is a Session? |
| A Session is always a part of an existing Route - you cannot have a Session that does not belong to a Route | |
| If you create a Route without a Session then ALL the active industries and rolling stock, time, environmental conditions, etc, will revert to their original (default) values. There will be no AI drivers and drivers will have a very limited set of available commands for manual driving |
| In general, while a route provides the physical structures (or "hardware"), a session provides the services (or "software"). While you can easily have a route without a session, it could be a very limited (or even a boring) experience. A single route can have multiple sessions, or none, but a session must always belong to a route. To put it into Trainz terminology, a session has a route as a dependency. A session consists of two parts:- |
|
|
![]() Session Data:
Session Data:
| Session Data are often the "invisibles" that control the operation of a session. Session rules, driver orders and loco assignments, commodities (loaded, unloaded and carried) and most of the Environmental Settings are examples of Session Data. |
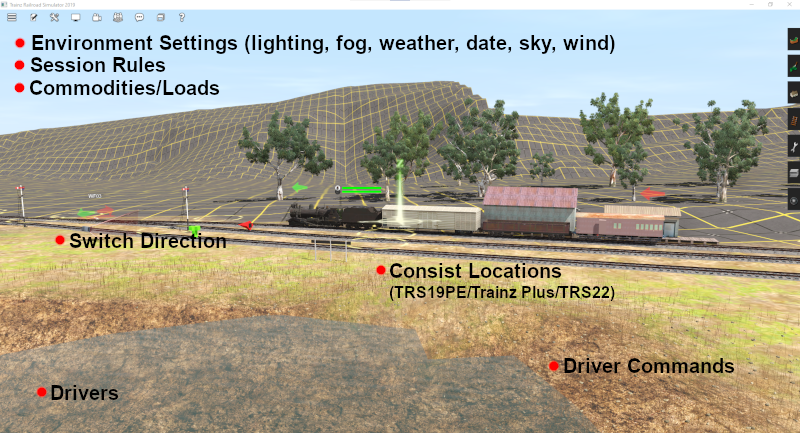
|
||||||||||||||||||
| Session Layers are used to hold the scenery assets that you want to only appear in that particular Session and not in all Sessions. The Session Layers can be left empty and the Route Layers can contain all the scenery assets |
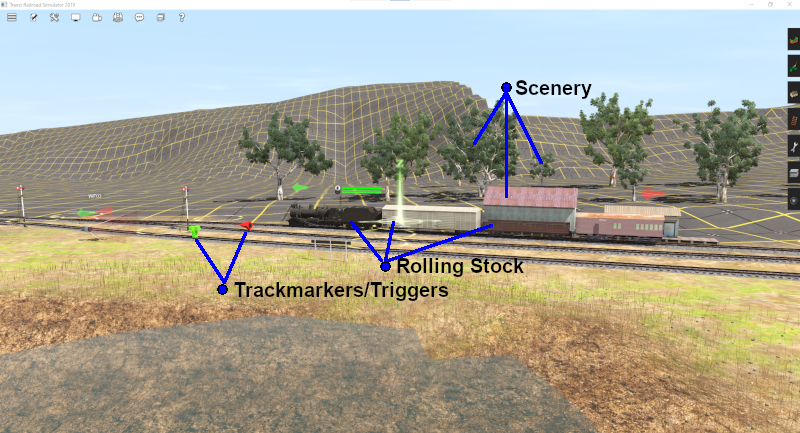
Session Layers give you a way of organising or grouping the assets displayed in your session.
|
|
|
A detailed description of Layers can be found on the Trainz Wiki Page:-
|
|
[edit] Loading (and Creating) a Session |
[edit] Creating a New Session
| To create a new Session you must first create a new Route or load an existing Route |
|
|
||||||||
[edit] Loading an Existing Session |
There are two different ways to load existing sessions into Surveyor.
|
||||||||||||||||||||||||||||||||||||||
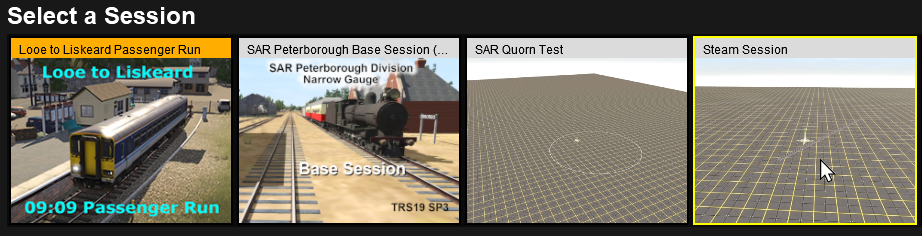
| OR |
|
||||||||||||||
| Both |
[edit] Loading a Session Into Surveyor From Content Manager |
Trainz provides a shortcut that allows you to load an existing session directly into Surveyor for editing from Content Manager.
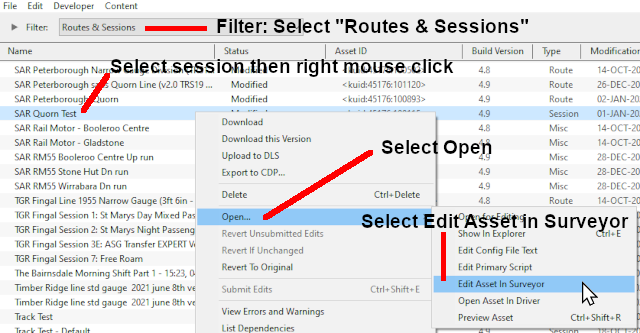 |
|
[edit] Loading a Session into Driver From Surveyor |
To start Driver simply select a session as described above in Loading an Existing Session and Left Click on the DRIVE SESSION button.
![]()
This will load both the session and the route into Driver.
You can save your "game play" in Driver at anytime. See ![]() Saving and Loading Sessions in Driver below.
Saving and Loading Sessions in Driver below.
[edit] Loading a Session into Driver From Content Manager |
Trainz provides a shortcut that allows you to load an existing session directly into Driver from Content Manager.
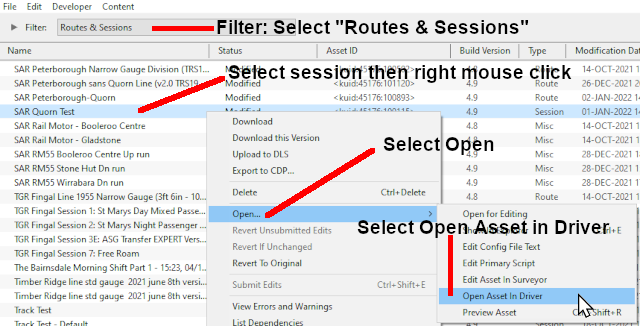 |
|
[edit] Editing a Session |
|
| Any changes made to the Session Rules (including drivers and their commands), the Environment Tools, Industry or Rolling Stock settings, will be added to the Session Data.
|
|
You can edit the Session Characteristics at any time by selecting the Edit Session... option from the |
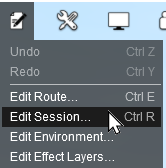 |
|
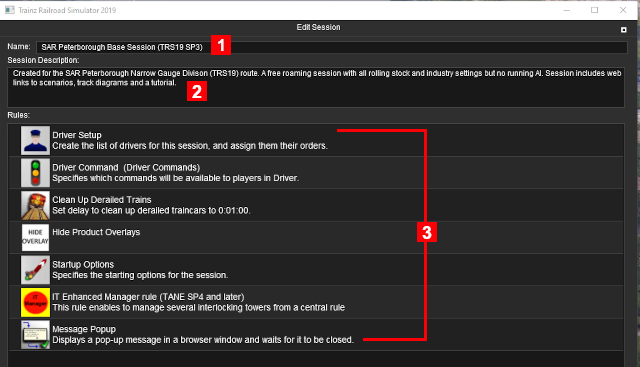 |
|
||||||||
[edit] Adding Assets to a Session |
| Assets include all visible objects (trees, buildings, roads, tracks, signals, rolling stock, etc) and invisible objects (track triggers, track marks, etc) that can be added to your session | |
| Any objects added to a session will only be available in that session |
[edit] In Surveyor Classic (S10)
| In Surveyor Classic (S10) the tools and objects are in tabbed icons on the right of the screen which can be opened by a Left Click on the icon or by pressing its Function Key |
|
||||||||||||
[edit] In Surveyor 2.0 (S20)
| In Surveyor 2.0 (S20) there is a single set of common tools that can add and manipulate objects of any type. Select a tool by a Left Click on its icon in the Tools Palette or by pressing its key. You can also select multiple objects, that can be of different types, and manipulate them (move, rotate, delete) as if they were a single object. |
|
||||||||||||
|
||||||||||||||||||||||||||||||||
[edit] Editing the Environment of a Session |
| Environmental settings in a Session will have priotity over those in a Route |
|
You can edit the Environment Controls of a Session by selecting the Edit Environment... option from the |
|
|
|
||||||||||
[edit] Saving a Route and a Session |
Routes and Sessions are saved from the System Menu on the Surveyor screen.
 |
|
|||||||||||||||||
| Notes on Saving DLS/DLC Routes and Sessions: |
|||||||||||||||||||||||||
|
|||||||||||||||||||||||||
|
|||||||||||||||||||||||||
[edit] Saving a New Route and Session |
If you have created a new route and select Save or Save As..., then you will be presented with the following Save Route Dialogue Windows.
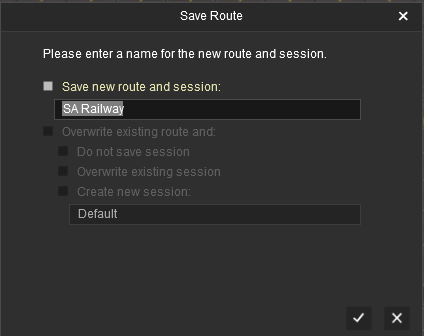 |
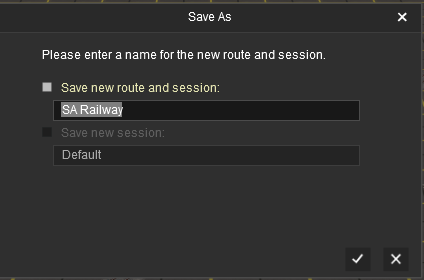 |
| In both cases the name of the route that was entered when it was created will be shown and you can change the name, even in the Save option. However, there is no option in either case to change the name of the created session because the other options have been greyed out and cannot be selected. | |
[edit] Saving an Existing Route |
If you have loaded the route only and not the session and HAVE NOT edited any Session Data or Session Layers, then selecting Save will produce the following Save Route Dialogue Window.
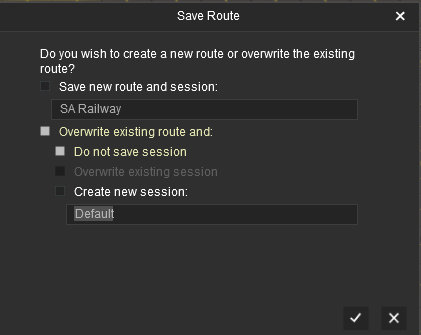 |
|
||||||||
If you have loaded the route only and not the session and HAVE edited Session Data or Session Layers, then selecting Save will produce the following Save Route Dialogue Window.
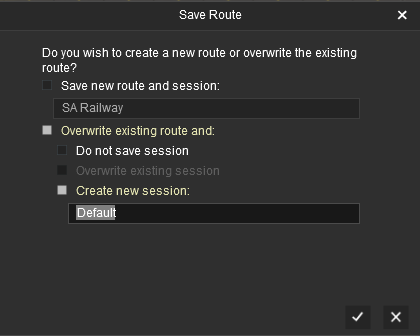 |
|
||||||||
|
[edit] Saving an Existing Route and Session |
| If you have loaded a route and a session and have edited the route OR both the route AND the session, then selecting Save will produce the following Save Route Dialogue Window. |
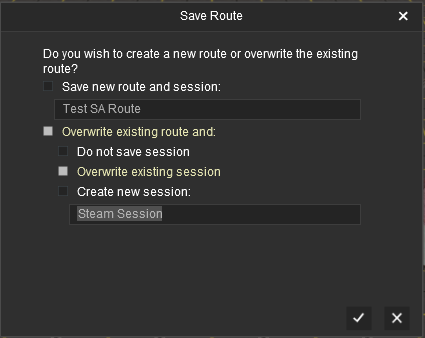 |
|
||||||||
|
[edit] Saving an Edited Session Only |
| If you have only edited the session then you will be given the option to save the Session only |
| If you have loaded a route and a session and have edited the session (Data or Layers) only and not the route, or have already saved the route but not the session, then selecting Save will produce the following Save Session Dialogue Window. |
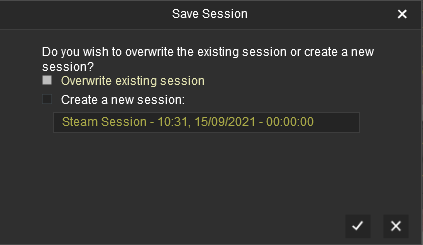 |
|
||||||||
[edit] Saving a Route and Session Using the UDS |
| The UDS feature is available in TRS19 Platinum Edition, Trainz Plus, TRS22 and TRS22 Platinum |
| The UDS (Unified Driver Surveyor) Interface allows you to quickly switch from Driver to Surveyor and back to Driver again without having to restart the session from the beginning. You can edit a route and session while in Surveyor and then switch back to Driver to continue the session where you left it. |
|
| Most of the problems users seem to be experiencing with the UDS, judging from the posts in the Trainz Forums, is when saving their edited Driver session after switching to Surveyor mode. |
|
Unless you have a particular reason for overwriting the original Session then the recommended save options are:-
| Option |
||||||||
|
This will save the Route only, using its existing name and it will overwrite the original route. This will save any edits that you have made to the Route but not to the Session. |
|||||||
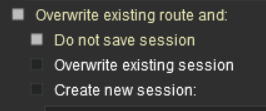
| Option |
||||||||||
|
This will save the Route using its existing name and it will overwrite the original route. It will also save the Session using the name you enter in the text box below the checkbox (Stage 3 in the example shown). The original Session will not be altered. This is useful when you want to test out changes to consists, industry settings, Rules, driver commands, etc but do not want to destroy the original Session. |
|||||||||
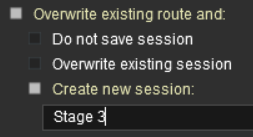
|
If you have NOT edited anything while in Surveyor and select Save then you will be shown the Save Driver Session dialogue window to save the session in its current state as a Driver Game (also called a Game or Driver Game). This is exactly the same as pressing Ctrl + S while in Driver. |
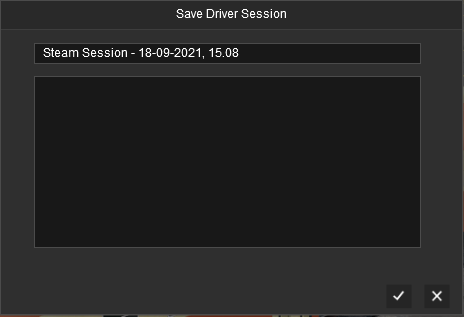
[edit] Exiting Surveyor |
| If you exit Surveyor after editing without saving then you will be prompted to Save. |
 |
|
||||||||||||
| Unsaved Route | Unsaved Session |
 |
 |
|
||||||||
[edit] Exiting Driver |
| If you exit Driver after running a session you will be prompted to Save a Driver Game. |
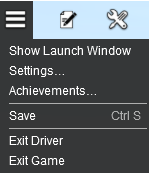 |
|
||||||||||||
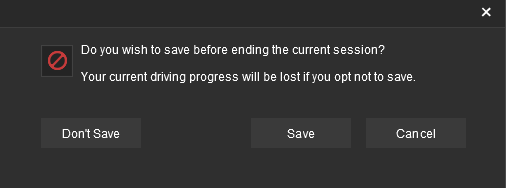
|
||||||||
[edit] Cloning a Route/Session |
| A Clone is an exact or duplicate copy of an asset. Some Payware routes and sessions cannot be cloned | |
| Cloned routes and sessions can be edited and saved as Your Content |
Cloning a Route or a Session allows you to work on a duplicate copy of the original. All changes that you make will be saved in the cloned copy leaving the original copy unchanged.
|
|
[edit] Cloning Using Surveyor |
Routes and Sessions that have been loaded into Surveyor can be cloned using the Save As... command from the Surveyor System Menu
 |
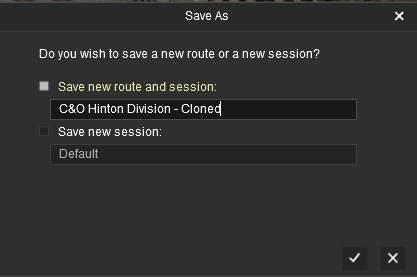 |
Enter a new name or edit the original name (as shown above) for your cloned route or session.
|
||||||||||||||
[edit] Cloning Using Content Manager |
![]() Select the Route or Session to Clone
Select the Route or Session to Clone
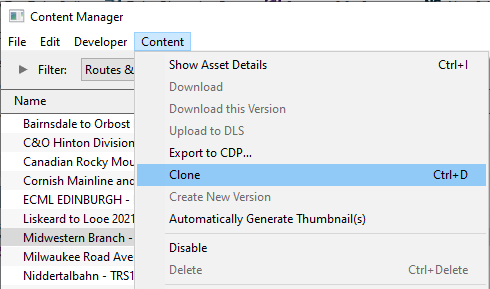 |
|
A Task Window will open to display the result.
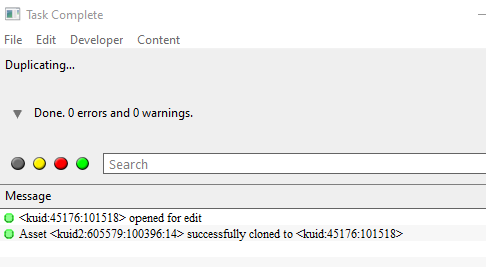
In the image above the original Route has been cloned and given a new <kuid> value.
The newly cloned Route will be shown in Content Manager as a New Asset that is Open for Editing.
|

![]() Rename the Clone (an Optional Step)
Rename the Clone (an Optional Step)
You can give the cloned Route or Session a new name and a new description. Note that these changes will not appear until after the New Asset has been submitted.
|
![]() Submit the Clone (a Necessary Step)
Submit the Clone (a Necessary Step)
| When submitted a cloned DLC Route or Session will be described as Payware, Modified while a cloned DLS Route or Session will be described as Modified |
|
|
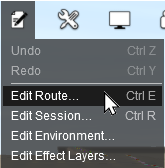
[edit] Saving and Loading Driver Games in Driver |
| Driver Games (sometimes called "Saved Games" or "Driver Sessions") are "Game States" saved while in Driver Mode |
|
||||||||||
[edit] Saving Driver Games |
|
Driver Games save the "state of play" in Driver - the position of consists, the commodities and levels in rolling stock and industries, the state of the Driver Command queues, Session Rules, clock time, etc. Once saved, the Driver Game can be loaded back into Driver to continue the play at the point where it was saved. When you are in Driver select Save from the System Menu or press Ctrl + S . This will display the Save Driver Session dialogue window showing the name of the current session with a date and time stamp (shown left below). If you Left Click pn the Tick then this will be the name used for the saved game. Alternatively, you could enter your own unique name (shown right below). The space below the entered name will display any other saved driver games for that session. |
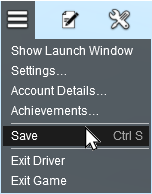 |
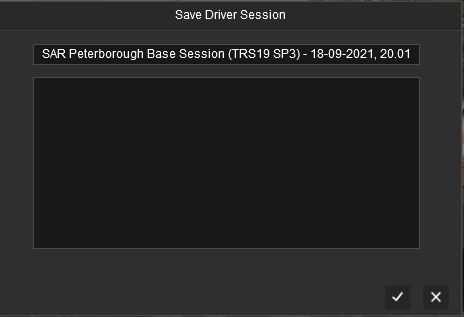 |
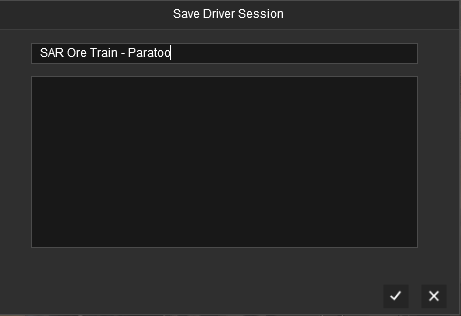 |
[edit] Loading Driver Games |
| Saved driver games will be shown with their sessions for a selected route. The section Method |
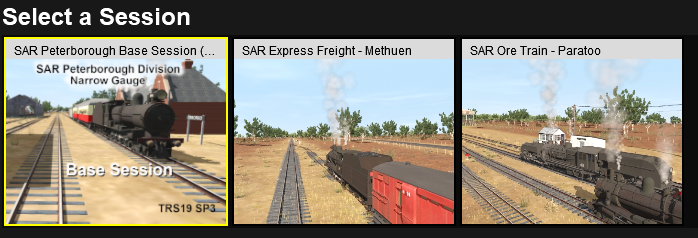
|
Where there is only one session in a route, the session will be the first thumbnail shown in the list followed by the driver games. Note that the session is selected by default.
Select (hightlight) the Driver Game you want to load and then Left Click on the DRIVE SESSION button.
![]()
This will load the Driver Game, the session and the route into Driver.
|
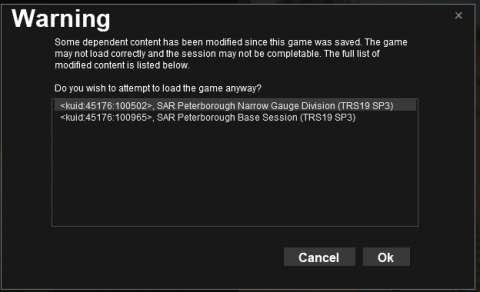
[edit] Editing Driver Games |
| It is possible to load and edit a saved Driver Game in versions of Trainz that have the UDS (Unified Driver Surveyor) interface - these versions are TRS19 Platinum, Trainz Plus, TRS22 and TRS22 Platinum. However, when you save your edit, it will NOT be saved as an update to the loaded Driver Game. Instead it will be saved as a Session. You can select to create a new session or to overwrite the original session. |
The Session will be saved with all the:-
| consists in their positions and states (stationary or moving) at the time of the save | |
| industries and rolling stock in their conditions (e.g. product levels) at the time of the save | |
| switches in their state at the time of the save, and | |
| session rules in their state (completed or not completed) at the time of the save |
[edit] Deleting Routes and Sessions |
| Deleting a Route will delete that Route, all its Sessions and all its Driver Games (if any) | |
| Deleting a Session will delete that Session and its Driver Games (if any). It will NOT delete the Route it was created from. It will NOT delete other Sessions created for that Route. It will NOT delete any other Driver Games created for those other Sessions | |
| Deleting a Driver Game will only delete that Driver Game. It will NOT delete the Route or Session it was created from or any other Driver Games from that Session |
All the Surveyor and Driver screens for loading routes and sessions have a DELETE ... button as an option.
|
| If you need a more selective way of deleting routes, sessions and driver games, then use Content Manager from the Trainz Launch Screen. Select the Filter Routes & Sessions.
The Type column will identify each entry as a route, session or Misc. Misc in this case means a saved Driver Game. |

|
|
[edit] Trainz Wiki
|
|

This page was created by Trainz user pware in September 2021 and was last updated as shown below.