How to Create a Picklist
m |
m |
||
| (4 intermediate revisions by one user not shown) | |||
| Line 1: | Line 1: | ||
| − | The information in this Wiki Page applies to '''TANE''' | + | <table width=1000> |
| + | <tr valign="top"> | ||
| + | <td>The information in this Wiki Page applies to '''TANE''' and '''TRS19'''. For information on creating, managing and using '''Picklists''' in '''Trainz Plus''' and '''TRS22''' refer to the more recent document at [[image:WikiLink.PNG|link=]] '''[[How_to_Manage_Filters_and_Picklists|How to Manage Search Filters and Picklists]]'''</td> | ||
| + | </tr> | ||
| + | </table> | ||
| + | |||
<table width=1000> | <table width=1000> | ||
<tr valign="top"> | <tr valign="top"> | ||
| Line 16: | Line 21: | ||
</tr> | </tr> | ||
</table> | </table> | ||
| − | |||
| − | |||
| − | |||
| − | |||
| − | |||
| − | |||
| − | |||
| − | |||
| − | |||
| − | |||
| − | |||
| − | |||
</td> | </td> | ||
</tr> | </tr> | ||
| Line 45: | Line 38: | ||
<tr valign="top"> | <tr valign="top"> | ||
<td>[[image:DotPoint.JPG|10px|link=]]</td> | <td>[[image:DotPoint.JPG|10px|link=]]</td> | ||
| − | <td>the '''Assets Palette''' and '''Info Palette''' in '''Surveyor 2.0''' (in '''Trainz Plus''' and '''TRS22 Platinum''' only), <span style="font-weight: 700; font-size: 15px;">OR</span></td> | + | <td>the '''Filter Palette''', '''Assets Palette''' and '''Info Palette''' in '''Surveyor 2.0''' (in '''Trainz Plus''' and '''TRS22 Platinum''' only), <span style="font-weight: 700; font-size: 15px;">OR</span></td> |
</tr> | </tr> | ||
<tr valign="top"> | <tr valign="top"> | ||
| Line 325: | Line 318: | ||
<tr valign="top"> | <tr valign="top"> | ||
<td width=10>[[image:BlueDot10x10.png|link=]]</td> | <td width=10>[[image:BlueDot10x10.png|link=]]</td> | ||
| − | <td>Picklists are created, managed and deleted using the '''Assets Palette''' in '''Surveyor 2.0'''</td> | + | <td>Picklists are created, managed and deleted using the '''Filter Palette''' and '''Assets Palette''' in '''Surveyor 2.0'''</td> |
</tr> | </tr> | ||
</table> | </table> | ||
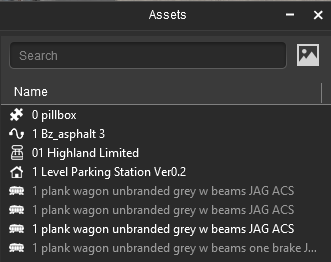
| − | The '''Assets Palette''' | + | The '''Filter Palette''' and '''Assets Palette''' give you access to all the installed '''Assets''', the '''Search Filters''' created in '''Content Manager''' and the '''Picklists'''.<br> |
<table width=1000 cellpadding=2> | <table width=1000 cellpadding=2> | ||
<tr valign="top"> | <tr valign="top"> | ||
| − | <td width=200 align="center">[[image: | + | <td width=200 align="center">[[image:FilterPaletteOpenSelections_S20.png|link=]]<br> |
| + | '''The Filter Palette'''<br> | ||
| + | [[image:FilterPaletteBulkReplaceExample_9_S20.png|link=]]<br> | ||
'''The Assets Palette'''</td> | '''The Assets Palette'''</td> | ||
<td> | <td> | ||
| Line 344: | Line 339: | ||
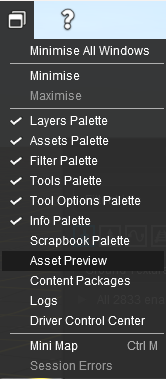
<td><span style="font-size: 17px; font-weight: 700;">Notes: Showing a Hidden Palette</span><br> | <td><span style="font-size: 17px; font-weight: 700;">Notes: Showing a Hidden Palette</span><br> | ||
---- | ---- | ||
| − | If the '''Assets Palete''' | + | If the '''Filter Palette''' and '''Assets Palete''' are not visible on the screen then:- |
<table bgcolor=#ffffff cellpadding=2> | <table bgcolor=#ffffff cellpadding=2> | ||
<tr valign="top"> | <tr valign="top"> | ||
| Line 351: | Line 346: | ||
<table cellpadding=2> | <table cellpadding=2> | ||
<tr valign="top"> | <tr valign="top"> | ||
| − | <td colspan=2><span style="font-weight: 700; font-size: 15px | + | <td colspan=2><span style="font-weight: 700; font-size: 15px;">Steps:</span> To Show a Hidden Palette:-</td> |
</tr> | </tr> | ||
<tr valign="top"> | <tr valign="top"> | ||
| Line 377: | Line 372: | ||
<tr valign="top"> | <tr valign="top"> | ||
<td width=10>[[image:DotPoint.JPG|10px|link=]]</td> | <td width=10>[[image:DotPoint.JPG|10px|link=]]</td> | ||
| − | <td>if | + | <td>if a palette you want has no tick ([[image:BulletNoTick.png|link=]]) then <span style="font-weight: 700; font-size: 15px; background-color: lightcyan;">Left Click</span> on its name <span style="font-weight: 700; font-size: 15px;">OR</span> on the [[image:BulletNoTick.png|link=]]. This will add the [[image:BulletTick.png|link=]] and it will appear docked on the screen</td> |
</tr> | </tr> | ||
<tr valign="top"> | <tr valign="top"> | ||
<td>[[image:DotPoint.JPG|10px|link=]]</td> | <td>[[image:DotPoint.JPG|10px|link=]]</td> | ||
| − | <td>if the | + | <td>if the palette name has a tick ([[image:BulletTick.png|link=]]) but is not visible on the screen then check the '''Minimised''' section at the bottom of the list below the horizontal dividing line. If its name appears there then it has been '''Minimised'''. <span style="font-weight: 700; font-size: 15px; background-color: lightcyan;">Left Click</span> on its name in the '''Minimised''' section ('''NOT''' in the Palettes section) to restore it to its normal size on the screen</td> |
</tr> | </tr> | ||
</table> | </table> | ||
| Line 402: | Line 397: | ||
<table width=1000 cellpadding=2> | <table width=1000 cellpadding=2> | ||
<tr valign="top"> | <tr valign="top"> | ||
| − | <td width=200 align="center">[[image: | + | <td width=200 align="center">[[image:FilterPaletteOpenSelections_S20.png|link=]]</td> |
<td> | <td> | ||
<table bgcolor=#000000 cellpadding=2> | <table bgcolor=#000000 cellpadding=2> | ||
| Line 412: | Line 407: | ||
<td><span style="font-size: 17px; font-weight: 700;">Notes:'''</span><br> | <td><span style="font-size: 17px; font-weight: 700;">Notes:'''</span><br> | ||
---- | ---- | ||
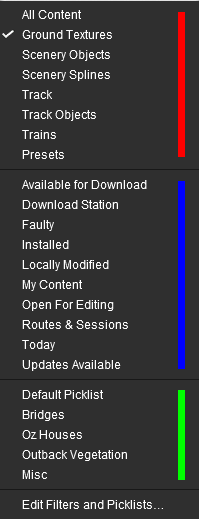
| − | The ''' | + | The '''Filter Palette''' has a '''Selection List'''.<br><br> |
<span style="font-weight: 700; font-size: 15px; background-color: lightcyan;">Left Click</span> on the data box (showing '''Ground Textures''' in the image) or on the double arrowhead as shown on the left. This will open up its list of contents. | <span style="font-weight: 700; font-size: 15px; background-color: lightcyan;">Left Click</span> on the data box (showing '''Ground Textures''' in the image) or on the double arrowhead as shown on the left. This will open up its list of contents. | ||
<table> | <table> | ||
<tr valign="top"> | <tr valign="top"> | ||
| − | <td>[[image: | + | <td>[[image:FilterListSurveyorColourCoded_S20.png|link=]]</td> |
<td> | <td> | ||
<table> | <table> | ||
| Line 423: | Line 418: | ||
</tr> | </tr> | ||
<tr valign="top"> | <tr valign="top"> | ||
| − | <td width= | + | <td width=25>[[image:DotPoint.JPG|link=]]</td> |
<td>'''Object Types''' (textures, scenery, splines, trains, etc) - these are search filters that are built into the palette to assist you in locating specific types of assets</td> | <td>'''Object Types''' (textures, scenery, splines, trains, etc) - these are search filters that are built into the palette to assist you in locating specific types of assets</td> | ||
</tr> | </tr> | ||
<tr valign="top"> | <tr valign="top"> | ||
| − | <td>[[image: | + | <td>[[image:DotPointBlueSquare.png|link=]]</td> |
| − | <td>'''Saved Filters''' - these are the '''Search Filters''' that are | + | <td>'''Saved Filters''' - these are the '''Search Filters''' that are created using '''Content Manager''' but can be used in '''Surveyor'''. They consist of:- |
<table> | <table> | ||
<tr valign="top"> | <tr valign="top"> | ||
| Line 452: | Line 447: | ||
<td>'''Routes & Sessions'''</td> | <td>'''Routes & Sessions'''</td> | ||
<td>'''Today'''</td> | <td>'''Today'''</td> | ||
| − | |||
| − | |||
| − | |||
</tr> | </tr> | ||
</table> | </table> | ||
</td> | </td> | ||
</tr> | </tr> | ||
| − | |||
| − | |||
<tr valign="top"> | <tr valign="top"> | ||
<td width=10>[[image:RedDot10x10.png|link=]]</td> | <td width=10>[[image:RedDot10x10.png|link=]]</td> | ||
| − | <td>Plus | + | <td>Plus those that you have created yourself using '''Content Manager''' - for example '''Updates Available'''</td> |
</tr> | </tr> | ||
</table> | </table> | ||
| Line 469: | Line 459: | ||
</tr> | </tr> | ||
<tr valign="top"> | <tr valign="top"> | ||
| − | <td>[[image: | + | <td>[[image:DotPointGreenSquare.png|link=]]</td> |
| − | <td>''' | + | <td>These are lists of assets that you have created for specific purposes. The '''Default Picklist''' is built in. Others, such as '''Oz Houses''', you create and save in '''Content Manager''' and '''Surveyor'''. Assets can be easily added to and removed from any of the '''Picklists'''</td> |
</tr> | </tr> | ||
</table> | </table> | ||
| Line 536: | Line 526: | ||
<tr valign="top"> | <tr valign="top"> | ||
<td width=25>[[image:DotPoint1.JPG|link=]]</td> | <td width=25>[[image:DotPoint1.JPG|link=]]</td> | ||
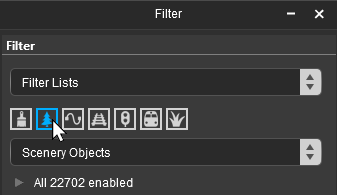
| − | <td> | + | <td>In the '''Filter Palette''' select the type of asset you want, such as '''Scenery Objects''', from the list of icons or the drop down list.<br> |
| − | For example to locate a scenery asset named '''Wooden Barn''':- | + | [[image:FilterPaletteSceneryObjectsSelected_S20.png|link=]]</td> |
| + | </tr> | ||
| + | <tr valign="top"> | ||
| + | <td>[[image:DotPoint2.JPG|link=]]</td> | ||
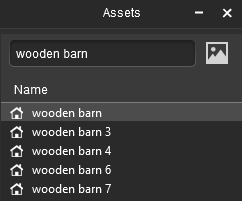
| + | <td>The '''Asset Palette''' list of assets will show all the assets that match the filter set by the '''Filter Palette''' but you can, if required, reduce the list even further<br> | ||
| + | For example, to locate a scenery asset named '''Wooden Barn''':- | ||
<table> | <table> | ||
<tr valign="top"> | <tr valign="top"> | ||
| − | <td> | + | <td>Type the text '''wooden barn''' ('''UPPER/lower case''' is not important) into the '''Assets Palette''' <span style="font-weight: 700; font-size: 15px; color: white; background-color: black;"> Search </span>box. This will filter all the assets to only show those that are '''Scenery (non-spline) Objects''' and have the text "'''wooden barn'''" in their names or descriptions.</td> |
| − | <td>[[image: | + | <td>[[image:AssetsPaletteMeshSearchWoodenBarn_S20.png|link=]]</td> |
</tr> | </tr> | ||
</table> | </table> | ||
</td> | </td> | ||
| − | |||
| − | |||
| − | |||
| − | |||
| − | |||
</tr> | </tr> | ||
<tr valign="top"> | <tr valign="top"> | ||
<td>[[image:DotPoint3.JPG|link=]]</td> | <td>[[image:DotPoint3.JPG|link=]]</td> | ||
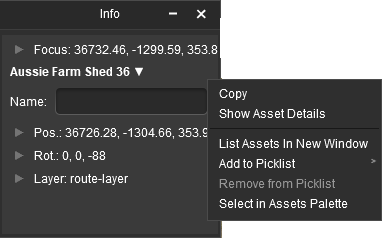
| − | <td> | + | <td><span style="font-weight: 700; font-size: 15px; background-color: lightcyan;">Right Click</span> on the particular asset that you want to use to create a new Picklist. This will open a popup menu.<br> |
| + | [[image:PickListNewList_S20.png|link=]]<br> | ||
| + | Select the option <span style="font-weight: 700; font-size: 15px; color: white; background-color: black;"> Add to Picklist </span> | ||
| + | </td> | ||
</tr> | </tr> | ||
</table> | </table> | ||
| Line 666: | Line 659: | ||
<span style="font-weight: 700; font-size: 15px;">To Remove Assets from a Picklist</span> | <span style="font-weight: 700; font-size: 15px;">To Remove Assets from a Picklist</span> | ||
<br> | <br> | ||
| − | <table bgcolor=#000000 cellpadding=2> | + | <table width=1000> |
| + | <tr valign="top"> | ||
| + | <td> | ||
| + | <table width=600 bgcolor=#000000 cellpadding=2> | ||
<tr valign="top"> | <tr valign="top"> | ||
<td> | <td> | ||
<table bgcolor=#ffffff cellpadding=2> | <table bgcolor=#ffffff cellpadding=2> | ||
<tr valign="top"> | <tr valign="top"> | ||
| − | <td colspan=2><span style="font-weight: 700; font-size: 15px;">Steps:</span> To remove assets from a Picklist:-</td> | + | <td colspan=2><span style="font-weight: 700; font-size: 15px;">Steps:</span> To remove assets from a Picklist (see '''Known Issue''' on the right):-</td> |
</tr> | </tr> | ||
<tr valign="top"> | <tr valign="top"> | ||
| Line 704: | Line 700: | ||
<td width=25>[[image:NotePad.PNG|link=]]</td> | <td width=25>[[image:NotePad.PNG|link=]]</td> | ||
<td>Removing the last item from a Picklist will delete the Picklist</td> | <td>Removing the last item from a Picklist will delete the Picklist</td> | ||
| + | </tr> | ||
| + | </table> | ||
| + | </td> | ||
| + | </tr> | ||
| + | </table> | ||
| + | </td> | ||
| + | </tr> | ||
| + | </table> | ||
| + | </td> | ||
| + | <td> | ||
| + | <table width=400 cellpadding=2 bgcolor=#ff0000> | ||
| + | <tr valign="top"> | ||
| + | <td> | ||
| + | <table cellpadding=2 bgcolor=#ffffff> | ||
| + | <tr valign="top"> | ||
| + | <td>[[image:Bug.png|link=]]</td> | ||
| + | <td><span style="font-size: 15px; font-weight: 700;">Known Issue:'''</span><br> | ||
| + | There is a bug that greys out the <span style="font-weight: 700; font-size: 15px; color: white; background-color: black;"> Remove from Picklist </span> option so it cannot be selected.</td> | ||
| + | </tr> | ||
| + | <tr valign="top"> | ||
| + | <td colspan=2>'''Workarounds:''' Two alternative solutions are available:- | ||
| + | # Use '''Content Manager''' to remove assets from a Picklist | ||
| + | # Use the working <span style="font-weight: 700; font-size: 15px; color: white; background-color: black;"> Remove from Picklist </span> option in the '''Filter Palette''' - see [[image:WikiLink.PNG|link=]] '''[[How to Use S20 Palettes#The Filter Palette|How to Use S20 Palettes-The Filter Palette]]''' for the details</td> | ||
</tr> | </tr> | ||
</table> | </table> | ||
| Line 868: | Line 887: | ||
---- | ---- | ||
='''Trainz Wiki'''= | ='''Trainz Wiki'''= | ||
| − | <table | + | <table width=1000> |
<tr valign="top"> | <tr valign="top"> | ||
| − | <td>[[image:TrainzWiki.png|link=]]</td> | + | <td> |
| + | <table width=500 cellpadding=2 bgcolor=#ffffff> | ||
| + | <tr valign="top"> | ||
| + | <td width=80>[[image:TrainzWiki.png|link=]]</td> | ||
<td> | <td> | ||
<span style="font-size: 17px;">'''More Tutorials and Guides to Using Trainz'''</span><br> | <span style="font-size: 17px;">'''More Tutorials and Guides to Using Trainz'''</span><br> | ||
| − | *'''<span class=" | + | *'''<span class="plain;s">[http://online.ts2009.com/mediaWiki/index.php/HowTo How to Guides]</span>''' |
*'''[[Driver Commands List]]''' | *'''[[Driver Commands List]]''' | ||
*'''[[Session Rule List with Parameters|Session Rules List (Alphabetical) with Parameters]]''' | *'''[[Session Rule List with Parameters|Session Rules List (Alphabetical) with Parameters]]''' | ||
*'''[[Session Rules By Categories With Properties|Session Rules List (Categories) With Parameters]]''' | *'''[[Session Rules By Categories With Properties|Session Rules List (Categories) With Parameters]]''' | ||
| + | </td> | ||
| + | </tr> | ||
| + | </table> | ||
| + | </td> | ||
| + | <td> | ||
| + | <table width=500 cellpadding=4 bgcolor="aquamarine"> | ||
| + | <tr valign="top"> | ||
| + | <td width=50>[[image:LinkWiki.PNG|link=]]</td> | ||
| + | <td> | ||
| + | <span style="font-size: 17px;">'''Related Links'''</span><br> | ||
| + | * '''[[How_to_Backup_a_Picklist|How to Backup a Picklist]]''' | ||
| + | * '''[[How_to_Move a Picklist|How to Move a Picklist]]''' | ||
| + | * '''[[How_to_Manage_Filters_and_Picklists|How to Manage Search Filters and Picklists]]''' | ||
| + | * '''[[How_to_Rename_a_Picklist|How to Rename a Picklist]]''' (for '''TRS19 SP3''' and earlier versions) | ||
| + | </td> | ||
| + | </tr> | ||
| + | </table> | ||
</td> | </td> | ||
</tr> | </tr> | ||
</table> | </table> | ||
---- | ---- | ||
| − | This page was created by Trainz user '''<span class=" | + | This page was created by Trainz user '''<span class="plain;s">[http://online.ts2009.com/mediaWiki/index.php/User:Pware pware]</span>''' in January 2019 and was last updated as shown below. |
---- | ---- | ||
[[Category:How-to guides]] | [[Category:How-to guides]] | ||
Latest revision as of 11:25, 27 July 2024
| The information in this Wiki Page applies to TANE and TRS19. For information on creating, managing and using Picklists in Trainz Plus and TRS22 refer to the more recent document at |
|
|
|
||||||||
[edit] Using Surveyor Classic |
| Steps: | |||||
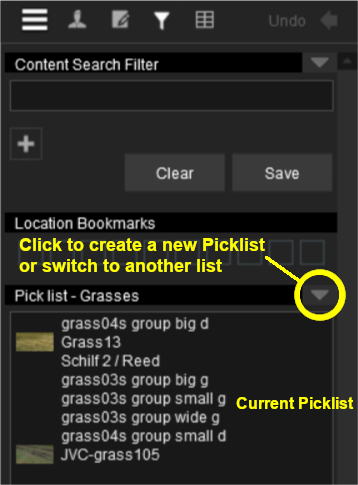
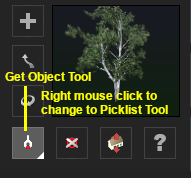
Open the Picklist Window:
|
|||||
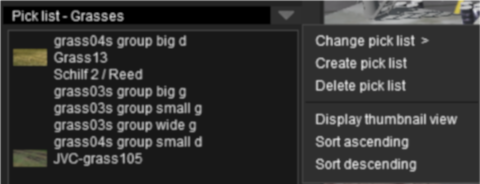
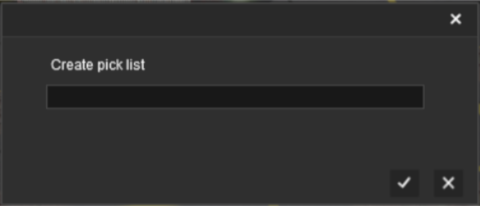
Select a Picklist or Create a New Picklist:
|
|||||||||||||
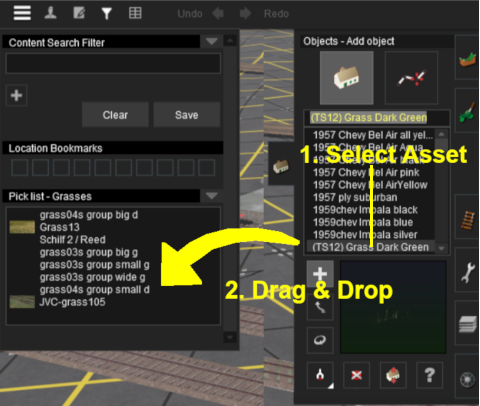
| Add Assets to the Picklist: Options: Choose one of two methods:- |
|||||||||||||||||||||||||||||||||||||||||
|
|||||||||||||||||||||||||||||||||||||||||
|
[edit] Using Surveyor 2.0 |
|
[edit] Locating the Picklists
| Picklists are created, managed and deleted using the Filter Palette and Assets Palette in Surveyor 2.0 |
The Filter Palette and Assets Palette give you access to all the installed Assets, the Search Filters created in Content Manager and the Picklists.
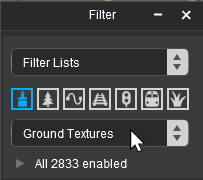 The Filter Palette |
|
|||||||||||||||||||||
 |
|
|||||||||||||||||||||||||||
[edit] Creating a New Picklist |
| New Picklists are created by selecting an asset in the Assets Palette or by selecting an existing object in the route |
| A new Picklist is created by first identifying an asset or object that will be added to the new (yet to be created) Picklist. You cannot create an empty Picklist. | |||||||||||||||||||||||||||||||||||
| Options: Choose one of two methods:- | |||||||||||||||||||||||||||||||||||
|
|
||||||||||||||||||||||||||||||||||
| In both Options |
||||
 |
|
|||
|
To Remove Assets from a Picklist
|
|
||||||||||||||||||||||
[edit] Using Content Manager (CM) |
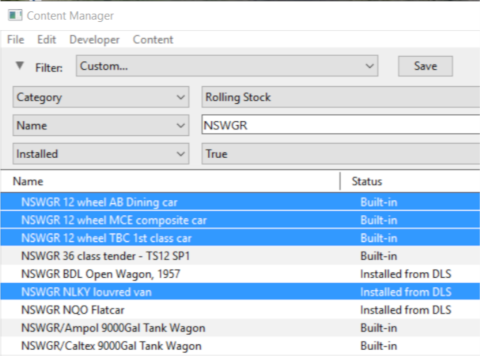
| Steps: | ||||||||||||
Select the Assets:
|
||||||||||||
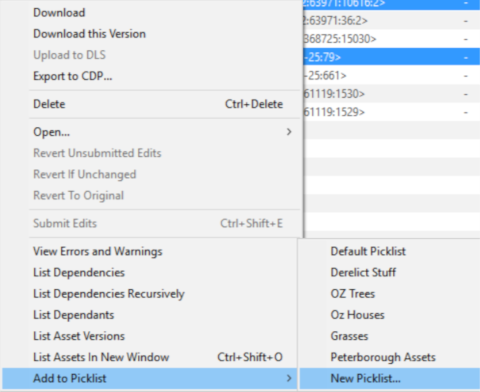
Add the Assets to the Picklist:
|
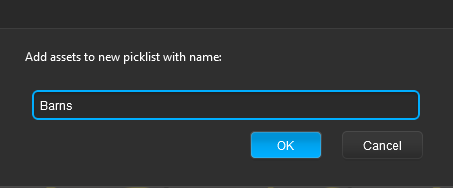
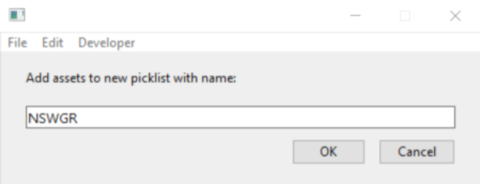
Enter Picklist Name (for New Picklist Option Only):
|
[edit] Trainz Wiki
|
|
This page was created by Trainz user pware in January 2019 and was last updated as shown below.
