How to Manage Filters and Picklists
m |
|||
| (29 intermediate revisions by one user not shown) | |||
| Line 1: | Line 1: | ||
| − | The information in this Wiki Page applies to '''Trainz Plus''' and '''TRS22'''. | + | The information in this Wiki Page applies to '''Trainz Plus''' and '''TRS22'''. It describes how to use, create and edit '''Search Filters''' and '''Picklists'''. |
<br> | <br> | ||
<table width=1000> <!-- BEGIN Nav Buttons Table --> | <table width=1000> <!-- BEGIN Nav Buttons Table --> | ||
| Line 68: | Line 68: | ||
</tr> | </tr> | ||
</table> <!-- END Nav Buttons Table --> | </table> <!-- END Nav Buttons Table --> | ||
| + | |||
| + | <table width=1000 bgcolor="lightcyan" cellpadding=2> | ||
| + | <tr valign="top"> | ||
| + | <td width=10>[[image:BlueDot10x10.png|link=]]</td> | ||
| + | <td>'''Surveyor Classic''', sometimes referred to as '''Surveyor 1.0''', is supplied in all versions of '''Trainz'''</td> | ||
| + | </tr> | ||
| + | </table> | ||
<table width=1000> | <table width=1000> | ||
<tr valign="top"> | <tr valign="top"> | ||
| − | <td colspan=2><span style="font-weight: 700; font-size: 15px;">Steps:</span> To use existing filters and Picklists in Surveyor Classic:-</td> | + | <td colspan=2><span style="font-weight: 700; font-size: 15px;">Steps:</span> To use existing filters and Picklists in '''Surveyor Classic''':-</td> |
</tr> | </tr> | ||
<tr valign="top"> | <tr valign="top"> | ||
| Line 96: | Line 103: | ||
</tr> | </tr> | ||
</table> | </table> | ||
| − | |||
</td> | </td> | ||
</tr> | </tr> | ||
| Line 102: | Line 108: | ||
<td width=25>[[image:DotPoint2.JPG|link=]]</td> | <td width=25>[[image:DotPoint2.JPG|link=]]</td> | ||
<td>select from the following methods to search the assets:- | <td>select from the following methods to search the assets:- | ||
| − | |||
<table bgcolor=#0000ff cellpadding=2> | <table bgcolor=#0000ff cellpadding=2> | ||
<tr valign="top"> | <tr valign="top"> | ||
| Line 178: | Line 183: | ||
<tr valign="top"> | <tr valign="top"> | ||
<td>[[image:DotPoint2Blue.png|link=]]</td> | <td>[[image:DotPoint2Blue.png|link=]]</td> | ||
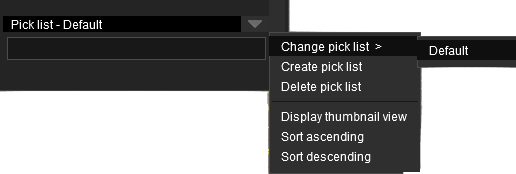
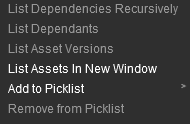
| − | <td>select (<span style="font-weight: 700; font-size: 15px; background-color: lightcyan;"> Left Click </span>) the <span style="font-weight: 700; font-size: 15px; color: white; background-color: black;"> Change pick list > </span> option< | + | <td>select (<span style="font-weight: 700; font-size: 15px; background-color: lightcyan;"> Left Click </span>) the <span style="font-weight: 700; font-size: 15px; color: white; background-color: black;"> Change pick list > </span> option |
| − | [[image:PickListMenus_S10.png|link=]]</td> | + | <table> |
| + | <tr valign="top"> | ||
| + | <td>[[image:PickListMenus_S10.png|link=]]</td> | ||
| + | <td> | ||
| + | <table bgcolor=#ffffe0 cellpadding=2> | ||
| + | <tr valign="top"> | ||
| + | <td>[[image:PencilTips.PNG|link=]]</td> | ||
| + | <td>The menu options:- | ||
| + | <table> | ||
| + | <tr valign="top"> | ||
| + | <td width=10>[[image:BlueDot10x10.png|link=]]</td> | ||
| + | <td><span style="font-weight: 700; font-size: 15px; color: white; background-color: black;"> Sort Ascending </span> and</td> | ||
| + | </tr> | ||
| + | <tr valign="top"> | ||
| + | <td>[[image:BlueDot10x10.png|link=]]</td> | ||
| + | <td><span style="font-weight: 700; font-size: 15px; color: white; background-color: black;"> Sort Descending </span> will sort the contents of the open picklist alphabetically</td> | ||
| + | </tr> | ||
| + | <tr valign="top"> | ||
| + | <td>[[image:BlueDot10x10.png|link=]]</td> | ||
| + | <td><span style="font-weight: 700; font-size: 15px; color: white; background-color: black;"> Display thumbnail view </span> will display the assets as thumbnails</td> | ||
| + | </tr> | ||
| + | </table> | ||
| + | </td> | ||
| + | </tr> | ||
| + | </table> | ||
| + | </td> | ||
| + | </tr> | ||
| + | </table> | ||
| + | </td> | ||
</tr> | </tr> | ||
<tr valign="top"> | <tr valign="top"> | ||
| Line 233: | Line 266: | ||
<tr valign="top"> | <tr valign="top"> | ||
<td width=10>[[image:BlueDot10x10.png|link=]]</td> | <td width=10>[[image:BlueDot10x10.png|link=]]</td> | ||
| − | <td> | + | <td>'''Surveyor 2.0''' is available in '''Trainz Plus''' and '''TRS22 Platinum''' only</td> |
</tr> | </tr> | ||
<tr valign="top"> | <tr valign="top"> | ||
| − | <td | + | <td>[[image:BlueDot10x10.png|link=]]</td> |
| − | <td> | + | <td>All '''Content Search Filter''' and '''Picklist''' tasks are conducted through the '''Assets Palette''' in '''Surveyor 2.0'''</td> |
</tr> | </tr> | ||
<tr valign="top"> | <tr valign="top"> | ||
| − | <td | + | <td>[[image:BlueDot10x10.png|link=]]</td> |
| − | <td>''' | + | <td>The '''Content Search Filters''' used in '''Surveyor 2.0''' are created using '''Content Manager'''</td> |
</tr> | </tr> | ||
</table> | </table> | ||
| Line 260: | Line 293: | ||
<table width=1000 cellpadding=2> | <table width=1000 cellpadding=2> | ||
<tr valign="top"> | <tr valign="top"> | ||
| − | <td colspan=2><span style="font-weight: 700; font-size: 15px;">Steps:</span> To use existing filters and Picklists in Surveyor 2.0:-</td> | + | <td colspan=2><span style="font-weight: 700; font-size: 15px;">Steps:</span> To use existing filters and Picklists in '''Surveyor 2.0''':-</td> |
</tr> | </tr> | ||
<tr valign="top"> | <tr valign="top"> | ||
| Line 272: | Line 305: | ||
<tr valign="top"> | <tr valign="top"> | ||
<td width=25>[[image:DotPoint2.JPG|link=]]</td> | <td width=25>[[image:DotPoint2.JPG|link=]]</td> | ||
| − | <td><span style="font-weight: 700; font-size: 15px; background-color: lightcyan;"> Left Click </span> on the data box (showing '''Ground Textures''' in the image) or on the double arrowhead as shown on its right to open up its lists of filters. The currently selected | + | <td><span style="font-weight: 700; font-size: 15px; background-color: lightcyan;"> Left Click </span> on the '''Asset Type''' data box (showing '''Ground Textures''' in the image) or on the double arrowhead as shown on its right to open up its lists of filters. The currently selected asset type ('''Ground Textures''' in the image), search filter or picklist will have a [[image:BulletTick.png|link=]] in front of its name in the drop down list |
<table> | <table> | ||
<tr valign="top"> | <tr valign="top"> | ||
| Line 322: | Line 355: | ||
<tr valign="top"> | <tr valign="top"> | ||
<td>[[image:PencilTips.PNG|link=]]</td> | <td>[[image:PencilTips.PNG|link=]]</td> | ||
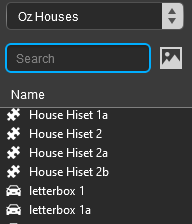
| − | <td>The | + | <td>The assets found by the Search Filter or in the Picklist can be narrowed down further by entering a text string in the '''Search''' box. For example typing '''house''' (UPPER/lower case is not important) will restrict the list to only showing those assets containing the text string "house" in their names or descriptions</td> |
</tr> | </tr> | ||
</table> | </table> | ||
</td> | </td> | ||
| + | </tr> | ||
| + | </table> | ||
| + | </td> | ||
| + | </tr> | ||
| + | </table> | ||
| + | <br> | ||
| + | <table bgcolor=#000000 cellpadding=2> | ||
| + | <tr valign="top"> | ||
| + | <td> | ||
| + | <table bgcolor=#ffffe0 cellpadding=2> | ||
| + | <tr valign="top"> | ||
| + | <td>[[image:PencilTips.PNG|link=]]</td> | ||
| + | <td>The '''Thumbnail''' icon [[image:AssetsPaletteListToggleViewIcon S20.png|link=]] next to the '''Search''' text box will toggle the list of assets between text and thumbnail views. The thumbnail view works best when the '''Assets Palette''' is undocked and resized. See the '''Wiki Page [[image:WikiLink.PNG|link=]] [[How_to_Use_S20_Palettes#skipHidingShowing|How to Use S20 Palettes]]''' for more information</td> | ||
</tr> | </tr> | ||
</table> | </table> | ||
| Line 354: | Line 400: | ||
</tr> | </tr> | ||
</table> <!-- END Nav Buttons Table --> | </table> <!-- END Nav Buttons Table --> | ||
| + | |||
| + | <table width=1000 bgcolor="lightcyan" cellpadding=2> | ||
| + | <tr valign="top"> | ||
| + | <td width=10>[[image:BlueDot10x10.png|link=]]</td> | ||
| + | <td>'''Content Manager''' is the asset management program that is supplied with all versions of '''Trainz'''</td> | ||
| + | </tr> | ||
| + | </table> | ||
<table width=1000> | <table width=1000> | ||
<tr valign="top"> | <tr valign="top"> | ||
| − | <td colspan=2><span style="font-weight: 700; font-size: 15px;">Steps:</span> To use existing filters and Picklists in Content Manager:-</td> | + | <td colspan=2><span style="font-weight: 700; font-size: 15px;">Steps:</span> To use existing filters and Picklists in '''Content Manager''':-</td> |
</tr> | </tr> | ||
<tr valign="top"> | <tr valign="top"> | ||
| Line 475: | Line 528: | ||
</table> <!-- END Nav Buttons Table --> | </table> <!-- END Nav Buttons Table --> | ||
| + | <table bgcolor=#000000 cellpadding=2> | ||
| + | <tr valign="top"> | ||
| + | <td> | ||
| + | <table bgcolor=#ffffe0 cellpadding=2> | ||
| + | <tr valign="top"> | ||
| + | <td>[[image:PencilTips.PNG|link=]]</td> | ||
| + | <td>'''Picklists''' that you create can be saved from '''Content Manager''' as text ('''.txt''') files. They can also be loaded into '''Content Manager''' from text files.<br> | ||
| + | Refer to the '''Wiki Page [[image:WikiLink.PNG|link=]] [[How to Backup a Picklist|How to Backup a Picklist]]''' for the details.</td> | ||
| + | </tr> | ||
| + | </table> | ||
| + | </td> | ||
| + | </tr> | ||
| + | </table> | ||
| + | <br> | ||
<table width=1000> <!-- BEGIN Nav Buttons Table NO SKIPS --> | <table width=1000> <!-- BEGIN Nav Buttons Table NO SKIPS --> | ||
<tr valign="top"> | <tr valign="top"> | ||
| Line 482: | Line 549: | ||
</tr> | </tr> | ||
</table> <!-- END Nav Buttons Table --> | </table> <!-- END Nav Buttons Table --> | ||
| + | |||
| + | <table width=1000 bgcolor="lightcyan" cellpadding=2> | ||
| + | <tr valign="top"> | ||
| + | <td width=10>[[image:BlueDot10x10.png|link=]]</td> | ||
| + | <td>'''Surveyor Classic''', sometimes referred to as '''Surveyor 1.0''', is supplied in all versions of '''Trainz'''</td> | ||
| + | </tr> | ||
| + | </table> | ||
<table width=1000 bgcolor="lightcyan" cellpadding=2> | <table width=1000 bgcolor="lightcyan" cellpadding=2> | ||
| Line 496: | Line 570: | ||
<table width=1000> | <table width=1000> | ||
<tr valign="top"> | <tr valign="top"> | ||
| − | <td colspan=2><span style="font-weight: 700; font-size: 15px;">Steps:</span> To create filters and Picklists in Surveyor Classic:-</td> | + | <td colspan=2><span style="font-weight: 700; font-size: 15px;">Steps:</span> To create filters and Picklists in '''Surveyor Classic''':-</td> |
</tr> | </tr> | ||
<tr valign="top"> | <tr valign="top"> | ||
| Line 545: | Line 619: | ||
<td width=25>[[image:DotPoint2.JPG|link=]]</td> | <td width=25>[[image:DotPoint2.JPG|link=]]</td> | ||
<td>select from the following methods to create the new search filter or Picklist:- | <td>select from the following methods to create the new search filter or Picklist:- | ||
| − | |||
<table bgcolor=#0000ff cellpadding=2> | <table bgcolor=#0000ff cellpadding=2> | ||
<tr valign="top"> | <tr valign="top"> | ||
| Line 741: | Line 814: | ||
<td>[[image:DotPoint.JPG|10px|link=]]</td> | <td>[[image:DotPoint.JPG|10px|link=]]</td> | ||
<td>Once you have created the new picklist you can add assets to it - see [[image:PageLink.PNG|link=]] '''[[#stepEditingFilters|Editing Search Filters and Picklists]]''' below for the details</td> | <td>Once you have created the new picklist you can add assets to it - see [[image:PageLink.PNG|link=]] '''[[#stepEditingFilters|Editing Search Filters and Picklists]]''' below for the details</td> | ||
| + | </tr> | ||
| + | </table> | ||
| + | <br> | ||
| + | <table bgcolor=#ffffe0 cellpadding=2> | ||
| + | <tr valign="top"> | ||
| + | <td>[[image:PencilTips.PNG|link=]]</td> | ||
| + | <td>The menu options:- | ||
| + | <table> | ||
| + | <tr valign="top"> | ||
| + | <td width=10>[[image:BlueDot10x10.png|link=]]</td> | ||
| + | <td><span style="font-weight: 700; font-size: 15px; color: white; background-color: black;"> Sort Ascending </span> and</td> | ||
| + | </tr> | ||
| + | <tr valign="top"> | ||
| + | <td>[[image:BlueDot10x10.png|link=]]</td> | ||
| + | <td><span style="font-weight: 700; font-size: 15px; color: white; background-color: black;"> Sort Descending </span> will sort the contents of the open picklist alphabetically</td> | ||
| + | </tr> | ||
| + | <tr valign="top"> | ||
| + | <td>[[image:BlueDot10x10.png|link=]]</td> | ||
| + | <td><span style="font-weight: 700; font-size: 15px; color: white; background-color: black;"> Display thumbnail view </span> will display the assets as thumbnails</td> | ||
| + | </tr> | ||
| + | </table> | ||
| + | </td> | ||
</tr> | </tr> | ||
</table> | </table> | ||
| Line 802: | Line 897: | ||
<tr valign="top"> | <tr valign="top"> | ||
<td width=10>[[image:BlueDot10x10.png|link=]]</td> | <td width=10>[[image:BlueDot10x10.png|link=]]</td> | ||
| − | <td>'''Surveyor 2.0''' is available in '''Trainz Plus''' and '''TRS22 Platinum''' | + | <td>'''Surveyor 2.0''' is available in '''Trainz Plus''' and '''TRS22 Platinum''' only</td> |
| − | + | ||
| − | + | ||
| − | + | ||
| − | + | ||
| − | + | ||
| − | + | ||
| − | + | ||
| − | + | ||
</tr> | </tr> | ||
</table> | </table> | ||
| − | + | ||
<table bgcolor=#ff0000 cellpadding=2> | <table bgcolor=#ff0000 cellpadding=2> | ||
<tr valign="top"> | <tr valign="top"> | ||
| Line 833: | Line 920: | ||
<table width=1000> | <table width=1000> | ||
<tr valign="top"> | <tr valign="top"> | ||
| − | <td colspan=2><span style="font-weight: 700; font-size: 15px;">Optional Steps:</span></td> | + | <td colspan=2><span style="font-weight: 700; font-size: 15px;">Optional Steps:</span> Choose combinations of the following options:-</td> |
</tr> | </tr> | ||
<tr valign="top"> | <tr valign="top"> | ||
<td width=25>[[image:DotPoint1Blue.png|link=]]</td> | <td width=25>[[image:DotPoint1Blue.png|link=]]</td> | ||
<td><span style="font-weight: 700; font-size: 15px; color: white; background-color: blue;"> Asset Display: </span> At the top of the '''Assets Palette''' is a '''Filter Option''' menu box. This controls how the search filters are applied to the '''Trainz World''' shown in the '''Surveyor Screen'''. It has no effect on the assets diplayed in the '''Assets Palette''' | <td><span style="font-weight: 700; font-size: 15px; color: white; background-color: blue;"> Asset Display: </span> At the top of the '''Assets Palette''' is a '''Filter Option''' menu box. This controls how the search filters are applied to the '''Trainz World''' shown in the '''Surveyor Screen'''. It has no effect on the assets diplayed in the '''Assets Palette''' | ||
| + | <table bgcolor=#000000 cellpadding=2> | ||
| + | <tr valign="top"> | ||
| + | <td> | ||
| + | <table bgcolor=#ffffff cellpadding=2> | ||
| + | <tr valign="top"> | ||
| + | <td><span style="font-weight: 700; font-size: 15px;"> This step is designed for use with selection tasks. It can be combined with Step [[image:DotPoint2Blue.png|link=]] and/or Step [[image:DotPoint3Blue.png|link=]] to narrow the selection process </span></td> | ||
| + | </tr> | ||
| + | </table> | ||
| + | </td> | ||
| + | </tr> | ||
| + | </table> | ||
</td> | </td> | ||
</tr> | </tr> | ||
| Line 946: | Line 1,044: | ||
<tr valign="top"> | <tr valign="top"> | ||
<td width=25>[[image:DotPoint2Blue.png|link=]]</td> | <td width=25>[[image:DotPoint2Blue.png|link=]]</td> | ||
| − | <td><span style="font-weight: 700; font-size: 15px; color: white; background-color: blue;"> Asset Selection: </span> The row of '''Asset Icons''' and the '''Drop Down Menu''' below it identify the '''type''' of assets that will be shown in the filter list.< | + | <td><span style="font-weight: 700; font-size: 15px; color: white; background-color: blue;"> Asset Selection: </span> The row of '''Asset Icons''' and the '''Drop Down Menu''' below it identify the '''type''' of assets that will be shown in the filter list |
| + | <table bgcolor=#000000 cellpadding=2> | ||
| + | <tr valign="top"> | ||
| + | <td> | ||
| + | <table bgcolor=#ffffff cellpadding=2> | ||
| + | <tr valign="top"> | ||
| + | <td><span style="font-weight: 700; font-size: 15px;"> This step and Step [[image:DotPoint3Blue.png|link=]] are suited for searching tasks </span></td> | ||
| + | </tr> | ||
| + | </table> | ||
| + | </td> | ||
| + | </tr> | ||
| + | </table> | ||
This option can be selected by a <span style="font-weight: 700; font-size: 15px; background-color: lightcyan;"> Left Click </span> on a icon that represents the different types of assets or selecting the type of asset from the drop down list. | This option can be selected by a <span style="font-weight: 700; font-size: 15px; background-color: lightcyan;"> Left Click </span> on a icon that represents the different types of assets or selecting the type of asset from the drop down list. | ||
| Line 1,030: | Line 1,139: | ||
<tr valign="top"> | <tr valign="top"> | ||
<td width=25>[[image:DotPoint3Blue.png|link=]]</td> | <td width=25>[[image:DotPoint3Blue.png|link=]]</td> | ||
| − | <td><span style="font-weight: 700; font-size: 15px; color: white; background-color: blue;"> Text Selection: </span> The '''Search''' text box allows you to enter a string of text characters that will be used to search the asset names and their descriptions for a match. Those assets that return a positive match, together with a positive asset type, if one has been set, will be shown in the filter name list. | + | <td><span style="font-weight: 700; font-size: 15px; color: white; background-color: blue;"> Text Selection: </span> The '''Search''' text box allows you to enter a string of text characters that will be used to search the asset names and their descriptions for a match. Those assets that return a positive match, together with a positive asset type, if one has been set, will be shown in the filter name list |
| + | <table bgcolor=#000000 cellpadding=2> | ||
| + | <tr valign="top"> | ||
| + | <td> | ||
| + | <table bgcolor=#ffffff cellpadding=2> | ||
| + | <tr valign="top"> | ||
| + | <td><span style="font-weight: 700; font-size: 15px;"> This step and Step [[image:DotPoint2Blue.png|link=]] are suited for searching tasks </span></td> | ||
| + | </tr> | ||
| + | </table> | ||
| + | </td> | ||
| + | </tr> | ||
| + | </table> | ||
| + | <br> | ||
<table bgcolor=#000000 width=1000 cellpadding=2> | <table bgcolor=#000000 width=1000 cellpadding=2> | ||
<tr valign="top"> | <tr valign="top"> | ||
| Line 1,081: | Line 1,202: | ||
<td>[[image:PencilTips.PNG|link=]]</td> | <td>[[image:PencilTips.PNG|link=]]</td> | ||
<td>You can enter a search text string without selecting an asset type. The filter will search through all assets types to find matches with your entered search string.<br><br> | <td>You can enter a search text string without selecting an asset type. The filter will search through all assets types to find matches with your entered search string.<br><br> | ||
| − | + | <table bgcolor=#ffffff cellpadding=2> | |
| − | + | <tr valign="top"> | |
| + | <td colspan=2><span style="font-weight: 700; font-size: 15px;">Steps:</span> To search all content:-</td> | ||
| + | </tr> | ||
| + | <tr valign="top"> | ||
| + | <td width=25>[[image:DotPoint1.JPG|link=]]</td> | ||
| + | <td>in the '''Content Drop Down''' box select the option <span style="font-weight: 700; font-size: 15px; color: white; background-color: black;"> All Content </span></td> | ||
| + | </tr> | ||
| + | <tr valign="top"> | ||
| + | <td>[[image:DotPoint2.JPG|link=]]</td> | ||
| + | <td>enter your search text string and press the <span style="font-weight: 700; font-size: 15px; color: white; background-color: black;"> Enter </span> key</td> | ||
</tr> | </tr> | ||
</table> | </table> | ||
| + | <br> | ||
</td> | </td> | ||
</tr> | </tr> | ||
| Line 1,094: | Line 1,225: | ||
</tr> | </tr> | ||
</table> | </table> | ||
| − | + | </td> | |
| + | </tr> | ||
| + | </table> | ||
| + | <br> | ||
<table width=1000> <!-- BEGIN Nav Buttons Table SKIPS NO SECTIONS --> | <table width=1000> <!-- BEGIN Nav Buttons Table SKIPS NO SECTIONS --> | ||
<tr valign="top"> | <tr valign="top"> | ||
| Line 1,137: | Line 1,271: | ||
</tr> | </tr> | ||
<tr valign="top"> | <tr valign="top"> | ||
| − | <td colspan=2><span style="font-weight: 700; font-size: 15px;">Steps:</span> To create new Picklists in Surveyor 2.0:-</td> | + | <td colspan=2><span style="font-weight: 700; font-size: 15px;">Steps:</span> To create new Picklists in '''Surveyor 2.0''':-</td> |
</tr> | </tr> | ||
<tr valign="top"> | <tr valign="top"> | ||
| Line 1,217: | Line 1,351: | ||
<tr valign="top"> | <tr valign="top"> | ||
<td width=10>[[image:DotPointBlueSquare.png|10px|link=]]</td> | <td width=10>[[image:DotPointBlueSquare.png|10px|link=]]</td> | ||
| − | <td><span style="font-weight: 700; font-size: 15px; color: black; background-color: lightcyan;"> Right Click </span> on the asset to be added to the Picklist, <span style="font-weight: 700; font-size: 15px;">OR</span></td> | + | <td><span style="font-weight: 700; font-size: 15px; color: black; background-color: lightcyan;"> Right Click </span> on the asset to be added to the Picklist, <span style="font-weight: 700; font-size: 15px;">OR</span> select multiple assets:-</td> |
</tr> | </tr> | ||
<tr valign="top"> | <tr valign="top"> | ||
| Line 1,257: | Line 1,391: | ||
<td>[[image:DotPoint4Blue.png|link=]]</td> | <td>[[image:DotPoint4Blue.png|link=]]</td> | ||
<td>then select the option <span style="font-weight: 700; font-size: 15px; color: white; background-color: black;"> New Picklist </span> from the next popout menu</td> | <td>then select the option <span style="font-weight: 700; font-size: 15px; color: white; background-color: black;"> New Picklist </span> from the next popout menu</td> | ||
| + | </tr> | ||
| + | </table> | ||
| + | <br> | ||
| + | <table bgcolor=#ffffe0 cellpadding=2> | ||
| + | <tr valign="top"> | ||
| + | <td>[[image:PencilTips.PNG|link=]]</td> | ||
| + | <td>The '''Thumbnail''' icon [[image:AssetsPaletteListToggleViewIcon S20.png|link=]] next to the '''Search''' text box will toggle the list of assets between text and thumbnail views. But the thumbnail view works best when the '''Assets Palette''' is undocked and resized. See the '''Wiki Page [[image:WikiLink.PNG|link=]] [[How_to_Use_S20_Palettes#skipHidingShowing|How to Use S20 Palettes]]''' for more information</td> | ||
</tr> | </tr> | ||
</table> | </table> | ||
| Line 1,379: | Line 1,520: | ||
<td width=629><span id="skipCreatingFiltersCM"></span> | <td width=629><span id="skipCreatingFiltersCM"></span> | ||
==<span style="font-weight: 700; font-size: 17px; color: white; background-color: black;"> In Content Manager </span>== | ==<span style="font-weight: 700; font-size: 17px; color: white; background-color: black;"> In Content Manager </span>== | ||
| + | |||
| + | <table width=1000 bgcolor="lightcyan" cellpadding=2> | ||
| + | <tr valign="top"> | ||
| + | <td width=10>[[image:BlueDot10x10.png|link=]]</td> | ||
| + | <td>'''Content Manager''' is the asset management program that is supplied with all versions of '''Trainz'''</td> | ||
| + | </tr> | ||
| + | </table> | ||
===<span style="font-weight: 700; font-size: 17px;">Creating New Search Filters</span>=== | ===<span style="font-weight: 700; font-size: 17px;">Creating New Search Filters</span>=== | ||
| Line 1,400: | Line 1,548: | ||
<table width=1000> | <table width=1000> | ||
<tr valign="top"> | <tr valign="top"> | ||
| − | <td colspan=2><span style="font-weight: 700; font-size: 15px;">Steps:</span> To create filters and Picklists in Content Manager:-</td> | + | <td colspan=2><span style="font-weight: 700; font-size: 15px;">Steps:</span> To create filters and Picklists in '''Content Manager''':-</td> |
</tr> | </tr> | ||
<tr valign="top"> | <tr valign="top"> | ||
| Line 1,408: | Line 1,556: | ||
<tr valign="top"> | <tr valign="top"> | ||
<td>[[image:DotPoint2.JPG|link=]]</td> | <td>[[image:DotPoint2.JPG|link=]]</td> | ||
| − | <td>the '''Default''' preset | + | <td>the '''Default''' preset '''Filter''' is named '''Installed''' which shows all the assets installed in your copy of '''Trainz'''. <span style="font-weight: 700; font-size: 15px; background-color: lightcyan;"> Left Click </span> on the '''Filter''' drop down menu box. |
<table> | <table> | ||
<tr valign="top"> | <tr valign="top"> | ||
| Line 1,490: | Line 1,638: | ||
<tr valign="top"> | <tr valign="top"> | ||
<td>At the end of each Filter Row is a pair of buttons [[image:FilterCreateCM04_S20.png|link=]]. <span style="font-weight: 700; font-size: 15px; background-color: lightcyan;"> Left Click </span>:- | <td>At the end of each Filter Row is a pair of buttons [[image:FilterCreateCM04_S20.png|link=]]. <span style="font-weight: 700; font-size: 15px; background-color: lightcyan;"> Left Click </span>:- | ||
| − | :the | + | :the [[image:CMFilterDeleteBtn.png|link=]] button to '''Delete''' this filter row, <span style="font-weight: 700; font-size: 15px;">OR</span> |
| − | :the | + | :the [[image:CMFilterAddBtn.png|link=]] button to '''add''' a new filter row below this button</td> |
</tr> | </tr> | ||
</table> | </table> | ||
| Line 1,596: | Line 1,744: | ||
<tr valign="top"> | <tr valign="top"> | ||
<td>[[image:DotPoint3Blue.png|link=]]</td> | <td>[[image:DotPoint3Blue.png|link=]]</td> | ||
| − | <td>The logic operator '''AND NOT''' adds a different decision making ability. For example:-<table> | + | <td>The logic operator '''AND NOT''' adds a different decision making ability. For example:- |
| + | <table> | ||
<tr valign="top"> | <tr valign="top"> | ||
<td>[[image:SearchLogic03_CM.png|link=]]</td> | <td>[[image:SearchLogic03_CM.png|link=]]</td> | ||
<td>Will search all assets to locate and display only those that meet the following requirements:- | <td>Will search all assets to locate and display only those that meet the following requirements:- | ||
:[[image:BlueDot10x10.png|link=]] are in the Picklist named '''Animals''' <span style="font-weight: 700; font-size: 15px;">AND</span> | :[[image:BlueDot10x10.png|link=]] are in the Picklist named '''Animals''' <span style="font-weight: 700; font-size: 15px;">AND</span> | ||
| − | :[[image:BlueDot10x10.png|link=]] have a '''build version''' number <span style="font-weight: 700; font-size: 15px;">LESS THAN</span> '''3.5''' | + | :[[image:BlueDot10x10.png|link=]] have a '''build version''' number <span style="font-weight: 700; font-size: 15px;">LESS THAN</span> '''3.5'''</td> |
| − | + | ||
</tr> | </tr> | ||
</table> | </table> | ||
| + | The <span style="font-weight: 700; font-size: 15px;">AND NOT</span> reverses the result of the next filter line which, in this example, would have only shown assets with a build version of '''3.5 or above'''. | ||
</td> | </td> | ||
</tr> | </tr> | ||
| Line 1,638: | Line 1,787: | ||
<table width=1000> | <table width=1000> | ||
<tr valign="top"> | <tr valign="top"> | ||
| − | <td colspan=2><span style="font-weight: 700; font-size: 15px;">Steps:</span> To create Picklists in Content Manager:-</td> | + | <td colspan=2><span style="font-weight: 700; font-size: 15px;">Steps:</span> To create Picklists in '''Content Manager''':-</td> |
</tr> | </tr> | ||
<tr valign="top"> | <tr valign="top"> | ||
| Line 1,654: | Line 1,803: | ||
<tr valign="top"> | <tr valign="top"> | ||
<td width=10>[[image:DotPoint.JPG|10px|link=]]</td> | <td width=10>[[image:DotPoint.JPG|10px|link=]]</td> | ||
| − | <td><span style="font-weight: 700; font-size: 15px; color: black; background-color: lightcyan;"> Right Click </span> on the asset to be added to the Picklist, <span style="font-weight: 700; font-size: 15px;">OR</span></td> | + | <td><span style="font-weight: 700; font-size: 15px; color: black; background-color: lightcyan;"> Right Click </span> on the asset to be added to the Picklist, <span style="font-weight: 700; font-size: 15px;">OR</span> select multiple assets:-</td> |
</tr> | </tr> | ||
<tr valign="top"> | <tr valign="top"> | ||
| Line 1,673: | Line 1,822: | ||
</td> | </td> | ||
</tr> | </tr> | ||
| + | </table> | ||
| + | <table width=1000> | ||
<tr valign="top"> | <tr valign="top"> | ||
| − | <td | + | <td width=25>[[image:DotPoint4.JPG|link=]]</td> |
| − | + | <td width=480>select the options <span style="font-weight: 700; font-size: 15px; color: white; background-color: black;"> Add to Picklist > </span> and <span style="font-weight: 700; font-size: 15px; color: white; background-color: black;"> New Picklist... </span><br> | |
| − | + | ||
| − | + | ||
| − | <td>select the options <span style="font-weight: 700; font-size: 15px; color: white; background-color: black;"> Add to Picklist > </span> and <span style="font-weight: 700; font-size: 15px; color: white; background-color: black;"> New Picklist... </span><br> | + | |
[[image:PickListAddNew_CM.png|link=]]</td> | [[image:PickListAddNew_CM.png|link=]]</td> | ||
| + | <td> | ||
| + | <table width=495 bgcolor=#000000 cellpadding=2> | ||
| + | <tr valign="top"> | ||
| + | <td> | ||
| + | <table bgcolor=#ffffe0 cellpadding=2> | ||
| + | <tr valign="top"> | ||
| + | <td>[[image:PencilTips.PNG|link=]]</td> | ||
| + | <td>'''Picklists''' that you create can be saved from '''Content Manager''' as text ('''.txt''') files. They can also be loaded into '''Content Manager''' from text files.<br> | ||
| + | Refer to the '''Wiki Page [[image:WikiLink.PNG|link=]] [[How to Backup a Picklist|How to Backup a Picklist]]''' for the details.</td> | ||
| + | </tr> | ||
| + | </table> | ||
| + | </td> | ||
| + | </tr> | ||
| + | </table> | ||
| + | </td> | ||
</tr> | </tr> | ||
<tr valign="top"> | <tr valign="top"> | ||
<td>[[image:DotPoint5.JPG|link=]]</td> | <td>[[image:DotPoint5.JPG|link=]]</td> | ||
| − | <td>enter a name for the new Picklist and | + | <td colspan=2>enter a name for the new Picklist and |
<table> | <table> | ||
<tr valign="top"> | <tr valign="top"> | ||
| Line 1,690: | Line 1,853: | ||
<br> | <br> | ||
<span style="font-weight: 700; font-size: 15px; background-color: lightcyan;"> Left Click </span> on:- | <span style="font-weight: 700; font-size: 15px; background-color: lightcyan;"> Left Click </span> on:- | ||
| − | :[[image:DotPoint.JPG|10px|link=]] the <span style="font-weight: 700; font-size: 15px; color: white; background-color: blue;"> OK </span> button to accept the name and save the new Picklist. The '''Picklist''' will be created and the selected asset will be added, <span style="font-weight: 700; font-size: 15px;">OR</span> | + | :[[image:DotPoint.JPG|10px|link=]] the <span style="font-weight: 700; font-size: 15px; color: white; background-color: blue;"> OK </span> button to accept the name and save the new Picklist. The '''Picklist''' will be created and the selected asset or assets will be added, <span style="font-weight: 700; font-size: 15px;">OR</span> |
:[[image:DotPoint.JPG|10px|link=]] the <span style="font-weight: 700; font-size: 15px; color: white; background-color: blue;"> Cancel </span> button to cancel the save</td> | :[[image:DotPoint.JPG|10px|link=]] the <span style="font-weight: 700; font-size: 15px; color: white; background-color: blue;"> Cancel </span> button to cancel the save</td> | ||
| − | |||
| − | |||
| − | |||
</tr> | </tr> | ||
</table> | </table> | ||
| Line 1,723: | Line 1,883: | ||
</tr> | </tr> | ||
</table> <!-- END Nav Buttons Table --> | </table> <!-- END Nav Buttons Table --> | ||
| + | |||
| + | <table width=1000 bgcolor="lightcyan" cellpadding=2> | ||
| + | <tr valign="top"> | ||
| + | <td width=10>[[image:BlueDot10x10.png|link=]]</td> | ||
| + | <td>'''Surveyor Classic''', sometimes referred to as '''Surveyor 1.0''', is supplied in all versions of '''Trainz'''</td> | ||
| + | </tr> | ||
| + | </table> | ||
<table width=1000> | <table width=1000> | ||
<tr valign="top"> | <tr valign="top"> | ||
| − | <td colspan=2><span style="font-weight: 700; font-size: 15px;">Steps:</span> To edit existing search filters in Surveyor Classic:-</td> | + | <td colspan=2><span style="font-weight: 700; font-size: 15px;">Steps:</span> To edit existing search filters in '''Surveyor Classic''':-</td> |
</tr> | </tr> | ||
<tr valign="top"> | <tr valign="top"> | ||
| Line 1,744: | Line 1,911: | ||
<td><span style="font-weight: 700; font-size: 15px; background-color: lightcyan;"> Left Click </span> on the '''Down Arrowhead''' icon to the right of the title '''Content Search Filter''' at the top of the window to list all the filters | <td><span style="font-weight: 700; font-size: 15px; background-color: lightcyan;"> Left Click </span> on the '''Down Arrowhead''' icon to the right of the title '''Content Search Filter''' at the top of the window to list all the filters | ||
<table> | <table> | ||
| + | <tr valign="top"> | ||
| + | <td> | ||
| + | <table bgcolor=#000000 cellpadding=2> | ||
<tr valign="top"> | <tr valign="top"> | ||
<td> | <td> | ||
| Line 1,752: | Line 1,922: | ||
---- | ---- | ||
The default (installed) '''Content Search Filters''' plus any that you have created and saved (for example '''Rail Workers''') will appear in the menu list</td> | The default (installed) '''Content Search Filters''' plus any that you have created and saved (for example '''Rail Workers''') will appear in the menu list</td> | ||
| + | </tr> | ||
| + | </table> | ||
| + | </td> | ||
</tr> | </tr> | ||
</table> | </table> | ||
| Line 1,890: | Line 2,063: | ||
<table width=1000> | <table width=1000> | ||
<tr valign="top"> | <tr valign="top"> | ||
| − | <td colspan=2><span style="font-weight: 700; font-size: 15px;">Steps:</span> To edit existing Picklists in Surveyor Classic:-</td> | + | <td colspan=2><span style="font-weight: 700; font-size: 15px;">Steps:</span> To edit existing Picklists in '''Surveyor Classic''':-</td> |
</tr> | </tr> | ||
<tr valign="top"> | <tr valign="top"> | ||
| Line 2,024: | Line 2,197: | ||
<td>[[image:Bug.png|link=]]</td> | <td>[[image:Bug.png|link=]]</td> | ||
<td><span style="font-size: 15px; font-weight: 700;">Known Issues:'''</span><br> | <td><span style="font-size: 15px; font-weight: 700;">Known Issues:'''</span><br> | ||
| − | A bug has been | + | A bug has been identified that will allow multiple copies of the same asset to be added to a '''Picklist''' but it will appear in the list only once. In this situation each instance of the asset must be removed separately - i.e. if the asset has been added 3 times then it must be removed 3 times for it to be completely removed from the '''Picklist'''</td> |
</tr> | </tr> | ||
</table> | </table> | ||
| Line 2,063: | Line 2,236: | ||
<tr valign="top"> | <tr valign="top"> | ||
<td width=10>[[image:BlueDot10x10.png|link=]]</td> | <td width=10>[[image:BlueDot10x10.png|link=]]</td> | ||
| − | <td> | + | <td>'''Surveyor 2.0''' is available in '''Trainz Plus''' and '''TRS22 Platinum''' only</td> |
</tr> | </tr> | ||
<tr valign="top"> | <tr valign="top"> | ||
| − | <td | + | <td>[[image:BlueDot10x10.png|link=]]</td> |
| − | <td> | + | <td>All '''Content Search Filter''' and '''Picklist''' tasks are conducted through the '''Assets Palette''' in '''Surveyor 2.0'''</td> |
</tr> | </tr> | ||
<tr valign="top"> | <tr valign="top"> | ||
| − | <td | + | <td>[[image:BlueDot10x10.png|link=]]</td> |
| − | <td>''' | + | <td>The '''Content Search Filters''' used in '''Surveyor 2.0''' are created using '''Content Manager'''</td> |
</tr> | </tr> | ||
</table> | </table> | ||
| Line 2,077: | Line 2,250: | ||
<table width=1000 cellpadding=2> | <table width=1000 cellpadding=2> | ||
<tr valign="top"> | <tr valign="top"> | ||
| − | <td colspan=2><span style="font-weight: 700; font-size: 15px;">Steps:</span> To edit filters and Picklists in Surveyor 2.0:-</td> | + | <td colspan=2><span style="font-weight: 700; font-size: 15px;">Steps:</span> To edit filters and Picklists in '''Surveyor 2.0''':-</td> |
</tr> | </tr> | ||
<tr valign="top"> | <tr valign="top"> | ||
| Line 2,101: | Line 2,274: | ||
<tr valign="top"> | <tr valign="top"> | ||
<td width=25>[[image:DotPoint2.JPG|link=]]</td> | <td width=25>[[image:DotPoint2.JPG|link=]]</td> | ||
| − | <td><span style="font-weight: 700; font-size: 15px; background-color: lightcyan;"> Left Click </span> on the data box (showing '''Ground Textures''' in the image) or on the double arrowhead as shown on its right to open up its lists of filters and Picklists | + | <td><span style="font-weight: 700; font-size: 15px; background-color: lightcyan;"> Left Click </span> on the '''Asset Type''' data box (showing '''Ground Textures''' in the image) or on the double arrowhead as shown on its right to open up its lists of filters and Picklists |
<table> | <table> | ||
<tr valign="top"> | <tr valign="top"> | ||
| Line 2,117: | Line 2,290: | ||
<tr valign="top"> | <tr valign="top"> | ||
<td width=10>[[image:DotPoint.JPG|10px|link=]]</td> | <td width=10>[[image:DotPoint.JPG|10px|link=]]</td> | ||
| − | <td>'''Asset Types''' (e.g. '''Track Objects''') | + | <td>'''Asset Types''' (e.g. '''Track Objects''') in the top section from '''All Content''' (all installed assets) to '''Presets''' (saved '''Effect Layers''')</td> |
</tr> | </tr> | ||
<tr valign="top"> | <tr valign="top"> | ||
| Line 2,135: | Line 2,308: | ||
</table> | </table> | ||
<br> | <br> | ||
| − | At the bottom of the list (you may have to scroll down) is an option <span style="font-weight: 700; font-size: 15px; color: white; background-color: black;"> Edit Filters and Picklists... </span> | + | At the bottom of the list (you may have to scroll down to see it) is an option <span style="font-weight: 700; font-size: 15px; color: white; background-color: black;"> Edit Filters and Picklists... </span> |
<table> | <table> | ||
<tr valign="top"> | <tr valign="top"> | ||
| Line 2,143: | Line 2,316: | ||
<td width=25>[[image:DotPoint1Blue.png|link=]]</td> | <td width=25>[[image:DotPoint1Blue.png|link=]]</td> | ||
<td><span style="font-weight: 700; font-size: 15px; background-color: lightcyan;"> Left Click </span> on the option <span style="font-weight: 700; font-size: 15px; color: white; background-color: black;"> Edit Filters and Picklists... </span><br> | <td><span style="font-weight: 700; font-size: 15px; background-color: lightcyan;"> Left Click </span> on the option <span style="font-weight: 700; font-size: 15px; color: white; background-color: black;"> Edit Filters and Picklists... </span><br> | ||
| − | This will open a window listing all the '''Content Search Filters''' and '''Picklists''' | + | This will open a window listing all the '''Asset Types''', '''Content Search Filters''' and '''Picklists''' |
<br> | <br> | ||
[[image:FilterEditMenu01_S20.png|link=]]</td> | [[image:FilterEditMenu01_S20.png|link=]]</td> | ||
| Line 2,189: | Line 2,362: | ||
</tr> | </tr> | ||
</table> | </table> | ||
| − | The contents of '''Picklists''' cannot be edited by this method. See [[image:PageLink.PNG|link=]] '''[[#skipEditingPickListsS20-2|Editing Picklists]]''' below for the method used to edit their contents</td> | + | The '''Edit''' option is greyed out for '''Picklists'''. The contents of '''Picklists''' cannot be edited by this method. See [[image:PageLink.PNG|link=]] '''[[#skipEditingPickListsS20-2|Editing Picklists]]''' below for the method used to edit their contents</td> |
</tr> | </tr> | ||
</table> | </table> | ||
| Line 2,223: | Line 2,396: | ||
<tr valign="top"> | <tr valign="top"> | ||
<td><span style="font-weight: 700; font-size: 15px; color: white; background-color: black;"> Edit </span></td> | <td><span style="font-weight: 700; font-size: 15px; color: white; background-color: black;"> Edit </span></td> | ||
| − | <td>will open a '''Filter Editor''' in the window to allow the selected '''Content Search Filter''' to be edited. See [[image:PageLink.PNG|link=]] '''[[#skipEditingFiltersS20-2|Editing | + | <td>will open a '''Filter Editor''' in the window to allow the selected '''Content Search Filter''' to be edited. See [[image:PageLink.PNG|link=]] '''[[#skipEditingFiltersS20-2|Editing Search Filters]]''' below for more details. <span style="background-color: #ffffb0;">This option cannot be selected for a '''Picklist'''</span></td> |
</tr> | </tr> | ||
</table> | </table> | ||
| Line 2,257: | Line 2,430: | ||
<tr valign="top"> | <tr valign="top"> | ||
<td width=629><span id="skipEditingFiltersS20-2"></span> | <td width=629><span id="skipEditingFiltersS20-2"></span> | ||
| − | ===Editing | + | ===Editing Search Filters=== |
</td> | </td> | ||
<td width=50>[[image:SkipDown.png|link=#skipEditingPickListsS20-2|Skip Down]]</td> <!-- skip Down --> | <td width=50>[[image:SkipDown.png|link=#skipEditingPickListsS20-2|Skip Down]]</td> <!-- skip Down --> | ||
| Line 2,335: | Line 2,508: | ||
<tr valign="top"> | <tr valign="top"> | ||
<td>At the end of each Filter Row is a pair of buttons [[image:FilterCreateCM04_S20.png|link=]]. <span style="font-weight: 700; font-size: 15px; background-color: lightcyan;"> Left Click </span>:- | <td>At the end of each Filter Row is a pair of buttons [[image:FilterCreateCM04_S20.png|link=]]. <span style="font-weight: 700; font-size: 15px; background-color: lightcyan;"> Left Click </span>:- | ||
| − | :the | + | :the [[image:CMFilterDeleteBtn.png|link=]] button to '''Delete''' this filter row, <span style="font-weight: 700; font-size: 15px;">OR</span> |
| − | :the | + | :the [[image:CMFilterAddBtn.png|link=]] button to '''add''' a new filter row below this button</td> |
</tr> | </tr> | ||
</table> | </table> | ||
| Line 2,405: | Line 2,578: | ||
<table width=996 bgcolor=#ffffff cellpadding=2> | <table width=996 bgcolor=#ffffff cellpadding=2> | ||
<tr valign="top"> | <tr valign="top"> | ||
| − | <td><span style="font-weight: 700; font-size: 15px;"> | + | <td><span style="font-weight: 700; font-size: 15px;">To <span style="text-decoration: underline;">ADD</span> assets to a Picklist</span></td> |
</tr> | </tr> | ||
</table> | </table> | ||
| Line 2,416: | Line 2,589: | ||
<td> | <td> | ||
<table> | <table> | ||
| + | <tr valign="top"> | ||
| + | <td colspan=2><span style="font-weight: 700; font-size: 15px;">Steps:</span></td> | ||
| + | </tr> | ||
<tr valign="top"> | <tr valign="top"> | ||
<td width=25>[[image:DotPoint1.JPG|link=]]</td> | <td width=25>[[image:DotPoint1.JPG|link=]]</td> | ||
| Line 2,501: | Line 2,677: | ||
<tr valign="top"> | <tr valign="top"> | ||
<td width=10>[[image:DotPointBlueSquare.png|10px|link=]]</td> | <td width=10>[[image:DotPointBlueSquare.png|10px|link=]]</td> | ||
| − | <td><span style="font-weight: 700; font-size: 15px; color: black; background-color: lightcyan;"> Right Click </span> on the asset to be added to the Picklist, <span style="font-weight: 700; font-size: 15px;">OR</span></td> | + | <td><span style="font-weight: 700; font-size: 15px; color: black; background-color: lightcyan;"> Right Click </span> on the asset to be added to the Picklist, <span style="font-weight: 700; font-size: 15px;">OR</span> select multiple assets:-</td> |
</tr> | </tr> | ||
<tr valign="top"> | <tr valign="top"> | ||
| Line 2,522: | Line 2,698: | ||
</tr> | </tr> | ||
<tr valign="top"> | <tr valign="top"> | ||
| − | <td colspan=2>A | + | <td colspan=2>A popout menu will appear.</td> |
</tr> | </tr> | ||
</table> | </table> | ||
| Line 2,528: | Line 2,704: | ||
</tr> | </tr> | ||
</table> | </table> | ||
| − | + | ||
| − | + | ||
| − | + | ||
| − | + | ||
| − | + | ||
| − | + | ||
| − | + | ||
| − | + | ||
| − | + | ||
| − | + | ||
<table> | <table> | ||
<tr valign="top"> | <tr valign="top"> | ||
| Line 2,545: | Line 2,712: | ||
<tr valign="top"> | <tr valign="top"> | ||
<td>[[image:DotPoint3Blue.png|link=]]</td> | <td>[[image:DotPoint3Blue.png|link=]]</td> | ||
| − | <td>select (<span style="font-weight: 700; font-size: 15px; background-color: lightcyan;"> Left Click </span> on) the option <span style="font-weight: 700; font-size: 15px; color: white; background-color: black;"> Add to Picklist > </span> from the popout menu</td> | + | <td>select (<span style="font-weight: 700; font-size: 15px; background-color: lightcyan;"> Left Click </span> on) the option <span style="font-weight: 700; font-size: 15px; color: white; background-color: black;"> Add to Picklist > </span> from the popout menu<br><br> |
| + | A new popout menu will appear.</td> | ||
</tr> | </tr> | ||
<tr valign="top"> | <tr valign="top"> | ||
| − | <td colspan=2> | + | <td colspan=2> |
| − | + | ||
| − | + | ||
| − | + | ||
| − | + | ||
<table> | <table> | ||
<tr valign="top"> | <tr valign="top"> | ||
<td>[[image:PickListAddNew03_S20.png|link=]]</td> | <td>[[image:PickListAddNew03_S20.png|link=]]</td> | ||
| + | <td>[[image:DotPoint4Blue.png|link=]]</td> | ||
<td> | <td> | ||
| − | + | <table> | |
| − | <table | + | |
<tr valign="top"> | <tr valign="top"> | ||
| − | <td | + | <td>select the name of the destination '''Picklist''' from the menu - you may have to scroll down the list to find it</td> |
| − | + | ||
</tr> | </tr> | ||
</table> | </table> | ||
</td> | </td> | ||
| + | </tr> | ||
| + | </table> | ||
| + | </td> | ||
| + | </tr> | ||
| + | </table> | ||
| + | </td> | ||
| + | </tr> | ||
| + | </table> | ||
| + | </td> | ||
| + | </tr> | ||
| + | </table> | ||
| + | |||
| + | <table bgcolor=#ffffb0 cellpadding=2> | ||
| + | <tr valign="top"> | ||
| + | <td width=25>[[image:NotePad.PNG|link=]]</td> | ||
| + | <td>There is no need to save your edits. The picklist will be automatically updated after each change</td> | ||
</tr> | </tr> | ||
</table> | </table> | ||
| Line 2,625: | Line 2,804: | ||
<td>[[image:DotPoint2Blue.png|link=]]</td> | <td>[[image:DotPoint2Blue.png|link=]]</td> | ||
<td>In the '''Info Palette''' <span style="font-weight: 700; font-size: 15px; background-color: lightcyan;"> Left Click </span> on the '''Down Arrowhead''' next to the asset name ('''Sign Station Oz 3b''' in the image below) | <td>In the '''Info Palette''' <span style="font-weight: 700; font-size: 15px; background-color: lightcyan;"> Left Click </span> on the '''Down Arrowhead''' next to the asset name ('''Sign Station Oz 3b''' in the image below) | ||
| + | <table bgcolor=#ffffb0 cellpadding=2> | ||
| + | <tr valign="top"> | ||
| + | <td width=25>[[image:NotePad.PNG|link=]]</td> | ||
| + | <td>If the '''Info Palette''' is not shown on the screen then refer to the '''Wiki Page [[image:WikiLink.PNG|link=]] [[How to Use S20 Palettes#skipHidingShowing|How to Use S20 Palettes]]'''</td> | ||
| + | </tr> | ||
| + | </table> | ||
</td> | </td> | ||
</tr> | </tr> | ||
| Line 2,660: | Line 2,845: | ||
<td width=25>[[image:NotePad.PNG|link=]]</td> | <td width=25>[[image:NotePad.PNG|link=]]</td> | ||
<td>There is no need to save your edits. The picklist will be automatically updated after each change</td> | <td>There is no need to save your edits. The picklist will be automatically updated after each change</td> | ||
| − | |||
| − | |||
| − | |||
</tr> | </tr> | ||
</table> | </table> | ||
| Line 2,689: | Line 2,871: | ||
<table width=996 bgcolor=#ffffff cellpadding=2> | <table width=996 bgcolor=#ffffff cellpadding=2> | ||
<tr valign="top"> | <tr valign="top"> | ||
| − | <td><span style="font-weight: 700; font-size: 15px;"> | + | <td><span style="font-weight: 700; font-size: 15px;">To <span style="text-decoration: underline;">REMOVE</span> assets from a Picklist</span></td> |
</tr> | </tr> | ||
</table> | </table> | ||
| Line 2,697: | Line 2,879: | ||
<table width=1000> | <table width=1000> | ||
| + | <tr valign="top"> | ||
| + | <td colspan=2><span style="font-weight: 700; font-size: 15px;">Steps:</span></td> | ||
| + | </tr> | ||
<tr valign="top"> | <tr valign="top"> | ||
<td width=25>[[image:DotPoint1.JPG|link=]]</td> | <td width=25>[[image:DotPoint1.JPG|link=]]</td> | ||
| Line 2,707: | Line 2,892: | ||
<tr valign="top"> | <tr valign="top"> | ||
<td>[[image:DotPoint3.JPG|link=]]</td> | <td>[[image:DotPoint3.JPG|link=]]</td> | ||
| − | <td><span style="font-weight: 700; font-size: 15px; background-color: lightcyan;"> Right Click </span> on the asset to be removed, <span style="font-weight: 700; font-size: 15px;">OR</span><br> | + | <td><span style="font-weight: 700; font-size: 15px; background-color: lightcyan;"> Right Click </span> on the asset to be removed, <span style="font-weight: 700; font-size: 15px;">OR</span> select multiple assets:-<br> |
To select multiple assets:- | To select multiple assets:- | ||
<table> | <table> | ||
| Line 2,761: | Line 2,946: | ||
<td>[[image:Bug.png|link=]]</td> | <td>[[image:Bug.png|link=]]</td> | ||
<td><span style="font-size: 15px; font-weight: 700;">Known Issues:'''</span><br> | <td><span style="font-size: 15px; font-weight: 700;">Known Issues:'''</span><br> | ||
| − | A bug has been | + | A bug has been identified that will allow multiple copies of the same asset to be added to a '''Picklist''' but it will appear in the list only once. In this situation each instance of the asset must be removed separately - i.e. if the asset has been added 3 times then it must be removed 3 times for it to be completely removed from the '''Picklist'''</td> |
</tr> | </tr> | ||
</table> | </table> | ||
| Line 2,790: | Line 2,975: | ||
</tr> | </tr> | ||
</table> <!-- END Nav Buttons Table --> | </table> <!-- END Nav Buttons Table --> | ||
| + | |||
| + | <table width=1000 bgcolor="lightcyan" cellpadding=2> | ||
| + | <tr valign="top"> | ||
| + | <td width=10>[[image:BlueDot10x10.png|link=]]</td> | ||
| + | <td>'''Content Manager''' is the asset management program that is supplied with all versions of '''Trainz'''</td> | ||
| + | </tr> | ||
| + | </table> | ||
<table width=1000> | <table width=1000> | ||
<tr valign="top"> | <tr valign="top"> | ||
| − | <td colspan=2><span style="font-weight: 700; font-size: 15px;">Steps:</span> To edit Content Search Filters and Picklists in Content Manager:-</td> | + | <td colspan=2><span style="font-weight: 700; font-size: 15px;">Steps:</span> To edit Content Search Filters and Picklists in '''Content Manager''':-</td> |
</tr> | </tr> | ||
<tr valign="top"> | <tr valign="top"> | ||
| Line 2,809: | Line 3,001: | ||
<tr valign="top"> | <tr valign="top"> | ||
<td>[[image:DotPoint3.JPG|link=]]</td> | <td>[[image:DotPoint3.JPG|link=]]</td> | ||
| − | <td>From the displayed list of '''Content Search Filters''' and '''Picklists''', scroll down to the bottom and <span style="font-weight: 700; font-size: 15px; background-color: lightcyan;"> Left Click </span> on the <span style="font-weight: 700; font-size: 15px; color: white; background-color: black;"> Edit Filters and Picklists... </span> option | + | <td>From the displayed list of '''Content Search Filters''' and '''Picklists''', scroll down to the bottom and <span style="font-weight: 700; font-size: 15px; background-color: lightcyan;"> Left Click </span> on the <span style="font-weight: 700; font-size: 15px; color: white; background-color: black;"> Edit Filters and Picklists... </span> option<br> |
This will open a window listing all the '''Content Search Filters''' and '''Picklists''' | This will open a window listing all the '''Content Search Filters''' and '''Picklists''' | ||
<br> | <br> | ||
| Line 2,893: | Line 3,085: | ||
<tr valign="top"> | <tr valign="top"> | ||
<td><span style="font-weight: 700; font-size: 15px; color: white; background-color: black;"> Edit </span></td> | <td><span style="font-weight: 700; font-size: 15px; color: white; background-color: black;"> Edit </span></td> | ||
| − | <td>will open a '''Filter Editor''' in the window to allow the selected '''Content Search Filter''' to be edited. See [[image:PageLink.PNG|link=]] '''[[#skipEditingFiltersCM-2|Editing | + | <td>will open a '''Filter Editor''' in the window to allow the selected '''Content Search Filter''' to be edited. See [[image:PageLink.PNG|link=]] '''[[#skipEditingFiltersCM-2|Editing Search Filters]]''' below for more details. <span style="background-color: #ffffb0;">This option cannot be selected for a '''Picklist'''</span></td> |
</tr> | </tr> | ||
</table> | </table> | ||
| Line 2,927: | Line 3,119: | ||
<tr valign="top"> | <tr valign="top"> | ||
<td width=629><span id="skipEditingFiltersCM-2"></span> | <td width=629><span id="skipEditingFiltersCM-2"></span> | ||
| − | ===Editing | + | ===Editing Search Filters=== |
</td> | </td> | ||
<td width=50>[[image:SkipDown.png|link=#skipEditingPickListsCM-2|Skip Down]]</td> <!-- skip Down --> | <td width=50>[[image:SkipDown.png|link=#skipEditingPickListsCM-2|Skip Down]]</td> <!-- skip Down --> | ||
| Line 3,005: | Line 3,197: | ||
<tr valign="top"> | <tr valign="top"> | ||
<td>At the end of each Filter Row is a pair of buttons [[image:FilterCreateCM04_S20.png|link=]]. <span style="font-weight: 700; font-size: 15px; background-color: lightcyan;"> Left Click </span>:- | <td>At the end of each Filter Row is a pair of buttons [[image:FilterCreateCM04_S20.png|link=]]. <span style="font-weight: 700; font-size: 15px; background-color: lightcyan;"> Left Click </span>:- | ||
| − | :the | + | :the [[image:CMFilterDeleteBtn.png|link=]] button to '''Delete''' this filter row, <span style="font-weight: 700; font-size: 15px;">OR</span> |
| − | :the | + | :the [[image:CMFilterAddBtn.png|link=]] button to '''add''' a new filter row below this button</td> |
</tr> | </tr> | ||
</table> | </table> | ||
| Line 3,063: | Line 3,255: | ||
</tr> | </tr> | ||
</table> | </table> | ||
| − | + | <br> | |
| − | <span style="font-weight: 700; font-size: 15px;">Adding Assets</span><br> | + | <span style="font-weight: 700; font-size: 15px; color: gold; background-color: black;"> Adding Assets </span><br> |
<table width=1000> | <table width=1000> | ||
| Line 3,081: | Line 3,273: | ||
<tr valign="top"> | <tr valign="top"> | ||
<td width=25>[[image:DotPoint3.JPG|link=]]</td> | <td width=25>[[image:DotPoint3.JPG|link=]]</td> | ||
| − | <td><span style="font-weight: 700; font-size: 15px; color: black; background-color: lightcyan;"> Right Click </span> on the asset to be added to the Picklist, <span style="font-weight: 700; font-size: 15px;">OR</span><br> | + | <td><span style="font-weight: 700; font-size: 15px; color: black; background-color: lightcyan;"> Right Click </span> on the asset to be added to the Picklist, <span style="font-weight: 700; font-size: 15px;">OR</span> select multiple assets:-<br> |
| − | To select multiple assets:- | + | To select multiple assets:- |
<table> | <table> | ||
<tr valign="top"> | <tr valign="top"> | ||
| Line 3,139: | Line 3,331: | ||
</tr> | </tr> | ||
</table> | </table> | ||
| − | + | <br> | |
| − | <span style="font-weight: 700; font-size: 15px;">Removing Assets</span><br> | + | <span style="font-weight: 700; font-size: 15px; color: gold; background-color: black;"> Removing Assets </span><br> |
<table width=1000> | <table width=1000> | ||
| Line 3,153: | Line 3,345: | ||
<tr valign="top"> | <tr valign="top"> | ||
<td>[[image:DotPoint3.JPG|link=]]</td> | <td>[[image:DotPoint3.JPG|link=]]</td> | ||
| − | <td><span style="font-weight: 700; font-size: 15px; background-color: lightcyan;"> Right Click </span> on the asset to be removed, <span style="font-weight: 700; font-size: 15px;">OR</span><br> | + | <td><span style="font-weight: 700; font-size: 15px; background-color: lightcyan;"> Right Click </span> on the asset to be removed, <span style="font-weight: 700; font-size: 15px;">OR</span> select multiple assets:-<br> |
To select multiple assets:- | To select multiple assets:- | ||
<table> | <table> | ||
| Line 3,207: | Line 3,399: | ||
<td>[[image:Bug.png|link=]]</td> | <td>[[image:Bug.png|link=]]</td> | ||
<td><span style="font-size: 15px; font-weight: 700;">Known Issues:'''</span><br> | <td><span style="font-size: 15px; font-weight: 700;">Known Issues:'''</span><br> | ||
| − | A bug has been | + | A bug has been identified that will allow multiple copies of the same asset to be added to a '''Picklist''' but it will appear in the list only once. In this situation each instance of the asset must be removed separately - i.e. if the asset has been added 3 times then it must be removed 3 times for it to be completely removed from the '''Picklist'''</td> |
</tr> | </tr> | ||
</table> | </table> | ||
| Line 3,237: | Line 3,429: | ||
---- | ---- | ||
='''Trainz Wiki'''= | ='''Trainz Wiki'''= | ||
| − | <table | + | <table width=1000> |
<tr valign="top"> | <tr valign="top"> | ||
| − | <td>[[image:TrainzWiki.png|link=]]</td> | + | <td> |
| + | <table width=600 cellpadding=2 bgcolor=#ffffff> | ||
| + | <tr valign="top"> | ||
| + | <td width=80>[[image:TrainzWiki.png|link=]]</td> | ||
<td> | <td> | ||
<span style="font-size: 17px;">'''More Tutorials and Guides to Using Trainz'''</span><br> | <span style="font-size: 17px;">'''More Tutorials and Guides to Using Trainz'''</span><br> | ||
| Line 3,246: | Line 3,441: | ||
*'''[[Session Rule List with Parameters|Session Rules List (Alphabetical) with Parameters]]''' | *'''[[Session Rule List with Parameters|Session Rules List (Alphabetical) with Parameters]]''' | ||
*'''[[Session Rules By Categories With Properties|Session Rules List (Categories) With Parameters]]''' | *'''[[Session Rules By Categories With Properties|Session Rules List (Categories) With Parameters]]''' | ||
| + | </td> | ||
| + | </tr> | ||
| + | </table> | ||
| + | </td> | ||
| + | <td> | ||
| + | <table width=500 cellpadding=4 bgcolor="aquamarine"> | ||
| + | <tr valign="top"> | ||
| + | <td width=50>[[image:LinkWiki.PNG|link=]]</td> | ||
| + | <td> | ||
| + | <span style="font-size: 17px;">'''Related Links'''</span><br> | ||
| + | *'''[[How_to_Backup_a_Picklist|How to Backup a Picklist]]''' | ||
| + | *'''[[How_to_Move a Picklist|How to Move a Picklist]]''' | ||
| + | </td> | ||
| + | </tr> | ||
| + | </table> | ||
</td> | </td> | ||
</tr> | </tr> | ||
Latest revision as of 22:13, 7 December 2023
The information in this Wiki Page applies to Trainz Plus and TRS22. It describes how to use, create and edit Search Filters and Picklists.
|
|
[edit] Using Existing Search Filters and Picklists |
[edit] In Surveyor Classic |
| Surveyor Classic, sometimes referred to as Surveyor 1.0, is supplied in all versions of Trainz |
| Steps: To use existing filters and Picklists in Surveyor Classic:- | |||||||||||||||||||||||||||||||||||||||||||
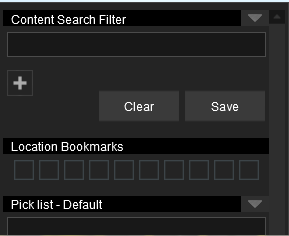
from the Surveyor Classic screen press Ctrl + Shift + F to open the Content Search Filter
|
|||||||||||||||||||||||||||||||||||||||||||
select from the following methods to search the assets:-
OR
|
|||||||||||||||||||||||||||||||||||||||||||
[edit] In Surveyor 2.0Using Existing Search Filters and Picklists |
| Surveyor 2.0 is available in Trainz Plus and TRS22 Platinum only | |
| All Content Search Filter and Picklist tasks are conducted through the Assets Palette in Surveyor 2.0 | |
| The Content Search Filters used in Surveyor 2.0 are created using Content Manager |
|
| Steps: To use existing filters and Picklists in Surveyor 2.0:- | |
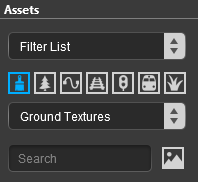
| in the Surveyor 2.0 screen locate the Assets Palette | |
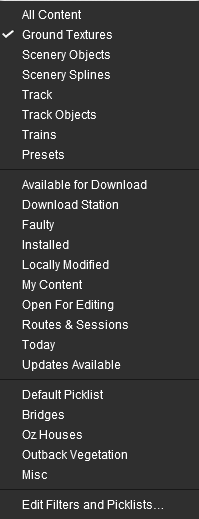
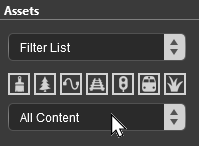
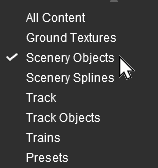
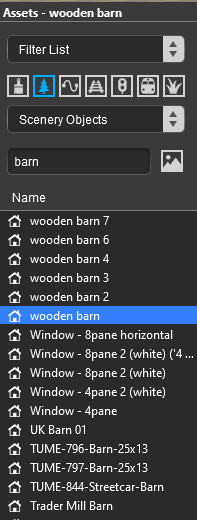
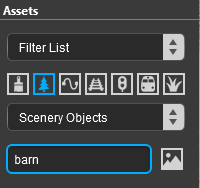
Left Click on the Asset Type data box (showing Ground Textures in the image) or on the double arrowhead as shown on its right to open up its lists of filters. The currently selected asset type (Ground Textures in the image), search filter or picklist will have a
|
[edit] In Content ManagerUsing Existing Search Filters and Picklists |
| Content Manager is the asset management program that is supplied with all versions of Trainz |
| Steps: To use existing filters and Picklists in Content Manager:- | ||||||||||||||||||
| from the Trainz Launcher select Manage Content | ||||||||||||||||||
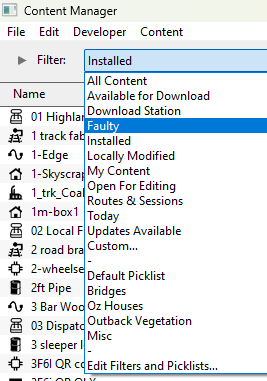
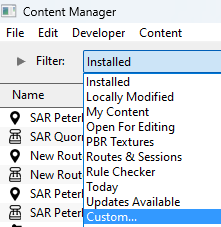
in Content Manager open the Filter drop down box
|
||||||||||||||||||
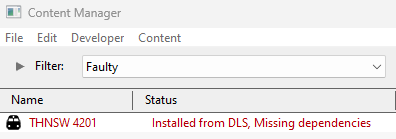
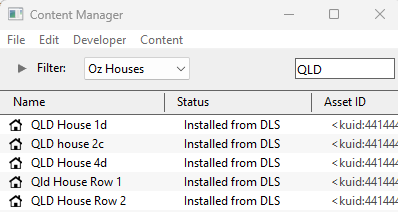
| to use a filter or Picklist Left Click on its name in the list. For example:-
|
||||||||||||||||||
[edit] Creating New Search Filters and Picklists |
|
[edit] In Surveyor ClassicCreating New Search Filters and Picklists |
| Surveyor Classic, sometimes referred to as Surveyor 1.0, is supplied in all versions of Trainz |
| Content Search Filters created in Surveyor Classic can only be used in Surveyor Classic | |
| Picklists created in Surveyor Classic can be used and edited in Surveyor 2.0 and Content Manager |
| Steps: To create filters and Picklists in Surveyor Classic:- | ||||||||||||||
from the Surveyor Classic screen press Ctrl + Shift + F to open the Content Search Filter
|
||||||||||||||
select from the following methods to create the new search filter or Picklist:-
OR
OR
|
|||||||||||||||||||||||||||||||||||||||||||||||||||||||||||||||||||||||||||||||
[edit] In Surveyor 2.0 |
[edit] Creating New Search Filters
| Surveyor 2.0 is available in Trainz Plus and TRS22 Platinum only |
|
| Optional Steps: Choose combinations of the following options:- | |||
Asset Display: At the top of the Assets Palette is a Filter Option menu box. This controls how the search filters are applied to the Trainz World shown in the Surveyor Screen. It has no effect on the assets diplayed in the Assets Palette
|
|||
 |
|
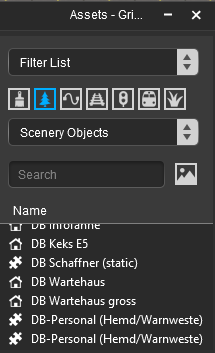
Asset Selection: The row of Asset Icons and the Drop Down Menu below it identify the type of assets that will be shown in the filter list
This option can be selected by a Left Click on a icon that represents the different types of assets or selecting the type of asset from the drop down list. Options: Choose from:-
|
Text Selection: The Search text box allows you to enter a string of text characters that will be used to search the asset names and their descriptions for a match. Those assets that return a positive match, together with a positive asset type, if one has been set, will be shown in the filter name list
|
||||||||||||||||||||||||||
[edit] Creating New Picklists |
|
||||
|
||||
| Steps: To create new Picklists in Surveyor 2.0:- | ||||
| in the Surveyor 2.0 screen locate the Assets Palette | ||||
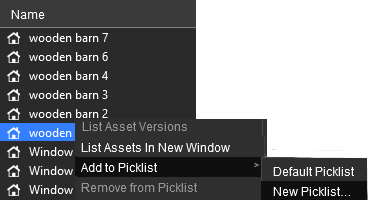
select an asset or object that will be added to the new (yet to be created) Picklist. You cannot create an empty Picklist
|
|||||||||||||||||||||||||||||||||||||||||||||||
OR
|
|||||||||||||||||||||||||
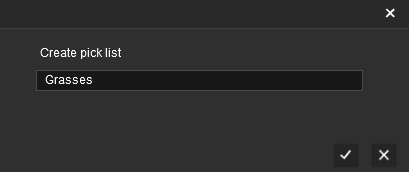
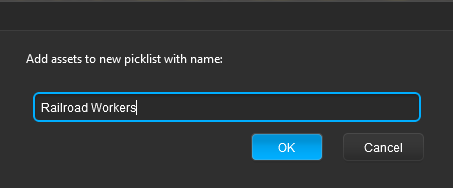
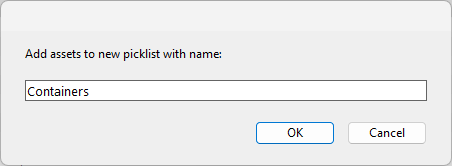
enter a name for the new Picklist and
|
[edit] In Content Manager
[edit] Creating New Search Filters |
| Content Search Filters created here can be used in Surveyor 2.0 asset searches |
| Steps: To create filters and Picklists in Content Manager:- | |||||||||||||||||||||||
| from the Trainz Launcher select Manage Content | |||||||||||||||||||||||
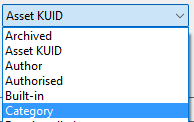
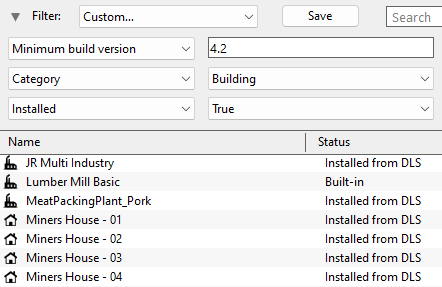
the Default preset Filter is named Installed which shows all the assets installed in your copy of Trainz. Left Click on the Filter drop down menu box.
|
|||||||||||||||||||||||
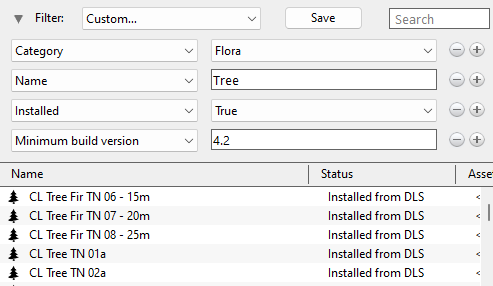
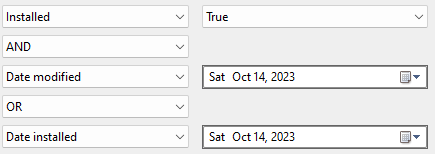
edit/add/delete the filter rows and their contents as required.
|
|||||||||||||||||||||||
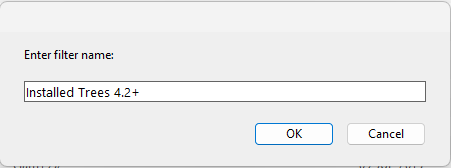
Save the new Content Search Filter. Left Click on the Save button above the filter lines, then:-
|
|||||||||||||||||||||||
|
[edit] Creating New Picklists |
| New Picklists are created in Content Manager by using a Content Search Filter to display the assets that you want to add to the new Picklist |
| Steps: To create Picklists in Content Manager:- | |||||||||||
| from the Trainz Launcher select Manage Content | |||||||||||
| select an existing Content Search Filter or Picklist or create a new one that will display at least some of the assets that you want to add to the Picklist. You can change your selected filter or Picklist at any time during the process | |||||||||||
From the displayed list of assets:-
|
|||||||||||
select the options Add to Picklist > and New Picklist...  |
|
||||
enter a name for the new Picklist and
|
|||||
[edit] Editing Search Filters and Picklists |
[edit] In Surveyor Classic[edit] Editing Search Filters |
| Surveyor Classic, sometimes referred to as Surveyor 1.0, is supplied in all versions of Trainz |
| Steps: To edit existing search filters in Surveyor Classic:- | ||||||||||
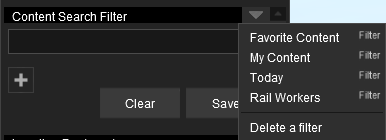
|
||||||||||
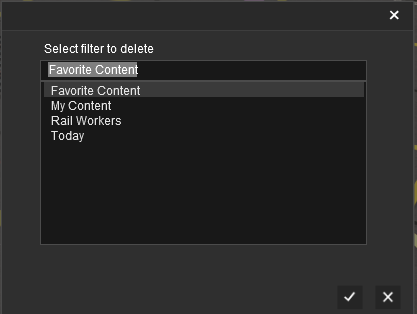
To Delete a filter, select the last option Delete a Filter from the popout menu then select the name of the filter to be deleted
|
|
|||||||||||||||||||||||||||
[edit] Editing Picklists |
| Steps: To edit existing Picklists in Surveyor Classic:- | |
| from the Surveyor Classic screen press Ctrl + Shift + F to open the Content Search Filter | |
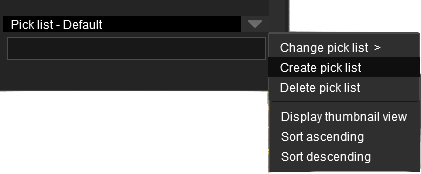
Left Click on the Down Arrowhead icon to the right of the title Pick list as shown in the image to list optins
 |
|
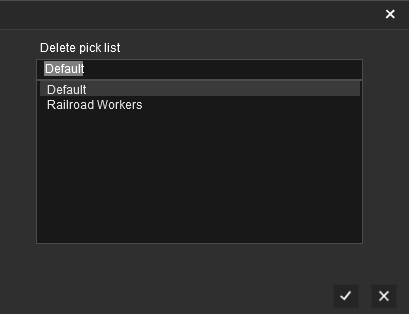
To Delete a Picklist, select the last option Delete pick list from the first popout menu then select the name of the Picklist to be deleted
|
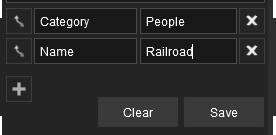
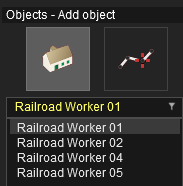
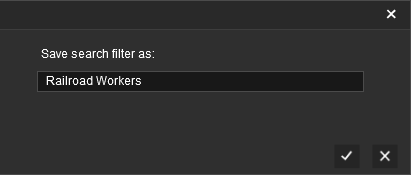
To Edit a Picklist Left Click on Change pick list > in the first popup menu and on its name (for example Railroad Workers ) in the second popup menu to load it into the Content Search Filter window.
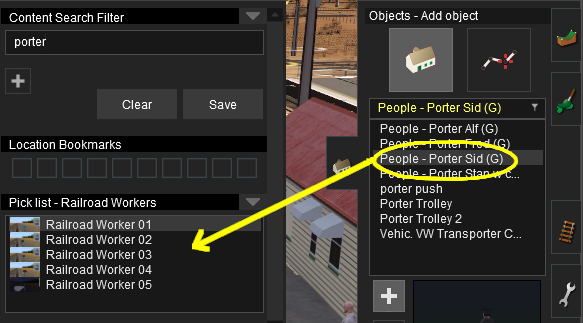
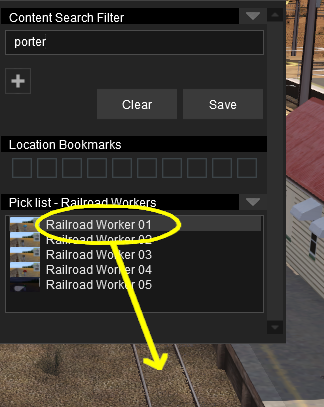
You then have the options of:-
OR
|
||||||||||||||||||||||||||||||||||||
[edit] In Surveyor 2.0Editing Search Filters and Picklists |
| Surveyor 2.0 is available in Trainz Plus and TRS22 Platinum only | |
| All Content Search Filter and Picklist tasks are conducted through the Assets Palette in Surveyor 2.0 | |
| The Content Search Filters used in Surveyor 2.0 are created using Content Manager |
| Steps: To edit filters and Picklists in Surveyor 2.0:- | ||||
in the Surveyor 2.0 screen locate the Assets Palette
|
||||
Left Click on the Asset Type data box (showing Ground Textures in the image) or on the double arrowhead as shown on its right to open up its lists of filters and Picklists
|
||||||||||||||||||||||||||||
The Editing options available are:-
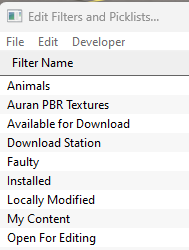
|
[edit] Editing Search Filters |
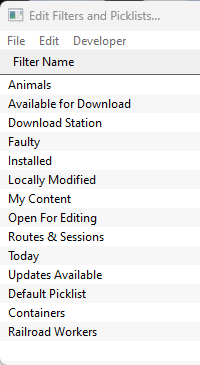
| Steps: To edit the Content Search Filter instructions:- Using the list of Content Search Filters and Picklist from opening the Edit Filters and Picklists... described above:- |
|||
| Right Click on a Content Search Filter | |||
| Left Click on the Edit option | |||
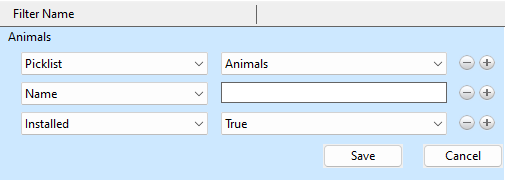
This will display Data Fields and Data Values for the the selected Content Search Filter
|
|||
|
|||||||||||||||||||||
[edit] Editing Picklists |
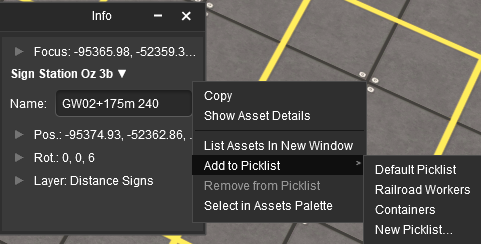
|
||||
|
|
||||||||||||||||||||||||||||||||||||||||||||||||||||||||||||
OR
|
||||||||||||||||||||||||||||||
|
| Steps: | |||||||||||||||||||||
| in the Surveyor 2.0 screen locate the Assets Palette | |||||||||||||||||||||
| select and load the Picklist to be edited | |||||||||||||||||||||
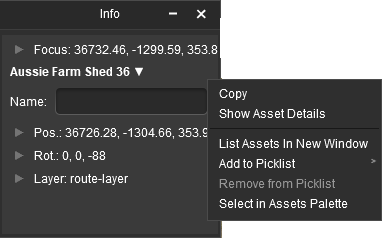
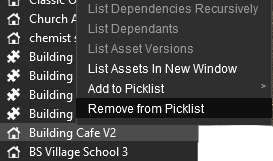
| Right Click on the asset to be removed, OR select multiple assets:- To select multiple assets:-
|
|||||||||||||||||||||
[edit] In Content ManagerEditing Search Filters and Picklists |
| Content Manager is the asset management program that is supplied with all versions of Trainz |
| Steps: To edit Content Search Filters and Picklists in Content Manager:- | |||||
| from the Trainz Launcher select Manage Content | |||||
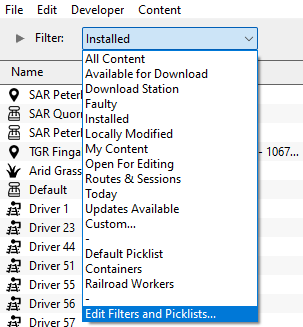
Left Click on the Filter drop down menu
|
|||||
| Right Click on a Content Search Filter or Picklist | ||||||||
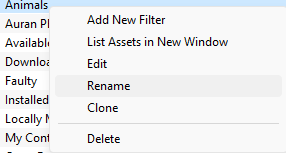
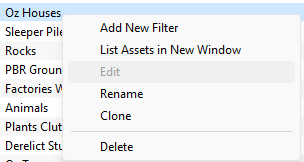
| This will open a sub-menu. There will be one minor difference between the sub-menus for Content Search Filters and Picklists | ||||||||
|
||||||||
The Editing options available are:-
|
[edit] Editing Search Filters |
| Steps: To edit the Content Search Filter instructions:- Using the list of Content Search Filters and Picklist from opening the Edit Filters and Picklists... described above:- |
|||
| Right Click on a Content Search Filter | |||
| Left Click on the Edit option | |||
This will display Data Fields and Data Values for the the selected Content Search Filter
|
|||
|
|||||||||||||||||||||
[edit] Editing Picklists |
|
|||
Adding Assets
| from the Trainz Launcher select Manage Content | |||||||||||||
you can optionally use a Content Search Filter to narrow down the list of displayed assets to make the selection of new assets easier. Left Click on the Filter boz and select a suitable Content Search Filter or construct a Custom filter manually. You can change the filter at any time during the process. For example:-
|
|||||||||||||
|
|
Removing Assets
| from the Trainz Launcher select Manage Content | |||||||||||||||||||||
| Left Click on the Filter boz and select a Picklist to be edited | |||||||||||||||||||||
| Right Click on the asset to be removed, OR select multiple assets:- To select multiple assets:-
|
|||||||||||||||||||||
[edit] Trainz Wiki
|
|
This page was created by Trainz user pware in October 2023 and was last updated as shown below.

