How to Manage Filters and Picklists
m |
m |
||
| (11 intermediate revisions by one user not shown) | |||
| Line 82: | Line 82: | ||
<tr valign="top"> | <tr valign="top"> | ||
<td width=25>[[image:DotPoint1.JPG|link=]]</td> | <td width=25>[[image:DotPoint1.JPG|link=]]</td> | ||
| − | <td>from the '''Surveyor Classic''' screen press <span style="font-weight: 700; font-size: 15px;"><span style="color: white; background-color: black;"> Ctrl </span> + <span style="color: white; background-color: black;"> Shift </span> + <span style="color: white; background-color: black;"> F </span></span> to open the ''' | + | <td>from the '''Surveyor Classic''' screen press <span style="font-weight: 700; font-size: 15px;"><span style="color: white; background-color: black;"> Ctrl </span> + <span style="color: white; background-color: black;"> Shift </span> + <span style="color: white; background-color: black;"> F </span></span> to open the '''Search Filter''' |
<table> | <table> | ||
<tr valign="top"> | <tr valign="top"> | ||
| Line 94: | Line 94: | ||
<tr valign="top"> | <tr valign="top"> | ||
<td width=25>[[image:NotePad.PNG|link=]]</td> | <td width=25>[[image:NotePad.PNG|link=]]</td> | ||
| − | <td>Your copy of '''Trainz''' has some ''' | + | <td>Your copy of '''Trainz''' has some '''Search Filters''' and a '''Picklist''' supplied as "built in"</td> |
</tr> | </tr> | ||
</table> | </table> | ||
| Line 117: | Line 117: | ||
<tr valign="top"> | <tr valign="top"> | ||
<td width=25>[[image:Ablue.png|link=]]</td> | <td width=25>[[image:Ablue.png|link=]]</td> | ||
| − | <td><span style="font-weight: 700; font-size: 15px;"> | + | <td><span style="font-weight: 700; font-size: 15px;">Search Filter:-</span><br> |
<span style="font-weight: 700; font-size: 15px;">Steps:</span> | <span style="font-weight: 700; font-size: 15px;">Steps:</span> | ||
<table> | <table> | ||
| Line 136: | Line 136: | ||
<tr valign="top"> | <tr valign="top"> | ||
<td>[[image:DotPoint.JPG|10px|link=]]</td> | <td>[[image:DotPoint.JPG|10px|link=]]</td> | ||
| − | <td>The first time you open this filter list it will only show the default (installed) ''' | + | <td>The first time you open this filter list it will only show the default (installed) '''Search Filters'''. If you have saved your own '''Search Filters''' (see [[image:PageLink.PNG|link=]] '''[[#stepCreatingFilters|Creating Search Filters]]''') then they will also appear in the list.</td> |
</tr> | </tr> | ||
<tr valign="top"> | <tr valign="top"> | ||
| Line 230: | Line 230: | ||
<tr valign="top"> | <tr valign="top"> | ||
<td>[[image:DotPoint.JPG|10px|link=]]</td> | <td>[[image:DotPoint.JPG|10px|link=]]</td> | ||
| − | <td>The contents of the selected '''Picklist''' are shown in the '''Picklist Section''' of this ''' | + | <td>The contents of the selected '''Picklist''' are shown in the '''Picklist Section''' of this '''Search Filter''' window and '''NOT''' in the '''Tool Flyouts'''</td> |
</tr> | </tr> | ||
</table> | </table> | ||
| Line 270: | Line 270: | ||
<tr valign="top"> | <tr valign="top"> | ||
<td>[[image:BlueDot10x10.png|link=]]</td> | <td>[[image:BlueDot10x10.png|link=]]</td> | ||
| − | <td>All ''' | + | <td>All '''Search Filter''' and '''Picklist''' tasks use the '''Filter Palette''' and '''Assets Palette''' in '''Surveyor 2.0'''</td> |
</tr> | </tr> | ||
<tr valign="top"> | <tr valign="top"> | ||
<td>[[image:BlueDot10x10.png|link=]]</td> | <td>[[image:BlueDot10x10.png|link=]]</td> | ||
| − | <td>The ''' | + | <td>The '''Search Filters''' used in '''Surveyor 2.0''' are created using '''Content Manager'''</td> |
| + | </tr> | ||
| + | </table> | ||
| + | <br> | ||
| + | <table width=1000 bgcolor=#000000> | ||
| + | <tr valign="top"> | ||
| + | <td> | ||
| + | <table width=996 bgcolor=#ffe89a cellpadding=2> | ||
| + | <tr valign="middle"> | ||
| + | <td width=45>[[image:PalettesIcon_S20.png|link=]]</td> | ||
| + | <td>The '''Filter Palette''' and the '''Assets Palette''' must be visible on the screen. If they are not then open the [[image:SurveyorWindowIcon.png|link=]] '''Window Menu''' at the top of the screen or refer to the '''Trainz Wiki Page [[image:WikiLink.PNG|link=]] [[How to Use S20 Palettes#skipHidingShowing|How to Use S20 Palettes]]'''</td> | ||
| + | </tr> | ||
| + | </table> | ||
| + | </td> | ||
</tr> | </tr> | ||
</table> | </table> | ||
| Line 288: | Line 301: | ||
<tr valign="top"> | <tr valign="top"> | ||
<td width=25>[[image:DotPoint1.JPG|link=]]</td> | <td width=25>[[image:DotPoint1.JPG|link=]]</td> | ||
| − | + | <td>In the '''Filter Palette''' <span style="font-weight: 700; font-size: 15px; background-color: lightcyan;"> Left Click </span> on the '''Asset Type''' drop down box (showing '''Ground Textures''' in the image on the left) or on the double arrowhead as shown on its right to open up its lists of filters.<br> | |
| − | + | ||
| − | + | ||
| − | + | ||
| − | <td>In the '''Filter Palette''' <span style="font-weight: 700; font-size: 15px; background-color: lightcyan;"> Left Click </span> on the '''Asset Type''' | + | |
<br> | <br> | ||
The currently selected '''Asset Type''' (e.g. '''Ground Textures'''), '''Search Filter''' or '''Picklist''' will have a [[image:BulletTick.png|link=]] in front of its name in the drop down list.</td> | The currently selected '''Asset Type''' (e.g. '''Ground Textures'''), '''Search Filter''' or '''Picklist''' will have a [[image:BulletTick.png|link=]] in front of its name in the drop down list.</td> | ||
| Line 307: | Line 316: | ||
<table> | <table> | ||
<tr valign="top"> | <tr valign="top"> | ||
| − | <td width=25>[[image: | + | <td width=25>[[image:DotPoint2.JPG|link=]]</td> |
<td>to select and open a specific '''Asset Type''', '''Search Filter''' or '''Picklist''' <span style="font-weight: 700; font-size: 15px; background-color: lightcyan;"> Left Click </span> on its name. | <td>to select and open a specific '''Asset Type''', '''Search Filter''' or '''Picklist''' <span style="font-weight: 700; font-size: 15px; background-color: lightcyan;"> Left Click </span> on its name. | ||
<table bgcolor=#000000 cellpadding=2> | <table bgcolor=#000000 cellpadding=2> | ||
| Line 318: | Line 327: | ||
<tr valign="top"> | <tr valign="top"> | ||
<td width=25>[[image:DotPoint.JPG|link=]]</td> | <td width=25>[[image:DotPoint.JPG|link=]]</td> | ||
| − | <td>'''Asset Types''' | + | <td>'''Asset Types''' will list all the installed assets sorted by their '''Asset Type'''. These '''Types''' are built into '''Trainz''' and cannot be altered</td> |
</tr> | </tr> | ||
<tr valign="top"> | <tr valign="top"> | ||
| Line 351: | Line 360: | ||
<tr valign="top"> | <tr valign="top"> | ||
<td>[[image:PencilTips.PNG|link=]]</td> | <td>[[image:PencilTips.PNG|link=]]</td> | ||
| − | <td>The assets found by the Search Filter or in the Picklist can be narrowed down further by entering a text string in the '''Search''' box. For example typing '''house''' (UPPER/lower case is not important) will restrict the list to only showing those assets containing the text string "house" in their names or descriptions</td> | + | <td>The assets found by the Search Filter or in the Picklist can be narrowed down further by entering a text string in the '''Search''' box. For example typing '''house''' ('''UPPER/lower''' case is not important) will restrict the list to only showing those assets containing the text string "house" in their names or descriptions</td> |
</tr> | </tr> | ||
</table> | </table> | ||
| Line 477: | Line 486: | ||
<tr valign="top"> | <tr valign="top"> | ||
<td>[[image:DotPoint.JPG|10px|link=]]</td> | <td>[[image:DotPoint.JPG|10px|link=]]</td> | ||
| − | <td>selecting the built-in '''Search Filter''' | + | <td>selecting the built-in '''Search Filter''' named '''Faulty''' will list all installed assets that have a fault such as "missing dependencies". If no assets appear then, congratulations, you have no faulty assets😀<br> |
[[image:FilterSelected_S20.png|link=]]</td> | [[image:FilterSelected_S20.png|link=]]</td> | ||
<td rowspan=2> | <td rowspan=2> | ||
| Line 486: | Line 495: | ||
<tr valign="top"> | <tr valign="top"> | ||
<td>[[image:PencilTips.PNG|link=]]</td> | <td>[[image:PencilTips.PNG|link=]]</td> | ||
| − | <td>Picklists and Filters can be refined further by entering a text string in the '''Search''' box on the right of the '''Content Manager''' window. For example typing '''QLD''' (UPPER/lower case is not important) will restrict the selected Picklist or Filter to only showing those assets containing the text string "QLD" in their names<br> | + | <td>Picklists and Filters can be refined further by entering a text string in the '''Search''' box on the right of the '''Content Manager''' window. For example typing '''QLD''' ('''UPPER/lower''' case is not important) will restrict the selected Picklist or Filter to only showing those assets containing the text string "QLD" in their names<br> |
[[image:PickListSearch_CM.png|link=]]</td> | [[image:PickListSearch_CM.png|link=]]</td> | ||
</tr> | </tr> | ||
| Line 550: | Line 559: | ||
<tr valign="top"> | <tr valign="top"> | ||
<td width=10>[[image:BlueDot10x10.png|link=]]</td> | <td width=10>[[image:BlueDot10x10.png|link=]]</td> | ||
| − | <td>''' | + | <td>'''Search Filters''' created in '''Surveyor Classic''' can only be used in '''Surveyor Classic'''</td> |
</tr> | </tr> | ||
<tr valign="top"> | <tr valign="top"> | ||
| Line 564: | Line 573: | ||
<tr valign="top"> | <tr valign="top"> | ||
<td width=25>[[image:DotPoint1.JPG|link=]]</td> | <td width=25>[[image:DotPoint1.JPG|link=]]</td> | ||
| − | <td>from the '''Surveyor Classic''' screen press <span style="font-weight: 700; font-size: 15px;"><span style="color: white; background-color: black;"> Ctrl </span> + <span style="color: white; background-color: black;"> Shift </span> + <span style="color: white; background-color: black;"> F </span></span> to open the ''' | + | <td>from the '''Surveyor Classic''' screen press <span style="font-weight: 700; font-size: 15px;"><span style="color: white; background-color: black;"> Ctrl </span> + <span style="color: white; background-color: black;"> Shift </span> + <span style="color: white; background-color: black;"> F </span></span> to open the '''Search Filter''' |
<table> | <table> | ||
<tr valign="top"> | <tr valign="top"> | ||
| Line 588: | Line 597: | ||
<tr valign="top"> | <tr valign="top"> | ||
<td>[[image:DotPoint.JPG|10px|link=]]</td> | <td>[[image:DotPoint.JPG|10px|link=]]</td> | ||
| − | <td>using the ''' | + | <td>using the '''Search Filter''' (the <span style="font-weight: 700; font-size: 15px; color: white; background-color: black;"> + </span> button). The search results will be shown in the relevant individual '''Tool Flyouts''' - such as the <span style="font-weight: 700; font-size: 15px; color: white; background-color: black;"> F3 </span> '''Objects''' flyout or the <span style="font-weight: 700; font-size: 15px; color: white; background-color: black;"> F4 </span> '''Tracks''' flyouts. This type of search '''can''' be saved as a new filter</td> |
</tr> | </tr> | ||
<tr valign="top"> | <tr valign="top"> | ||
<td>[[image:DotPoint.JPG|10px|link=]]</td> | <td>[[image:DotPoint.JPG|10px|link=]]</td> | ||
| − | <td>creating and saving a '''Picklist'''. The Picklist contents will be shown in the bottom section of this ''' | + | <td>creating and saving a '''Picklist'''. The Picklist contents will be shown in the bottom section of this '''Search Filter''' window</td> |
</tr> | </tr> | ||
</table> | </table> | ||
| Line 625: | Line 634: | ||
<tr valign="top"> | <tr valign="top"> | ||
<td width=25>[[image:DotPoint1Blue.png|link=]]</td> | <td width=25>[[image:DotPoint1Blue.png|link=]]</td> | ||
| − | <td><span style="font-weight: 700; font-size: 15px; background-color: lightcyan;"> Left Click </span> in the text box near the top of the ''' | + | <td><span style="font-weight: 700; font-size: 15px; background-color: lightcyan;"> Left Click </span> in the text box near the top of the '''Search Filter'''</td> |
</tr> | </tr> | ||
<tr valign="top"> | <tr valign="top"> | ||
<td>[[image:DotPoint2Blue.png|link=]]</td> | <td>[[image:DotPoint2Blue.png|link=]]</td> | ||
| − | <td>type any text string (UPPER/lower case does matter)<br> | + | <td>type any text string ('''UPPER/lower''' case does matter)<br> |
[[image:TextSearchFilter_Surveyor.png|link=]]</td> | [[image:TextSearchFilter_Surveyor.png|link=]]</td> | ||
</tr> | </tr> | ||
| Line 660: | Line 669: | ||
<tr valign="top"> | <tr valign="top"> | ||
<td width=25>[[image:Bblue.png|link=]]</td> | <td width=25>[[image:Bblue.png|link=]]</td> | ||
| − | <td><span style="font-weight: 700; font-size: 15px;"> | + | <td><span style="font-weight: 700; font-size: 15px;">Search Filter:-</span> |
<table> | <table> | ||
<tr valign="top"> | <tr valign="top"> | ||
| Line 723: | Line 732: | ||
<tr valign="top"> | <tr valign="top"> | ||
<td width=10>[[image:DotPointBlueSquare.png|10px|link=]]</td> | <td width=10>[[image:DotPointBlueSquare.png|10px|link=]]</td> | ||
| − | <td colspan=2>the <span style="font-weight: 700; font-size: 15px; color: white; background-color: black;"> Save </span> button will save your filter. You will be asked to enter a name for the new ''' | + | <td colspan=2>the <span style="font-weight: 700; font-size: 15px; color: white; background-color: black;"> Save </span> button will save your filter. You will be asked to enter a name for the new '''Search Filter''' |
<table> | <table> | ||
<tr valign="top"> | <tr valign="top"> | ||
| Line 735: | Line 744: | ||
<tr valign="top"> | <tr valign="top"> | ||
<td width=25>[[image:NotePad.PNG|link=]]</td> | <td width=25>[[image:NotePad.PNG|link=]]</td> | ||
| − | <td>''' | + | <td>'''Search Filters''' saved in '''Surveyor Classic''' will only appear in '''Surveyor Classic'''. They will not be accessable in '''Content Manager''' or in '''Surveyor 2.0'''</td> |
</tr> | </tr> | ||
</table> | </table> | ||
| Line 898: | Line 907: | ||
<td>[[image:Stop.PNG|link=]]</td> | <td>[[image:Stop.PNG|link=]]</td> | ||
<td><span style="font-size: 15px; font-weight: 700;">WARNING:</span><br> | <td><span style="font-size: 15px; font-weight: 700;">WARNING:</span><br> | ||
| − | ''' | + | '''Search Filters''' created here in Surveyor 2.0 '''CANNOT''' be saved as separate filters.<br> |
| − | Use '''Content Manager''' to save ''' | + | Use '''Content Manager''' to save '''Search Filters''' in '''Surveyor 2.0''' - see [[image:PageLink.PNG|link=]] '''[[#skipCreatingFiltersCM|In Content Manager]]''' below for the details |
</td> | </td> | ||
</tr> | </tr> | ||
| Line 908: | Line 917: | ||
</table> | </table> | ||
<br> | <br> | ||
| − | <table width=1000> | + | <table width=1000 bgcolor=#000000> |
<tr valign="top"> | <tr valign="top"> | ||
| − | <td>< | + | <td> |
| + | <table width=996 bgcolor=#ffe89a cellpadding=2> | ||
| + | <tr valign="middle"> | ||
| + | <td width=45>[[image:PalettesIcon_S20.png|link=]]</td> | ||
| + | <td>The '''Filter Palette''' and the '''Assets Palette''' must be visible on the screen. If they are not then open the [[image:SurveyorWindowIcon.png|link=]] '''Window Menu''' at the top of the screen or refer to the '''Trainz Wiki Page [[image:WikiLink.PNG|link=]] [[How to Use S20 Palettes#skipHidingShowing|How to Use S20 Palettes]]'''</td> | ||
</tr> | </tr> | ||
</table> | </table> | ||
| − | + | </td> | |
| + | </tr> | ||
| + | </table> | ||
| + | <br> | ||
<table width=1000> | <table width=1000> | ||
<tr valign="top"> | <tr valign="top"> | ||
| − | <td | + | <td colspan=2><span style="font-weight: 700; font-size: 15px; color: white; background-color: black;"> Choose any combinations of the following 3 steps </span></td> |
| + | </tr> | ||
| + | <tr valign="top"> | ||
| + | <td colspan=2><span style="font-weight: 700; font-size: 15px;">Optional Step:</span> [[image:DotPoint1Blue.png|link=]]</td> | ||
| + | </tr> | ||
| + | <tr valign="top"> | ||
| + | <td width=25> </td> | ||
<td><span style="font-weight: 700; font-size: 15px; color: white; background-color: blue;"> Filter Actions: </span> At the top of the '''Filter Palette''' is a '''Filter Action''' drop-down menu that controls how the search filters are applied to your visible '''Trainz World''' | <td><span style="font-weight: 700; font-size: 15px; color: white; background-color: blue;"> Filter Actions: </span> At the top of the '''Filter Palette''' is a '''Filter Action''' drop-down menu that controls how the search filters are applied to your visible '''Trainz World''' | ||
| Line 994: | Line 1,016: | ||
<tr valign="top"> | <tr valign="top"> | ||
<td><span style="font-weight: 700; font-size: 15px; color: white; background-color: black;"> Filter List </span></td> | <td><span style="font-weight: 700; font-size: 15px; color: white; background-color: black;"> Filter List </span></td> | ||
| − | <td>this action is the default setting for the '''Filter Palette'''. It has no effect on the operation of the tools in the '''Tool Palette''' or on the objects displayed on the screen in your '''Trainz World'''. The filtered list of assets shown in the '''Filter Toggles''' and in the '''Assets Palette''' will be the result of the search | + | <td>this action is the default setting for the '''Filter Palette'''. It has no effect on the operation of the tools in the '''Tool Palette''' or on the objects displayed on the screen in your '''Trainz World'''. The filtered list of assets shown in the '''Filter Toggles''' and in the '''Assets Palette''' will be the result of the search performed by the '''Filter Selections''' and other settings.</td> |
</tr> | </tr> | ||
</table> | </table> | ||
| Line 1,035: | Line 1,057: | ||
<table width=1000> | <table width=1000> | ||
<tr valign="top"> | <tr valign="top"> | ||
| − | <td | + | <td colspan=2><span style="font-weight: 700; font-size: 15px;">Optional Step:</span> [[image:DotPoint2Blue.png|link=]]</td> |
| − | <td><span style="font-weight: 700; font-size: 15px; color: white; background-color: blue;"> Filter Selection: </span> | + | </tr> |
| + | <tr valign="top"> | ||
| + | <td width=25> </td> | ||
| + | <td><span style="font-weight: 700; font-size: 15px; color: white; background-color: blue;"> Filter Selection: </span> In the '''Filter Palette''' the row of '''Asset Icons''' and the '''Drop Down Menu''' below them identify the '''type''' of assets that will be shown in the filtered list | ||
<table bgcolor=#000000 cellpadding=2> | <table bgcolor=#000000 cellpadding=2> | ||
| Line 1,130: | Line 1,155: | ||
<table width=1000> | <table width=1000> | ||
<tr valign="top"> | <tr valign="top"> | ||
| − | <td | + | <td colspan=2><span style="font-weight: 700; font-size: 15px;">Optional Step:</span> [[image:DotPoint3Blue.png|link=]]</td> |
| + | </tr> | ||
| + | <tr valign="top"> | ||
| + | <td width=25> </td> | ||
<td><span style="font-weight: 700; font-size: 15px; color: white; background-color: blue;"> Text Selection: </span> In the '''Assets Palette''' the '''Search''' box allows you to enter a string of text characters that will be used to search the asset names and their descriptions for a match. Those assets that return a positive match, together with a positive asset type, if one has been set, will be shown in the filtered list | <td><span style="font-weight: 700; font-size: 15px; color: white; background-color: blue;"> Text Selection: </span> In the '''Assets Palette''' the '''Search''' box allows you to enter a string of text characters that will be used to search the asset names and their descriptions for a match. Those assets that return a positive match, together with a positive asset type, if one has been set, will be shown in the filtered list | ||
| Line 1,183: | Line 1,211: | ||
<tr valign="top"> | <tr valign="top"> | ||
<td>[[image:DotPoint2.JPG|link=]]</td> | <td>[[image:DotPoint2.JPG|link=]]</td> | ||
| − | <td>In the '''Assets Palette''' <span style="font-weight: 700; font-size: 15px; color: white; background-color: black;"> Search </span> box type the text <span style="font-weight: 700; font-size: 15px;">barn</span> (UPPER/lower case is not important) and press the <span style="font-weight: 700; font-size: 15px; color: white; background-color: black;"> Enter </span> key<br> | + | <td>In the '''Assets Palette''' <span style="font-weight: 700; font-size: 15px; color: white; background-color: black;"> Search </span> box type the text <span style="font-weight: 700; font-size: 15px;">barn</span> ('''UPPER/lower''' case is not important) and press the <span style="font-weight: 700; font-size: 15px; color: white; background-color: black;"> Enter </span> key<br> |
This will list all the '''Scenery Objects''' containing the text "barn" in their name or description</td> | This will list all the '''Scenery Objects''' containing the text "barn" in their name or description</td> | ||
</tr> | </tr> | ||
| Line 1,250: | Line 1,278: | ||
<td width=10>[[image:BlueDot10x10.png|link=]]</td> | <td width=10>[[image:BlueDot10x10.png|link=]]</td> | ||
<td>New Picklists are created in '''Surveyor 2.0''' by selecting an asset in the '''Assets Palette''' or by selecting an existing object in the route and using the '''Info Palette'''</td> | <td>New Picklists are created in '''Surveyor 2.0''' by selecting an asset in the '''Assets Palette''' or by selecting an existing object in the route and using the '''Info Palette'''</td> | ||
| + | </tr> | ||
| + | </table> | ||
| + | </td> | ||
| + | </tr> | ||
| + | </table> | ||
| + | <br> | ||
| + | <table width=1000 bgcolor=#000000> | ||
| + | <tr valign="top"> | ||
| + | <td> | ||
| + | <table width=996 bgcolor=#ffe89a cellpadding=2> | ||
| + | <tr valign="middle"> | ||
| + | <td width=45>[[image:PalettesIcon_S20.png|link=]]</td> | ||
| + | <td>The '''Filter Palette''', '''Assets Palette''' and '''Info Palette''' must be visible on the screen. If they are not then open the [[image:SurveyorWindowIcon.png|link=]] '''Window Menu''' at the top of the screen or refer to the '''Trainz Wiki Page [[image:WikiLink.PNG|link=]] [[How to Use S20 Palettes#skipHidingShowing|How to Use S20 Palettes]]'''</td> | ||
</tr> | </tr> | ||
</table> | </table> | ||
| Line 1,262: | Line 1,303: | ||
<tr valign="top"> | <tr valign="top"> | ||
<td width=25>[[image:DotPoint1.JPG|link=]]</td> | <td width=25>[[image:DotPoint1.JPG|link=]]</td> | ||
| − | <td> | + | <td>using the '''Filter Palette''' and the '''Assets Palette''' locate and select an asset that will be added to the new (yet to be created) Picklist. '''You cannot create an empty Picklist''' |
| − | + | ||
| − | + | ||
| − | + | ||
| − | + | ||
<table> | <table> | ||
<tr valign="top"> | <tr valign="top"> | ||
| Line 1,317: | Line 1,354: | ||
</tr> | </tr> | ||
</table> | </table> | ||
| − | ... and type the text '''barn''' (UPPER/lower case is not important) into the search text entry box. This will filter all the assets to only show those that are '''Scenery (non-spline) Objects''' and have the text "'''barn'''" in their names or descriptions. | + | ... and type the text '''barn''' ('''UPPER/lower''' case is not important) into the search text entry box. This will filter all the assets to only show those that are '''Scenery (non-spline) Objects''' and have the text "'''barn'''" in their names or descriptions. |
<br> | <br> | ||
<table bgcolor=#ffffb0 cellpadding=2> | <table bgcolor=#ffffb0 cellpadding=2> | ||
| Line 1,351: | Line 1,388: | ||
</tr> | </tr> | ||
</table> | </table> | ||
| + | |||
<table> | <table> | ||
<tr valign="top"> | <tr valign="top"> | ||
| Line 1,362: | Line 1,400: | ||
<tr valign="top"> | <tr valign="top"> | ||
<td width=10>[[image:DotPointBlueSquare.png|10px|link=]]</td> | <td width=10>[[image:DotPointBlueSquare.png|10px|link=]]</td> | ||
| − | <td | + | <td>To select multiple assets:-</td> |
| − | + | ||
| − | + | ||
| − | + | ||
</tr> | </tr> | ||
<tr valign="top"> | <tr valign="top"> | ||
| Line 1,372: | Line 1,407: | ||
<table> | <table> | ||
<tr valign="top"> | <tr valign="top"> | ||
| − | <td width=10>[[image: | + | <td width=10>[[image:BlueDot10x10.png|link=]]</td> |
<td><span style="font-weight: 700; font-size: 15px;"><span style="color: white; background-color: black;"> Shift </span> + <span style="color: black; background-color: lightcyan;"> Left Click </span></span> on the '''first''' and '''last''' in a sequence of multiple assets to be added. Then <span style="font-weight: 700; font-size: 15px; background-color: lightcyan;"> Right Click </span> on one of the selected assets, <span style="font-weight: 700; font-size: 15px;">OR</span></td> | <td><span style="font-weight: 700; font-size: 15px;"><span style="color: white; background-color: black;"> Shift </span> + <span style="color: black; background-color: lightcyan;"> Left Click </span></span> on the '''first''' and '''last''' in a sequence of multiple assets to be added. Then <span style="font-weight: 700; font-size: 15px; background-color: lightcyan;"> Right Click </span> on one of the selected assets, <span style="font-weight: 700; font-size: 15px;">OR</span></td> | ||
</tr> | </tr> | ||
<tr valign="top"> | <tr valign="top"> | ||
| − | <td>[[image: | + | <td>[[image:BlueDot10x10.png|10px|link=]]</td> |
<td><span style="font-weight: 700; font-size: 15px;"><span style="color: white; background-color: black;"> Ctrl </span> + <span style="color: black; background-color: lightcyan;"> Left Click </span></span> on any number of individual assets to be added. Then <span style="font-weight: 700; font-size: 15px; background-color: lightcyan;"> Right Click </span> on one of the selected assets</td> | <td><span style="font-weight: 700; font-size: 15px;"><span style="color: white; background-color: black;"> Ctrl </span> + <span style="color: black; background-color: lightcyan;"> Left Click </span></span> on any number of individual assets to be added. Then <span style="font-weight: 700; font-size: 15px; background-color: lightcyan;"> Right Click </span> on one of the selected assets</td> | ||
</tr> | </tr> | ||
| Line 1,549: | Line 1,584: | ||
<tr valign="top"> | <tr valign="top"> | ||
<td width=10>[[image:BlueDot10x10.png|link=]]</td> | <td width=10>[[image:BlueDot10x10.png|link=]]</td> | ||
| − | <td>''' | + | <td>'''Search Filters''' created here can be used in '''Surveyor 2.0''' asset searches</td> |
</tr> | </tr> | ||
</table> | </table> | ||
| Line 1,680: | Line 1,715: | ||
<tr valign="top"> | <tr valign="top"> | ||
<td>[[image:DotPoint5.JPG|link=]]</td> | <td>[[image:DotPoint5.JPG|link=]]</td> | ||
| − | <td>Save the new ''' | + | <td>Save the new '''Search Filter'''. <span style="font-weight: 700; font-size: 15px; background-color: lightcyan;"> Left Click </span> on the <span style="font-weight: 700; font-size: 15px;">Save</span> button above the filter lines, then:- |
<table> | <table> | ||
<tr valign="top"> | <tr valign="top"> | ||
| Line 1,756: | Line 1,791: | ||
<td>[[image:SearchLogic03_CM.png|link=]]</td> | <td>[[image:SearchLogic03_CM.png|link=]]</td> | ||
<td>Will search all assets to locate and display only those that meet the following requirements:- | <td>Will search all assets to locate and display only those that meet the following requirements:- | ||
| − | :[[image:BlueDot10x10.png|link=]] are in the Picklist named '''Animals''' <span style="font-weight: 700; font-size: 15px;">AND</span> | + | :[[image:BlueDot10x10.png|link=]] assets are in the Picklist named '''Animals''' <span style="font-weight: 700; font-size: 15px;">AND</span> |
| − | + | The <span style="font-weight: 700; font-size: 15px;">AND NOT</span> reverses the result of the next filter line, which, '''by itself''' would only include | |
| + | :[[image:BlueDot10x10.png|link=]] assets with a '''build version''' number of '''3.5''' or greater</td> | ||
</tr> | </tr> | ||
</table> | </table> | ||
| − | The | + | The result of filter [[image:DotPoint3Blue.png|link=]] is that only assets that are in the Picklist "Animals" and have a build version '''BELOW 3.5''' would be shown. Without the '''AND NOT''' filter line the result would be that only assets that are in the Picklist "Animals" and have a build version '''3.5 AND ABOVE''' would be shown.</td> |
| − | </td> | + | |
</tr> | </tr> | ||
</table> | </table> | ||
| Line 1,788: | Line 1,823: | ||
<tr valign="top"> | <tr valign="top"> | ||
<td width=10>[[image:BlueDot10x10.png|link=]]</td> | <td width=10>[[image:BlueDot10x10.png|link=]]</td> | ||
| − | <td>New Picklists are created in '''Content Manager''' by using a ''' | + | <td>New Picklists are created in '''Content Manager''' by using a '''Search Filter''' to display the assets that you want to add to the new Picklist</td> |
</tr> | </tr> | ||
</table> | </table> | ||
| Line 1,802: | Line 1,837: | ||
<tr valign="top"> | <tr valign="top"> | ||
<td>[[image:DotPoint2.JPG|link=]]</td> | <td>[[image:DotPoint2.JPG|link=]]</td> | ||
| − | <td>select an existing ''' | + | <td>select an existing '''Search Filter''' or '''Picklist''' or create a new one that will display at least some of the assets that you want to add to the Picklist. You can change your selected filter or Picklist at any time during the process</td> |
</tr> | </tr> | ||
<tr valign="top"> | <tr valign="top"> | ||
| Line 1,810: | Line 1,845: | ||
<tr valign="top"> | <tr valign="top"> | ||
<td width=10>[[image:DotPoint.JPG|10px|link=]]</td> | <td width=10>[[image:DotPoint.JPG|10px|link=]]</td> | ||
| − | <td><span style="font-weight: 700; font-size: 15px; color: black; background-color: lightcyan;"> Right Click </span> on the asset to be added to the Picklist, <span style="font-weight: 700; font-size: 15px;">OR</span> | + | <td><span style="font-weight: 700; font-size: 15px; color: black; background-color: lightcyan;"> Right Click </span> on the asset to be added to the Picklist, <span style="font-weight: 700; font-size: 15px;">OR</span></td> |
</tr> | </tr> | ||
<tr valign="top"> | <tr valign="top"> | ||
| − | <td | + | <td> </td> |
| + | <td>To select multiple assets:-</td> | ||
</tr> | </tr> | ||
<tr valign="top"> | <tr valign="top"> | ||
| Line 1,824: | Line 1,860: | ||
</tr> | </tr> | ||
<tr valign="top"> | <tr valign="top"> | ||
| − | <td colspan=2>A | + | <td colspan=2>A popout menu will appear.</td> |
</tr> | </tr> | ||
</table> | </table> | ||
| Line 1,830: | Line 1,866: | ||
</tr> | </tr> | ||
</table> | </table> | ||
| + | |||
<table width=1000> | <table width=1000> | ||
<tr valign="top"> | <tr valign="top"> | ||
| Line 1,907: | Line 1,944: | ||
<table> | <table> | ||
<tr valign="top"> | <tr valign="top"> | ||
| − | <td>from the '''Surveyor Classic''' screen press <span style="font-weight: 700; font-size: 15px;"><span style="color: white; background-color: black;"> Ctrl </span> + <span style="color: white; background-color: black;"> Shift </span> + <span style="color: white; background-color: black;"> F </span></span> to open the ''' | + | <td>from the '''Surveyor Classic''' screen press <span style="font-weight: 700; font-size: 15px;"><span style="color: white; background-color: black;"> Ctrl </span> + <span style="color: white; background-color: black;"> Shift </span> + <span style="color: white; background-color: black;"> F </span></span> to open the '''Search Filter''' |
<table> | <table> | ||
<tr valign="top"> | <tr valign="top"> | ||
| Line 1,916: | Line 1,953: | ||
<tr valign="top"> | <tr valign="top"> | ||
<td width=25>[[image:DotPoint2.JPG|link=]]</td> | <td width=25>[[image:DotPoint2.JPG|link=]]</td> | ||
| − | <td><span style="font-weight: 700; font-size: 15px; background-color: lightcyan;"> Left Click </span> on the '''Down Arrowhead''' icon to the right of the title ''' | + | <td><span style="font-weight: 700; font-size: 15px; background-color: lightcyan;"> Left Click </span> on the '''Down Arrowhead''' icon to the right of the title '''Search Filter''' at the top of the window to list all the filters |
<table> | <table> | ||
<tr valign="top"> | <tr valign="top"> | ||
| Line 1,928: | Line 1,965: | ||
<td><span style="font-size: 17px;">'''Notes:'''</span><br> | <td><span style="font-size: 17px;">'''Notes:'''</span><br> | ||
---- | ---- | ||
| − | The default (installed) ''' | + | The default (installed) '''Search Filters''' plus any that you have created and saved (for example '''Rail Workers''') will appear in the menu list</td> |
</tr> | </tr> | ||
</table> | </table> | ||
| Line 1,974: | Line 2,011: | ||
<table> | <table> | ||
<tr valign="top"> | <tr valign="top"> | ||
| − | <td>To <span style="font-weight: 700; font-size: 15px;">Edit</span> a filter <span style="font-weight: 700; font-size: 15px; background-color: lightcyan;"> Left Click </span> on its name in the popup menu list to load it into the ''' | + | <td>To <span style="font-weight: 700; font-size: 15px;">Edit</span> a filter <span style="font-weight: 700; font-size: 15px; background-color: lightcyan;"> Left Click </span> on its name in the popup menu list to load it into the '''Search Filter'''. You then have the options of:- |
<table bgcolor=#0000ff cellpadding=2> | <table bgcolor=#0000ff cellpadding=2> | ||
<tr valign="top"> | <tr valign="top"> | ||
| Line 2,031: | Line 2,068: | ||
<tr valign="top"> | <tr valign="top"> | ||
<td>[[image:DotPoint.JPG|10px|link=]]</td> | <td>[[image:DotPoint.JPG|10px|link=]]</td> | ||
| − | <td>''' | + | <td>'''Search Filters''' saved in '''Surveyor Classic''' will only appear in '''Surveyor Classic'''. They will not be accessable in '''Content Manager''' or in '''Surveyor 2.0'''</td> |
</tr> | </tr> | ||
<tr valign="top"> | <tr valign="top"> | ||
| Line 2,074: | Line 2,111: | ||
<tr valign="top"> | <tr valign="top"> | ||
<td width=25>[[image:DotPoint1.JPG|link=]]</td> | <td width=25>[[image:DotPoint1.JPG|link=]]</td> | ||
| − | <td>from the '''Surveyor Classic''' screen press <span style="font-weight: 700; font-size: 15px;"><span style="color: white; background-color: black;"> Ctrl </span> + <span style="color: white; background-color: black;"> Shift </span> + <span style="color: white; background-color: black;"> F </span></span> to open the ''' | + | <td>from the '''Surveyor Classic''' screen press <span style="font-weight: 700; font-size: 15px;"><span style="color: white; background-color: black;"> Ctrl </span> + <span style="color: white; background-color: black;"> Shift </span> + <span style="color: white; background-color: black;"> F </span></span> to open the '''Search Filter'''</td> |
</tr> | </tr> | ||
<tr valign="top"> | <tr valign="top"> | ||
| Line 2,104: | Line 2,141: | ||
<tr valign="top"> | <tr valign="top"> | ||
<td width=25>[[image:DotPoint4.JPG|link=]]</td> | <td width=25>[[image:DotPoint4.JPG|link=]]</td> | ||
| − | <td>To <span style="font-weight: 700; font-size: 15px;">Edit</span> a Picklist <span style="font-weight: 700; font-size: 15px; background-color: lightcyan;"> Left Click </span> on <span style="font-weight: 700; font-size: 15px; color: white; background-color: black;"> Change pick list > </span> in the '''first popup menu''' and on its name (for example <span style="font-weight: 700; font-size: 15px; color: white; background-color: black;"> Railroad Workers </span>) in the '''second popup menu''' to load it into the ''' | + | <td>To <span style="font-weight: 700; font-size: 15px;">Edit</span> a Picklist <span style="font-weight: 700; font-size: 15px; background-color: lightcyan;"> Left Click </span> on <span style="font-weight: 700; font-size: 15px; color: white; background-color: black;"> Change pick list > </span> in the '''first popup menu''' and on its name (for example <span style="font-weight: 700; font-size: 15px; color: white; background-color: black;"> Railroad Workers </span>) in the '''second popup menu''' to load it into the '''Search Filter''' window. |
<table bgcolor=#000000 cellpadding=2> | <table bgcolor=#000000 cellpadding=2> | ||
<tr valign="top"> | <tr valign="top"> | ||
| Line 2,229: | Line 2,266: | ||
<tr valign="top"> | <tr valign="top"> | ||
<td>[[image:BlueDot10x10.png|link=]]</td> | <td>[[image:BlueDot10x10.png|link=]]</td> | ||
| − | <td>All ''' | + | <td>All '''Search Filter''' and '''Picklist''' tasks use the '''Filter Palette''' and '''Assets Palette''' in '''Surveyor 2.0'''</td> |
</tr> | </tr> | ||
<tr valign="top"> | <tr valign="top"> | ||
<td>[[image:BlueDot10x10.png|link=]]</td> | <td>[[image:BlueDot10x10.png|link=]]</td> | ||
| − | <td>The ''' | + | <td>The '''Search Filters''' used in '''Surveyor 2.0''' are created using '''Content Manager'''</td> |
</tr> | </tr> | ||
</table> | </table> | ||
| − | + | <br> | |
| − | <table width=1000 cellpadding=2> | + | <table width=1000 bgcolor=#000000 cellpadding=2> |
<tr valign="top"> | <tr valign="top"> | ||
| − | <td colspan=2><span style="font-weight: 700; font-size: 15px;">Steps:</span> To | + | <td> |
| + | <table width=996 bgcolor=#ffe89a cellpadding=2> | ||
| + | <tr valign="middle"> | ||
| + | <td width=45>[[image:PalettesIcon_S20.png|link=]]</td> | ||
| + | <td>The '''Filter Palette''' and the '''Assets Palette''' must be visible on the screen. If they are not then open the [[image:SurveyorWindowIcon.png|link=]] '''Window Menu''' at the top of the screen or refer to the '''Trainz Wiki Page [[image:WikiLink.PNG|link=]] [[How to Use S20 Palettes#skipHidingShowing|How to Use S20 Palettes]]'''</td> | ||
| + | </tr> | ||
| + | </table> | ||
| + | </td> | ||
| + | </tr> | ||
| + | </table> | ||
| + | <br> | ||
| + | <table width=1000> | ||
| + | <tr valign="top"> | ||
| + | <td width=205>[[image:FilterPaletteOpenSelections_S20.png|link=]]</td> | ||
| + | <td> | ||
| + | <table> | ||
| + | <tr valign="top"> | ||
| + | <td colspan=2><span style="font-weight: 700; font-size: 15px;">Steps:</span> To access your '''Picklists''' and '''Search Filters'''</td> | ||
</tr> | </tr> | ||
<tr valign="top"> | <tr valign="top"> | ||
<td width=25>[[image:DotPoint1.JPG|link=]]</td> | <td width=25>[[image:DotPoint1.JPG|link=]]</td> | ||
| − | <td> | + | <td>In the '''Filter Palette''' <span style="font-weight: 700; font-size: 15px; background-color: lightcyan;"> Left Click </span> on the '''Asset Type''' data box (showing '''Ground Textures''' in the image on the left) or on the double arrowhead as shown on its right to open up its lists of filters.</td> |
</tr> | </tr> | ||
</table> | </table> | ||
| − | + | </td> | |
| + | </tr> | ||
| + | </table> | ||
| + | <br> | ||
<table width=1000> | <table width=1000> | ||
<tr valign="top"> | <tr valign="top"> | ||
| − | <td | + | <td>[[image:FilterListSurveyorColourCoded_S20.png|link=]]</td> |
| − | <td> | + | <td> |
| + | |||
<table> | <table> | ||
<tr valign="top"> | <tr valign="top"> | ||
| − | |||
| − | |||
<td> | <td> | ||
| − | + | ||
<table bgcolor=#000000 cellpadding=2> | <table bgcolor=#000000 cellpadding=2> | ||
<tr valign="top"> | <tr valign="top"> | ||
| Line 2,262: | Line 2,318: | ||
<table bgcolor=#ffffff cellpadding=2> | <table bgcolor=#ffffff cellpadding=2> | ||
<tr valign="top"> | <tr valign="top"> | ||
| − | <td>The list shows all the:- | + | <td>The drop down list shows all the:- |
<table> | <table> | ||
<tr valign="top"> | <tr valign="top"> | ||
<td width=25>[[image:DotPoint.JPG|link=]]</td> | <td width=25>[[image:DotPoint.JPG|link=]]</td> | ||
| − | <td>'''Asset Types''' | + | <td>'''Asset Types''' in the top section will list all the installed assets sorted by their '''Asset Type'''. These '''Types''' are built into '''Trainz''' and cannot be altered</td> |
</tr> | </tr> | ||
<tr valign="top"> | <tr valign="top"> | ||
<td>[[image:DotPointBlueSquare.png|link=]]</td> | <td>[[image:DotPointBlueSquare.png|link=]]</td> | ||
| − | <td>'''Search Filters''' both built in (such as | + | <td>'''Search Filters''' in the middle section will list all the '''Search Filters''', both built in (such as '''Faulty''' and '''Open for Editing''') and those that you have created and saved yourself</td> |
</tr> | </tr> | ||
<tr valign="top"> | <tr valign="top"> | ||
<td>[[image:DotPointGreenSquare.png|link=]]</td> | <td>[[image:DotPointGreenSquare.png|link=]]</td> | ||
| − | <td>'''Picklists''' both built in (the '''Default Picklist''') and | + | <td>'''Picklists''' in the lower section will list all the '''Picklist''', both built in (the '''Default Picklist''') and those that you have created and saved yourself</td> |
</tr> | </tr> | ||
</table> | </table> | ||
| Line 2,284: | Line 2,340: | ||
</table> | </table> | ||
<br> | <br> | ||
| − | |||
<table> | <table> | ||
<tr valign="top"> | <tr valign="top"> | ||
| − | <td | + | <td>At the bottom of the drop down list (you may have to scroll down to see it) is an option <span style="font-weight: 700; font-size: 15px; color: white; background-color: black;"> Edit Filters and Picklists... </span>. This option will allow you to select and edit a '''Picklist''' or '''Search Filter'''.</td> |
</tr> | </tr> | ||
| − | + | </table> | |
| − | + | ||
| − | + | ||
| − | + | ||
<br> | <br> | ||
| − | [[image: | + | <table cellpadding=2> |
| + | <tr valign="top"> | ||
| + | <td width=25>[[image:DotPoint2.JPG|link=]]</td> | ||
| + | <td><span style="font-weight: 700; font-size: 15px; background-color: lightcyan;"> Left Click </span> on the option <span style="font-weight: 700; font-size: 15px; color: white; background-color: black;"> Edit Filters and Picklists... </span>. This will open a new window that will list all the installed '''Picklists''' and '''Search Filters'''. | ||
| + | <table> | ||
| + | <tr valign="top"> | ||
| + | <td width=260>[[image:EditFilterPicklistWindow_S20.png|link=]]</td> | ||
| + | <td> | ||
| + | <table cellpadding=2> | ||
| + | <tr valign="top"> | ||
| + | <td width=25>[[image:DotPoint3.JPG|link=]]</td> | ||
| + | <td><span style="font-weight: 700; font-size: 15px; background-color: lightcyan;"> Right Click </span> on the column heading and select the options '''Insert Column''' and '''Filter TYpe'''<br> | ||
| + | [[image:EditFilterPicklistWindowAddColumn_S20.png|link=]]<br><br> | ||
| + | This will identify each list item as a '''Picklist''' or a '''Search Filter'''</td> | ||
</tr> | </tr> | ||
| + | </table> | ||
| + | </td> | ||
| + | </tr> | ||
| + | </table> | ||
| + | </td> | ||
| + | </tr> | ||
| + | </table> | ||
| + | </td> | ||
| + | </tr> | ||
| + | </table> | ||
| + | </td> | ||
| + | </tr> | ||
| + | </table> | ||
| + | <br> | ||
| + | <table width=1000> | ||
<tr valign="top"> | <tr valign="top"> | ||
| − | <td>[[image: | + | <td width=25>[[image:DotPoint4.JPG|link=]]</td> |
| − | <td><span style="font-weight: 700; font-size: 15px; background-color: lightcyan;"> Right Click </span> on a ''' | + | <td><span style="font-weight: 700; font-size: 15px; background-color: lightcyan;"> Right Click </span> on a '''Search Filter''' (or '''Picklist''')</td> |
</tr> | </tr> | ||
<tr valign="top"> | <tr valign="top"> | ||
| − | <td colspan=2>This will open a sub-menu. There will be one '''minor''' difference between the sub-menus for ''' | + | <td colspan=2>This will open a sub-menu. There will be one '''minor''' difference between the sub-menus for '''Search Filters''' and '''Picklists'''</td> |
</tr> | </tr> | ||
<tr valign="top"> | <tr valign="top"> | ||
| Line 2,313: | Line 2,393: | ||
<table bgcolor=#ffffff cellpadding=2> | <table bgcolor=#ffffff cellpadding=2> | ||
<tr valign="top"> | <tr valign="top"> | ||
| − | <td align="center">''' | + | <td align="center">'''Search Filter'''<br> |
[[image:FilterEditMenu02_S20.png|link=]]</td> | [[image:FilterEditMenu02_S20.png|link=]]</td> | ||
</tr> | </tr> | ||
| Line 2,335: | Line 2,415: | ||
</tr> | </tr> | ||
</table> | </table> | ||
| + | </td> | ||
| + | <td> | ||
| + | <table bgcolor=#000000 cellpadding=2> | ||
| + | <tr valign="top"> | ||
| + | <td> | ||
| + | <table bgcolor=#ffffb0 cellpadding=2> | ||
| + | <tr valign="top"> | ||
| + | <td width=25>[[image:NotePad.PNG|link=]]</td> | ||
| + | <td><span style="font-size: 17px;">'''Notes:'''</span><br> | ||
| + | ---- | ||
</td> | </td> | ||
</tr> | </tr> | ||
| − | </ | + | <tr valign="top"> |
| − | + | <td width=10>[[image:DotPoint.JPG|10px|link=]]</td> | |
| + | <td>'''Picklists''' can only be created and their contents edited by using the '''Surveyor 2.0 Assets Palette'''</td> | ||
| + | </tr> | ||
| + | <tr valign="top"> | ||
| + | <td>[[image:DotPoint.JPG|10px|link=]]</td> | ||
| + | <td>You can '''Rename''', '''Clone''' and '''Delete''' '''Picklists'''</td> | ||
</tr> | </tr> | ||
</table> | </table> | ||
| Line 2,345: | Line 2,440: | ||
</table> | </table> | ||
</td> | </td> | ||
| + | </tr> | ||
| + | </table> | ||
| + | The '''Edit''' option is greyed out for '''Picklists'''. The contents of '''Picklists''' cannot be edited by this method. See [[image:PageLink.PNG|link=]] '''[[#skipEditingPickListsS20-2|Editing Picklists]]''' below for the method used to edit their contents</td> | ||
</tr> | </tr> | ||
</table> | </table> | ||
| Line 2,360: | Line 2,458: | ||
<tr valign="top"> | <tr valign="top"> | ||
<td><span style="font-weight: 700; font-size: 15px; color: white; background-color: black;"> Add New Filter </span></td> | <td><span style="font-weight: 700; font-size: 15px; color: white; background-color: black;"> Add New Filter </span></td> | ||
| − | <td>will create a new ''' | + | <td>will create a new '''Search Filter''' (even if it was a '''Picklist''' that was selected)</td> |
</tr> | </tr> | ||
</table> | </table> | ||
| Line 2,366: | Line 2,464: | ||
<tr valign="top"> | <tr valign="top"> | ||
<td width=225><span style="font-weight: 700; font-size: 15px; color: white; background-color: black;"> List Assets in New Window </span></td> | <td width=225><span style="font-weight: 700; font-size: 15px; color: white; background-color: black;"> List Assets in New Window </span></td> | ||
| − | <td>will open a '''Content Manager''' window which will display the results of applying the ''' | + | <td>will open a '''Content Manager''' window which will display the results of applying the '''Search Filter''' or the contents of the '''Picklist'''</td> |
</tr> | </tr> | ||
</table> | </table> | ||
| Line 2,372: | Line 2,470: | ||
<tr valign="top"> | <tr valign="top"> | ||
<td><span style="font-weight: 700; font-size: 15px; color: white; background-color: black;"> Edit </span></td> | <td><span style="font-weight: 700; font-size: 15px; color: white; background-color: black;"> Edit </span></td> | ||
| − | <td>will open a '''Filter Editor''' in the window to allow the selected ''' | + | <td>will open a '''Filter Editor''' in the window to allow the selected '''Search Filter''' to be edited. See [[image:PageLink.PNG|link=]] '''[[#skipEditingFiltersS20-2|Editing Search Filters]]''' below for more details. <span style="background-color: #ffffb0;">This option cannot be selected for a '''Picklist'''</span></td> |
</tr> | </tr> | ||
</table> | </table> | ||
| Line 2,378: | Line 2,476: | ||
<tr valign="top"> | <tr valign="top"> | ||
<td><span style="font-weight: 700; font-size: 15px; color: white; background-color: black;"> Rename </span></td> | <td><span style="font-weight: 700; font-size: 15px; color: white; background-color: black;"> Rename </span></td> | ||
| − | <td>will rename the selected ''' | + | <td>will rename the selected '''Search Filter''' or '''Picklist'''. You will be asked to enter a new name</td> |
</tr> | </tr> | ||
</table> | </table> | ||
| Line 2,384: | Line 2,482: | ||
<tr valign="top"> | <tr valign="top"> | ||
<td><span style="font-weight: 700; font-size: 15px; color: white; background-color: black;"> Clone </span></td> | <td><span style="font-weight: 700; font-size: 15px; color: white; background-color: black;"> Clone </span></td> | ||
| − | <td>will create a copy of the selected ''' | + | <td>will create a copy of the selected '''Search Filter''' or '''Picklist'''. The copy will have the same name as the original but with the text "''' - Copy'''" added at the end</td> |
</tr> | </tr> | ||
</table> | </table> | ||
| Line 2,390: | Line 2,488: | ||
<tr valign="top"> | <tr valign="top"> | ||
<td><span style="font-weight: 700; font-size: 15px; color: white; background-color: black;"> Delete </span></td> | <td><span style="font-weight: 700; font-size: 15px; color: white; background-color: black;"> Delete </span></td> | ||
| − | <td>will delete the selected ''' | + | <td>will delete the selected '''Search Filter''' or '''Picklist'''. <span style="font-weight: 700; font-size: 15px"><span style="color: white; background-color: red;"> Warning: </span> You will NOT be asked to confirm the delete order</span></td> |
</tr> | </tr> | ||
</table> | </table> | ||
| Line 2,419: | Line 2,517: | ||
<table width=1000> | <table width=1000> | ||
<tr valign="top"> | <tr valign="top"> | ||
| − | <td colspan=2><span style="font-weight: 700; font-size: 15px;">Steps:</span> To edit the ''' | + | <td colspan=2><span style="font-weight: 700; font-size: 15px;">Steps:</span> To edit the '''Search Filter''' instructions:-<br> |
| − | Using the list of ''' | + | Using the list of '''Search Filters''' and '''Picklist''' from opening the <span style="font-weight: 700; font-size: 15px; color: white; background-color: black;"> Edit Filters and Picklists... </span> described above:-</td> |
</tr> | </tr> | ||
<tr valign="top"> | <tr valign="top"> | ||
<td width=25>[[image:DotPoint1.JPG|link=]]</td> | <td width=25>[[image:DotPoint1.JPG|link=]]</td> | ||
| − | <td><span style="font-weight: 700; font-size: 15px; background-color: lightcyan;"> Right Click </span> on a ''' | + | <td><span style="font-weight: 700; font-size: 15px; background-color: lightcyan;"> Right Click </span> on a '''Search Filter'''</td> |
</tr> | </tr> | ||
<tr valign="top"> | <tr valign="top"> | ||
| Line 2,431: | Line 2,529: | ||
</tr> | </tr> | ||
<tr valign="top"> | <tr valign="top"> | ||
| − | <td colspan=2>This will display '''Data Fields''' and '''Data Values''' for the the selected ''' | + | <td colspan=2>This will display '''Data Fields''' and '''Data Values''' for the the selected '''Search Filter''' |
<table> | <table> | ||
<tr valign="top"> | <tr valign="top"> | ||
| Line 2,530: | Line 2,628: | ||
</table> <!-- END Nav Buttons Table --> | </table> <!-- END Nav Buttons Table --> | ||
| − | <table width=1000 | + | <table width=1000 bgcolor=#000000> |
| − | + | ||
| − | + | ||
| − | + | ||
<tr valign="top"> | <tr valign="top"> | ||
<td> | <td> | ||
| − | <table bgcolor=# | + | <table width=996 bgcolor=#ffe89a cellpadding=2> |
| − | <tr valign=" | + | <tr valign="middle"> |
| − | <td width= | + | <td width=45>[[image:PalettesIcon_S20.png|link=]]</td> |
| − | <td> | + | <td>The '''Filter Palette''', '''Assets Palette''' and '''Info Palette''' must be visible on the screen. If they are not then open the [[image:SurveyorWindowIcon.png|link=]] '''Window Menu''' at the top of the screen or refer to the '''Trainz Wiki Page [[image:WikiLink.PNG|link=]] [[How to Use S20 Palettes#skipHidingShowing|How to Use S20 Palettes]]'''</td> |
| − | + | ||
| − | + | ||
| − | </td> | + | |
</tr> | </tr> | ||
</table> | </table> | ||
| Line 2,548: | Line 2,640: | ||
</tr> | </tr> | ||
</table> | </table> | ||
| + | <br> | ||
<br> | <br> | ||
<table width=1000 bgcolor=#000000 cellpadding=2> | <table width=1000 bgcolor=#000000 cellpadding=2> | ||
| Line 2,570: | Line 2,663: | ||
<tr valign="top"> | <tr valign="top"> | ||
<td width=25>[[image:DotPoint1.JPG|link=]]</td> | <td width=25>[[image:DotPoint1.JPG|link=]]</td> | ||
| − | |||
| − | |||
| − | |||
| − | |||
<td>select an asset or object that will be added to the Picklist by using one of two methods below:- | <td>select an asset or object that will be added to the Picklist by using one of two methods below:- | ||
| + | |||
<table bgcolor=#0000ff cellpadding=2> | <table bgcolor=#0000ff cellpadding=2> | ||
<tr valign="top"> | <tr valign="top"> | ||
| Line 2,585: | Line 2,675: | ||
<tr valign="top"> | <tr valign="top"> | ||
<td colspan=2> | <td colspan=2> | ||
| + | |||
<table> | <table> | ||
<tr valign="top"> | <tr valign="top"> | ||
<td colspan=2><span style="font-weight: 700; font-size: 15px;">Steps:</span> To add an asset from the '''Assets Palette''' to a Picklist:- | <td colspan=2><span style="font-weight: 700; font-size: 15px;">Steps:</span> To add an asset from the '''Assets Palette''' to a Picklist:- | ||
| + | |||
<table bgcolor=#ffffb0 cellpadding=2> | <table bgcolor=#ffffb0 cellpadding=2> | ||
<tr valign="top"> | <tr valign="top"> | ||
| Line 2,598: | Line 2,690: | ||
<tr valign="top"> | <tr valign="top"> | ||
<td colspan=2> | <td colspan=2> | ||
| + | |||
<table> | <table> | ||
<tr valign="top"> | <tr valign="top"> | ||
<td colspan=2> | <td colspan=2> | ||
| + | |||
<table> | <table> | ||
<tr valign="top"> | <tr valign="top"> | ||
<td width=25>[[image:DotPoint1Blue.png|link=]]</td> | <td width=25>[[image:DotPoint1Blue.png|link=]]</td> | ||
| − | <td>Find the asset in the '''Asset Palette''' list of assets - you can use the ''' | + | <td>Find the asset in the '''Asset Palette''' list of assets - you can use the '''Search Filters''' or another '''Picklist''' to help narrow the search. |
| + | |||
<table> | <table> | ||
<tr valign="top"> | <tr valign="top"> | ||
| − | <td width=200>[[image: | + | <td width=200>[[image:FilterSelectDairyBarn_S20.png|link=]]</td> |
<td> | <td> | ||
| + | |||
<table> | <table> | ||
<tr valign="top"> | <tr valign="top"> | ||
| − | <td>'''For example:''' To display all scenery objects that have the text '''barn''' in their names or descriptions, select one or both of:- | + | <td>'''For example:''' To display all scenery objects that have the text '''dairy barn''' in their names or descriptions, select one or both of:- |
| + | |||
<table> | <table> | ||
<tr valign="top"> | <tr valign="top"> | ||
<td>[[image:DotPointBlueSquare.png|10px|link=]]</td> | <td>[[image:DotPointBlueSquare.png|10px|link=]]</td> | ||
<td>'''Scenery Object Type:-''' | <td>'''Scenery Object Type:-''' | ||
| + | |||
<table> | <table> | ||
<tr valign="top"> | <tr valign="top"> | ||
| Line 2,636: | Line 2,734: | ||
<tr valign="top"> | <tr valign="top"> | ||
<td> | <td> | ||
| + | |||
<table> | <table> | ||
<tr valign="top"> | <tr valign="top"> | ||
<td>[[image:DotPointBlueSquare.png|10px|link=]]</td> | <td>[[image:DotPointBlueSquare.png|10px|link=]]</td> | ||
| − | <td>type a text string (e.g. '''barn''') (UPPER/lower case is not important) into the search text entry box.</td> | + | <td>type a text string (e.g. '''dairy barn''') ('''UPPER/lower case''' is not important) into the search text entry box.</td> |
</tr> | </tr> | ||
</table> | </table> | ||
| Line 2,645: | Line 2,744: | ||
</tr> | </tr> | ||
</table> | </table> | ||
| − | < | + | </td> |
| + | </tr> | ||
| + | </table> | ||
| + | |||
<table> | <table> | ||
<tr valign="top"> | <tr valign="top"> | ||
<td>[[image:DotPoint2Blue.png|link=]]</td> | <td>[[image:DotPoint2Blue.png|link=]]</td> | ||
<td>From the displayed list of assets:- | <td>From the displayed list of assets:- | ||
| + | |||
<table> | <table> | ||
<tr valign="top"> | <tr valign="top"> | ||
<td width=10>[[image:DotPointBlueSquare.png|10px|link=]]</td> | <td width=10>[[image:DotPointBlueSquare.png|10px|link=]]</td> | ||
| − | <td><span style="font-weight: 700; font-size: 15px; color: black; background-color: lightcyan;"> Right Click </span> on the asset to be added to the Picklist, <span style="font-weight: 700; font-size: 15px;">OR</span> | + | <td><span style="font-weight: 700; font-size: 15px; color: black; background-color: lightcyan;"> Right Click </span> on the asset to be added to the Picklist, <span style="font-weight: 700; font-size: 15px;">OR</span></td> |
</tr> | </tr> | ||
<tr valign="top"> | <tr valign="top"> | ||
| − | <td | + | <td> </td> |
| + | <td>To select multiple assets:-</td> | ||
</tr> | </tr> | ||
<tr valign="top"> | <tr valign="top"> | ||
<td> </td> | <td> </td> | ||
<td> | <td> | ||
| + | |||
<table> | <table> | ||
<tr valign="top"> | <tr valign="top"> | ||
| Line 2,720: | Line 2,825: | ||
<td width=25>[[image:NotePad.PNG|link=]]</td> | <td width=25>[[image:NotePad.PNG|link=]]</td> | ||
<td>There is no need to save your edits. The picklist will be automatically updated after each change</td> | <td>There is no need to save your edits. The picklist will be automatically updated after each change</td> | ||
| − | |||
| − | |||
| − | |||
</tr> | </tr> | ||
</table> | </table> | ||
| Line 2,806: | Line 2,908: | ||
</table> | </table> | ||
</td> | </td> | ||
| − | |||
| − | |||
| − | |||
| − | |||
| − | |||
| − | |||
| − | |||
| − | |||
</tr> | </tr> | ||
</table> | </table> | ||
| Line 2,822: | Line 2,916: | ||
</tr> | </tr> | ||
</table> | </table> | ||
| − | </td> | + | <br> |
| + | <table bgcolor=#ffffb0 cellpadding=2> | ||
| + | <tr valign="top"> | ||
| + | <td width=25>[[image:NotePad.PNG|link=]]</td> | ||
| + | <td>There is no need to save your edits. The picklist will be automatically updated after each change</td> | ||
</tr> | </tr> | ||
</table> | </table> | ||
| Line 2,846: | Line 2,944: | ||
</tr> | </tr> | ||
</table> | </table> | ||
| − | + | <br> | |
| + | <table width=1000 bgcolor=#000000> | ||
| + | <tr valign="top"> | ||
| + | <td> | ||
| + | <table width=996 bgcolor=#ffe89a cellpadding=2> | ||
| + | <tr valign="middle"> | ||
| + | <td width=45>[[image:PalettesIcon_S20.png|link=]]</td> | ||
| + | <td>The '''Filter Palette''' and the '''Assets Palette''' must be visible on the screen. If they are not then open the [[image:SurveyorWindowIcon.png|link=]] '''Window Menu''' at the top of the screen or refer to the '''Trainz Wiki Page [[image:WikiLink.PNG|link=]] [[How to Use S20 Palettes#skipHidingShowing|How to Use S20 Palettes]]'''</td> | ||
| + | </tr> | ||
| + | </table> | ||
| + | </td> | ||
| + | </tr> | ||
| + | </table> | ||
| + | <br> | ||
<table width=1000> | <table width=1000> | ||
<tr valign="top"> | <tr valign="top"> | ||
| − | <td colspan=2><span style="font-weight: 700; font-size: 15px;">Steps:</span></td> | + | <td colspan=2><span style="font-weight: 700; font-size: 15px;">Steps:</span> To remove an asset from a '''Picklist''' (see '''Known Issue''' on the right):-</td> |
</tr> | </tr> | ||
<tr valign="top"> | <tr valign="top"> | ||
| Line 2,859: | Line 2,970: | ||
<tr valign="top"> | <tr valign="top"> | ||
<td width=25>[[image:DotPoint1.JPG|link=]]</td> | <td width=25>[[image:DotPoint1.JPG|link=]]</td> | ||
| − | <td> | + | <td>In the '''Filter Palette''' select the '''Picklist''' to be edited</td> |
</tr> | </tr> | ||
<tr valign="top"> | <tr valign="top"> | ||
<td>[[image:DotPoint2.JPG|link=]]</td> | <td>[[image:DotPoint2.JPG|link=]]</td> | ||
| − | <td>In the ''' | + | <td>In the '''Assets Palette''' <span style="font-weight: 700; font-size: 15px; background-color: lightcyan;"> Right Click </span> on the asset to be removed, <span style="font-weight: 700; font-size: 15px;">OR</span> |
| + | <table> | ||
| + | <tr valign="top"> | ||
| + | <td>To select multiple assets:- | ||
| + | <table> | ||
| + | <tr valign="top"> | ||
| + | <td width=10>[[image:DotPoint.JPG|10px|link=]]</td> | ||
| + | <td><span style="font-weight: 700; font-size: 15px;"><span style="color: white; background-color: black;"> Shift </span> + <span style="color: black; background-color: lightcyan;"> Left Click </span></span> on the '''first''' and '''last''' in a sequence of multiple assets to be removed. Then <span style="font-weight: 700; font-size: 15px; background-color: lightcyan;"> Right Click </span> on one of the selected assets, <span style="font-weight: 700; font-size: 15px;">OR</span></td> | ||
</tr> | </tr> | ||
<tr valign="top"> | <tr valign="top"> | ||
| − | <td>[[image: | + | <td>[[image:DotPoint.JPG|10px|link=]]</td> |
| − | <td> | + | <td><span style="font-weight: 700; font-size: 15px;"><span style="color: white; background-color: black;"> Ctrl </span> + <span style="color: black; background-color: lightcyan;"> Left Click </span></span> on any number of individual assets to be removed.</td> |
| + | </tr> | ||
| + | </table> | ||
| + | </td> | ||
| + | </tr> | ||
| + | </table> | ||
| + | </td> | ||
</tr> | </tr> | ||
</table> | </table> | ||
| Line 2,879: | Line 3,003: | ||
<td>[[image:Bug.png|link=]]</td> | <td>[[image:Bug.png|link=]]</td> | ||
<td><span style="font-size: 15px; font-weight: 700;">Known Issue:'''</span><br> | <td><span style="font-size: 15px; font-weight: 700;">Known Issue:'''</span><br> | ||
| − | A bug has been reported that prevents this method from removing assets from a Picklist.< | + | A bug has been reported that prevents this method from removing assets from a Picklist.</td> |
| − | '''Workarounds:''' Two alternative solutions are available:- | + | </tr> |
| + | <tr valign="top"> | ||
| + | <td colspan=2>'''Workarounds:''' Two alternative solutions are available:- | ||
# Use the method described in [[image:PageLink.PNG|link=]] '''[[#skipEditingPickListsCM-2|Editing Picklists in Content Manager]]''' below to remove assets from a Picklist | # Use the method described in [[image:PageLink.PNG|link=]] '''[[#skipEditingPickListsCM-2|Editing Picklists in Content Manager]]''' below to remove assets from a Picklist | ||
# Open the '''Filter Palette Toggle''' control, <span style="font-weight: 700; font-size: 15px; background-color: lightcyan;"> Right Click </span> on the asset in the toggled list and select <span style="font-weight: 700; font-size: 15px; color: white; background-color: black;"> Remove from Picklist </span></td> | # Open the '''Filter Palette Toggle''' control, <span style="font-weight: 700; font-size: 15px; background-color: lightcyan;"> Right Click </span> on the asset in the toggled list and select <span style="font-weight: 700; font-size: 15px; color: white; background-color: black;"> Remove from Picklist </span></td> | ||
| Line 2,886: | Line 3,012: | ||
</table> | </table> | ||
</td> | </td> | ||
| − | |||
| − | |||
| − | |||
| − | |||
| − | |||
| − | |||
| − | |||
| − | |||
| − | |||
| − | |||
| − | |||
| − | |||
| − | |||
| − | |||
| − | |||
| − | |||
| − | |||
| − | |||
| − | |||
| − | |||
| − | |||
</tr> | </tr> | ||
</table> | </table> | ||
| Line 2,918: | Line 3,023: | ||
<table width=1000> | <table width=1000> | ||
<tr valign="top"> | <tr valign="top"> | ||
| − | <td width=25>[[image:DotPoint4.JPG|link=]]</td> | + | <td width=25>[[image:DotPoint3.JPG|link=]]</td> |
| + | <td>Then <span style="font-weight: 700; font-size: 15px; background-color: lightcyan;"> Right Click </span> on one of the selected assets. A popout menu will appear</td> | ||
| + | </tr> | ||
| + | <tr valign="top"> | ||
| + | <td>[[image:DotPoint4.JPG|link=]]</td> | ||
<td>from the popout menu <span style="font-weight: 700; font-size: 15px; background-color: lightcyan;"> Left Click </span> the option <span style="font-weight: 700; font-size: 15px; color: white; background-color: black;"> Remove from Picklist </span>. The asset will disappear from the '''Picklist''' | <td>from the popout menu <span style="font-weight: 700; font-size: 15px; background-color: lightcyan;"> Left Click </span> the option <span style="font-weight: 700; font-size: 15px; color: white; background-color: black;"> Remove from Picklist </span>. The asset will disappear from the '''Picklist''' | ||
<table> | <table> | ||
| Line 2,976: | Line 3,085: | ||
<table width=1000> | <table width=1000> | ||
<tr valign="top"> | <tr valign="top"> | ||
| − | <td colspan=2><span style="font-weight: 700; font-size: 15px;">Steps:</span> To edit | + | <td colspan=2><span style="font-weight: 700; font-size: 15px;">Steps:</span> To edit Search Filters and Picklists in '''Content Manager''':-</td> |
</tr> | </tr> | ||
<tr valign="top"> | <tr valign="top"> | ||
| Line 2,992: | Line 3,101: | ||
<tr valign="top"> | <tr valign="top"> | ||
<td>[[image:DotPoint3.JPG|link=]]</td> | <td>[[image:DotPoint3.JPG|link=]]</td> | ||
| − | <td>From the displayed list of ''' | + | <td>From the displayed list of '''Search Filters''' and '''Picklists''', scroll down to the bottom and <span style="font-weight: 700; font-size: 15px; background-color: lightcyan;"> Left Click </span> on the <span style="font-weight: 700; font-size: 15px; color: white; background-color: black;"> Edit Filters and Picklists... </span> option<br> |
| − | This will open a window listing all the ''' | + | This will open a window listing all the '''Search Filters''' and '''Picklists''' |
<br> | <br> | ||
[[image:FilterEdit04_CM.png|link=]]</td> | [[image:FilterEdit04_CM.png|link=]]</td> | ||
| Line 3,008: | Line 3,117: | ||
<tr valign="top"> | <tr valign="top"> | ||
<td width=25>[[image:DotPoint4.JPG|link=]]</td> | <td width=25>[[image:DotPoint4.JPG|link=]]</td> | ||
| − | <td><span style="font-weight: 700; font-size: 15px; background-color: lightcyan;"> Right Click </span> on a ''' | + | <td><span style="font-weight: 700; font-size: 15px; background-color: lightcyan;"> Right Click </span> on a '''Search Filter''' or '''Picklist'''</td> |
</tr> | </tr> | ||
<tr valign="top"> | <tr valign="top"> | ||
| − | <td colspan=2>This will open a sub-menu. There will be one '''minor''' difference between the sub-menus for ''' | + | <td colspan=2>This will open a sub-menu. There will be one '''minor''' difference between the sub-menus for '''Search Filters''' and '''Picklists'''</td> |
</tr> | </tr> | ||
<tr valign="top"> | <tr valign="top"> | ||
| Line 3,023: | Line 3,132: | ||
<table bgcolor=#ffffff cellpadding=2> | <table bgcolor=#ffffff cellpadding=2> | ||
<tr valign="top"> | <tr valign="top"> | ||
| − | <td align="center">''' | + | <td align="center">'''Search Filter'''<br> |
[[image:FilterEditMenu02_S20.png|link=]]</td> | [[image:FilterEditMenu02_S20.png|link=]]</td> | ||
</tr> | </tr> | ||
| Line 3,064: | Line 3,173: | ||
<tr valign="top"> | <tr valign="top"> | ||
<td><span style="font-weight: 700; font-size: 15px; color: white; background-color: black;"> Add New Filter </span></td> | <td><span style="font-weight: 700; font-size: 15px; color: white; background-color: black;"> Add New Filter </span></td> | ||
| − | <td>will create a new ''' | + | <td>will create a new '''Search Filter''' (even if it was a '''Picklist''' that was selected)</td> |
</tr> | </tr> | ||
</table> | </table> | ||
| Line 3,070: | Line 3,179: | ||
<tr valign="top"> | <tr valign="top"> | ||
<td width=225><span style="font-weight: 700; font-size: 15px; color: white; background-color: black;"> List Assets in New Window </span></td> | <td width=225><span style="font-weight: 700; font-size: 15px; color: white; background-color: black;"> List Assets in New Window </span></td> | ||
| − | <td>will open a new '''Content Manager''' window which will display the results of applying the ''' | + | <td>will open a new '''Content Manager''' window which will display the results of applying the '''Search Filter''' or the contents of the '''Picklist'''</td> |
</tr> | </tr> | ||
</table> | </table> | ||
| Line 3,076: | Line 3,185: | ||
<tr valign="top"> | <tr valign="top"> | ||
<td><span style="font-weight: 700; font-size: 15px; color: white; background-color: black;"> Edit </span></td> | <td><span style="font-weight: 700; font-size: 15px; color: white; background-color: black;"> Edit </span></td> | ||
| − | <td>will open a '''Filter Editor''' in the window to allow the selected ''' | + | <td>will open a '''Filter Editor''' in the window to allow the selected '''Search Filter''' to be edited. See [[image:PageLink.PNG|link=]] '''[[#skipEditingFiltersCM-2|Editing Search Filters]]''' below for more details. <span style="background-color: #ffffb0;">This option cannot be selected for a '''Picklist'''</span></td> |
</tr> | </tr> | ||
</table> | </table> | ||
| Line 3,082: | Line 3,191: | ||
<tr valign="top"> | <tr valign="top"> | ||
<td><span style="font-weight: 700; font-size: 15px; color: white; background-color: black;"> Rename </span></td> | <td><span style="font-weight: 700; font-size: 15px; color: white; background-color: black;"> Rename </span></td> | ||
| − | <td>will rename the selected ''' | + | <td>will rename the selected '''Search Filter''' or '''Picklist'''. You will be asked to enter a new name</td> |
</tr> | </tr> | ||
</table> | </table> | ||
| Line 3,088: | Line 3,197: | ||
<tr valign="top"> | <tr valign="top"> | ||
<td><span style="font-weight: 700; font-size: 15px; color: white; background-color: black;"> Clone </span></td> | <td><span style="font-weight: 700; font-size: 15px; color: white; background-color: black;"> Clone </span></td> | ||
| − | <td>will create a copy of the selected ''' | + | <td>will create a copy of the selected '''Search Filter''' or '''Picklist'''. The copy will have the same name as the original but with the text "''' - Copy'''" added at the end</td> |
</tr> | </tr> | ||
</table> | </table> | ||
| Line 3,094: | Line 3,203: | ||
<tr valign="top"> | <tr valign="top"> | ||
<td><span style="font-weight: 700; font-size: 15px; color: white; background-color: black;"> Delete </span></td> | <td><span style="font-weight: 700; font-size: 15px; color: white; background-color: black;"> Delete </span></td> | ||
| − | <td>will delete the selected ''' | + | <td>will delete the selected '''Search Filter''' or '''Picklist'''. <span style="font-weight: 700; font-size: 15px"><span style="color: white; background-color: red;"> Warning: </span> You will NOT be asked to confirm the delete order</span></td> |
</tr> | </tr> | ||
</table> | </table> | ||
| Line 3,123: | Line 3,232: | ||
<table width=1000> | <table width=1000> | ||
<tr valign="top"> | <tr valign="top"> | ||
| − | <td colspan=2><span style="font-weight: 700; font-size: 15px;">Steps:</span> To edit the ''' | + | <td colspan=2><span style="font-weight: 700; font-size: 15px;">Steps:</span> To edit the '''Search Filter''' instructions:-<br> |
| − | Using the list of ''' | + | Using the list of '''Search Filters''' and '''Picklist''' from opening the <span style="font-weight: 700; font-size: 15px; color: white; background-color: black;"> Edit Filters and Picklists... </span> described above:-</td> |
</tr> | </tr> | ||
<tr valign="top"> | <tr valign="top"> | ||
<td width=25>[[image:DotPoint1.JPG|link=]]</td> | <td width=25>[[image:DotPoint1.JPG|link=]]</td> | ||
| − | <td><span style="font-weight: 700; font-size: 15px; background-color: lightcyan;"> Right Click </span> on a ''' | + | <td><span style="font-weight: 700; font-size: 15px; background-color: lightcyan;"> Right Click </span> on a '''Search Filter'''</td> |
</tr> | </tr> | ||
<tr valign="top"> | <tr valign="top"> | ||
| Line 3,135: | Line 3,244: | ||
</tr> | </tr> | ||
<tr valign="top"> | <tr valign="top"> | ||
| − | <td colspan=2>This will display '''Data Fields''' and '''Data Values''' for the the selected ''' | + | <td colspan=2>This will display '''Data Fields''' and '''Data Values''' for the the selected '''Search Filter''' |
<table> | <table> | ||
<tr valign="top"> | <tr valign="top"> | ||
| Line 3,256: | Line 3,365: | ||
<tr valign="top"> | <tr valign="top"> | ||
<td>[[image:DotPoint2.JPG|link=]]</td> | <td>[[image:DotPoint2.JPG|link=]]</td> | ||
| − | <td>you can optionally use a ''' | + | <td>you can optionally use a '''Search Filter''' to narrow down the list of displayed assets to make the selection of new assets easier. <span style="font-weight: 700; font-size: 15px; background-color: lightcyan;"> Left Click </span> on the <span style="font-weight: 700; font-size: 15px; color: white; background-color: black;"> Filter </span> boz and select a suitable '''Search Filter''' or construct a '''Custom''' filter manually. You can change the filter at any time during the process. For example:- |
<table> | <table> | ||
<tr valign="top"> | <tr valign="top"> | ||
| Line 3,264: | Line 3,373: | ||
<tr valign="top"> | <tr valign="top"> | ||
<td width=25>[[image:DotPoint3.JPG|link=]]</td> | <td width=25>[[image:DotPoint3.JPG|link=]]</td> | ||
| − | <td><span style="font-weight: 700; font-size: 15px; color: black; background-color: lightcyan;"> Right Click </span> on the asset to be added to the Picklist, <span style="font-weight: 700; font-size: 15px;">OR</span> | + | <td><span style="font-weight: 700; font-size: 15px; color: black; background-color: lightcyan;"> Right Click </span> on the asset to be added to the Picklist, <span style="font-weight: 700; font-size: 15px;">OR</span></td> |
| − | To select multiple assets:- | + | </tr> |
| + | <tr valign="top"> | ||
| + | <td> </td> | ||
| + | <td>To select multiple assets:-</td> | ||
| + | </tr> | ||
| + | <tr valign="top"> | ||
| + | <td> </td> | ||
| + | <td> | ||
<table> | <table> | ||
<tr valign="top"> | <tr valign="top"> | ||
| Line 3,336: | Line 3,452: | ||
<tr valign="top"> | <tr valign="top"> | ||
<td>[[image:DotPoint3.JPG|link=]]</td> | <td>[[image:DotPoint3.JPG|link=]]</td> | ||
| − | <td><span style="font-weight: 700; font-size: 15px; background-color: lightcyan;"> Right Click </span> on the asset to be removed, <span style="font-weight: 700; font-size: 15px;">OR</span> | + | <td><span style="font-weight: 700; font-size: 15px; background-color: lightcyan;"> Right Click </span> on the asset to be removed, <span style="font-weight: 700; font-size: 15px;">OR</span></td> |
| − | To select multiple assets:- | + | </tr> |
| + | <tr valign="top"> | ||
| + | <td> </td> | ||
| + | <td>To select multiple assets:-</td> | ||
| + | </tr> | ||
| + | <tr valign="top"> | ||
| + | <td> </td> | ||
| + | <td> | ||
<table> | <table> | ||
<tr valign="top"> | <tr valign="top"> | ||
| Line 3,348: | Line 3,471: | ||
</tr> | </tr> | ||
<tr valign="top"> | <tr valign="top"> | ||
| − | <td colspan=2>A | + | <td colspan=2>A popout menu will appear |
<table> | <table> | ||
<tr valign="top"> | <tr valign="top"> | ||
Latest revision as of 10:06, 19 August 2024
The information in this Wiki Page applies to Trainz Plus and TRS22. It describes how to use, create and edit Search Filters and Picklists.
|
|

[edit] Using Existing Search Filters and Picklists |
[edit] In Surveyor Classic |
| Surveyor Classic, sometimes referred to as Surveyor 1.0, is supplied in all versions of Trainz |
| Steps: To use existing filters and Picklists in Surveyor Classic:- | |||||||||||||||||||||||||||||||||||||||||||
from the Surveyor Classic screen press Ctrl + Shift + F to open the Search Filter
|
|||||||||||||||||||||||||||||||||||||||||||
select from the following methods to search the assets:-
OR
|
|||||||||||||||||||||||||||||||||||||||||||
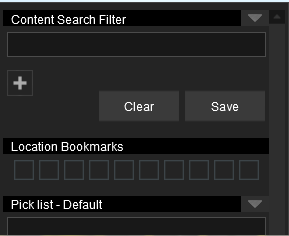
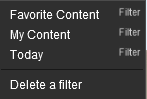

[edit] In Surveyor 2.0Using Existing Search Filters and Picklists |
| Surveyor 2.0 is available in Trainz Plus and TRS22 Platinum only | |
| All Search Filter and Picklist tasks use the Filter Palette and Assets Palette in Surveyor 2.0 | |
| The Search Filters used in Surveyor 2.0 are created using Content Manager |
|
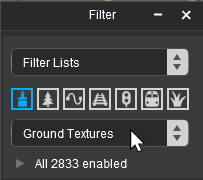 |
|
||||
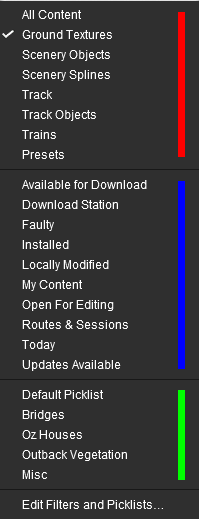 |
|
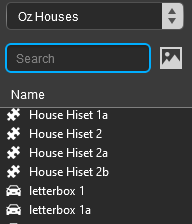
[edit] In Content ManagerUsing Existing Search Filters and Picklists |
| Content Manager is the asset management program that is supplied with all versions of Trainz |
| Steps: To use existing filters and Picklists in Content Manager:- | ||||||||||||||||||
| from the Trainz Launcher select Manage Content | ||||||||||||||||||
in Content Manager open the Filter drop down box
|
||||||||||||||||||
| to use a filter or Picklist Left Click on its name in the list. For example:-
|
||||||||||||||||||
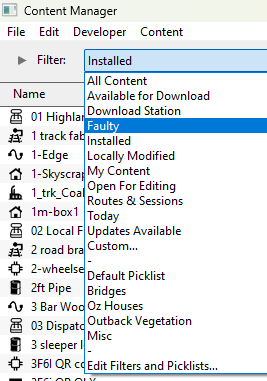
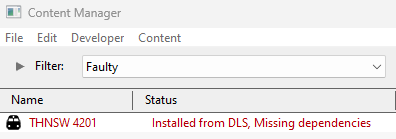
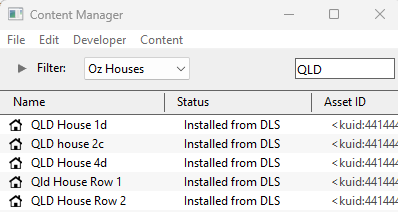
[edit] Creating New Search Filters and Picklists |
|
[edit] In Surveyor ClassicCreating New Search Filters and Picklists |
| Surveyor Classic, sometimes referred to as Surveyor 1.0, is supplied in all versions of Trainz |
| Search Filters created in Surveyor Classic can only be used in Surveyor Classic | |
| Picklists created in Surveyor Classic can be used and edited in Surveyor 2.0 and Content Manager |
| Steps: To create filters and Picklists in Surveyor Classic:- | ||||||||||||||
from the Surveyor Classic screen press Ctrl + Shift + F to open the Search Filter
|
||||||||||||||
select from the following methods to create the new search filter or Picklist:-
OR
OR
|
|||||||||||||||||||||||||||||||||||||||||||||||||||||||||||||||||||||||||||||||

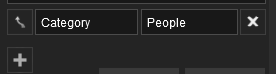
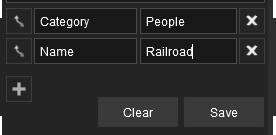
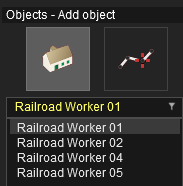
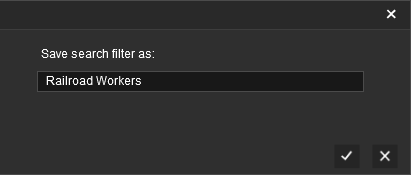
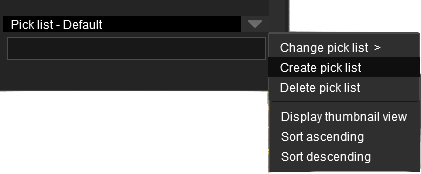
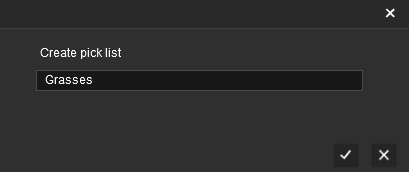
[edit] In Surveyor 2.0 |
[edit] Creating New Search Filters
| Surveyor 2.0 is available in Trainz Plus and TRS22 Platinum only |
|
|
| Choose any combinations of the following 3 steps | ||||||||||||||||||||||||||||||||||
| Optional Step: |
||||||||||||||||||||||||||||||||||
Filter Actions: At the top of the Filter Palette is a Filter Action drop-down menu that controls how the search filters are applied to your visible Trainz World
|
||||||||||||||||||||||||||||||||||
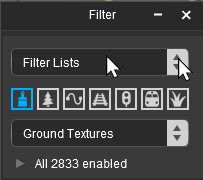

| Optional Step: |
||||||||||||||||||||||||||
Filter Selection: In the Filter Palette the row of Asset Icons and the Drop Down Menu below them identify the type of assets that will be shown in the filtered list
|
||||||||||||||||||||||||||
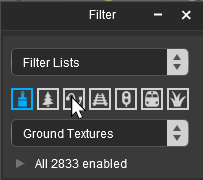
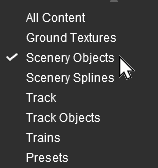
| Optional Step: |
||||||||||||||||||||||||||||
Text Selection: In the Assets Palette the Search box allows you to enter a string of text characters that will be used to search the asset names and their descriptions for a match. Those assets that return a positive match, together with a positive asset type, if one has been set, will be shown in the filtered list
|
||||||||||||||||||||||||||||
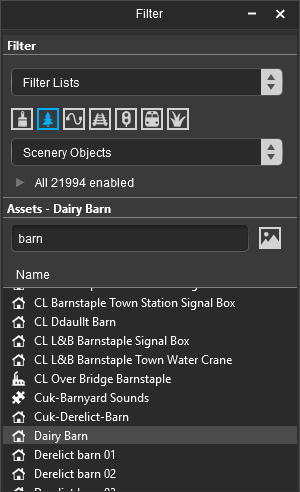
[edit] Creating New Picklists |
|
|||
|
| Steps: To create new Picklists in Surveyor 2.0:- | |||||||||||||||||||||||||||||||||||||||||||||||||||||
using the Filter Palette and the Assets Palette locate and select an asset that will be added to the new (yet to be created) Picklist. You cannot create an empty Picklist
|
|||||||||||||||||||||||||||||||||||||||||||||||||||||
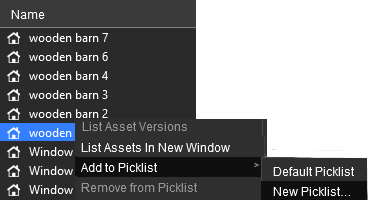
OR
|
|||||||||||||||||||||||
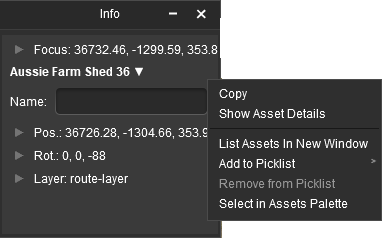
enter a name for the new Picklist and
|
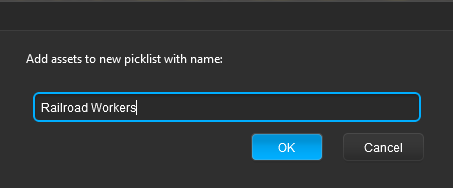
[edit] In Content Manager |
| Content Manager is the asset management program that is supplied with all versions of Trainz |
[edit] Creating New Search Filters
| Search Filters created here can be used in Surveyor 2.0 asset searches |
| Steps: To create filters and Picklists in Content Manager:- | |||||||||||||||||||||||
| from the Trainz Launcher select Manage Content | |||||||||||||||||||||||
the Default preset Filter is named Installed which shows all the assets installed in your copy of Trainz. Left Click on the Filter drop down menu box.
|
|||||||||||||||||||||||
edit/add/delete the filter rows and their contents as required.
|
|||||||||||||||||||||||
Save the new Search Filter. Left Click on the Save button above the filter lines, then:-
|
|||||||||||||||||||||||
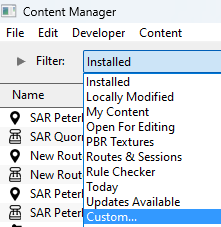
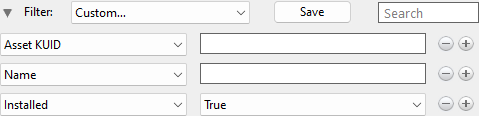
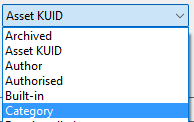
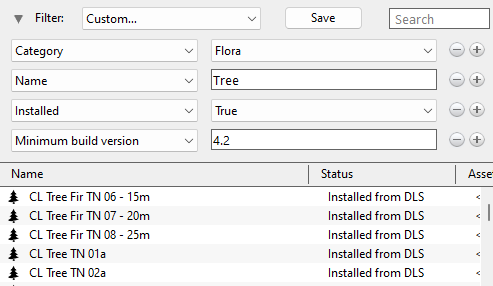
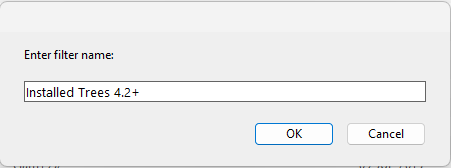
|
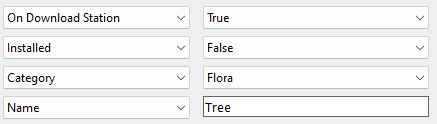
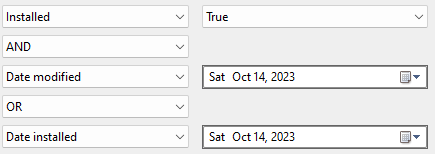
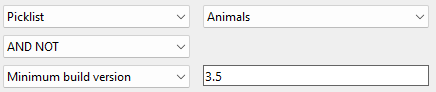
[edit] Creating New Picklists |
| New Picklists are created in Content Manager by using a Search Filter to display the assets that you want to add to the new Picklist |
| Steps: To create Picklists in Content Manager:- | |||||||||||
| from the Trainz Launcher select Manage Content | |||||||||||
| select an existing Search Filter or Picklist or create a new one that will display at least some of the assets that you want to add to the Picklist. You can change your selected filter or Picklist at any time during the process | |||||||||||
From the displayed list of assets:-
|
|||||||||||
select the options Add to Picklist > and New Picklist...  |
|
||||
enter a name for the new Picklist and
|
|||||
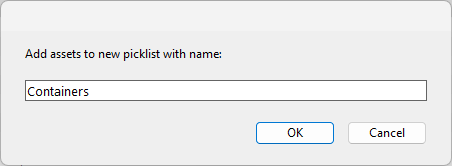
[edit] Editing Search Filters and Picklists |
[edit] In Surveyor Classic[edit] Editing Search Filters |
| Surveyor Classic, sometimes referred to as Surveyor 1.0, is supplied in all versions of Trainz |
| Steps: To edit existing search filters in Surveyor Classic:- | ||||||||||
|
||||||||||
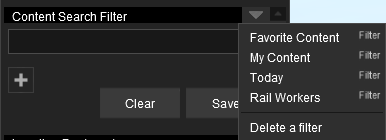
To Delete a filter, select the last option Delete a Filter from the popout menu then select the name of the filter to be deleted
|
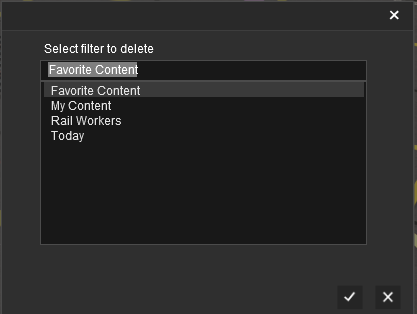
|
|||||||||||||||||||||||||||
[edit] Editing Picklists |
| Steps: To edit existing Picklists in Surveyor Classic:- | |
| from the Surveyor Classic screen press Ctrl + Shift + F to open the Search Filter | |
Left Click on the Down Arrowhead icon to the right of the title Pick list as shown in the image to list optins
 |
|
To Delete a Picklist, select the last option Delete pick list from the first popout menu then select the name of the Picklist to be deleted
|
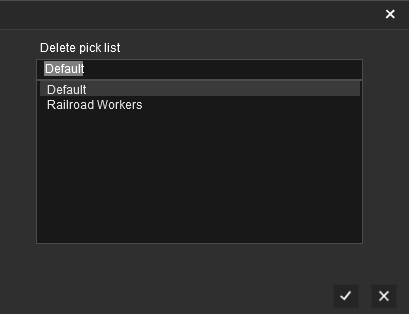
To Edit a Picklist Left Click on Change pick list > in the first popup menu and on its name (for example Railroad Workers ) in the second popup menu to load it into the Search Filter window.
You then have the options of:-
OR
|
||||||||||||||||||||||||||||||||
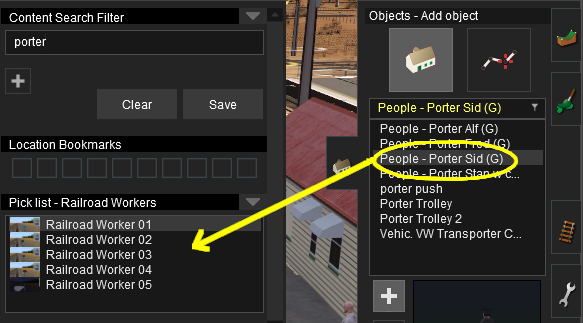

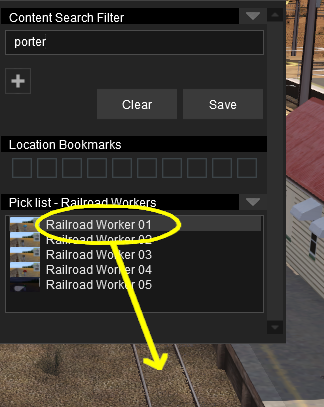
[edit] In Surveyor 2.0Editing Search Filters and Picklists |
| Surveyor 2.0 is available in Trainz Plus and TRS22 Platinum only | |
| All Search Filter and Picklist tasks use the Filter Palette and Assets Palette in Surveyor 2.0 | |
| The Search Filters used in Surveyor 2.0 are created using Content Manager |
|
|
|
||||
|
|
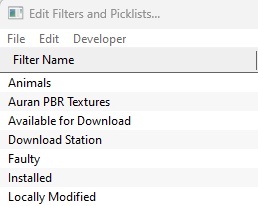

| Right Click on a Search Filter (or Picklist) | ||||||||||||||||
| This will open a sub-menu. There will be one minor difference between the sub-menus for Search Filters and Picklists | ||||||||||||||||
|
||||||||||||||||
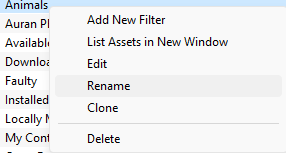
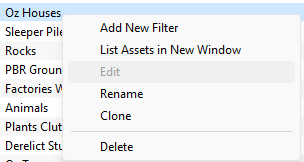
The Editing options available are:-
|
[edit] Editing Search Filters |
| Steps: To edit the Search Filter instructions:- Using the list of Search Filters and Picklist from opening the Edit Filters and Picklists... described above:- |
|||
| Right Click on a Search Filter | |||
| Left Click on the Edit option | |||
This will display Data Fields and Data Values for the the selected Search Filter
|
|||

|
|||||||||||||||||||||
[edit] Editing Picklists |
|
|
|
||||||||||||||||||||||||||||||||||||||||||||||||||||||||||
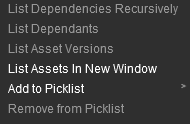
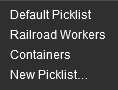
OR
|
|||||||||||||||||||||||||||

|
|
| Steps: To remove an asset from a Picklist (see Known Issue on the right):- | |||||||||||||||||
|
|||||||||||||||||
| Then Right Click on one of the selected assets. A popout menu will appear | ||||||||||
from the popout menu Left Click the option Remove from Picklist . The asset will disappear from the Picklist
|
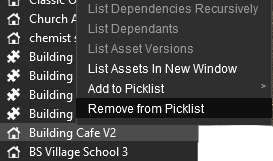
[edit] In Content ManagerEditing Search Filters and Picklists |
| Content Manager is the asset management program that is supplied with all versions of Trainz |
| Steps: To edit Search Filters and Picklists in Content Manager:- | |||||
| from the Trainz Launcher select Manage Content | |||||
Left Click on the Filter drop down menu
|
|||||
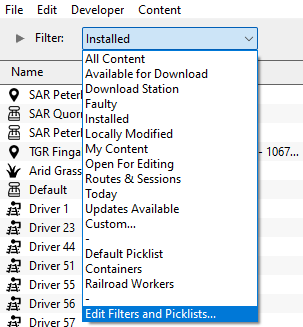
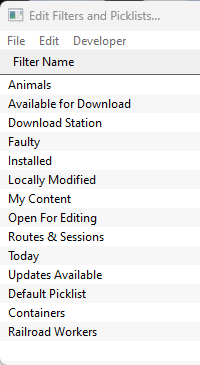
| Right Click on a Search Filter or Picklist | ||||||||
| This will open a sub-menu. There will be one minor difference between the sub-menus for Search Filters and Picklists | ||||||||
|
||||||||
The Editing options available are:-
|
[edit] Editing Search Filters |
| Steps: To edit the Search Filter instructions:- Using the list of Search Filters and Picklist from opening the Edit Filters and Picklists... described above:- |
|||
| Right Click on a Search Filter | |||
| Left Click on the Edit option | |||
This will display Data Fields and Data Values for the the selected Search Filter
|
|||
|
|||||||||||||||||||||
[edit] Editing Picklists |
|
|||
Adding Assets
| from the Trainz Launcher select Manage Content | |||||||||||||||||
you can optionally use a Search Filter to narrow down the list of displayed assets to make the selection of new assets easier. Left Click on the Filter boz and select a suitable Search Filter or construct a Custom filter manually. You can change the filter at any time during the process. For example:-
|
|||||||||||||||||
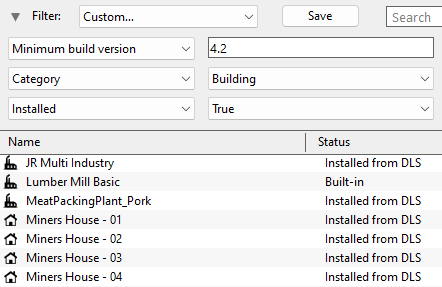

|
|
Removing Assets
| from the Trainz Launcher select Manage Content | ||||||||||||||||||
| Left Click on the Filter boz and select a Picklist to be edited | ||||||||||||||||||
| Right Click on the asset to be removed, OR | ||||||||||||||||||
| To select multiple assets:- | ||||||||||||||||||
|
||||||||||||||||||
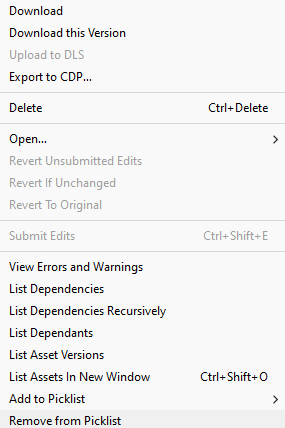
[edit] Trainz Wiki
|
|

This page was created by Trainz user pware in October 2023 and was last updated as shown below.