Route and Session Basics
m |
m (→Trainz Worlds) |
||
| Line 30: | Line 30: | ||
</tr> | </tr> | ||
</table> | </table> | ||
| − | '''Sessions''' are also created in '''Surveyor''' but are designed to be run in '''Driver'''. '''Sessions''' contain the instructions that will control your trains when they are operating in automatic or "AI" mode in your '''Route'''. They also control the goods your trains will carry, load and unload at industries along the way. You can create different '''Sessions''' for different aspects of your railway - freight, passenger, shunting or a mixture - or for different seasons of the year or times of the day. '''Sessions''' also control some of the environment settings in your virtual world, such as lighting and the weather. A '''Session''' can have many:-<br><br> | + | '''Sessions''' are also created in '''Surveyor''' but are designed to be run in '''Driver'''. '''Sessions''' contain the instructions that will control your trains when they are operating in automatic or "AI" mode in your '''Route'''. They also control the goods your trains will carry, load and unload at industries along the way, regardless of whether you are driving them manually or using the AI. You can create different '''Sessions''' for different aspects of your railway - freight, passenger, shunting or a mixture - or for different seasons of the year or times of the day. '''Sessions''' also control some of the environment settings in your virtual world, such as lighting and the weather. A '''Session''' can have many:-<br><br> |
<table cellpadding=4> | <table cellpadding=4> | ||
<tr valign="top"> | <tr valign="top"> | ||
Revision as of 18:04, 27 April 2022
The information in this Wiki Page applies to TRS19, Trainz Plus and TRS22. This page is intended to provide you with an overview of the properties and features of Routes and Sessions when creating layouts for Trainz. More detailed descriptions of these various features plus instructions on getting you started with creating Routes and Sessions can be found in the Trainz Wiki How To Guides - links are provided at the end of this document.
Contents |
Trainz Worlds
The virtual worlds that Trainz creates can be classified as:-
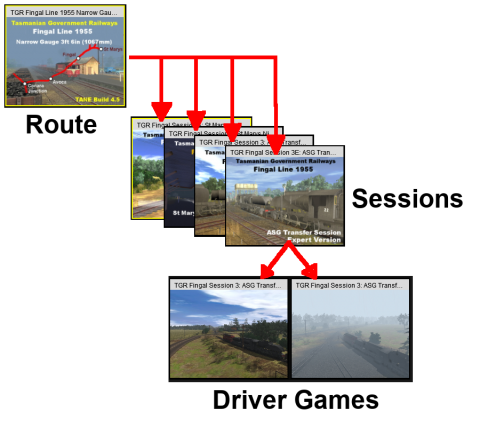 |
Routes are created in Surveyor and contain most (if not all) of what you will see in your virtual Trainz world. You can have multiple Routes, limited only by your storage space. Routes can be built to represent different geographical regions (real or imagined) and different periods of time (past, present, future). Each Route can have one or more:-
Sessions are also created in Surveyor but are designed to be run in Driver. Sessions contain the instructions that will control your trains when they are operating in automatic or "AI" mode in your Route. They also control the goods your trains will carry, load and unload at industries along the way, regardless of whether you are driving them manually or using the AI. You can create different Sessions for different aspects of your railway - freight, passenger, shunting or a mixture - or for different seasons of the year or times of the day. Sessions also control some of the environment settings in your virtual world, such as lighting and the weather. A Session can have many:-
|
What is a Route?
A Route (also known as a "Layout") consists of most of what you will see on the screen when using Surveyor and Driver. Things such as the landform or terrain, most (if not all) of the scenery items, the ground textures, the effect layers (TurfFX and Clutter), plus some "environmental" features.
A Route consists of two parts:-
- Route Data and
- Route Layers.
| When you save a Route, all the items in the Route Data and Route Layers will be saved |
Route Data:
| The Route Data stores all those features that are painted into a layout using a brush tool |
This covers all those visual elements that are "painted" in Surveyor with a brush tool and all the Environmental features.
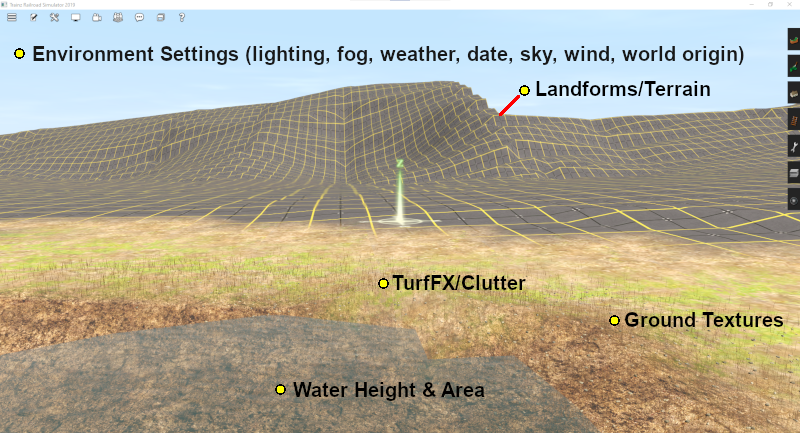
Route Data consists of:-
- Landforms (Terrain) - baseboards and ground height
- Water height and spread
- Ground Textures including the grid pattern which is a texture
- TurfFX and Clutter - found in the Effects Layers
- Environmental Settings - World Origin (latitude, longitude, altitude), Water Surface (rough/calm/etc), Snow Altitude, Lighting (sun, ambient and water colours), Sky (clouds), Road Traffic (on/off), Date (day, month), Wind strength, Fog level, Weather (rain/fine/snow), Brightness level. You must edit and save the Route for these settings to become part of the Route Data - see
How to Use Environment Tools for more details.
Route Layers:
| Route Layers are used to hold the scenery assets that you want to appear in all Sessions created for the Route |
All scenery assets are held in layers. Route Layers give you a way of organising or grouping the assets displayed in your Route.
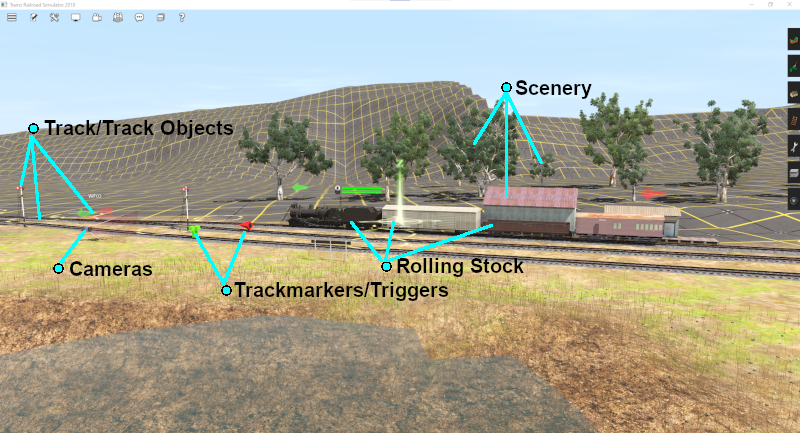
Route Layers have those scenery items that you want to always appear.
Route Layers can contain:-
- Track and Track Objects (such as signals, switches, bridges, tunnels, speed signs, etc)
- Most (or all) scenery items (e.g. buildings, trees, rocks, active industries/stations) and scenery splines (e.g. roads, fences, etc)
- Rolling Stock (including locos) - Note: It is strongly recommended that all rolling stock be placed into a Session Layer
- Lineside and Fixed Cameras
- Trackmarks, Triggers, Direction and Priority Marks
 |
A detailed description of Layers can be found on the Trainz Wiki Page How to Use Layers |
Loading (and Creating) a Route
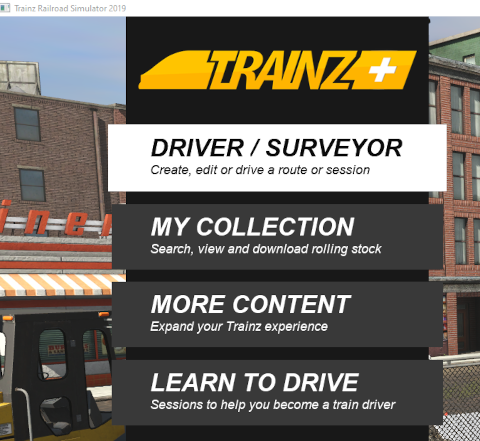
The Main Menu screen is shown below. The first option (shown highlighted in the image) opens Driver/Surveyor with all its options including loading and creating a Route.
In Driver/Surveyor a strip of thumbnails for all the installed Routes will be shown at the base of the screen. The strip will scroll horizontally if there are too many to display. Just move the mouse pointer onto any thumbnail to reveal the scroll bar device.

The MAIN MENU button will take you back to the starting or main screen.
The Sort By A-Z will give you a drop down menu of sorting options for the thumbnail list.
The ![]() button will expand the thumbnail list to fill the screen - click it again to return the thumbnails to the strip at the bottom of the screen.
button will expand the thumbnail list to fill the screen - click it again to return the thumbnails to the strip at the bottom of the screen.
The thumbnail images are colour coded.
| Payware | DLC - must be purchased. DLC items cannot be deleted. To remove them use the Uninstall option in the Content Store from the Launcher. You can reinstall them later without any additional cost | |
| Installed | Downloaded from the Download Station (DLS) or created by you. This includes any cloned DLC Routes and Sessions (see |
|
| Not Installed | Needs to be downloaded and installed before you can use this route |
Creating a New Route
On the Driver/Surveyor screen the Route options are shown as a set of buttons at the bottom of the screen.
![]()
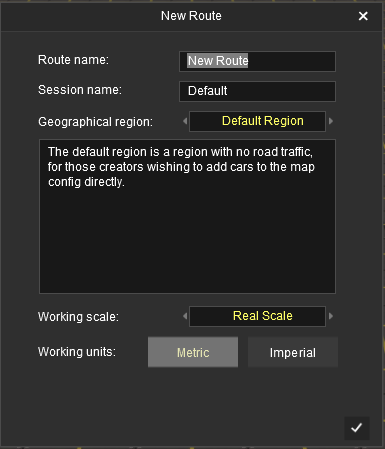
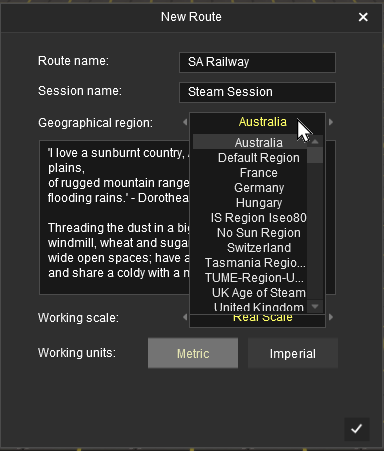
Click CREATE ROUTE . This will start Trainz Surveyor and open the New Route Dialogue Window.
 |
|
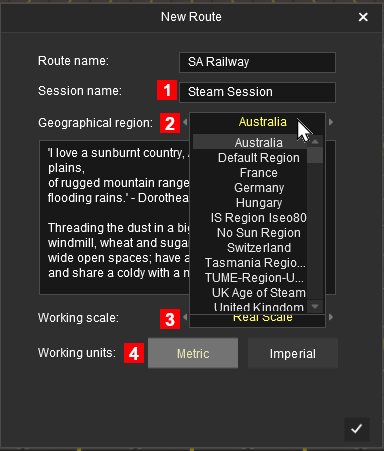
It is strongly advised that you enter some details before clicking the tick icon to create the new route. This will save you time and hassle later.
| Route name: | Enter a name for your new Route (keep it simple) |
| Session name: | Enter a name for your Session (again keep it simple) - see Notes: below |
| Geographical region: | Select a region from the drop down list |
 |
|
Loading an Existing Route
You must first find and select the Route to load from those already installed. At the top of the Driver/Surveyor screen the Route search options are shown as a set of buttons.
![]()
| Type: | ROUTES is the default selection. No need to change this. |
| Source: | PURCHASED is the default selection, Click and change to MY CONTENT for a Route you have created (or already modified) or to INSTALLED for one you have downloaded from the DLS. |
| Region: | ALL is the default selection. You can select a particular geographic region if required and IF the Route had a geographic region set when it was created. |
| Search: | You can narrow down the list of Routes by typing the first few letters of its name (e.g. SA) as shown in the image above. |
This will produce a display of thumbnails at the bottom of the screen.

Click on the thumbnail for the Route you want to load, then click on the EDIT ROUTE button to load the Route into Surveyor.
![]()
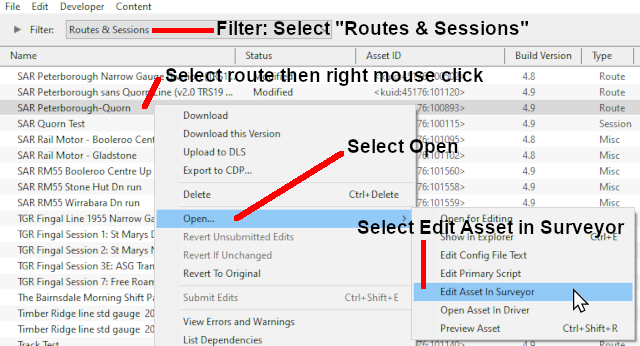
Loading a Route Into Surveyor From Content Manager
Trainz provides a shortcut that allows you to load an existing Route directly into Surveyor for editing from Content Manager.
 |
|
||||||
Loading After an Unexpected Shutdown
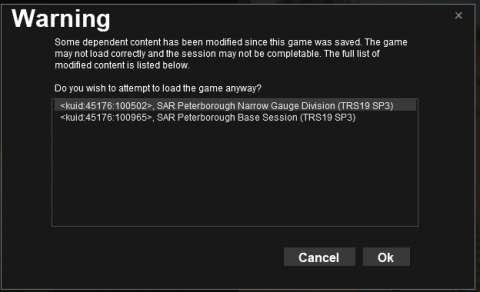
If you select a Route for loading after an unexpected shutdown of Trainz then any Route (or Route and Session) that was open and running in Trainz Surveyor or Driver will be left marked as Open for Edit. When you attempt to load this Route into Surveyor or Driver you will see a message listing the Route and Session (if any) that were affected.
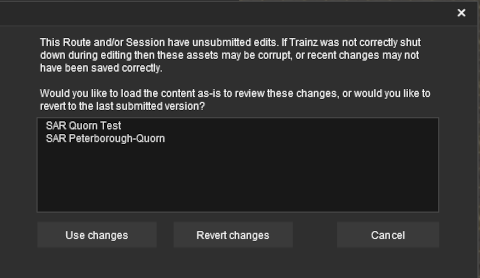 |
|
The message is saying that the assets in the list may have been changed since the last time you loaded them and exited Trainz normally. For example if you had been editing the Route and/or Session and had experienced a crash to the desktop or had used Windows Task Manager to terminate the program.
The options you will see are:-
| Use changes | Use the edited/changed versions that are in the open database assets - there is a possibility that they may have been damaged during the shutdown and may be corrupted | |
| Revert changes | Ignore the edited/changed versions and load the previous versions instead | |
| Cancel | Cancel the Load and return to the Surveyor/Driver menu screen |
You could also use the Content Manager program (select Manage Content from the Trainz Launcher) to Submit the open Route or Route and Session assets. This has the risk of replacing the last good copy of that asset or assets with a possibly faulty copy.
Editing a Route
| When a Route is loaded or a new Route is created all the assets you add will be automatically placed into a Route Layer |
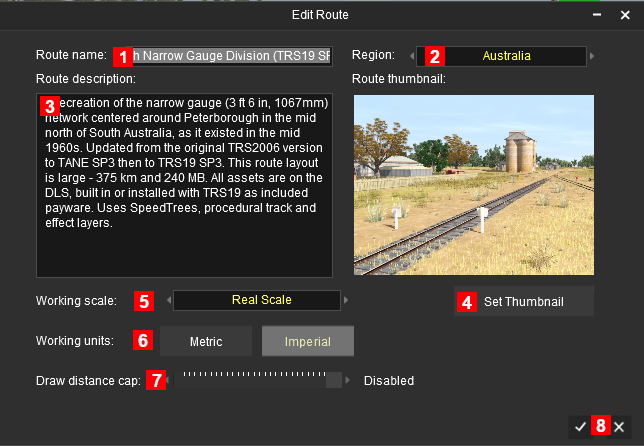
When you create a new Route (with or without a named Session), or load an existing Route without a Session, and start adding scenery assets they will automatically be placed into a Route Layer. See How to Use Layers for more details.
Any ground textures, water, effect layers (turfFX and clutter) you add, or terrain changes (including new baseboards) you make, will be added to the Route Data.
|
|
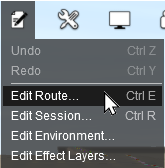
You can edit the Route Characteristics at any time by selecting the Edit Route command from the Edit menu or simply pressing Ctrl E . |
 |
|
 |
|
What is a Session?
| A Session is always a part of an existing Route - you cannot have a Session that does not belong to a Route | |
| If you create a Route without a Session then ALL the active industries and rolling stock, time, environmental conditions, etc, will revert to their original (default) values. There will be no AI drivers and drivers will have a very limited set of available commands for manual driving |
In general, while a Route provides the physical structures (or "hardware"), a Session provides the services (or "software"). While you can easily have a Route without a Session, it could be a very limited (or even a boring) experience.
A single Route can have multiple Sessions, or none, but a Session must always belong to a Route. To put it into Trainz terminology, a Session has a Route as a dependency.
A Session consists of two parts:-
- Session Data and
- Session Layers.
| When you save a Session, all the items in the Session Data and Session Layers will be saved |
Session Data:
Session Data are often the "invisibles" that control the operation of a Session. Session rules, driver orders and loco assignments, commodities (loaded, unloaded and carried) and most of the Environmental Settings are examples of Session Data.
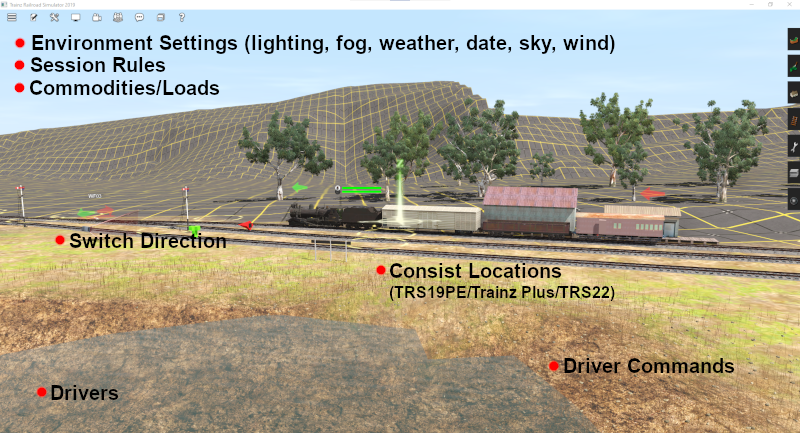
Session Data contains:-
- Drivers (names, AI commands and assigned locos)
- Driver Commands - those available for AI and manual driving
- Session Rules
- Industry Settings (commodities consumed and produced)
- Consist Settings (commodities carried)
- Consist Locations - this is stored in the Session even if the consists are placed in the Route
- Switch Settings (left/right) - but the default switch direction is stored in the Route
- Environmental Settings - Water Surface (rough/calm/etc), Snow Altitude, Lighting (sun, ambient and water colours), Sky (clouds), Road Traffic (on/off), Date (day, month), Wind strength, Fog level, Weather (rain/fine/snow), Brightness level. You must edit and save the Session for these settings to become part of the Session Data - see
How to Use Environment Tools for more details. If both a Route and a Session have saved Environmental Settings, which do not have to be the same, then those in the Session will be used. If the Session does not have any saved Environmental Settings then those in the Route will be used
Session Layers:
| Session Layers are used to hold the scenery assets that you want to only appear in that particular Session and not in all Sessions | |
| Session Layers can be left empty and the Route Layers can contain all the scenery assets |
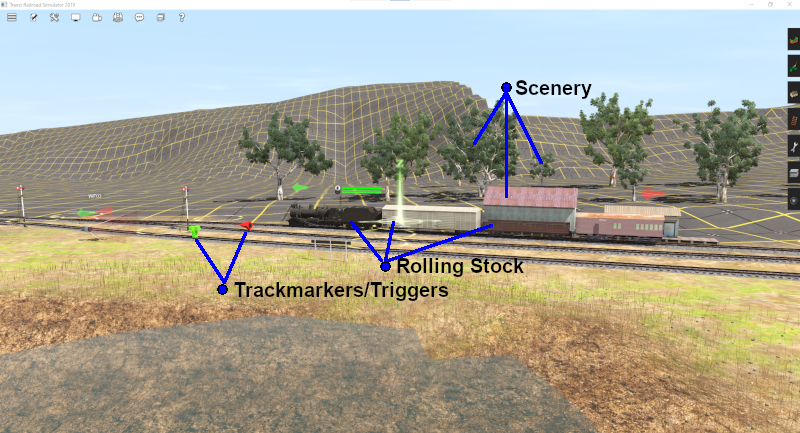
Session Layers give you a way of organising or grouping the assets displayed in your Session.
|
Session Layers can contain:-
|
|
 |
A detailed description of Layers can be found on the Trainz Wiki Page How to Use Layers |
|
Loading (and Creating) a Session
Creating a New Session
| To create a new Session you must first create a new Route or identify an existing Route |
A new Session can be created in two ways:-
| Method |
|
 |
Follow the steps shown in the section
|
| Method |
|||
|
The first step is to locate (but not load) the Route as described in the section Once you have selected the Route from its thumbnail, click the VIEW SESSIONS button.
Then click the CREATE SESSION button. If no other Session exists for this Route then this will be the only choice available to you.
|
|||
Both methods will load the Route into Surveyor and create a new Session with all its values/parameters set at default levels.
Loading an Existing Session
There are two different ways to load existing Sessions into Surveyor.
| Method |
||||||||
| The easiest way to load an existing Session is to use the search tools at the top of the Driver/Surveyor screen.
|
||||||||
This will produce a list of Session thumbnails at the bottom of the screen. As with the Route thumbnails, the list can be scrolled horizontally.

The same colour coding system used in the Route thumbnails also applies to Session thumbnails.
| Payware | DLC - must be purchased. DLC items cannot be deleted. To remove them use the Uninstall option in the Trainz Store from the Launcher. You can reinstall them later without any additional cost | |
| Installed | Downloaded from the Download Station (DLS) or created by you. This includes any cloned DLC Routes and Sessions (see |
|
| Not Installed | Needs to be downloaded and installed before you can use this session |
Click on the thumbnail for the Session you want to load and then click on the EDIT SESSION button. This will load BOTH the Route and the Session into Surveyor.
![]()
|
| Method |
|||
| Select the Route as described in the section
This will display a list of thumbnails for all the Sessions in that Route. Select the Session thumbnail you need and then click the EDIT SESSION button.
Again, both the selected Route and its Session will be loaded into Surveyor.
|
|||
Loading a Session Into Surveyor From Content Manager
Trainz provides a shortcut that allows you to load an existing Session directly into Surveyor for editing from Content Manager.
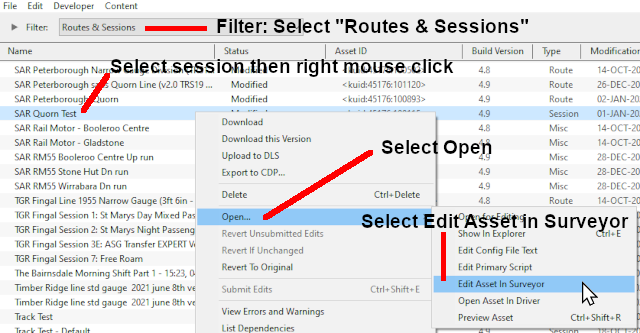 |
Both the Route and the Session will be loaded into Surveyor for editing. |
||||||
Loading a Session into Driver From Surveyor
To start Driver simply select a Session as described above in Loading an Existing Session and click the DRIVE SESSION button.
![]()
This will load both the Session and the Route into Driver.
You can save your "game play" in Driver at anytime. See Saving and Loading Sessions in Driver below.
Loading a Session into Driver From Content Manager
Trainz provides a shortcut that allows you to load an existing Session directly into Driver from Content Manager.
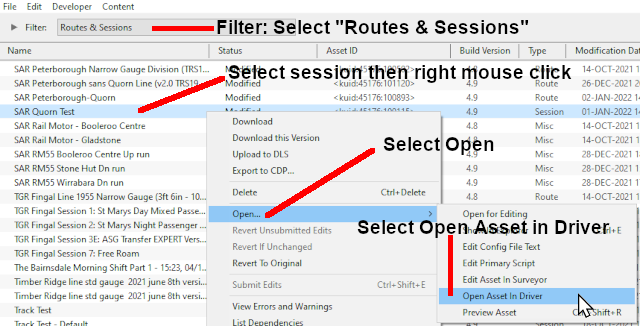 |
The Session and its parent Route will be loaded into Driver and the simulation will be started. |
||||||
Editing a Session
| When a Session is loaded into Surveyor or a new Session is created for an existing Route, all the assets you add will be automatically placed into a Session Layer |
When you create a new Session, or load an existing Session, and start adding scenery assets in Surveyor they will automatically be placed into a Session Layer. See the Trainz Wiki Page How to Use Layers for more details.
Any changes made to the Session Rules (including drivers and their commands), the Environment Tools, Industry or Rolling Stock settings, will be added to the Session Data.
There are also other changes that will be added to the Session Data.
|
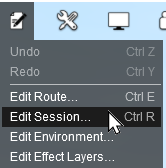
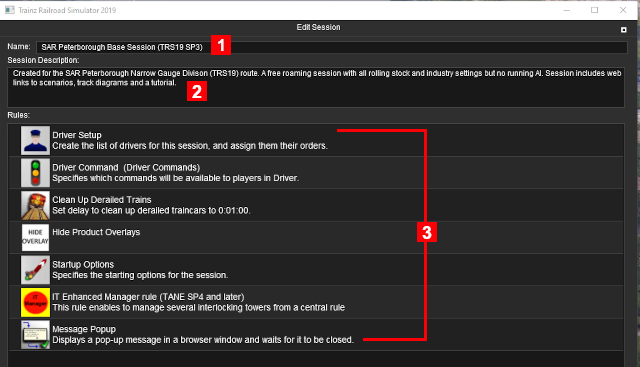
You can edit the Session Characteristics at any time by selecting the Edit Session command from the Edit Menu or by simply pressing Ctrl R . |
 |
|
 |
|
|
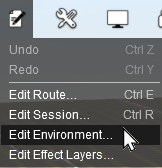
You can edit the Environment Controls of a Session by selecting the Edit Environment command from the Edit Menu. |
 |
|
Saving a Route and a Session
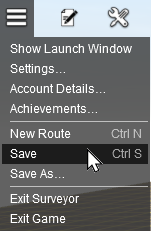
Routes and Sessions are saved from the System Menu on the Surveyor screen.
 |
|
Notes on Saving:
|
Saving a New Route and Session
If you have created a new Route and select Save or Save As..., then you will be presented with the following Save Route Dialogue Windows.
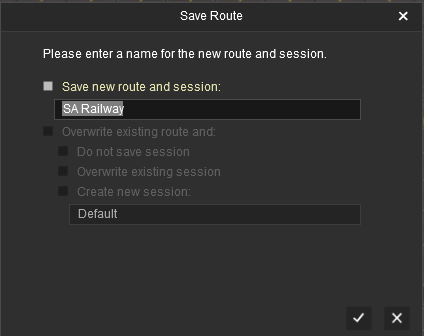 |
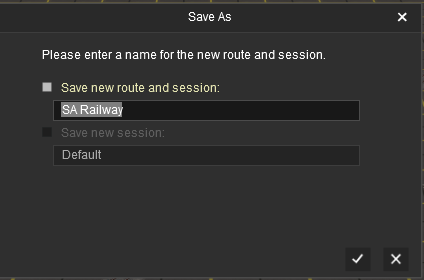 |
| In both cases the name of the Route that was entered when it was created will be shown and you can change the name, even in the Save option. However, there is no option in either case to change the name of the created Session because the other options have been greyed out and cannot be selected. | |
Saving an Existing Route
| If you have loaded the Route only and not the Session and HAVE NOT edited any Session Data or Session Layers, then selecting Save will produce the following Save Route Dialogue Window. |
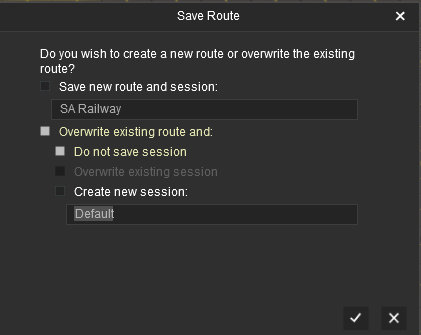 |
|
|||||||
| If you have loaded the Route only and not the Session and HAVE edited Session Data or Session Layers, then selecting Save will produce the following Save Route Dialogue Window. |
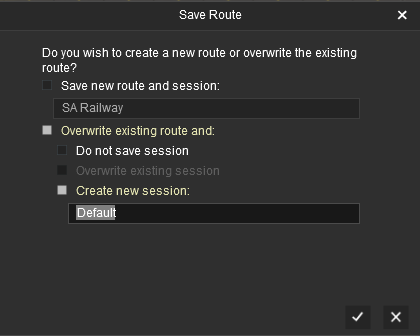 |
|
|||||||
Saving an Existing Route and Session
| If you have loaded a Route and a Session and have edited the Route or the Route and the Session then selecting Save will produce the following Save Route Dialogue Window. |
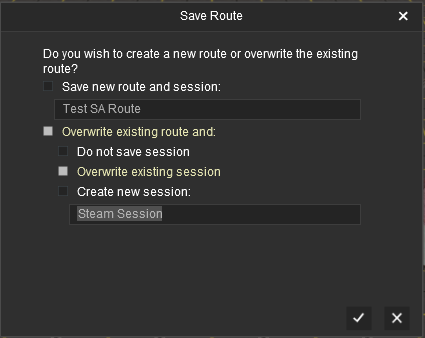 |
|
|||||||
| If you have loaded a Route and a Session and have edited the Session (Data or Layers) only and not the Route then selecting Save will produce the following Save Session Dialogue Window. |
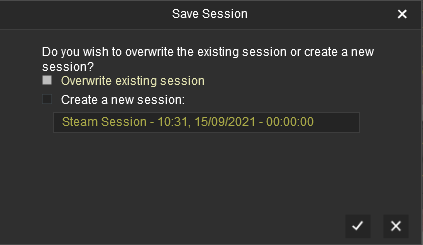 |
|
|||||||
Saving a Route and Session Using the UDS
The UDS (Unified Driver Surveyor) Interface allows you to quickly switch from Driver to Surveyor and back to Driver again without having to restart the Session from the start. You can edit a Route and Session while in Surveyor and then switch back to Driver to continue the Session where you left it.
This powerful ability does come with a warning. If you save the edited Session before switching back into Driver then all the moving consists will be saved in their new positions. Other changes, such as the status of Session Rules, will also be saved in new states. See the Trainz Wiki Page How to Use the UDS Interface for more details.
Most of the problems users seem to be experiencing with the UDS, judging from the posts in the Trainz Forums, is when saving their edited Session before switching back into Driver mode.
| Using Driver Mode involves driving consists (either manually or through the AI) and activating rules. These will change the Session Data | |
| Overwriting the Session will save changes to the consist locations and the Session Rules |
|
||||||
When you are in Driver Mode at least one of the consists will probably be moving. Some of the Session Rules may have already been completed while others may still be running or waiting for events (e.g. triggers to be activated). If, after switching to Surveyor Mode, you then choose to save using the Overwrite existing session option then you will be replacing your original starting Session with a new one with the consists saved in their new positions and the Session Rules saved in their new states. So when you later load and restart the Session things will not be the same as they were in the original or starting Session.
Unless you have a particular reason for overwriting the original Session then the recommended save options are:-
| Option |
|
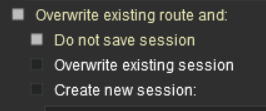 This will only save the Route using its existing name. This will save any edits that you have made to the Route but not to the Session. |
|
| Option |
|
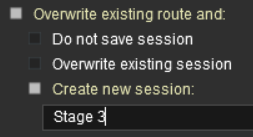 This will save the Route using its existing name. It will also save the Session using a new name you enter in the text box below the option (Stage 3 in the example shown). The original Session will not be altered. This is useful when you want to test out changes to consists, industry settings, Rules, driver commands, etc but do not want to destroy the original Session. |
|
If you have have NOT edited anything while in Surveyor and select Save then you will be shown the Save Driver Session dialogue window to save the Session in its current state as a Driver Game (also called a Game or Driver Game). This is exactly the same as pressing Ctrl S while in Driver.
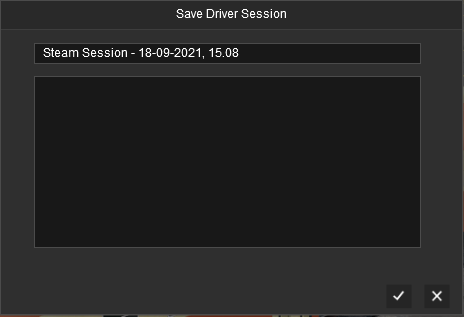
The Driver Game will appear in the Select Session menu for the Route. Loading it will resume Driver at the point where it was saved.
Exiting Surveyor
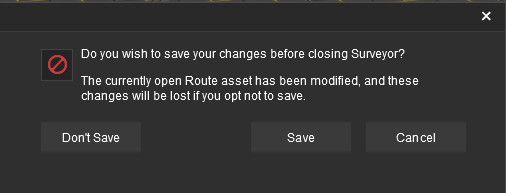
If you exit Surveyor after editing without saving then you will be prompted to Save.
| Unsaved Route | Unsaved Session |
 |
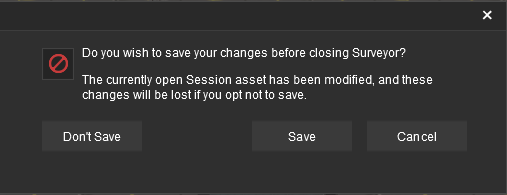 |
| Selecting Don't Save will exit Surveyor without saving. Any changes you have made will be lost. | |
| Selecting Save will exit Surveyor after saving. You will be prompted to select what to save as described in the section |
|
| Selecting Cancel will cancel the save command and return you to Surveyor. |
Cloning a Route/Session
| A Clone is an exact or duplicate copy of an asset. Routes and Sessions can be cloned | |
| Cloned Routes and Sessions can be edited and saved as Your Content | |
| Cloned DLC Routes and Sessions CANNOT be uploaded to the DLS |
Cloning a Route or a Session allows you to work on a duplicate copy of the original. All changes that you make will be saved in the cloned copy leaving the original copy unchanged.
|
|
Using Surveyor
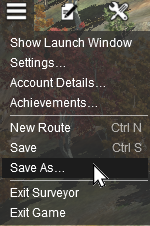
Routes and Sessions that have been loaded into Surveyor can be cloned using the Save As... command from the Surveyor System Menu
 |
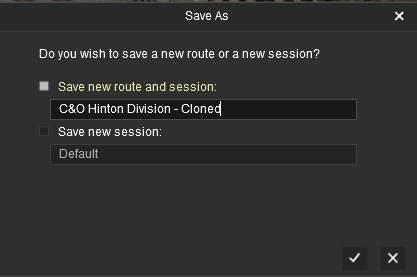 |
Enter a new name or edit the original name (as shown above) for your cloned Route or Session.
|
Using Content Manager
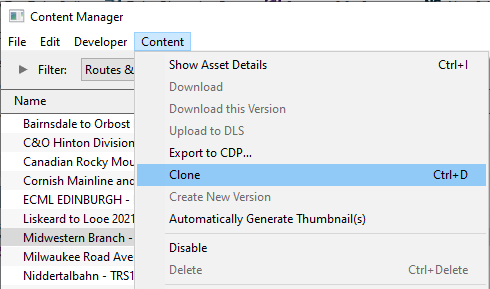
1. Select the Route or Session to Clone
 |
|
||||||
A Task Window will open to display the result.
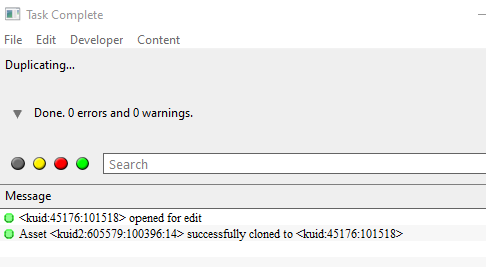
In the image above the original Route has been cloned and given a new <kuid> value.
The newly cloned Route will be shown in Content Manager as a New Asset that is Open for Editing.
|
|
|
 |
Steps:
|
|
|
|

2. Rename the Clone (an Optional Step)
You can give the cloned Route or Session a new name and a new description. Note that these changes will not appear until after the New Asset has been submitted.
|
|
|
 |
Steps:
The config.txt file will open in your default text editor. You can then edit both the Title (username) and the Description of the Route or Session.
|
|
|
|
3. Submit the Clone (a Necessary Step)
| When submitted a cloned DLC Route or Session will be described as Payware, Modified |
|
|
|
 |
Steps:
The New Asset entry will vanish from the Open for Editing display. Open the Content Manager filter Today to check that it has been correctly submitted. If you have renamed the clone than it should appear using its new name. |
|
|
|
|
Saving and Loading Driver Games in Driver
Saving Driver Games
| Driver Games (sometimes called "Saved Games" or "Driver Sessions") are "Game States" saved while in Driver Mode |
|
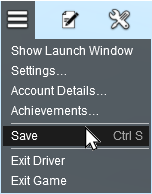
Driver Games save the "state of play" in Driver - the position of consists, the commodities and levels in rolling stock and industries, the state of the Driver Command queues, Session Rules, clock time, etc. Once saved, the Driver Game can be loaded back into Driver to continue the play at the point where it was saved. When you are in Driver select Save from the System Menu or press Ctrl S . This will display the Save Driver Session dialogue window showing the name of the current Session with a date and time stamp (shown left below). If you click the Tick then this will be the name used for the saved game. Alternatively, you could enter your own unique name (shown right below). The space below the entered name will display any other saved Driver Games for that Session. |
 |
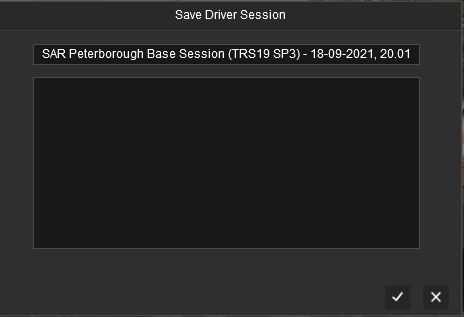 |
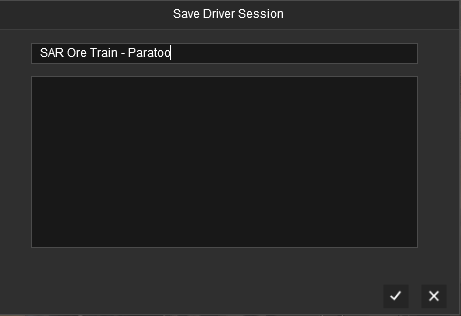 |
Loading Driver Games
Saved Driver Games will be shown with their Sessions for a selected Route. The section Loading an Existing Session shows two different methods of displaying saved Sessions and their Driver Games.
Method will display ALL the saved Sessions and Driver Games which may be a very long list.
Method will display ALL the saved Sessions and Driver Games for a selected Route, which should be a much shorter list.
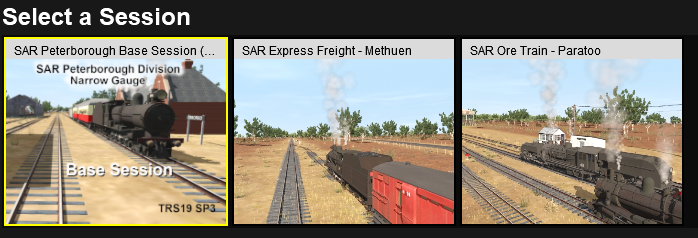
Using Method 2: select the Route first and then click the VIEW SESSIONS button. This will display a list of thumbnails for all the Sessions and Driver Games in that Route.
|
Where there is only one session in a Route, the Session will be the first thumbnail shown in the list followed by the Driver Games. Note that the Session is selected by default.
Select (hightlight) the Driver Game you want to load and click the DRIVE SESSION button.
![]()
This will load the Driver Game, the Session and the Route into Driver.
|
Deleting Routes and Sessions
All the Surveyor and Driver screens for loading Routes and Sessions have a DELETE ... button as an option. Selecting a thumbnail and clicking DELETE ... will delete the selected thumbnail and the Route/Session it represents.
|
| Deleting a Driver Game will only delete that Driver Game, not the Session or Route it was created from |
If you need a more selective way of deleting Routes, Sessions and Driver Games, then use Content Manager from the Trainz Launch Screen. Select the Filter Routes & Sessions.
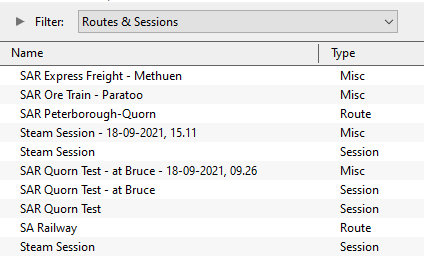
The Type column will identify each entry as a Route, Session or Misc. Misc in this case means a saved Driver Game.
You can delete Routes and/or Sessions individually but if you delete a Route by itself then its dependant Sessions and Driver Games will be shown as faulty with Missing dependencies. Likewise, if you delete a Session by itself then its dependant Driver Games will be shown as faulty with Missing dependencies.
Trainz Wiki
 |
Route and Session Building Guides |
|
More Tutorials and Guides to Using Trainz |
This page was created by Trainz user pware in September 2021 and was last updated as shown below.
