SAR Scenario Gladstone Pickup Grain

From TrainzOnline
(Difference between revisions)
Jump to: navigation, search
m
m
Line 81: Line 81:
 
# If you have already closed the opening message window then the first step is to pause the session by pressing the <span style="font-weight: 700; font-size: 15px; color: white; background-color: black;">&nbsp;P&nbsp;</span> key.
 
# If you have already closed the opening message window then the first step is to pause the session by pressing the <span style="font-weight: 700; font-size: 15px; color: white; background-color: black;">&nbsp;P&nbsp;</span> key.
 
# Next locate your loco. '''Either''':-
 
# Next locate your loco. '''Either''':-
## Open the '''Finder Tool''' (press <span style="font-weight: 700; font-size: 15px; color: white; background-color: black;">&nbsp;Ctrl&nbsp;</span> <span style="font-weight: 700; font-size: 15px; color: white; background-color: black;">&nbsp;F&nbsp;</span>) and type, in the '''Name''' field, the name of the loco. For example '''SAR T 23''' (or just '''T 23''' should be enough). Click the '''tick''' icon, '''OR'''
+
#* Open the '''Finder Tool''' (press <span style="font-weight: 700; font-size: 15px; color: white; background-color: black;">&nbsp;Ctrl&nbsp;</span> <span style="font-weight: 700; font-size: 15px; color: white; background-color: black;">&nbsp;F&nbsp;</span>) and type, in the '''Name''' field, the name of your selected loco, for example '''SAR T 23''' (or just '''T 23''' which should be enough), then click the '''tick''' icon, '''OR'''
## Open the '''Driver List''' (bottom left of the screen) and find the '''loco name''' (e.g. '''SAR T 23''') '''OR''' find the '''driver''' of your selected loco (e.g. '''Driver 23''' for '''SAR T 23'''). Click the drivers '''Eye''' icon [[image:Driver_Eye.png|link=]] to take control of the loco.
+
#*Open the '''Driver List''' (bottom left of the screen) and then scroll through the list to find '''either''':-
 +
#:*the '''loco name''' ('''SAR T 23''') '''OR'''  
 +
#:*the '''driver''' icon (named '''Driver 23''') - this is a non-animated icon
 +
#::then click the drivers '''Eye''' icon [[image:Driver_Eye.png|link=]] to take control of the loco.
 
# Take a few moments to get your bearings. Click [[image:Line_Index_Peterborough.png|link=SAR_Peterborough|Peterborough Data]] (this link will open in this window) to show the location details and track plans for '''Gladstone'''. In each location details page:-
 
# Take a few moments to get your bearings. Click [[image:Line_Index_Peterborough.png|link=SAR_Peterborough|Peterborough Data]] (this link will open in this window) to show the location details and track plans for '''Gladstone'''. In each location details page:-
 
#*the [[image:Tab_HM_White.png|link=|75px]]&nbsp;tab gives an overall summary of each location with a "potted" history (where available).
 
#*the [[image:Tab_HM_White.png|link=|75px]]&nbsp;tab gives an overall summary of each location with a "potted" history (where available).

Revision as of 17:50, 24 August 2022

ArrowLeftBtn.png   
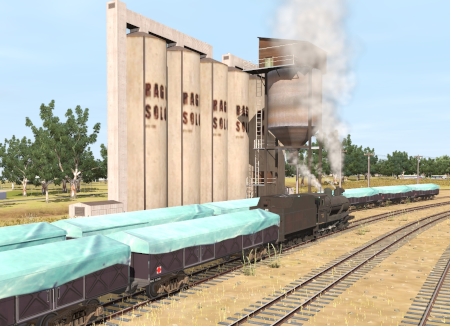
20   Gladstone Pickup Grain  ArrowRightBtn.png
A scenario in the SAR Peterborough Base Session v2.0
A pickup service from Peterborough to Gladstone servicing the grain storage silos at Yongala, Jamestown and Caltowie. Bottom

 The Historical Bit 

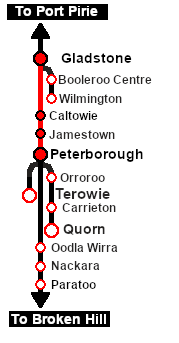
The  Terowie-Peterborough-Quorn Line  was roughly the dividing line in the state of South Australia between the grain producing region and the cattle and sheep grazing region. West of the line there was enough rain to produce one crop of grain each year. East of the line the country was too dry for crops and could only be used for grazing.

The grain storage silos followed this pattern with many of the locations west of Peterborough (towards Port Pirie) equipped with grain loaders while locations east (towards Broken Hill) had only livestock loading facilities.


Gladstone Grain
 Era:  1960s
 Duration:  2 hours 30 minutes
 Loco:  The Loco Roster Label.png has locos available at the  Peterborough Loco Depot 
 Consist:  To be attached to the selected loco
  • 1 Guard Van in the  Peterborough Car Shed 
  • WHE Gondola covered wagons at Yongala, Jamestown and Caltowie

Location Index

Each location in the layout has a detailed set of track diagrams that provide a variety of useful information

The  Getting Started  guide below gives a summary of what is available.

To display this information click any Location Index graphic, or go to the bottom of the page for all the session links (all links will open in this window).
Getting Started:
  1. If you have already closed the opening message window then the first step is to pause the session by pressing the  P  key.
  2. Next locate your loco. Either:-
    • Open the Finder Tool (press  Ctrl   F ) and type, in the Name field, the name of your selected loco, for example SAR T 23 (or just T 23 which should be enough), then click the tick icon, OR
    • Open the Driver List (bottom left of the screen) and then scroll through the list to find either:-
    • the loco name (SAR T 23) OR
    • the driver icon (named Driver 23) - this is a non-animated icon
    then click the drivers Eye icon Driver Eye.png to take control of the loco.
  3. Take a few moments to get your bearings. Click Peterborough Data (this link will open in this window) to show the location details and track plans for Gladstone. In each location details page:-
    • the Tab HM White.png tab gives an overall summary of each location with a "potted" history (where available).
    • the Tab TM Grey.png tab reveals the invisible TM Track Marks for Drive To commands.
    • the Tab IN Grey.png tab lists all active industries and their commodities.
    • the Tab SW Grey.png tab describes the names, locations and settings of all junction switches as well as some switch sets you may want to use.
  4. Each location details page has direct links to the adjacent locations so you can explore along the route.
  5. When you are ready to start, reload the Peterborough Base Session page (click the Scenarios button on your current location page) and select this Scenario again or just use the Back button on your browser - whichever is quicker.
  6. Switch back to Driver Mode and either close the opening message window or press the  P  key to start the session.


Tutorial:
Tutorial A tutorial on using these scenarios is provided in the link on the left. The link will open in this window


Orders:
  1. Move your selected loco into the  Peterborough Car Shed  and couple to the Guard Van stored there.
  2. Proceed to Yongala.
  3. At Yongala pickup the loaded WHE grain wagons on the  Grain  siding
  4. Proceed to Jamestown.
  5. At Jamestown pickup the loaded WHE grain wagons on the  Goods Yard  road
  6. Proceed to Caltowie.
  7. At Caltowie pickup the loaded WHE grain wagons on the  Grain  siding
  8. Proceed to Gladstone
  9. At Gladstone deliver the wagons to a storage siding at the  Grain Loader 
  10. Shunt the Guard Van to one of the storage sidings near the Wool Transfer Dock and stable
  11. Refuel the loco (if required) at the  Gladstone Loco Depot 
  12. Stable the loco in the  Depot 
Logo


Driving Notes:

A summary of the facilities and product loads at all locations along the line is provided in the link Port Pirie-Broken Hill Line

  • The approaches to all locations are protected by invisible signals to prevent the AI Half Speed Slowdown Problem when approaching a signal at stop.
  • Trackmarks and industries have been provided for AI Drive To Trackmark, Drive via Trackmark and Drive to  Industry  commands. Click Location Index for details.
  • Manual (no AI) driving is possible. As a visual driving aid, a Caution warning sign has been placed at the location of the Main Approach Dn and Main Approach Up trackmarks. Click Location Index for details.
  • If driving manually in yards, you are responsible for correctly setting any catch points.
Strip Map
Route Key

Links: All links will open in this window
ArrowLeftBtn.png Scenarios
Session Scenarios
Location Index
Location List
Tutorial
Drive Tutorial
Rolling Stock
Rolling Stock
Loco Roster
Loco Roster
Industries
Active Industries
Top ArrowRightBtn.png


This page was created by Trainz user pware in January 2022 and was last updated as shown below.


Personal tools