SAR Scenario Gladstone Pickup Grain
m |
m |
||
| Line 1: | Line 1: | ||
| + | <!-- V2.0 only --> | ||
<table width=1000> <!-- BEGIN Title table --> | <table width=1000> <!-- BEGIN Title table --> | ||
<tr valign="top"> | <tr valign="top"> | ||
| Line 26: | Line 27: | ||
<td width=450>[[image:SAR Gladstone Grain.png|link=|alt=Gladstone Grain]]</td> | <td width=450>[[image:SAR Gladstone Grain.png|link=|alt=Gladstone Grain]]</td> | ||
<td> | <td> | ||
| − | <table width=550> <!-- BEGIN Loco/consist sub table --> | + | <table width=550 bgcolor="black"> <!-- BEGIN Loco/consist sub table --> |
| + | <tr valign="top"> | ||
| + | <td> | ||
| + | <table width=546 bgcolor="white"> | ||
<tr valign="top"> | <tr valign="top"> | ||
<td width=75><span style="font-size: 15px; font-weight: 700; color: white; background-color: black;"> Era: </span></td> | <td width=75><span style="font-size: 15px; font-weight: 700; color: white; background-color: black;"> Era: </span></td> | ||
| Line 40: | Line 44: | ||
*<span style="font-weight: 700;">[[SAR_Scenario_Rolling_Stock#SAR_T_Class|SAR T 23]] at <span style="color: white; background-color: black;"> Loco Sidings </span></span> | *<span style="font-weight: 700;">[[SAR_Scenario_Rolling_Stock#SAR_T_Class|SAR T 23]] at <span style="color: white; background-color: black;"> Loco Sidings </span></span> | ||
*<span style="font-weight: 700;">[[SAR_Scenario_Rolling_Stock#SAR_T_Class|SAR T 233]] at <span style="color: white; background-color: black;"> Loco Sheds </span></span> | *<span style="font-weight: 700;">[[SAR_Scenario_Rolling_Stock#SAR_T_Class|SAR T 233]] at <span style="color: white; background-color: black;"> Loco Sheds </span></span> | ||
| + | *<span style="font-weight: 700;">[[SAR_Scenario_Rolling_Stock#SAR_Y_Class|SAR Y 141]] at <span style="color: white; background-color: black;"> Loco Sheds </span></span> | ||
*<span style="font-weight: 700;">[[SAR_Scenario_Rolling_Stock#SAR_400_Class|SAR 407]] at <span style="color: white; background-color: black;"> Repair Shop Sheds </span></span> | *<span style="font-weight: 700;">[[SAR_Scenario_Rolling_Stock#SAR_400_Class|SAR 407]] at <span style="color: white; background-color: black;"> Repair Shop Sheds </span></span> | ||
| − | *<span style="font-weight: 700;">[[SAR_Scenario_Rolling_Stock#SAR_830_Class|SAR 837 | + | *<span style="font-weight: 700;">[[SAR_Scenario_Rolling_Stock#SAR_830_Class|SAR 837/840]] at <span style="color: white; background-color: black;"> Loco Sheds </span></span> |
| − | + | ||
</td> | </td> | ||
</tr> | </tr> | ||
<tr valign="top"> | <tr valign="top"> | ||
<td><span style="font-size: 15px; font-weight: 700; color: white; background-color: black;"> Consist: </span></td> | <td><span style="font-size: 15px; font-weight: 700; color: white; background-color: black;"> Consist: </span></td> | ||
| − | <td>To be attached to the selected loco | + | <td>To be attached to the selected loco |
| + | *1 '''[[SAR_Scenario_Rolling_Stock#SAR_Brake_Van|Guard Van]]''' in the <span style="font-weight: 700; color: white; background-color: black;"> Peterborough Car Shed </span> | ||
| + | *'''[[SAR_Scenario_Rolling_Stock#QR_WHE|WHE Gondola]]''' covered wagons at '''Yongala''', '''Jamestown''' and '''Caltowie''' | ||
</td> | </td> | ||
</tr> | </tr> | ||
| − | + | </table> | |
| − | + | ||
| − | + | ||
| − | + | ||
| − | + | ||
| − | + | ||
| − | + | ||
| − | + | ||
| − | + | ||
| − | + | ||
| − | + | ||
</td> | </td> | ||
</tr> | </tr> | ||
| Line 67: | Line 63: | ||
</tr> | </tr> | ||
</table> <!-- END Scenario image and loco/consist table --> | </table> <!-- END Scenario image and loco/consist table --> | ||
| − | <br> | + | <table bgcolor="lightcyan" width=1000> <!-- BEGIN Location Data table --> |
| + | <tr> | ||
| + | <td> | ||
| + | [[Image:Location Index.png|link=SAR Index|alt=Location Index|Location Index]] | ||
| + | </td> | ||
| + | <td>'''Each location in the layout has a detailed set of track diagrams that provide a variety of useful information'''<br> | ||
| + | The <span style="font-weight: 700; color: white; background-color: black;"> Getting Started </span> guide below gives a summary of what is available.<br> | ||
| + | To display this information click any [[image:Line_Index_Label.png|link=SAR_Index|Location Index]] graphic, or go to the bottom of the page for all the session links (all links will open in this window).</td> | ||
| + | </tr> | ||
| + | </table> <!-- END Location Data table --> | ||
<table cellpadding="2" bgcolor="black" width=1000> <!-- BEGIN Black border for Getting Started table --> | <table cellpadding="2" bgcolor="black" width=1000> <!-- BEGIN Black border for Getting Started table --> | ||
<tr valign="top"> | <tr valign="top"> | ||
| Line 77: | Line 82: | ||
# Next locate your loco. '''Either''':- | # Next locate your loco. '''Either''':- | ||
## Open the '''Finder Tool''' (press <span style="font-weight: 700; font-size: 15px; color: white; background-color: black;"> Ctrl </span> <span style="font-weight: 700; font-size: 15px; color: white; background-color: black;"> F </span>) and type, in the '''Name''' field, the name of the loco. For example '''SAR T 23''' (or just '''T 23''' should be enough). Click the '''tick''' icon, '''OR''' | ## Open the '''Finder Tool''' (press <span style="font-weight: 700; font-size: 15px; color: white; background-color: black;"> Ctrl </span> <span style="font-weight: 700; font-size: 15px; color: white; background-color: black;"> F </span>) and type, in the '''Name''' field, the name of the loco. For example '''SAR T 23''' (or just '''T 23''' should be enough). Click the '''tick''' icon, '''OR''' | ||
| − | ## Open the '''Driver List''' (bottom left of the screen) and | + | ## Open the '''Driver List''' (bottom left of the screen) and find the '''loco name''' (e.g. '''SAR T 23''') '''OR''' find the '''driver''' of your selected loco (e.g. '''Driver 23''' for '''SAR T 23'''). Click the drivers '''Eye''' icon [[image:Driver_Eye.png|link=]] to take control of the loco. |
# Take a few moments to get your bearings. Click [[image:Line_Index_Peterborough.png|link=SAR_Peterborough|Peterborough Data]] (this link will open in this window) to show the location details and track plans for '''Gladstone'''. In each location details page:- | # Take a few moments to get your bearings. Click [[image:Line_Index_Peterborough.png|link=SAR_Peterborough|Peterborough Data]] (this link will open in this window) to show the location details and track plans for '''Gladstone'''. In each location details page:- | ||
#*the [[image:Tab_HM_White.png|link=|75px]] tab gives an overall summary of each location with a "potted" history (where available). | #*the [[image:Tab_HM_White.png|link=|75px]] tab gives an overall summary of each location with a "potted" history (where available). | ||
Revision as of 11:17, 24 August 2022
| 20 Gladstone Pickup Grain | ||
| A scenario in the SAR Peterborough Base Session v2.0 | ||
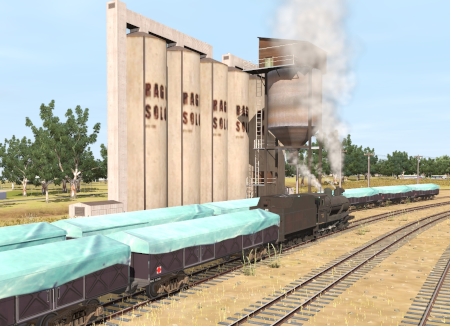
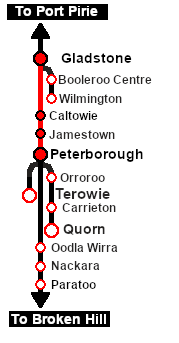
| A pickup service from Peterborough to Gladstone servicing the grain storage silos at Yongala, Jamestown and Caltowie. |
The Historical Bit
The Terowie-Peterborough-Quorn Line was roughly the dividing line in the state of South Australia between the grain producing region and the cattle and sheep grazing region. West of the line there was enough rain to produce one crop of grain each year. East of the line the country was too dry for crops and could only be used for grazing.
The grain storage silos followed this pattern with many of the locations west of Peterborough (towards Port Pirie) equipped with grain loaders while locations east (towards Broken Hill) had only livestock loading facilities.
 |
|
Tutorial:
|
|
|
| Links: All links will open in this window | ||||||||
 Session Scenarios |
 Location List |
 Drive Tutorial |
 Rolling Stock |
 Loco Roster |
 Active Industries |
|||
This page was created by Trainz user pware in January 2022 and was last updated as shown below.


