How to Use Track Triggers
m (→Alternatives to the Trigger Check Rule) |
m |
||
| (16 intermediate revisions by one user not shown) | |||
| Line 2: | Line 2: | ||
__TOC__ | __TOC__ | ||
| + | <table> <!-- BEGIN Nav Buttons Table --> | ||
| + | <tr valign="top"> | ||
| + | <td width=729><span id="stepWhat"></span> </td> | ||
| + | <td width=46>[[file:BackToTop.png|link=#top|alt=Top|Top]]</td> | ||
| + | <td width=75> </td> | ||
| + | <td width=75>[[file:NextDown.png|link=#stepRoute|alt=Next Down|Next Down]]</td> | ||
| + | <td width=75>[[file:BackToBottom.png|link=#bottom|alt=Bottom|Bottom]]</td> | ||
| + | </tr> | ||
| + | </table> <!-- END Nav Buttons Table --> | ||
='''What are Track Triggers?'''= | ='''What are Track Triggers?'''= | ||
<table cellpadding="4" bgcolor=#c1e7e7> | <table cellpadding="4" bgcolor=#c1e7e7> | ||
<tr> | <tr> | ||
<td>[[file:DotPoint.JPG|link=]]</td> | <td>[[file:DotPoint.JPG|link=]]</td> | ||
| − | <td>'''Track triggers are track markers that are invisible in ''Driver Mode'' but visible in ''Surveyor Mode''.''' They are used to activate '''Session Rules''' | + | <td>'''Track triggers are track markers that are invisible in ''Driver Mode'' but visible in ''Surveyor Mode''.''' They are used to activate '''Session Rules''' and some '''Driver Commands'''</td> |
</tr> | </tr> | ||
</table> | </table> | ||
| Line 17: | Line 26: | ||
<td><br> | <td><br> | ||
Shown at left is a '''Track Trigger''' placed on a track in '''Surveyor Mode'''. It is NOT visible in '''Driver Mode'''. The "5.00m" shown below the trigger name is the trigger detection radius | Shown at left is a '''Track Trigger''' placed on a track in '''Surveyor Mode'''. It is NOT visible in '''Driver Mode'''. The "5.00m" shown below the trigger name is the trigger detection radius | ||
| + | </tr> | ||
| + | </table> | ||
| + | <table> <!-- BEGIN Nav Buttons Table --> | ||
| + | <tr valign="top"> | ||
| + | <td width=729><span id="stepRoute"></span> </td> | ||
| + | <td width=46>[[file:BackToTop.png|link=#top|alt=Top|Top]]</td> | ||
| + | <td width=75>[[file:NextUp.png|link=#stepWhat|alt=Next Up|Top]]</td> | ||
| + | <td width=75>[[file:NextDown.png|link=#stepAdding|alt=Next Down|Next Down]]</td> | ||
| + | <td width=75>[[file:BackToBottom.png|link=#bottom|alt=Bottom|Bottom]]</td> | ||
| + | </tr> | ||
| + | </table> <!-- END Nav Buttons Table --> | ||
| + | ='''Route or Session?'''= | ||
| + | |||
| + | <table cellpadding="4" bgcolor=#c1e7e7> | ||
| + | <tr valign="top"> | ||
| + | <td>[[file:DotPoint.JPG|link=]]</td> | ||
| + | <td>'''Track Triggers can be placed in a Route layer or in a Session layer'''</td> | ||
</tr> | </tr> | ||
</table> | </table> | ||
<br> | <br> | ||
| + | <table cellpadding="4" bgcolor=#ffffb0> | ||
| + | <tr valign="top"> | ||
| + | <td>[[file:NotePad.PNG|link=]]</td> | ||
| + | <td><span style="font-size: 17px; font-weight: 700;">Notes:'''</span><br> | ||
| + | *Placing Track Triggers in a '''Route layer''' (e.g. in the same layer as the track) means that they will be available in '''all Sessions''' created using that particular Route. | ||
| + | *Placing Track Triggers in a '''Session layer''' means that they will only be available in that Session. This can be useful if two or more Sessions are being created and you want to use different Track Triggers in each Session.</td> | ||
| + | </tr> | ||
| + | </table> | ||
| + | |||
| + | <table cellpadding="4" bgcolor="Aquamarine"> | ||
| + | <tr valign="top"> | ||
| + | <td>[[file:LinkWiki.PNG|link=]]</td> | ||
| + | <td>Information on Route and Session layers can be found at:-<br> | ||
| + | * '''[[How to Use Layers]]''' | ||
| + | </td> | ||
| + | </tr> | ||
| + | </table> | ||
| + | <table> <!-- BEGIN Nav Buttons Table --> | ||
| + | <tr valign="top"> | ||
| + | <td width=729><span id="stepAdding"></span> </td> | ||
| + | <td width=46>[[file:BackToTop.png|link=#top|alt=Top|Top]]</td> | ||
| + | <td width=75>[[file:NextUp.png|link=#stepRoute|alt=Next Up|Top]]</td> | ||
| + | <td width=75>[[file:NextDown.png|link=#stepConfiguring|alt=Next Down|Next Down]]</td> | ||
| + | <td width=75>[[file:BackToBottom.png|link=#bottom|alt=Bottom|Bottom]]</td> | ||
| + | </tr> | ||
| + | </table> <!-- END Nav Buttons Table --> | ||
='''Adding a Track Trigger'''= | ='''Adding a Track Trigger'''= | ||
| Line 48: | Line 100: | ||
</tr> | </tr> | ||
</table> | </table> | ||
| − | < | + | <table> <!-- BEGIN Nav Buttons Table --> |
| − | < | + | |
<tr valign="top"> | <tr valign="top"> | ||
| − | <td | + | <td width=729><span id="stepConfiguring"></span> </td> |
| + | <td width=46>[[file:BackToTop.png|link=#top|alt=Top|Top]]</td> | ||
| + | <td width=75>[[file:NextUp.png|link=#stepAdding|alt=Next Up|Top]]</td> | ||
| + | <td width=75>[[file:NextDown.png|link=#stepCreating|alt=Next Down|Next Down]]</td> | ||
| + | <td width=75>[[file:BackToBottom.png|link=#bottom|alt=Bottom|Bottom]]</td> | ||
</tr> | </tr> | ||
| − | </table> | + | </table> <!-- END Nav Buttons Table --> |
| − | + | ||
='''Configuring a Track Trigger'''= | ='''Configuring a Track Trigger'''= | ||
| − | As soon as a new track trigger has been placed, its properties window | + | As soon as a new track trigger has been placed, its properties window will open on the screen. It will be given a default name and assigned to the currently active layer. |
| − | + | <table cellpadding="4" bgcolor=#ffffff> <!-- BEGIN Step table --> | |
| − | + | ||
| − | + | ||
| − | + | ||
| − | <table cellpadding="4" bgcolor=#ffffff> | + | |
<tr> | <tr> | ||
<td colspan="2"> | <td colspan="2"> | ||
| Line 69: | Line 119: | ||
</tr> | </tr> | ||
<tr valign="top"> | <tr valign="top"> | ||
| − | <td>[[file:Steps.PNG|link=]]</td> | + | <td>[[file:Steps.PNG|link=]]<br><br> |
| − | <td><span style="font-size: 17px;"> | + | <span style="font-size: 17px; font-weight: 700;">Steps</span></td> |
| − | *To change the track trigger name click on the name box, delete the highlighted default name and enter a new name | + | <td>[[file:DotPoint1.JPG|link=]] <span style="font-size: 17px; font-weight: 700;">Name the Trigger:</span><br> |
| − | *To change the assigned layer click on the layer box and select a new layer | + | <table> <!-- BEGIN Step 1 table --> |
| − | *Leave the "Bound Layer" at ''<none>''. (See the '''Trainz Wiki Page''' [[file:WikiLink.PNG|link=]] '''[[How to Use Layers|Using Layers]]''' for information on layers) | + | <tr valign="top"> |
| − | *To confirm the changes click on the [[file:Tick.PNG|link=]] icon on the bottom right of the window | + | <td>[[file:TrackTriggerProperties.JPG|link=]]</td> |
| + | <td> | ||
| + | *To change the track trigger name click on the name box, delete the highlighted default name and enter a new name | ||
| + | *To change the assigned layer click on the layer box and select a new layer | ||
| + | *Leave the "Bound Layer" at ''<none>''. (See the '''Trainz Wiki Page''' [[file:WikiLink.PNG|link=]] '''[[How to Use Layers|Using Layers]]''' for information on layers) | ||
| + | *To confirm the changes click on the [[file:Tick.PNG|link=]] icon on the bottom right of the window | ||
| + | </td> | ||
</tr> | </tr> | ||
<tr> | <tr> | ||
| Line 80: | Line 136: | ||
----</td> | ----</td> | ||
</tr> | </tr> | ||
| − | </table></td> | + | </table> <!-- END Step 1 table --> |
| + | </td> | ||
</tr> | </tr> | ||
| − | |||
| − | |||
| − | |||
| − | |||
| − | |||
<tr valign="top"> | <tr valign="top"> | ||
| − | <td>[[file: | + | <td> </td> |
| − | < | + | <td>[[file:DotPoint2.JPG|link=]] <span style="font-size: 17px; font-weight: 700;">(Optional) Set the Trigger Detection Radius:</span><br> |
| − | <table | + | <table> <!-- BEGIN Step 2 table --> |
| + | <tr valign="top"> | ||
| + | <td colspan=2>Track triggers have a "detection radius" that controls how close a train has to approach to trigger the event. The default radius is 20 metres. The smaller the radius the closer the train has to be to the track trigger to be detected. This radius is set in the '''Advanced Properties''' section of the '''Tools''' window (shown below).</td> | ||
<tr> | <tr> | ||
| − | |||
| − | |||
| − | |||
<tr valign="top"> | <tr valign="top"> | ||
| − | <td>[[file: | + | <td width=340>[[file:TrackTriggerRadius.JPG|link=]]</td> |
| − | <td | + | <td> |
| − | #Click the '''Advanced Tab''' to open its properties | + | #Click the '''Advanced Tab''' to open its properties |
| − | #Enter a new radius value in metres | + | #Enter a new radius value in metres |
#Click the '''Set Trigger Radius''' button | #Click the '''Set Trigger Radius''' button | ||
| − | #Click on the track trigger to assign its new radius. | + | #Click on the track trigger to assign its new radius |
| + | <br> | ||
| + | <table cellpadding="4" bgcolor=#ffffb0> <!-- BEGIN Step 2 Tip Table --> | ||
| + | <tr valign="top"> | ||
| + | <td>[[file:PencilTips.PNG|link=]]</td> | ||
| + | <td>A small radius should only be used for slower moving trains. Short fast trains may pass over a small radius track trigger without being detected.</td> | ||
| + | </tr> | ||
| + | </table> <!-- END Step 2 Tip Table --> | ||
</td> | </td> | ||
</tr> | </tr> | ||
| Line 108: | Line 166: | ||
----</td> | ----</td> | ||
</tr> | </tr> | ||
| − | </table> | + | </table> <!-- END Step 2 table --> |
| − | + | </td> | |
| − | <table | + | |
| − | + | ||
| − | + | ||
| − | + | ||
</tr> | </tr> | ||
| − | </table>< | + | </table> <!-- END Steps Table --> |
| − | < | + | <table> <!-- BEGIN Nav Buttons Table --> |
| − | + | ||
| − | < | + | |
| − | + | ||
<tr valign="top"> | <tr valign="top"> | ||
| − | <td | + | <td width=729><span id="stepCreating"></span> </td> |
| + | <td width=46>[[file:BackToTop.png|link=#top|alt=Top|Top]]</td> | ||
| + | <td width=75>[[file:NextUp.png|link=#stepConfiguring|alt=Next Up|Top]]</td> | ||
| + | <td width=75>[[file:NextDown.png|link=#stepEvent|alt=Next Down|Next Down]]</td> | ||
| + | <td width=75>[[file:BackToBottom.png|link=#bottom|alt=Bottom|Bottom]]</td> | ||
</tr> | </tr> | ||
| − | </table> | + | </table> <!-- END Nav Buttons Table --> |
| − | + | ||
='''Creating a Track Trigger Event'''= | ='''Creating a Track Trigger Event'''= | ||
| Line 139: | Line 193: | ||
</table> | </table> | ||
<br> | <br> | ||
| − | + | <table cellpadding="4" bgcolor=#ffffff> <!-- BEGIN Step table --> | |
| − | + | ||
| − | + | ||
| − | + | ||
| − | <table cellpadding="4" bgcolor=#ffffff> | + | |
<tr> | <tr> | ||
<td colspan="2"> | <td colspan="2"> | ||
| Line 149: | Line 199: | ||
</tr> | </tr> | ||
<tr valign="top"> | <tr valign="top"> | ||
| − | <td>[[file:Steps.PNG|link=]]</td> | + | <td>[[file:Steps.PNG|link=]]<br><br> |
| − | <td><span style="font-size: 17px;"> | + | <span style="font-size: 17px; font-weight: 700;">Steps</span></td> |
| + | <td>[[file:DotPoint1.JPG|link=]] <span style="font-size: 17px; font-weight: 700;">Open the Session Editor:</span><br> | ||
| + | <table> <!-- BEGIN Step 1 table --> | ||
| + | <tr valign="top"> | ||
| + | <td colspan=2> | ||
To add the '''Trigger Check Rule''' to a session:- | To add the '''Trigger Check Rule''' to a session:- | ||
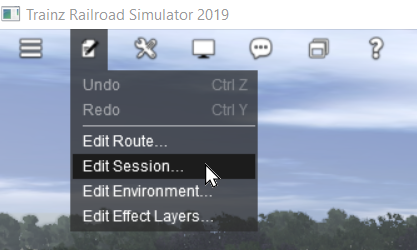
| − | #Open the '''Surveyor Main Menu''' in '''TANE | + | #Open the '''Surveyor Main Menu''' in '''TANE''' (shown below left) or the '''Surveyor Edit Menu''' in '''TRS19''' and '''Trainz Plus''' (shown below right) |
| − | #Select the option '''Edit Session''' from the drop down menu list.</td> | + | #Select the option '''Edit Session''' from the drop down menu list |
| + | </td> | ||
| + | </tr> | ||
| + | <tr valign="top"> | ||
| + | <td>[[file:EditSessionMenu.JPG|link=]]</td> | ||
| + | <td>[[file:SessionEditMenuSP1.png|link=]]<br> | ||
</tr> | </tr> | ||
<tr> | <tr> | ||
| Line 159: | Line 218: | ||
----</td> | ----</td> | ||
</tr> | </tr> | ||
| − | </table></td> | + | </table> <!-- END Step 1 table --> |
| + | </td> | ||
</tr> | </tr> | ||
| − | |||
| − | |||
<tr valign="top"> | <tr valign="top"> | ||
| − | <td | + | <td> </td> |
| − | < | + | <td>[[file:DotPoint2.JPG|link=]] <span style="font-size: 17px; font-weight: 700;">Add the Trigger Check Rule:</span><br> |
| − | <table | + | <table> <!-- BEGIN Step 2 table --> |
| − | < | + | |
| − | + | ||
| − | ---- | + | |
| − | + | ||
<tr valign="top"> | <tr valign="top"> | ||
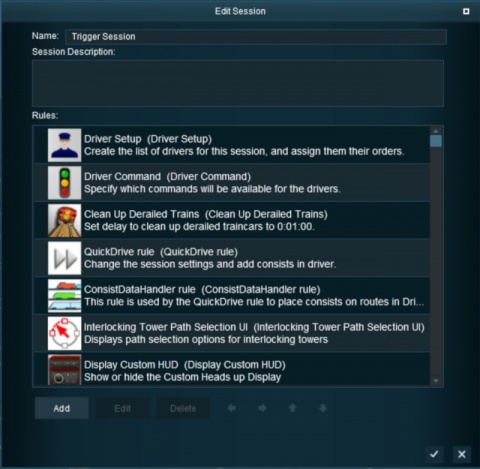
| − | <td> | + | <td>In the Edit Session window (shown below left):- |
| − | + | ||
| − | In the Edit Session window (shown left):- | + | |
*Click the '''Add''' button | *Click the '''Add''' button | ||
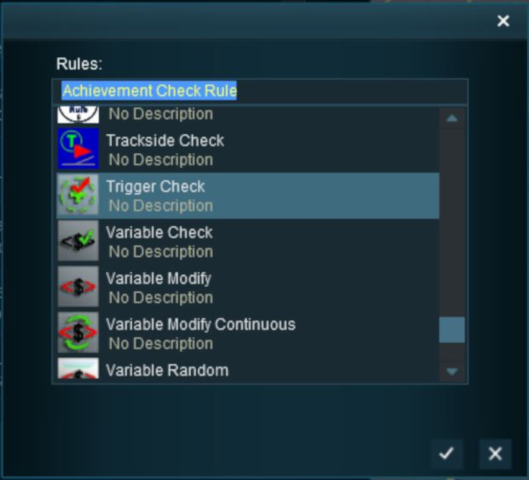
| − | In the Rule Selection window (shown below):- | + | </td> |
| − | #Scroll down the list to select the '''Trigger Check''' rule | + | <td> |
| − | #Click on the [[file:Tick.PNG|link=]] icon</td> | + | In the Rule Selection window (shown below right):- |
| + | :#Scroll down the list to select the '''Trigger Check''' rule | ||
| + | :#Click on the [[file:Tick.PNG|link=]] icon | ||
| + | </td> | ||
| + | </tr> | ||
| + | <tr valign="top"> | ||
| + | <td width=490>[[file:EditSessionWindowX.JPG|link=|480px]]</td> | ||
| + | <td>[[file:RuleSelect.JPG|link=]]</td> | ||
</tr> | </tr> | ||
<tr> | <tr> | ||
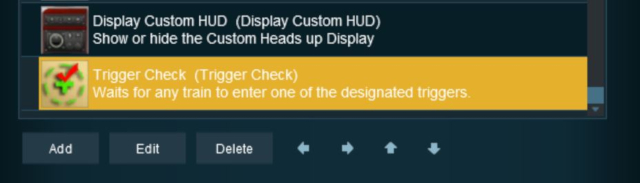
| − | <td colspan= | + | <td colspan=2><br>This will add the '''Trigger Check''' rule to the session.</td> |
| + | </tr> | ||
| + | <tr> | ||
| + | <td colspan=2> | ||
----</td> | ----</td> | ||
</tr> | </tr> | ||
| − | </table></td> | + | </table> <!-- END Step 2 table --> |
| + | </td> | ||
</tr> | </tr> | ||
<tr valign="top"> | <tr valign="top"> | ||
| − | <td>[[file: | + | <td> </td> |
| + | <td>[[file:DotPoint3.JPG|link=]] <span style="font-size: 17px; font-weight: 700;">Open the Trigger Check Rule Properties:</span><br> | ||
| + | <table> <!-- BEGIN Step 3 table --> | ||
| + | <tr valign="top"> | ||
| + | <td>With the '''Trigger Check''' rule highlighted (shown below):- | ||
| + | *Click the '''Edit''' button. This will open the rule properties window | ||
| + | </td> | ||
</tr> | </tr> | ||
| − | |||
| − | |||
| − | |||
| − | |||
<tr valign="top"> | <tr valign="top"> | ||
<td>[[file:TriggerCheck.JPG|link=]]</td> | <td>[[file:TriggerCheck.JPG|link=]]</td> | ||
| − | < | + | </tr> |
| − | + | ||
<tr> | <tr> | ||
<td colspan="2"> | <td colspan="2"> | ||
----</td> | ----</td> | ||
| + | </tr> | ||
| + | </table> <!-- END Step 3 table --> | ||
| + | </td> | ||
</tr> | </tr> | ||
<tr valign="top"> | <tr valign="top"> | ||
| − | <td>[[file: | + | <td> </td> |
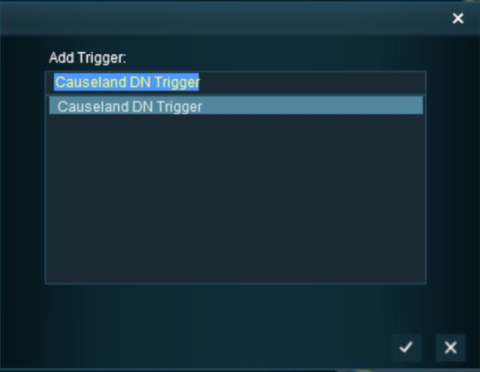
| − | + | <td>[[file:DotPoint4.JPG|link=]] <span style="font-size: 17px; font-weight: 700;">Configure the Rule:</span><br> | |
| − | + | <table> <!-- BEGIN Step 4 table --> | |
| − | *Click the ''' | + | <tr valign="top"> |
| + | <td colspan=2>For this example we will leave all settings unchanged and simply identify the track trigger to be used.<br> | ||
| + | In the Trigger Properties window (shown below):- | ||
| + | *Click the '''''<span style="text-decoration: underline;">Add trigger</span>''''' link | ||
| + | </td> | ||
| + | </tr> | ||
| + | <tr valign="top"> | ||
| + | <td>[[file:TriggerCheckProperties.JPG|link=]]</td> | ||
| + | <td> | ||
| + | </td> | ||
</tr> | </tr> | ||
<tr> | <tr> | ||
| − | <td | + | <td> |
| − | ----</td> | + | <table cellpadding="4" bgcolor="Aquamarine"> <!-- BEGIN Table 4 Wiki Table --> |
| + | <tr valign="top"> | ||
| + | <td>[[file:LinkWiki.PNG|link=]]</td> | ||
| + | <td> | ||
| + | More information on the settings and options in this rule can be found on the '''Trainz Wiki Rules Page''' at:-<br> | ||
| + | * '''[[Session_Rule_List_with_Parameters#Trigger_Check_Rule|Trigger Check Rule]]'''<br> | ||
| + | </td> | ||
</tr> | </tr> | ||
| − | </table></td> | + | </table> <!-- END Table 4 Wiki Table --> |
| + | </td> | ||
</tr> | </tr> | ||
| − | |||
| − | |||
| − | |||
| − | |||
| − | |||
| − | |||
| − | |||
| − | |||
| − | |||
| − | |||
<tr> | <tr> | ||
<td colspan="2"> | <td colspan="2"> | ||
----</td> | ----</td> | ||
| + | </tr> | ||
| + | </table> <!-- END Step 4 table --> | ||
| + | </td> | ||
</tr> | </tr> | ||
<tr valign="top"> | <tr valign="top"> | ||
| − | <td>[[file: | + | <td> </td> |
| − | + | <td>[[file:DotPoint5.JPG|link=]] <span style="font-size: 17px; font-weight: 700;">Select the Trigger:</span><br> | |
| − | + | <table> <!-- BEGIN Step 5 table --> | |
| − | + | <tr valign="top"> | |
| − | + | <td>The '''Trigger Selection Window''' will list all the '''Track Triggers''' in your layout. | |
#Select the trigger you have just added | #Select the trigger you have just added | ||
| − | #Click on the [[file:Tick.PNG|link=]] icon | + | #Click on the [[file:Tick.PNG|link=]] icon at the bottom of the selection window |
| + | </td> | ||
</tr> | </tr> | ||
| + | <tr valign="top"> | ||
| + | <td>[[file:TriggerList.JPG|link=]]</td> | ||
| + | </tr> | ||
| + | <tr> | ||
| + | <td>Once the trigger has been added to the rule, click on the [[file:Tick.PNG|link=]] icon in the '''Trigger Check''' properties window to accept the change. | ||
<tr> | <tr> | ||
<td colspan="2"> | <td colspan="2"> | ||
----</td> | ----</td> | ||
</tr> | </tr> | ||
| − | </table>< | + | </table> <!-- END Step 5 table --> |
| − | + | ||
| − | + | ||
| − | + | ||
</td> | </td> | ||
</tr> | </tr> | ||
| − | </table> | + | </table> <!-- END Step Table --> |
| − | < | + | |
| − | <table | + | <table> <!-- BEGIN Nav Buttons Table --> |
<tr valign="top"> | <tr valign="top"> | ||
| − | <td | + | <td width=729><span id="stepEvent"></span> </td> |
| + | <td width=46>[[file:BackToTop.png|link=#top|alt=Top|Top]]</td> | ||
| + | <td width=75>[[file:NextUp.png|link=#stepCreating|alt=Next Up|Top]]</td> | ||
| + | <td width=75>[[file:NextDown.png|link=#stepAlternatives|alt=Next Down|Next Down]]</td> | ||
| + | <td width=75>[[file:BackToBottom.png|link=#bottom|alt=Bottom|Bottom]]</td> | ||
</tr> | </tr> | ||
| − | </table> | + | </table> <!-- END Nav Buttons Table --> |
| − | + | ||
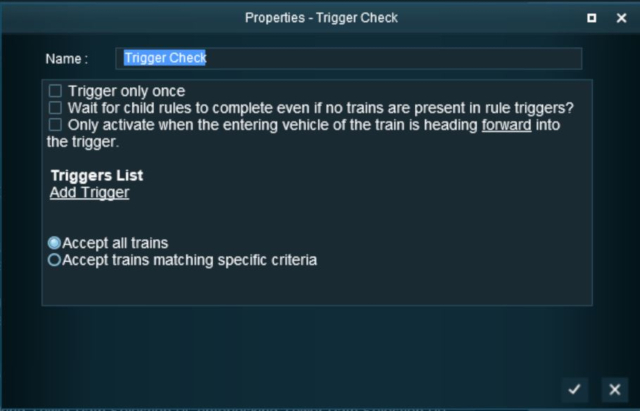
='''Adding an Instruction to the Trigger Event'''= | ='''Adding an Instruction to the Trigger Event'''= | ||
| − | To test your trigger event you will need to add at least one rule. | + | To test your trigger event you will need to add at least one rule. |
==Adding a Child Rule== | ==Adding a Child Rule== | ||
| − | <table> | + | <table cellpadding="4" bgcolor=#ffffff> <!-- BEGIN Step table --> |
<tr valign="top"> | <tr valign="top"> | ||
| − | <td | + | <td>[[file:Steps.PNG|link=]]<br><br> |
| − | < | + | <span style="font-size: 17px; font-weight: 700;">Steps</span></td> |
| − | < | + | <td>[[file:DotPoint1.JPG|link=]] <span style="font-size: 17px; font-weight: 700;">Add A Message Popup Rule:</span><br> |
| − | < | + | <table> <!-- BEGIN Step 1 table --> |
| − | <td | + | |
| − | + | ||
| − | < | + | |
<tr valign="top"> | <tr valign="top"> | ||
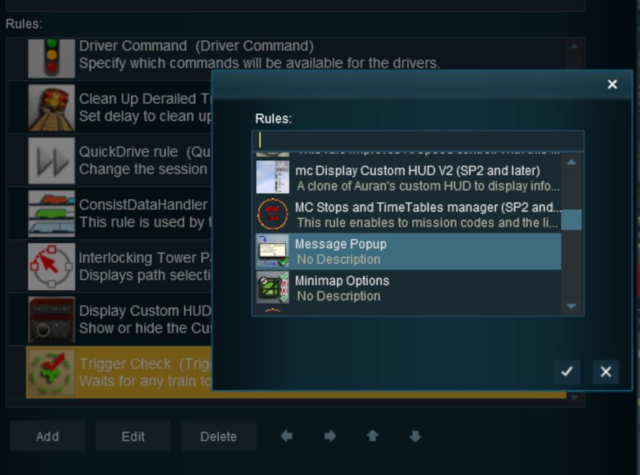
| − | <td> | + | <td>When you are back in the '''Session Editor''' window:- |
| − | + | #Make sure that the new '''Trigger Check Rule''' is selected (highlighted) | |
| − | When you are back in the '''Session Editor''' window:- | + | #Click the '''Add''' button to add another new rule |
| − | #Click the '''Add''' button to add | + | |
#Scroll down the rule selection window to find and select the '''Message Popup''' rule | #Scroll down the rule selection window to find and select the '''Message Popup''' rule | ||
| − | #Click on the [[file:Tick.PNG|link=]] icon</td> | + | #Click on the [[file:Tick.PNG|link=]] icon |
| + | </td> | ||
| + | </tr> | ||
| + | <tr valign="top"> | ||
| + | <td>[[file:TriggerAddMesPopup.JPG|link=]]</td> | ||
</tr> | </tr> | ||
<tr> | <tr> | ||
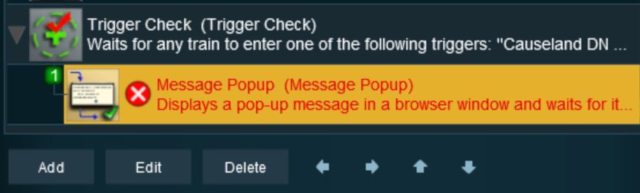
| − | <td | + | <td>The '''Message Popup Rule''' should now appear directly below the '''Trigger Check''' rule. It will display a red cross because it has not yet been configured. |
| − | + | </td> | |
</tr> | </tr> | ||
| − | |||
| − | |||
| − | |||
| − | |||
| − | |||
| − | |||
| − | |||
| − | |||
| − | |||
| − | |||
| − | |||
| − | |||
| − | |||
| − | |||
<tr> | <tr> | ||
<td colspan="2"> | <td colspan="2"> | ||
----</td> | ----</td> | ||
| + | </tr> | ||
| + | </table> <!-- END Step 1 table --> | ||
| + | </td> | ||
</tr> | </tr> | ||
<tr valign="top"> | <tr valign="top"> | ||
| − | <td>[[file: | + | <td> </td> |
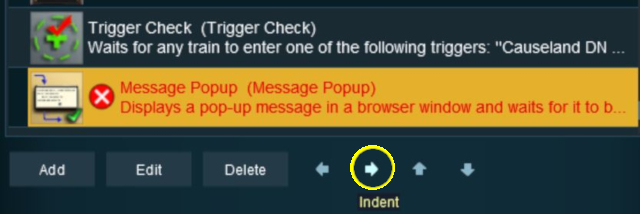
| − | + | <td>[[file:DotPoint2.JPG|link=]] <span style="font-size: 17px; font-weight: 700;">Indent the Popup Message Rule:</span><br> | |
| − | With the '''Message Popup Rule''' highlighted | + | <table> <!-- BEGIN Step 2 table --> |
| + | <tr valign="top"> | ||
| + | <td>The '''Message Popup Rule''' has to be ''indented'' so that it becomes a ''Child'' of the '''Trigger Check Rule''' and is controlled by that rule.<br> | ||
| + | [[file:SessionRuleIndent.JPG|link=]]<br> | ||
| + | With the '''Message Popup Rule''' highlighted:- | ||
*Click the '''''Indent''''' (''right arrow'') button. | *Click the '''''Indent''''' (''right arrow'') button. | ||
| − | This should indent the '''Message Popup''' rule one level inwards (shown below).</td> | + | This should indent the '''Message Popup''' rule one level inwards (as shown below). |
| + | </td> | ||
| + | </tr> | ||
| + | <tr valign="top"> | ||
| + | <td>[[file:SessionRuleIndented.JPG|link=]]</td> | ||
| + | </tr> | ||
| + | <tr> | ||
| + | <td><br> | ||
| + | This '''Message Popup Rule''' is now a '''Child Rule''' of the '''Trigger Check Rule''' and will only be executed ''after'' the track trigger has been activated by a train.</td> | ||
</tr> | </tr> | ||
<tr> | <tr> | ||
| Line 309: | Line 392: | ||
----</td> | ----</td> | ||
</tr> | </tr> | ||
| − | </table> | + | </table> <!-- END Step 2 table --> |
</td> | </td> | ||
</tr> | </tr> | ||
| − | + | </table> <!-- END Steps Table --> | |
| − | + | ==Configuring the Message and Testing== | |
| − | </ | + | |
| − | < | + | |
| − | + | ||
| − | + | ||
| − | + | <table cellpadding="4" bgcolor=#ffffff> <!-- BEGIN Step table --> | |
| − | + | ||
| − | <table cellpadding="4" bgcolor=#ffffff> | + | |
<tr valign="top"> | <tr valign="top"> | ||
| − | <td>[[file:Steps.PNG|link=]]</td> | + | <td>[[file:Steps.PNG|link=]]<br><br> |
| − | <td><span style="font-size: 17px;"> | + | <span style="font-size: 17px; font-weight: 700;">Steps</span></td> |
| − | With the '''Message Popup Rule''' highlighted and indented (as shown above):- | + | <td>[[file:DotPoint1.JPG|link=]] <span style="font-size: 17px; font-weight: 700;">Open the Message Popup Rule for Editing:</span><br> |
| − | *Click the '''Edit''' button. The '''Message Popup Rule''' properties window will appear (shown below) | + | <table> <!-- BEGIN Step 1 table --> |
| + | <tr valign="top"> | ||
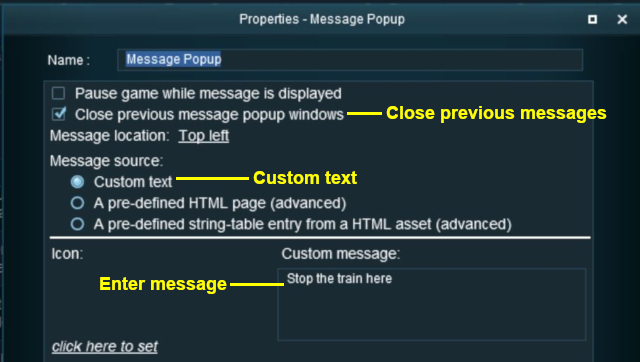
| + | <td>With the '''Message Popup Rule''' highlighted and indented (as shown above):- | ||
| + | *Click the '''Edit''' button. The '''Message Popup Rule''' properties window will appear (as shown below)</td> | ||
</tr> | </tr> | ||
<tr> | <tr> | ||
| Line 332: | Line 412: | ||
----</td> | ----</td> | ||
</tr> | </tr> | ||
| − | </table> | + | </table> <!-- END Step 1 table --> |
| − | + | ||
| − | <table> | + | |
| − | + | ||
| − | + | ||
| − | + | ||
| − | + | ||
</td> | </td> | ||
| − | |||
| − | |||
| − | |||
| − | |||
| − | |||
</tr> | </tr> | ||
<tr valign="top"> | <tr valign="top"> | ||
| − | <td>[[file: | + | <td> </td> |
| − | + | <td>[[file:DotPoint2.JPG|link=]] <span style="font-size: 17px; font-weight: 700;">Configure the Message:</span><br> | |
| − | Set the properties as shown:- | + | <table> <!-- BEGIN Step 2 table --> |
| + | <tr valign="top"> | ||
| + | <td>Set the properties as shown:- | ||
#Check '''ON''' ''Close previous message popup windows'' | #Check '''ON''' ''Close previous message popup windows'' | ||
#Select '''Option Button''' ''Custom text'' | #Select '''Option Button''' ''Custom text'' | ||
#Enter a short text message (you are limited to about 6 lines of text) | #Enter a short text message (you are limited to about 6 lines of text) | ||
| − | + | </td> | |
| − | + | </tr> | |
| − | + | <tr valign="top"> | |
| − | + | <td width="640">[[file:MessagePopupText.JPG|link=]]</td> | |
| − | + | </tr> | |
| + | <tr> | ||
| + | <td> | ||
| + | <table cellpadding="4" bgcolor="Aquamarine"> <!-- BEGIN Step 2 Wikilink Table --> | ||
| + | <tr valign="top"> | ||
| + | <td>[[file:LinkWiki.PNG|link=]]</td> | ||
| + | <td> | ||
| + | More information on this rule can be found on the '''Trainz Wiki Page''' at:-<br> | ||
| + | * '''[[How to Use Message Popup Rule]]'''<br> | ||
| + | </td> | ||
| + | </tr> | ||
| + | </table> <!-- END Step 2 Wikilink Table --> | ||
| + | </td> | ||
</tr> | </tr> | ||
<tr> | <tr> | ||
| Line 363: | Line 446: | ||
----</td> | ----</td> | ||
</tr> | </tr> | ||
| − | </table> | + | </table> <!-- END Step 2 table --> |
| − | + | ||
</td> | </td> | ||
</tr> | </tr> | ||
| − | |||
| − | |||
| − | |||
<tr valign="top"> | <tr valign="top"> | ||
| − | <td>[[file: | + | <td> </td> |
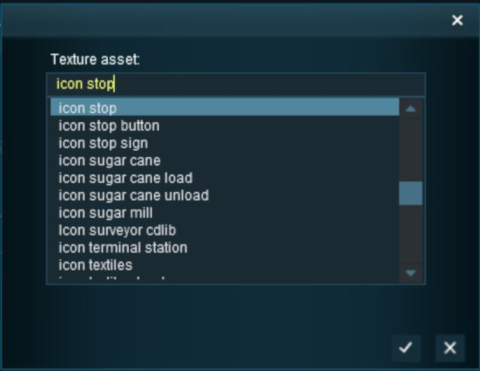
| + | <td>[[file:DotPoint3.JPG|link=]] <span style="font-size: 17px; font-weight: 700;">(Optional) Add a Message Icon:</span><br> | ||
| + | <table> <!-- BEGIN Step 3 table --> | ||
| + | <tr valign="top"> | ||
<td> | <td> | ||
| − | + | *Click the link '''''<span style="text-decoration: underline;">click here to set</span>''''' (shown left) and either | |
| − | + | :*Scroll down the Texture Asset Selection List (shown below) to find a suitable icon, or | |
| − | </td> | + | :*Simply type "icon stop" in the text box to use one of the builtin icons. |
| + | *Click on the [[file:Tick.PNG|link=]] icon</td> | ||
</tr> | </tr> | ||
| − | </ | + | <tr valign="top"> |
| − | < | + | <td>[[file:IconStop.JPG|link=]]</td> |
| − | < | + | </tr> |
| + | <tr valign="top"> | ||
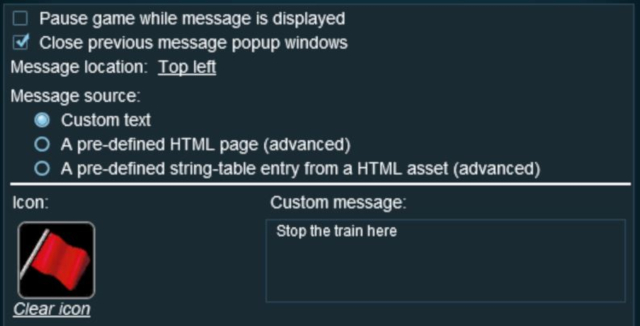
| + | <td> | ||
| + | *click on the [[file:Tick.PNG|link=]] icon to exit the '''Message Popup Rule''' and return to the '''Session Editor'''<br> | ||
| + | The completed Message Popup Rule<br> | ||
| + | [[file:MessagePopupStop.JPG|link=]] | ||
<tr> | <tr> | ||
<td colspan="2"> | <td colspan="2"> | ||
----</td> | ----</td> | ||
| + | </tr> | ||
| + | </table> <!-- END Step 3 table --> | ||
| + | </td> | ||
</tr> | </tr> | ||
<tr valign="top"> | <tr valign="top"> | ||
| − | <td>[[file: | + | <td> </td> |
| − | + | <td>[[file:DotPoint4.JPG|link=]] <span style="font-size: 17px; font-weight: 700;">Test the Trigger:</span><br> | |
| − | + | <table> <!-- BEGIN Step 4 table --> | |
| + | <tr valign="top"> | ||
| + | <td> | ||
| + | *Exit the '''Session Editor''' | ||
*Add a consist to your layout a short distance from the track trigger (but further away than its radius), save the Surveyor Session, and then test in '''Driver Mode'''</td> | *Add a consist to your layout a short distance from the track trigger (but further away than its radius), save the Surveyor Session, and then test in '''Driver Mode'''</td> | ||
</tr> | </tr> | ||
| Line 394: | Line 488: | ||
----</td> | ----</td> | ||
</tr> | </tr> | ||
| − | </table> | + | </table> <!-- END Step 4 table --> |
Another example of using the '''Trigger Check Rule''' can be found in the '''Trainz Wiki Page''' [[file:WikiLink.PNG|link=]] '''[[How to Use Message Popup Rule (Applications)]]'''. | Another example of using the '''Trigger Check Rule''' can be found in the '''Trainz Wiki Page''' [[file:WikiLink.PNG|link=]] '''[[How to Use Message Popup Rule (Applications)]]'''. | ||
<br> | <br> | ||
| − | + | </td> | |
| − | + | ||
| − | + | ||
</tr> | </tr> | ||
| − | </table> | + | </table> <!-- END Steps Table --> |
| + | <table> <!-- BEGIN Nav Buttons Table --> | ||
| + | <tr valign="top"> | ||
| + | <td width=729><span id="stepAlternatives"></span> </td> | ||
| + | <td width=46>[[file:BackToTop.png|link=#top|alt=Top|Top]]</td> | ||
| + | <td width=75>[[file:NextUp.png|link=#stepEvent|alt=Next Up|Top]]</td> | ||
| + | <td width=75> </td> | ||
| + | <td width=75>[[file:BackToBottom.png|link=#bottom|alt=Bottom|Bottom]]</td> | ||
| + | </tr> | ||
| + | </table> <!-- END Nav Buttons Table --> | ||
='''Alternatives to the Trigger Check Rule'''= | ='''Alternatives to the Trigger Check Rule'''= | ||
| Line 443: | Line 544: | ||
</tr> | </tr> | ||
</table> | </table> | ||
| − | < | + | <table> <!-- BEGIN Nav Buttons Table --> |
| − | < | + | |
<tr valign="top"> | <tr valign="top"> | ||
| − | <td | + | <td width=729><span id="bottom"></span> </td> |
| + | <td width=46>[[file:BackToTop.png|link=#top|alt=Top|Top]]</td> | ||
| + | <td width=75>[[file:NextUp.png|link=#stepAlternatives|alt=Next Up|Top]]</td> | ||
| + | <td width=75> </td> | ||
| + | <td width=75> </td> | ||
</tr> | </tr> | ||
| − | </table> | + | </table> <!-- END Nav Buttons Table --> |
---- | ---- | ||
---- | ---- | ||
| Line 465: | Line 569: | ||
</tr> | </tr> | ||
</table> | </table> | ||
| − | + | ---- | |
| + | This page was created by Trainz user '''<span class="plainlinks">[http://online.ts2009.com/mediaWiki/index.php/User:Pware pware]</span>''' in May 2018 and was last updated as shown below. | ||
| + | ---- | ||
[[Category:How-to guides]][[Category:Rules]] | [[Category:How-to guides]][[Category:Rules]] | ||
Revision as of 09:12, 19 August 2021
The information in this Wiki Page applies to TANE, TRS19 and Trainz Plus.
Contents |
What are Track Triggers?
| Track triggers are track markers that are invisible in Driver Mode but visible in Surveyor Mode. They are used to activate Session Rules and some Driver Commands |
Track triggers can be programmed to respond when a train (any train or a specific train) passes over them in Driver Mode. The response comes from executing a set of Session Rules that have been attached to a ![]() Trigger Check Rule (or a similar rule) or a Driver Command that is monitoring the track trigger.
Trigger Check Rule (or a similar rule) or a Driver Command that is monitoring the track trigger.
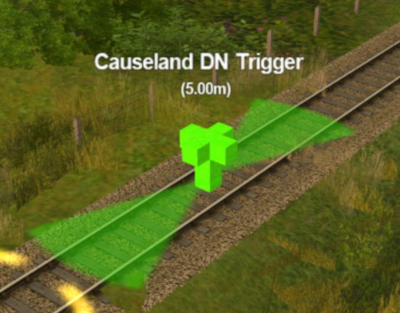 |
Shown at left is a Track Trigger placed on a track in Surveyor Mode. It is NOT visible in Driver Mode. The "5.00m" shown below the trigger name is the trigger detection radius |
Route or Session?
| Track Triggers can be placed in a Route layer or in a Session layer |
Notes:
|
 |
Information on Route and Session layers can be found at:- |
Adding a Track Trigger
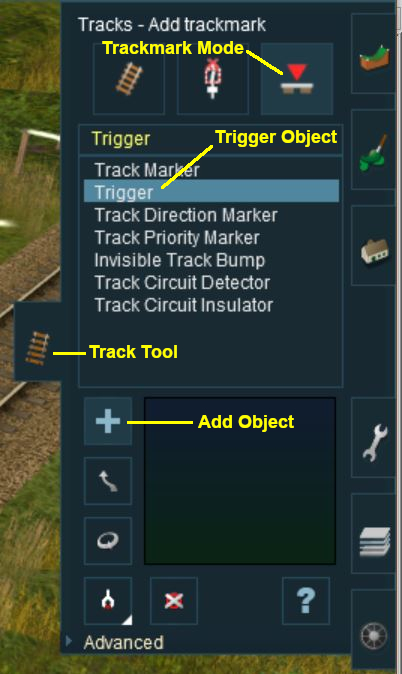 |
|
||||||
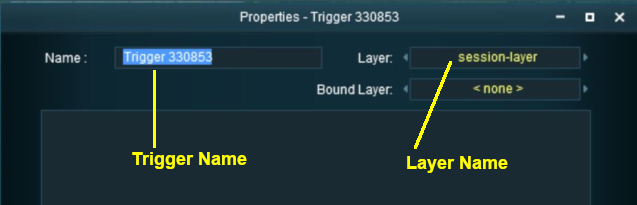
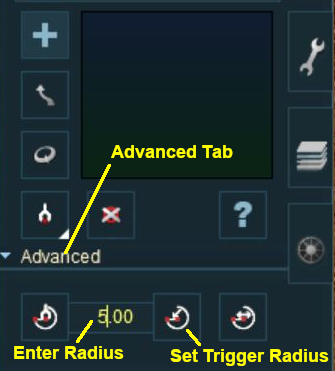
Configuring a Track Trigger
As soon as a new track trigger has been placed, its properties window will open on the screen. It will be given a default name and assigned to the currently active layer.
|
|
|||||||||
 Steps |
|
||||||||
|
|||||||||
Creating a Track Trigger Event
Track trigger events are handled by the Trigger Check Rule (or a similar rule) which is added to a Session in the ![]() Session Editor.
Session Editor.
|
More information on the Trigger Check Rule can be found on the Trainz Wiki Rules Page at:- |
|
|
||||||||||
Steps |
|
|||||||||
|
||||||||||
|
||||||||||
|
||||||||||
|
||||||||||

Adding an Instruction to the Trigger Event
To test your trigger event you will need to add at least one rule.
Adding a Child Rule
Steps |
|
|||||
|
||||||
Configuring the Message and Testing
Steps |
|
|||||||
|
||||||||
|
||||||||
Another example of using the Trigger Check Rule can be found in the Trainz Wiki Page |
||||||||
Alternatives to the Trigger Check Rule
 |
There are other rules that can be used in place of the Trigger Check Rule and triggers. A few possibilities are listed below:- |
- Directional Trigger Check Rule - identical to the Trigger Check Rule but adds the ability to test the train direction. Requires the use of a special Directional Trigger. For an example of its use see the Trainz Wiki Page
 Controlling Signals in Sessions.
- Trackside Check Rule - very similar to the Trigger Check Rule but provides some different options.
- Navigation Points (see the How to Guides link below) are more complex but provide more advanced controls and options.
- Multiple Resource Check Rule - monitors and acts on changes in multiple industry or multiple wagon resource (commodity) levels.
- Resource Verify Rule - monitors and acts on changes in a single industry or wagon resource (commodity) level.
- Timecheck Rule - triggers an event at a set time.
 |
There is a driver command that can be used in place of the Trigger Check Rule. |
- Wait For Trigger - forces an AI controlled train to wait until a specified trigger has been activated by another train.
Related Links
|
Trainz Wiki
 |
More Tutorials and Guides to Using Trainz |
This page was created by Trainz user pware in May 2018 and was last updated as shown below.