How to Use Layers
m (→Merging Layers) |
m |
||
| (48 intermediate revisions by one user not shown) | |||
| Line 1: | Line 1: | ||
| − | The information in this Wiki Page applies to '''TANE''', '''TRS19''' | + | The information in this Wiki Page applies to '''TANE''', '''TRS19''', '''Trainz Plus''' and '''TRS22'''. |
| − | + | ||
__TOC__ | __TOC__ | ||
| + | <table> <!-- BEGIN Nav Buttons Table --> | ||
| + | <tr valign="top"> | ||
| + | <td width=729><span id="stepWhat"></span> </td> | ||
| + | <td width=46>[[file:BackToTop.png|link=#top|alt=Top|Top]]</td> | ||
| + | <td width=75> </td> | ||
| + | <td width=75>[[file:NextDown.png|link=#stepTool|alt=Next Down|Next Down]]</td> | ||
| + | <td width=75>[[file:BackToBottom.png|link=#bottom|alt=Bottom|Bottom]]</td> | ||
| + | </tr> | ||
| + | </table> <!-- END Nav Buttons Table --> | ||
| + | |||
='''What Are Layers?'''= | ='''What Are Layers?'''= | ||
| − | <table cellpadding= | + | <table cellpadding=4 bgcolor=#c1e7e7> |
<tr valign="top"> | <tr valign="top"> | ||
<td colspan=2><span style="font-size: 17px;"><b>In Summary:</b></span></td> | <td colspan=2><span style="font-size: 17px;"><b>In Summary:</b></span></td> | ||
| Line 18: | Line 27: | ||
Layers can contain any objects, visible and invisible, that can be placed into a layout using the Surveyor '''Object''', '''Track''' and '''Train''' tools. The layers and their contents can be hidden from view or locked against alteration whenever required. Their main use is in the development of a Route and a Session but they can also be used as a way of providing some additional novelty during a Driver session. | Layers can contain any objects, visible and invisible, that can be placed into a layout using the Surveyor '''Object''', '''Track''' and '''Train''' tools. The layers and their contents can be hidden from view or locked against alteration whenever required. Their main use is in the development of a Route and a Session but they can also be used as a way of providing some additional novelty during a Driver session. | ||
| − | <table | + | |
| + | <table bgcolor=#ffffb0 cellpadding=2> | ||
<tr valign="top"> | <tr valign="top"> | ||
| − | <td>[[ | + | <td>[[image:NotePad.PNG|link=]]</td> |
| − | <td><span style="font-size: 17px; font-weight: 700;">Notes:'''</span><br> | + | <td><span style="font-size: 17px; font-weight: 700;">Effect Layers Notes:'''</span><br> |
| − | The special ground effects layers '''Clutter''' and '''TurfFX''' that are available in the <span style="font-weight: 700;">Topology Tools</span> (press the <span style="font-weight: 700; color: white; background-color: black;"> F1 </span> key) are not discussed here. They are more like '''Textures''' than '''Layers''' but some aspects of their use and operations are similar to the layers covered here. These special ground effects layers are saved as part of a '''Route''' but are not associated with any '''Route Layer'''. | + | ---- |
| + | The special ground effects layers, '''Clutter''' and '''TurfFX''', that are available in the <span style="font-weight: 700;">Topology Tools</span> (press the <span style="font-weight: 700; color: white; background-color: black;"> F1 </span> key) are not discussed here. They are more like '''Textures''' than '''Layers''' but some aspects of their use and operations are similar to the layers covered here. These special ground effects layers are saved as part of a '''Route''' but are not associated with any '''Route Layer'''. | ||
</td> | </td> | ||
</tr> | </tr> | ||
</table> | </table> | ||
| − | <table | + | |
| + | <table> <!-- BEGIN Nav Buttons Table --> | ||
<tr valign="top"> | <tr valign="top"> | ||
| − | <td | + | <td width=729><span id="stepTool"></span> </td> |
| + | <td width=46>[[file:BackToTop.png|link=#top|alt=Top|Top]]</td> | ||
| + | <td width=75>[[file:NextUp.png|link=#stepWhat|alt=Next Up|Top]]</td> | ||
| + | <td width=75>[[file:NextDown.png|link=#stepRouteSession|alt=Next Down|Next Down]]</td> | ||
| + | <td width=75>[[file:BackToBottom.png|link=#bottom|alt=Bottom|Bottom]]</td> | ||
</tr> | </tr> | ||
| − | </table> | + | </table> <!-- END Nav Buttons Table --> |
='''The Layers Tool'''= | ='''The Layers Tool'''= | ||
| Line 40: | Line 56: | ||
<td>Click the '''Layers Tool''' to open up its properties.<br> | <td>Click the '''Layers Tool''' to open up its properties.<br> | ||
[[file:LayersTools.JPG|480px]]</td> | [[file:LayersTools.JPG|480px]]</td> | ||
| − | <td> | + | <td> |
| − | <table cellpadding=" | + | <br> |
| + | |||
| + | <table bgcolor=#000000 cellpadding=2> | ||
| + | <tr valign="top"> | ||
| + | <td> | ||
| + | <table bgcolor=#ffffb0 cellpadding=2> | ||
<tr valign="top"> | <tr valign="top"> | ||
<td>[[file:NotePad.PNG|link=]]</td> | <td>[[file:NotePad.PNG|link=]]</td> | ||
<td><span style="font-size: 17px;">'''Notes:'''</span><br> | <td><span style="font-size: 17px;">'''Notes:'''</span><br> | ||
| + | ---- | ||
The layers are organised into two groups:- | The layers are organised into two groups:- | ||
*'''Route Layers''' in the top group, and | *'''Route Layers''' in the top group, and | ||
| Line 50: | Line 72: | ||
Each group can contain multiple layers - the scroll bars next to the layer names shown on the left indicate that there are more layers in each group than can fit into the display window area.</td> | Each group can contain multiple layers - the scroll bars next to the layer names shown on the left indicate that there are more layers in each group than can fit into the display window area.</td> | ||
</tr> | </tr> | ||
| − | </table></td> | + | </table> |
| + | </td> | ||
| + | </tr> | ||
| + | </table> | ||
| + | </td> | ||
</tr> | </tr> | ||
</table> | </table> | ||
| Line 56: | Line 82: | ||
==Loading a Route and Loading a Session== | ==Loading a Route and Loading a Session== | ||
| − | <table cellpadding= | + | <table cellpadding=4 bgcolor=#c1e7e7 width="730"> <!-- BEGIN top level --> |
<tr valign="top"> | <tr valign="top"> | ||
<td colspan=2><span style="font-size: 17px;"><b>In Summary:</b></span></td> | <td colspan=2><span style="font-size: 17px;"><b>In Summary:</b></span></td> | ||
| Line 69: | Line 95: | ||
</tr> | </tr> | ||
</table> <!-- END top level --> | </table> <!-- END top level --> | ||
| − | + | <br> | |
| − | + | <table cellpadding=4 bgcolor="Aquamarine"> <!-- BEGIN Trainz Wiki Link --> | |
| − | <table cellpadding= | + | |
<tr valign="top"> | <tr valign="top"> | ||
| − | <td>[[ | + | <td>[[image:LinkWiki.PNG|link=]]</td> |
| − | <td> | + | <td> |
| + | More information on creating, loading and saving '''Routes''' and '''Sessions''' can be found on the '''Trainz Wiki Page''' at '''[[Route_and_Session_Basics|Route and Session Basics]]''' | ||
| + | </td> | ||
</tr> | </tr> | ||
| − | </table> <!-- END | + | </table> <!-- END Trainz Wiki Link --> |
| + | <br> | ||
| + | The layers you see will depend on whether you have loaded a '''Route''' by itself (with no "child" Session) or a '''Session''' and its "parent" Route. | ||
<table> <!-- BEGIN top level --> | <table> <!-- BEGIN top level --> | ||
| Line 82: | Line 111: | ||
<td>[[file:LayersToolsRoute.JPG|link=]]</td> | <td>[[file:LayersToolsRoute.JPG|link=]]</td> | ||
<td>[[file:LayersToolsSession.JPG|link=]]</td> | <td>[[file:LayersToolsSession.JPG|link=]]</td> | ||
| − | <td> | + | <td>The first image on the left gives an example of the layers that can appear if a '''Route only''' is loaded into Surveyor. These are the layers that are saved with the Route. '''Note that a default "session-layer" is present'''. |
| − | + | <table cellpadding=4 bgcolor=#c1e7e7> <!-- BEGIN 2nd level --> | |
| − | <table cellpadding= | + | |
<tr valign="top"> | <tr valign="top"> | ||
<td>[[file:DotPoint.JPG|link=]]</td> | <td>[[file:DotPoint.JPG|link=]]</td> | ||
| Line 95: | Line 123: | ||
</tr> | </tr> | ||
</table> <!-- END 2nd level --> | </table> <!-- END 2nd level --> | ||
| − | + | The second image on the left gives an example of the layers that can appear if a '''Session based on that Route''' is loaded into Surveyor. It shows Route Layers and Session Layers.<br><br> | |
In both cases, the '''Route Layers''' are identical because the same Route has been loaded. A Session contains its own layers, the '''Session Layers''', that are loaded and saved with the Session but are not loaded or saved with the Route.<br> | In both cases, the '''Route Layers''' are identical because the same Route has been loaded. A Session contains its own layers, the '''Session Layers''', that are loaded and saved with the Session but are not loaded or saved with the Route.<br> | ||
| − | <table | + | |
| + | <table bgcolor=#000000> <!-- BEGIN 2nd level Black Border --> | ||
| + | <tr valign="top"> | ||
| + | <td> | ||
| + | <table bgcolor=#ffffe0> <!-- BEGIN 2nd level Tip --> | ||
<tr valign="top"> | <tr valign="top"> | ||
<td>[[file:PencilTips.PNG|link=]]</td> | <td>[[file:PencilTips.PNG|link=]]</td> | ||
| Line 105: | Line 137: | ||
<tr> | <tr> | ||
<td>[[file:LayersToolButtonsLOCKALL.JPG|link=]]</td> | <td>[[file:LayersToolButtonsLOCKALL.JPG|link=]]</td> | ||
| − | <td>Click the '''Lock Button'''</td> | + | <td>Click the '''Lock Button''' |
| + | </td> | ||
</tr> | </tr> | ||
</table> <!-- END 3rd level --> | </table> <!-- END 3rd level --> | ||
</td> | </td> | ||
</tr> | </tr> | ||
| − | </table> <!-- END 2nd level --> | + | </table> <!-- END 2nd level Tip--> |
| + | </td> | ||
| + | </tr> | ||
| + | </table> | ||
| + | <br> <!-- END 2nd level Black Border --> | ||
</td> | </td> | ||
</tr> | </tr> | ||
</table> <!-- END top level --> | </table> <!-- END top level --> | ||
<br> | <br> | ||
| − | <table cellpadding=" | + | <table bgcolor="red" cellpadding=2> |
| + | <tr valign="top"> | ||
| + | <td> | ||
| + | <table bgcolor=#fcbcbc cellpadding=2> | ||
<tr valign="top"> | <tr valign="top"> | ||
<td>[[file:Stop.PNG|link=]]</td> | <td>[[file:Stop.PNG|link=]]</td> | ||
| − | <td><span style="font-size: 17px;">< | + | <td><span style="font-size: 17px; font-weight: 700;">If you load a <span style="text-decoration: underline;">ROUTE</span> but not the SESSION then only <span style="text-decoration: underline;">edit the Route Layers</span></span></td> |
</tr> | </tr> | ||
<tr valign="top"> | <tr valign="top"> | ||
| − | <td>[[file: | + | <td>[[file:Stop.PNG|link=]]</td> |
| − | <td><span style="font-size: 17px;">'''If you | + | <td><span style="font-size: 17px;">'''If you edit a <span style="text-decoration: underline;">SESSION</span> or its layers then always <span style="text-decoration: underline;">save the Session</span>'''</span></td> |
</tr> | </tr> | ||
<tr valign="top"> | <tr valign="top"> | ||
| − | <td>[[file: | + | <td>[[file:Stop.PNG|link=]]</td> |
| − | <td><span style="font-size: 17px;">''' | + | <td><span style="font-size: 17px;">'''When you save a new <span style="text-decoration: underline;">SESSION</span> always give it a name, do <span style="text-decoration: underline;">NOT</span> leave it as "Default"</span> |
| + | </td> | ||
</tr> | </tr> | ||
| − | + | </table> | |
| − | + | </td> | |
| − | + | ||
</tr> | </tr> | ||
</table> | </table> | ||
| − | |||
==Creating a New Route== | ==Creating a New Route== | ||
| Line 141: | Line 180: | ||
<td>[[file:LayersNewRoute.JPG|link=]]</td> | <td>[[file:LayersNewRoute.JPG|link=]]</td> | ||
<td> | <td> | ||
| − | <table | + | <table> |
| + | <tr valign="top"> | ||
| + | <td>[[file:LayersNewRoute.JPG|link=]]</td> | ||
| + | <td> | ||
| + | <table bgcolor=#000000 width=604> | ||
| + | <tr valign="top"> | ||
| + | <td> | ||
| + | <table bgcolor=#ffffb0 width=600> | ||
<tr valign="top"> | <tr valign="top"> | ||
<td>[[file:NotePad.PNG|link=]]</td> | <td>[[file:NotePad.PNG|link=]]</td> | ||
<td><span style="font-size: 17px;">'''Notes:'''</span><br> | <td><span style="font-size: 17px;">'''Notes:'''</span><br> | ||
| − | *When a brand new route is created it will come with two layers, a single | + | ---- |
| + | *When a brand new route is created it will come with two layers, a single '''route-layer''' and a single '''session-layer'''. | ||
*Both layers will be empty (the baseboard with its grid is saved with the route but is not in any layer). | *Both layers will be empty (the baseboard with its grid is saved with the route but is not in any layer). | ||
</td> | </td> | ||
</tr> | </tr> | ||
| − | < | + | <tr valign="top"> |
| − | <table | + | <td colspan=2> |
| + | <table width=600 bgcolor=#ffffe0> | ||
<tr valign="top"> | <tr valign="top"> | ||
<td>[[file:PencilTips.PNG|link=]]</td> | <td>[[file:PencilTips.PNG|link=]]</td> | ||
| − | <td>'''A layer can be renamed at anytime by double clicking on its name with the left mouse button and typing a new name | + | <td>'''A layer can be renamed at anytime by double clicking on its name with the left mouse button and typing a new name''' |
| + | </td> | ||
</tr> | </tr> | ||
| − | </table></td> | + | </table> |
| + | </td> | ||
| + | </tr> | ||
| + | </table> | ||
| + | </td> | ||
| + | </tr> | ||
| + | </table> | ||
| + | </td> | ||
| + | </tr> | ||
| + | </table> | ||
| + | </td> | ||
</tr> | </tr> | ||
</table> | </table> | ||
==The "Active Layer"== | ==The "Active Layer"== | ||
| − | <table cellpadding= | + | <table cellpadding=4 bgcolor=#c1e7e7> |
<tr valign="top"> | <tr valign="top"> | ||
<td colspan=2><span style="font-size: 17px;"><b>In Summary:</b></span></td> | <td colspan=2><span style="font-size: 17px;"><b>In Summary:</b></span></td> | ||
| Line 179: | Line 238: | ||
In the image above, the '''route-layer''' is the '''Active Layer'''. You can change the '''Active Layer''' at any time by clicking on the name of another layer. | In the image above, the '''route-layer''' is the '''Active Layer'''. You can change the '''Active Layer''' at any time by clicking on the name of another layer. | ||
<br> | <br> | ||
| − | <table | + | |
| + | <table width=900> | ||
| + | <tr valign="top"> | ||
| + | <td width=484> | ||
| + | <table bgcolor=#000000 width=464> | ||
| + | <tr valign="top"> | ||
| + | <td> | ||
| + | <table bgcolor=#ffffb0 width=460> | ||
<tr valign="top"> | <tr valign="top"> | ||
<td>[[file:NotePad.PNG|link=]]</td> | <td>[[file:NotePad.PNG|link=]]</td> | ||
<td><span style="font-size: 17px;">'''Notes:'''</span><br> | <td><span style="font-size: 17px;">'''Notes:'''</span><br> | ||
| + | ---- | ||
The '''Active Layer''' is the "working layer" which is:- | The '''Active Layer''' is the "working layer" which is:- | ||
*where new objects will be added to the layout | *where new objects will be added to the layout | ||
| − | *the layer that is automatically selected for merging and deleting</td> | + | *the layer that is automatically selected for merging and deleting |
| + | </td> | ||
</tr> | </tr> | ||
</table> | </table> | ||
| − | + | </td> | |
| − | + | ||
| − | + | ||
</tr> | </tr> | ||
| + | </table> | ||
| + | </td> | ||
| + | <td width=12> </td> | ||
| + | <td width=484> | ||
| + | <table bgcolor="red" width=464> | ||
| + | <tr valign="top"> | ||
| + | <td> | ||
| + | <table bgcolor=#fcbcbc width=460> | ||
<tr valign="top"> | <tr valign="top"> | ||
<td>[[file:Stop.PNG|link=]]</td> | <td>[[file:Stop.PNG|link=]]</td> | ||
| − | <td>'''Trainz''' does not identify which is the '''Active Layer''' in Surveyor and this often leads to problems such as objects being added to the wrong layer.<br> | + | <td>'''Trainz''' does not identify which is the '''Active Layer''' in '''Surveyor''' and this often leads to problems such as objects being added to the wrong layer.<br> |
| − | See [[file:PageLink.PNG|link=]] '''[[#Adding Objects To Layers|Adding Objects To Layers]]''' below for more information.</td> | + | See [[file:PageLink.PNG|link=]] '''[[#Adding Objects To Layers|Adding Objects To Layers]]''' below for more information. |
| + | </td> | ||
| + | </tr> | ||
| + | </table> | ||
| + | </td> | ||
| + | </tr> | ||
| + | </table> | ||
| + | </td> | ||
</tr> | </tr> | ||
</table> | </table> | ||
| Line 214: | Line 295: | ||
<td>[[file:LayersAddLayer.JPG|link=]]</td> | <td>[[file:LayersAddLayer.JPG|link=]]</td> | ||
<td> | <td> | ||
| − | <table cellpadding= | + | <table cellpadding=4 bgcolor=#ffffff> |
<tr> | <tr> | ||
<td colspan="2"> | <td colspan="2"> | ||
| Line 231: | Line 312: | ||
</tr> | </tr> | ||
</table> | </table> | ||
| − | <table | + | <table bgcolor=#000000> |
| + | <tr valign="top"> | ||
| + | <td> | ||
| + | <table bgcolor=#ffffe0> | ||
<tr valign="top"> | <tr valign="top"> | ||
<td>[[file:PencilTips.PNG|link=]]</td> | <td>[[file:PencilTips.PNG|link=]]</td> | ||
| − | <td>You can easily rename the layer or move it to the other layer group | + | <td>You can easily rename the layer or move it to the other layer group if you change your mind.</td> |
</tr> | </tr> | ||
| − | </table></td> | + | </table> |
| + | </td> | ||
| + | </tr> | ||
| + | </table> | ||
| + | </td> | ||
</tr> | </tr> | ||
</table> | </table> | ||
| Line 242: | Line 330: | ||
==Deleting a Layer== | ==Deleting a Layer== | ||
| + | <table bgcolor="red" width=300> | ||
| + | <tr valign="top"> | ||
| + | <td> | ||
| + | <table bgcolor=#fcbcbc width=296> | ||
| + | <tr valign="top"> | ||
| + | <td>[[file:Stop.PNG|link=]]</td> | ||
| + | <td><span style="font-size: 15px; font-weight: 700;">WARNING:</span><br> | ||
| + | '''Deleting Layers''' cannot be undone | ||
| + | </td> | ||
| + | </tr> | ||
| + | </table> | ||
| + | </td> | ||
| + | </tr> | ||
| + | </table> | ||
| + | <br> | ||
<table> | <table> | ||
<tr> | <tr> | ||
<td>[[file:LayersToolButtonsDELETE.JPG|link=]]</td> | <td>[[file:LayersToolButtonsDELETE.JPG|link=]]</td> | ||
| − | <td>Select the layer to be deleted and click the '''Delete Button'''. <span style="background-color: yellow;"> If you don't select a layer to delete then | + | <td>Select the layer to be deleted and click the '''Delete Button'''. <span style="background-color: yellow; font-weight: 700;"> If you don't select a layer to delete then Trainz will select the current Active Layer. </span></td> |
</tr> | </tr> | ||
</table> | </table> | ||
<br> | <br> | ||
| − | <table | + | <table bgcolor="red" width=900> |
<tr valign="top"> | <tr valign="top"> | ||
| − | <td | + | <td> |
| + | <table bgcolor=#fcbcbc width=896> | ||
| + | <tr valign="top"> | ||
| + | <td>[[file:Stop.PNG|link=]]</td> | ||
| + | <td>'''Deleting a layer will delete ALL the objects placed in that layer''' except objects that are "Bound" to that layer. See [[file:PageLink.PNG|link=]] '''[[#The Bound Layer|The Bound Layer]]''' section below.</td> | ||
</tr> | </tr> | ||
<tr valign="top"> | <tr valign="top"> | ||
<td>[[file:Stop.PNG|link=]]</td> | <td>[[file:Stop.PNG|link=]]</td> | ||
| − | <td> | + | <td>In '''TRS19''' and later '''Trainz''' versions there will be a delay when deleting a layer. The delay will be indicated by a progress bar but can take several minutes on very large routes.<br> |
| − | + | <span style="color: white; background-color: red; font-weight: 700;"> Resist any urge to click the Cancel button </span><br> | |
| − | + | This delay will occur '''every time''' a layer is deleted.</td> | |
| + | </tr> | ||
| + | <tr valign="top"> | ||
| + | <td>[[file:Stop.PNG|link=]]</td> | ||
| + | <td>Due to a "bug" '''deleting a layer that contains a ruler will not delete the ruler'''. It will be hidden from view but it may reappear if another layer with the same name as the deleted layer is created or it will, eventually, reappear in the '''route-layer'''. | ||
| + | </td> | ||
| + | </tr> | ||
| + | </table> | ||
</td> | </td> | ||
</tr> | </tr> | ||
| Line 268: | Line 382: | ||
<td>[[file:LayerDeleteEmpty.JPG|link=]]</td> | <td>[[file:LayerDeleteEmpty.JPG|link=]]</td> | ||
<td> | <td> | ||
| − | <table cellpadding= | + | <table cellpadding=4 bgcolor=#ffffff> |
<tr> | <tr> | ||
<td colspan="2"> | <td colspan="2"> | ||
| Line 283: | Line 397: | ||
----</td> | ----</td> | ||
</tr> | </tr> | ||
| − | </table></td> | + | </table> |
| + | </td> | ||
</tr> | </tr> | ||
</table> | </table> | ||
| Line 293: | Line 408: | ||
<td>[[file:LayerDeleteNotEmpty.JPG|link=]]</td> | <td>[[file:LayerDeleteNotEmpty.JPG|link=]]</td> | ||
<td> | <td> | ||
| − | <table cellpadding= | + | <table cellpadding=4 bgcolor=#ffffff> |
<tr> | <tr> | ||
<td colspan="2"> | <td colspan="2"> | ||
| Line 301: | Line 416: | ||
<td>[[file:Choices.PNG|link=]]</td> | <td>[[file:Choices.PNG|link=]]</td> | ||
<td><span style="font-size: 17px;">'''Choices:'''</span><br> | <td><span style="font-size: 17px;">'''Choices:'''</span><br> | ||
| − | *Click '''Merge''' to merge this layer and its contents into another layer. See '''Merging Layers''' below for more information | + | *Click '''Merge''' to merge this layer and its contents into another layer. See '''Merging Layers''' below for more information |
| − | *Click '''Delete''' to delete the layer and its contents | + | *Click '''Delete''' to delete the layer and its contents |
*Click '''Cancel''' to cancel the delete operation</td> | *Click '''Cancel''' to cancel the delete operation</td> | ||
| + | </tr> | ||
| + | </table> | ||
</tr> | </tr> | ||
<tr> | <tr> | ||
<td colspan="2"> | <td colspan="2"> | ||
| − | ---- | + | ---- |
| − | + | </td> | |
| − | + | ||
</tr> | </tr> | ||
</table> | </table> | ||
| Line 315: | Line 431: | ||
==Merging Layers== | ==Merging Layers== | ||
| + | <table bgcolor="red" width=300> | ||
| + | <tr valign="top"> | ||
| + | <td> | ||
| + | <table bgcolor=#fcbcbc width=296> | ||
| + | <tr valign="top"> | ||
| + | <td>[[file:Stop.PNG|link=]]</td> | ||
| + | <td><span style="font-size: 15px; font-weight: 700;">WARNING:</span><br> | ||
| + | '''Mergeing Layers''' cannot be undone | ||
| + | </td> | ||
| + | </tr> | ||
| + | </table> | ||
| + | </td> | ||
| + | </tr> | ||
| + | </table> | ||
| + | <br> | ||
<table> | <table> | ||
<tr> | <tr> | ||
<td>[[file:LayersToolButtonsMERGE.JPG|link=]]</td> | <td>[[file:LayersToolButtonsMERGE.JPG|link=]]</td> | ||
| − | <td>Select the layer to be merged into another layer and click the '''Merge Button'''. <span style="background-color: yellow;"> If you don't select a layer to merge then | + | <td>Select the layer to be merged into another layer and click the '''Merge Button'''. <span style="background-color: yellow; font-weight: 700;"> If you don't select a layer to merge then Trainz will select the current Active Layer. </span></td> |
</tr> | </tr> | ||
</table> | </table> | ||
| − | <table cellpadding= | + | <table cellpadding=4 bgcolor=#c1e7e7> |
<tr valign="top"> | <tr valign="top"> | ||
<td colspan=2><span style="font-size: 17px;"><b>In Summary:</b></span></td> | <td colspan=2><span style="font-size: 17px;"><b>In Summary:</b></span></td> | ||
| Line 334: | Line 465: | ||
</tr> | </tr> | ||
</table> | </table> | ||
| + | <br> | ||
| + | <table bgcolor="red" width=900> | ||
| + | <tr valign="top"> | ||
| + | <td> | ||
| + | <table bgcolor=#fcbcbc> | ||
| + | <tr valign="top"> | ||
| + | <td>[[file:Stop.PNG|link=]]</td> | ||
| + | <td>In '''TRS19''' and later '''Trainz''' versions there will be a delay when merging a layer. The delay will be indicated by a progress bar but can take several minutes on very large routes.<br> | ||
| + | <span style="color: white; background-color: red; font-weight: 700;"> Resist any urge to click the Cancel button </span><br> | ||
| + | This delay will occur '''every time''' a layer is merged. | ||
| + | </td> | ||
| + | </tr> | ||
| + | </table> | ||
| + | </td> | ||
| + | </tr> | ||
| + | </table> | ||
| + | <br> | ||
The layer merge dialogue window will appear as shown below:- | The layer merge dialogue window will appear as shown below:- | ||
| Line 341: | Line 489: | ||
<td>[[file:LayersMergeInto.JPG|link=]]</td> | <td>[[file:LayersMergeInto.JPG|link=]]</td> | ||
<td> | <td> | ||
| − | <table cellpadding= | + | <table cellpadding=4 bgcolor=#ffffff> |
<tr> | <tr> | ||
<td colspan="2"> | <td colspan="2"> | ||
| Line 358: | Line 506: | ||
</tr> | </tr> | ||
</table> | </table> | ||
| − | |||
| − | |||
| − | |||
| − | |||
| − | |||
| − | |||
| − | |||
| − | |||
| − | |||
</td> | </td> | ||
</tr> | </tr> | ||
| Line 373: | Line 512: | ||
==Locking Layers== | ==Locking Layers== | ||
| − | <table | + | <table bgcolor=#000000> |
| + | <tr valign="top"> | ||
| + | <td> | ||
| + | <table bgcolor=#ffffe0> | ||
<tr valign="top"> | <tr valign="top"> | ||
<td>[[file:PencilTips.PNG|link=]]</td> | <td>[[file:PencilTips.PNG|link=]]</td> | ||
| − | <td>It is good practice to '''LOCK ALL LAYERS that you are not currently editing.''' This will avoid the all too common problem of accidentally adding objects to the wrong layer.</td> | + | <td>It is good practice to '''LOCK ALL LAYERS that you are not currently editing.''' This will avoid the all too common problem of accidentally adding objects to the wrong layer. |
| + | </td> | ||
| + | </tr> | ||
| + | </table> | ||
| + | </td> | ||
</tr> | </tr> | ||
</table> | </table> | ||
<br> | <br> | ||
| − | <table cellpadding= | + | <table cellpadding=4 bgcolor=#c1e7e7> |
<tr valign="top"> | <tr valign="top"> | ||
<td>[[file:DotPoint.JPG|link=]]</td> | <td>[[file:DotPoint.JPG|link=]]</td> | ||
| Line 390: | Line 536: | ||
'''To LOCK an individual layer, click on the ''Open Padlock'' icon next to its name.''' The layer being locked does not have to be the current '''Active Layer'''. | '''To LOCK an individual layer, click on the ''Open Padlock'' icon next to its name.''' The layer being locked does not have to be the current '''Active Layer'''. | ||
| − | <table cellpadding= | + | <table cellpadding=4 bgcolor=#c1e7e7> |
<tr valign="top"> | <tr valign="top"> | ||
<td>[[file:DotPoint.JPG|link=]]</td> | <td>[[file:DotPoint.JPG|link=]]</td> | ||
| Line 430: | Line 576: | ||
==Moving a Layer== | ==Moving a Layer== | ||
| − | <table cellpadding= | + | <table cellpadding=4 bgcolor=#c1e7e7> |
<tr valign="top"> | <tr valign="top"> | ||
<td colspan=2><span style="font-size: 17px;"><b>Main Points:</b></span></td> | <td colspan=2><span style="font-size: 17px;"><b>Main Points:</b></span></td> | ||
| Line 446: | Line 592: | ||
</table> | </table> | ||
<br> | <br> | ||
| − | <table | + | <table bgcolor="red" width=900> |
<tr valign="top"> | <tr valign="top"> | ||
| − | <td | + | <td> |
| − | + | <table bgcolor=#fcbcbc width=896> | |
<tr valign="top"> | <tr valign="top"> | ||
<td>[[file:Stop.PNG|link=]]</td> | <td>[[file:Stop.PNG|link=]]</td> | ||
<td> | <td> | ||
| − | In '''TRS19 | + | In '''TRS19''' and later '''Trainz''' versions there will be a delay when moving a layer. The delay will be indicated by a progress bar but can take several minutes on very large routes<br> |
| + | <span style="color: white; background-color: red; font-weight: 700;"> Resist any urge to click the Cancel button </span><br> | ||
| + | This delay will occur '''every time''' a layer is moved. | ||
| + | </td> | ||
| + | </tr> | ||
| + | </table> | ||
</td> | </td> | ||
</tr> | </tr> | ||
| Line 464: | Line 615: | ||
<td>[[file:LayersMove3.JPG|link=]]</td> | <td>[[file:LayersMove3.JPG|link=]]</td> | ||
<td> | <td> | ||
| − | <table cellpadding= | + | <table cellpadding=4 bgcolor=#ffffff> |
<tr> | <tr> | ||
<td colspan="2"> | <td colspan="2"> | ||
| Line 485: | Line 636: | ||
*The only situation where layer order within a layer group makes any difference is when adding track objects (e.g. signals, track signs, etc) to a track. | *The only situation where layer order within a layer group makes any difference is when adding track objects (e.g. signals, track signs, etc) to a track. | ||
<br> | <br> | ||
| − | <table cellpadding= | + | <table cellpadding=4 bgcolor=#c1e7e7> |
<tr valign="top"> | <tr valign="top"> | ||
<td>[[file:DotPoint.JPG|link=]]</td> | <td>[[file:DotPoint.JPG|link=]]</td> | ||
| Line 498: | Line 649: | ||
</tr> | </tr> | ||
</table> | </table> | ||
| − | |||
==Hiding Layers== | ==Hiding Layers== | ||
| Line 515: | Line 665: | ||
<td> | <td> | ||
*In the image shown left the '''Trees''' layer has its '''Eye Icon''' set to '''Hide'''<br><br> | *In the image shown left the '''Trees''' layer has its '''Eye Icon''' set to '''Hide'''<br><br> | ||
| − | <table cellpadding= | + | <table cellpadding=4 bgcolor=#c1e7e7> |
<tr valign="top"> | <tr valign="top"> | ||
<td>[[file:DotPoint.JPG|link=]]</td> | <td>[[file:DotPoint.JPG|link=]]</td> | ||
| Line 529: | Line 679: | ||
</table> | </table> | ||
<br> | <br> | ||
| − | <table | + | <table> <!-- BEGIN Nav Buttons Table --> |
<tr valign="top"> | <tr valign="top"> | ||
| − | <td | + | <td width=729><span id="stepRouteSession"></span> </td> |
| + | <td width=46>[[file:BackToTop.png|link=#top|alt=Top|Top]]</td> | ||
| + | <td width=75>[[file:NextUp.png|link=#stepTool|alt=Next Up|Top]]</td> | ||
| + | <td width=75>[[file:NextDown.png|link=#stepAdding|alt=Next Down|Next Down]]</td> | ||
| + | <td width=75>[[file:BackToBottom.png|link=#bottom|alt=Bottom|Bottom]]</td> | ||
</tr> | </tr> | ||
| − | </table> | + | </table> <!-- END Nav Buttons Table --> |
='''Route Layers vs Session Layers'''= | ='''Route Layers vs Session Layers'''= | ||
| Line 539: | Line 693: | ||
This topic has filled endless threads in the '''Trainz Forums''' with arguments raging on both sides. | This topic has filled endless threads in the '''Trainz Forums''' with arguments raging on both sides. | ||
| − | <table cellpadding= | + | <table cellpadding=4 bgcolor=#c1e7e7> |
<tr valign="top"> | <tr valign="top"> | ||
<td colspan=2><span style="font-size: 17px;"><b>In Summary:</b></span></td> | <td colspan=2><span style="font-size: 17px;"><b>In Summary:</b></span></td> | ||
| Line 545: | Line 699: | ||
<tr valign="top"> | <tr valign="top"> | ||
<td>[[file:DotPoint.JPG|link=]]</td> | <td>[[file:DotPoint.JPG|link=]]</td> | ||
| − | <td>In general, there are no "cast iron" rules that dictate what should be placed in the '''Route Layers Group''' and what should be placed in the '''Session Layers Group''' (for an exception see ''' | + | <td>In general, there are no "cast iron" rules that dictate what should be placed in the '''Route Layers Group''' and what should be placed in the '''Session Layers Group''' (for an exception see '''TRS19 Platinum Edition, Trainz Plus, TRS22 Notes''' below). Each Route and Session will be different and different creators have different ways of working. The main question to be asked is how many different '''Sessions''' will be created using a particular '''Route'''?</td> |
</tr> | </tr> | ||
</table> | </table> | ||
<br> | <br> | ||
| − | <table cellpadding= | + | <table cellpadding=4 bgcolor=#ffffb0> |
<tr valign="top"> | <tr valign="top"> | ||
<td>[[file:NotePad.PNG|link=]]</td> | <td>[[file:NotePad.PNG|link=]]</td> | ||
<td><span style="font-size: 17px;">'''Notes:'''</span><br> | <td><span style="font-size: 17px;">'''Notes:'''</span><br> | ||
| + | ---- | ||
*'''For a Route with only a single Session''' - everything can safely go into the '''Route Layers Group''' | *'''For a Route with only a single Session''' - everything can safely go into the '''Route Layers Group''' | ||
:Many creators only ever build a single Session for each of their Routes and do not use Session Layers at all (but they still have to save the session separately from the route). | :Many creators only ever build a single Session for each of their Routes and do not use Session Layers at all (but they still have to save the session separately from the route). | ||
*'''For a Route with multiple (2 or more) Sessions''' - certain things will probably need to go into the '''Session Layers Group''' for each Session. | *'''For a Route with multiple (2 or more) Sessions''' - certain things will probably need to go into the '''Session Layers Group''' for each Session. | ||
| − | :Many creators build multiple Sessions for each Route and rely on the Session Layers to create the differences between their Sessions. | + | :Many creators build multiple Sessions for each Route and rely on the Session Layers to create the differences between their Sessions. |
| + | *Many scenery assets actually have their properties stored in the Session, even when the assets themselves are in a Route layer. Editing the properties of these assets is considered to be a '''change to the Session'''. Unless you have a particular reason for saving the edited data (such as a change to commodities) you can '''usually''' ignore the offer to save the Session. These assets include:- | ||
| + | **junction switches - the left/right switch direction is stored in the Session | ||
| + | **industries - the commodities and quantities loaded/unloaded are stored in the Session (but the '''default''' direction is stored in the Route) | ||
| + | **industry enabled wagons - the commodities and quantities carried are stored in the Session | ||
| + | **consist locations ('''TRS19 Platinum Edition''', '''Trainz Plus''' and '''TRS22''') - this is stored in the Session (unless you need to save their new locations, you can safely ignore the offer to save the Session) | ||
| + | **named route objects ('''TRS19 Platinum Edition''', '''Trainz Plus''' and '''TRS22''') - while the name is stored in the Route, adding or changing the name is treated as a change to the Session | ||
</td> | </td> | ||
</tr> | </tr> | ||
</table> | </table> | ||
<br> | <br> | ||
| − | <table cellpadding= | + | <table cellpadding=4 bgcolor=#ffffb0> |
<tr valign="top"> | <tr valign="top"> | ||
<td>[[file:NotePad.PNG|link=]]</td> | <td>[[file:NotePad.PNG|link=]]</td> | ||
| − | <td><span style="font-size: 17px; font-weight: 700;"> | + | <td><span style="font-size: 17px; font-weight: 700;">TRS19 Platinum Edition, Trainz Plus, TRS22 Notes:</span><br> |
| + | ---- | ||
*The '''recommended''' practice in these versions of Trainz is to place all consists in a '''session layer''' and '''NOT''' in a '''route layer'''. Because these versions use a '''Unified Driver Surveyor''', placing a train in a route layer after switching from Driver to Surveyor can cause problems. For example: | *The '''recommended''' practice in these versions of Trainz is to place all consists in a '''session layer''' and '''NOT''' in a '''route layer'''. Because these versions use a '''Unified Driver Surveyor''', placing a train in a route layer after switching from Driver to Surveyor can cause problems. For example: | ||
**If active Driver consists (i.e. those under manual or AI control) are in a route layer and you switch from Driver to Surveyor to edit the route and save the route edit, then those consists will be saved in their new positions, not their starting positions for the session. | **If active Driver consists (i.e. those under manual or AI control) are in a route layer and you switch from Driver to Surveyor to edit the route and save the route edit, then those consists will be saved in their new positions, not their starting positions for the session. | ||
| − | *Recent experiments using the '''Unified Driver Surveyor''' have indicated that when portals produce trains they will be placed into the same layer as the portal - so if a train that is in a '''Session layer''' enters a portal that is in a '''Route layer''' and is later returned to the layout, it will be returned in the same '''Route layer''' as the portal. This has ''possibly always been the case'' with portals but has not been noticed until the arrival of the '''Unified Driver Surveyor'''</td> | + | *Recent experiments using the '''Unified Driver Surveyor''' have indicated that when portals produce trains they will be placed into the same layer as the portal - so if a train that is in a '''Session layer''' enters a portal that is in a '''Route layer''' and is later returned to the layout, it will be returned in the same '''Route layer''' as the portal. This has ''possibly always been the case'' with portals but has not been noticed until the arrival of the '''Unified Driver Surveyor''' |
| + | For more details see the Trainz Wiki page [[image:WikiLink.PNG|link=]]'''[[How_to_Use_the_UDS_Interface|How to Use the UDS Interface]]'''</td> | ||
</tr> | </tr> | ||
</table> | </table> | ||
<br> | <br> | ||
==The Route Layers Group== | ==The Route Layers Group== | ||
| − | <table cellpadding= | + | <table cellpadding=4 bgcolor=#c1e7e7> |
<tr valign="top"> | <tr valign="top"> | ||
<td>[[file:DotPoint.JPG|link=]]</td> | <td>[[file:DotPoint.JPG|link=]]</td> | ||
| Line 585: | Line 748: | ||
*A '''Ruler Layer''' if you are using rulers. Although rulers obey layer behavior (lock and hide) just like all other objects and splines, they have no properties window to show their layer or allow you to change that layer. Consider placing all rulers in a dedicated layer to make their management easier. <span style="background-color: red; color: white; font-weight: 700;"> NOTE: </span> Due to a bug in TANE/TRS19, deleting a dedicated '''Ruler Layer''' will not delete the rulers but will '''temporarily''' hide them from view. Rulers will still have to be deleted individually. | *A '''Ruler Layer''' if you are using rulers. Although rulers obey layer behavior (lock and hide) just like all other objects and splines, they have no properties window to show their layer or allow you to change that layer. Consider placing all rulers in a dedicated layer to make their management easier. <span style="background-color: red; color: white; font-weight: 700;"> NOTE: </span> Due to a bug in TANE/TRS19, deleting a dedicated '''Ruler Layer''' will not delete the rulers but will '''temporarily''' hide them from view. Rulers will still have to be deleted individually. | ||
| − | <table | + | <table bgcolor=#000000> |
| + | <tr valign="top"> | ||
| + | <td> | ||
| + | <table bgcolor=#ffffe0> | ||
<tr valign="top"> | <tr valign="top"> | ||
<td>[[file:PencilTips.PNG|link=]]</td> | <td>[[file:PencilTips.PNG|link=]]</td> | ||
<td> | <td> | ||
*'''It is a good idea to place ALL the consists in the same layer''' particularly if they are going to be coupled together during the running of a Session. | *'''It is a good idea to place ALL the consists in the same layer''' particularly if they are going to be coupled together during the running of a Session. | ||
| − | *A very useful development tool is the '''Bound Layer'''. See [[file:PageLink.PNG|link=]] '''[[#The Bound Layer|The Bound Layer]]''' section below.</td> | + | *A very useful development tool is the '''Bound Layer'''. See [[file:PageLink.PNG|link=]] '''[[#The Bound Layer|The Bound Layer]]''' section below. |
| + | </td> | ||
| + | </tr> | ||
| + | </table> | ||
| + | </td> | ||
</tr> | </tr> | ||
</table> | </table> | ||
| Line 596: | Line 766: | ||
===The "route-layer"=== | ===The "route-layer"=== | ||
| − | <table cellpadding= | + | <table cellpadding=4 bgcolor=#c1e7e7> |
<tr valign="top"> | <tr valign="top"> | ||
<td>[[file:DotPoint.JPG|link=]]</td> | <td>[[file:DotPoint.JPG|link=]]</td> | ||
| Line 605: | Line 775: | ||
While all layers are equal, the "route-layer" is special. | While all layers are equal, the "route-layer" is special. | ||
| − | <table | + | <table bgcolor="red" width=900> |
<tr valign="top"> | <tr valign="top"> | ||
| − | <td | + | <td> |
| − | + | <table bgcolor=#fcbcbc width=896> | |
<tr valign="top"> | <tr valign="top"> | ||
<td>[[file:Stop.PNG|link=]]</td> | <td>[[file:Stop.PNG|link=]]</td> | ||
| − | <td>'''Track objects''', such as signals, junctions and track signs, ''cannot'' be placed in any layer that is above the layer | + | <td>'''Track objects''', such as signals, junctions and track signs, ''cannot'' be placed in any layer that is above the layer containing the track that they are attached to. If the '''route-layer''' is used for all the track and track objects and this layer is left as the top layer then this will never be a problem. |
| + | </td> | ||
| + | </tr> | ||
| + | </table> | ||
| + | </td> | ||
</tr> | </tr> | ||
</table> | </table> | ||
<br> | <br> | ||
| − | <table cellpadding=" | + | <table bgcolor=#000000 cellpadding=2> |
| + | <tr valign="top"> | ||
| + | <td> | ||
| + | <table bgcolor=#ffffe0> | ||
<tr valign="top"> | <tr valign="top"> | ||
<td>[[file:PencilTips.PNG|link=]]</td> | <td>[[file:PencilTips.PNG|link=]]</td> | ||
| − | <td>It is recommended that the following objects should be placed in the | + | <td>It is '''recommended''' that the following objects should be placed in the '''route-layer''':- |
*Track and interactive industries with track | *Track and interactive industries with track | ||
*Track infrastructure (turntables, bridges, tunnels, etc) | *Track infrastructure (turntables, bridges, tunnels, etc) | ||
*Signals and track signs (speed limits, warnings, distance, etc) | *Signals and track signs (speed limits, warnings, distance, etc) | ||
*Junctions and switches | *Junctions and switches | ||
| − | ..and that the "route-layer" be placed at the top of the '''Route Layers Group'''.</td> | + | ..and that the "route-layer" be placed at the top of the '''Route Layers Group'''. |
| + | </td> | ||
| + | </tr> | ||
| + | </table> | ||
| + | </td> | ||
</tr> | </tr> | ||
</table> | </table> | ||
| − | |||
==The Session Layers Group== | ==The Session Layers Group== | ||
| − | <table cellpadding= | + | |
| + | <table cellpadding=4 bgcolor=#c1e7e7> | ||
<tr valign="top"> | <tr valign="top"> | ||
<td>[[file:DotPoint.JPG|link=]]</td> | <td>[[file:DotPoint.JPG|link=]]</td> | ||
| Line 638: | Line 819: | ||
If you are creating more than one Session based around a particular Route, then you will probably make use of the Session Layers. | If you are creating more than one Session based around a particular Route, then you will probably make use of the Session Layers. | ||
| − | <table cellpadding= | + | <table cellpadding=4 bgcolor=#ffffb0> |
<tr valign="top"> | <tr valign="top"> | ||
<td>[[file:NotePad.PNG|link=]]</td> | <td>[[file:NotePad.PNG|link=]]</td> | ||
<td><span style="font-size: 17px;">'''Notes:'''</span><br> | <td><span style="font-size: 17px;">'''Notes:'''</span><br> | ||
| + | ---- | ||
Session Layers can contain:- | Session Layers can contain:- | ||
*Scenery objects that will only appear in one or some of the Sessions. | *Scenery objects that will only appear in one or some of the Sessions. | ||
| Line 648: | Line 830: | ||
</td> | </td> | ||
</tr> | </tr> | ||
| − | < | + | <tr valign="top"> |
| − | <table | + | <td colspan=2> |
| + | <table bgcolor=#000000> | ||
| + | <tr valign="top"> | ||
| + | <td> | ||
| + | <table bgcolor=#ffffe0> | ||
<tr valign="top"> | <tr valign="top"> | ||
<td>[[file:PencilTips.PNG|link=]]</td> | <td>[[file:PencilTips.PNG|link=]]</td> | ||
<td> | <td> | ||
| − | *'''It is a good idea to place ALL the consists in the same Session Layer''' and using a Session Layer for '''ALL''' consists is the '''recommended''' method for '''Trainz Plus'''. Particularly if they are going to be coupled together during the running of a Session | + | *'''It is a good idea to place ALL the consists in the same Session Layer''' and using a Session Layer for '''ALL''' consists is the '''recommended''' method for '''Trainz Plus'''. Particularly if they are going to be coupled together during the running of a Session |
| − | *'''When you first save a Session, give it a distinctive and informative name.''' Avoid the temptation to use '''Default''' as the name of your Session as you can easily end up with several Sessions under the same Route all called '''Default''' | + | *'''When you first save a Session, give it a distinctive and informative name.''' Avoid the temptation to use '''Default''' as the name of your Session as you can easily end up with several Sessions under the same Route all called '''Default''' |
| + | </td> | ||
| + | </tr> | ||
| + | </table> | ||
| + | </td> | ||
| + | </tr> | ||
| + | </table> | ||
| + | </td> | ||
</tr> | </tr> | ||
</table> | </table> | ||
<br> | <br> | ||
| − | <table | + | <table> <!-- BEGIN Nav Buttons Table --> |
<tr valign="top"> | <tr valign="top"> | ||
| − | <td | + | <td width=729><span id="stepAdding"></span> </td> |
| + | <td width=46>[[file:BackToTop.png|link=#top|alt=Top|Top]]</td> | ||
| + | <td width=75>[[file:NextUp.png|link=#stepRouteSession|alt=Next Up|Top]]</td> | ||
| + | <td width=75>[[file:NextDown.png|link=#stepDeleting|alt=Next Down|Next Down]]</td> | ||
| + | <td width=75>[[file:BackToBottom.png|link=#bottom|alt=Bottom|Bottom]]</td> | ||
</tr> | </tr> | ||
| − | </table> | + | </table> <!-- END Nav Buttons Table --> |
='''Adding Objects To Layers'''= | ='''Adding Objects To Layers'''= | ||
| Line 668: | Line 865: | ||
When an object (such as a scenery item, consist, track or track object) is added to the layout it is automatically placed in the currently '''Active Layer'''. Unfortunately, '''Trainz''' does not indicate which layer is the '''Active Layer''' unless you open the Layers Tool to look. This can lead to objects being placed into the wrong layers and while these objects can later be moved to another layer (see the section [[file:PageLink.PNG|link=]] '''[[#Moving Objects To Other Layers|Moving Objects To Other Layers]]''' below) it would be better to correctly set the '''Active Layer''' first. | When an object (such as a scenery item, consist, track or track object) is added to the layout it is automatically placed in the currently '''Active Layer'''. Unfortunately, '''Trainz''' does not indicate which layer is the '''Active Layer''' unless you open the Layers Tool to look. This can lead to objects being placed into the wrong layers and while these objects can later be moved to another layer (see the section [[file:PageLink.PNG|link=]] '''[[#Moving Objects To Other Layers|Moving Objects To Other Layers]]''' below) it would be better to correctly set the '''Active Layer''' first. | ||
<br><br> | <br><br> | ||
| − | <table | + | <table bgcolor=#000000> |
| + | <tr valign="top"> | ||
| + | <td> | ||
| + | <table bgcolor=#ffffe0> | ||
<tr valign="top"> | <tr valign="top"> | ||
<td>[[file:PencilTips.PNG|link=]]</td> | <td>[[file:PencilTips.PNG|link=]]</td> | ||
| − | <td>It is good practice to '''LOCK ALL LAYERS that you are not currently editing.''' This will avoid the all too common problem of accidentally adding objects to the wrong layer.</td> | + | <td>It is good practice to '''LOCK ALL LAYERS that you are not currently editing.''' This will avoid the all too common problem of accidentally adding objects to the wrong layer. |
| + | </td> | ||
| + | </tr> | ||
| + | </table> | ||
| + | </td> | ||
</tr> | </tr> | ||
</table> | </table> | ||
<br> | <br> | ||
| − | <table cellpadding= | + | <table cellpadding=4 bgcolor=#c1e7e7> |
<tr valign="top"> | <tr valign="top"> | ||
<td>[[file:DotPoint.JPG|link=]]</td> | <td>[[file:DotPoint.JPG|link=]]</td> | ||
| Line 690: | Line 894: | ||
</table> | </table> | ||
<br> | <br> | ||
| − | <table cellpadding= | + | <table cellpadding=4 bgcolor=#c1e7e7> |
<tr valign="top"> | <tr valign="top"> | ||
<td>[[file:DotPoint.JPG|link=]]</td> | <td>[[file:DotPoint.JPG|link=]]</td> | ||
| Line 697: | Line 901: | ||
</table> | </table> | ||
<br> | <br> | ||
| − | <table | + | <table bgcolor=#000000 width=1000> |
| + | <tr valign="top"> | ||
| + | <td> | ||
| + | <table bgcolor=#ffffb0 width=996> | ||
<tr valign="top"> | <tr valign="top"> | ||
<td>[[file:NotePad.PNG|link=]]</td> | <td>[[file:NotePad.PNG|link=]]</td> | ||
<td><span style="font-size: 17px;">'''Notes:'''</span><br> | <td><span style="font-size: 17px;">'''Notes:'''</span><br> | ||
| − | There are many features of Trainz Routes and Sessions that are '''NOT stored in layers'''. These include:- | + | ---- |
| + | There are many features of '''Trainz Routes''' and '''Sessions''' that are '''NOT stored in layers'''. In some cases while the objects themselves may be placed in layers, their settings or properties are not. These include:- | ||
<div style="column-count:2;-moz-column-count:2;-webkit-column-count:2"> | <div style="column-count:2;-moz-column-count:2;-webkit-column-count:2"> | ||
*landforms | *landforms | ||
*textures | *textures | ||
*'''TurfFX''' and '''Clutter''' ground effects | *'''TurfFX''' and '''Clutter''' ground effects | ||
| − | *trackside camera | + | *trackside camera '''settings''' |
*weather conditions | *weather conditions | ||
*time of day | *time of day | ||
*session rules and driver commands | *session rules and driver commands | ||
| − | *signal and junctions settings | + | *signal and junctions '''settings''' |
*rolling stock loads | *rolling stock loads | ||
| − | *industry settings | + | *industry '''settings''' |
*portal settings | *portal settings | ||
| − | *passenger station settings | + | *passenger station '''settings''' |
*navigation points | *navigation points | ||
| − | *interlocking tower | + | *interlocking tower '''settings''' [[file:BugMini.PNG|link=]] |
</div> | </div> | ||
| − | Landforms, textures, TurfFX, Clutter and | + | </td> |
| − | < | + | </tr> |
| − | ''' | + | <tr valign="top"> |
| + | <td>[[file:DotPoint.JPG|link=]]</td> | ||
| + | <td>Landforms, textures, effect layers (TurfFX, Clutter) and some Environment settings are saved as part of the '''Route''' while all the others are saved as part of a '''Session'''</td> | ||
| + | </tr> | ||
| + | <tr valign="top"> | ||
| + | <td>[[file:DotPoint.JPG|link=]]</td> | ||
| + | <td>When you enter or edit the name of a route layer scenery object, such as a station name board, that change will be treated as a change to the '''Session''' but the new or edited name will still be saved as a property of the scenery object in a '''Route''' layer. When you save, you will be given the option of saving the '''Session''' as well as the '''Route'''. You can ignore the offer to save the '''Session''' if you have not edited any objects in a '''Session Layer''', the '''Session Layers''' themselves (e.g. moved, merged, deleted or renamed) or other '''Session''' properties (e.g. commodity levels or loads). <span style="background-color: yellow; font-weight: 700;"> If uncertain, always save the Session </span> | ||
| + | </td> | ||
| + | </tr> | ||
| + | <tr valign="top"> | ||
| + | <td>[[file:Bug.png|link=|30px]]</td> | ||
| + | <td>A bug has been reported in the '''Interlocking Towers''' (and the '''Enhanced Interlocking Towers''') where the path and settings are initially saved in the '''Route''' but any later edits and changes are then saved in the '''Session'''. The workaround for this is to always load the '''Session''' when working with '''IT''' and '''EIT''' assets. This problem has not been resolved in the latest versions of '''Trainz'''. | ||
| + | </td> | ||
| + | </tr> | ||
| + | </table> | ||
</td> | </td> | ||
</tr> | </tr> | ||
</table> | </table> | ||
<br> | <br> | ||
| − | <table | + | <table> <!-- BEGIN Nav Buttons Table --> |
<tr valign="top"> | <tr valign="top"> | ||
| − | <td | + | <td width=729><span id="stepDeleting"></span> </td> |
| + | <td width=46>[[file:BackToTop.png|link=#top|alt=Top|Top]]</td> | ||
| + | <td width=75>[[file:NextUp.png|link=#stepAdding|alt=Next Up|Top]]</td> | ||
| + | <td width=75>[[file:NextDown.png|link=#stepMoving|alt=Next Down|Next Down]]</td> | ||
| + | <td width=75>[[file:BackToBottom.png|link=#bottom|alt=Bottom|Bottom]]</td> | ||
</tr> | </tr> | ||
| − | </table> | + | </table> <!-- END Nav Buttons Table --> |
='''Deleting Objects From Layers'''= | ='''Deleting Objects From Layers'''= | ||
| − | <table | + | <table bgcolor=#000000 width=900> |
| + | <tr valign="top"> | ||
| + | <td> | ||
| + | <table bgcolor=#ffffe0> | ||
<tr valign="top"> | <tr valign="top"> | ||
<td>[[file:PencilTips.PNG|link=]]</td> | <td>[[file:PencilTips.PNG|link=]]</td> | ||
<td> | <td> | ||
*It is good practice to '''LOCK ALL LAYERS that you are not currently editing.''' This will avoid the all too common problem of accidentally deleting objects from the wrong layer. | *It is good practice to '''LOCK ALL LAYERS that you are not currently editing.''' This will avoid the all too common problem of accidentally deleting objects from the wrong layer. | ||
| − | *An exception to this "good practice" is when managing rulers. Unless you have used a dedicated ruler layer for all rulers it can be difficult to discover which layer contains a particular ruler. If rulers are not added to a dedicated layer then you will need to unlock and unhide all the layers first before you can use the '''Delete Ruler''' tool.</td> | + | *An exception to this "good practice" is when managing rulers. Unless you have used a dedicated ruler layer for all rulers it can be difficult to discover which layer contains a particular ruler. If rulers are not added to a dedicated layer then you will need to unlock and unhide all the layers first before you can use the '''Delete Ruler''' tool. |
| + | </td> | ||
| + | </tr> | ||
| + | </table> | ||
| + | </td> | ||
</tr> | </tr> | ||
</table> | </table> | ||
| − | |||
<br> | <br> | ||
| − | <table cellpadding= | + | <table cellpadding=4 bgcolor=#c1e7e7> |
<tr valign="top"> | <tr valign="top"> | ||
<td>[[file:DotPoint.JPG|link=]]</td> | <td>[[file:DotPoint.JPG|link=]]</td> | ||
| Line 748: | Line 980: | ||
</tr> | </tr> | ||
</table> | </table> | ||
| − | + | <br> | |
Unfortunately '''Trainz''' does not give you a warning message when you attempt to delete an object from a locked layer, the object just refuses to be deleted. | Unfortunately '''Trainz''' does not give you a warning message when you attempt to delete an object from a locked layer, the object just refuses to be deleted. | ||
| − | + | <br> | |
| − | <table | + | <table bgcolor=#000000> |
| + | <tr valign="top"> | ||
| + | <td> | ||
| + | <table bgcolor=#ffffe0> | ||
<tr valign="top"> | <tr valign="top"> | ||
<td>[[file:PencilTips.PNG|link=]]</td> | <td>[[file:PencilTips.PNG|link=]]</td> | ||
<td>If you cannot delete an object then check:- | <td>If you cannot delete an object then check:- | ||
| − | *that the objects layer and bound layer (if set) are unlocked | + | *that the objects layer and bound layer (if it has been set) are unlocked |
| − | *that you are using the correct delete tool (e.g. such as attempting to delete a tree with the spline, signal or rolling stock delete tool) - it happens!</td> | + | *that you are using the correct delete tool (e.g. such as attempting to delete a tree with the spline, signal or rolling stock delete tool) - it happens! |
| + | </td> | ||
| + | </tr> | ||
| + | </table> | ||
| + | </td> | ||
</tr> | </tr> | ||
</table> | </table> | ||
<br> | <br> | ||
| − | <table | + | <table> <!-- BEGIN Nav Buttons Table --> |
<tr valign="top"> | <tr valign="top"> | ||
| − | <td | + | <td width=729><span id="stepMoving"></span> </td> |
| + | <td width=46>[[file:BackToTop.png|link=#top|alt=Top|Top]]</td> | ||
| + | <td width=75>[[file:NextUp.png|link=#stepDeleting|alt=Next Up|Top]]</td> | ||
| + | <td width=75>[[file:NextDown.png|link=#stepBound|alt=Next Down|Next Down]]</td> | ||
| + | <td width=75>[[file:BackToBottom.png|link=#bottom|alt=Bottom|Bottom]]</td> | ||
</tr> | </tr> | ||
| − | </table> | + | </table> <!-- END Nav Buttons Table --> |
='''Moving Objects To Other Layers'''= | ='''Moving Objects To Other Layers'''= | ||
| Line 772: | Line 1,015: | ||
<td>[[file:LayersObjectProperties.JPG|link=]]</td> | <td>[[file:LayersObjectProperties.JPG|link=]]</td> | ||
<td> | <td> | ||
| − | <table cellpadding= | + | <table cellpadding=4 bgcolor=#ffffff> |
<tr valign="top"> | <tr valign="top"> | ||
<td>[[file:Steps.PNG|link=]]</td> | <td>[[file:Steps.PNG|link=]]</td> | ||
| Line 789: | Line 1,032: | ||
</table> | </table> | ||
<br> | <br> | ||
| − | <table cellpadding= | + | <table cellpadding=4 bgcolor=#c1e7e7> |
<tr valign="top"> | <tr valign="top"> | ||
<td>[[file:DotPoint.JPG|link=]]</td> | <td>[[file:DotPoint.JPG|link=]]</td> | ||
| Line 809: | Line 1,052: | ||
</table> | </table> | ||
<br> | <br> | ||
| − | <table | + | <table> <!-- BEGIN Nav Buttons Table --> |
<tr valign="top"> | <tr valign="top"> | ||
| − | <td | + | <td width=729><span id="stepBound"></span> </td> |
| + | <td width=46>[[file:BackToTop.png|link=#top|alt=Top|Top]]</td> | ||
| + | <td width=75>[[file:NextUp.png|link=#stepMoving|alt=Next Up|Top]]</td> | ||
| + | <td width=75>[[file:NextDown.png|link=#stepDriver|alt=Next Down|Next Down]]</td> | ||
| + | <td width=75>[[file:BackToBottom.png|link=#bottom|alt=Bottom|Bottom]]</td> | ||
</tr> | </tr> | ||
| − | </table> | + | </table> <!-- END Nav Buttons Table --> |
='''The Bound Layer'''= | ='''The Bound Layer'''= | ||
| Line 819: | Line 1,066: | ||
This is a little used and probably little understood layer feature. It allows you to attach an object to two different layers so it can have the properties (locked/unlocked and show/hide) of both layers. The bound layer was introduced as a development tool, its sole use is as a tool in the building of routes and sessions. | This is a little used and probably little understood layer feature. It allows you to attach an object to two different layers so it can have the properties (locked/unlocked and show/hide) of both layers. The bound layer was introduced as a development tool, its sole use is as a tool in the building of routes and sessions. | ||
| − | <table cellpadding= | + | <table cellpadding=4 bgcolor=#c1e7e7> |
<tr valign="top"> | <tr valign="top"> | ||
<td>[[file:DotPoint.JPG|link=]]</td> | <td>[[file:DotPoint.JPG|link=]]</td> | ||
| Line 842: | Line 1,089: | ||
<td>[[file:LayersBoundLayer.JPG|link=]]</td> | <td>[[file:LayersBoundLayer.JPG|link=]]</td> | ||
<td><br> | <td><br> | ||
| − | <table cellpadding= | + | <table cellpadding=4 bgcolor=#ffffff> |
<tr> | <tr> | ||
<td colspan="2"> | <td colspan="2"> | ||
| Line 863: | Line 1,110: | ||
</table> | </table> | ||
<br> | <br> | ||
| − | <table cellpadding= | + | <table cellpadding=4 bgcolor=#c1e7e7> |
<tr valign="top"> | <tr valign="top"> | ||
<td>[[file:DotPoint.JPG|link=]]</td> | <td>[[file:DotPoint.JPG|link=]]</td> | ||
| Line 871: | Line 1,118: | ||
<br> | <br> | ||
| − | <table | + | <table bgcolor=#000000> |
| + | <tr valign="top"> | ||
| + | <td> | ||
| + | <table bgcolor=#ffffe0> | ||
<tr valign="top"> | <tr valign="top"> | ||
<td>[[file:PencilTips.PNG|link=]]</td> | <td>[[file:PencilTips.PNG|link=]]</td> | ||
| Line 877: | Line 1,127: | ||
*Create a new empty layer called "Locked" or "Hidden" and lock or hide that layer, according to your needs | *Create a new empty layer called "Locked" or "Hidden" and lock or hide that layer, according to your needs | ||
*Bind the individual objects to that layer as required | *Bind the individual objects to that layer as required | ||
| − | *When editing, testing or whatever you are doing has been completed simply delete the new layer. All objects that have been bound to that layer will have their '''Bound Layer''' property reset to '''none''' so the hidden objects will reappear and the locked objects will be unlocked.</td> | + | *When editing, testing or whatever you are doing has been completed simply delete the new layer. All objects that have been bound to that layer will have their '''Bound Layer''' property reset to '''none''' so the hidden objects will reappear and the locked objects will be unlocked. |
| + | </td> | ||
| + | </tr> | ||
| + | </table> | ||
| + | </td> | ||
</tr> | </tr> | ||
</table> | </table> | ||
<br> | <br> | ||
| − | <table | + | <table bgcolor=#000000> |
| + | <tr valign="top"> | ||
| + | <td> | ||
| + | <table bgcolor=#ffffe0> | ||
<tr valign="top"> | <tr valign="top"> | ||
<td>[[file:PencilTips.PNG|link=]]</td> | <td>[[file:PencilTips.PNG|link=]]</td> | ||
| − | <td>If you need to remove an object from a route but cannot alter the route (e.g. it is payware or under another users kuid) then create a new hidden session layer and change the bound layer of the object to the hidden layer. This will be treated as a change to the session only and Trainz will not ask you to save the route as well as the session.</td> | + | <td>If you need to remove an object from a route but cannot alter the route (e.g. it is payware or under another users kuid) then create a new hidden session layer and change the bound layer of the object to the hidden layer. This will be treated as a change to the session only and Trainz will not ask you to save the route as well as the session. |
| + | </td> | ||
| + | </tr> | ||
| + | </table> | ||
| + | </td> | ||
</tr> | </tr> | ||
</table> | </table> | ||
<br> | <br> | ||
| − | <table | + | <table> <!-- BEGIN Nav Buttons Table --> |
<tr valign="top"> | <tr valign="top"> | ||
| − | <td | + | <td width=729><span id="stepDriver"></span> </td> |
| + | <td width=46>[[file:BackToTop.png|link=#top|alt=Top|Top]]</td> | ||
| + | <td width=75>[[file:NextUp.png|link=#stepBound|alt=Next Up|Top]]</td> | ||
| + | <td width=75>[[file:NextDown.png|link=#bottom|alt=Next Down|Next Down]]</td> | ||
| + | <td width=75>[[file:BackToBottom.png|link=#bottom|alt=Bottom|Bottom]]</td> | ||
</tr> | </tr> | ||
| − | </table> | + | </table> <!-- END Nav Buttons Table --> |
='''Layers in Driver Mode'''= | ='''Layers in Driver Mode'''= | ||
| Line 920: | Line 1,185: | ||
=='''Using Session Rules'''== | =='''Using Session Rules'''== | ||
<br> | <br> | ||
| − | <table cellpadding= | + | <table cellpadding=4 bgcolor=#ffffff> |
<tr valign="top"> | <tr valign="top"> | ||
<td width="58">[[file:RulesWiki.PNG|link=]]</td> | <td width="58">[[file:RulesWiki.PNG|link=]]</td> | ||
| Line 931: | Line 1,196: | ||
*'''[[Session_Rule_List_with_Parameters#Message_Popup_Rule|Message Popup Rule]]''' - to open a browser window with a message | *'''[[Session_Rule_List_with_Parameters#Message_Popup_Rule|Message Popup Rule]]''' - to open a browser window with a message | ||
<br> | <br> | ||
| − | <table cellpadding= | + | <table cellpadding=4 bgcolor=#ffffff> |
<tr valign="top"> | <tr valign="top"> | ||
<td width="58">[[file:screenshot.PNG|link=]]</td> | <td width="58">[[file:screenshot.PNG|link=]]</td> | ||
| Line 944: | Line 1,209: | ||
</table> | </table> | ||
<br> | <br> | ||
| − | <table cellpadding= | + | <table cellpadding=4 bgcolor=#ffffff> |
<tr valign="top"> | <tr valign="top"> | ||
<td width="58">[[file:explanation.PNG|link=]]</td> | <td width="58">[[file:explanation.PNG|link=]]</td> | ||
| Line 952: | Line 1,217: | ||
</table> | </table> | ||
In this example:- | In this example:- | ||
| − | *The '''Trackside Check Rule''' is triggered when a specific train comes to a stop at a trackmark. This then executes the following rules:- | + | *The '''Trackside Check Rule''' is triggered when a specific train comes to a stop at a trackmark. This then executes the following rules in order:- |
**The '''Show/Hide Layer Rule''' is used to hide the layer named "People". Four passengers (three standing and one seated) are hidden. | **The '''Show/Hide Layer Rule''' is used to hide the layer named "People". Four passengers (three standing and one seated) are hidden. | ||
**The '''Show/Hide Layer Rule''' is used to hide the layer named "CNJCartsFull". The boxes and mail bags on the three platform trolleys are hidden. | **The '''Show/Hide Layer Rule''' is used to hide the layer named "CNJCartsFull". The boxes and mail bags on the three platform trolleys are hidden. | ||
**The '''Message Popup Rule''' is used to place a message on the screen informing the player that the passengers and mail have been loaded. | **The '''Message Popup Rule''' is used to place a message on the screen informing the player that the passengers and mail have been loaded. | ||
<br> | <br> | ||
| − | <table | + | <table> <!-- BEGIN Nav Buttons Table --> |
<tr valign="top"> | <tr valign="top"> | ||
| − | <td | + | <td width=729><span id="bottom"></span> </td> |
| + | <td width=46>[[file:BackToTop.png|link=#top|alt=Top|Top]]</td> | ||
| + | <td width=75>[[file:NextUp.png|link=#stepDriver|alt=Next Up|Top]]</td> | ||
| + | <td width=75> </td> | ||
| + | <td width=75> </td> | ||
</tr> | </tr> | ||
| − | </table> | + | </table> <!-- END Nav Buttons Table --> |
| − | + | ||
---- | ---- | ||
---- | ---- | ||
='''Trainz Wiki'''= | ='''Trainz Wiki'''= | ||
| − | <table cellpadding= | + | <table cellpadding=4 bgcolor=#ffffff> |
<tr valign="top"> | <tr valign="top"> | ||
<td>[[file:TrainzWiki.png|link=]]</td> | <td>[[file:TrainzWiki.png|link=]]</td> | ||
Revision as of 23:16, 13 April 2022
The information in this Wiki Page applies to TANE, TRS19, Trainz Plus and TRS22.
Contents |
What Are Layers?
| In Summary: | ||
| Layers are a Surveyor tool that allows you to better manage the objects that are placed in your Trainz World. | ||
| Layers are a Driver tool that allows you to change what the players see as they drive around your Trainz World. | ||
Layers can contain any objects, visible and invisible, that can be placed into a layout using the Surveyor Object, Track and Train tools. The layers and their contents can be hidden from view or locked against alteration whenever required. Their main use is in the development of a Route and a Session but they can also be used as a way of providing some additional novelty during a Driver session.
| Effect Layers Notes: The special ground effects layers, Clutter and TurfFX, that are available in the Topology Tools (press the F1 key) are not discussed here. They are more like Textures than Layers but some aspects of their use and operations are similar to the layers covered here. These special ground effects layers are saved as part of a Route but are not associated with any Route Layer. |
The Layers Tool
 |

| Click the Layers Tool to open up its properties. |
|
Loading a Route and Loading a Session
| In Summary: | ||
| Route Layers are saved with the Route. Session Layers are saved with the Session. | ||
| If you edit a Session Layer and later load just the Route then those edits will not appear. | ||
 |
More information on creating, loading and saving Routes and Sessions can be found on the Trainz Wiki Page at Route and Session Basics |
The layers you see will depend on whether you have loaded a Route by itself (with no "child" Session) or a Session and its "parent" Route.
 |
 |
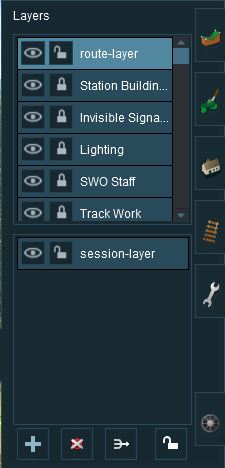
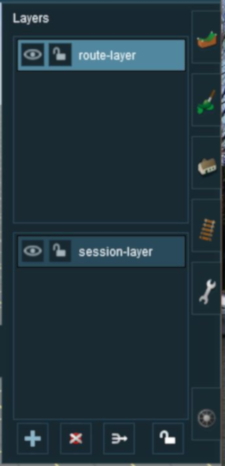
The first image on the left gives an example of the layers that can appear if a Route only is loaded into Surveyor. These are the layers that are saved with the Route. Note that a default "session-layer" is present.
The second image on the left gives an example of the layers that can appear if a Session based on that Route is loaded into Surveyor. It shows Route Layers and Session Layers. In both cases, the Route Layers are identical because the same Route has been loaded. A Session contains its own layers, the Session Layers, that are loaded and saved with the Session but are not loaded or saved with the Route.
|
|
Creating a New Route
 |
|
|||||||||
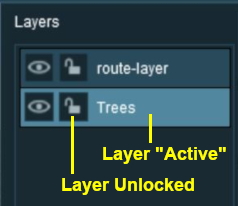
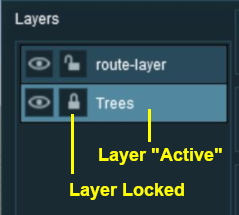
The "Active Layer"
| In Summary: | |
| The Active Layer is the selected (highlighted) layer. | |
| When you load the Route only into Surveyor, the first Route layer will be the Active Layer | |
| When you load a Session into Surveyor, the first Session layer will be the Active Layer | |
In the image above, the route-layer is the Active Layer. You can change the Active Layer at any time by clicking on the name of another layer.
|
|
Adding a New Layer
| Click the Add Button |
An Add layer dialogue window will appear.
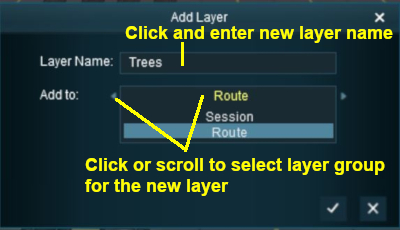 |
|
|||||||||

Deleting a Layer
|
| Select the layer to be deleted and click the Delete Button. If you don't select a layer to delete then Trainz will select the current Active Layer. |
|
If the layer being deleted is empty, then the following dialogue window will appear:-
 |
|
||||||
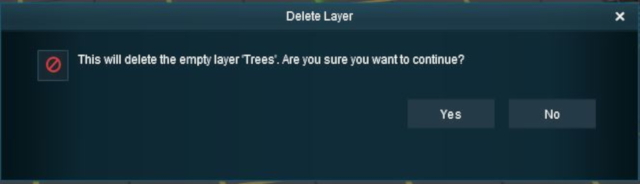
If the layer being deleted is NOT empty, then the following dialogue window will appear:-
 |
| ||||
|
|
|||||
Merging Layers
|
| Select the layer to be merged into another layer and click the Merge Button. If you don't select a layer to merge then Trainz will select the current Active Layer. |
| In Summary: | |
| Merging a layer into another layer will move ALL the objects from the first layer into the second layer. The first layer, which is now empty, will then be deleted. | |
| Once layers have been merged they cannot be separated. | |
|
The layer merge dialogue window will appear as shown below:-
 |
|
||||||
Locking Layers
|
| If you LOCK or UNLOCK a Route Layer while editing a Session then you will have made a change to the Route and will be asked to save both the Route and the Session when you exit Surveyor. |
Locking Individual Layers
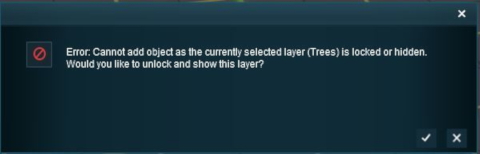
To LOCK an individual layer, click on the Open Padlock icon next to its name. The layer being locked does not have to be the current Active Layer.
| The objects in a LOCKED layer cannot be moved (around the layout) or deleted but they can be moved to other layers. |
 |
 |
|
If you attempt to add a scenery object to a locked layer you will receive the following message:-
|
Locking ALL Route Layers
| Click the Lock Button |
This will LOCK ALL the layers in the Route Layers Group. The Session Layers Group will not be affected.
The Route Layers Group can be UNLOCKED by clicking the Lock Button again.
Moving a Layer
| Main Points: | |
Layers can be moved up or down
|
|
| A layer containing track objects (e.g. signals, switches, etc) CANNOT be placed above the layer containing the track | |
|
In the example shown below a layer created in the Route Layers Group is being moved into the Session Layers Group.
 |
 |
|
||||||||||
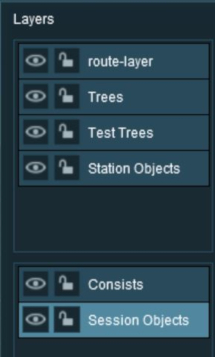
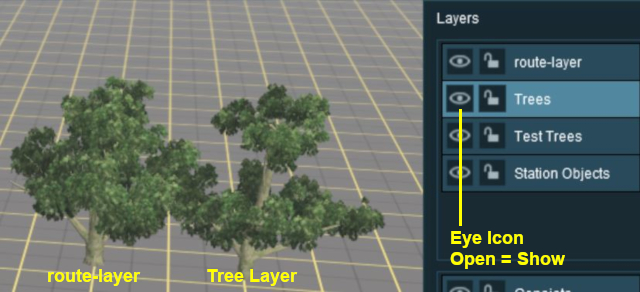
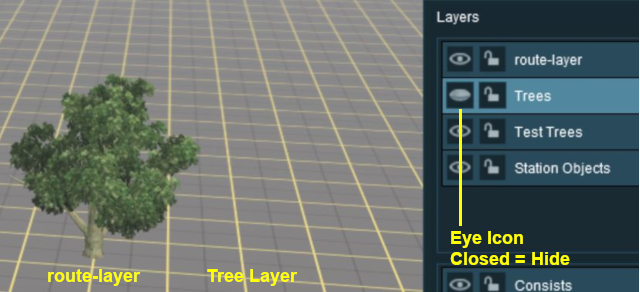
Hiding Layers
To hide or show a layer click the Eye Icon next to its name.
 |
|
|||||
 |
|
Route Layers vs Session Layers
This topic has filled endless threads in the Trainz Forums with arguments raging on both sides.
| In Summary: | |
| In general, there are no "cast iron" rules that dictate what should be placed in the Route Layers Group and what should be placed in the Session Layers Group (for an exception see TRS19 Platinum Edition, Trainz Plus, TRS22 Notes below). Each Route and Session will be different and different creators have different ways of working. The main question to be asked is how many different Sessions will be created using a particular Route? | |
Notes:
|
TRS19 Platinum Edition, Trainz Plus, TRS22 Notes:
|
The Route Layers Group
| The Route Layer Group should be used for everything that will always appear in Driver Mode regardless of which Session is playing. |
There is nothing stopping you from placing everything in the "route-layer" of the Route Layers Group and never having to worry about dealing with layers ever again - some creators prefer to work this way. However, layers do provide you with a way of organising your scenery objects to make them more manageable, particularly in more complicated layouts. Some examples:-
- A Special Objects layer or layers that can be used to hold certain scenery objects. For example all the trees or a particular building. This can be very useful when you need to hide those objects to locate or place other objects. Trackside cameras in particular can be very difficult to find when placed in a forest.
- A Platform Objects layer can be used to hold all platform items such as seats, luggage, luggage trolleys, people, lamp posts, etc. Because these items are placed on top of a platform object they can be very difficult to move or delete without first moving the platform. The layer containing the platform can be locked allowing these objects to be easily moved or deleted.
- Hiding and Showing Objects in Driver Mode. There is a Session Rule and a Driver Command that can hide and show layers during the running of a Session. For example: a rail worker can be placed in a separate layer and positioned next to a track lever while shunting operations are underway but can be removed from the scene by hiding that layer when shunting has been completed.
- A Test Layer for experimenting. Not sure if a particular object is right for your layout? Place it in a temporary layer which you can hide and show to see any differences it makes. This is particularly useful if you are deciding between different types of grasses, for example, placed throughout the layout. If the objects prove to be unsuitable then they can all be deleted by deleting the layer. If they are suitable then the layer can be merged with another or left as a new layer.
- A Ruler Layer if you are using rulers. Although rulers obey layer behavior (lock and hide) just like all other objects and splines, they have no properties window to show their layer or allow you to change that layer. Consider placing all rulers in a dedicated layer to make their management easier. NOTE: Due to a bug in TANE/TRS19, deleting a dedicated Ruler Layer will not delete the rulers but will temporarily hide them from view. Rulers will still have to be deleted individually.
|
The "route-layer"
| To avoid any confusion over which layer is the original "route-layer", this is one layer that should not be renamed or moved from the top position. |
While all layers are equal, the "route-layer" is special.
|
|
The Session Layers Group
| The Session Layers Group should be used for everything that will only be seen in the currently loaded Session. |
If you are creating more than one Session based around a particular Route, then you will probably make use of the Session Layers.
| Notes: Session Layers can contain:-
|
||||
|
||||
Adding Objects To Layers
When an object (such as a scenery item, consist, track or track object) is added to the layout it is automatically placed in the currently Active Layer. Unfortunately, Trainz does not indicate which layer is the Active Layer unless you open the Layers Tool to look. This can lead to objects being placed into the wrong layers and while these objects can later be moved to another layer (see the section ![]() Moving Objects To Other Layers below) it would be better to correctly set the Active Layer first.
Moving Objects To Other Layers below) it would be better to correctly set the Active Layer first.
|
| You cannot add objects to a layer that is LOCKED. |
If you attempt to add a scenery object to a locked layer you will receive the following message:-
|
| When adding track objects (signals, speed signs, etc) to a track, the objects being added must be in the same layer as the track or in a layer below the track layer. For more information, see the section |
|
Deleting Objects From Layers
|
| You cannot delete objects from a layer that is LOCKED. |
Unfortunately Trainz does not give you a warning message when you attempt to delete an object from a locked layer, the object just refuses to be deleted.
|
Moving Objects To Other Layers
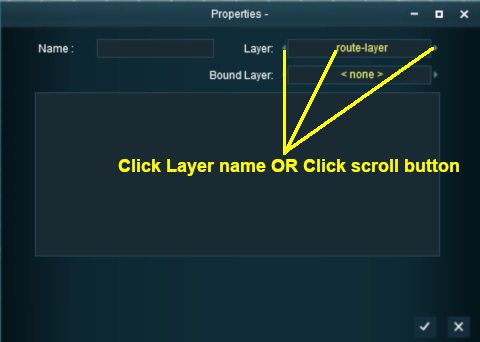 |
|
||||||||||
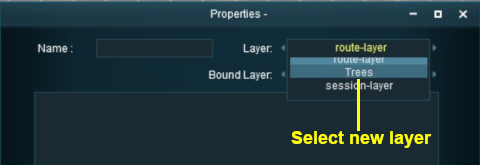 |
|||||||||||
The Bound Layer
This is a little used and probably little understood layer feature. It allows you to attach an object to two different layers so it can have the properties (locked/unlocked and show/hide) of both layers. The bound layer was introduced as a development tool, its sole use is as a tool in the building of routes and sessions.
| An object will be LOCKED and cannot be deleted or moved if its layer OR its bound layer is locked. | |
| An object will be HIDDEN if its layer OR its bound layer is hidden. | |
| Rulers cannot be bound to another layer. |
Some applications:-
- Temporarily locking an object by binding it to a locked layer while allowing other objects in the same unlocked layer to be moved or deleted. A simple but very effective development technique is to create a Route layer called "Locked" and then lock it. If you need to temporarily stop an object from being deleted or moved then it can be bound to the "Locked" layer.
- Temporarily hiding an object by binding it to a hidden layer (this will require the hidden layer to be made visible so the object can be unbound).
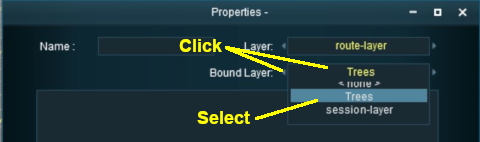 |
|
||||||
| When a layer is deleted any objects bound to that layer will have their Bound Layer reset to <none> |
|
|
Layers in Driver Mode
During the running of a Session in Driver Mode visible layers can be hidden and invisible layers revealled according to the events that occur during the Session.
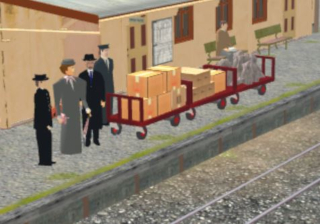 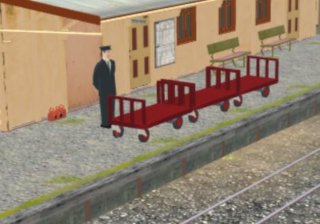 |
The two Driver Mode scenes shown on the left illustrate this feature.
|
This effect could be achieved in two different ways:-
- A Driver Command - specific to a particular driver, or
- A Session Rule - specific to a particular driver, consist, or any driver/consist
Using a Driver Command
The driver command ![]() Layer Control hides and shows named layers.
Layer Control hides and shows named layers.
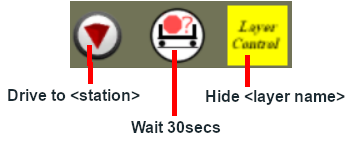
Using Session Rules
 |
Rules Used: |
- Trackside Check Rule - to trigger the event
- Show/Hide Layer Rule - to hide layers
- Message Popup Rule - to open a browser window with a message
 |
Session Editor Screenshot: |
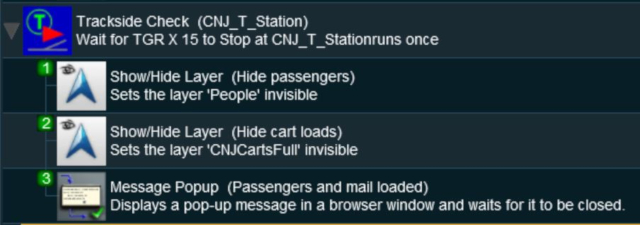 |
 |
Description: |
In this example:-
- The Trackside Check Rule is triggered when a specific train comes to a stop at a trackmark. This then executes the following rules in order:-
- The Show/Hide Layer Rule is used to hide the layer named "People". Four passengers (three standing and one seated) are hidden.
- The Show/Hide Layer Rule is used to hide the layer named "CNJCartsFull". The boxes and mail bags on the three platform trolleys are hidden.
- The Message Popup Rule is used to place a message on the screen informing the player that the passengers and mail have been loaded.
Trainz Wiki
 |
More Tutorials and Guides to Using Trainz |
This page was created by Trainz user pware in June 2018 and was last updated as shown below.