How to Move a Picklist
From TrainzOnline
(Difference between revisions)
m (Replaced <font> tags with <span> tags and CSS) |
m (removed hyperlinks from all images) |
||
| Line 7: | Line 7: | ||
<table cellpadding="4" bgcolor=#ffffff> | <table cellpadding="4" bgcolor=#ffffff> | ||
<tr valign="top"> | <tr valign="top"> | ||
| − | <td>[[file:Steps.PNG]]</td> | + | <td>[[file:Steps.PNG|link=]]</td> |
<td><span style="font-size: 17px;">'''Step 1: Open CM and Your Picklists'''</span><br> | <td><span style="font-size: 17px;">'''Step 1: Open CM and Your Picklists'''</span><br> | ||
<table> | <table> | ||
| Line 15: | Line 15: | ||
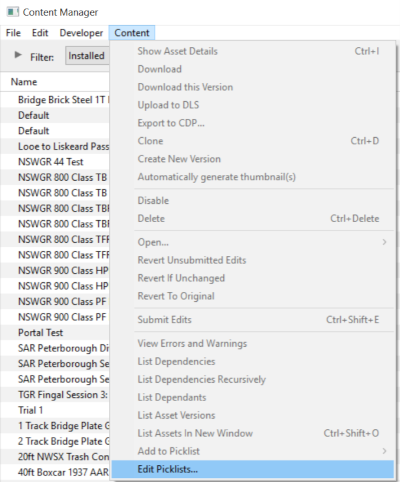
#in '''Content Manager''' open the '''Content''' menu | #in '''Content Manager''' open the '''Content''' menu | ||
#select '''Edit Picklist'''<br> | #select '''Edit Picklist'''<br> | ||
| − | [[file:PickListEditPickList.png]]<br><br> | + | [[file:PickListEditPickList.png|link=]]<br><br> |
This will display all your current Picklists. | This will display all your current Picklists. | ||
</td> | </td> | ||
| Line 25: | Line 25: | ||
<table cellpadding="4" bgcolor=#ffffff> | <table cellpadding="4" bgcolor=#ffffff> | ||
<tr valign="top"> | <tr valign="top"> | ||
| − | <td>[[file:Steps.PNG]]</td> | + | <td>[[file:Steps.PNG|link=]]</td> |
<td><span style="font-size: 17px;">'''Step 2: Select the Picklist to be moved'''</span><br> | <td><span style="font-size: 17px;">'''Step 2: Select the Picklist to be moved'''</span><br> | ||
<table> | <table> | ||
| Line 32: | Line 32: | ||
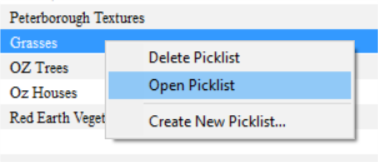
#right mouse click on the required Picklist | #right mouse click on the required Picklist | ||
#select '''Open Picklist''' from the popup menu<br> | #select '''Open Picklist''' from the popup menu<br> | ||
| − | [[file:PickListOpenGrasses.png]]<br> | + | [[file:PickListOpenGrasses.png|link=]]<br> |
This will open the Picklist</td> | This will open the Picklist</td> | ||
</tr> | </tr> | ||
| Line 41: | Line 41: | ||
<table cellpadding="4" bgcolor=#ffffff> | <table cellpadding="4" bgcolor=#ffffff> | ||
<tr valign="top"> | <tr valign="top"> | ||
| − | <td>[[file:Steps.PNG]]</td> | + | <td>[[file:Steps.PNG|link=]]</td> |
<td><span style="font-size: 17px;">'''Step 3: Select Picklist Contents'''</span><br> | <td><span style="font-size: 17px;">'''Step 3: Select Picklist Contents'''</span><br> | ||
<table> | <table> | ||
| Line 48: | Line 48: | ||
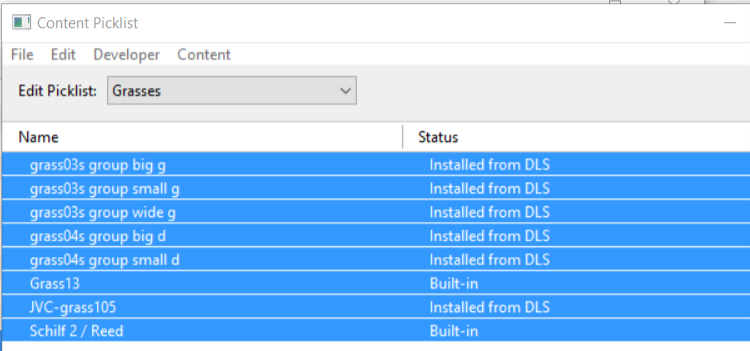
#left mouse click on any one of the items | #left mouse click on any one of the items | ||
#press '''Ctrl-A''' to '''Select All''' the items<br> | #press '''Ctrl-A''' to '''Select All''' the items<br> | ||
| − | [[file:PickListSelectAll.png]]</td> | + | [[file:PickListSelectAll.png|link=]]</td> |
</tr><br> | </tr><br> | ||
</table></td> | </table></td> | ||
| Line 56: | Line 56: | ||
<table cellpadding="4" bgcolor=#ffffff> | <table cellpadding="4" bgcolor=#ffffff> | ||
<tr valign="top"> | <tr valign="top"> | ||
| − | <td>[[file:Steps.PNG]]</td> | + | <td>[[file:Steps.PNG|link=]]</td> |
<td><span style="font-size: 17px;">'''Step 4: Transfer List to a New Window'''</span><br> | <td><span style="font-size: 17px;">'''Step 4: Transfer List to a New Window'''</span><br> | ||
<table> | <table> | ||
| Line 63: | Line 63: | ||
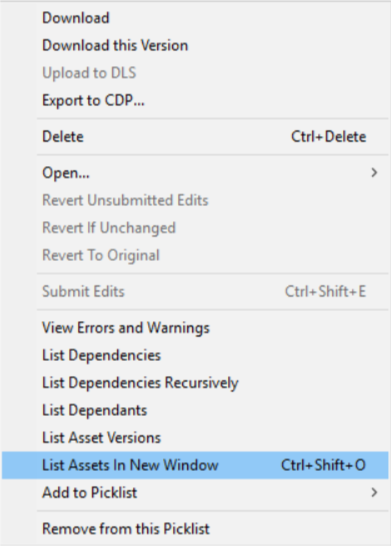
#right mouse click on any one of the items | #right mouse click on any one of the items | ||
#select '''List Assets in New Window''' from the popup menu<br> | #select '''List Assets in New Window''' from the popup menu<br> | ||
| − | [[file:PickListListinNewWindow.png]]</td> | + | [[file:PickListListinNewWindow.png|link=]]</td> |
</tr> | </tr> | ||
</table></td> | </table></td> | ||
| Line 71: | Line 71: | ||
<table cellpadding="4" bgcolor=#ffffff> | <table cellpadding="4" bgcolor=#ffffff> | ||
<tr valign="top"> | <tr valign="top"> | ||
| − | <td>[[file:Steps.PNG]]</td> | + | <td>[[file:Steps.PNG|link=]]</td> |
<td><span style="font-size: 17px;">'''Step 5: Copy Assets in Picklist'''</span><br> | <td><span style="font-size: 17px;">'''Step 5: Copy Assets in Picklist'''</span><br> | ||
<table> | <table> | ||
| Line 77: | Line 77: | ||
<td> | <td> | ||
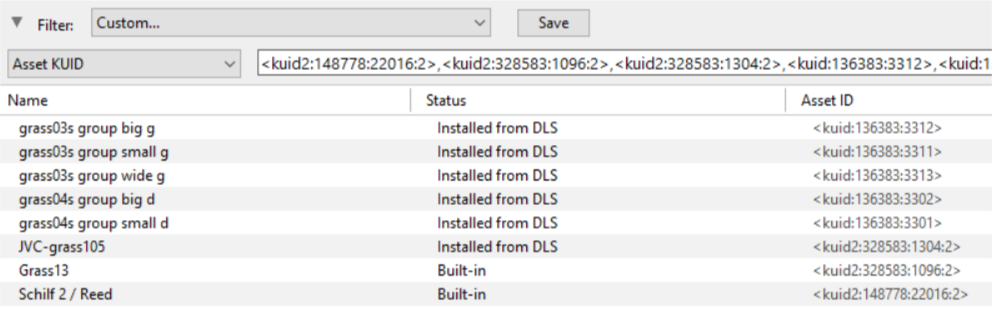
The Picklist assets will be listed by their kuids in the '''Asset KUID''' box of a new search filter<br> | The Picklist assets will be listed by their kuids in the '''Asset KUID''' box of a new search filter<br> | ||
| − | [[file:PickListSelectListofAssetsSelected.png]]<br><br> | + | [[file:PickListSelectListofAssetsSelected.png|link=]]<br><br> |
#click inside the '''Asset KUID''' box and press '''Ctrl-A''' to select them all | #click inside the '''Asset KUID''' box and press '''Ctrl-A''' to select them all | ||
#copy the asset list to the clipboard (press '''Ctrl-C''')</td> | #copy the asset list to the clipboard (press '''Ctrl-C''')</td> | ||
| Line 90: | Line 90: | ||
<table cellpadding="4" bgcolor=#ffffb0> | <table cellpadding="4" bgcolor=#ffffb0> | ||
<tr valign="top"> | <tr valign="top"> | ||
| − | <td>[[file:NotePad.PNG]]</td> | + | <td>[[file:NotePad.PNG|link=]]</td> |
<td><span style="font-size: 17px;">'''Notes:'''</span><br> | <td><span style="font-size: 17px;">'''Notes:'''</span><br> | ||
If you are transferring the Picklist to another computer then you will need to:- | If you are transferring the Picklist to another computer then you will need to:- | ||
| Line 105: | Line 105: | ||
<table cellpadding="4" bgcolor=#ffffff> | <table cellpadding="4" bgcolor=#ffffff> | ||
<tr valign="top"> | <tr valign="top"> | ||
| − | <td>[[file:Steps.PNG]]</td> | + | <td>[[file:Steps.PNG|link=]]</td> |
<td><span style="font-size: 17px;">'''Step 6: Open CM in the Destination Trainz and Create a New Filter'''</span><br> | <td><span style="font-size: 17px;">'''Step 6: Open CM in the Destination Trainz and Create a New Filter'''</span><br> | ||
<table> | <table> | ||
| Line 113: | Line 113: | ||
#start a new filter | #start a new filter | ||
#paste ('''Ctrl-V''') the asset list into the '''Asset KUID''' box<br><br> | #paste ('''Ctrl-V''') the asset list into the '''Asset KUID''' box<br><br> | ||
| − | [[file:PickListSelectListofAssets.png]]<br><br></td> | + | [[file:PickListSelectListofAssets.png|link=]]<br><br></td> |
</tr> | </tr> | ||
</table></td> | </table></td> | ||
| Line 121: | Line 121: | ||
<table cellpadding="4" bgcolor=#ffffff> | <table cellpadding="4" bgcolor=#ffffff> | ||
<tr valign="top"> | <tr valign="top"> | ||
| − | <td>[[file:Steps.PNG]]</td> | + | <td>[[file:Steps.PNG|link=]]</td> |
<td><span style="font-size: 17px;">'''Step 7: Create a New Picklist'''</span><br><br> | <td><span style="font-size: 17px;">'''Step 7: Create a New Picklist'''</span><br><br> | ||
The pasted asset list will appear in the CM display window, as shown below.<table> | The pasted asset list will appear in the CM display window, as shown below.<table> | ||
<tr valign="top"> | <tr valign="top"> | ||
<td> | <td> | ||
| − | [[file:PickListTRS19Paste.png]]<br><br> | + | [[file:PickListTRS19Paste.png|link=]]<br><br> |
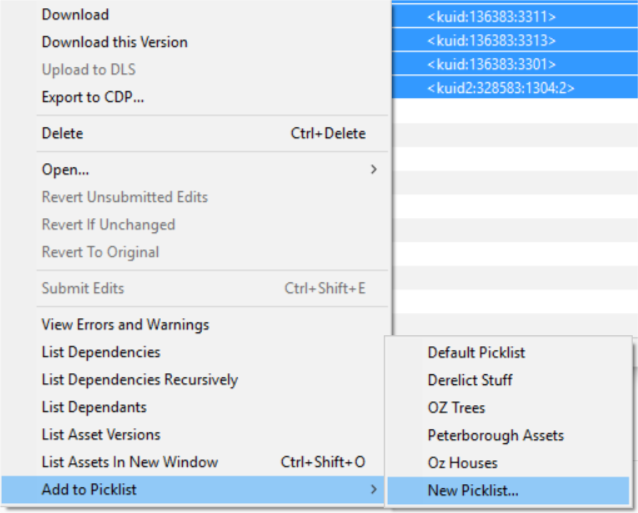
#select an entry and then select all ('''Ctrl-A''') | #select an entry and then select all ('''Ctrl-A''') | ||
#right mouse click on any entry and select '''Add to Picklist''' and then '''New Picklist''' from the popup menus<br><br> | #right mouse click on any entry and select '''Add to Picklist''' and then '''New Picklist''' from the popup menus<br><br> | ||
| − | [[file:PickListTRS19NewList.png]]<br><br></td> | + | [[file:PickListTRS19NewList.png|link=]]<br><br></td> |
</tr> | </tr> | ||
</table></td> | </table></td> | ||
| Line 137: | Line 137: | ||
<table cellpadding="4" bgcolor=#ffffff> | <table cellpadding="4" bgcolor=#ffffff> | ||
<tr valign="top"> | <tr valign="top"> | ||
| − | <td>[[file:Steps.PNG]]</td> | + | <td>[[file:Steps.PNG|link=]]</td> |
<td><span style="font-size: 17px;">'''Step 8: Enter a Name for the Picklist'''</span><br> | <td><span style="font-size: 17px;">'''Step 8: Enter a Name for the Picklist'''</span><br> | ||
<table> | <table> | ||
<tr valign="top"> | <tr valign="top"> | ||
<td> | <td> | ||
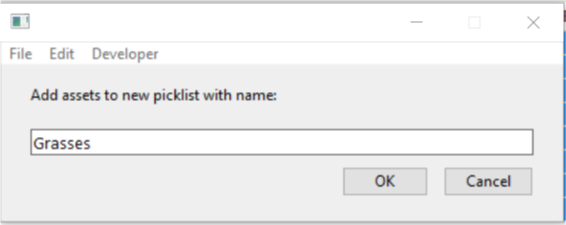
| − | [[file:PickListTRS19NewListName.png]]<br><br> | + | [[file:PickListTRS19NewListName.png|link=]]<br><br> |
Enter a name for the Picklist and click '''Ok'''</td> | Enter a name for the Picklist and click '''Ok'''</td> | ||
</tr> | </tr> | ||
| Line 153: | Line 153: | ||
<table cellpadding="4" bgcolor=#ffffff> | <table cellpadding="4" bgcolor=#ffffff> | ||
<tr valign="top"> | <tr valign="top"> | ||
| − | <td>[[file:TrainzWiki.png]]</td> | + | <td>[[file:TrainzWiki.png|link=]]</td> |
<td> | <td> | ||
<span style="font-size: 17px;">'''More Tutorials and Guides to Using Trainz'''</span><br> | <span style="font-size: 17px;">'''More Tutorials and Guides to Using Trainz'''</span><br> | ||
Revision as of 07:36, 6 September 2019
The information in this Wiki Page applies to both TANE and TRS19 and will show you how to move a Picklist created in Trainz (TRS19 or TANE) to another installation of Trainz (for example, on another computer).
- For instructions on how to backup a Picklist, see the wiki page How to Backup a Picklist
- For instructions on how to create a Picklist, see the wiki page How to Create a Picklist
Access Your Current Picklists
 |
Step 1: Open CM and Your Picklists
|
|
Step 2: Select the Picklist to be moved
|
|
Step 3: Select Picklist Contents
|
|
Step 4: Transfer List to a New Window
|
|
Step 5: Copy Assets in Picklist
|

Transfer the List to Another Copy of Trainz
| Notes: If you are transferring the Picklist to another computer then you will need to:-
There you can reverse the steps by:-
|
|
Step 6: Open CM in the Destination Trainz and Create a New Filter
|

|
Step 7: Create a New Picklist The pasted asset list will appear in the CM display window, as shown below.
|
|
Step 8: Enter a Name for the Picklist
|
Trainz Wiki
 |
More Tutorials and Guides to Using Trainz |