How to Create a Picklist
From TrainzOnline
(Difference between revisions)
m (→Using Surveyor) |
m (replaced <font> tags with <span> tags and CSS) |
||
| Line 1: | Line 1: | ||
| − | The information in this Wiki Page applies to both '''TANE''' and '''TRS19''' and will show you how to create a '''Picklist''' in | + | The information in this Wiki Page applies to both '''TANE''' and '''TRS19''' and will show you how to create a '''Picklist''' in TRS19 or TANE (both programs use identical methods). |
* For instructions on how to '''backup''' a Picklist, see the wiki page '''[[How to Backup a Picklist]]''' | * For instructions on how to '''backup''' a Picklist, see the wiki page '''[[How to Backup a Picklist]]''' | ||
* For instructions on how to '''move''' a Picklist, see the wiki page '''[[How to Move a Picklist]]'''<br> | * For instructions on how to '''move''' a Picklist, see the wiki page '''[[How to Move a Picklist]]'''<br> | ||
| Line 10: | Line 10: | ||
<tr valign="top"> | <tr valign="top"> | ||
<td>[[file:Steps.PNG]]</td> | <td>[[file:Steps.PNG]]</td> | ||
| − | <td><font size | + | <td><span style="font-size: 17px;">'''Step 1: Select the assets'''</span><br> |
| − | + | ||
| − | + | ||
| − | + | ||
| − | + | ||
| − | + | ||
| − | + | ||
| − | + | ||
<table> | <table> | ||
<tr valign="top"> | <tr valign="top"> | ||
| Line 33: | Line 26: | ||
<tr valign="top"> | <tr valign="top"> | ||
<td>[[file:Steps.PNG]]</td> | <td>[[file:Steps.PNG]]</td> | ||
| − | <td><font size | + | <td><span style="font-size: 17px;">'''Step 2: Add the assets to the Picklist'''</span><br> |
| + | <table cellpadding="4" bgcolor=#ffffb0> | ||
| + | <tr valign="top"> | ||
| + | <td>[[file:NotePad.PNG]]</td> | ||
| + | <td><span style="font-size: 17px;">'''Notes:'''</span><br> | ||
| + | Only assets that are '''installed on your system''' can be added to a Picklist. They can be built-in, base, payware or installed from the DLS.</td> | ||
| + | </tr> | ||
| + | </table> | ||
<table> | <table> | ||
<tr valign="top"> | <tr valign="top"> | ||
| Line 51: | Line 51: | ||
<tr valign="top"> | <tr valign="top"> | ||
<td>[[file:Steps.PNG]]</td> | <td>[[file:Steps.PNG]]</td> | ||
| − | <td><font size | + | <td><span style="font-size: 17px;">'''Step 3: Enter Picklist Name (for New Picklist option only)</span> |
<table> | <table> | ||
<tr valign="top"> | <tr valign="top"> | ||
| Line 70: | Line 70: | ||
<tr valign="top"> | <tr valign="top"> | ||
<td>[[file:Steps.PNG]]</td> | <td>[[file:Steps.PNG]]</td> | ||
| − | <td><font size | + | <td><span style="font-size: 17px;">'''Step 1: Open the Picklist Window'''</span><br> |
<table> | <table> | ||
<tr valign="top"> | <tr valign="top"> | ||
| Line 100: | Line 100: | ||
<tr valign="top"> | <tr valign="top"> | ||
<td>[[file:Steps.PNG]]</td> | <td>[[file:Steps.PNG]]</td> | ||
| − | <td><font size | + | <td><span style="font-size: 17px;">'''Step 2: Add the assets to the Picklist'''</span><br> |
[[file:Alternatives.png]] Choose from one of two alternative methods.</td> | [[file:Alternatives.png]] Choose from one of two alternative methods.</td> | ||
</tr> | </tr> | ||
| Line 139: | Line 139: | ||
---- | ---- | ||
<br> | <br> | ||
| − | |||
='''Trainz Wiki'''= | ='''Trainz Wiki'''= | ||
<table cellpadding="4" bgcolor=#ffffff> | <table cellpadding="4" bgcolor=#ffffff> | ||
| Line 145: | Line 144: | ||
<td>[[file:TrainzWiki.png]]</td> | <td>[[file:TrainzWiki.png]]</td> | ||
<td> | <td> | ||
| − | <font size | + | <span style="font-size: 17px;">'''More Tutorials and Guides to Using Trainz'''</span><br> |
*'''<span class="plainlinks">[http://online.ts2009.com/mediaWiki/index.php/HowTo How to Guides]</span>''' | *'''<span class="plainlinks">[http://online.ts2009.com/mediaWiki/index.php/HowTo How to Guides]</span>''' | ||
*'''[[Driver Commands List]]''' | *'''[[Driver Commands List]]''' | ||
Revision as of 15:58, 5 September 2019
The information in this Wiki Page applies to both TANE and TRS19 and will show you how to create a Picklist in TRS19 or TANE (both programs use identical methods).
- For instructions on how to backup a Picklist, see the wiki page How to Backup a Picklist
- For instructions on how to move a Picklist, see the wiki page How to Move a Picklist
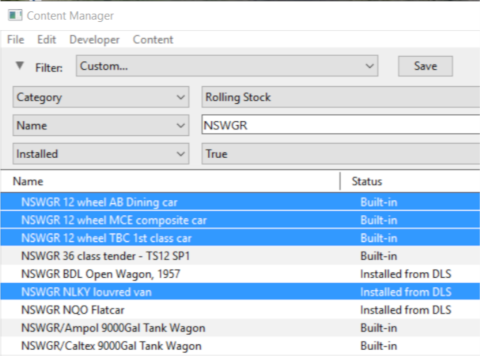
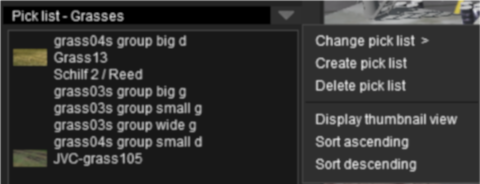
Both programs provide you with two different methods of creating Picklists, using either Content Manager (or Manage Content from the TANE/TRS19 Launcher) or in Surveyor.
Using Content Manager (CM)
 |
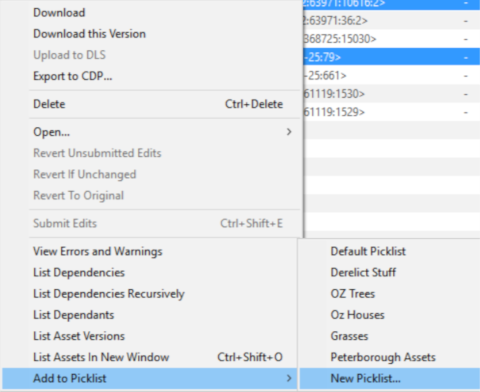
Step 2: Add the assets to the Picklist
|
 |
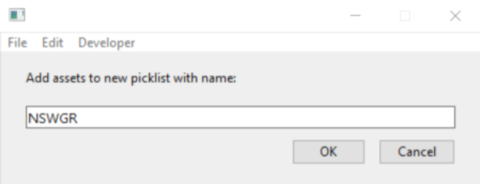
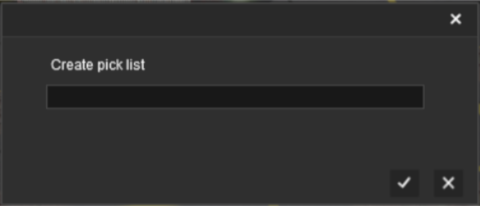
Step 3: Enter Picklist Name (for New Picklist option only)
|
Using Surveyor
In Surveyor in either TRS19 or TANE.
 |
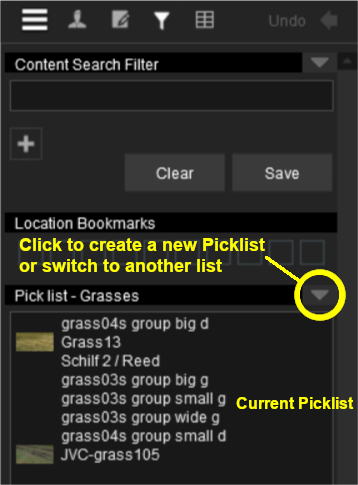
Step 1: Open the Picklist Window
|
 |
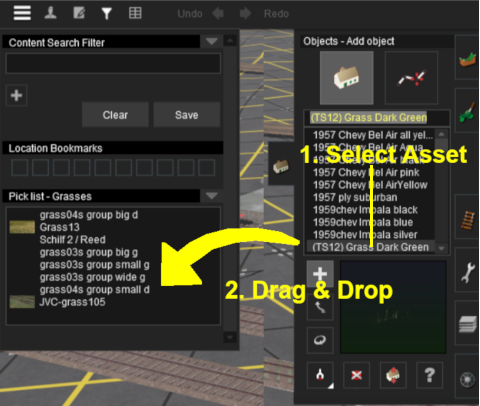
Step 2: Add the assets to the Picklist Choose from one of two alternative methods. Choose from one of two alternative methods. |
|
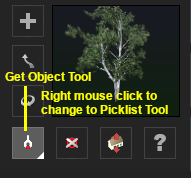
When finished, right mouse click on the tool again to restore it to the Get Object state. |
| Each asset is automatically saved to the Picklist when it is "dropped" or "clicked" into the Picklist window | |
| If an added asset does not appear in the window, then it usually means that the asset is already present in the list | |
| To remove an asset from the Picklist simply drag it out of the Picklist window onto the Surveyor screen |
Press the ESCape key to close the Search Filter/Picklist Tool.
Trainz Wiki
 |
More Tutorials and Guides to Using Trainz |
