How to Use Session Editor
m |
m |
||
| Line 100: | Line 100: | ||
</table> <!-- END Main table --> | </table> <!-- END Main table --> | ||
<br> | <br> | ||
| − | Rules can be grouped together into lists for convenience (e.g. all the Rules that set signals at the start of the Session) or because they depend on a particular event (e.g. a time, a train arriving at a set point, a wagon being loaded, etc). These form '''Nested Rules''' and are indicated by ''arrow heads'' as shown in the image above. Click on an arrow head to open up its nested list of child Rules as shown in the image below. | + | Rules can be grouped together into lists for convenience (e.g. all the Rules that set signals at the start of the Session) or because they depend on a particular event (e.g. a time, a train arriving at a set point, a wagon being loaded, etc). These form '''Nested Rules''' and are indicated by ''arrow heads'' as shown in the image above. <span style="font-weight: 700; font-size: 15px; background-color: lightcyan;">Left Click</span> on an arrow head to open up its nested list of child Rules as shown in the image below. |
<br><br> | <br><br> | ||
[[file:SessionEditOpenLayerSP1.png|480px|link=]] | [[file:SessionEditOpenLayerSP1.png|480px|link=]] | ||
<br><br> | <br><br> | ||
| − | Each of the Rules that have been nested under the '''Ordered List Rule''' in the image above have been '''indented''' one level to the right. Click the ''arrow head'' again to close the list. | + | Each of the Rules that have been nested under the '''Ordered List Rule''' in the image above have been '''indented''' one level to the right. <span style="font-weight: 700; font-size: 15px; background-color: lightcyan;">Left Click</span> on the ''arrow head'' again to close the list. |
<table cellpadding=4 bgcolor="Aquamarine"> | <table cellpadding=4 bgcolor="Aquamarine"> | ||
| Line 133: | Line 133: | ||
<td>[[file:SessionEditButtonsSP1.png|link=]]</td> | <td>[[file:SessionEditButtonsSP1.png|link=]]</td> | ||
<td> | <td> | ||
| − | *the <span style="background-color: black; color: white; font-weight: 700;"> Add </span> button will insert a new Rule below the selected (highlighted) Rule or at the end of the list if no Rule has been selected | + | *the <span style="background-color: black; color: white; font-weight: 700; font-size: 15px;"> Add </span> button will insert a new Rule below the selected (highlighted) Rule or at the end of the list if no Rule has been selected |
| − | To use the other buttons, select a Rule | + | To use the other buttons, first select a '''Rule''' with a <span style="font-weight: 700; font-size: 15px; background-color: lightcyan;">Left Click</span> |
| − | *the <span style="background-color: black; color: white; font-weight: 700;"> Edit </span> button will open the selected (highlighted) Rule for editing | + | *the <span style="background-color: black; color: white; font-weight: 700; font-size: 15px;"> Edit </span> button will open the selected (highlighted) Rule for editing |
| − | *the <span style="background-color: black; color: white; font-weight: 700;"> Delete </span> button will delete the selected Rule | + | *the <span style="background-color: black; color: white; font-weight: 700; font-size: 15px;"> Delete </span> button will delete the selected Rule |
| − | *the <span style="background-color: black; color: white; font-weight: 700;"> Indent/Outdent </span> buttons will move the selected Rule right or left | + | *the <span style="background-color: black; color: white; font-weight: 700; font-size: 15px;"> Indent/Outdent </span> buttons will move the selected Rule right or left |
| − | *the <span style="background-color: black; color: white; font-weight: 700;"> Up/Down </span> buttons will move the selected Rule Up or Down</td> | + | *the <span style="background-color: black; color: white; font-weight: 700; font-size: 15px;"> Up/Down </span> buttons will move the selected Rule Up or Down</td> |
</tr> | </tr> | ||
</table> | </table> | ||
| Line 145: | Line 145: | ||
<tr valign="top"> | <tr valign="top"> | ||
<td>[[file:Tick.PNG|link=]]</td> | <td>[[file:Tick.PNG|link=]]</td> | ||
| − | <td>Click to '''Accept''' your edits and close the Session Editor</td> | + | <td><span style="font-weight: 700; font-size: 15px; background-color: lightcyan;">Left Click</span> to '''Accept''' your edits and close the Session Editor</td> |
<td> </td> | <td> </td> | ||
<td>[[file:Cross.PNG|link=]]</td> | <td>[[file:Cross.PNG|link=]]</td> | ||
| − | <td>Click to '''Cancel''' your edits and close the Session Editor</td> | + | <td><span style="font-weight: 700; font-size: 15px; background-color: lightcyan;">Left Click</span> to '''Cancel''' your edits and close the Session Editor</td> |
</tr> | </tr> | ||
</table> | </table> | ||
| Line 156: | Line 156: | ||
<tr valign="top"> | <tr valign="top"> | ||
<td>[[file:DotPoint.JPG|link=]]</td> | <td>[[file:DotPoint.JPG|link=]]</td> | ||
| − | <td>The above operations, and more, can also be found by | + | <td>The above operations, and more, can also be found by a <span style="font-weight: 700; font-size: 15px; color: blue;">Right Click</span> on a '''Rule''' to open up a menu</td> |
</tr> | </tr> | ||
</table> | </table> | ||
| Line 164: | Line 164: | ||
<td width=370>[[file:SessionEditPopupMenu.png|link=]]</td> | <td width=370>[[file:SessionEditPopupMenu.png|link=]]</td> | ||
<td width=630> | <td width=630> | ||
| − | *<span style="background-color: black; color: white; font-weight: 700;"> Edit rule </span> is the same as the <span style="background-color: black; color: white; font-weight: 700;"> Edit </span> button | + | *<span style="background-color: black; color: white; font-weight: 700; font-size: 15px;"> Edit rule </span> is the same as the <span style="background-color: black; color: white; font-weight: 700; font-size: 15px;"> Edit </span> button |
| − | *<span style="background-color: black; color: white; font-weight: 700;"> Insert above </span> is the same as the <span style="background-color: black; color: white; font-weight: 700;"> Add </span> button but inserts the new Rule '''above''' the selected Rule | + | *<span style="background-color: black; color: white; font-weight: 700; font-size: 15px;"> Insert above </span> is the same as the <span style="background-color: black; color: white; font-weight: 700; font-size: 15px;"> Add </span> button but inserts the new Rule '''above''' the selected Rule |
| − | *<span style="background-color: black; color: white; font-weight: 700;"> Insert below </span> is the same as the <span style="background-color: black; color: white; font-weight: 700;"> Add </span> button (inserts the new rule '''below''' the selected Rule) | + | *<span style="background-color: black; color: white; font-weight: 700; font-size: 15px;"> Insert below </span> is the same as the <span style="background-color: black; color: white; font-weight: 700; font-size: 15px;"> Add </span> button (inserts the new rule '''below''' the selected Rule) |
| − | *<span style="background-color: black; color: white; font-weight: 700;"> Cut Copy Paste </span> will move/copy the rule (and its nested child rules if it has any) between the '''Session Editor''' and the '''Clipboard''' | + | *<span style="background-color: black; color: white; font-weight: 700; font-size: 15px;"> Cut Copy Paste </span> will move/copy the rule (and its nested child rules if it has any) between the '''Session Editor''' and the '''Clipboard''' |
| − | *<span style="background-color: black; color: white; font-weight: 700;"> Delete </span> is the same as the <span style="background-color: black; color: white; font-weight: 700;"> Delete </span> button | + | *<span style="background-color: black; color: white; font-weight: 700; font-size: 15px;"> Delete </span> is the same as the <span style="background-color: black; color: white; font-weight: 700; font-size: 15px;"> Delete </span> button |
| − | *<span style="background-color: black; color: white; font-weight: 700;"> Indent </span> is the same as the <span style="background-color: black; color: white; font-weight: 700;"> Indent </span> button | + | *<span style="background-color: black; color: white; font-weight: 700; font-size: 15px;"> Indent </span> is the same as the <span style="background-color: black; color: white; font-weight: 700; font-size: 15px;"> Indent </span> button |
| − | *<span style="background-color: black; color: white; font-weight: 700;"> Outdent </span> is the same as the <span style="background-color: black; color: white; font-weight: 700;"> Outdent </span> button | + | *<span style="background-color: black; color: white; font-weight: 700; font-size: 15px;"> Outdent </span> is the same as the <span style="background-color: black; color: white; font-weight: 700; font-size: 15px;"> Outdent </span> button |
| − | *<span style="background-color: black; color: white; font-weight: 700;"> Move up </span> is the same as the <span style="background-color: black; color: white; font-weight: 700;"> Up </span> button | + | *<span style="background-color: black; color: white; font-weight: 700; font-size: 15px;"> Move up </span> is the same as the <span style="background-color: black; color: white; font-weight: 700; font-size: 15px;"> Up </span> button |
| − | *<span style="background-color: black; color: white; font-weight: 700;"> Move down </span> is the same as the <span style="background-color: black; color: white; font-weight: 700;"> Down </span> button | + | *<span style="background-color: black; color: white; font-weight: 700; font-size: 15px;"> Move down </span> is the same as the <span style="background-color: black; color: white; font-weight: 700; font-size: 15px;"> Down </span> button |
<table bgcolor="red" width=630> | <table bgcolor="red" width=630> | ||
<tr valign="top"> | <tr valign="top"> | ||
| Line 206: | Line 206: | ||
<tr valign="top"> | <tr valign="top"> | ||
<td>[[file:DotPoint.JPG|link=]]</td> | <td>[[file:DotPoint.JPG|link=]]</td> | ||
| − | <td> | + | <td><span style="font-weight: 700; font-size: 15px; color: blue;">Left Click</span> on the <span style="color: white; background-color: black; font-weight: 700; font-size: 15px;"> Add </span> button to add or insert a new rule'''</td> |
</tr> | </tr> | ||
</table> | </table> | ||
New rules can be added from those that have been installed in your copy of Trainz.<br><br> | New rules can be added from those that have been installed in your copy of Trainz.<br><br> | ||
| − | + | <span style="font-weight: 700; font-size: 15px; background-color: lightcyan;">Left Click</span> on the <span style="color: white; background-color: black; font-weight: 700; font-size: 15px;"> Add </span> button on the button bar will insert a new rule either:- | |
*below the selected (highlighted) rule, or | *below the selected (highlighted) rule, or | ||
*at the end of the list if no rule is highlighted | *at the end of the list if no rule is highlighted | ||
| − | Alternatively, | + | Alternatively, <span style="font-weight: 700; font-size: 15px; background-color: lightcyan;">Right Click</span> on a rule and select either:- |
| − | *<span style="background-color: black; color: white; font-weight: 700;"> Insert above </span>, or | + | *<span style="background-color: black; color: white; font-weight: 700; font-size: 15px;"> Insert above </span>, or |
| − | *<span style="background-color: black; color: white; font-weight: 700;"> Insert below </span> | + | *<span style="background-color: black; color: white; font-weight: 700; font-size: 15px;"> Insert below </span> |
to position the new rule above or below the selected rule.<br> | to position the new rule above or below the selected rule.<br> | ||
| Line 243: | Line 243: | ||
</table> | </table> | ||
<br> | <br> | ||
| − | Select the rule to be added and | + | Select the rule to be added and <span style="font-weight: 700; font-size: 15px; background-color: lightcyan;">Left Click</span> on the [[image:Tick.PNG|link=]] icon. |
<br> | <br> | ||
<table> <!-- BEGIN Nav Buttons Table --> | <table> <!-- BEGIN Nav Buttons Table --> | ||
| Line 256: | Line 256: | ||
='''Copying Rules Between Sessions'''= | ='''Copying Rules Between Sessions'''= | ||
| − | |||
| − | |||
| − | |||
| − | |||
| − | |||
| − | |||
| − | |||
| − | |||
<table cellpadding=4 bgcolor=#c1e7e7> | <table cellpadding=4 bgcolor=#c1e7e7> | ||
<tr valign="top"> | <tr valign="top"> | ||
| Line 271: | Line 263: | ||
</table> | </table> | ||
| − | The <span style="background-color: black; color: white; font-weight: 700;"> Copy </span> and <span style="background-color: black; color: white; font-weight: 700;"> Paste </span> commands can be used to copy configured rules from one session to another. This saves you having to reenter the same data sets, such as driver commands, in each session. | + | The <span style="background-color: black; color: white; font-weight: 700; font-size: 15px;"> Copy </span> and <span style="background-color: black; color: white; font-weight: 700; font-size: 15px;"> Paste </span> commands can be used to copy configured rules from one session to another. This saves you having to reenter the same data sets, such as driver commands, in each session. |
<table cellpadding=4 bgcolor=#ffffff> | <table cellpadding=4 bgcolor=#ffffff> | ||
<tr> | <tr> | ||
| Line 280: | Line 272: | ||
<td>[[file:Steps.PNG|link=]]</td> | <td>[[file:Steps.PNG|link=]]</td> | ||
<td><span style="font-size: 17px; font-weight: 700;">Steps:'''</span><br> | <td><span style="font-size: 17px; font-weight: 700;">Steps:'''</span><br> | ||
| − | #in the Session Editor | + | #in the Session Editor <span style="font-weight: 700; font-size: 15px; background-color: lightcyan;">Right Click</span> on the Rule to be copied (more than one Rule can be highlighted) |
#select '''Copy''' from the popup menu | #select '''Copy''' from the popup menu | ||
#exit the session | #exit the session | ||
#load the second session (where the Rules are to be copied to) into Surveyor and open the Session Editor | #load the second session (where the Rules are to be copied to) into Surveyor and open the Session Editor | ||
| − | # | + | #<span style="font-weight: 700; font-size: 15px; background-color: lightcyan;">Right Click</span> after the last rule entry and select '''Paste'''</td> |
</tr> | </tr> | ||
<tr> | <tr> | ||
| Line 377: | Line 369: | ||
<tr valign="top"> | <tr valign="top"> | ||
<td>[[image:SessionEditMenuRestartRules.png|link=]]</td> | <td>[[image:SessionEditMenuRestartRules.png|link=]]</td> | ||
| − | <td>At the bottom of the '''Session Editor''' is a new button, | + | <td>At the bottom of the '''Session Editor''' is a new button, <span style="color: white; background-color: black; font-weight: 700; font-size: 15px;"> Restart All Rules </span>. This will reset or restart '''ALL''' rules in the Session.<br></td> |
</tr> | </tr> | ||
<tr valign="top"> | <tr valign="top"> | ||
<td>[[image:UDS-CompleteWasComplete.png|link=]]</td> | <td>[[image:UDS-CompleteWasComplete.png|link=]]</td> | ||
| − | <td>Some rules, as shown in the screen shot above, have the label '''(complete was-complete)''' after the rule name. This indicates that the rule has already been completed. These rules can be individually restarted by | + | <td>Some rules, as shown in the screen shot above, have the label '''(complete was-complete)''' after the rule name. This indicates that the rule has already been completed. These rules can be individually restarted by a <span style="font-weight: 700; font-size: 15px; background-color: lightcyan;">Right Click</span> on the rule and selecting the <span style="color: white; background-color: black; font-weight: 700; font-size: 15px;"> Reset </span> option from the pop up menu. This will change the rule status to '''(paused)'''.</td> |
</tr> | </tr> | ||
<tr valign="top"> | <tr valign="top"> | ||
| − | <td colspan=2>When the '''Driver Mode''' is selected again, all the reset or '''(paused)''' rules will be restarted.</td> | + | <td colspan=2><br> |
| + | When the '''Driver Mode''' is selected again, all the reset or '''(paused)''' rules will be restarted.</td> | ||
</tr> | </tr> | ||
</table> | </table> | ||
| − | + | <br> | |
<table cellpadding=4 bgcolor="Aquamarine"> | <table cellpadding=4 bgcolor="Aquamarine"> | ||
<tr valign="top"> | <tr valign="top"> | ||
Revision as of 15:07, 23 April 2023
The information in this Wiki Page applies to TANE, TRS19, Trainz Plus and TRS22.
Contents |
What is the Session Editor
| The Session Editor allows you to add, delete and edit the Rules in a Session | |
| The Rules control the operation of the Session |
|
In TANE the Session Editor is found in the Surveyor Main Menu. In TRS19 and later versions it is in the Surveyor Edit Menu. In either case select Edit Session from the menu.
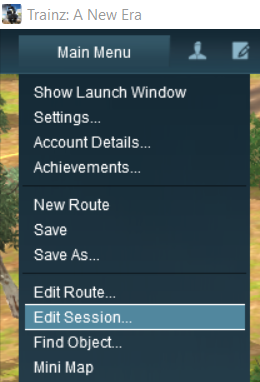
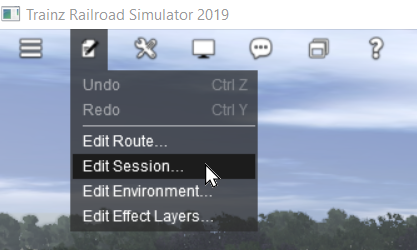
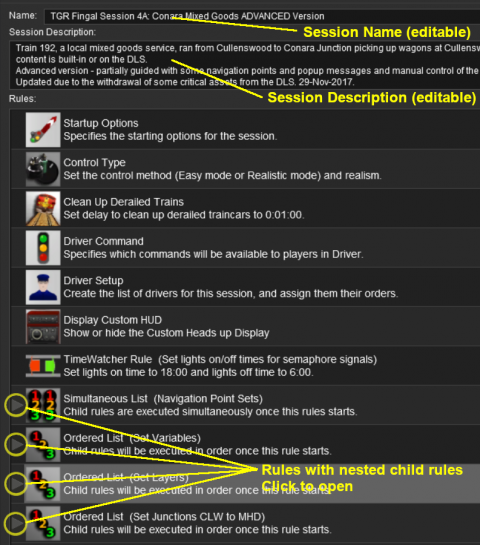
When loaded, the Session Editor will show all the Rules that have been added to the Session. If you have just opened the Editor on a Route without a Session then it will show a very basic set of Rules. The Editor will allow you to add additional Rules, and delete or edit those shown. Links to extensive lists of Rules that are built into Trainz or available on the DLS can be found at the end of this document.
 |
|
Rules can be grouped together into lists for convenience (e.g. all the Rules that set signals at the start of the Session) or because they depend on a particular event (e.g. a time, a train arriving at a set point, a wagon being loaded, etc). These form Nested Rules and are indicated by arrow heads as shown in the image above. Left Click on an arrow head to open up its nested list of child Rules as shown in the image below.
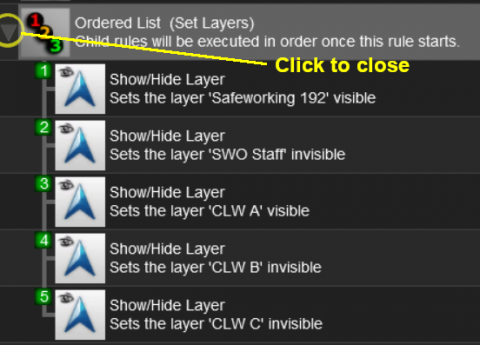
Each of the Rules that have been nested under the Ordered List Rule in the image above have been indented one level to the right. Left Click on the arrow head again to close the list.
 |
More information on the various types of List Rules and how to create Nested Rules can be found on the Trainz Wiki Page at:- |
The "Button Bar"
At the bottom of the Session Editor is the "button Bar".
 |
To use the other buttons, first select a Rule with a Left Click
|
| Left Click to Accept your edits and close the Session Editor | Left Click to Cancel your edits and close the Session Editor |
| The above operations, and more, can also be found by a Right Click on a Rule to open up a menu |
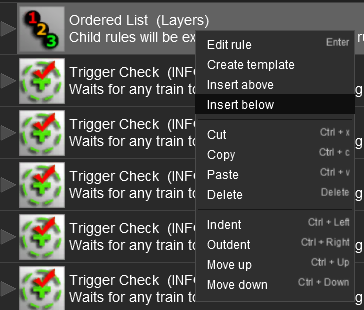 |
|
|||||
Adding Rules to Sessions
| Left Click on the Add button to add or insert a new rule |
New rules can be added from those that have been installed in your copy of Trainz.
Left Click on the Add button on the button bar will insert a new rule either:-
- below the selected (highlighted) rule, or
- at the end of the list if no rule is highlighted
Alternatively, Right Click on a rule and select either:-
- Insert above , or
- Insert below
to position the new rule above or below the selected rule.
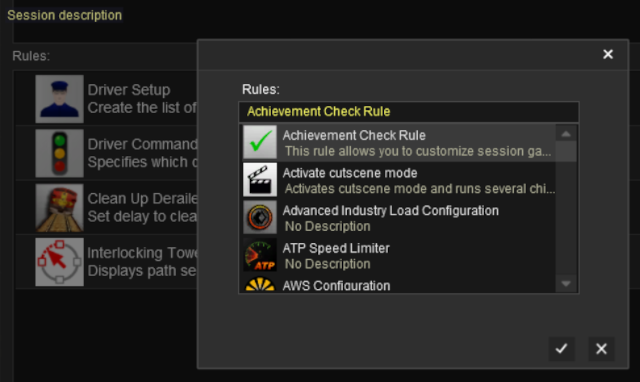
A new window showing all the installed and available rules will appear.
 |
|
Select the rule to be added and Left Click on the icon.
Copying Rules Between Sessions
| Rules can be copied between Sessions |
The Copy and Paste commands can be used to copy configured rules from one session to another. This saves you having to reenter the same data sets, such as driver commands, in each session.
|
|
|
 |
Steps:
|
|
|
|
|
||||
|
Examples of Using the Session Editor
Wiki pages that show examples of using the Session Editor to solve particular problems or to carry out particular tasks can be found at the following links:-
TRS19 Platinum Edition, Trainz Plus and TRS22 UDS
TRS19 Platinum Edition and later Trainz versions have a Unified Driver Surveyor (UDS) which allows you to switch seamlessly between Driver and Surveyor modes. The UDS allows an edited Session to be continued without having to restart it from the beginning. This includes editing the Session Editor on an active Session where some of the Rules may have already been completed or others have started. To allow for this additional features have been added to the Trainz versions with the UDS interface.
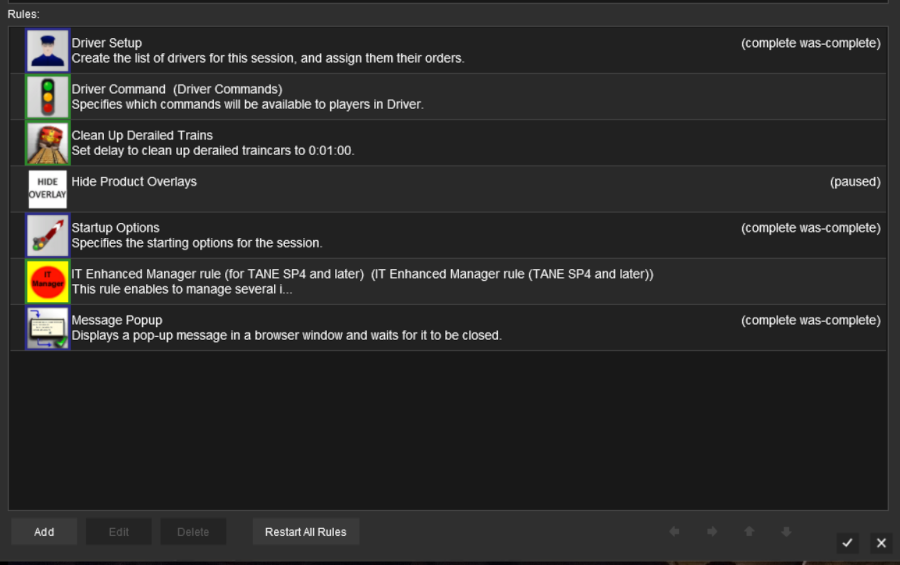
| At the bottom of the Session Editor is a new button, Restart All Rules . This will reset or restart ALL rules in the Session. |
|
 |
Some rules, as shown in the screen shot above, have the label (complete was-complete) after the rule name. This indicates that the rule has already been completed. These rules can be individually restarted by a Right Click on the rule and selecting the Reset option from the pop up menu. This will change the rule status to (paused). |
When the Driver Mode is selected again, all the reset or (paused) rules will be restarted. |
|
 |
A detailed description of the UDS can be found on the Trainz Wiki Page at:- |
Related Links
 |
Trainz Wiki
 |
More Tutorials and Guides to Using Trainz |
This page was created by Trainz user pware in October 2019 and was last updated as shown below.