How to Use Track Triggers
m (→Configuring a Track Trigger) |
(→Creating a Track Trigger Event: reorganised section) |
||
| Line 171: | Line 171: | ||
</table> | </table> | ||
<br> | <br> | ||
| − | + | <table cellpadding="4" bgcolor=#ffffff> <!-- BEGIN Step table --> | |
| − | + | ||
| − | + | ||
| − | + | ||
| − | <table cellpadding="4" bgcolor=#ffffff> | + | |
<tr> | <tr> | ||
<td colspan="2"> | <td colspan="2"> | ||
| Line 181: | Line 177: | ||
</tr> | </tr> | ||
<tr valign="top"> | <tr valign="top"> | ||
| − | <td>[[file:Steps.PNG|link=]]</td> | + | <td>[[file:Steps.PNG|link=]]<br><br> |
| − | <td><span style="font-size: 17px;"> | + | <span style="font-size: 17px; font-weight: 700;">Steps</span></td> |
| + | <td>[[file:DotPoint1.JPG|link=]] <span style="font-size: 17px; font-weight: 700;">Open the Session Editor:</span><br> | ||
| + | <table> <!-- BEGIN Step 1 table --> | ||
| + | <tr valign="top"> | ||
| + | <td colspan=2> | ||
To add the '''Trigger Check Rule''' to a session:- | To add the '''Trigger Check Rule''' to a session:- | ||
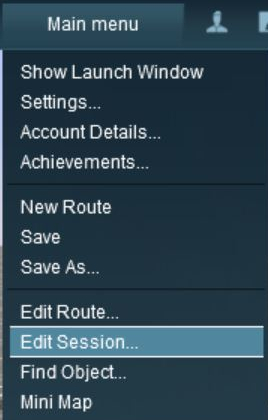
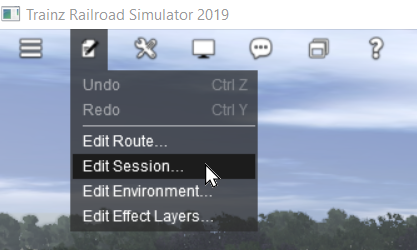
| − | #Open the '''Surveyor Main Menu''' in '''TANE | + | #Open the '''Surveyor Main Menu''' in '''TANE''' (shown below left) or the '''Surveyor Edit Menu''' in '''TRS19''' and '''Trainz Plus''' (shown below right) |
| − | #Select the option '''Edit Session''' from the drop down menu list.</td> | + | #Select the option '''Edit Session''' from the drop down menu list |
| + | </td> | ||
| + | </tr> | ||
| + | <tr valign="top"> | ||
| + | <td>[[file:EditSessionMenu.JPG|link=]]</td> | ||
| + | <td>[[file:SessionEditMenuSP1.png|link=]]<br> | ||
</tr> | </tr> | ||
<tr> | <tr> | ||
| Line 191: | Line 196: | ||
----</td> | ----</td> | ||
</tr> | </tr> | ||
| − | </table></td> | + | </table> <!-- END Step 1 table --> |
| + | </td> | ||
</tr> | </tr> | ||
| − | |||
| − | |||
<tr valign="top"> | <tr valign="top"> | ||
| − | <td | + | <td> </td> |
| − | < | + | <td>[[file:DotPoint2.JPG|link=]] <span style="font-size: 17px; font-weight: 700;">Add the Trigger Check Rule:</span><br> |
| − | <table | + | <table> <!-- BEGIN Step 2 table --> |
| − | < | + | |
| − | + | ||
| − | ---- | + | |
| − | + | ||
<tr valign="top"> | <tr valign="top"> | ||
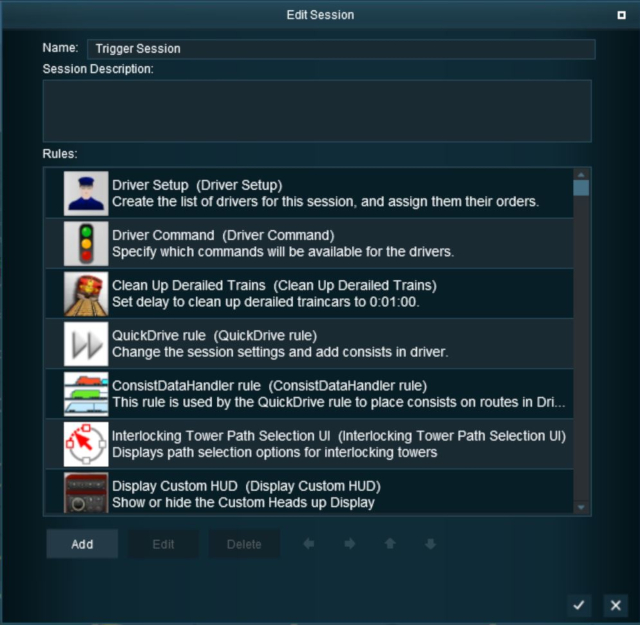
| − | <td> | + | <td>In the Edit Session window (shown below left):- |
| − | + | ||
| − | In the Edit Session window (shown left):- | + | |
*Click the '''Add''' button | *Click the '''Add''' button | ||
| − | In the Rule Selection window (shown below):- | + | </td> |
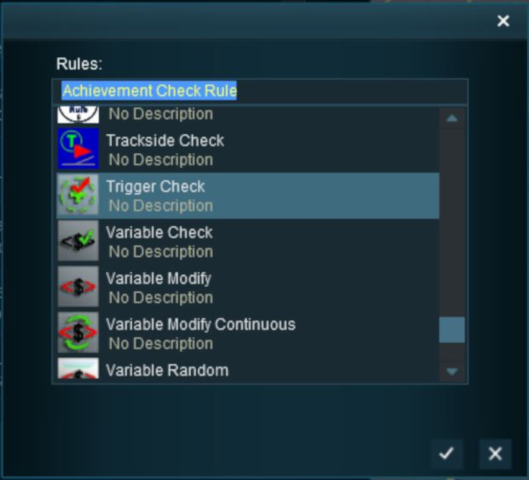
| − | #Scroll down the list to select the '''Trigger Check''' rule | + | <td> |
| − | #Click on the [[file:Tick.PNG|link=]] icon</td> | + | In the Rule Selection window (shown below right):- |
| + | :#Scroll down the list to select the '''Trigger Check''' rule | ||
| + | :#Click on the [[file:Tick.PNG|link=]] icon | ||
| + | </td> | ||
| + | </tr> | ||
| + | <tr valign="top"> | ||
| + | <td width=650>[[file:EditSessionWindowX.JPG|link=]]</td> | ||
| + | <td>[[file:RuleSelect.JPG|link=]]</td> | ||
</tr> | </tr> | ||
<tr> | <tr> | ||
| − | <td colspan= | + | <td colspan=2><br>This will add the '''Trigger Check''' rule to the session.</td> |
| + | </tr> | ||
| + | <tr> | ||
| + | <td colspan=2> | ||
----</td> | ----</td> | ||
</tr> | </tr> | ||
| − | </table></td> | + | </table> <!-- END Step 2 table --> |
| + | </td> | ||
</tr> | </tr> | ||
<tr valign="top"> | <tr valign="top"> | ||
| − | <td>[[file: | + | <td> </td> |
| + | <td>[[file:DotPoint3.JPG|link=]] <span style="font-size: 17px; font-weight: 700;">Open the Trigger Check Rule Properties:</span><br> | ||
| + | <table> <!-- BEGIN Step 3 table --> | ||
| + | <tr valign="top"> | ||
| + | <td>With the '''Trigger Check''' rule highlighted (shown below):- | ||
| + | *Click the '''Edit''' button. This will open the rule properties window | ||
| + | </td> | ||
</tr> | </tr> | ||
| − | |||
| − | |||
| − | |||
| − | |||
<tr valign="top"> | <tr valign="top"> | ||
<td>[[file:TriggerCheck.JPG|link=]]</td> | <td>[[file:TriggerCheck.JPG|link=]]</td> | ||
| − | < | + | </tr> |
| − | + | ||
<tr> | <tr> | ||
<td colspan="2"> | <td colspan="2"> | ||
----</td> | ----</td> | ||
| + | </tr> | ||
| + | </table> <!-- END Step 3 table --> | ||
| + | </td> | ||
</tr> | </tr> | ||
<tr valign="top"> | <tr valign="top"> | ||
| − | <td>[[file: | + | <td> </td> |
| − | + | <td>[[file:DotPoint4.JPG|link=]] <span style="font-size: 17px; font-weight: 700;">Configure the Rule:</span><br> | |
| − | + | <table> <!-- BEGIN Step 4 table --> | |
| − | *Click the ''' | + | <tr valign="top"> |
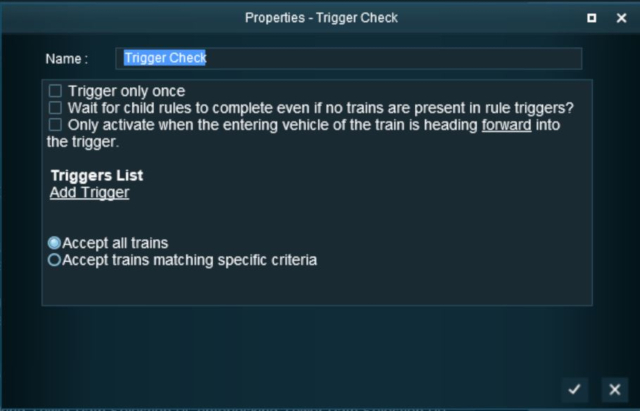
| + | <td colspan=2>For this example we will leave all settings unchanged and simply identify the track trigger to be used.<br> | ||
| + | In the Trigger Properties window (shown below):- | ||
| + | *Click the '''''<span style="text-decoration: underline;">Add trigger</span>''''' link | ||
| + | </td> | ||
</tr> | </tr> | ||
| − | <tr> | + | <tr valign="top"> |
| − | <td | + | <td>[[file:TriggerCheckProperties.JPG|link=]]</td> |
| − | ----</td> | + | <td> |
| + | <table cellpadding="4" bgcolor="Aquamarine"> <!-- BEGIN Table 4 Wiki Table --> | ||
| + | <tr valign="top"> | ||
| + | <td>[[file:LinkWiki.PNG|link=]]</td> | ||
| + | <td> | ||
| + | More information on the settings and options in this rule can be found on the '''Trainz Wiki Rules Page''' at:-<br> | ||
| + | * '''[[Session_Rule_List_with_Parameters#Trigger_Check_Rule|Trigger Check Rule]]'''<br> | ||
| + | </td> | ||
</tr> | </tr> | ||
| − | </table></td> | + | </table> <!-- END Table 4 Wiki Table --> |
| + | </td> | ||
</tr> | </tr> | ||
| − | |||
| − | |||
| − | |||
| − | |||
| − | |||
| − | |||
| − | |||
| − | |||
| − | |||
| − | |||
<tr> | <tr> | ||
<td colspan="2"> | <td colspan="2"> | ||
----</td> | ----</td> | ||
| + | </tr> | ||
| + | </table> <!-- END Step 4 table --> | ||
| + | </td> | ||
</tr> | </tr> | ||
<tr valign="top"> | <tr valign="top"> | ||
| − | <td>[[file: | + | <td> </td> |
| − | + | <td>[[file:DotPoint5.JPG|link=]] <span style="font-size: 17px; font-weight: 700;">Select the Trigger:</span><br> | |
| − | + | <table> <!-- BEGIN Step 5 table --> | |
| − | + | <tr valign="top"> | |
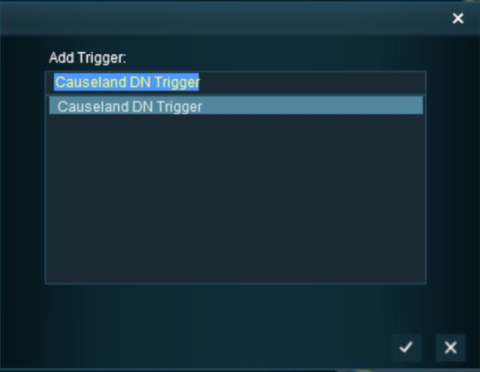
| − | + | <td>The '''Trigger Selection Window''' will list all the '''Track Triggers''' in your layout. | |
#Select the trigger you have just added | #Select the trigger you have just added | ||
| − | #Click on the [[file:Tick.PNG|link=]] icon | + | #Click on the [[file:Tick.PNG|link=]] icon at the bottom of the selection window |
| + | </td> | ||
| + | </tr> | ||
| + | <tr valign="top"> | ||
| + | <td>[[file:TriggerList.JPG|link=]]</td> | ||
</tr> | </tr> | ||
| + | <tr> | ||
| + | <td>Once the trigger has been added to the rule, click on the [[file:Tick.PNG|link=]] icon in the '''Trigger Check''' properties window to accept the change. | ||
<tr> | <tr> | ||
<td colspan="2"> | <td colspan="2"> | ||
----</td> | ----</td> | ||
</tr> | </tr> | ||
| − | </table>< | + | </table> <!-- END Step 5 table --> |
| − | + | <table width="100%"> <!-- BEGIN Back-To-Top Table --> | |
| − | + | ||
| − | + | ||
| − | + | ||
| − | + | ||
| − | + | ||
| − | + | ||
| − | <table width="100%"> | + | |
<tr valign="top"> | <tr valign="top"> | ||
<td align="right">[[file:BackToTop.png|link=#top|alt=Top|Top]]</td> | <td align="right">[[file:BackToTop.png|link=#top|alt=Top|Top]]</td> | ||
</tr> | </tr> | ||
| − | </table> | + | </table> <!-- END Back-To-Top Table --> |
='''Adding an Instruction to the Trigger Event'''= | ='''Adding an Instruction to the Trigger Event'''= | ||
Revision as of 19:54, 12 February 2020
The information in this Wiki Page applies to TANE, TRS19 and Trainz Plus.
Contents |
What are Track Triggers?
| Track triggers are track markers that are invisible in Driver Mode but visible in Surveyor Mode. They are used to activate Session Rules and some Driver Commands |
Track triggers can be programmed to respond when a train (any train or a specific train) passes over them in Driver Mode. The response comes from executing a set of Session Rules that have been attached to a Trigger Check Rule (or a similar rule) or a Driver Command that is monitoring the track trigger.
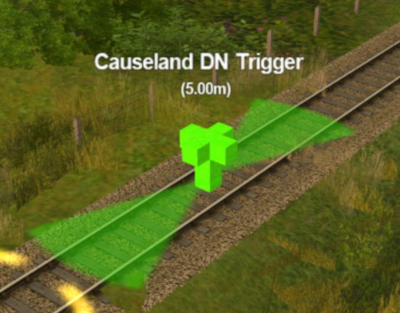 |
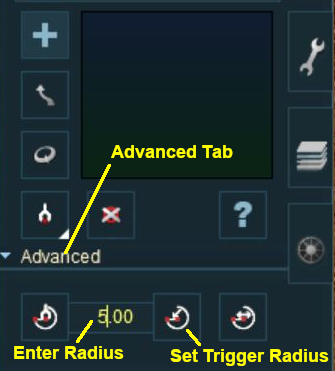
Shown at left is a Track Trigger placed on a track in Surveyor Mode. It is NOT visible in Driver Mode. The "5.00m" shown below the trigger name is the trigger detection radius |
Route or Session?
| Track Triggers can be placed in a Route layer or in a Session layer |
Notes:
|
 |
Information on Route and Session layers can be found at:- |
Adding a Track Trigger
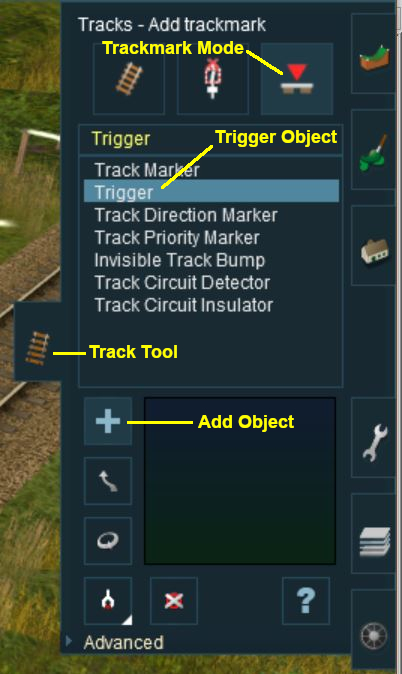 |
|
||||||
Configuring a Track Trigger
As soon as a new track trigger has been placed, its properties window will open on the screen. It will be given a default name and assigned to the currently active layer.
|
|
|||||||||
 Steps |
|
||||||||
|
|||||||||
Creating a Track Trigger Event
Track trigger events are handled by the Trigger Check Rule (or a similar rule) which is added to a Session in the Session Editor.
 |
More information on the Trigger Check Rule can be found on the Trainz Wiki Rules Page at:- |
|
|
||||||||||||||||||||||||||||||||||||||||||||||||||||||
 Steps |
|
|||||||||||||||||||||||||||||||||||||||||||||||||||||
|
||||||||||||||||||||||||||||||||||||||||||||||||||||||
|
||||||||||||||||||||||||||||||||||||||||||||||||||||||
|
||||||||||||||||||||||||||||||||||||||||||||||||||||||
Adding an Instruction to the Trigger EventTo test your trigger event you will need to add at least one rule. Adding a Child Rule
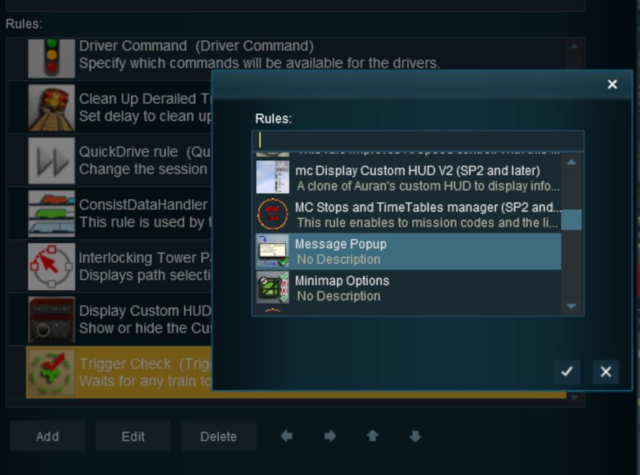
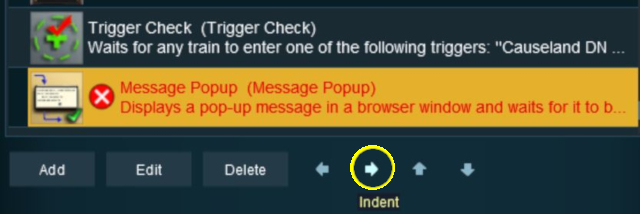
The Message Popup Rule should now appear directly below the Trigger Check rule. It will display a red cross because it has not yet been configured. The Message Popup Rule has to be indented so that it becomes a Child of the Trigger Check Rule and is controlled by that rule.
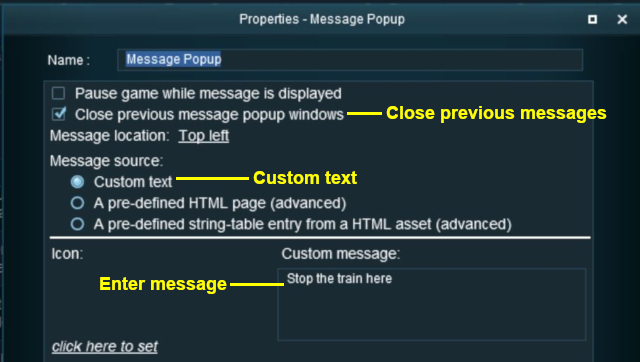
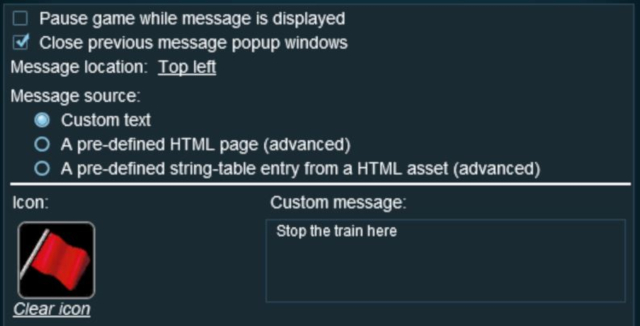
Configuring the Message
Another example of using the Trigger Check Rule can be found in the Trainz Wiki Page Alternatives to the Trigger Check Rule
Related Links
Trainz Wiki
This page was created by Trainz user pware in May 2018 and was last updated as shown below. |
||||||||||||||||||||||||||||||||||||||||||||||||||||||

