SAR Scenarios Tutorial V1
(Created page with "<table width=1000> <!-- BEGIN Title and summary table --> <tr valign="top"> <td width=1000 align="center">alt=Tutorial <span style=...") |
m |
||
| (One intermediate revision by one user not shown) | |||
| Line 1: | Line 1: | ||
| + | <!-- V1.0 --> | ||
<table width=1000> <!-- BEGIN Title and summary table --> | <table width=1000> <!-- BEGIN Title and summary table --> | ||
<tr valign="top"> | <tr valign="top"> | ||
| Line 21: | Line 22: | ||
<span style="font-weight: 700; font-size: 19px; background-color: black; color: white;"> The Tutorial Scenario </span><br> | <span style="font-weight: 700; font-size: 19px; background-color: black; color: white;"> The Tutorial Scenario </span><br> | ||
| − | '''Tutorial Updated | + | '''Tutorial Updated April 24th, 2024.'''<br> <!-- 16:45 AEST 29-July-2022 4,052 --> |
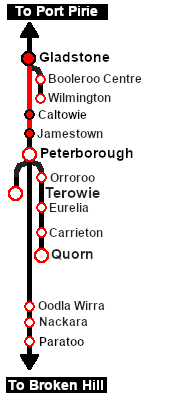
The scenario used in this tutorial is [[image:No_1.png|link=|alt=1]] '''[[SAR Scenario Depot Fuel Run V1|Gladstone-Peterborough Depot Fuel]]''' which has the consist already fully assembled with its locomotive ('''T 258''') on the <span style="font-weight: 700;">Gladstone <span style="color: black; background-color: yellow;"> Goods Loop </span></span>. This tutorial will follow the scenario until the consist arrives at '''Jamestown''' and delivers a coal load to the <span style="font-weight: 700; color: white; background-color: black;"> Coal Stage </span>.<br> | The scenario used in this tutorial is [[image:No_1.png|link=|alt=1]] '''[[SAR Scenario Depot Fuel Run V1|Gladstone-Peterborough Depot Fuel]]''' which has the consist already fully assembled with its locomotive ('''T 258''') on the <span style="font-weight: 700;">Gladstone <span style="color: black; background-color: yellow;"> Goods Loop </span></span>. This tutorial will follow the scenario until the consist arrives at '''Jamestown''' and delivers a coal load to the <span style="font-weight: 700; color: white; background-color: black;"> Coal Stage </span>.<br> | ||
| Line 153: | Line 154: | ||
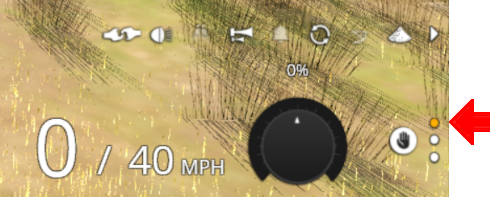
You can use the '''Driver Speed Dial''' or the keyboard controls (<span style="font-weight: 700; font-size: 15px; color: white; background-color: black;"> W </span>, <span style="font-weight: 700; font-size: 15px; color: white; background-color: black;"> S </span>, <span style="font-weight: 700; font-size: 15px; color: white; background-color: black;"> X </span>) to drive the train out of '''Gladstone Yard''' to '''Caltowie'''. Alternatively, for those with advanced steam loco driving skills, you can take control of the throttle, brake and various other lever and control wheel devices in the loco cab.<br><br> | You can use the '''Driver Speed Dial''' or the keyboard controls (<span style="font-weight: 700; font-size: 15px; color: white; background-color: black;"> W </span>, <span style="font-weight: 700; font-size: 15px; color: white; background-color: black;"> S </span>, <span style="font-weight: 700; font-size: 15px; color: white; background-color: black;"> X </span>) to drive the train out of '''Gladstone Yard''' to '''Caltowie'''. Alternatively, for those with advanced steam loco driving skills, you can take control of the throttle, brake and various other lever and control wheel devices in the loco cab.<br><br> | ||
| − | <table | + | <table bgcolor="lightcyan" cellpadding=2> <!-- BEGIN Dot Point --> |
<tr valign="top"> | <tr valign="top"> | ||
| − | <td>[[ | + | <td width=10>[[image:BlueDot10x10.png|link=]]</td> |
<td>'''All''' locations have a '''Caution''' track sign placed just in front of the yard entry point and clear of all signals to provide a stopping guide for manual driving, especially for those locations without visible signals</td> | <td>'''All''' locations have a '''Caution''' track sign placed just in front of the yard entry point and clear of all signals to provide a stopping guide for manual driving, especially for those locations without visible signals</td> | ||
</tr> | </tr> | ||
<tr valign="top"> | <tr valign="top"> | ||
| − | <td>[[ | + | <td>[[image:BlueDot10x10.png|link=]]</td> |
<td>At '''Caltowie''' the Caution track sign is just in front of the '''Caltowie Home Dn''' semaphore signal at the entrance to the yard</td> | <td>At '''Caltowie''' the Caution track sign is just in front of the '''Caltowie Home Dn''' semaphore signal at the entrance to the yard</td> | ||
</tr> | </tr> | ||
| Line 183: | Line 184: | ||
When driving manually you will have to obey all signals, unless given specific instructions for shunting operations.<br> | When driving manually you will have to obey all signals, unless given specific instructions for shunting operations.<br> | ||
| − | All signals in the layout are '''Lower Quadrant Sempahore''' signals. They use a moving arm or arm indicator that drops down at an angle of about 45º from the horizontal to indicate '''Proceed'''. The arm stays horizontal to indicate '''Stop | + | All signals in the layout are '''Lower Quadrant Sempahore''' signals. They use a moving arm or arm indicator that drops down at an angle of about 45º from the horizontal to indicate '''Proceed'''. The arm stays horizontal to indicate '''Stop'''.<br> |
<table width=940 bgcolor="black"> <!-- BEGIN Signal Table Black Border --> | <table width=940 bgcolor="black"> <!-- BEGIN Signal Table Black Border --> | ||
| Line 197: | Line 198: | ||
<td>[[image:Semaphore_LQ_Single_Proceed.jpg|link=|alt=Single Arm Proceed|60px]]</td> | <td>[[image:Semaphore_LQ_Single_Proceed.jpg|link=|alt=Single Arm Proceed|60px]]</td> | ||
<td>Traffic Semaphore on a mast showing <span style="font-weight: 700; font-size: 15px; color: white; background-color: green;"> PROCEED </span></td> | <td>Traffic Semaphore on a mast showing <span style="font-weight: 700; font-size: 15px; color: white; background-color: green;"> PROCEED </span></td> | ||
| − | |||
| − | |||
| − | |||
| − | |||
| − | |||
| − | |||
</tr> | </tr> | ||
<tr valign="top"> | <tr valign="top"> | ||
| Line 209: | Line 204: | ||
<td>[[image:Shunt_Disc_Single_Proceed.jpg|link=|alt=Single Disc Shunt at Proceed|60px]]</td> | <td>[[image:Shunt_Disc_Single_Proceed.jpg|link=|alt=Single Disc Shunt at Proceed|60px]]</td> | ||
<td>Shunting Disc Semaphore showing <span style="font-weight: 700; font-size: 15px; color: white; background-color: green;"> PROCEED </span></td> | <td>Shunting Disc Semaphore showing <span style="font-weight: 700; font-size: 15px; color: white; background-color: green;"> PROCEED </span></td> | ||
| − | |||
| − | |||
| − | |||
| − | |||
| − | |||
| − | |||
| − | |||
| − | |||
| − | |||
| − | |||
| − | |||
| − | |||
| − | |||
| − | |||
| − | |||
| − | |||
| − | |||
| − | |||
| − | |||
| − | |||
| − | |||
| − | |||
| − | |||
| − | |||
| − | |||
| − | |||
| − | |||
| − | |||
| − | |||
| − | |||
| − | |||
| − | |||
| − | |||
| − | |||
| − | |||
| − | |||
| − | |||
| − | |||
| − | |||
| − | |||
</tr> | </tr> | ||
</table> <!-- END Signal Table --> | </table> <!-- END Signal Table --> | ||
| Line 263: | Line 218: | ||
<span style="font-weight: 700; font-size: 17px; color: white;"><span style="background-color: red;"> B </span> <span style="background-color: black;"> AI Control </span></span><br> | <span style="font-weight: 700; font-size: 17px; color: white;"><span style="background-color: red;"> B </span> <span style="background-color: black;"> AI Control </span></span><br> | ||
| − | <table | + | <table bgcolor="lightcyan" cellpadding=2> <!-- BEGIN Dot Point --> |
<tr valign="top"> | <tr valign="top"> | ||
| − | <td>[[ | + | <td width=10>[[image:BlueDot10x10.png|link=]]</td> |
<td>One advantage of using the '''AI''' to do all the driving is that it will set all the track junction switches to your destination for you</td> | <td>One advantage of using the '''AI''' to do all the driving is that it will set all the track junction switches to your destination for you</td> | ||
</tr> | </tr> | ||
| Line 281: | Line 236: | ||
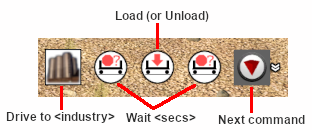
*'''Set Max Speed To''' - to set the maximum train speed (in mph) when approaching loading/unloading points. This can also be used to cancel a previously set Max Speed. | *'''Set Max Speed To''' - to set the maximum train speed (in mph) when approaching loading/unloading points. This can also be used to cancel a previously set Max Speed. | ||
<br> | <br> | ||
| − | <table | + | <table bgcolor="lightcyan" cellpadding=2> <!-- BEGIN Dot Point --> |
<tr valign="top"> | <tr valign="top"> | ||
| − | <td>[[ | + | <td width=10>[[image:BlueDot10x10.png|link=]]</td> |
<td>An [[image:Trackmark_Invert_Right.png|link=]] '''Approach Track Mark''' is placed a short distance ahead of the yard approach signal, visible and invisible, at '''all''' locations in the route. Alongside each is a '''Caution''' track sign.</td> | <td>An [[image:Trackmark_Invert_Right.png|link=]] '''Approach Track Mark''' is placed a short distance ahead of the yard approach signal, visible and invisible, at '''all''' locations in the route. Alongside each is a '''Caution''' track sign.</td> | ||
</tr> | </tr> | ||
| Line 410: | Line 365: | ||
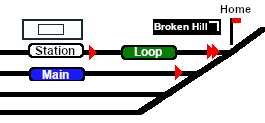
Notice that the '''Switch Track Diagram''' above shows three switches in red with letters as IDs - <span style="font-weight: 700; font-size: 14px;"><span style="background-color: red; color: white;"> A </span>  <span style="background-color: red; color: white;"> B </span>  <span style="background-color: red; color: white;"> C </span></span>. | Notice that the '''Switch Track Diagram''' above shows three switches in red with letters as IDs - <span style="font-weight: 700; font-size: 14px;"><span style="background-color: red; color: white;"> A </span>  <span style="background-color: red; color: white;"> B </span>  <span style="background-color: red; color: white;"> C </span></span>. | ||
<br><br> | <br><br> | ||
| − | These special switches are identified on the '''Caltowie''' [[image:Tab_SW_Grey.png|link=SAR Caltowie Switches|75px]] page as '''Catchpoints''', which are also known as '''Derails'''. They are designed to prevent runaway wagons from entering the running lines. Most yards in the route have at least one '''Catchpoint'''.<br> | + | These special switches are identified on the '''Caltowie''' [[image:Tab_SW_Grey.png|link=SAR Caltowie Switches V1|75px]] page as '''Catchpoints''', which are also known as '''Derails'''. They are designed to prevent runaway wagons from entering the running lines. Most yards in the route have at least one '''Catchpoint'''.<br> |
[[image:Caltowie Map Catchpoints.png|link=|alt=Catchpoints]]<br> | [[image:Caltowie Map Catchpoints.png|link=|alt=Catchpoints]]<br> | ||
| Line 441: | Line 396: | ||
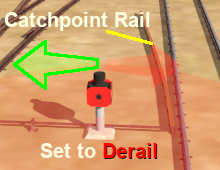
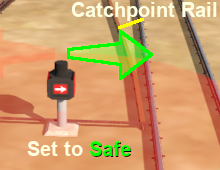
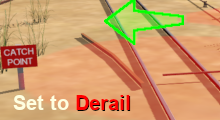
<td colspan=5>The '''Catchpoints''' used in major yards have mechanical indicators. Smaller yards use a simplier version with a static sign.<br><br> | <td colspan=5>The '''Catchpoints''' used in major yards have mechanical indicators. Smaller yards use a simplier version with a static sign.<br><br> | ||
| − | <table | + | <table bgcolor="lightcyan" cellpadding=2> <!-- BEGIN Dot Point --> |
<tr valign="top"> | <tr valign="top"> | ||
| − | <td>[[ | + | <td width=10>[[image:BlueDot10x10.png|link=]]</td> |
<td>The '''Catchpoint''' switch green arrow '''MUST''' point to the '''opposite side''' of the track from the '''Catchpoint Rail''' for the train to safely pass.</td> | <td>The '''Catchpoint''' switch green arrow '''MUST''' point to the '''opposite side''' of the track from the '''Catchpoint Rail''' for the train to safely pass.</td> | ||
</tr> | </tr> | ||
| Line 547: | Line 502: | ||
[[image:Jamestown Map TM.png|link=|alt=Jamestown Path]]<br> | [[image:Jamestown Map TM.png|link=|alt=Jamestown Path]]<br> | ||
| − | The important '''Track Marks''' for this tutorial scenario are identified on the '''Jamestown''' [[image:Tab_TM_Grey.png|link=|75px]] page as<br> | + | The important '''Track Marks''' for this tutorial scenario are identified on the '''Jamestown''' [[image:Tab_TM_Grey.png|link=SAR Jamestown Switches V1|75px]] page as<br> |
[[image:Jamestown TM ApproachLoop.png|link=|alt=Jamestown TMs]]<br> | [[image:Jamestown TM ApproachLoop.png|link=|alt=Jamestown TMs]]<br> | ||
Latest revision as of 08:20, 24 April 2024
 SAR Peterborough Narrow Gauge Scenarios Tutorial SAR Peterborough Narrow Gauge Scenarios Tutorial |
| A part of the SAR Peterborough Base Session V1 |
| A tutorial guide to using the Scenarios for the DLS SAR Peterborough Base Session and SAR Peterborough Narrow Gauge Division (TRS19 SP3) route. |
|
The Tutorial Scenario Tutorial Updated April 24th, 2024. The scenario used in this tutorial is The task in this tutorial scenario is to drive the coal and fuel oil train out of Gladstone yard and onto the Port Pirie to Broken Hill main line. Continue through Caltowie yard and into Jamestown yard. |
||||||||||||||||
|
|
|||||||||||||||
|
|
|||||||||||||||||||||||
Step |
Caltowie to Jamestown |
|
|||||||||||||||||||||
|
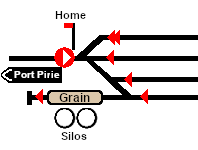
Caltowie does not have a coal stage or a fuel oil store in need of a refill so the consist will not be stopping here. A through path is the best option. A Manual Control To manually drive the train through Caltowie to Jamestown you will have to set all the switches yourself using the information on the Caltowie
Notice that the Switch Track Diagram above shows three switches in red with letters as IDs - A B C .
The information above shows that the default position of the Catchpoints, the first direction setting shown as an (L) or an (R), is set to Catchpoint which is the derail position.
B AI Control After reaching Caltowie you can use the Track Marks placed in the yard to navigate your way through. The track marks are shown on the Caltowie
All stations on the route, including the passenger enabled stations, have track marks on both their Up and Down sides. This allows you to use the Drive To Trackmark command to reach any passenger station. The track marks are named using the name of the station (e.g. Caltowie), the word Station and the direction of travel, Up or Dn. So Caltowie has the station track marks Caltowie Station Dn and Caltowie Station Up (not shown above).
If you prefer to travel through Caltowie via, for example the Station, then use the AI Drive Via Trackmark Driver Command, select the required Track Mark (e.g. Caltowie Station Dn ) followed by Drive To Trackmark Jamestown Main Approach Dn |
|||||||||||||||||||||||
|
|
|||||||
Step |
Jamestown |
|
|||||
| We will be using the Loop Yard road as the destination in Jamestown. Using this road instead of the Station Yard road will allow the loco to be moved from the front of the train to the rear for shunting the Jamestown coal wagons without passing the Jamestown Home Up signal and entering the Jamestown - Belalie North section. A Manual Control As at Caltowie, to drive into Jamestown you will have to set all the switches manually. The Jamestown
The Jamestown Switch Set is identified on the Jamestown
Because we will be driving beyond the Loop and into the Loop Yard the Optional switches 7 and 10 will also have to be correctly set. Use the Driver Speed Dial, the keyboard controls ( W S X ) or the advanced on screen controls to drive the train into Jamestown Loop Yard and halt once the rear wagon is safely clear of switch junction 10 . B AI Control The Jamestown
The important Track Marks for this tutorial scenario are identified on the Jamestown From the open Driver Command Menu select the Drive To Trackmark command which will open up a long alphabetical list of track marks. Find and select the track mark Jamestown Loop Yard Dn . |
|||||||
|
|
|||||||||||
Step |
Shunting Jamestown Yard |
|
|||||||||
|
Jamestown Loco Depot will be receiving two CCC wagons loaded with coal. Both wagons have been marshalled at the rear of the consist in front of the Guard Van. This operation could be done entirely using the AI but the process would be more complex than needed so only Manual Driving, or a mixture of manual and AI, will be used. The task will involve moving the loco to the rear of the consist, uncouplng the two coal wagons (plus the Guard Van) from the train and then shunting them into the Loco Depot and Sidings. You will have two options at the Depot:-
|
|||||||||||
| Links: All links will open in this window | |||||||||
 Session Scenarios |
 Location Index |
 Rolling Stock |
 Loco Roster |
 Active Industries |
|
||||
This page was created by Trainz user pware in March 2021 and was last updated as shown below.
