How to Move Your User Data Folder
m |
m (→Moving the User Data) |
||
| (11 intermediate revisions by one user not shown) | |||
| Line 24: | Line 24: | ||
<tr valign="top"> | <tr valign="top"> | ||
<td width=10>[[image:BlueDot10x10.png|link=]]</td> | <td width=10>[[image:BlueDot10x10.png|link=]]</td> | ||
| − | <td>The folder can be moved to another location such as a different drive BUT '''Trainz''' must know | + | <td>The folder can be moved to another location such as a different drive BUT '''Trainz''' must know where to find the new '''User Data Folder''' so the move must be performed correctly using a specific method</td> |
</tr> | </tr> | ||
</table> | </table> | ||
| Line 34: | Line 34: | ||
<td>When you install '''Trainz''' it will default to installing the program code and the user data on the '''C:''' drive. During the install you be given the option of installing on another drive but most users will use the default.<br> | <td>When you install '''Trainz''' it will default to installing the program code and the user data on the '''C:''' drive. During the install you be given the option of installing on another drive but most users will use the default.<br> | ||
| − | As you add more data, such as '''DLC''' and '''DLS''' downloads plus create new assets (e.g. routes and sessions) of your own, the size of the '''User Data''' will grow significantly. Several '''GB''' (gigabytes) of data is not unusual for even a modest installation. Eventually, the '''C:''' drive may not be large enough to store all the Trainz data plus all the other Windows software and data.<br> | + | As you add more data, such as '''DLC''' and '''DLS''' downloads plus create new assets (e.g. routes and sessions) of your own, the size of the '''User Data''' will grow significantly. Several '''GB''' (gigabytes) of data is not unusual for even a modest installation. Some users have data sets measured in '''TB''' (terabytes). Eventually, the '''C:''' drive may not be large enough to store all the Trainz data plus all the other Windows software and data.<br> |
In this situation moving the user data to another attached drive to free up storage space may be the best option.</td> | In this situation moving the user data to another attached drive to free up storage space may be the best option.</td> | ||
| Line 55: | Line 55: | ||
</table> | </table> | ||
<br> | <br> | ||
| + | |||
='''Moving the User Data'''= | ='''Moving the User Data'''= | ||
| Line 75: | Line 76: | ||
<td><span style="font-weight: 700; font-size: 15px;">Open Install</span><br> | <td><span style="font-weight: 700; font-size: 15px;">Open Install</span><br> | ||
<span style="font-weight: 700; font-size: 15px; background-color: lightcyan;"> Left Click </span> on the <span style="font-weight: 700; font-size: 15px;">Install</span> tab<br> | <span style="font-weight: 700; font-size: 15px; background-color: lightcyan;"> Left Click </span> on the <span style="font-weight: 700; font-size: 15px;">Install</span> tab<br> | ||
| − | [[image:MoveUserData02.png|link=]]<br> | + | [[image:MoveUserData02.png|link=]]<br><br> |
| − | This will display the drive, folder and filename of the current '''User Data Folder''' which will be shown under the label '''Local data folder'''<br> | + | This will display the drive, folder and filename of the current '''User Data Folder''' which will be shown under the label '''Local data folder'''<br><br> |
[[image:MoveUserData03.png|link=]]<br><br></td> | [[image:MoveUserData03.png|link=]]<br><br></td> | ||
</tr> | </tr> | ||
| Line 93: | Line 94: | ||
<tr valign="top"> | <tr valign="top"> | ||
<td width=25>[[image:NotePad.PNG|link=]]</td> | <td width=25>[[image:NotePad.PNG|link=]]</td> | ||
| − | <td>Do not close the '''Trainz Launcher Settings''' window as you will need it again ('''Step''' <span style="font-weight: 700; font-size: | + | <td>Do not close the '''Trainz Launcher Settings''' window as you will need it again ('''Step''' <span style="font-weight: 700; font-size: 15px; color: white; background-color: red;"> 11 </span> below)</td> |
| + | </tr> | ||
| + | </table> | ||
| + | </td> | ||
| + | </tr> | ||
| + | </table> | ||
| + | <br> | ||
| + | <table bgcolor=#000000 cellpadding=2> | ||
| + | <tr valign="top"> | ||
| + | <td> | ||
| + | <table bgcolor=#ffffe0 cellpadding=2> | ||
| + | <tr valign="top"> | ||
| + | <td>[[image:PencilTips.PNG|link=]]</td> | ||
| + | <td>A useful tip is to paste a copy of the folder address into a text editor (e.g. '''Notepad''') for future reference. When it comes to deleting the original user data folder after the move has been completed you may find that you have several user data folders from past '''Trainz''' installs. The reference copy will identify the one to be deleted.</td> | ||
</tr> | </tr> | ||
</table> | </table> | ||
| Line 127: | Line 141: | ||
</tr> | </tr> | ||
</table> | </table> | ||
| − | Then paste (press the <span style="font-weight: 700; font-size: 15px;"><span style="color: white; background-color: black;"> Ctrl </span> + <span style="color: white; background-color: black;"> V </span></span> keys) the address of the '''User Data Folder''' stored in your clipboard into the '''File Explorer Address Bar'''<br> | + | <br> |
| − | [[image:MoveUserData08.png|link=]]<br> | + | Then paste (press the <span style="font-weight: 700; font-size: 15px;"><span style="color: white; background-color: black;"> Ctrl </span> + <span style="color: white; background-color: black;"> V </span></span> keys) the address of the '''User Data Folder''' stored in your clipboard into the '''File Explorer Address Bar'''<br><br> |
| + | [[image:MoveUserData08.png|link=]]<br><br> | ||
The contents of the folder will be shown. These are the folders and files that will be moved to another location<br><br></td> | The contents of the folder will be shown. These are the folders and files that will be moved to another location<br><br></td> | ||
</tr> | </tr> | ||
| Line 174: | Line 189: | ||
<td><span style="font-weight: 700; font-size: 17px; color: white; background-color: red;"> 9 </span></td> | <td><span style="font-weight: 700; font-size: 17px; color: white; background-color: red;"> 9 </span></td> | ||
<td><span style="font-weight: 700; font-size: 15px;">Paste the Copied Files and Folders into the Destination</span><br> | <td><span style="font-weight: 700; font-size: 15px;">Paste the Copied Files and Folders into the Destination</span><br> | ||
| − | <span style="font-weight: 700; font-size: 15px; background-color: lightcyan;"> Left Click </span> in the empty '''Name Display Area''' and paste (press the <span style="font-weight: 700; font-size: 15px;"><span style="color: white; background-color: black;"> Ctrl </span> + <span style="color: white; background-color: black;"> V </span></span> keys) the copied files and folders into their new location - this may take some time depending on how much data you have. As the files and folders are copied across they will appear in the '''File Explorer''' display window<br><br></td> | + | <span style="font-weight: 700; font-size: 15px; background-color: lightcyan;"> Left Click </span> in the empty '''Name Display Area''' and paste (press the <span style="font-weight: 700; font-size: 15px;"><span style="color: white; background-color: black;"> Ctrl </span> + <span style="color: white; background-color: black;"> V </span></span> keys) the copied files and folders into their new location - this may take some time depending on how much data you have. As the files and folders are copied across they will appear in the '''File Explorer''' display window.<br> |
| + | |||
| + | Wait until the copy task is completed.<br><br></td> | ||
</tr> | </tr> | ||
<tr valign="top"> | <tr valign="top"> | ||
| Line 202: | Line 219: | ||
<tr valign="top"> | <tr valign="top"> | ||
<td>[[image:DotPoint3Blue.png|link=]]</td> | <td>[[image:DotPoint3Blue.png|link=]]</td> | ||
| − | <td>paste (press the <span style="font-weight: 700; font-size: 15px;"><span style="color: white; background-color: black;"> Ctrl </span> + <span style="color: white; background-color: black;"> V </span></span> keys) the new folder address you stored in your system clipboard into the '''User Data Folder''' box</td> | + | <td>paste (press the <span style="font-weight: 700; font-size: 15px;"><span style="color: white; background-color: black;"> Ctrl </span> + <span style="color: white; background-color: black;"> V </span></span> keys) the new folder address you stored in your system clipboard into the '''User Data Folder''' box<br> |
| + | [[image:MoveUserData14.png|link=]]</td> | ||
</tr> | </tr> | ||
</table> | </table> | ||
</td> | </td> | ||
| − | <td width= | + | <td width=380>[[image:MoveUserData04.png|link=]]</td> |
</tr> | </tr> | ||
</table> | </table> | ||
| Line 212: | Line 230: | ||
</tr> | </tr> | ||
</table> | </table> | ||
| − | <br></td> | + | <br> |
| + | </td> | ||
</tr> | </tr> | ||
<tr valign="top"> | <tr valign="top"> | ||
| Line 221: | Line 240: | ||
<tr valign="top"> | <tr valign="top"> | ||
<td>[[image:MoveUserData15.png|link=]]<br><br></td> | <td>[[image:MoveUserData15.png|link=]]<br><br></td> | ||
| − | <td><br><br><br><br><span style="font-weight: 700; font-size: 15px; background-color: lightcyan;"> Left Click </span> | + | <td><br><br><br><br><span style="font-weight: 700; font-size: 15px; background-color: lightcyan;"> Left Click </span> on the [[image:OKBtn.png|link=]] button to acknowledge it.</td> |
</tr> | </tr> | ||
</table> | </table> | ||
| Line 241: | Line 260: | ||
<tr valign="top"> | <tr valign="top"> | ||
<td>[[image:PencilTips.PNG|link=]]</td> | <td>[[image:PencilTips.PNG|link=]]</td> | ||
| − | <td>It is '''recommended''' that you perform a '''DBR''' (Database Repair) before starting '''Trainz'''.<br> | + | <td>It is '''recommended''' that you perform a '''DBR''' (Database Repair) before starting '''Trainz''' in '''Step''' <span style="font-weight: 700; font-size: 15px; color: white; background-color: red;"> 15 </span> below.<br> |
| − | + | <br> | |
| − | The '''Trainz Wiki Page [[image:WikiLink.PNG|link=]] [[ | + | The '''Trainz Wiki Page [[image:WikiLink.PNG|link=]] [[How_to_Perform_Database_Repairs|How to Perform Database Repairs]]''' describes the process of performing a '''DBR'''</td> |
</tr> | </tr> | ||
</table> | </table> | ||
| Line 267: | Line 286: | ||
<td><span style="font-size: 17px; font-weight: 700;">Notes:'''</span><br> | <td><span style="font-size: 17px; font-weight: 700;">Notes:'''</span><br> | ||
---- | ---- | ||
| − | Once you are happy that the new setup is working you can delete the original '''User Data Folder''' on '''C:''' to reclaim its space <span style="font-weight: 700; font-size: 15px;">BUT</span> (and this is '''VITAL''') '''do not delete the folder that contained the original user data folder''' (ie. its parent folder) as this contains files that '''Trainz''' will need to locate your new '''User Data Folder'''.</td> | + | Once you are happy that the new setup is working you can delete the original '''User Data Folder''' on '''C:''' to reclaim its space <span style="font-weight: 700; font-size: 15px;">BUT</span> (and this is '''VITAL''') '''do not delete the folder that contained the original user data folder''' (ie. its parent folder) as this contains files that '''Trainz''' will need to locate your new '''User Data Folder'''.<br> |
| + | |||
| + | In the example screen shots shown in '''Steps''' <span style="font-weight: 700; font-size: 15px; color: white; background-color: red;"> 4 </span> and <span style="font-weight: 700; font-size: 15px; color: white; background-color: red;"> 11 </span> and as shown again below. | ||
| + | <table> | ||
| + | <tr valign="top"> | ||
| + | <td>[[image:MoveUserData04.png|link=]]</td> | ||
| + | <td>The '''User Data Folder''' in this example is named '''build sd6ccvr61'''. The letters and numbers after the '''build''' are random so yours will have its own unique name. This allows you to have multiple '''User Data Folders''' for the same install of '''Trainz''' - for example: one with all the assets installed and another with just the "built-in" and "base" assets.<br> | ||
| + | Once you are satisfied that everything is working correctly, you can delete the original folder ('''build sd6ccvr61''' in this example but yours will have a different name) from your system.<br> | ||
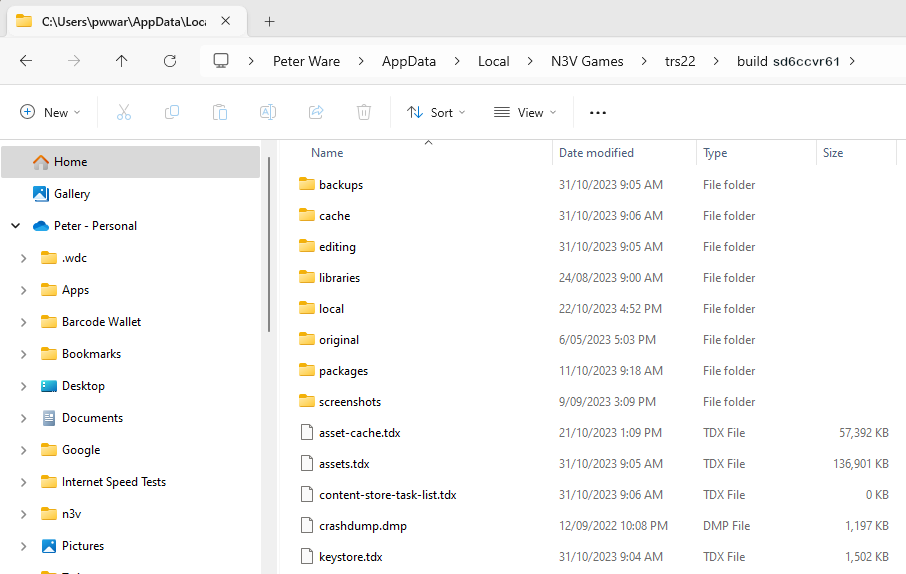
| + | The parent folder of '''build sd6ccvr61''' is named <span style="font-weight: 700; font-size: 15px;">trs22</span> in this example. <span style="font-weight: 700; font-aize: 15px; background-color: #fcbcbc;"> DO NOT delete this folder or any of the files it contains </span> - one of those files is used to redirect '''Trainz''' to the location of your new '''User Data Folder'''.</td> | ||
| + | </tr> | ||
| + | </table> | ||
| + | </td> | ||
</tr> | </tr> | ||
</table> | </table> | ||
| Line 287: | Line 317: | ||
---- | ---- | ||
---- | ---- | ||
| + | |||
='''Trainz Wiki'''= | ='''Trainz Wiki'''= | ||
| − | <table | + | <table width=1000> |
<tr valign="top"> | <tr valign="top"> | ||
| − | <td>[[image:TrainzWiki.png|link=]]</td> | + | <td> |
| + | <table width=500 cellpadding=2 bgcolor=#ffffff> | ||
| + | <tr valign="top"> | ||
| + | <td width=80>[[image:TrainzWiki.png|link=]]</td> | ||
<td> | <td> | ||
<span style="font-size: 17px;">'''More Tutorials and Guides to Using Trainz'''</span><br> | <span style="font-size: 17px;">'''More Tutorials and Guides to Using Trainz'''</span><br> | ||
| Line 297: | Line 331: | ||
*'''[[Session Rule List with Parameters|Session Rules List (Alphabetical) with Parameters]]''' | *'''[[Session Rule List with Parameters|Session Rules List (Alphabetical) with Parameters]]''' | ||
*'''[[Session Rules By Categories With Properties|Session Rules List (Categories) With Parameters]]''' | *'''[[Session Rules By Categories With Properties|Session Rules List (Categories) With Parameters]]''' | ||
| + | </td> | ||
| + | </tr> | ||
| + | </table> | ||
| + | </td> | ||
| + | <td> | ||
| + | <table width=500 cellpadding=4 bgcolor="aquamarine"> | ||
| + | <tr valign="top"> | ||
| + | <td width=50>[[image:LinkWiki.PNG|link=]]</td> | ||
| + | <td> | ||
| + | <span style="font-size: 17px;">'''Related Links'''</span><br> | ||
| + | *'''[[How to Create a Clean Install|How to Create a Clean Install and Additional User Data Folders]]''' | ||
| + | </td> | ||
| + | </tr> | ||
| + | </table> | ||
</td> | </td> | ||
</tr> | </tr> | ||
Latest revision as of 06:41, 22 November 2023
The information in this Wiki Page applies to T:ANE, TRS19, Trainz Plus and TRS22. It describes how to move your user data folder to a new location.
| The User Data Folder contains all the assets that came installed with your version of Trainz plus those that you have downloaded or have created yourself. This includes all routes and sessions | |
| This folder is created when Trainz is installed and is located (in Windows) on the C:\ drive in the Users\AppData folder. The AppData folder is normally a hidden folder | |
| The folder can be moved to another location such as a different drive BUT Trainz must know where to find the new User Data Folder so the move must be performed correctly using a specific method |
[edit] Why Move the User Data Folder?
| When you install Trainz it will default to installing the program code and the user data on the C: drive. During the install you be given the option of installing on another drive but most users will use the default. As you add more data, such as DLC and DLS downloads plus create new assets (e.g. routes and sessions) of your own, the size of the User Data will grow significantly. Several GB (gigabytes) of data is not unusual for even a modest installation. Some users have data sets measured in TB (terabytes). Eventually, the C: drive may not be large enough to store all the Trainz data plus all the other Windows software and data. |
|
[edit] Moving the User Data
| Steps: | ||||||||||
| 1 | Start Trainz |
|||||||||
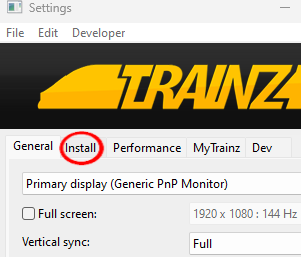
| 2 | Open Trainz Settings From the Trainz Launcher select Trainz Settings 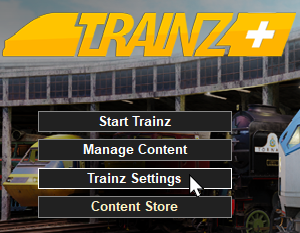 |
|||||||||
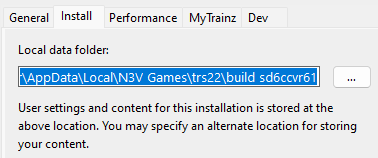
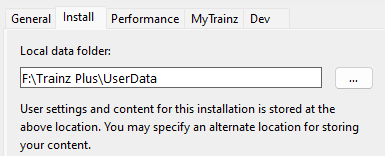
| 3 | Open Install Left Click on the Install tab 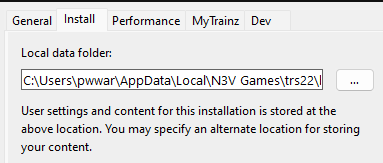 |
|||||||||
| 4 | Copy the Folder Address Left Click inside the box containing the address details then highlight and copy (press the Ctrl + A keys then the Ctrl + C keys). The address will be copied to your systems clipboard.
|
|||||||||
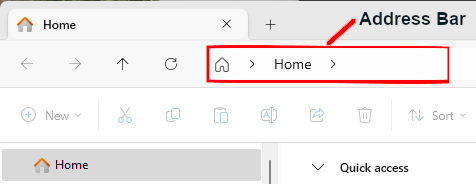
| 5 | Open Windows File Explorer In Windows 10 and 11 you will find the File Explorer on the Task Bar at the bottom of the screen. |
|||||||||
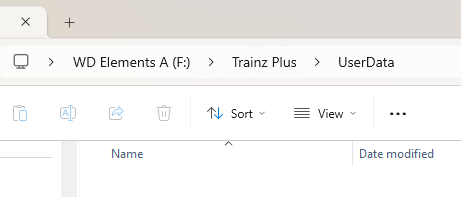
| 6 |
|
|||||||||
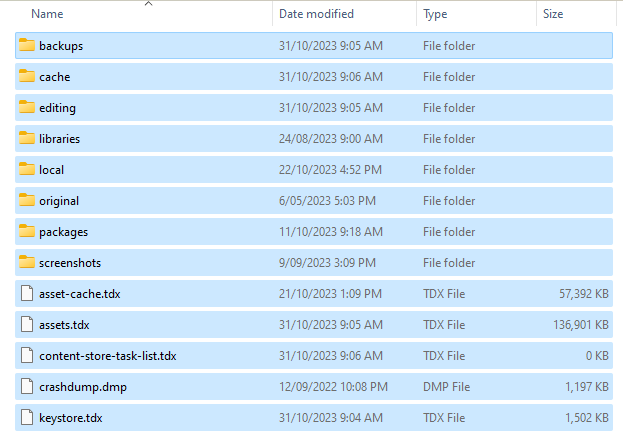
| 7 | Copy the Folders and Files Left Click on one of the items (a file or a folder) shown in the list then highlight and copy (press the Ctrl + A keys then the Ctrl + C keys) all the folders and files shown |
|||||||||
| 8 | Navigate to the New Folder Location In File Explorer navigate to the drive and/or folder where the User Data Folder will be placed.
|
|||||||||
| 9 | Paste the Copied Files and Folders into the Destination Left Click in the empty Name Display Area and paste (press the Ctrl + V keys) the copied files and folders into their new location - this may take some time depending on how much data you have. As the files and folders are copied across they will appear in the File Explorer display window. |
|||||||||
| 10 | Copy the New Folder Address Left Click in the File Explorer Address Bar then highlight and copy (press the Ctrl + A keys then the Ctrl + C keys) into your system clipboard the new folder address you created for the user data  |
|||||||||
| 11 | Paste the Address into Trainz Settings
|
|||||||||
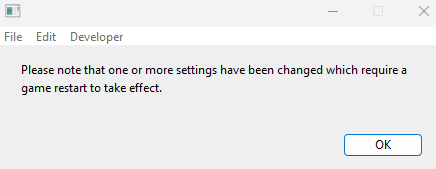
| 12 | Close the Trainz Settings Window You will be shown a message asking for a restart.
|
|||||||||
| 13 | Close the Trainz Launcher Dropping you back to the Windows desktop. |
|||||||||
| 14 | Restart Trainz Launcher You may get a dialogue asking you to set your display options (Ultra, etc). If so select one to suit.
|
|||||||||
| 15 | Start Trainz Select the Start Trainz option from the Launcher |
|||||||||
|
[edit] Trainz Wiki
|
|
This page was created by Trainz user pware in November 2023 and was last updated as shown below.
