How to Create a Clean Install

From TrainzOnline
Jump to: navigation, search
The information in this Wiki Page applies to T:ANE, TRS19, TRS22 and Trainz Plus. It describes how to set up one (or more) alternative User Data Folders that can contain different sets of installed assets from a bare minimum Clean Install (with Built-in and Base assets only) to various specialist installs such as a DLS Install (with Built-in, Base and Downloaded from DLS assets only).

Contents

BlueDot10x10.png the User Data Folder, also known as the Local Data Folder, stores all your installed assets and packages, screenshots, script libraries, etc
BlueDot10x10.png you can have multiple User Data Folders, each configured for different purposes (e.g. a current "full" install, a "minimal" install, a "DLS only" install, etc), and can switch between them when required

What is a "Clean Install"

        Next Down Bottom
BlueDot10x10.png A Clean Install is a User Data Folder that contains only those assets that were originally installed with your version of Trainz
BlueDot10x10.png There will be no assets that are Installed from DLS, Payware, Packaged or Modified but these can be added


A Clean Install will create a User Data Folder that is identical to the one that existed immediately after you first installed your current version of Trainz.
It will contain only assets that are:-
DotPoint.JPG Base and
DotPoint.JPG Built-in
for the version of Trainz that you have installed. There will be NO assets that are:-
DotPoint.JPG installed from the DLS (or anywhere else)
DotPoint.JPG installed as part of DLC Payware
DotPoint.JPG created by you (original, cloned, modified)
... but you can still add these assets to the new install.
NotePad.PNG Notes:

DotPoint.JPG the new User Data Folder you create will NOT delete your current User Data Folder but will be a completely separate install and can be on a different drive
DotPoint.JPG you can add new assets (from the DLS, DLC, your own creations) so it will become an "Alternate" User Data Folder
DotPoint.JPG depending on your available storage space you can have many "Alternate" User Data Folders installed and can switch Trainz back-and-forth between them as often as you like
DotPoint.JPG only those assets in your currently selected User Data Folder will be available for use in Trainz


Setting Up the New User Data Folder

    Top   Next Down Bottom
BlueDot10x10.png 
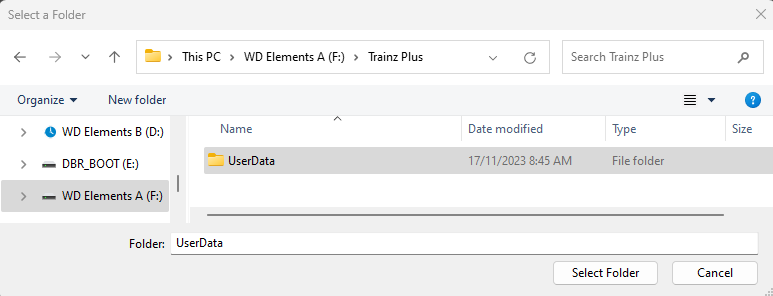
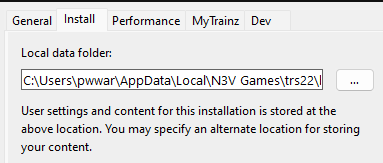
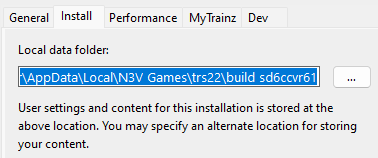
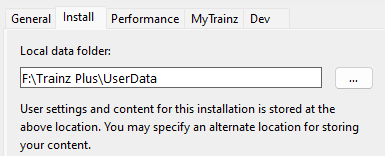
the new folder can be created in a location (drive and folder tree) of your choosing
BlueDot10x10.png it is strongly recommended that you record the location of your original User Data Folder and any alternative User Data Folders that you create


Steps:
 1  Create a Destination Folder for the New User Data Install
Steps:
DotPoint1Blue.png Open Windows File Explorer

In Windows 10 and 11 you will find the File Explorer on the Task Bar at the bottom of the screen.
MoveUserData05.png

 Left Click  on the folder icon to launch File Explorer
DotPoint2Blue.png Navigate to the Selected Location

In File Explorer navigate to the drive and parent folder where the new User Data Folder will be placed. Create the folder using a name of your choice (e.g. F:\Trainz Plus\UserData)

MoveUserData11.png
 2  Start Trainz
 3  Open Trainz Settings

From the Trainz Launcher select  Trainz Settings 

MoveUserData01.png

 4  Open Install

 Left Click  on the Install tab
MoveUserData02.png

This will display the drive and folder path of the current User Data Folder which will be shown under the label Local data folder

MoveUserData03.png The image shown is an example only. Each user and install will have a different location for their current User Data Folder


 5  Copy and Save the Current Folder Address  Strongly Recommended But Not Required 
Steps:
DotPoint1Blue.png Copy the Folder Address

 Left Click  inside the box containing the address details then highlight and copy (press the  Ctrl  +  A  keys then the  Ctrl  +  C  keys). The address will be copied to your systems clipboard

MoveUserData04.png
NotePad.PNG Notes:

You may find that your parent folder (e.g. N3V Games\trs22) may have several "build xxxxxxxxx" folders. Each one will be a User Data Folder for a different install of Trainz - for example, you may have been running both the beta and retail versions.

To avoid possible later confusion over which of these folders is the correct one, it is recommended that you save the locations of your original and any created User Data Folders
DotPoint2Blue.png Create a Text File to Store the Folder Address
Use Notepad or another text editor to create a text file and paste into it the copied address of the original User Data Folder. Save it for future reference
 6  Point Trainz to the New User Data Folder
Steps:
DotPoint1Blue.png  Left Click  on the 3DotsBtn.png button next to the folder address box
DotPoint2Blue.png navigate to the new folder you created in Step:  1  above
DotPoint3Blue.png  Left Click  on the SelectFolderBtn.png button
PencilTips.PNG Make sure that you add the address of your new User Data Folder to the text file that was recommended in Step  5  above. Again, this is for future reference.
  SelectNewUserDataFolder.png
 7  Close the Trainz Settings Window

You will be shown a message asking for a restart.

MoveUserData15.png

 Left Click  on the OKBtn.png button to acknowledge it.
 8  Close the Trainz Launcher
Dropping you back to the Windows desktop.

 9  Restart Trainz Launcher
You may get a dialogue window asking you to set your display options (Ultra, etc). If so select one to suit.

 10  Start Trainz
Select the  Start Trainz  option from the Launcher
NotePad.PNG The first time you access your new user data folder you will need to reenter your username and password. This is the same username password you used to register your copy of Trainz and the same ones you use to access the Trainz Forums.
From the Trainz Launcher select  Trainz Settings . Then select the MyTrainz tab and click on the link in the My Trainz Account section. After entering your username and password (and waiting for it to be confirmed), exit the launcher and restart.


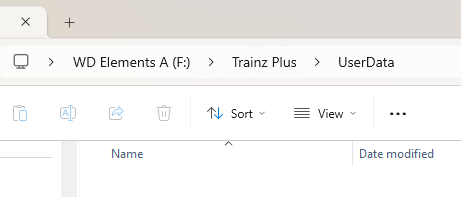
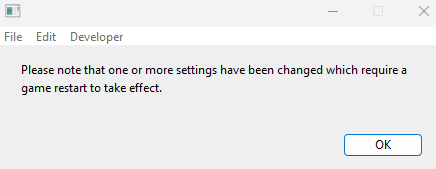
On launching Trainz will scan the newly created User Data Folder and discover that it is empty. It will then copy all the required folders and files from its installation files into the new User Data Folder


Switching Between User Data Folders

    Top Next Up   Bottom
BlueDot10x10.png You can switch Trainz between your seperate User Data Folders at any time
BlueDot10x10.png Only those assets installed in your currently selected User Data Folder will be available for use in Trainz


Once you have set up an alternative User Data Folder or Folders you can easily switch between them and the original at any time.

Steps:
 1  Open the Trainz Settings Install Tab

(A repeat of Steps  2 ,  3  and  4  in the section above)

Steps:
DotPoint1Blue.png Start Trainz
DotPoint2Blue.png Open Trainz Settings

From the Trainz Launcher select  Trainz Settings 

MoveUserData01.png

DotPoint3Blue.png Open Install

 Left Click  on the Install tab
MoveUserData02.png

This will display the drive and folder path of the current User Data Folder which will be shown under the label Local data folder

MoveUserData03.png

 2  Navigate to the Alternative User Data Folder
Steps:
DotPoint1Blue.png  Left Click  on the 3DotsBtn.png button next to the folder address box
DotPoint2Blue.png navigate to the alternative User Data Folder you are going to use
PencilTips.PNG The text file containing the addresses of all your User Data Folders ( you did save it, didn't you? ) will remind you where they are located
SelectNewUserDataFolder.png
DotPoint3Blue.png  Left Click  on the SelectFolderBtn.png button. The new User Data Folder will be selected in the Settings - Install Tab
MoveUserData14.png
 3  Close the Trainz Settings Window

You will be shown a message asking for a restart.

MoveUserData15.png

 Left Click  on the OKBtn.png button to acknowledge it.
 4  Close the Trainz Launcher
Dropping you back to the Windows desktop.

 5  Restart Trainz Launcher
You may get a dialogue window asking you to set your display options (Ultra, etc). If so select one to suit.

 6  Start Trainz
Select the  Start Trainz  option from the Launcher


On launching Trainz will open the selected User Data Folder and you will have normal access to all of its installed assets. This includes installing new assets (from the DLS, DLC, .cdp files or creating new assets yourself) as well as deleting and modifying/cloning existing assets. The changes you make will NOT affect any other User Data Folders that you may have created.


      Top Next Up    


Trainz Wiki

TrainzWiki.png

More Tutorials and Guides to Using Trainz

LinkWiki.PNG

Related Links


This page was created by Trainz user pware in November 2023 and was last updated as shown below.


Personal tools