How to Move a Picklist
From TrainzOnline
(Difference between revisions)
m (added link to text version of this page) |
m |
||
| (22 intermediate revisions by one user not shown) | |||
| Line 1: | Line 1: | ||
| − | + | <table width=1000> | |
| − | + | ||
| − | <table | + | |
<tr valign="top"> | <tr valign="top"> | ||
| − | <td> | + | <td>The information in this Wiki Page applies to '''TANE''', '''TRS19''', '''Trainz Plus''' and '''TRS22'''. This guide will show you how to move a Picklist from one installation of Trainz to another, on the same or different computers.</td> |
| − | + | ||
| − | + | ||
| − | </td> | + | |
</tr> | </tr> | ||
</table> | </table> | ||
| − | + | <br> | |
| − | <table cellpadding= | + | <table cellpadding=4 bgcolor="Aquamarine"> |
<tr valign="top"> | <tr valign="top"> | ||
| − | <td>[[ | + | <td>[[image:LinkWiki.PNG|link=]]</td> |
<td> | <td> | ||
| − | * For instructions on how to '''backup''' a Picklist, see the Trainz Wiki page '''[[How to Backup a Picklist]]''' | + | * For instructions on how to '''backup''' a Picklist, see the Trainz Wiki page [[image:WikiLink.PNG|link=]] '''[[How_to_Backup_a_Picklist|How to Backup a Picklist]]''' |
| − | * For instructions on how to ''' | + | * For instructions on how to '''manage''' a Picklist, see the Trainz Wiki page [[image:WikiLink.PNG|link=]] '''[[How_to_Manage_Filters_and_Picklists|How to Manage Filters and Picklists]]''' |
| − | * For instructions on how to '''rename''' a Picklist, see the Trainz Wiki page '''[[How to Rename a Picklist]]''' | + | * For instructions on how to '''rename''' a Picklist, see the Trainz Wiki page [[image:WikiLink.PNG|link=]] '''[[How_to_Rename_a_Picklist|How to Rename a Picklist]]''' (for '''TRS19 SP3''' and earlier) |
</td> | </td> | ||
</tr> | </tr> | ||
</table> | </table> | ||
<br> | <br> | ||
| − | <table | + | <table bgcolor=#000000 width=900> |
| + | <tr valign="top"> | ||
| + | <td> | ||
| + | <table bgcolor=#ffffe0 width=896> | ||
<tr valign="top"> | <tr valign="top"> | ||
| − | <td>[[ | + | <td>[[image:PencilTips.PNG|link=]]</td> |
| − | <td>If you have made '''backup copies''' of your Picklists then you have already completed half the work. Use the | + | <td>If you have made '''backup copies''' of your Picklists then you have already completed half the work. Use the steps described in the Wiki Page [[image:WikiLink.PNG|link=]] '''[[How to Backup a Picklist#How to Restore a Picklist|How to Backup a Picklist]] (Restore Operation)''' to complete the move.</td> |
| + | </tr> | ||
| + | </table> | ||
| + | </td> | ||
</tr> | </tr> | ||
</table> | </table> | ||
<br> | <br> | ||
| + | <table width=1000> <!-- BEGIN Nav Buttons Table NO SKIPS --> | ||
| + | <tr valign="top"> | ||
| + | <td width=629><span id="stepAccess"></span> | ||
='''Access Your Current Picklists'''= | ='''Access Your Current Picklists'''= | ||
| + | </td> | ||
| + | <td width=50> </td> <!-- Skip Down --> | ||
| + | <td width=50> </td> <!-- Skip Up --> | ||
| + | <td width=46>[[image:BackToTop.png|link=#top|alt=Top|Top]]</td> | ||
| + | <td width=75> </td> | ||
| + | <td width=75>[[image:NextDown.png|link=#stepTransfer|alt=Next Down|Next Down]]</td> | ||
| + | <td width=75>[[image:BackToBottom.png|link=#bottom|alt=Bottom|Bottom]]</td> | ||
| + | </tr> | ||
| + | </table> <!-- END Nav Buttons Table --> | ||
| − | <table cellpadding= | + | <table width=1000 cellpadding=4 bgcolor=#ffffff> <!-- BEGIN Step table --> |
<tr valign="top"> | <tr valign="top"> | ||
| − | <td | + | <td colspan=2><span style="font-weight: 700; font-size: 15px;">Steps:</span></td> |
| − | <span style="font- | + | </tr> |
| − | + | ||
| − | + | ||
<tr valign="top"> | <tr valign="top"> | ||
| − | <td> | + | <td width=25>[[image:DotPoint1.JPG|link=]]</td> |
| − | + | <td><span style="font-size: 17px; font-weight: 700;">Open Content Manager and Your Picklists</span><br> | |
| − | + | <table width=975> <!-- BEGIN Step 1 table --> | |
| − | + | ||
| − | [[ | + | |
| − | + | ||
| − | <table | + | |
<tr valign="top"> | <tr valign="top"> | ||
| − | <td | + | <td colspan=2>From the '''Trainz Launcher''' select <span style="color: white; background-color: black; font-weight: 700; font-size: 15px;"> Manage Content </span></td> |
| − | + | ||
</tr> | </tr> | ||
| − | < | + | <tr valign="top"> |
| + | <td> | ||
| + | <table bgcolor=#000000 width=485> <!-- BEGIN TRS19 black border --> | ||
| + | <tr valign="top"> | ||
| + | <td> | ||
| + | <table width=481 bgcolor="white"> <!-- BEGIN TRS19 table --> | ||
| + | <tr valign="top"> | ||
| + | <td bgcolor=#000000 align="center"><span style="color: white; font-weight: 700; font-size: 15px;">In TRS19 SP4, Trainz Plus SP4 (and later) and TRS22</span></td> | ||
| + | </tr> | ||
| + | <tr valign="top"> | ||
| + | <td> | ||
| + | <table> | ||
| + | <tr valign="top"> | ||
| + | <td width=25>[[image:DotPoint1Blue.png|link=]]</td> | ||
| + | <td>Open the '''Filter List'''<br> | ||
| + | [[image:PickListFilter.png|link=|alt=Pick List Filter]]</td> | ||
| + | </tr> | ||
| + | <tr valign="top"> | ||
| + | <td>[[image:DotPoint2Blue.png|link=]]</td> | ||
| + | <td>Select the '''Picklist''' to be backed up. This will open the Picklist</td> | ||
| + | </tr> | ||
| + | </table> | ||
| + | |||
| + | <table bgcolor=#ffffb0 cellpadding=2> | ||
| + | <tr valign="top"> | ||
| + | <td width=25>[[image:NotePad.PNG|link=]]</td> | ||
| + | <td>In '''TRS19 SP4''', '''Trainz Plus SP4''' (and later) and '''TRS22''' you '''CAN''' select and backup the '''Default Picklist'''</td> | ||
| + | </tr> | ||
| + | </table> | ||
</td> | </td> | ||
</tr> | </tr> | ||
| − | </table | + | </table> |
</td> | </td> | ||
</tr> | </tr> | ||
| − | < | + | </table> |
| − | <td | + | </td> |
| − | ----</td> | + | <td width=20> </td> |
| + | <td> | ||
| + | <table bgcolor=#000000 width=485> <!-- BEGIN TANE black border --> | ||
| + | <tr valign="top"> | ||
| + | <td> | ||
| + | <table width=481 bgcolor="white"> <!-- BEGIN TANE table --> | ||
| + | <tr valign="top"> | ||
| + | <td bgcolor=#000000 align="center"><span style="color: white; font-weight: 700; font-size: 15px;">In T:ANE and TRS19 SP3, Trainz Plus SP3 and earlier Trainz versions</span></td> | ||
</tr> | </tr> | ||
<tr valign="top"> | <tr valign="top"> | ||
| − | <td> | + | <td> |
| − | <td>[[ | + | <table> |
| + | <tr valign="top"> | ||
| + | <td width=25>[[image:DotPoint1Blue.png|link=]]</td> | ||
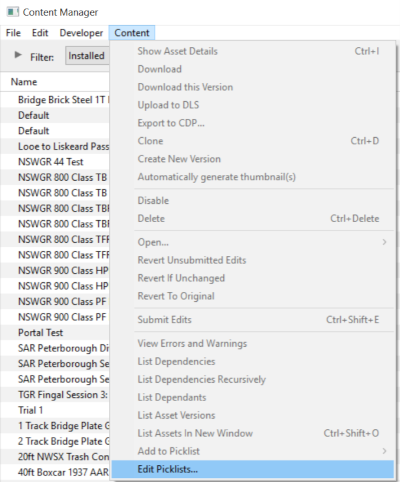
| + | <td>in '''Content Manager''' open the '''Content''' menu</td> | ||
| + | </tr> | ||
| + | <tr valign="top"> | ||
| + | <td>[[image:DotPoint2Blue.png|link=]]</td> | ||
| + | <td>select '''Edit Picklist'''<br> | ||
| + | [[image:PickListEditPickList.png|link=]]</td> | ||
| + | </tr> | ||
| + | <tr valign="top"> | ||
| + | <td colspan=2>This will display all your current Picklists</td> | ||
| + | </tr> | ||
| + | <tr valign="top"> | ||
| + | <td>[[image:DotPoint3Blue.png|link=]]</td> | ||
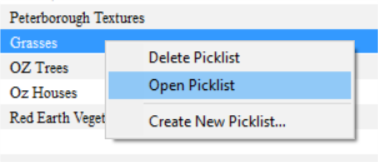
| + | <td><span style="font-weight: 700; font-size: 15px; background-color: lightcyan;">Right Click</span> on the required Picklist</td> | ||
| + | </tr> | ||
| + | <tr valign="top"> | ||
| + | <td>[[image:DotPoint4Blue.png|link=]]</td> | ||
| + | <td>select '''Open Picklist''' from the popup menu<br> | ||
| + | [[image:PickListOpenGrasses.png|link=]]</td> | ||
| + | </tr> | ||
| + | <tr valign="top"> | ||
| + | <td colspan=2>This will open the Picklist</td> | ||
| + | </tr> | ||
| + | </table> | ||
| + | |||
| + | <table bgcolor=#ffffb0 cellpadding=2> | ||
| + | <tr valign="top"> | ||
| + | <td width=25>[[image:NotePad.PNG|link=]]</td> | ||
| + | <td>In '''T:ANE''', '''TRS19/Trainz Plus SP3''' and earlier '''Trainz''' versions you '''CANNOT''' select and backup the '''Default Picklist'''</td> | ||
| + | </tr> | ||
| + | </table> <!-- END Dot Point table --> | ||
| + | </td> | ||
| + | </tr> | ||
| + | </table> <!-- END TANE table --> | ||
| + | </td> | ||
| + | </tr> | ||
| + | </table> <!-- END TANE black border --> | ||
| + | </td> | ||
| + | </tr> | ||
| + | </table> <!-- END Step 1 table --> | ||
| + | </td> | ||
| + | </tr> | ||
| + | </table> | ||
| + | |||
| + | <table width=1000> | ||
| + | <tr valign="top"> | ||
| + | <td width=25>[[image:DotPoint2.JPG|link=]]</td> | ||
| + | <td><span style="font-size: 17px; font-weight: 700;">Select the Picklist Contents:</span><br> | ||
<table> <!-- BEGIN Step 2 table --> | <table> <!-- BEGIN Step 2 table --> | ||
<tr valign="top"> | <tr valign="top"> | ||
<td> | <td> | ||
| − | + | <table> | |
| − | # | + | <tr valign="top"> |
| − | [[ | + | <td width=25>[[image:DotPoint1Blue.png|link=]]</td> |
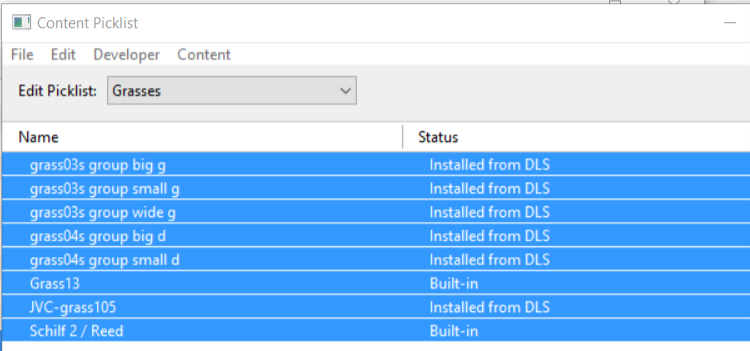
| − | + | <td><span style="font-weight: 700; font-size: 15px; background-color: lightcyan;">Left Click</span> on any one of the items</td> | |
| + | </tr> | ||
| + | <tr valign="top"> | ||
| + | <td>[[image:DotPoint2Blue.png|link=]]</td> | ||
| + | <td>press <span style="font-weight: 700; font-size: 15px;"><span style="color: white; background-color: black;"> Ctrl </span> + <span style="color: white; background-color: black;"> A </span></span> to '''Select All''' the items<br> | ||
| + | [[image:PickListSelectAll.png|link=]]</td> | ||
| + | </tr> | ||
| + | </table> | ||
| + | </td> | ||
</tr> | </tr> | ||
</table> <!-- END Step 2 table --> | </table> <!-- END Step 2 table --> | ||
</td> | </td> | ||
</tr> | </tr> | ||
| − | <tr> | + | </table> |
| − | <td | + | |
| − | --- | + | <table width=1000> |
| + | <tr valign="top"> | ||
| + | <td width=25>[[image:DotPoint3.JPG|link=]]</td> | ||
| + | <td><span style="font-size: 17px; font-weight: 700;">Copy the List to a New Window:</span> | ||
| + | <table> | ||
| + | <tr valign="top"> | ||
| + | <td width=25>[[image:DotPoint1Blue.png|link=]]</td> | ||
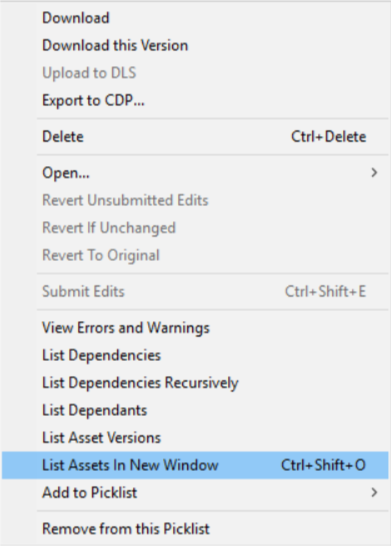
| + | <td><span style="font-weight: 700; font-size: 15px; background-color: lightcyan;">Right Click</span> on any one of the items</td> | ||
</tr> | </tr> | ||
<tr valign="top"> | <tr valign="top"> | ||
| − | + | <td>[[image:DotPoint2Blue.png|link=]]</td> | |
| − | <td>[[ | + | <td>select '''List Assets in New Window''' from the popup menu</td> |
| − | <table> <!-- BEGIN Step 3 | + | </tr> |
| + | </table> | ||
| + | <br> | ||
| + | <table> <!-- BEGIN Step 3 Side tables --> | ||
<tr valign="top"> | <tr valign="top"> | ||
| + | <td>[[image:PickListListinNewWindow.png|link=]]</td> | ||
<td> | <td> | ||
| − | # | + | <table bgcolor=#000000 width=500> |
| − | # | + | <tr valign="top"> |
| − | + | <td> | |
| + | <table bgcolor=#ffffb0 width=496> | ||
| + | <tr valign="top"> | ||
| + | <td>[[image:NotePad.PNG|link=]]</td> | ||
| + | <td><span style="font-size: 17px; font-weight: 700;">Notes:'''</span><br> | ||
| + | ---- | ||
| + | The option <span style="font-weight: 700; font-size: 15px;">Export to CDP</span> does appear in the menu list but this will export all the selected assets (with '''ALL''' their meshes, textures, config.txt files, etc) and not just a list of '''<kuids>'''. The resulting '''.cdp''' file can easily be many megabytes in size.</td> | ||
</tr> | </tr> | ||
| − | </table | + | </table> |
</td> | </td> | ||
</tr> | </tr> | ||
| − | < | + | </table> |
| − | + | </td> | |
| − | + | ||
</tr> | </tr> | ||
| + | </table> | ||
| + | </td> | ||
| + | </tr> | ||
| + | </table> | ||
| + | |||
| + | <table width=1000> | ||
<tr valign="top"> | <tr valign="top"> | ||
| − | <td | + | <td width=25>[[image:DotPoint4.JPG|link=]]</td> |
| − | + | <td><span style="font-size: 17px; font-weight: 700;">Copy Assets in Picklist:</span><br> | |
<table> <!-- BEGIN Step 4 table --> | <table> <!-- BEGIN Step 4 table --> | ||
<tr valign="top"> | <tr valign="top"> | ||
<td> | <td> | ||
| − | + | <table> | |
| − | #select ''' | + | <tr valign="top"> |
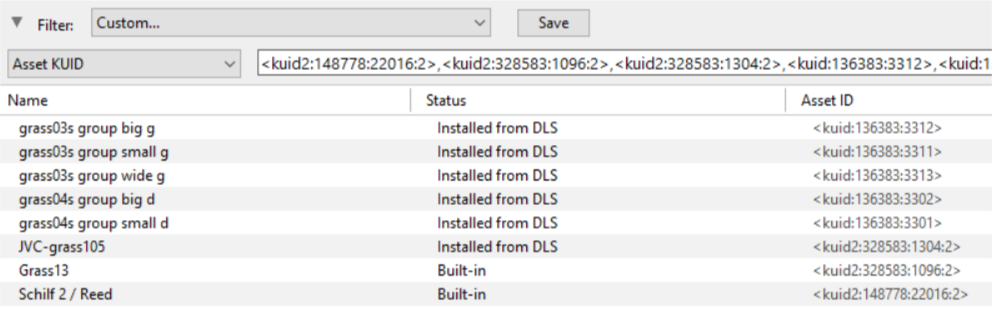
| − | [[ | + | <td colspan=2>The Picklist assets will be listed by their kuids in the '''Asset KUID''' box of a new search filter<br> |
| + | [[image:PickListSelectListofAssetsSelected.png|link=]]</td> | ||
| + | </tr> | ||
| + | <tr valign="top"> | ||
| + | <td width=25>[[image:DotPoint1Blue.png|link=]]</td> | ||
| + | <td><span style="font-weight: 700; font-size: 15px; background-color: lightcyan;">Left Click</span> inside the '''Asset KUID''' box and press <span style="font-weight: 700; font-size: 15px;"><span style="color: white; background-color: black;"> Ctrl </span> + <span style="color: white; background-color: black;"> A </span></span> to select them '''ALL'''</td> | ||
| + | </tr> | ||
| + | <tr valign="top"> | ||
| + | <td>[[image:DotPoint2Blue.png|link=]]</td> | ||
| + | <td>copy the asset list to your operating system clipboard (press <span style="font-weight: 700; font-size: 15px;"><span style="color: white; background-color: black;"> Ctrl </span> + <span style="color: white; background-color: black;"> C </span></span>)</td> | ||
| + | </tr> | ||
| + | </table> | ||
</td> | </td> | ||
</tr> | </tr> | ||
| Line 107: | Line 238: | ||
</td> | </td> | ||
</tr> | </tr> | ||
| − | <tr> | + | </table> <!-- END Step Table --> |
| − | <td | + | <br> |
| − | ----</td> | + | <table width=1000> <!-- BEGIN Nav Buttons Table NO SKIPS --> |
| + | <tr valign="top"> | ||
| + | <td width=629><span id="stepTransfer"></span> | ||
| + | ='''Transfer the List to Another Copy of Trainz'''= | ||
| + | </td> | ||
| + | <td width=50> </td> <!-- Skip Down --> | ||
| + | <td width=50> </td> <!-- Skip Up --> | ||
| + | <td width=46>[[image:BackToTop.png|link=#top|alt=Top|Top]]</td> | ||
| + | <td width=75>[[image:NextUp.png|link=#stepAccess|alt=Next Up|Next Up]]</td> | ||
| + | <td width=75> </td> | ||
| + | <td width=75>[[image:BackToBottom.png|link=#bottom|alt=Bottom|Bottom]]</td> | ||
</tr> | </tr> | ||
| + | </table> <!-- END Nav Buttons Table --> | ||
| + | |||
| + | <table bgcolor=#000000> | ||
<tr valign="top"> | <tr valign="top"> | ||
| − | < | + | <td> |
| − | < | + | <table bgcolor=#ffffb0> |
| − | + | ||
<tr valign="top"> | <tr valign="top"> | ||
| − | <td> | + | <td>[[image:NotePad.PNG|link=]]</td> |
| − | + | <td><span style="font-size: 17px; font-weight: 700;">Notes:'''</span><br> | |
| − | [[ | + | ---- |
| − | + | If you are transferring the Picklist to another computer then you will need to:- | |
| − | + | <table bgcolor=#ffffff> | |
| − | </td> | + | <tr valign="top"> |
| + | <td colspan=2><span style="font-weight: 700; font-size: 15px;">Steps:</span> To copy a Picklist between different computers:-</td> | ||
</tr> | </tr> | ||
| − | <tr> | + | <tr valign="top"> |
| − | <td | + | <td width=25>[[image:DotPoint1Blue.png|link=]]</td> |
| − | + | <td>paste the list from '''Step: '''[[image:DotPoint4.JPG|link=]] above into a text editor such as '''Notepad'''</td> | |
</tr> | </tr> | ||
| − | < | + | <tr valign="top"> |
| − | </td> | + | <td>[[image:DotPoint2Blue.png|link=]]</td> |
| + | <td>save it as a text file</td> | ||
</tr> | </tr> | ||
| − | |||
| − | |||
<tr valign="top"> | <tr valign="top"> | ||
| − | <td | + | <td>[[image:DotPoint3Blue.png|link=]]</td> |
| + | <td>copy the file to your second computer</td> | ||
</tr> | </tr> | ||
| − | |||
| − | |||
| − | |||
| − | |||
| − | |||
<tr valign="top"> | <tr valign="top"> | ||
| − | <td>[[ | + | <td colspan=2>On the second computer, reverse the steps by:-</td> |
| − | <td>< | + | </tr> |
| − | + | <tr valign="top"> | |
| − | + | <td>[[image:DotPoint4Blue.png|link=]]</td> | |
| − | + | <td>opening the text document (in Notepad)</td> | |
| − | + | </tr> | |
| − | + | <tr valign="top"> | |
| − | + | <td>[[image:DotPoint5Blue.png|link=]]</td> | |
| − | + | <td>select and copy all the items in the list to the clipboard</td> | |
| − | Then proceed as described below | + | </tr> |
| + | <tr valign="top"> | ||
| + | <td colspan=2>Then proceed as described below</td> | ||
| + | </tr> | ||
| + | </table> | ||
| + | </td> | ||
| + | </tr> | ||
| + | </table> | ||
| + | </td> | ||
</tr> | </tr> | ||
</table> | </table> | ||
<br> | <br> | ||
| − | <table cellpadding= | + | <table width=1000 cellpadding=4 bgcolor=#ffffff> <!-- BEGIN Step table --> |
| − | <tr> | + | <tr valign="top"> |
| − | <td colspan= | + | <td colspan=2><span style="font-weight: 700; font-size: 15px;">Steps:</span></td> |
| − | + | ||
</tr> | </tr> | ||
<tr valign="top"> | <tr valign="top"> | ||
| − | <td>[[ | + | <td width=25>[[image:DotPoint5.JPG|link=]]</td> |
| − | + | <td><span style="font-size: 17px; font-weight: 700;">Open CM in the Destination Trainz and Create a New Filter:</span><br> | |
| − | <td> | + | |
<table> <!-- BEGIN Step 6 table --> | <table> <!-- BEGIN Step 6 table --> | ||
<tr valign="top"> | <tr valign="top"> | ||
<td> | <td> | ||
| − | + | <table width=500> | |
| − | + | <tr valign="top"> | |
| − | + | <td width=25>[[image:DotPoint1Blue.png|link=]]</td> | |
| − | + | <td>in the copy of Trainz where the Picklist is being transferred, open '''Content Manager'''</td> | |
| − | </td> | + | |
</tr> | </tr> | ||
| − | <tr> | + | <tr valign="top"> |
| − | <td | + | <td>[[image:DotPoint2Blue.png|link=]]</td> |
| − | + | <td>start a new '''Custom''' filter</td> | |
</tr> | </tr> | ||
| − | </ | + | <tr valign="top"> |
| + | <td>[[image:DotPoint3Blue.png|link=]]</td> | ||
| + | <td>paste (<span style="color: white; background-color: black; font-weight: 700; font-size: 15px;"> Ctrl </span> '''+''' <span style="color: white; background-color: black; font-weight: 700; font-size: 15px;"> V </span>) the asset list into the '''Asset KUID''' box</td> | ||
| + | </tr> | ||
| + | <tr valign="top"> | ||
| + | <td>[[image:DotPoint4Blue.png|link=]]</td> | ||
| + | <td>delete the filter line '''Installed''' if it is present (but '''<u>before you do</u>''' see '''Tips:''' on the right) | ||
</td> | </td> | ||
</tr> | </tr> | ||
| + | </table> | ||
| + | </td> | ||
| + | <td> | ||
| + | <table width=500> | ||
<tr valign="top"> | <tr valign="top"> | ||
| − | < | + | <td> |
| − | < | + | <table bgcolor=#000000 width=500 cellpadding=2> |
| − | + | ||
<tr valign="top"> | <tr valign="top"> | ||
<td> | <td> | ||
| − | [[ | + | <table bgcolor=#ffffe0 width=496 cellpadding=2> |
| − | + | <tr valign="top"> | |
| − | + | <td>[[image:PencilTips.PNG|link=]]</td> | |
| − | + | <td>Before you delete the '''Installed''' filter line, change it from '''True''' to '''False'''. This will identify any assets in the pasted list that have not been installed in your new '''Content Manager'''. They will appear as '''Available for download'''.<br><br> | |
| − | + | Download and install each one and then delete the '''Installed''' filter line.</td> | |
| + | </tr> | ||
| + | </table> | ||
| + | </td> | ||
| + | </tr> | ||
| + | </table> | ||
| + | </td> | ||
| + | </tr> | ||
| + | </table> | ||
</td> | </td> | ||
</tr> | </tr> | ||
<tr> | <tr> | ||
| − | <td colspan= | + | <td colspan=2>[[image:PickListSelectListofAssets.png|link=]]</td> |
| − | + | ||
</tr> | </tr> | ||
| − | </table | + | </table> |
</td> | </td> | ||
</tr> | </tr> | ||
| + | </table> | ||
| + | |||
| + | <table width=1000> | ||
<tr valign="top"> | <tr valign="top"> | ||
| − | <td | + | <td width=25>[[image:DotPoint6.JPG|link=]]</td> |
| − | + | <td><span style="font-size: 17px; font-weight: 700;">Create a New Picklist:</span><br> | |
| − | <table | + | <table> |
<tr valign="top"> | <tr valign="top"> | ||
| − | <td> | + | <td colspan=2>[[image:PickListTRS19Paste.png|link=]]</td> |
| − | [[ | + | </tr> |
| − | + | <tr valign="top"> | |
| + | <td width=25>[[image:DotPoint1Blue.png|link=]]</td> | ||
| + | <td>check for any assets labelled as '''Available for download''' and download these assets</td> | ||
| + | </tr> | ||
| + | <tr valign="top"> | ||
| + | <td >[[image:DotPoint2Blue.png|link=]]</td> | ||
| + | <td>select an entry and then select all (<span style="color: white; background-color: black; font-weight: 700; font-size: 15px;"> Ctrl </span> '''+''' <span style="color: white; background-color: black; font-weight: 700; font-size: 15px;"> A </span>)</td> | ||
| + | </tr> | ||
| + | <tr valign="top"> | ||
| + | <td >[[image:DotPoint3Blue.png|link=]]</td> | ||
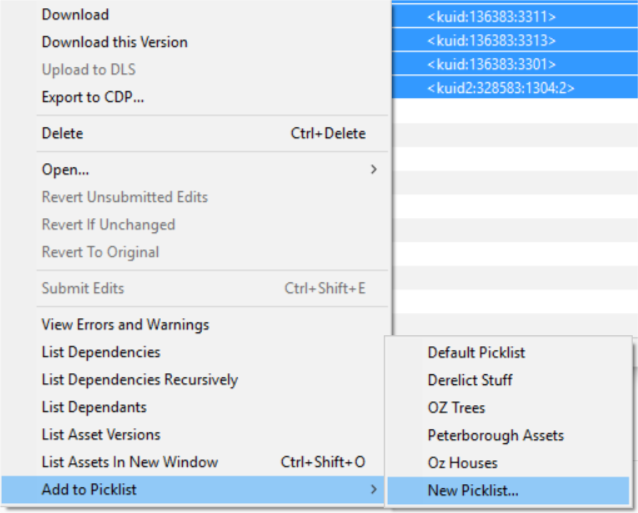
| + | <td><span style="font-weight: 700; font-size: 15px; background-color: lightcyan;">Right Click</span> on any entry and select <span style="font-weight: 700; font-size: 15px; color: white; background-color: black;"> Add to Picklist </span> and then <span style="font-weight: 700; font-size: 15px; color: white; background-color: black;"> New Picklist </span> from the popup menus</td> | ||
| + | </tr> | ||
| + | <tr valign="top"> | ||
| + | <td colspan=2>[[image:PickListTRS19NewList.png|link=]]</td> | ||
| + | </tr> | ||
| + | </table> | ||
</td> | </td> | ||
</tr> | </tr> | ||
| − | <tr> | + | </table> |
| − | <td | + | <br> |
| − | ----</td> | + | <table width=1000> |
| + | <tr valign="top"> | ||
| + | <td width=25>[[image:DotPoint7.JPG|link=]]</td> | ||
| + | <td><span style="font-size: 17px; font-weight: 700;">Name the Picklist:</span><br> | ||
| + | <table> | ||
| + | <tr valign="top"> | ||
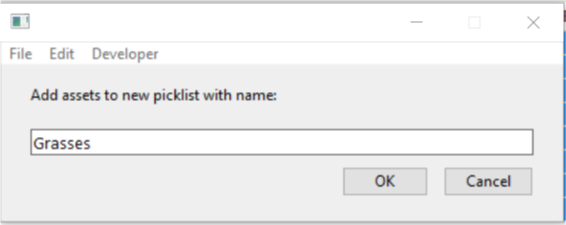
| + | <td>Enter a name for the Picklist (the same name as the original would be a good idea) and <span style="font-weight: 700; font-size: 15px; background-color: lightcyan;">Left Click</span> the <span style="font-weight: 700; font-size: 15px;">OK</span> button (for '''T:ANE''' and '''TRS19''') or the <span style="font-weight: 700; font-size: 15px; color: white; background-color: blue;"> Save </span> button (for '''Trainz Plus''' and '''TRS22''')<br> | ||
| + | [[image:PickListTRS19NewListName.png|link=]]</td> | ||
</tr> | </tr> | ||
| − | </table | + | </table> |
</td> | </td> | ||
</tr> | </tr> | ||
| − | </table> | + | </table> |
| + | <br> | ||
| + | <table> <!-- BEGIN Nav Buttons Table --> | ||
| + | <tr valign="top"> | ||
| + | <td width=729><span id="bottom"></span> </td> | ||
| + | <td width=46>[[image:BackToTop.png|link=#top|alt=Top|Top]]</td> | ||
| + | <td width=75>[[image:NextUp.png|link=#stepTransfer|alt=Next Up|Next Up]]</td> | ||
| + | <td width=75> </td> | ||
| + | <td width=75> </td> | ||
| + | </tr> | ||
| + | </table> <!-- END Nav Buttons Table --> | ||
---- | ---- | ||
---- | ---- | ||
| − | |||
='''Trainz Wiki'''= | ='''Trainz Wiki'''= | ||
| − | <table | + | <table width=1000> |
<tr valign="top"> | <tr valign="top"> | ||
| − | <td>[[ | + | <td> |
| + | <table width=500 cellpadding=2 bgcolor=#ffffff> | ||
| + | <tr valign="top"> | ||
| + | <td width=80>[[image:TrainzWiki.png|link=]]</td> | ||
<td> | <td> | ||
<span style="font-size: 17px;">'''More Tutorials and Guides to Using Trainz'''</span><br> | <span style="font-size: 17px;">'''More Tutorials and Guides to Using Trainz'''</span><br> | ||
| Line 230: | Line 427: | ||
*'''[[Session Rule List with Parameters|Session Rules List (Alphabetical) with Parameters]]''' | *'''[[Session Rule List with Parameters|Session Rules List (Alphabetical) with Parameters]]''' | ||
*'''[[Session Rules By Categories With Properties|Session Rules List (Categories) With Parameters]]''' | *'''[[Session Rules By Categories With Properties|Session Rules List (Categories) With Parameters]]''' | ||
| + | </td> | ||
| + | </tr> | ||
| + | </table> | ||
| + | </td> | ||
| + | <td> | ||
| + | <table width=500 cellpadding=4 bgcolor="aquamarine"> | ||
| + | <tr valign="top"> | ||
| + | <td width=50>[[image:LinkWiki.PNG|link=]]</td> | ||
| + | <td> | ||
| + | <span style="font-size: 17px;">'''Related Links'''</span><br> | ||
| + | * '''[[How_to_Backup_a_Picklist|How to Backup a Picklist]]''' | ||
| + | * '''[[How_to_Manage_Filters_and_Picklists|How to Manage Filters and Picklists]]''' | ||
| + | * '''[[How_to_Rename_a_Picklist|How to Rename a Picklist]]''' (for '''TRS19 SP3''' and earlier) | ||
| + | </td> | ||
| + | </tr> | ||
| + | </table> | ||
</td> | </td> | ||
</tr> | </tr> | ||
Latest revision as of 19:25, 21 November 2023
| The information in this Wiki Page applies to TANE, TRS19, Trainz Plus and TRS22. This guide will show you how to move a Picklist from one installation of Trainz to another, on the same or different computers. |
 |
|
|
[edit] Access Your Current Picklists |
| Steps: | ||||||||||||||||||||||||||||||||
Open Content Manager and Your Picklists
|
||||||||||||||||||||||||||||||||

Select the Picklist Contents:
|
Copy the List to a New Window:
|
Copy Assets in Picklist:
|
||||||||

[edit] Transfer the List to Another Copy of Trainz |
|
||||||||||||||||||
| Steps: | |||||||||||||||||
Open CM in the Destination Trainz and Create a New Filter:
|
|||||||||||||||||

Create a New Picklist:
|
|||||||||||
Name the Picklist:
|
[edit] Trainz Wiki
|
|

This page was created by Trainz user pware in October 2018 and was last updated as shown below.