SAR Scenarios Tutorial
m |
m |
||
| (43 intermediate revisions by one user not shown) | |||
| Line 1: | Line 1: | ||
| − | |||
<table width=1000> <!-- BEGIN Title and summary table --> | <table width=1000> <!-- BEGIN Title and summary table --> | ||
<tr valign="top"> | <tr valign="top"> | ||
| Line 16: | Line 15: | ||
</table> <!-- END Nav Buttons Table --> | </table> <!-- END Nav Buttons Table --> | ||
----- | ----- | ||
| − | |||
| − | |||
| − | |||
| − | |||
| − | |||
| − | |||
| − | |||
| − | |||
| − | |||
| − | |||
| − | |||
| − | |||
| − | |||
| − | |||
| − | |||
| − | |||
| − | |||
| − | |||
| − | |||
| − | |||
| − | |||
| − | |||
| − | |||
| − | |||
| − | |||
| − | |||
| − | |||
| − | |||
| − | |||
| − | |||
| − | |||
| − | |||
| − | |||
| − | |||
| − | |||
| − | |||
| − | |||
| − | |||
| − | |||
| − | |||
| − | |||
| − | |||
| − | |||
| − | |||
| − | |||
<table width=1000> <!-- BEGIN Combined Intro Table --> | <table width=1000> <!-- BEGIN Combined Intro Table --> | ||
<tr valign="top"> | <tr valign="top"> | ||
| Line 66: | Line 20: | ||
<span style="font-weight: 700; font-size: 19px; background-color: black; color: white;"> The Tutorial Scenario </span><br> | <span style="font-weight: 700; font-size: 19px; background-color: black; color: white;"> The Tutorial Scenario </span><br> | ||
| − | + | '''Tutorial Updated July 29th, 2022.'''<br> <!-- 16:45 AEST 29-July-2022 4,052 --> | |
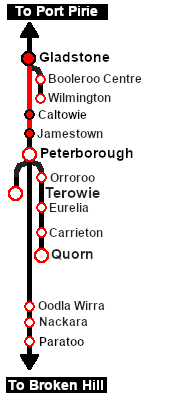
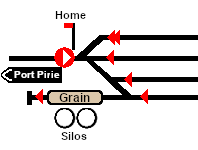
| − | The task in this tutorial scenario is to drive the coal and fuel oil train out of '''Gladstone''' yard and onto the | + | The scenario used in this tutorial is [[image:No_1.png|link=|alt=1]] '''[[SAR Scenario Depot Fuel Run|Gladstone-Peterborough Depot Fuel]]''' which has the consist already fully assembled with its locomotive ('''T 258''') on the <span style="font-weight: 700;">Gladstone <span style="color: black; background-color: yellow;"> Goods Loop </span></span>. This tutorial will follow the scenario until the consist arrives at '''Jamestown''' and delivers a coal load to the <span style="font-weight: 700; color: white; background-color: black;"> Coal Stage </span>.<br> |
| + | |||
| + | The task in this tutorial scenario is to drive the coal and fuel oil train out of '''Gladstone''' yard and onto the '''Port Pirie to Broken Hill''' main line. Continue through '''Caltowie''' yard and into '''Jamestown''' yard.<br> | ||
</td> | </td> | ||
</tr> | </tr> | ||
<tr valign="top"> | <tr valign="top"> | ||
<td> | <td> | ||
| − | <table cellpadding="2" bgcolor= | + | <table cellpadding="2" bgcolor=#000000 width=820> <!-- BEGIN Black border for Getting Started table --> |
<tr valign="top"> | <tr valign="top"> | ||
<td><span style="font-size: 15px; font-weight: 700; color: white">Getting Started:</span><br> | <td><span style="font-size: 15px; font-weight: 700; color: white">Getting Started:</span><br> | ||
| Line 80: | Line 36: | ||
<td> | <td> | ||
After starting the '''SAR Peterborough Base Session''' find the loco and its consist. '''Either''':- | After starting the '''SAR Peterborough Base Session''' find the loco and its consist. '''Either''':- | ||
| − | + | * Open the '''Finder Tool''' (press <span style="font-weight: 700; font-size: 15px; color: white; background-color: black;"> Ctrl </span> <span style="font-weight: 700; font-size: 15px; color: white; background-color: black;"> F </span>) and type, in the '''Name''' field, the name of the loco, '''SAR T 258''' (or just '''T 258''' should be enough). Click the '''tick''' icon, '''OR''' | |
| − | + | * Open the '''Driver List''' (bottom left of the screen) and select the loco '''SAR T 258''' from there - click the drivers '''Eye''' icon to jump to the loco. | |
</td> | </td> | ||
</tr> | </tr> | ||
| Line 89: | Line 45: | ||
</table> <!-- END Black border for Getting Started table --> | </table> <!-- END Black border for Getting Started table --> | ||
<br> | <br> | ||
| − | <table width=820> <!-- BEGIN Driver Command Bar --> | + | <table width=820> <!-- BEGIN Driver Command Bar Table --> |
<tr valign="top"> | <tr valign="top"> | ||
| − | <td colspan= | + | <td colspan=2><span style="font-weight: 700; font-size: 17px; background-color: black; color: white;"> The Driver Command Bar </span><br></td> |
</tr> | </tr> | ||
<tr valign="top"> | <tr valign="top"> | ||
| − | <td colspan= | + | <td colspan=2>Make sure that the '''Driver Command Bar''' is visible on the screen. In '''Driver Mode''' the interactive driver controls are at the bottom right of the screen.<br></td> |
</tr> | </tr> | ||
<tr valign="top"> | <tr valign="top"> | ||
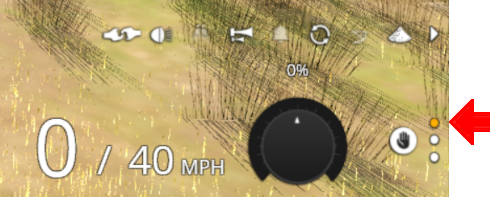
| − | <td colspan= | + | <td colspan=2><span style="font-size: 15px; font-weight: 700;">Cycle Through the Command States</span><br> |
| − | [[image:Driver Command | + | Click the '''3 dots''' on the extreme bottom right of the screen to cycle the control display through the different '''Driver Command Bar''' states to reach the control method you want. The different command choices are:-</td> |
| + | </tr> | ||
| + | <tr valign="top"> | ||
| + | <td width=20>[[image:DotPoint1.JPG|link=]] </td> | ||
| + | <td width=800><span style="font-weight: 700; font-size: 15px; color: white; background-color: black;"> Manual (Basic) Control </span><br> | ||
| + | Using the keyboard (<span style="font-weight: 700; color: white; background-color: black;"> W </span> <span style="font-weight: 700; color: white; background-color: black;"> S </span> <span style="font-weight: 700; color: white; background-color: black;"> X </span> keys) or the '''Speed Dial'''<br><br> | ||
| + | [[image:Driver Command Menu 1.png|link=|alt=Manual (basic) control]]<br> | ||
| + | </td> | ||
</tr> | </tr> | ||
<tr valign="top"> | <tr valign="top"> | ||
| − | |||
| − | |||
| − | |||
| − | |||
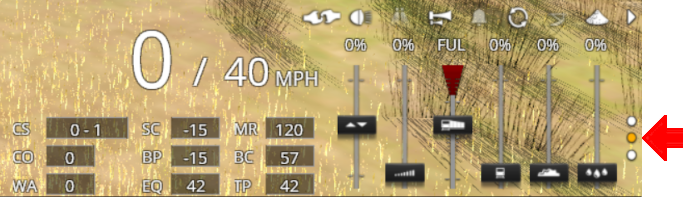
<td>[[image:DotPoint2.JPG|link=]] </td> | <td>[[image:DotPoint2.JPG|link=]] </td> | ||
| − | <td | + | <td><span style="font-weight: 700; font-size: 15px; color: white; background-color: black;"> Manual (Advanced) Control </span><br> |
| − | + | Using the on-screen graphic controls<br><br> | |
| + | [[image:Driver Command Menu 2.png|link=|alt=Manual (basic) control]]<br> | ||
| + | </td> | ||
</tr> | </tr> | ||
| − | </table> <!-- END Driver Command Bar --> | + | <tr valign="top"> |
| + | <td>[[image:DotPoint3.JPG|link=]] </td> | ||
| + | <td><span style="font-weight: 700; font-size: 15px; color: white; background-color: black;"> AI Control </span><br> | ||
| + | Using AI Driver Commands<br><br> | ||
| + | [[image:Driver Command Menu 3.png|link=|alt=Manual (basic) control]]<br> | ||
| + | Click the '''chevron''' icon to select and enter Driver AI Commands.<br> | ||
| + | </td> | ||
| + | </tr> | ||
| + | </table> <!-- END Driver Command Bar Table --> | ||
</td> | </td> | ||
<td> | <td> | ||
<table width=180> <!-- BEGIN Strip Map Table --> | <table width=180> <!-- BEGIN Strip Map Table --> | ||
<tr valign="top"> | <tr valign="top"> | ||
| − | <td align="right">[[image:SAR | + | <td align="right">[[image:SAR Gladstone-Jamestown Strip Map.png|link=|alt=SAR Gladstone-Jamestown Strip Map]]</td> |
</tr> | </tr> | ||
</table> <!-- END Strip Map Table --> | </table> <!-- END Strip Map Table --> | ||
| Line 128: | Line 97: | ||
<td width=729><span id="step1"></span> </td> | <td width=729><span id="step1"></span> </td> | ||
<td width=46>[[file:BackToTop.png|link=#top|alt=Top|Top]]</td> | <td width=46>[[file:BackToTop.png|link=#top|alt=Top|Top]]</td> | ||
| − | <td width=75> | + | <td width=75> </td> |
<td width=75>[[file:NextDown.png|link=#step2|alt=Next Down|Next Down]]</td> | <td width=75>[[file:NextDown.png|link=#step2|alt=Next Down|Next Down]]</td> | ||
<td width=75>[[file:BackToBottom.png|link=#bottom|alt=Bottom|Bottom]]</td> | <td width=75>[[file:BackToBottom.png|link=#bottom|alt=Bottom|Bottom]]</td> | ||
| Line 137: | Line 106: | ||
</tr> | </tr> | ||
<tr valign="top"> | <tr valign="top"> | ||
| − | <td | + | <td bgcolor="lightyellow" align="center" width=30><br> |
| − | < | + | '''Step'''<br>[[image:DotPoint1Blue.png|link=]]</td> <!-- left colour bar --> |
| + | <td bgcolor="lightyellow" width=940><br> | ||
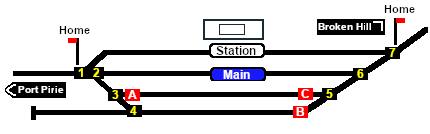
| + | <span style="font-weight: 700; font-size: 19px; background-color: black; color: white;"> Gladstone to Caltowie </span><br> | ||
| + | </td> <!-- top colour bar --> | ||
| + | <td bgcolor="lightyellow" width=30> <br></td> <!-- right color bar --> | ||
| + | </tr> | ||
<tr valign="top"> | <tr valign="top"> | ||
| − | <td>[[file: | + | <td bgcolor="lightyellow"> </td> <!-- left colour bar (again) --> |
| − | <td><span style="font-weight: 700;"> | + | <td> |
| + | <table bgcolor=#000000 width=904> <!-- BEGIN NotePad --> | ||
| + | <tr valign="top"> | ||
| + | <td> | ||
| + | <table cellpadding=4 bgcolor=#ffffb0 width=900> | ||
| + | <tr valign="top"> | ||
| + | <td>[[file:NotePad.PNG|link=]]</td> | ||
| + | <td><span style="font-size: 17px; font-weight: 700;">Notes:'''</span><br> | ||
| + | There is a minor location, '''Yangya''', between '''Gladstone''' and '''Caltowie'''. It has no visible signals and its track switches are set for the main line through to '''Caltowie'''</td> | ||
</tr> | </tr> | ||
| − | </table | + | </table> |
</td> | </td> | ||
</tr> | </tr> | ||
| − | + | </table> <!-- END Notepad --> | |
| − | + | ||
| − | + | ||
| − | + | ||
| − | + | ||
| − | + | ||
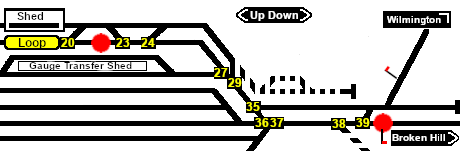
| − | + | <span style="font-weight: 700; font-size: 17px; color: white;"><span style="background-color: red;"> A </span> <span style="background-color: black;"> Using Manual Control </span></span><br> | |
| − | + | You can manually drive the train through to '''Caltowie''' without using the '''AI Driver Commands'''. This requires that all the switches along the path are correctly set. You can do this using the information on the '''Gladstone''' [[image:Tab_SW_Grey.png|link=SAR Gladstone Switches|75px]] page (link will open in this window). | |
| − | + | <table> <!-- BEGIN Switch Maps Table --> | |
| − | + | ||
| − | <table> | + | |
<tr valign="top"> | <tr valign="top"> | ||
| − | <td | + | <td width=465> |
| − | < | + | [[image:Gladstone Map Switches.png|link=|alt=Gladstone Switches]]<br> |
| + | [[image:Gladstone GStoBH Switch Set.png|link=|alt=Switch Set]]</td> | ||
| + | <td>Part of this page is shown left with only those switches relevant to this tutorial scenario. The red dots indicate the yard '''Start''' and '''Exit''' positions for the train path.<br><br> | ||
| + | |||
| + | Also shown left below is the '''Switch Set''' data, taken from the same page, for the path <span style="font-weight: 700;">Gladstone <span style="background-color: yellow; color: black;"> Goods Loop </span></span> to <span style="font-weight: 700;"><span style="background-color: black; color: white;"> Broken Hill </span></span>. The switch directions, '''L''' or '''R''' are the directions when '''facing''' the junction fork i.e. the '''L''' and '''R''' that determine which direction a train will take when passing over the junction.<br> | ||
| + | |||
| + | Switch <span style="font-weight: 700; font-size: 14px; background-color: black; color: yellow;"> 20 </span> does not need to be set as the consist is beyond the switch.</td> | ||
</tr> | </tr> | ||
| − | </table> | + | </table> <!-- END Switch Maps Table --> |
| + | <br> | ||
| + | Set the switches as shown to create a path for your train from the <span style="font-weight: 700; color: black; background-color: yellow;"> Goods Loop </span> to the <span style="font-weight: 700;"><span style="color: white; background-color: black;"> Broken Hill </span> main line</span>.<br> | ||
| − | <table cellpadding= | + | You can use the '''Driver Speed Dial''' or the keyboard controls (<span style="font-weight: 700; font-size: 15px; color: white; background-color: black;"> W </span>, <span style="font-weight: 700; font-size: 15px; color: white; background-color: black;"> S </span>, <span style="font-weight: 700; font-size: 15px; color: white; background-color: black;"> X </span>) to drive the train out of '''Gladstone Yard''' to '''Caltowie'''. Alternatively, for those with advanced steam loco driving skills, you can take control of the throttle, brake and various other lever and control wheel devices in the loco cab.<br><br> |
| + | |||
| + | <table cellpadding=4 bgcolor=#c1e7e7> <!-- BEGIN Dot Point --> | ||
<tr valign="top"> | <tr valign="top"> | ||
<td>[[file:DotPoint.JPG|link=]]</td> | <td>[[file:DotPoint.JPG|link=]]</td> | ||
| − | <td> | + | <td>'''All''' locations have a '''Caution''' track sign placed just in front of the yard entry point and clear of all signals to provide a stopping guide for manual driving, especially for those locations without visible signals</td> |
</tr> | </tr> | ||
<tr valign="top"> | <tr valign="top"> | ||
<td>[[file:DotPoint.JPG|link=]]</td> | <td>[[file:DotPoint.JPG|link=]]</td> | ||
| − | <td> | + | <td>At '''Caltowie''' the Caution track sign is just in front of the '''Caltowie Home Dn''' semaphore signal at the entrance to the yard</td> |
</tr> | </tr> | ||
</table> <!-- END Dot Point --> | </table> <!-- END Dot Point --> | ||
<br> | <br> | ||
| − | |||
| − | |||
| − | |||
| − | + | <table bgcolor=#000000 width=904> <!-- BEGIN Tip Table --> | |
| − | + | ||
| − | + | ||
| − | + | ||
| − | <table | + | |
<tr valign="top"> | <tr valign="top"> | ||
| − | < | + | <td> |
| − | + | <table cellpadding=4 bgcolor=#ffffb0 width=900> | |
| − | + | ||
| − | + | ||
| − | + | ||
| − | + | ||
| − | + | ||
| − | + | ||
| − | + | ||
| − | + | ||
| − | + | ||
| − | + | ||
| − | + | ||
| − | + | ||
| − | + | ||
| − | + | ||
| − | + | ||
| − | + | ||
| − | + | ||
| − | + | ||
| − | + | ||
| − | + | ||
| − | <table cellpadding= | + | |
<tr valign="top"> | <tr valign="top"> | ||
<td>[[file:PencilTips.PNG|link=]]</td> | <td>[[file:PencilTips.PNG|link=]]</td> | ||
<td><span style="font-weight: 700; font-size: 15px;">Check Train Heading</span><br> | <td><span style="font-weight: 700; font-size: 15px;">Check Train Heading</span><br> | ||
| − | If you are using the manual driving controls (either the keyboard or on-screen controls) then it is a good idea to check the train heading (its '''forward''' direction) first by clicking the [[image:Train Direction Control.png|link=|alt=]] '''Train Heading Button''' in the lower right of the screen. This will | + | If you are using the manual driving controls (either the keyboard or on-screen controls) then it is a good idea to check the '''train heading''' (its '''forward''' direction) first by clicking the [[image:Train Direction Control.png|link=|alt=]] '''Train Heading Button''' in the lower right of the screen. This will reverse the current direction setting (shown by the red and green direction arrows directly above the consist) and reveal the new heading (the green arrow). A second click will reset it, if needed.</td> |
| + | </tr> | ||
| + | </table> | ||
| + | </td> | ||
</tr> | </tr> | ||
</table> <!-- END Tip Table --> | </table> <!-- END Tip Table --> | ||
<br> | <br> | ||
| + | <span style="font-weight: 700; font-size: 15px; background-color: black; color: white;"> Signals </span><br> | ||
| − | + | When driving manually you will have to obey all signals, unless given specific instructions for shunting operations.<br> | |
| − | + | All signals in the layout are '''Lower Quadrant Sempahore''' signals. They use a moving arm or arm indicator that drops down at an angle of about 45º from the horizontal to indicate '''Proceed'''. The arm stays horizontal to indicate '''Stop'''. Shunting lever semaphore signals only appear in '''SAR Peterborough Narrow Gauge Division V2''' of the route for '''Trainz Plus''' and '''TRS22'''.<br> | |
| − | + | <table width=940 bgcolor="black"> <!-- BEGIN Signal Table Black Border --> | |
| − | + | <tr valign="top"> | |
| − | + | <td> | |
| − | + | <table width=936 bgcolor="white"> <!-- BEGIN Signal Table --> | |
| − | + | <tr valign="top"> | |
| − | + | <td colspan=4 align="center"><span style="font-weight: 700; font-size: 17px;">Single Arm Semaphores</span></td> | |
| − | + | ||
| − | < | + | |
| − | <td | + | |
</tr> | </tr> | ||
<tr valign="top"> | <tr valign="top"> | ||
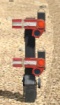
| − | <td | + | <td>[[image:Semaphore_LQ_Single_Stop.jpg|link=|alt=Single Arm Stop|60px]]</td> |
| + | <td>Traffic Semaphore on a mast showing <span style="font-weight: 700; font-size: 15px; color: white; background-color: red;"> STOP </span></td> | ||
| + | <td>[[image:Semaphore_LQ_Single_Proceed.jpg|link=|alt=Single Arm Proceed|60px]]</td> | ||
| + | <td>Traffic Semaphore on a mast showing <span style="font-weight: 700; font-size: 15px; color: white; background-color: green;"> PROCEED </span></td> | ||
</tr> | </tr> | ||
| − | |||
| − | |||
<tr valign="top"> | <tr valign="top"> | ||
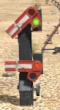
| − | <td | + | <td>[[image:Shunt_Lever_Single_Stop.jpg|link=|alt=Single Lever Shunt at Stop|60px]]</td> |
| + | <td>Shunting Lever Semaphore showing <span style="font-weight: 700; font-size: 15px; color: white; background-color: red;"> STOP </span></td> | ||
| + | <td>[[image:Shunt_Lever_Single_Proceed.jpg|link=|alt=Single Lever Shunt at Proceed|60px]]</td> | ||
| + | <td>Shunting Lever Semaphore showing <span style="font-weight: 700; font-size: 15px; color: white; background-color: green;"> PROCEED </span></td> | ||
</tr> | </tr> | ||
<tr valign="top"> | <tr valign="top"> | ||
| − | <td | + | <td>[[image:Shunt_Disc_Single_Stop.jpg|link=|alt=Single Disc Shunt at Stop|60px]]</td> |
| − | < | + | <td>Shunting Disc Semaphore showing <span style="font-weight: 700; font-size: 15px; color: white; background-color: red;"> STOP </span></td> |
| + | <td>[[image:Shunt_Disc_Single_Proceed.jpg|link=|alt=Single Disc Shunt at Proceed|60px]]</td> | ||
| + | <td>Shunting Disc Semaphore showing <span style="font-weight: 700; font-size: 15px; color: white; background-color: green;"> PROCEED </span></td> | ||
| + | </tr> | ||
<tr valign="top"> | <tr valign="top"> | ||
| − | <td | + | <td colspan=4 align="center"><span style="font-weight: 700; font-size: 17px;">Dual Arm (Diverging Path) Semaphores</span></td> |
| − | + | ||
| − | + | ||
| − | + | ||
| − | + | ||
| − | + | ||
| − | + | ||
| − | + | ||
| − | + | ||
</tr> | </tr> | ||
<tr valign="top"> | <tr valign="top"> | ||
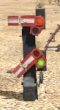
| − | <td | + | <td>[[image:Semaphore_LQ_Diverging_Stop.jpg|link=|alt=Dual Arm Stop|60px]]</td> |
| + | <td>Diverging Traffic Semaphore on a mast showing <span style="font-weight: 700; font-size: 15px; color: white; background-color: red;"> STOP </span> for both paths</td> | ||
| + | <td> </td> | ||
| + | <td> </td> | ||
</tr> | </tr> | ||
<tr valign="top"> | <tr valign="top"> | ||
| − | <td | + | <td>[[image:Semaphore_LQ_Diverging_Upper_Proceed.jpg|link=|alt=Dual Arm Upper Proceed|60px]]</td> |
| − | <td> | + | <td>Diverging Traffic Semaphore on a mast showing |
| − | <span style="font-weight: 700; font-size: | + | *<span style="font-weight: 700; font-size: 15px; color: white; background-color: green;"> PROCEED </span> for the '''Main'''† path |
| − | < | + | *<span style="font-weight: 700; font-size: 15px; color: white; background-color: red;"> STOP </span> for the '''Diverging'''‡ path</td> |
| − | + | <td>[[image:Semaphore_LQ_Diverging_Lower_Proceed.jpg|link=|alt=Dual Arm Lower Proceed|60px]]</td> | |
| − | + | <td>Diverging Traffic Semaphore on a mast showing | |
| − | < | + | *<span style="font-weight: 700; font-size: 15px; color: white; background-color: red;"> STOP </span> for the '''Main'''† path |
| − | <td>[[ | + | *<span style="font-weight: 700; font-size: 15px; color: white; background-color: green;"> PROCEED </span> for the '''Diverging'''‡ path</td> |
| − | <td><span style="font- | + | |
| − | + | ||
</tr> | </tr> | ||
| − | |||
| − | |||
| − | |||
| − | |||
| − | |||
| − | |||
| − | |||
| − | |||
| − | |||
| − | |||
<tr valign="top"> | <tr valign="top"> | ||
| − | <td | + | <td>[[image:Shunt_Lever_Diverging_Stop.jpg|link=|alt=Dual Lever Shunt Stop|60px]]</td> |
| − | [[image: | + | <td>Diverging Shunting Semaphore showing '''STOP''' for both paths</td> |
| − | + | <td> </td> | |
| − | <td> | + | <td> </td> |
| − | + | ||
| − | + | ||
| − | + | ||
| − | + | ||
</tr> | </tr> | ||
| − | |||
| − | |||
| − | |||
| − | |||
| − | |||
<tr valign="top"> | <tr valign="top"> | ||
| − | <td>[[ | + | <td>[[image:Shunt_Lever_Diverging_Upper_Proceed.jpg|link=|alt=Dual Lever Shunt Upper Proceed|60px]]</td> |
| − | <td>''' | + | <td>Diverging Shunting Semaphore showing |
| + | *<span style="font-weight: 700; font-size: 15px; color: white; background-color: green;"> PROCEED </span> for the '''Main'''† path | ||
| + | *<span style="font-weight: 700; font-size: 15px; color: white; background-color: red;"> STOP </span> for the '''Diverging'''‡ path</td> | ||
| + | <td>[[image:Shunt_Lever_Diverging_Lower_Proceed.jpg|link=|alt=Dual Lever Shunt Lower Proceed|60px]]</td> | ||
| + | <td>Diverging Shunting Semaphore showing | ||
| + | *<span style="font-weight: 700; font-size: 15px; color: white; background-color: red;"> STOP </span> for the '''Main'''† path | ||
| + | *<span style="font-weight: 700; font-size: 15px; color: white; background-color: green;"> PROCEED </span> for the '''Diverging'''‡ path</td> | ||
| + | <tr valign="top"> | ||
| + | <td colspan=4> | ||
| + | :† The '''Main''' path represents the continuation of the current path which may not be straight ahead<br> | ||
| + | :‡ The '''Diverging''' path represent a path into a siding, a branch line or a turnout to an adjacent track. This will normally be to the left or right, but may, in some circumstances, be straight ahead</td> | ||
</tr> | </tr> | ||
| − | </table> | + | </table> <!-- END Signal Table --> |
| − | < | + | </td> |
| + | </tr> | ||
| + | </table> <!-- END Signal Table Black Border --> | ||
| − | + | <table width=940> <!-- BEGIN Dividing Line Table --> | |
| − | + | ||
| − | + | ||
| − | + | ||
| − | + | ||
| − | + | ||
| − | + | ||
| − | <table width=940> | + | |
<tr valign="top"> | <tr valign="top"> | ||
<td align="center">[[Image:line740.png|link=]]</td> | <td align="center">[[Image:line740.png|link=]]</td> | ||
| Line 314: | Line 258: | ||
</table> <!-- END Dividing Line Table --> | </table> <!-- END Dividing Line Table --> | ||
| − | + | <span style="font-weight: 700; font-size: 17px; color: white;"><span style="background-color: red;"> B </span> <span style="background-color: black;"> AI Control </span></span><br> | |
| − | <table cellpadding= | + | <table cellpadding=4 bgcolor=#c1e7e7> <!-- BEGIN Dot Point --> |
<tr valign="top"> | <tr valign="top"> | ||
| − | <td>[[file: | + | <td>[[file:DotPoint.JPG|link=]]</td> |
| − | <td> | + | <td>One advantage of using the '''AI''' to do all the driving is that it will set all the track junction switches to your destination for you</td> |
| − | + | ||
| − | + | ||
</tr> | </tr> | ||
| − | </table> <!-- END | + | </table> <!-- END Dot Point --> |
<br> | <br> | ||
| Line 331: | Line 273: | ||
Apart from the standard commands ('''Drive To''', '''Load''', '''Unload''', '''Couple''', '''Wait For''', etc), additional commands have been added to the session. Specifically:- | Apart from the standard commands ('''Drive To''', '''Load''', '''Unload''', '''Couple''', '''Wait For''', etc), additional commands have been added to the session. Specifically:- | ||
| − | *'''Instant Load Command''' - to instantly load all wagons (except locos) with the first item in their product queues | + | *'''Instant Load Command''' - to instantly load all wagons (except locos and tenders) with the first item in their product queues |
*'''InstantLoadLocos''' - to instantly load all locos (or their tenders) with '''water''' and either '''coal''' or '''bunker c oil''' | *'''InstantLoadLocos''' - to instantly load all locos (or their tenders) with '''water''' and either '''coal''' or '''bunker c oil''' | ||
| − | *'''InstantUnload''' - to instantly unload all wagons (except locos) | + | *'''InstantUnload''' - to instantly unload all wagons (except locos and tenders) |
| − | + | *'''Set Max Speed To''' - to set the maximum train speed (in mph) when approaching loading/unloading points. This can also be used to cancel a previously set Max Speed. | |
| − | <table cellpadding= | + | <br> |
| + | <table cellpadding=4 bgcolor=#c1e7e7> <!-- BEGIN Dot Point --> | ||
<tr valign="top"> | <tr valign="top"> | ||
<td>[[file:DotPoint.JPG|link=]]</td> | <td>[[file:DotPoint.JPG|link=]]</td> | ||
| Line 342: | Line 285: | ||
</table> <!-- END Dot Point --> | </table> <!-- END Dot Point --> | ||
<br> | <br> | ||
| − | + | <table bgcolor=#000000 width=904> <!-- BEGIN Tip Table --> | |
| − | + | ||
| − | + | ||
| − | + | ||
<tr valign="top"> | <tr valign="top"> | ||
| − | <td width= | + | <td> |
| − | [[ | + | <table cellpadding=4 bgcolor=#ffffb0 width=900> |
| − | </td> | + | <tr valign="top"> |
| − | <td> | + | <td>[[file:PencilTips.PNG|link=]]</td> |
| − | + | <td><span style="font-weight: 700; font-size: 15px;">Check Train Heading</span><br> | |
| − | [[image: | + | If you are using the '''AI''' then it is still a good idea to check the '''train heading''' (its '''forward''' direction) before issuing a '''Drive To''' command. Clicking the [[image:Train Direction Control.png|link=|alt=]] '''Train Heading Button''' in the lower right of the screen will reveal and revese the current train heading - click it again if needed to restore it. The '''AI''' does have a "habit" of taking off in the direction of the train heading when its destination is in the opposite direction.</td> |
| − | + | ||
| − | + | ||
| − | </td> | + | |
</tr> | </tr> | ||
| − | </table | + | </table> |
</td> | </td> | ||
| − | |||
</tr> | </tr> | ||
| − | + | </table> <!-- END Tip Table --> | |
| − | + | ||
| − | + | ||
| − | </table> | + | |
| − | + | ||
| − | + | ||
| − | + | ||
| − | + | ||
| − | + | ||
| − | + | ||
| − | + | ||
| − | + | ||
| − | + | ||
| − | + | ||
| − | + | ||
| − | + | ||
| − | + | ||
| − | + | ||
| − | + | ||
| − | + | ||
<br> | <br> | ||
| − | < | + | <table bgcolor=#ff0000 width=900 cellpadding=2> |
| − | + | ||
| − | + | ||
<tr valign="top"> | <tr valign="top"> | ||
| − | < | + | <td> |
| − | < | + | <table bgcolor=#fcbcbc cellpadding=4 width=896> <!-- BEGIN Warning Table --> |
| − | + | ||
| − | + | ||
| − | + | ||
<tr valign="top"> | <tr valign="top"> | ||
| − | <td | + | <td>[[file:Stop.PNG|link=]]</td> |
| − | <td> | + | <td><span style="font-size: 15px; font-weight: 700;">WARNING:</span><br> |
| − | <span style="font- | + | If you are using a combination of '''AI''' and '''Manual''' driving, especially with shunting operations in yards, be aware that the '''AI''' system will reset the switches to their original positions after the completion of a '''Drive To''' or similar command. Following an '''AI''' driving command with '''Manual''' shunting operations can lead to derailments if you do not first check the positions of switches that you will be moving over. |
| − | + | ||
| − | ''' | + | |
| − | + | ||
| − | + | ||
| − | + | ||
| − | + | ||
| − | + | ||
</td> | </td> | ||
</tr> | </tr> | ||
| − | </table | + | </table> |
| − | + | </td> | |
| − | + | ||
| − | + | ||
| − | + | ||
| − | + | ||
| − | + | ||
</tr> | </tr> | ||
| − | </table> | + | </table> <!-- END Warning Table --> |
| − | + | ||
| − | + | The '''Track Marks''' are shown on the '''Caltowie''' [[image:Tab_TM_Grey.png|link=SAR Caltowie TrackMarks|75px]] page (link will open in this window).<br> | |
| − | <table> | + | <table> <!-- BEGIN TM Table --> |
<tr valign="top"> | <tr valign="top"> | ||
| − | <td width= | + | <td width=200> |
| − | <td> | + | [[image:Caltowie Approach Dn.png|link=|alt=Caltowie Approach]] |
| + | </td> | ||
| + | <td>Part of this page is shown left. The approach track mark on the '''Port Pirie''' side is <span style="font-weight: 700; font-size: 15px; color: white; background-color: black;"> Caltowie Main Approach Dn </span>. This is also identified in the data table, also copied from the same page, shown below.<br> | ||
| − | [[image: | + | [[image:Caltowie Approach TM.png|link=|alt=Caltowie TM]]<br><br> |
| − | + | ||
| − | + | ||
| − | + | ||
| − | + | ||
| + | From the '''Driver Command Menu''' (see the <span style="font-weight: 700; background-color: black; color: white;"> The Driver Command Bar </span> in the section above) select the <span style="font-weight: 700;">Driver Command <span style="font-size: 15px; background-color: black; color: white;"> Drive To Trackmark </span></span> then find and select from the alphabetical list the <span style="font-weight: 700;">Track Mark <span style="font-size: 15px; background-color: black; color: white;"> Caltowie Main Approach Dn </span></span>. | ||
</td> | </td> | ||
</tr> | </tr> | ||
| − | </table> | + | </table> <!-- END TM Table --> |
| − | < | + | <table bgcolor=#000000 width=904> <!-- BEGIN Tip Table --> |
| − | + | ||
| − | + | ||
| − | + | ||
<tr valign="top"> | <tr valign="top"> | ||
| − | < | + | <td> |
| − | + | <table cellpadding=4 bgcolor=#ffffb0 width=900> | |
| − | + | ||
| − | + | ||
| − | + | ||
| − | + | ||
| − | + | ||
| − | + | ||
| − | + | ||
| − | + | ||
| − | + | ||
| − | <table cellpadding= | + | |
<tr valign="top"> | <tr valign="top"> | ||
<td>[[file:PencilTips.PNG|link=]]</td> | <td>[[file:PencilTips.PNG|link=]]</td> | ||
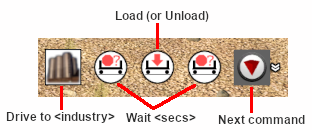
| − | <td><span style="font-weight: 700; font-size: 15px;"> | + | <td><span style="font-weight: 700; font-size: 15px;">Load/Unload Commands</span><br> |
| − | + | AI '''Load''' and '''Unload''' commands can be a "hit and miss" affair. Some users have reported situations where an AI controlled train will sail through an industry stop and either ignore the '''Load/Unload''' command and proceed to the next command in the queue, or it will keep the '''Load/Unload''' in its queue and "wander off" looking for a place to load or unload. One suggested solution to this problem is shown in the image below.<br> | |
| + | [[image:DriverLoadCommand.png|link=|alt=Driver Command Tip]]<br> | ||
| + | Insert '''Wait for <time delay>''' commands on each side of the '''Load''' and '''Unload''' commands. The duration of the '''<time delay>''' will depend on factors such as the train speed approaching the load/unload point. 20 seconds seems to work well. | ||
</td> | </td> | ||
</tr> | </tr> | ||
| − | </table | + | </table> |
| − | + | ||
| − | + | ||
| − | + | ||
| − | + | ||
| − | + | ||
| − | + | ||
| − | + | ||
| − | + | ||
| − | + | ||
| − | + | ||
| − | + | ||
| − | + | ||
</td> | </td> | ||
</tr> | </tr> | ||
| − | </table> | + | </table> <!-- END Driver Load/Unload command tip --> |
| − | + | ||
| − | + | ||
| − | + | ||
| − | + | ||
| − | + | ||
| − | + | ||
| − | + | ||
| − | + | ||
| − | + | ||
| − | + | ||
| − | + | ||
| − | + | ||
</td> | </td> | ||
| − | |||
| − | |||
| − | |||
| − | + | <td width=30 bgcolor="lightyellow"> </td> <!-- right colour bar --> | |
| − | + | ||
| − | <td width=30 bgcolor=" | + | |
</tr> | </tr> | ||
<tr valign="top"> | <tr valign="top"> | ||
| − | <td colspan=3 bgcolor=" | + | <td colspan=3 bgcolor="lightyellow"> </td> <!-- bottom colour bar --> |
</tr> | </tr> | ||
| − | </table> <!-- END Instruction Set | + | </table> <!-- END Instruction Set 1 --> |
| − | <table width=1000> <!-- BEGIN Instruction Set | + | <table width=1000> <!-- BEGIN Instruction Set 2 --> |
<tr valign="top"> | <tr valign="top"> | ||
<td colspan=3> </td> | <td colspan=3> </td> | ||
| Line 503: | Line 361: | ||
<table> <!-- BEGIN Nav Buttons Table --> | <table> <!-- BEGIN Nav Buttons Table --> | ||
<tr valign="top"> | <tr valign="top"> | ||
| − | <td width=729><span id=" | + | <td width=729><span id="step2"></span> </td> |
<td width=46>[[file:BackToTop.png|link=#top|alt=Top|Top]]</td> | <td width=46>[[file:BackToTop.png|link=#top|alt=Top|Top]]</td> | ||
| − | <td width=75>[[file:NextUp.png|link=# | + | <td width=75>[[file:NextUp.png|link=#step1|alt=Next Up|Top]]</td> |
| − | <td width=75>[[file:NextDown.png|link=# | + | <td width=75>[[file:NextDown.png|link=#step3|alt=Next Down|Next Down]]</td> |
<td width=75>[[file:BackToBottom.png|link=#bottom|alt=Bottom|Bottom]]</td> | <td width=75>[[file:BackToBottom.png|link=#bottom|alt=Bottom|Bottom]]</td> | ||
</tr> | </tr> | ||
| Line 514: | Line 372: | ||
</tr> | </tr> | ||
<tr valign="top"> | <tr valign="top"> | ||
| − | <td | + | <td bgcolor="lightyellow" align="center" width=30><br> |
| + | '''Step'''<br>[[image:DotPoint2Blue.png|link=]]</td> <!-- left colour bar --> | ||
| + | <td bgcolor="lightyellow" width=940><br> | ||
| + | <span style="font-weight: 700; font-size: 19px; background-color: black; color: white;"> Caltowie to Jamestown </span><br> | ||
| + | </td> <!-- top colour bar --> | ||
| + | <td bgcolor="lightyellow" width=30> <br></td> <!-- right color bar --> | ||
</tr> | </tr> | ||
<tr valign="top"> | <tr valign="top"> | ||
| − | <td | + | <td bgcolor="lightyellow"> </td> <!-- left colour bar (again) --> |
| − | <td | + | <td> |
'''Caltowie''' does not have a coal stage or a fuel oil store in need of a refill so the consist will not be stopping here. A '''through path''' is the best option.<br> | '''Caltowie''' does not have a coal stage or a fuel oil store in need of a refill so the consist will not be stopping here. A '''through path''' is the best option.<br> | ||
| − | + | <span style="font-weight: 700; font-size: 17px; color: white;"><span style="background-color: red;"> A </span> <span style="background-color: black;"> Manual Control </span></span><br> | |
| − | To manually drive the train through '''Caltowie''' to '''Jamestown | + | To manually drive the train through '''Caltowie''' to '''Jamestown''' you will have to set all the switches yourself using the information on the '''Caltowie''' [[image:Tab_SW_Grey.png|link=SAR Caltowie Switches|75px]] page (link will open in this window). |
<table> <!-- BEGIN Switch Maps Table --> | <table> <!-- BEGIN Switch Maps Table --> | ||
| Line 530: | Line 393: | ||
<td width=465>[[image:Caltowie Map Switches.png|link=|alt=Caltowie Switches]]</td> | <td width=465>[[image:Caltowie Map Switches.png|link=|alt=Caltowie Switches]]</td> | ||
<td>Because '''Caltowie''' is a fairly simple yard, the switch sets are not complex. | <td>Because '''Caltowie''' is a fairly simple yard, the switch sets are not complex. | ||
| − | *<span style="font-weight: 700; background-color: black; color: white;"> Port Pirie to Broken Hill </span> via <span style="font-weight: 700; color: white; background-color: blue;"> Main </span> - <span style="font-weight: 700;"><span style="font-size: | + | *<span style="font-weight: 700; background-color: black; color: white;"> Port Pirie to Broken Hill </span> via <span style="font-weight: 700; color: white; background-color: blue;"> Main </span> - <span style="font-weight: 700;"><span style="font-size: 14px; background-color: black; color: yellow;"> 1 </span>-R <span style="font-size: 14px; background-color: black; color: yellow;"> 2 </span>-L <span style="font-size: 14px; background-color: black; color: yellow;"> 6 </span>-R <span style="font-size: 14px; background-color: black; color: yellow;"> 7 </span>-L</span> |
| − | *<span style="font-weight: 700; background-color: black; color: white;"> Port Pirie to Broken Hill </span> via '''Station''' - <span style="font-weight: 700;"><span style="font-size: | + | *<span style="font-weight: 700; background-color: black; color: white;"> Port Pirie to Broken Hill </span> via '''Station''' - <span style="font-weight: 700;"><span style="font-size: 14px; background-color: black; color: yellow;"> 1 </span>-L <span style="font-size: 14px; background-color: black; color: yellow;"> 7 </span>-R</span> |
| − | Once the switches have been set, use the '''Driver Speed Dial''', the keyboard controls ( | + | Once the switches have been set, use the '''Driver Speed Dial''', the keyboard controls (<span style="font-weight: 700; color: white; background-color: black;"> W </span> <span style="font-weight: 700; color: white; background-color: black;"> S </span> <span style="font-weight: 700; color: white; background-color: black;"> X </span>) or the advanced on screen controls to drive the train through '''Caltowie'''. |
</td> | </td> | ||
</tr> | </tr> | ||
| Line 540: | Line 403: | ||
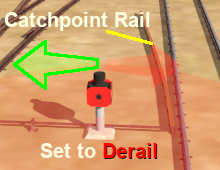
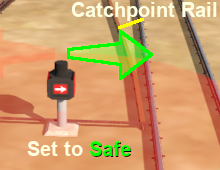
<span style="font-weight: 700; font-size: 15px; background-color: black; color: white;"> Catchpoints </span><br> | <span style="font-weight: 700; font-size: 15px; background-color: black; color: white;"> Catchpoints </span><br> | ||
| − | Notice that the '''Switch Track Diagram''' above shows three switches in red with letters as IDs - <span style="font-weight: 700; font-size: | + | Notice that the '''Switch Track Diagram''' above shows three switches in red with letters as IDs - <span style="font-weight: 700; font-size: 14px;"><span style="background-color: red; color: white;"> A </span> <span style="background-color: red; color: white;"> B </span> <span style="background-color: red; color: white;"> C </span></span>. |
<br><br> | <br><br> | ||
| − | These special switches are identified on the '''Caltowie''' [[image:Tab_SW_Grey.png|link=|75px]] page as ''' | + | These special switches are identified on the '''Caltowie''' [[image:Tab_SW_Grey.png|link=SAR Caltowie Switches|75px]] page as '''Catchpoints''', which are also known as '''Derails'''. They are designed to prevent runaway wagons from entering the running lines. Most yards in the route have at least one '''Catchpoint'''.<br> |
[[image:Caltowie Map Catchpoints.png|link=|alt=Catchpoints]]<br> | [[image:Caltowie Map Catchpoints.png|link=|alt=Catchpoints]]<br> | ||
| − | The information above shows that the default position of the ''' | + | The information above shows that the default position of the '''Catchpoints''', the first direction setting shown as an '''(L)''' or an '''(R)''', is set to <span style="font-weight: 700; background-color: red; color: white;"> Catchpoint </span> which is the '''derail''' position.<br> |
| − | <table | + | <table bgcolor=#000000 width=904> <!-- BEGIN NotePad --> |
| + | <tr valign="top"> | ||
| + | <td> | ||
| + | <table cellpadding=4 bgcolor=#ffffb0 width=900> | ||
<tr valign="top"> | <tr valign="top"> | ||
<td>[[file:NotePad.PNG|link=]]</td> | <td>[[file:NotePad.PNG|link=]]</td> | ||
<td><span style="font-size: 17px; font-weight: 700;">Notes:'''</span><br> | <td><span style="font-size: 17px; font-weight: 700;">Notes:'''</span><br> | ||
| − | + | If you are manually driving through a yard, then you '''MUST''' correctly set each <span style="font-weight: 700; background-color: red; color: white;"> Catchpoint </span> on your path yourself otherwise your train will '''DERAIL'''</td> | |
| − | + | ||
| − | + | ||
| − | + | ||
| − | + | ||
| − | + | ||
| − | + | ||
| − | + | ||
</tr> | </tr> | ||
| − | </table | + | </table> |
</td> | </td> | ||
</tr> | </tr> | ||
| − | </table> | + | </table> <!-- END NotePad --> |
<br> | <br> | ||
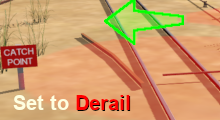
<table> <!-- BEGIN Derail images table --> | <table> <!-- BEGIN Derail images table --> | ||
| Line 577: | Line 436: | ||
<td colspan=5>The '''Catchpoints''' used in major yards have mechanical indicators. Smaller yards use a simplier version with a static sign.<br><br> | <td colspan=5>The '''Catchpoints''' used in major yards have mechanical indicators. Smaller yards use a simplier version with a static sign.<br><br> | ||
| − | <table cellpadding= | + | <table cellpadding=4 bgcolor=#c1e7e7> <!-- BEGIN Dot Point --> |
<tr valign="top"> | <tr valign="top"> | ||
<td>[[file:DotPoint.JPG|link=]]</td> | <td>[[file:DotPoint.JPG|link=]]</td> | ||
| Line 586: | Line 445: | ||
</tr> | </tr> | ||
</table> <!-- END Derail images table --> | </table> <!-- END Derail images table --> | ||
| − | <table width=940> | + | <table width=940> <!-- BEGIN Dividing Line Table --> |
<tr valign="top"> | <tr valign="top"> | ||
<td align="center">[[Image:line740.png|link=]]</td> | <td align="center">[[Image:line740.png|link=]]</td> | ||
| Line 592: | Line 451: | ||
</table> <!-- END Dividing Line Table --> | </table> <!-- END Dividing Line Table --> | ||
| − | + | <span style="font-weight: 700; font-size: 17px; color: white;"><span style="background-color: red;"> B </span> <span style="background-color: black;"> AI Control </span></span><br> | |
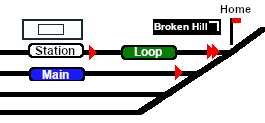
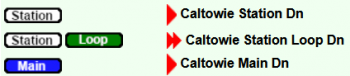
| − | After reaching '''Caltowie''' you can use the '''Track Marks''' placed in the yard to navigate your way through. The track marks are shown on the '''Caltowie''' [[image:Tab_TM_Grey.png|link=|75px]] page ( | + | After reaching '''Caltowie''' you can use the '''Track Marks''' placed in the yard to navigate your way through. The track marks are shown on the '''Caltowie''' [[image:Tab_TM_Grey.png|link=SAR Caltowie TM|75px]] page (link will open in this window) with a section containing a few that are relevant to this tutorial reproduced below with a secion of the '''Track Mark''' details from the same page.<br> |
[[image:Caltowie Map TMs.png|link=|alt=Caltowie Map Track Marks]] [[image:Caltowie TMs.png|link=|alt=Caltowie Exit TMs|350px]]<br> | [[image:Caltowie Map TMs.png|link=|alt=Caltowie Map Track Marks]] [[image:Caltowie TMs.png|link=|alt=Caltowie Exit TMs|350px]]<br> | ||
| Line 600: | Line 459: | ||
All stations on the route, including the passenger enabled stations, have track marks on both their '''Up''' and '''Down''' sides. This allows you to use the '''Drive To Trackmark''' command to reach any passenger station. The track marks are named using the name of the station (e.g. '''Caltowie'''), the word '''Station''' and the direction of travel, '''Up''' or '''Dn'''. So '''Caltowie''' has the station track marks '''Caltowie Station Dn''' and '''Caltowie Station Up''' (not shown above).<br> | All stations on the route, including the passenger enabled stations, have track marks on both their '''Up''' and '''Down''' sides. This allows you to use the '''Drive To Trackmark''' command to reach any passenger station. The track marks are named using the name of the station (e.g. '''Caltowie'''), the word '''Station''' and the direction of travel, '''Up''' or '''Dn'''. So '''Caltowie''' has the station track marks '''Caltowie Station Dn''' and '''Caltowie Station Up''' (not shown above).<br> | ||
| − | <table | + | <table bgcolor=#000000 width=904> <!-- BEGIN NotePad --> |
| + | <tr valign="top"> | ||
| + | <td> | ||
| + | <table cellpadding=4 bgcolor=#ffffb0 width=900> | ||
<tr valign="top"> | <tr valign="top"> | ||
<td>[[file:NotePad.PNG|link=]]</td> | <td>[[file:NotePad.PNG|link=]]</td> | ||
<td><span style="font-size: 17px; font-weight: 700;">Notes:'''</span><br> | <td><span style="font-size: 17px; font-weight: 700;">Notes:'''</span><br> | ||
| − | + | Most stations on the route are '''NOT''' passenger enabled which reflects the actual level of passenger traffic that existed at those locations in the 1960s. The '''Drive To Trackmark''' command has to be used to bring a train alongside these stations when using the '''AI'''</td> | |
| − | + | ||
| − | + | ||
| − | + | ||
</tr> | </tr> | ||
| − | + | </table> | |
| − | + | ||
| − | + | ||
| − | + | ||
| − | + | ||
| − | + | ||
| − | + | ||
| − | + | ||
| − | + | ||
</td> | </td> | ||
</tr> | </tr> | ||
</table> <!-- END NotePad --> | </table> <!-- END NotePad --> | ||
<br> | <br> | ||
| − | + | The simplest option is to use the '''AI''' <span style="font-weight: 700; font-size: 15px; color: white; background-color: black;"> Drive To Trackmark </span> '''Driver Command''' and then select the '''Track Mark''' <span style="font-weight: 700; font-size: 15px; color: white; background-color: black;"> Jamestown Main Approach Dn </span> to navigate to '''Jamestown'''.<br> | |
| + | |||
| + | If you prefer to travel through '''Caltowie''' via, for example the '''Station''', then use the '''AI''' <span style="font-weight: 700; font-size: 15px; color: white; background-color: black;"> Drive Via Trackmark </span> '''Driver Command''', select the required '''Track Mark''' (e.g. <span style="font-weight: 700; font-size: 15px; color: white; background-color: black;"> Caltowie Station Dn </span>) followed by <span style="font-weight: 700; font-size: 15px;"><span style="color: white; background-color: black;"> Drive To Trackmark </span> <span style="color: white; background-color: black;"> Jamestown Main Approach Dn </span></span> | ||
</td> | </td> | ||
<td width=30 bgcolor="lightyellow"> </td> <!-- right colour bar --> | <td width=30 bgcolor="lightyellow"> </td> <!-- right colour bar --> | ||
| Line 629: | Line 482: | ||
<td colspan=3 bgcolor="lightyellow"> </td> <!-- bottom colour bar --> | <td colspan=3 bgcolor="lightyellow"> </td> <!-- bottom colour bar --> | ||
</tr> | </tr> | ||
| − | </table> <!-- END Instruction Set | + | </table> <!-- END Instruction Set 2 --> |
| − | <table width=1000> <!-- BEGIN Instruction Set | + | <table width=1000> <!-- BEGIN Instruction Set 3 --> |
<tr valign="top"> | <tr valign="top"> | ||
<td colspan=3> </td> | <td colspan=3> </td> | ||
| Line 638: | Line 491: | ||
<table> <!-- BEGIN Nav Buttons Table --> | <table> <!-- BEGIN Nav Buttons Table --> | ||
<tr valign="top"> | <tr valign="top"> | ||
| − | <td width=729><span id=" | + | <td width=729><span id="step3"></span> </td> |
<td width=46>[[file:BackToTop.png|link=#top|alt=Top|Top]]</td> | <td width=46>[[file:BackToTop.png|link=#top|alt=Top|Top]]</td> | ||
| − | <td width=75>[[file:NextUp.png|link=# | + | <td width=75>[[file:NextUp.png|link=#step2|alt=Next Up|Top]]</td> |
| − | <td width=75>[[file:NextDown.png|link=# | + | <td width=75>[[file:NextDown.png|link=#step4|alt=Next Down|Next Down]]</td> |
<td width=75>[[file:BackToBottom.png|link=#bottom|alt=Bottom|Bottom]]</td> | <td width=75>[[file:BackToBottom.png|link=#bottom|alt=Bottom|Bottom]]</td> | ||
</tr> | </tr> | ||
| Line 648: | Line 501: | ||
<br> | <br> | ||
</tr> | </tr> | ||
| − | |||
| − | |||
<tr valign="top"> | <tr valign="top"> | ||
| − | <td>[[ | + | <td bgcolor="lightyellow" align="center" width=30><br> |
| − | <td><span style="font-weight: 700;" | + | '''Step'''<br>[[image:DotPoint3Blue.png|link=]]</td> <!-- left colour bar --> |
| + | <td bgcolor="lightyellow" width=940><br> | ||
| + | <span style="font-weight: 700; font-size: 19px; background-color: black; color: white;"> Jamestown </span><br> | ||
| + | </td> <!-- top colour bar --> | ||
| + | <td bgcolor="lightyellow" width=30> <br></td> <!-- right color bar --> | ||
</tr> | </tr> | ||
| − | |||
| − | |||
<tr valign="top"> | <tr valign="top"> | ||
| − | <td | + | <td bgcolor="lightyellow"> </td> <!-- left colour bar (again) --> |
| − | <td><span style="font-weight: 700; | + | <td>We will be using the <span style="font-weight: 700;"><span style="color: white; background-color: #008100;"> Loop Yard </span> road</span> as the destination in '''Jamestown'''. Using this road instead of the '''Station Yard''' road will allow the loco to be moved from the front of the train to the rear for shunting the '''Jamestown''' coal wagons without passing the '''Jamestown Home Up''' signal and entering the '''Jamestown - Belalie North''' section.<br><br> |
| − | '''Jamestown''' | + | |
| − | + | <span style="font-weight: 700; font-size: 17px; color: white;"><span style="background-color: red;"> A </span> <span style="background-color: black;"> Manual Control </span></span><br> | |
| − | The '''Jamestown''' [[image: | + | As at '''Caltowie''', to drive into '''Jamestown''' you will have to set all the switches manually. The '''Jamestown''' [[image:Tab_SW_Grey.png|link=SAR Jamestown Switches|75px]] page (link will open in this window) shows all the switches into '''Jamestown''' and their settings.<br> |
| − | + | [[image:Jamestown Map SW.png|link=|alt=Jamestown Path]]<br> | |
| − | + | ||
| − | + | ||
| − | + | ||
| − | <table> | + | The '''Jamestown Switch Set''' is identified on the '''Jamestown''' [[image:Tab_SW_Grey.png|link=SAR Jamestown Switches|75px]] page as<br> |
| + | |||
| + | [[image:Jamestown SW Loop.png|link=|alt=Jamestown Switch Set]]<br> | ||
| + | |||
| + | Because we will be driving beyond the <span style="font-weight: 700; color: white; background-color: #008100;"> Loop </span> and into the <span style="font-weight: 700; color: white; background-color: #008100;"> Loop Yard </span> the <span style="font-weight: 700; background-color: #c7c7c7; color: black;"> Optional </span> switches <span style="font-weight: 700; color: yellow; background-color: black;"> 7 </span> and <span style="font-weight: 700; color: yellow; background-color: black;"> 10 </span> will also have to be correctly set.<br> | ||
| + | |||
| + | Use the '''Driver Speed Dial''', the keyboard controls (<span style="font-weight: 700; color: white; background-color: black;"> W </span> <span style="font-weight: 700; color: white; background-color: black;"> S </span> <span style="font-weight: 700; color: white; background-color: black;"> X </span>) or the advanced on screen controls to drive the train into <span style="font-weight: 700;">Jamestown <span style="color: white; background-color: #008100;"> Loop Yard </span></span> and halt once the rear wagon is safely clear of switch junction <span style="font-weight: 700; color: yellow; background-color: black;"> 10 </span>.<br> | ||
| + | |||
| + | <table width=940> <!-- BEGIN Dividing Line Table --> | ||
<tr valign="top"> | <tr valign="top"> | ||
| − | <td>[[ | + | <td align="center">[[Image:line740.png|link=]]</td> |
| − | < | + | </tr> |
| − | + | </table> <!-- END Dividing Line Table --> | |
| − | + | <span style="font-weight: 700; font-size: 17px; color: white;"><span style="background-color: red;"> B </span> <span style="background-color: black;"> AI Control </span></span><br> | |
| + | |||
| + | The '''Jamestown''' [[image:Tab_TM_Grey.png|link=SAR Jamestown TM|75px]] page (link will open in this window) shows all the '''Jamestown''' track marks.<br> | ||
| + | |||
| + | [[image:Jamestown Map TM.png|link=|alt=Jamestown Path]]<br> | ||
| + | |||
| + | The important '''Track Marks''' for this tutorial scenario are identified on the '''Jamestown''' [[image:Tab_TM_Grey.png|link=|75px]] page as<br> | ||
| + | [[image:Jamestown TM ApproachLoop.png|link=|alt=Jamestown TMs]]<br> | ||
| + | |||
| + | From the open '''Driver Command Menu''' select the <span style="font-weight: 700; font-size: 15px; color: white; background-color: black;"> Drive To Trackmark </span> command which will open up a long alphabetical list of track marks. Find and select the track mark <span style="font-weight: 700; font-size: 15px; color: white; background-color: black;"> Jamestown Loop Yard Dn </span>. | ||
</td> | </td> | ||
| − | + | <td width=30 bgcolor="lightyellow"> </td> <!-- right colour bar --> | |
| − | + | ||
| − | + | ||
| − | <td width=30 bgcolor=" | + | |
</tr> | </tr> | ||
<tr valign="top"> | <tr valign="top"> | ||
| − | <td colspan=3 bgcolor=" | + | <td colspan=3 bgcolor="lightyellow"> </td> <!-- bottom colour bar --> |
</tr> | </tr> | ||
| − | </table> <!-- END Instruction Set | + | </table> <!-- END Instruction Set 3 --> |
| − | <table width=1000> <!-- BEGIN Instruction Set | + | <table width=1000> <!-- BEGIN Instruction Set 4 --> |
<tr valign="top"> | <tr valign="top"> | ||
<td colspan=3> </td> | <td colspan=3> </td> | ||
| Line 695: | Line 558: | ||
<table> <!-- BEGIN Nav Buttons Table --> | <table> <!-- BEGIN Nav Buttons Table --> | ||
<tr valign="top"> | <tr valign="top"> | ||
| − | <td width=729><span id=" | + | <td width=729><span id="step4"></span> </td> |
<td width=46>[[file:BackToTop.png|link=#top|alt=Top|Top]]</td> | <td width=46>[[file:BackToTop.png|link=#top|alt=Top|Top]]</td> | ||
| − | <td width=75>[[file:NextUp.png|link=# | + | <td width=75>[[file:NextUp.png|link=#step3|alt=Next Up|Top]]</td> |
<td width=75> </td> | <td width=75> </td> | ||
<td width=75>[[file:BackToBottom.png|link=#bottom|alt=Bottom|Bottom]]</td> | <td width=75>[[file:BackToBottom.png|link=#bottom|alt=Bottom|Bottom]]</td> | ||
| Line 706: | Line 569: | ||
</tr> | </tr> | ||
<tr valign="top"> | <tr valign="top"> | ||
| − | <td | + | <td bgcolor="lightyellow" align="center" width=30><br> |
| + | '''Step'''<br>[[image:DotPoint4Blue.png|link=]]</td> <!-- left colour bar --> | ||
| + | <td bgcolor="lightyellow" width=940><br> | ||
| + | <span style="font-weight: 700; font-size: 19px; background-color: black; color: white;"> Shunting Jamestown Yard </span><br> | ||
| + | </td> <!-- top colour bar --> | ||
| + | <td bgcolor="lightyellow" width=30> <br></td> <!-- right color bar --> | ||
</tr> | </tr> | ||
<tr valign="top"> | <tr valign="top"> | ||
| − | <td | + | <td bgcolor="lightyellow"> </td> <!-- left colour bar (again) --> |
| − | <td><span style="font-weight: 700; | + | <td> |
| − | ''' | + | <span style="font-weight: 700;">Jamestown <span style="color: white; background-color: black;"> Loco </span> Depot</span> will be receiving two '''CCC''' wagons loaded with coal. Both wagons have been marshalled at the rear of the consist in front of the '''Guard Van'''. This operation could be done entirely using the '''AI''' but the process would be more complex than needed so only '''Manual Driving''', or a mixture of manual and '''AI''', will be used.<br> |
| − | + | ||
| − | + | The task will involve moving the loco to the rear of the consist, uncouplng the two coal wagons (plus the '''Guard Van''') from the train and then shunting them into the <span style="font-weight: 700;"><span style="color: white; background-color: black;"> Loco </span> Depot and Sidings</span>. You will have two options at the '''Depot''':-<br> | |
| − | + | <table> <!-- BEGIN Options Table --> | |
| − | <table> | + | |
<tr valign="top"> | <tr valign="top"> | ||
| − | <td> | + | <td><span style="font-weight: 700; font-size: 17px; color: white; background-color: red;"> A </span></td> |
| − | <td> | + | <td>Move the wagons to the <span style="font-weight: 700; color: white; background-color: black;"> Coal & Water Stage </span> for unloading. This will require using the '''AI''' to prevent the wagons being loaded with coal again as soon as they are unloaded (because that is what some <span style="font-weight: 700; color: white; background-color: black;"> Coal Stage </span> assets will do).<br> |
| − | + | Then store the empty wagons on one of the <span style="font-weight: 700;"><span style="color: white; background-color: black;"> Loco </span> Depot Sidings</span><br> | |
| − | + | '''OR'''</td> | |
| − | + | ||
| − | + | ||
| − | </td> | + | |
</tr> | </tr> | ||
| − | </table> | + | <tr valign+"top"> |
| − | <table width=940> | + | <td><span style="font-weight: 700; font-size: 17px; color: white; background-color: red;"> B </span></td> |
| + | <td>Move the loaded wagons into one of the <span style="font-weight: 700;"><span style="color: white; background-color: black;"> Loco </span> Depot Sidings</span> for storage until they are needed - the easier if less interesting option.</td> | ||
| + | </tr> | ||
| + | </table> <!-- END Options Table --> | ||
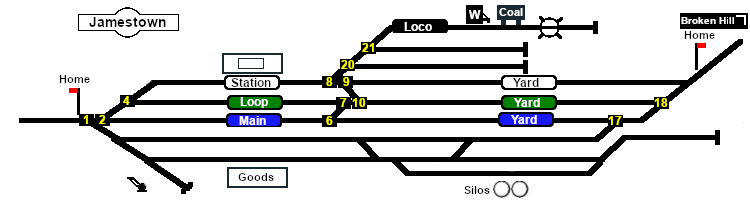
| + | <table cellpadding="2" bgcolor="blue" width=940> <!-- BEGIN Blue border for Quick Steps table --> | ||
<tr valign="top"> | <tr valign="top"> | ||
| − | <td align="center">[[ | + | <td><span style="font-size: 15px; font-weight: 700; color: white">Quick Steps:</span><br> |
| + | <table bgcolor="lightyellow" width=936> <!-- BEGIN Quick Steps table --> | ||
| + | <tr valign="top"> | ||
| + | <td align="center">[[image:Jamestown Map SW2.png|link=]]</td> | ||
</tr> | </tr> | ||
| − | |||
| − | |||
| − | |||
| − | |||
| − | |||
| − | |||
| − | |||
<tr valign="top"> | <tr valign="top"> | ||
| − | < | + | <td> |
| − | + | # uncouple the loco and tender and run them around the train via the <span style="font-weight: 700; color: white; background-color: blue;"> Main Yard </span> to couple to the '''Guard Van''' at the rear. '''Junction switches:''' <span style="font-size: 14px; background-color: black; color: yellow;"> 18 </span>, <span style="font-size: 14px; background-color: black; color: yellow;"> 17 </span>, <span style="font-size: 14px; background-color: black; color: yellow;"> 6 </span>, <span style="font-size: 14px; background-color: black; color: yellow;"> 7 </span> and <span style="font-size: 14px; background-color: black; color: yellow;"> 10 </span> | |
| − | + | # uncouple the '''Guard Van''' and the the first 2 '''CCC''' loaded coal wagons. Shunt them to the <span style="color: black; background-color: white; font-weight: 700;"> Station </span>. '''Junction Switches:''' <span style="font-size: 14px; background-color: black; color: yellow;"> 10 </span>, <span style="font-size: 14px; background-color: black; color: yellow;"> 9 </span> and <span style="font-size: 14px; background-color: black; color: yellow;"> 8 </span> | |
| − | </ | + | # set access to the <span style="font-weight: 700;"><span style="color: white; background-color: black;"> Loco </span> Depot Sidings</span>. '''Junction Switch:''' <span style="font-size: 14px; background-color: black; color: yellow;"> 8 </span>.<br> |
| − | </ | + | |
| − | <br> | + | |
| − | <table> | + | If you are using <span style="font-weight: 700;">Option <span style="color: white; background-color: red; font-size: 15px;"> A </span> (unload at the <span style="color: white; background-color: black;"> Coal & Water Loader </span>)</span> then |
| + | # check the train heading. Make sure that the <span style="Font-weight: 700; color: white; background-color: green;"> Green Arrow </span> is above the last coal wagon and is pointing '''away''' from the locomotive. | ||
| + | # issue the '''AI Driver Commands''' <span style="font-weight: 700; font-size: 15px;"><span style="color: white; background-color: black;"> Drive To </span> <span style="color: white; background-color: black;"> Jamestown Coal & Water Stage </span></span> and <span style="font-weight: 700; font-size: 15px; color: white; background-color: black;"> Unload </span> | ||
| + | # after unloading has been completed, return the wagons to the <span style="color: black; background-color: white; font-weight: 700;"> Station </span>. Then follow the steps below for <span style="font-weight: 700;">Option <span style="color: white; background-color: red; font-size: 15px;"> B </span></span> to stable the empty coal wagons in one of the <span style="font-weight: 700; color: white; background-color: black;"> Depot Sidings </span>. | ||
| + | <table bgcolor=#000000 width=904> <!-- BEGIN Tip Table --> | ||
<tr valign="top"> | <tr valign="top"> | ||
| − | |||
<td> | <td> | ||
| − | + | <table cellpadding=4 bgcolor=#ffffb0 width=900> | |
| − | [[ | + | <tr valign="top"> |
| − | + | <td>[[file:PencilTips.PNG|link=]]</td> | |
| − | + | <td>If the coal wagons won't unload at the <span style="font-weight: 700; color: white; background-color: black;"> Coal & Water Stage </span> then there is a '''cheat''' you can use (we won't tell anyone). Issue the '''Driver Command''' <span style="font-weight: 700; color: white; background-color: black;"> InstantUnload </span></td> | |
| + | </tr> | ||
| + | </table> | ||
| + | </td> | ||
| + | </tr> | ||
| + | </table> <!-- END Tip Table --> | ||
| + | If you are using <span style="font-weight: 700;">Option <span style="color: white; background-color: red; font-size: 15px;"> B </span> (stable the coal wagons in the <span style="color: white; background-color: black;"> Depot Sidings </span>)</span> then:- | ||
| + | # select one of two siding roads to stable the '''CCC''' wagons. Either:- | ||
| + | #* <span style="font-weight: 700;"><span style="color: white; background-color: black;"> Loco </span> Siding 1</span> '''Junction Switch:''' <span style="font-size: 14px; background-color: black; color: yellow;"> 20 </span> | ||
| + | #* <span style="font-weight: 700;"><span style="color: white; background-color: black;"> Loco </span> Siding 2</span> '''Junction Switches:''' <span style="font-size: 14px; background-color: black; color: yellow;"> 20 </span> and <span style="font-size: 14px; background-color: black; color: yellow;"> 21 </span> | ||
| + | # shunt the wagons into the selected siding and uncouple the '''Guard Van''' from the wagons. Return the loco and '''Guard Van''' to the <span style="color: black; background-color: white; font-weight: 700;"> Station </span>. | ||
| + | # couple the '''Guard Van''' to the rear of the train. '''Junction Switches:''' <span style="font-size: 14px; background-color: black; color: yellow;"> 8 </span>, <span style="font-size: 14px; background-color: black; color: yellow;"> 9 </span> and <span style="font-size: 14px; background-color: black; color: yellow;"> 10 </span> | ||
| + | # uncouple the loco and run it around to the front of the train via the <span style="font-weight: 700; color: white; background-color: blue;"> Main Yard </span>. '''Junction Switches:''' <span style="font-size: 14px; background-color: black; color: yellow;"> 10 </span>, <span style="font-size: 14px; background-color: black; color: yellow;"> 7 </span>, <span style="font-size: 14px; background-color: black; color: yellow;"> 6 </span>, <span style="font-size: 14px; background-color: black; color: yellow;"> 17 </span> and <span style="font-size: 14px; background-color: black; color: yellow;"> 18 </span> | ||
| + | # couple the loco to the front of the train. | ||
| + | # make sure all junction switches are returned to their original state. | ||
</td> | </td> | ||
</tr> | </tr> | ||
| − | </table> | + | </table> <!-- END Quick Steps table --> |
| − | + | ||
</td> | </td> | ||
| + | </tr> | ||
| + | </table> <!-- END Blue border for Quick Steps table --> | ||
| + | <br> | ||
| + | That ends the '''Tutotial Scenario''' but the '''[[SAR Scenario Depot Fuel Run|Gladstone-Peterborough Depot Fuel]] Scenario''' continues on to deliver coal and bunker c oil to the two loco depots at '''Peterborough'''.</td> | ||
<td width=30 bgcolor="lightyellow"> </td> <!-- right colour bar --> | <td width=30 bgcolor="lightyellow"> </td> <!-- right colour bar --> | ||
</tr> | </tr> | ||
| Line 765: | Line 646: | ||
<td colspan=3 bgcolor="lightyellow"> </td> <!-- bottom colour bar --> | <td colspan=3 bgcolor="lightyellow"> </td> <!-- bottom colour bar --> | ||
</tr> | </tr> | ||
| − | </table> <!-- END Instruction Set | + | </table> <!-- END Instruction Set 4 --> |
----- | ----- | ||
<table width=1000> <!-- BEGIN End Links Table --> | <table width=1000> <!-- BEGIN End Links Table --> | ||
<tr valign="top"> | <tr valign="top"> | ||
| − | <td colspan= | + | <td colspan=8>'''Links:''' All links will open in this window</td> |
<tr> | <tr> | ||
| − | <tr valign="center"> | + | <tr valign="middle"> |
| − | <td width= | + | <td width=125 align="center"> </td> |
| − | <td width= | + | <td width=125 align="center">[[image:Session Scenario Index.png|link=SAR Peterborough Base Session|alt=Scenarios|Scenario Index]]<br>'''[[SAR Peterborough Base Session|Session Scenarios]]'''</td> |
| − | <td width= | + | <td width=125 align="center">[[Image:Location Index.png|link=SAR Index|alt=Location Index|Location Index]]<br>'''[[SAR Index|Location Index]]'''</td> |
| − | <td width= | + | <td width=125 align="center"> </td> |
| − | <td width= | + | <td width=125 align="center">[[image:Rolling Stock Index.png|link=SAR Scenario Rolling Stock|alt=Rolling Stock]]<br>'''[[SAR Scenario Rolling Stock|Rolling Stock]]'''</td> |
| + | <td width=125 align="center">[[image:Loco Index.png|link=SAR Peterborough Division Loco Roster|alt=Loco Roster]]<br>'''[[SAR Peterborough Division Loco Roster|Loco Roster]]'''</td> | ||
| + | <td width=125 align="center">[[image:Industry Index.png|link=SAR Scenario Industries|alt=Industries]]<br>'''[[SAR Scenario Industries|Active Industries]]'''</td> | ||
| + | <td width=125 align="center"> | ||
<table> <!-- BEGIN Nav sub table --> | <table> <!-- BEGIN Nav sub table --> | ||
<tr valign="top"> | <tr valign="top"> | ||
| − | <td width= | + | <td width=50>[[file:BackToTop.png|link=#top|alt=Top|Top]]</td> |
| − | <td width=75>[[file:NextUp.png|link=# | + | <td width=75>[[file:NextUp.png|link=#step4|alt=Next Up|Top]]</td> |
</tr> | </tr> | ||
</table> <!-- END Nav sub table --> | </table> <!-- END Nav sub table --> | ||
Latest revision as of 11:07, 20 September 2022
 SAR Peterborough Narrow Gauge Scenarios Tutorial SAR Peterborough Narrow Gauge Scenarios Tutorial |
| A part of the SAR Peterborough Base Session |
| A tutorial guide to using the Scenarios for the DLS SAR Peterborough Base Session and SAR Peterborough Narrow Gauge Division (TRS19 SP3) route. |
|
The Tutorial Scenario Tutorial Updated July 29th, 2022. The scenario used in this tutorial is The task in this tutorial scenario is to drive the coal and fuel oil train out of Gladstone yard and onto the Port Pirie to Broken Hill main line. Continue through Caltowie yard and into Jamestown yard. |
||||||||||||||||
|
|
|||||||||||||||

|
| |||||||||||||||||||||||||||||||||||||||||||||||||||||||||||||||||||||||
Step |
Gladstone to Caltowie |
|
|||||||||||||||||||||||||||||||||||||||||||||||||||||||||||||||||||||
A Using Manual Control You can manually drive the train through to Caltowie without using the AI Driver Commands. This requires that all the switches along the path are correctly set. You can do this using the information on the Gladstone
You can use the Driver Speed Dial or the keyboard controls ( W , S , X ) to drive the train out of Gladstone Yard to Caltowie. Alternatively, for those with advanced steam loco driving skills, you can take control of the throttle, brake and various other lever and control wheel devices in the loco cab.
When driving manually you will have to obey all signals, unless given specific instructions for shunting operations. All signals in the layout are Lower Quadrant Sempahore signals. They use a moving arm or arm indicator that drops down at an angle of about 45º from the horizontal to indicate Proceed. The arm stays horizontal to indicate Stop. Shunting lever semaphore signals only appear in SAR Peterborough Narrow Gauge Division V2 of the route for Trainz Plus and TRS22.
B AI Control
You can drive by adding AI Driver Commands directly into the Driver Command Bar on the bottom right of the screen. A large number of track marks and some industies have been added to provide destinations for these commands. The approach to every location in the route has Apart from the standard commands (Drive To, Load, Unload, Couple, Wait For, etc), additional commands have been added to the session. Specifically:-
The Track Marks are shown on the Caltowie
|
|||||||||||||||||||||||||||||||||||||||||||||||||||||||||||||||||||||||


|
| |||||||||||||||||||||||
Step |
Caltowie to Jamestown |
|
|||||||||||||||||||||
|
Caltowie does not have a coal stage or a fuel oil store in need of a refill so the consist will not be stopping here. A through path is the best option. A Manual Control To manually drive the train through Caltowie to Jamestown you will have to set all the switches yourself using the information on the Caltowie
Notice that the Switch Track Diagram above shows three switches in red with letters as IDs - A B C .
The information above shows that the default position of the Catchpoints, the first direction setting shown as an (L) or an (R), is set to Catchpoint which is the derail position.
B AI Control After reaching Caltowie you can use the Track Marks placed in the yard to navigate your way through. The track marks are shown on the Caltowie
All stations on the route, including the passenger enabled stations, have track marks on both their Up and Down sides. This allows you to use the Drive To Trackmark command to reach any passenger station. The track marks are named using the name of the station (e.g. Caltowie), the word Station and the direction of travel, Up or Dn. So Caltowie has the station track marks Caltowie Station Dn and Caltowie Station Up (not shown above).
If you prefer to travel through Caltowie via, for example the Station, then use the AI Drive Via Trackmark Driver Command, select the required Track Mark (e.g. Caltowie Station Dn ) followed by Drive To Trackmark Jamestown Main Approach Dn |
|||||||||||||||||||||||
|
| |||||||
Step |
Jamestown |
|
|||||
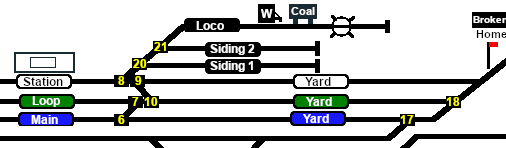
| We will be using the Loop Yard road as the destination in Jamestown. Using this road instead of the Station Yard road will allow the loco to be moved from the front of the train to the rear for shunting the Jamestown coal wagons without passing the Jamestown Home Up signal and entering the Jamestown - Belalie North section. A Manual Control As at Caltowie, to drive into Jamestown you will have to set all the switches manually. The Jamestown
The Jamestown Switch Set is identified on the Jamestown
Because we will be driving beyond the Loop and into the Loop Yard the Optional switches 7 and 10 will also have to be correctly set. Use the Driver Speed Dial, the keyboard controls ( W S X ) or the advanced on screen controls to drive the train into Jamestown Loop Yard and halt once the rear wagon is safely clear of switch junction 10 . B AI Control The Jamestown
The important Track Marks for this tutorial scenario are identified on the Jamestown From the open Driver Command Menu select the Drive To Trackmark command which will open up a long alphabetical list of track marks. Find and select the track mark Jamestown Loop Yard Dn . |
|||||||


|
| ||||||||||||
Step |
Shunting Jamestown Yard |
|
||||||||||
|
Jamestown Loco Depot will be receiving two CCC wagons loaded with coal. Both wagons have been marshalled at the rear of the consist in front of the Guard Van. This operation could be done entirely using the AI but the process would be more complex than needed so only Manual Driving, or a mixture of manual and AI, will be used. The task will involve moving the loco to the rear of the consist, uncouplng the two coal wagons (plus the Guard Van) from the train and then shunting them into the Loco Depot and Sidings. You will have two options at the Depot:-
|
||||||||||||
| Links: All links will open in this window | |||||||||
 Session Scenarios |
 Location Index |
 Rolling Stock |
 Loco Roster |
 Active Industries |
|
||||
This page was created by Trainz user pware in March 2021 and was last updated as shown below.