|
|
| Line 16: |
Line 16: |
| | </table> <!-- END Nav Buttons Table --> | | </table> <!-- END Nav Buttons Table --> |
| | ----- | | ----- |
| − | <table width=1000> <!-- BEGIN EITs List -->
| |
| − | <tr valign="top">
| |
| − | <td><span style="font-weight: 700; font-size: 19px; background-color: black; color: white;"> Interlocking Towers </span><br>
| |
| − |
| |
| − | '''Interlocking Towers (ITs)''' are included in the '''SAR Peterborough Base Session''' (they are not part of the route or layout) to provide easier navigation in some of the more complex yards in the layout. They provide paths into and out of those yards and in some cases they provide direct paths through the yards.<br><br>
| |
| − |
| |
| − | <table cellpadding="4" bgcolor=#c1e7e7> <!-- BEGIN Dot Point -->
| |
| − | <tr valign="top">
| |
| − | <td>[[file:DotPoint.JPG|link=]]</td>
| |
| − | <td>'''ITs''' are '''optional''', they do not have to be used</td>
| |
| − | </tr>
| |
| − | </table> <!-- END Dot Point -->
| |
| − | <br>
| |
| − | '''ITs''' are setup at the following locations:-
| |
| − | *'''Gladstone Down''' - to provide paths '''out of''' '''Gladstone''' towards '''Peterborough''' and the '''Wilmington Line'''.
| |
| − | *'''Gladstone Up''' - to provide paths '''into''' '''Gladstone''' from '''Peterborough''' and the '''Wilmington Line'''.
| |
| − | *'''Caltowie''' - to provide paths '''into, out of and through''' '''Caltowie''' towards/from '''Gladstone''' and '''Peterborough'''.
| |
| − | *'''Jamestown''' - to provide paths '''into, out of and through''' '''Jamestown''' towards/from '''Gladstone''' and '''Peterborough'''.
| |
| − | *'''Peterborough West''' - to provide paths '''into and out''' of '''Peterborough''' towards/from '''Gladstone''' and '''Quorn'''.
| |
| − | *'''Peterborough East''' - to provide paths '''into and out''' of '''Peterborough''' towards/from '''Terowie''' and '''Paratoo'''.
| |
| − | *'''Paratoo''' - to provide paths '''into and out of''' '''Paratoo''' towards/from '''Peterborough'''.
| |
| − | *'''Terowie''' - to provide paths '''into and out of''' '''Terowie''' towards/from '''Peterborough'''.
| |
| − | *'''Orroroo''' - to provide paths '''into, out of and through''' '''Orroroo''' towards/from '''Peterborough''' and '''Quorn'''.
| |
| − | *'''Carrieton''' - to provide paths '''into, out of and through''' '''Carrieton''' towards/from '''Peterborough''' and '''Quorn'''.
| |
| − | *'''Quorn''' - to provide paths '''into and out of''' '''Quorn''' towards/from '''Peterborough'''.
| |
| − | '''Gladstone''' and '''Peterborough''' have each been split into two '''ITs''' because of the large number of paths at each location. Three of these '''ITs''' are used in this tutorial - '''Gladstone Down''', '''Caltowie''' and '''Jamestown'''.
| |
| − | <br>
| |
| − | <table cellpadding="4" bgcolor=#ffffb0> <!-- BEGIN Tip Table -->
| |
| − | <tr valign="top">
| |
| − | <td>[[file:PencilTips.PNG|link=]]</td>
| |
| − | <td><span style="font-weight: 700; font-size: 15px;">Deleting the ITs</span><br>
| |
| − | If you never want to use the '''ITs''' then they can be removed from the Session:-
| |
| − | #load the Session in '''Surveyor'''
| |
| − | #open the '''Layers''' tool, select the '''Interlocking Towers''' layer and then click '''Delete''' (this will take a minute or two).
| |
| − | #save the edited Session with a new name or overwrite the old Session name - whichever you prefer
| |
| − | This will also delete some of the invisible signals that have been specifically added to support the '''ITs''' but their absence will have no effect on anything else.
| |
| − | </td>
| |
| − | </tr>
| |
| − | </table> <!-- END Tip Table -->
| |
| − | </td>
| |
| − | </tr>
| |
| − | </table> <!-- END EITs List -->
| |
| − |
| |
| − | -----
| |
| − |
| |
| | <table width=1000> <!-- BEGIN Combined Intro Table --> | | <table width=1000> <!-- BEGIN Combined Intro Table --> |
| | <tr valign="top"> | | <tr valign="top"> |
| Line 130: |
Line 85: |
| | <td width=75>[[file:NextUp.png|link=#top|alt=Next Up|Top]]</td> | | <td width=75>[[file:NextUp.png|link=#top|alt=Next Up|Top]]</td> |
| | <td width=75>[[file:NextDown.png|link=#step2|alt=Next Down|Next Down]]</td> | | <td width=75>[[file:NextDown.png|link=#step2|alt=Next Down|Next Down]]</td> |
| − | <td width=75>[[file:BackToBottom.png|link=#bottom|alt=Bottom|Bottom]]</td>
| |
| − | </tr>
| |
| − | </table> <!-- END Nav Buttons Table -->
| |
| − | -----
| |
| − | <br>
| |
| − | </tr>
| |
| − | <tr valign="top">
| |
| − | <td colspan=3 bgcolor="lightcyan">
| |
| − | <table cellpadding="4"> <!-- BEGIN Dot Point -->
| |
| − | <tr valign="top">
| |
| − | <td>[[file:DotPoint.JPG|link=]]</td>
| |
| − | <td><span style="font-weight: 700;">If you want to drive the train entirely by manual control (no '''AI Drive To''' commands) and you don't want to use '''ITs''' then go straight to Step</span> [[image:DotPoint2Blue.png|link=]] [[file:NextDown.png|link=#step2|alt=Next Down|Next Down]]</td>
| |
| − | </tr>
| |
| − | </table> <!-- END Dot Point -->
| |
| − | </td>
| |
| − | </tr>
| |
| − | <tr valign="top">
| |
| − | <td width=30 align="center" bgcolor="lightcyan">'''Step'''<br>[[image:DotPoint1Blue.png|link=]]</td> <!-- left colour bar -->
| |
| − | <td width=940>
| |
| − | <span style="font-weight: 700; font-size: 19px; background-color: black; color: white;"> Gladstone Interlocking Tower </span><br>
| |
| − | <br>
| |
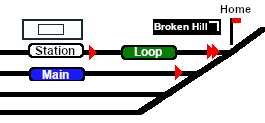
| − | The first path to be set in this tutorial is from the <span style="font-weight: 700;">Gladstone <span style="background-color: yellow; color: black;"> Goods Loop </span></span> to <span style="font-weight: 700;"><span style="background-color: black; color: white;"> Broken Hill </span></span>. On the '''Gladstone''' [[image:Tab_PH_Grey.png|link=|75px]] page (link via [[image:Line_Index_Label.png|link=SAR_Index|Location Index]] - link will open in this window) this is identified on that page as:-<br><br>
| |
| − |
| |
| − | [[image:GS MtoB Path.png|link=|alt=M to P Path]]<br><br>
| |
| − |
| |
| − | From the open '''Driver Command Menu''', select the <span style="font-weight: 700; font-size: 15px; color: white; background-color: black;"> IT SetPath (TANE SP4 and later) </span> option. This will open a list of all the '''ITs''' that have been placed in the Session.<br>
| |
| − |
| |
| − | Because an '''IT Starting Signal''', in this case invisible signal <span style="font-weight: 700; font-size: 15px; color: white; background-color: black;"> GSX G27D IT Start </span>, is directly in front of your loco, the signal will be included in the list of available '''ITs''' as shown below left. If no '''IT Starting Signal''' is directly ahead of your loco then only the available '''ITs''' will be listed, as shown below right.<br>
| |
| − |
| |
| − | <table> <!-- BEGIN Path selection table -->
| |
| − | <tr valign="top">
| |
| − | <td align="center">[[image:IT SetPath Start Signal.png|link=|alt=Starting Signal available]]<br>'''A Starting Signal Present'''</td>
| |
| − | <td align="center">[[image:IT SetPath No Start Signal.png|link=|alt=No Starting Signal]]<br>'''No Starting Signal Present'''</td>
| |
| − | </tr>
| |
| − | </table> <!-- END Path selection table -->
| |
| − |
| |
| − | <table cellpadding="4" bgcolor=#c1e7e7> <!-- BEGIN Dot Point -->
| |
| − | <tr valign="top">
| |
| − | <td>[[file:DotPoint.JPG|link=]]</td>
| |
| − | <td>All '''Interlocking Tower Starting Signals''' have '''IT Start''' at the end of their names.</td>
| |
| − | </tr>
| |
| − | <tr valign="top">
| |
| − | <td>[[file:DotPoint.JPG|link=]]</td>
| |
| − | <td>All '''IT Starting Signals''' are '''invisible signals'''. Some have been placed directly in front of visible (semaphore) signals to prevent the IT paths locking the visible signals.</td>
| |
| − | </tr>
| |
| − | </table> <!-- END Dot Point -->
| |
| − | <br>
| |
| − | Select the starting signal <span style="font-weight: 700; font-size: 15px; color: white; background-color: black;"> GSX G27D IT Start </span>. This will reveal that two different paths out of '''Gladstone''' start from this signal.<br>
| |
| − | * <span style="font-weight: 700; font-size: 15px; color: white; background-color: black;"> Goods Loop to Broken Hill </span>, and
| |
| − | * <span style="font-weight: 700; font-size: 15px; color: white; background-color: black;"> Goods Loop to Wilmington </span>
| |
| − |
| |
| − | Select the path <span style="font-weight: 700; font-size: 15px; color: white; background-color: black;"> Goods Loop to Broken Hill </span>.<br>
| |
| − |
| |
| − | Every '''IT Path''' is named according to a starting point and a destination. In most cases one of those will be a track or location in the local yard (e.g. '''Goods Loop''' or '''Station''') and the other will be one of the locations '''Port Pirie''', '''Broken Hill''', '''Gladstone''', '''Terowie''', '''Quorn''', '''Wilmington''' and '''Peterborough'''. Those locations may not be the final destination or initial starting point of the train but they indicate the direction of travel.<br>
| |
| − |
| |
| − | <table cellpadding="4" bgcolor=#ffffb0> <!-- BEGIN Notepad -->
| |
| − | <tr valign="top">
| |
| − | <td>[[file:NotePad.PNG|link=]]</td>
| |
| − | <td><span style="font-size: 17px; font-weight: 700;">Notes:'''</span><br>
| |
| − | Selecting a path to or from an outside location will '''NOT''' set the entire path to/from that location (e.g. all the way to '''Broken Hill'''). It will only set the path between the '''Starting Signal''' and the '''Exit Signal'''. In most cases one signal will be just outside the yard and the other will be within the yard</td>
| |
| − | </tr>
| |
| − | </table> <!-- END Notepad -->
| |
| − | <br>
| |
| − |
| |
| − | <table> <!-- BEGIN Path M to B Table -->
| |
| − | <tr valign="top">
| |
| − | <td width-475>[[image:Gladstone Map MtoB.png|link=|alt=Path on map]]</td>
| |
| − | <td>In the track diagram on the left, the '''Starting Signal''' is at the location marked [[image:Mgreen.png|link=]] and the '''Exit Signal''' is at [[image:Bblue.png|link=]].<br>
| |
| − |
| |
| − | '''The path, the yellow line between the two points, has now been set'''.<br>
| |
| − |
| |
| − | All junction switches and signals along the selected path from the '''Start Signal''' (<span style="font-weight: 700; font-size: 15px; color: white; background-color: black;"> GSX G27D IT Start </span>) to the '''Exit Signal''' (<span style="font-weight: 700; font-size: 15px; color: white; background-color: black;"> Gladstone Home Up </span>) are set to give loco '''T 258''' the road out of '''Gladstone''' towards '''Broken Hill'''.<br>
| |
| − |
| |
| − | '''Note:''' not all signals will automatically show '''Proceed''' once the path has been set. Some signals, semaphore signals for example, will only show '''Proceed''' when a train starts moving towards the signal.</td>
| |
| − | </tr>
| |
| − | </table> <!-- END Path M to B Table -->
| |
| − | <br>
| |
| − | Once the path has been set, use the '''Driver Speed Dial''', the keyboard controls ('''W''', '''S''', '''X'''), advanced on-screen controls, or the '''AI''' to drive the train out of '''Gladstone Yard''' to '''Caltowie'''.<br>
| |
| − |
| |
| − | <table cellpadding="4" bgcolor=#ffffb0> <!-- BEGIN Tip Table -->
| |
| − | <tr valign="top">
| |
| − | <td>[[file:PencilTips.PNG|link=]]</td>
| |
| − | <td><span style="font-weight: 700; font-size: 15px;">Check Train Heading</span><br>
| |
| − | If you are using the manual driving controls (either the keyboard or on-screen controls) then it is a good idea to check the train heading (its '''forward''' direction) first by clicking the [[image:Train Direction Control.png|link=|alt=]] '''Train Heading Button''' in the lower right of the screen. This will set and reveal the red and green direction arrows on the consist and establish the heading (the green arrow).</td>
| |
| − | </tr>
| |
| − | </table> <!-- END Tip Table -->
| |
| − | <br>
| |
| − |
| |
| − | <span style="font-weight: 700; font-size: 17px; background-color: black; color: white;"> Cancelling a Set IT Path </span><br>
| |
| − |
| |
| − | Paths that have been set can be cancelled so that their signals and junction switches will be returned to their previous states.<br>
| |
| − |
| |
| − | Set paths are automatically returned to their initial states after the consist has cleared the '''Exit Signal''', but if you change your mind and decide to take a different path or not use the IT then a set path can be cancelled.<br>
| |
| − |
| |
| − | From the '''Driver Command Menu''' select the '''IT CancelEnhancedPath''' command.<br>
| |
| − |
| |
| − | [[image:IT CancelEnhancedPath.png|link=|alt=Cancel Path]]<br>
| |
| − |
| |
| − | You will have the option of cancelling '''ALL PATHS''' or selecting a particular '''IT''' and path to cancel.<br>
| |
| − | </td>
| |
| − | <td width=30 bgcolor="lightcyan"> </td> <!-- right colour bar -->
| |
| − | </tr>
| |
| − | <tr valign="top">
| |
| − | <td colspan=3 bgcolor="lightcyan"> </td> <!-- bottom colour bar -->
| |
| − | </tr>
| |
| − | </table> <!-- END Instruction Set 1 -->
| |
| − | <table width=1000> <!-- BEGIN Instruction Set 2 -->
| |
| − | <tr valign="top">
| |
| − | <td colspan=3> </td>
| |
| − | </tr>
| |
| − | <tr valign="top">
| |
| − | <td colspan=3>
| |
| − | <table> <!-- BEGIN Nav Buttons Table -->
| |
| − | <tr valign="top">
| |
| − | <td width=729><span id="step2"></span> </td>
| |
| − | <td width=46>[[file:BackToTop.png|link=#top|alt=Top|Top]]</td>
| |
| − | <td width=75>[[file:NextUp.png|link=#step1|alt=Next Up|Next Up]]</td>
| |
| − | <td width=75>[[file:NextDown.png|link=#step3|alt=Next Down|Next Down]]</td>
| |
| | <td width=75>[[file:BackToBottom.png|link=#bottom|alt=Bottom|Bottom]]</td> | | <td width=75>[[file:BackToBottom.png|link=#bottom|alt=Bottom|Bottom]]</td> |
| | </tr> | | </tr> |
| Line 258: |
Line 95: |
| | </tr> | | </tr> |
| | <tr valign="top"> | | <tr valign="top"> |
| − | <td align="center" bgcolor="lightyellow">'''Step'''<br>[[image:DotPoint2Blue.png|link=]]</td> <!-- left colour bar --> | + | <td align="center" bgcolor="lightyellow">'''Step'''<br>[[image:DotPoint1Blue.png|link=]]</td> <!-- left colour bar --> |
| | <td> | | <td> |
| | <span style="font-weight: 700; font-size: 19px; background-color: black; color: white;"> Gladstone to Caltowie </span><br> | | <span style="font-weight: 700; font-size: 19px; background-color: black; color: white;"> Gladstone to Caltowie </span><br> |
| Line 267: |
Line 104: |
| | <td>[[file:NotePad.PNG|link=]]</td> | | <td>[[file:NotePad.PNG|link=]]</td> |
| | <td><span style="font-size: 17px; font-weight: 700;">Notes:'''</span><br> | | <td><span style="font-size: 17px; font-weight: 700;">Notes:'''</span><br> |
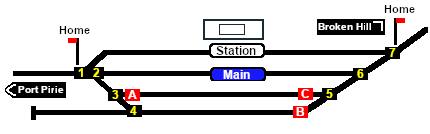
| − | There is a minor location, '''Yangya''', between '''Gladstone''' and '''Caltowie''' but it has no IT, minimal yard infrastructure, no visible signals and its switches are set for the main line through to '''Caltowie'''</td> | + | There is a minor location, '''Yangya''', between '''Gladstone''' and '''Caltowie''' but it has a sinple yard structure, no visible signals and its switches are set for the main line through to '''Caltowie'''</td> |
| | </tr> | | </tr> |
| | </table> <!-- END Notepad --> | | </table> <!-- END Notepad --> |
| Line 274: |
Line 111: |
| | You have two options for driving to '''Caltowie''' - '''Manual''' and '''AI control'''.<br> | | You have two options for driving to '''Caltowie''' - '''Manual''' and '''AI control'''.<br> |
| | | | |
| − | [[image:DotPoint1.JPG|link=]] <span style="font-weight: 700; font-size: 17px; background-color: black; color: white;"> Manual Control </span><br>
| + | <span style="font-weight: 700; font-size: 17px; color: white;"><span style="background-color: red;"> A </span> <span style="background-color: black;"> Manual Control </span></span><br> |
| | | | |
| − | You can manually drive the train through to '''Caltowie''' without using the '''AI Driver Commands''' or setting '''IT Paths'''. This requires that all the switches along the path are correctly set. You can do this using the information on the '''Gladstone''' [[image:Tab_SW_Grey.png|link=|75px]] page (link via [[image:Line_Index_Label.png|link=SAR_Index|Location Index]] - link will open in this window). | + | You can manually drive the train through to '''Caltowie''' without using the '''AI Driver Commands'''. This requires that all the switches along the path are correctly set. You can do this using the information on the '''Gladstone''' [[image:Tab_SW_Grey.png|link=|75px]] page (link via [[image:Line_Index_Label.png|link=SAR_Index|Location Index]] - link will open in this window). |
| | | | |
| | <table> <!-- BEGIN Switch Maps Table --> | | <table> <!-- BEGIN Switch Maps Table --> |
| Line 314: |
Line 151: |
| | </table> <!-- END Dividing Line Table --> | | </table> <!-- END Dividing Line Table --> |
| | | | |
| − | [[image:DotPoint2.JPG|link=]] <span style="font-weight: 700; font-size: 17px; background-color: black; color: white;"> AI Control </span><br>
| + | <span style="font-weight: 700; font-size: 17px; color: white;"><span style="background-color: red;"> B </span> <span style="background-color: black;"> AI Control </span></span><br> |
| | | | |
| − | <table cellpadding="4" bgcolor=#ffffb0> <!-- BEGIN NotePad --> | + | <table cellpadding="4" bgcolor=#c1e7e7> <!-- BEGIN Dot Point --> |
| | <tr valign="top"> | | <tr valign="top"> |
| − | <td>[[file:NotePad.PNG|link=]]</td> | + | <td>[[file:DotPoint.JPG|link=]]</td> |
| − | <td><span style="font-size: 17px; font-weight: 700;">Notes:'''</span><br> | + | <td>One advantage of using the '''AI''' to do all the driving is that it will set all the track junction switches to your destination for you</td> |
| − | Because the '''ITs''' lock the path '''starting signals''' at '''STOP''' it is not possible to use the '''AI Drive To''' commands at locations that have '''ITs''' without first setting an '''IT''' path for the train. The '''Drive To''' commands will not override any '''IT''' locked signals.<br>
| + | |
| − | Locations without '''ITs''', such as '''Yangya''' between '''Gladstone''' and '''Caltowie''', can be navigated using '''AI Drive To''' commands without any problems.</td>
| + | |
| | </tr> | | </tr> |
| − | </table> <!-- END NotePad --> | + | </table> <!-- END Dot Point --> |
| | <br> | | <br> |
| | | | |
| Line 364: |
Line 199: |
| | <td colspan=3 bgcolor="lightyellow"> </td> <!-- bottom colour bar --> | | <td colspan=3 bgcolor="lightyellow"> </td> <!-- bottom colour bar --> |
| | </tr> | | </tr> |
| − | </table> <!-- END Instruction Set 2 --> | + | </table> <!-- END Instruction Set 1 --> |
| − | <table width=1000> <!-- BEGIN Instruction Set 3 --> | + | <table width=1000> <!-- BEGIN Instruction Set 2 --> |
| | <tr valign="top"> | | <tr valign="top"> |
| | <td colspan=3> </td> | | <td colspan=3> </td> |
| Line 373: |
Line 208: |
| | <table> <!-- BEGIN Nav Buttons Table --> | | <table> <!-- BEGIN Nav Buttons Table --> |
| | <tr valign="top"> | | <tr valign="top"> |
| − | <td width=729><span id="step3"></span> </td> | + | <td width=729><span id="step2"></span> </td> |
| | <td width=46>[[file:BackToTop.png|link=#top|alt=Top|Top]]</td> | | <td width=46>[[file:BackToTop.png|link=#top|alt=Top|Top]]</td> |
| − | <td width=75>[[file:NextUp.png|link=#step2|alt=Next Up|Top]]</td> | + | <td width=75>[[file:NextUp.png|link=#step1|alt=Next Up|Top]]</td> |
| − | <td width=75>[[file:NextDown.png|link=#step4|alt=Next Down|Next Down]]</td> | + | <td width=75>[[file:NextDown.png|link=#step3|alt=Next Down|Next Down]]</td> |
| − | <td width=75>[[file:BackToBottom.png|link=#bottom|alt=Bottom|Bottom]]</td>
| + | |
| − | </tr>
| + | |
| − | </table> <!-- END Nav Buttons Table -->
| + | |
| − | -----
| + | |
| − | <br>
| + | |
| − | </tr>
| + | |
| − | <td colspan=3 bgcolor="lightcyan"> <!-- top colour bar -->
| + | |
| − | <table cellpadding="4"> <!-- BEGIN Dot Point -->
| + | |
| − | <tr valign="top">
| + | |
| − | <td>[[file:DotPoint.JPG|link=]]</td>
| + | |
| − | <td><span style="font-weight: 700;">If you want to drive the train entirely by manual control (no '''AI Drive To''' commands) and you don't want to use '''ITs''' then go straight to Step</span> [[image:DotPoint4Blue.png|link=]] [[file:NextDown.png|link=#step4|alt=Next Down|Next Down]]</td>
| + | |
| − | </tr>
| + | |
| − | </table> <!-- END Dot Point -->
| + | |
| − | </td>
| + | |
| − | <tr valign="top">
| + | |
| − | <td align="center" bgcolor="lightcyan">'''Step'''<br>[[image:DotPoint3Blue.png|link=]]</td> <!-- left colour bar -->
| + | |
| − | <td>
| + | |
| − | <span style="font-weight: 700; font-size: 19px; background-color: black; color: white;"> Caltowie Interlocking Tower </span><br>
| + | |
| − | | + | |
| − | '''Caltowie''' does not have a coal stage or a fuel oil store in need of a refill so the consist will not be stopping here. A '''through path''' is the best option.<br>
| + | |
| − | | + | |
| − | <table> <!-- BEGIN Bullet A -->
| + | |
| − | <tr valign-"top">
| + | |
| − | <td>[[image:Ablue.png|link=|alt=]] </td>
| + | |
| − | <td>You can set an IT path without having to be directly in front of a '''Starting Signal'''. For example, you can set all the IT paths for the train through '''Caltowie''' and into '''Jamestown''' before you even leave '''Gladstone'''.
| + | |
| − | </td>
| + | |
| − | </tr>
| + | |
| − | </table> <!-- END Bullet A -->
| + | |
| − | | + | |
| − | <table cellpadding="4" bgcolor=#ffffb0> <!-- BEGIN Tip Table -->
| + | |
| − | <tr valign="top">
| + | |
| − | <td>[[file:PencilTips.PNG|link=]]</td>
| + | |
| − | <td><span style="font-weight: 700; font-size: 15px;">To Set a Remote Path</span><br>
| + | |
| − | To set a path for a distant '''IT''', open the '''Driver Command Menu''' and select the <span style="font-weight: 700; font-size: 15px; color: white; background-color: black;"> IT SetPath (TANE SP4 and later) </span> option. Then select the required '''IT''' and path from the lists. This can be repeated for as many '''ITs''' as needed along the path of the train.</td>
| + | |
| − | </tr>
| + | |
| − | </table> <!-- END Tip Table -->
| + | |
| − | <br>
| + | |
| − | | + | |
| − | Open the '''Driver Command Menu''' and select the <span style="font-weight: 700; font-size: 15px; color: white; background-color: black;"> IT SetPath (TANE SP4 and later) </span> option. Then select the <span style="font-weight: 700; font-size: 15px; background-color: black; color: white;"> Caltowie Interlocking Tower </span>. This will open a list of '''ALL''' the '''IT paths''' controlled by the '''Caltowie IT''', including any paths that will not be directly accessable to your consist.<br>
| + | |
| − | | + | |
| − | <table> <!-- BEGIN Caltowie Path Selection -->
| + | |
| − | <tr valign="top">
| + | |
| − | <td width=520>[[image:IT SetPath Remote.png|link=|alt=Clatowie IT path selection]]</td>
| + | |
| − | <td>On the '''Caltowie''' [[image:Tab_PH_Grey.png|link=|75px]] page (link via [[image:Line_Index_Label.png|link=SAR_Index|Location Index]] - link will open in this window) the path we will select is identified as:-<br><br>
| + | |
| − | | + | |
| − | [[image:CT Path AtoB.png|link=|alt=A to B Path]]<br>
| + | |
| − | | + | |
| − | Select the path <span style="font-weight: 700; font-size: 15px; background-color: black; color: white;"> Port Pirie to Broken Hill </span>. This will set a direct path, via the <span style="font-weight: 700;"><span style="color: white; background-color: blue;"> Main </span> Line</span>, through '''Caltowie Yard''' and out towards '''Broken Hill'''.<br>
| + | |
| − | | + | |
| − | [[image:Caltowie AtoB Path.png|link=|alt=Caltowie AB]]<br>
| + | |
| − | | + | |
| − | </td>
| + | |
| − | </tr>
| + | |
| − | </table> <!-- END Caltowie Path Selection -->
| + | |
| − | <br>
| + | |
| − | | + | |
| − | You could also select any of the <span style="font-weight: 700; font-size: 15px; background-color: black; color: white;"> Port Pirie to ... </span> paths. The only other through path is <span style="font-weight: 700; font-size: 15px; background-color: black; color: white;"> Port Pirie to Station to Broken Hill </span> which will take you through the yard via the '''Station'''. The other <span style="font-weight: 700; font-size: 15px; background-color: black; color: white;"> Port Pirie to ... </span> paths will take you into the yard but will not provide a set path out. You will need to select and set the appropriate <span style="font-weight: 700; font-size: 15px; background-color: black; color: white;"> ... to Broken Hill </span> path to exit the yard.<br><br>
| + | |
| − | <table width=940> <!-- BEGIN Dividing Line Table -->
| + | |
| − | <tr valign="top">
| + | |
| − | <td align="center">[[Image:line740.png|link=]]</td>
| + | |
| − | </tr>
| + | |
| − | </table> <!-- END Dividing Line Table -->
| + | |
| − | | + | |
| − | <table> <!-- BEGIN Bullet B -->
| + | |
| − | <tr valign-"top">
| + | |
| − | <td>[[image:Bblue.png|link=|alt=]] </td>
| + | |
| − | <td>If you have manually driven to the '''Caltowie Home Dn''' signal (or used the '''AI Drive To Trackmark Caltowie Main Approach Dn''' command) then open the '''Driver Command Menu''' and select the <span style="font-weight: 700; font-size: 15px; color: white; background-color: black;"> IT SetPath (TANE SP4 and later) </span> option. The name of the '''Start Signal''' <span style="font-weight: 700; font-size: 15px; background-color: black; color: white;"> Caltowie Home Dn IT Start </span> will appear in the '''IT''' list.</td>
| + | |
| − | </tr>
| + | |
| − | </table> <!-- END Bullet B -->
| + | |
| − | | + | |
| − | <table cellpadding="4" bgcolor=#ffffb0> <!-- BEGIN Tip Table -->
| + | |
| − | <tr valign="top">
| + | |
| − | <td>[[file:PencilTips.PNG|link=]]</td>
| + | |
| − | <td><span style="font-weight: 700; font-size: 15px;">The Ideal Stop Position</span><br>
| + | |
| − | If you are using the manual driving controls (the keyboard or on-screen controls) and want to stop clear of an invisible '''IT Start''' signal that controls the entry '''IT''' paths into a location, such as '''Caltowie''', then stop at the '''Caution''' marker placed alongside the track in front of any visible signal and the yard entry switch.
| + | |
| − | </td>
| + | |
| − | </tr>
| + | |
| − | </table> <!-- END Tip Table -->
| + | |
| − | <br>
| + | |
| − | | + | |
| − | <table> <!-- BEGIN Caltowie EIT paths 2 selection -->
| + | |
| − | <tr valign="top">
| + | |
| − | <td width=530>[[image:IT SetPath Local.png|link=|alt=Caltowie Home IT]]</td>
| + | |
| − | <td>
| + | |
| − | Select <span style="font-weight: 700; font-size: 15px; background-color: black; color: white;"> Caltowie Home Dn IT Start </span>. This will open a list of all its assigned paths.<br>
| + | |
| − | | + | |
| − | Select the through path you want, for example <span style="font-weight: 700; font-size: 15px; background-color: black; color: white;"> Port Pirie to Broken Hill </span> or <span style="font-weight: 700; font-size: 15px; background-color: black; color: white;"> Port Pirie to Station to Broken Hill </span>.<br>
| + | |
| − | | + | |
| − | [[image:Caltowie AtoCtoB Path.png|link=|alt=Caltowie AB]]<br>
| + | |
| − | Path via '''Caltowie Station'''<br>
| + | |
| − | </td>
| + | |
| − | </tr>
| + | |
| − | </table> <!-- END Caltowie EIT paths 2 selection -->
| + | |
| − | | + | |
| − | <table cellpadding="4" bgcolor=#ffffb0> <!-- BEGIN Tip Table -->
| + | |
| − | <tr valign="top">
| + | |
| − | <td>[[file:PencilTips.PNG|link=]]</td>
| + | |
| − | <td><span style="font-weight: 700; font-size: 15px;">Starting Signal Not Showing</span><br>
| + | |
| − | If you have stopped in front of an '''IT Starting Signal''' but it does not appear in the '''IT''' list, then
| + | |
| − | #you may be positioned too close to the signal. In which case either:-
| + | |
| − | #*move the train back a few metres and check again, or
| + | |
| − | #*follow the instructions in step [[image:DotPoint3Blue.png|link=]] [[image:Ablue.png|link=|alt=]] above and select the path through its '''IT'''
| + | |
| − | #there are track objects such as other signals (even those facing the opposite direction) or track junctions between the loco and the signal. In which case either:-
| + | |
| − | #*move the loco closer so that it is clear of any other signal or junction and check again, or
| + | |
| − | #*follow the instructions in step [[image:DotPoint3Blue.png|link=]] [[image:Ablue.png|link=|alt=]] above and select the path through its '''IT'''
| + | |
| − | </td>
| + | |
| − | </tr>
| + | |
| − | </table> <!-- END Tip Table -->
| + | |
| − | <br>
| + | |
| − | | + | |
| − | Once the path has been set, use the '''Driver Speed Dial''', the keyboard controls ('''W''', '''S''', '''X'''), advanced on screen controls, or the '''AI''' to drive the train through '''Caltowie Yard''' to '''Jamestown'''.<br>
| + | |
| − | </td>
| + | |
| − | <td width=30 bgcolor="lightcyan"> </td> <!-- right colour bar -->
| + | |
| − | </tr>
| + | |
| − | <tr valign="top">
| + | |
| − | <td colspan=3 bgcolor="lightcyan"> </td> <!-- bottom colour bar -->
| + | |
| − | </tr>
| + | |
| − | </table> <!-- END Instruction Set 3 -->
| + | |
| − | <table width=1000> <!-- BEGIN Instruction Set 4 -->
| + | |
| − | <tr valign="top">
| + | |
| − | <td colspan=3> </td>
| + | |
| − | </tr>
| + | |
| − | <tr valign="top">
| + | |
| − | <td colspan=3>
| + | |
| − | <table> <!-- BEGIN Nav Buttons Table -->
| + | |
| − | <tr valign="top">
| + | |
| − | <td width=729><span id="step4"></span> </td>
| + | |
| − | <td width=46>[[file:BackToTop.png|link=#top|alt=Top|Top]]</td>
| + | |
| − | <td width=75>[[file:NextUp.png|link=#step3|alt=Next Up|Top]]</td>
| + | |
| − | <td width=75>[[file:NextDown.png|link=#step5|alt=Next Down|Next Down]]</td>
| + | |
| | <td width=75>[[file:BackToBottom.png|link=#bottom|alt=Bottom|Bottom]]</td> | | <td width=75>[[file:BackToBottom.png|link=#bottom|alt=Bottom|Bottom]]</td> |
| | </tr> | | </tr> |
| Line 517: |
Line 222: |
| | </tr> | | </tr> |
| | <tr valign="top"> | | <tr valign="top"> |
| − | <td align="center" bgcolor="lightyellow">'''Step'''<br>[[image:DotPoint4Blue.png|link=]]</td> <!-- left colour bar --> | + | <td align="center" bgcolor="lightyellow">'''Step'''<br>[[image:DotPoint2Blue.png|link=]]</td> <!-- left colour bar --> |
| | <td><span style="font-weight: 700; font-size: 19px; background-color: black; color: white;"> Caltowie to Jamestown </span><br> | | <td><span style="font-weight: 700; font-size: 19px; background-color: black; color: white;"> Caltowie to Jamestown </span><br> |
| | | | |
| | '''Caltowie''' does not have a coal stage or a fuel oil store in need of a refill so the consist will not be stopping here. A '''through path''' is the best option.<br> | | '''Caltowie''' does not have a coal stage or a fuel oil store in need of a refill so the consist will not be stopping here. A '''through path''' is the best option.<br> |
| | | | |
| − | [[image:DotPoint1.JPG|link=]] <span style="font-weight: 700; font-size: 17px; background-color: black; color: white;"> Manual Control </span><br>
| + | <span style="font-weight: 700; font-size: 17px; color: white;"><span style="background-color: red;"> A </span> <span style="background-color: black;"> Manual Control </span></span><br> |
| | | | |
| − | To manually drive the train through '''Caltowie''' to '''Jamestown''' without first setting '''IT Paths''' you will have to set all the switches yourself using the information on the '''Caltowie''' [[image:Tab_SW_Grey.png|link=|75px]] page (link via [[image:Line_Index_Label.png|link=SAR_Index|Location Index]] - link will open in this window). | + | To manually drive the train through '''Caltowie''' to '''Jamestown''' you will have to set all the switches yourself using the information on the '''Caltowie''' [[image:Tab_SW_Grey.png|link=|75px]] page (link via [[image:Line_Index_Label.png|link=SAR_Index|Location Index]] - link will open in this window). |
| | | | |
| | <table> <!-- BEGIN Switch Maps Table --> | | <table> <!-- BEGIN Switch Maps Table --> |
| Line 552: |
Line 257: |
| | <td>[[file:NotePad.PNG|link=]]</td> | | <td>[[file:NotePad.PNG|link=]]</td> |
| | <td><span style="font-size: 17px; font-weight: 700;">Notes:'''</span><br> | | <td><span style="font-size: 17px; font-weight: 700;">Notes:'''</span><br> |
| − | <table> <!-- BEGIN Notepad sub table -->
| + | If you are manually driving through a yard, then you '''MUST''' correctly set each <span style="font-weight: 700; background-color: red; color: white;"> Catchpoint </span> on your path yourself otherwise your train will '''DERAIL'''</td> |
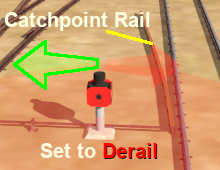
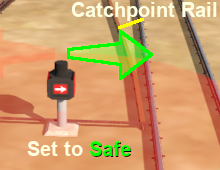
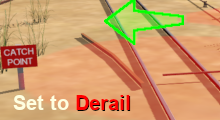
| − | <tr valign="top">
| + | |
| − | <td>[[file:DotPoint.JPG|link=]]</td>
| + | |
| − | <td>If you are manually driving through a yard, then you '''MUST''' correctly set each <span style="font-weight: 700; background-color: red; color: white;"> Catchpoint </span> on your path yourself otherwise your train will '''DERAIL'''</td>
| + | |
| − | </tr>
| + | |
| − | <tr valign="top">
| + | |
| − | <td>[[file:DotPoint.JPG|link=]]</td>
| + | |
| − | <td>If you have set the path through a yard using the '''IT''' option, then any <span style="font-weight: 700; background-color: red; color: white;"> Catchpoints </span> along the path of your train will be automatically set to allow the train to safely pass.</td>
| + | |
| − | </tr>
| + | |
| − | </table> <!-- END NotePad sub table -->
| + | |
| − | </td> | + | |
| | </tr> | | </tr> |
| | </table> <!-- END NotePad --> | | </table> <!-- END NotePad --> |
| Line 592: |
Line 287: |
| | </table> <!-- END Dividing Line Table --> | | </table> <!-- END Dividing Line Table --> |
| | | | |
| − | [[image:DotPoint2.JPG|link=]] <span style="font-weight: 700; font-size: 17px; background-color: black; color: white;"> AI Control </span><br>
| + | <span style="font-weight: 700; font-size: 17px; color: white;"><span style="background-color: red;"> B </span> <span style="background-color: black;"> AI Control </span></span><br> |
| | | | |
| | After reaching '''Caltowie''' you can use the '''Track Marks''' placed in the yard to navigate your way through. The track marks are shown on the '''Caltowie''' [[image:Tab_TM_Grey.png|link=|75px]] page (link via [[image:Line_Index_Label.png|link=SAR_Index|Location Index]] - link will open in this window) with a section containing a few that are relevant to this tutorial reproduced below with a secion of the '''Track Mark''' details from the same page.<br> | | After reaching '''Caltowie''' you can use the '''Track Marks''' placed in the yard to navigate your way through. The track marks are shown on the '''Caltowie''' [[image:Tab_TM_Grey.png|link=|75px]] page (link via [[image:Line_Index_Label.png|link=SAR_Index|Location Index]] - link will open in this window) with a section containing a few that are relevant to this tutorial reproduced below with a secion of the '''Track Mark''' details from the same page.<br> |
| Line 604: |
Line 299: |
| | <td>[[file:NotePad.PNG|link=]]</td> | | <td>[[file:NotePad.PNG|link=]]</td> |
| | <td><span style="font-size: 17px; font-weight: 700;">Notes:'''</span><br> | | <td><span style="font-size: 17px; font-weight: 700;">Notes:'''</span><br> |
| − | <table> <!-- BEGIN Notepad sub table -->
| + | Most stations on the route are '''NOT''' passenger enabled which reflects the actual level of passenger traffic that existed at those locations. The '''Drive To Trackmark''' command has to be used to bring a train alongside these stations when using the '''AI'''</td> |
| − | <tr valign="top">
| + | |
| − | <td>[[file:DotPoint.JPG|link=]]</td>
| + | |
| − | <td>Most stations on the route are '''NOT''' passenger enabled which reflects the actual level of passenger traffic that existed at those locations. The '''Drive To Trackmark''' command has to be used to bring a train alongside these stations when using the '''AI'''</td>
| + | |
| − | </tr>
| + | |
| − | <tr valign="top">
| + | |
| − | <td>[[file:DotPoint.JPG|link=]]</td>
| + | |
| − | <td>The [[image:Tab_IN_Grey.png|link=|75px]] page at each location ([[image:Line_Index_Label.png|link=SAR_Index|Location Index]]) will show the status of each station</td>
| + | |
| − | </tr>
| + | |
| − | <tr valign="top">
| + | |
| − | <td>[[file:DotPoint.JPG|link=]]</td>
| + | |
| − | <td>Because the '''ITs''' lock the path '''starting signals''' at '''STOP''' it is not possible to use the '''AI Drive To''' commands at locations that have '''ITs''' without first setting an '''IT''' path for the train. The '''Drive To''' commands will not override any '''IT''' locked signals.</td>
| + | |
| − | </tr>
| + | |
| − | </table> <!-- END Notepad sub table -->
| + | |
| − | </td> | + | |
| | </tr> | | </tr> |
| | </table> <!-- END NotePad --> | | </table> <!-- END NotePad --> |
| | <br> | | <br> |
| − | Once you have set an '''IT''' path through '''Caltowie''', the best option is to use the '''AI''' <span style="font-weight: 700; font-size: 15px; color: white; background-color: black;"> Drive To Trackmark </span> '''Driver Command''' and then select the '''Track Mark''' <span style="font-weight: 700; font-size: 15px; color: white; background-color: black;"> Jamestown Main Approach Dn </span> to navigate to '''Jamestown'''
| + | The simplest option is to use the '''AI''' <span style="font-weight: 700; font-size: 15px; color: white; background-color: black;"> Drive To Trackmark </span> '''Driver Command''' and then select the '''Track Mark''' <span style="font-weight: 700; font-size: 15px; color: white; background-color: black;"> Jamestown Main Approach Dn </span> to navigate to '''Jamestown''' |
| | </td> | | </td> |
| | <td width=30 bgcolor="lightyellow"> </td> <!-- right colour bar --> | | <td width=30 bgcolor="lightyellow"> </td> <!-- right colour bar --> |
| Line 630: |
Line 311: |
| | </tr> | | </tr> |
| | </table> <!-- END Instruction Set 4 --> | | </table> <!-- END Instruction Set 4 --> |
| − | <table width=1000> <!-- BEGIN Instruction Set 5 -->
| |
| − | <tr valign="top">
| |
| − | <td colspan=3> </td>
| |
| − | </tr>
| |
| − | <tr valign="top">
| |
| − | <td colspan=3>
| |
| − | <table> <!-- BEGIN Nav Buttons Table -->
| |
| − | <tr valign="top">
| |
| − | <td width=729><span id="step5"></span> </td>
| |
| − | <td width=46>[[file:BackToTop.png|link=#top|alt=Top|Top]]</td>
| |
| − | <td width=75>[[file:NextUp.png|link=#step4|alt=Next Up|Top]]</td>
| |
| − | <td width=75>[[file:NextDown.png|link=#step6|alt=Next Down|Next Down]]</td>
| |
| − | <td width=75>[[file:BackToBottom.png|link=#bottom|alt=Bottom|Bottom]]</td>
| |
| − | </tr>
| |
| − | </table> <!-- END Nav Buttons Table -->
| |
| − | -----
| |
| − | <br>
| |
| − | </tr>
| |
| − | <td colspan=3 bgcolor="lightcyan"> <!-- top colour bar -->
| |
| − | <table cellpadding="4"> <!-- BEGIN Dot Point -->
| |
| − | <tr valign="top">
| |
| − | <td>[[file:DotPoint.JPG|link=]]</td>
| |
| − | <td><span style="font-weight: 700;">If you want to drive the train entirely by manual control (no '''AI Drive To''' commands) and you don't want to use '''ITs''' then go straight to Step</span> [[image:DotPoint6Blue.png|link=]] [[file:NextDown.png|link=#step6|alt=Next Down|Next Down]]</td>
| |
| − | </tr>
| |
| − | </table> <!-- END Dot Point -->
| |
| − | </td>
| |
| − | <tr valign="top">
| |
| − | <td align="center" bgcolor="lightcyan">'''Step'''<br>[[image:DotPoint5Blue.png|link=]]</td> <!-- left colour bar -->
| |
| − | <td><span style="font-weight: 700; font-size: 19px; background-color: black; color: white;"> Jamestown Interlocking Tower </span><br>
| |
| − | '''Jamestown''' is the final destination of this tutorial but the '''[[SAR Scenario Depot Fuel Run|Gladstone-Peterborough Depot Fuel]] Scenario''' continues on to '''Peterborough'''.<br>
| |
| − |
| |
| − | In this tutorial scenario, we will be using the path into the <span style="font-weight: 700;"><span style="color: white; background-color: #008100;"> Loop </span> road</span>. The '''Jamestown''' [[image:Tab_PH_Grey.png|link=|75px]] page (link via [[image:Line_Index_Label.png|link=SAR_Index|Location Index]] - link will open in this window) shows all the '''IT paths''' into and out of '''Jamestown'''.<br>
| |
| − |
| |
| − | The '''Jamestown''' [[image:Tab_PH_Grey.png|link=|75px]] page identifies the path as [[image:Jamestown PH AtoD.png|link=|alt=Jamestown AtoD]]<br>
| |
| − |
| |
| − | # Open the '''Driver Command Menu''' and select the <span style="font-weight: 700; font-size: 15px; color: white; background-color: black;"> IT SetPath (TANE SP4 and later) </span> option.
| |
| − | #*If you prefer to set the path into '''Jamestown''' well before arriving, then <span style="font-weight: 700; font-size: 15px; color: white; background-color: black;"> Jamestown Interlocking Tower </span> will appear in the '''IT''' list. Select it.
| |
| − | #*If you have manually driven to the '''Jamestown Home Dn''' signal (or used the '''AI Drive To Trackmark Jamestown Main Approach Dn''' command) then the '''Start Signal''' <span style="font-weight: 700; font-size: 15px; background-color: black; color: white;"> Jamestown Home Dn IT Start </span> will appear in the '''IT''' list. Select this '''Start Signal'''.
| |
| − | # In either case, the path name <span style="font-weight: 700; font-size: 15px; color: white; background-color: black;"> Port Pirie to Loop </span> will appear in the list of available or assigned paths. Select this path.
| |
| − |
| |
| − | <table> <!-- BEGIN Jamestown EIT Path -->
| |
| − | <tr valign="top">
| |
| − | <td>[[image:Jamestown Map PH.png|link=|alt=Jamestown Loop Path]]</td>
| |
| − | <td>'''The path has now been set'''<br><br>
| |
| − | All that remains now is to use the '''Driver Speed Dial''', the keyboard controls ('''W''', '''S''', '''X'''), advanced on screen controls or the '''AI''' to drive the train into <span style="font-weight: 700;">Jamestown <span style="color: white; background-color: #008100;"> Loop </span></span> and halt at the end of the loop.<br>
| |
| − |
| |
| − | This ends the tutorial but you can continue the '''[[SAR Scenario Depot Fuel Run|Gladstone-Peterborough Depot Fuel]] Scenario'''.
| |
| − | </td>
| |
| − | </tr>
| |
| − | </table> <!-- END Jamestown EIT Path -->
| |
| − | </td>
| |
| − | <td width=30 bgcolor="lightcyan"> </td> <!-- right colour bar -->
| |
| − | </tr>
| |
| − | <tr valign="top">
| |
| − | <td colspan=3 bgcolor="lightcyan"> </td> <!-- bottom colour bar -->
| |
| − | </tr>
| |
| − | </table> <!-- END Instruction Set 5 -->
| |
| | <table width=1000> <!-- BEGIN Instruction Set 6 --> | | <table width=1000> <!-- BEGIN Instruction Set 6 --> |
| | <tr valign="top"> | | <tr valign="top"> |
| Line 695: |
Line 319: |
| | <table> <!-- BEGIN Nav Buttons Table --> | | <table> <!-- BEGIN Nav Buttons Table --> |
| | <tr valign="top"> | | <tr valign="top"> |
| − | <td width=729><span id="step6"></span> </td> | + | <td width=729><span id="step3"></span> </td> |
| | <td width=46>[[file:BackToTop.png|link=#top|alt=Top|Top]]</td> | | <td width=46>[[file:BackToTop.png|link=#top|alt=Top|Top]]</td> |
| − | <td width=75>[[file:NextUp.png|link=#step5|alt=Next Up|Top]]</td> | + | <td width=75>[[file:NextUp.png|link=#step2|alt=Next Up|Top]]</td> |
| | <td width=75> </td> | | <td width=75> </td> |
| | <td width=75>[[file:BackToBottom.png|link=#bottom|alt=Bottom|Bottom]]</td> | | <td width=75>[[file:BackToBottom.png|link=#bottom|alt=Bottom|Bottom]]</td> |
| Line 709: |
Line 333: |
| | </tr> | | </tr> |
| | <tr valign="top"> | | <tr valign="top"> |
| − | <td align="center" bgcolor="lightyellow">'''Step'''<br>[[image:DotPoint6Blue.png|link=]]</td> <!-- left colour bar --> | + | <td align="center" bgcolor="lightyellow">'''Step'''<br>[[image:DotPoint3Blue.png|link=]]</td> <!-- left colour bar --> |
| | <td><span style="font-weight: 700; font-size: 19px; background-color: black; color: white;"> Arriving at Jamestown </span><br><br> | | <td><span style="font-weight: 700; font-size: 19px; background-color: black; color: white;"> Arriving at Jamestown </span><br><br> |
| | '''Jamestown''' is the final destination of this tutorial but the '''[[SAR Scenario Depot Fuel Run|Gladstone-Peterborough Depot Fuel]] Scenario''' continues on to '''Peterborough'''. We will be using the <span style="font-weight: 700;"><span style="color: white; background-color: #008100;"> Loop </span> road</span> as the destination in '''Jamestown'''.<br><br> | | '''Jamestown''' is the final destination of this tutorial but the '''[[SAR Scenario Depot Fuel Run|Gladstone-Peterborough Depot Fuel]] Scenario''' continues on to '''Peterborough'''. We will be using the <span style="font-weight: 700;"><span style="color: white; background-color: #008100;"> Loop </span> road</span> as the destination in '''Jamestown'''.<br><br> |
| − | [[image:DotPoint1.JPG|link=]] <span style="font-weight: 700; font-size: 17px; background-color: black; color: white;"> Manual Control </span><br>
| |
| | | | |
| − | As at '''Caltowie''', to drive into '''Jamestown''' without first setting an '''IT Path''' you will have to set all the switches manually. The '''Jamestown''' [[image:Tab_SW_Grey.png|link=|75px]] page (link via [[image:Line_Index_Label.png|link=SAR_Index|Location Index]] - link will open in this window) shows all the switches into '''Jamestown''' and their settings.<br> | + | <span style="font-weight: 700; font-size: 17px; color: white;"><span style="background-color: red;"> A </span> <span style="background-color: black;"> Manual Control </span></span><br> |
| | + | |
| | + | As at '''Caltowie''', to drive into '''Jamestown''' you will have to set all the switches manually. The '''Jamestown''' [[image:Tab_SW_Grey.png|link=|75px]] page (link via [[image:Line_Index_Label.png|link=SAR_Index|Location Index]] - link will open in this window) shows all the switches into '''Jamestown''' and their settings.<br> |
| | | | |
| | <table> <!-- BEGIN Loop Set Table --> | | <table> <!-- BEGIN Loop Set Table --> |
| Line 733: |
Line 358: |
| | </table> <!-- END Dividing Line Table --> | | </table> <!-- END Dividing Line Table --> |
| | | | |
| − | [[image:DotPoint2.JPG|link=]] <span style="font-weight: 700; font-size: 17px; background-color: black; color: white;"> AI Control </span><br>
| + | <span style="font-weight: 700; font-size: 17px; color: white;"><span style="background-color: red;"> B </span> <span style="background-color: black;"> AI Control </span></span><br> |
| | | | |
| | The '''Jamestown''' [[image:Tab_TM_Grey.png|link=|75px]] page (link via [[image:Line_Index_Label.png|link=SAR_Index|Location Index]] - link will open in this window) shows all the '''Jamestown''' track marks.<br> | | The '''Jamestown''' [[image:Tab_TM_Grey.png|link=|75px]] page (link via [[image:Line_Index_Label.png|link=SAR_Index|Location Index]] - link will open in this window) shows all the '''Jamestown''' track marks.<br> |
| − |
| |
| − | <table cellpadding="4" bgcolor=#ffffb0> <!-- BEGIN NotePad -->
| |
| − | <tr valign="top">
| |
| − | <td>[[file:NotePad.PNG|link=]]</td>
| |
| − | <td><span style="font-size: 17px; font-weight: 700;">Notes:'''</span><br>
| |
| − | Because the '''ITs''' lock the path '''starting signals''' at '''STOP''' it is not possible to use the '''AI Drive To''' commands at locations that have '''ITs''' without first setting an '''IT''' path for the train. The '''Drive To''' commands will not override any '''IT''' locked signals.</td>
| |
| − | </tr>
| |
| − | </table> <!-- END NotePad -->
| |
| − | <br>
| |
| | | | |
| | <table> <!-- BEGIN Jamestown AI Table --> | | <table> <!-- BEGIN Jamestown AI Table --> |
| Line 780: |
Line 396: |
| | <tr valign="top"> | | <tr valign="top"> |
| | <td width=46>[[file:BackToTop.png|link=#top|alt=Top|Top]]</td> | | <td width=46>[[file:BackToTop.png|link=#top|alt=Top|Top]]</td> |
| − | <td width=75>[[file:NextUp.png|link=#step6|alt=Next Up|Top]]</td> | + | <td width=75>[[file:NextUp.png|link=#step3|alt=Next Up|Top]]</td> |
| | </tr> | | </tr> |
| | </table> <!-- END Nav sub table --> | | </table> <!-- END Nav sub table --> |
 SAR Peterborough Narrow Gauge Scenarios Tutorial