|
|
| Line 77: |
Line 77: |
| | </table> <!-- END Combined Intro Table --> | | </table> <!-- END Combined Intro Table --> |
| | | | |
| − | <table width=1000> <!-- BEGIN Instruction Set 1 -->
| |
| − | <tr valign="top">
| |
| − | <td colspan=3>
| |
| − | <table> <!-- BEGIN Nav Buttons Table -->
| |
| − | <tr valign="top">
| |
| − | <td width=729><span id="step1"></span> </td>
| |
| − | <td width=46>[[file:BackToTop.png|link=#top|alt=Top|Top]]</td>
| |
| − | <td width=75> </td>
| |
| − | <td width=75>[[file:NextDown.png|link=#step2|alt=Next Down|Next Down]]</td>
| |
| − | <td width=75>[[file:BackToBottom.png|link=#bottom|alt=Bottom|Bottom]]</td>
| |
| − | </tr>
| |
| − | </table> <!-- END Nav Buttons Table -->
| |
| − | -----
| |
| − | <br>
| |
| − | </tr>
| |
| − | <tr valign="top">
| |
| − | <td colspan=3 bgcolor="lightcyan"> </td>
| |
| − | </tr>
| |
| − | <tr valign="top">
| |
| − | <td width=30 align="center" bgcolor="lightcyan">'''Step'''<br>[[image:DotPoint1Blue.JPG|link=]]</td> <!-- Instruction 1 -->
| |
| − | <td width=940>
| |
| − | <span style="font-weight: 700; font-size: 19px; background-color: black; color: white;"> Using the Gladstone EIT </span><br>
| |
| − | <br>
| |
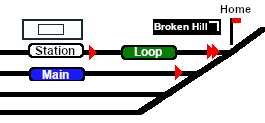
| − | The first path to be set in this tutorial is from the <span style="font-weight: 700;">Gladstone <span style="background-color: yellow; color: black;"> Goods Loop </span></span> to <span style="font-weight: 700;"><span style="background-color: black; color: white;"> Broken Hill </span></span>. On the '''Gladstone''' [[image:Tab_PH_Grey.png|link=|75px]] page (link via [[image:Line_Index_Label.png|link=SAR_Index|Location Index]] - link will open in this window) this is identified on that page as:-<br><br>
| |
| − |
| |
| − | [[image:GS MtoB Path.png|link=|alt=M to P Path]]<br><br>
| |
| − |
| |
| − | From the open '''Driver Command Menu''', select the <span style="font-weight: 700;"><span style="color: white; background-color: black;"> IT SetPath (TANE SP4 and later) </span></span> option. This will open a list of all the '''EITs''' that have been placed in the Session. Because an '''EIT Starting Signal''', in this case invisible signal '''GSX G27D''', is directly in front of the loco, the signal will be included in the '''EIT''' list.<br>
| |
| − |
| |
| − | <table> <!-- BEGIN Starting Signal Example Table -->
| |
| − | <tr valign="top">
| |
| − | <td align="center">[[image:GS to PTB Paths 1.png|link=|alt=Starting Paths]]</td>
| |
| − | <td>
| |
| − | Select the starting signal <span style="font-weight: 700;"><span style="color: white; background-color: black;"> GSX G27D </span></span>. This will reveal that two different paths out of '''Gladstone''' start from this signal.<br>
| |
| − |
| |
| − | * <span style="font-weight: 700;"><span style="color: white; background-color: black;"> Goods Loop to Broken Hill </span></span>, and
| |
| − | * <span style="font-weight: 700;"><span style="color: white; background-color: black;"> Goods Loop to Wilmington </span></span>
| |
| − | <br>
| |
| − | </td>
| |
| − | </tr>
| |
| − | </table> <!-- END Starting Signal Example Table -->
| |
| − |
| |
| − | Select the path <span style="font-weight: 700;"><span style="color: white; background-color: black;"> Goods Loop to Broken Hill </span></span>.<br>
| |
| − |
| |
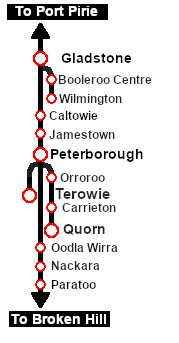
| − | Every path is named according to its starting point (one of six "outside" locations or a track in the local yard) and its destination (one of six "outside" locations or a track in the local yard). The six "outside" locations are '''Port Pirie''', '''Broken Hill''', '''Terowie''', '''Quorn''', '''Wilmington''' and '''Peterborough'''. Those locations may not be the destination or starting point of the consist and they indicate the direction of travel only.<br>
| |
| − |
| |
| − | <table cellpadding="4" bgcolor=#c1e7e7> <!-- BEGIN Dot Point -->
| |
| − | <tr valign="top">
| |
| − | <td>[[file:DotPoint.JPG|link=]]</td>
| |
| − | <td>Selecting a path to or from an outside location will '''NOT''' set the entire path to/from that location (e.g. all the way to '''Broken Hill'''). It will only set the path between the '''Starting Signal''' and the '''Exit Signal'''. Either both signals will be just outside the yard or one will be within the yard and the other just outside</td>
| |
| − | </tr>
| |
| − | </table> <!-- END Dot Point -->
| |
| − | <br>
| |
| − |
| |
| − | <table> <!-- BEGIN Path M to B Table -->
| |
| − | <tr valign="top">
| |
| − | <td width-475>[[image:Gladstone Map MtoB.png|link=|alt=Path on map]]</td>
| |
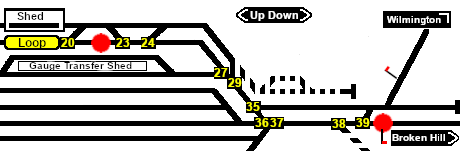
| − | <td>'''The path has now been set'''.<br>
| |
| − |
| |
| − | All junction switches and signals along the selected path from the '''Start Signal''' ('''GSX G27D''') to the '''Exit Signal''' ('''Gladstone Home Up''') are set to give loco '''T 258''' the road out of '''Gladstone''' towards '''Broken Hill'''.<br>
| |
| − |
| |
| − | '''Note:''' not all signals will automatically show '''Proceed''' once the path has been set. Some signals, semaphore signals for example, will only show '''Proceed''' when a train starts moving towards the signal.</td>
| |
| − | </tr>
| |
| − | </table> <!-- END Path M to B Table -->
| |
| − | <br>
| |
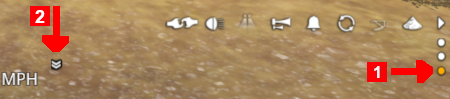
| − | Once the path has been set, use the '''Driver Speed Dial''', the keyboard controls ('''W''', '''S''', '''X'''), advanced on screen controls, or the '''AI''' to drive the train out of '''Gladstone Yard''' to '''Caltowie'''.<br>
| |
| − |
| |
| − | <table cellpadding="4" bgcolor=#ffffb0> <!-- BEGIN Tip Table -->
| |
| − | <tr valign="top">
| |
| − | <td>[[file:PencilTips.PNG|link=]]</td>
| |
| − | <td>If you are using the manual driving controls (either the keyboard or on-screen cab controls) then it is a good idea to test the train direction first by clicking the [[image:Train Direction Control.png|link=|alt=]] '''Train Direction Button''' in the lower right of the screen. This will set and reveal the red and green direction arrows on the consist and establish the forward direction of travel.</td>
| |
| − | </tr>
| |
| − | </table> <!-- END Tip Table -->
| |
| − | <br>
| |
| − |
| |
| − | <span style="font-weight: 700; font-size: 17px; background-color: black; color: white;"> Cancelling a Set EIT Path </span><br>
| |
| − |
| |
| − | Paths that have been set can be cancelled so that their signals and junction switches will be returned to their previous states.<br>
| |
| − |
| |
| − | Set paths are automatically returned to their initial states after the consist has cleared the '''Exit Signal''', but if you change your mind and decide to take a different path or not use the EITs then a set path can be cancelled.<br>
| |
| − |
| |
| − | From the '''Driver Command Menu''' select the '''IT CancelEnhancedPath''' command.<br>
| |
| − |
| |
| − | [[image:IT CancelEnhancedPath.png|link=|alt=Cancel Path]]<br>
| |
| − |
| |
| − | You will have the option of cancelling '''ALL PATHS''' or selecting a particular '''EIT''' and path to cancel.<br>
| |
| − | </td>
| |
| − | <td width=30 bgcolor="lightcyan"> </td>
| |
| − | </tr>
| |
| − | <tr valign="top">
| |
| − | <td colspan=3 bgcolor="lightcyan"> </td>
| |
| − | </tr>
| |
| − | </table> <!-- END Instruction Set 1 -->
| |
| | <table width=1000> <!-- BEGIN Instruction Set 2 --> | | <table width=1000> <!-- BEGIN Instruction Set 2 --> |
| | <tr valign="top"> | | <tr valign="top"> |
| Line 178: |
Line 85: |
| | <table> <!-- BEGIN Nav Buttons Table --> | | <table> <!-- BEGIN Nav Buttons Table --> |
| | <tr valign="top"> | | <tr valign="top"> |
| − | <td width=729><span id="step2"></span> </td> | + | <td width=729><span id="step1"></span> </td> |
| | <td width=46>[[file:BackToTop.png|link=#top|alt=Top|Top]]</td> | | <td width=46>[[file:BackToTop.png|link=#top|alt=Top|Top]]</td> |
| − | <td width=75>[[file:NextUp.png|link=#step1|alt=Next Up|Top]]</td> | + | <td width=75> </td> |
| − | <td width=75>[[file:NextDown.png|link=#step3|alt=Next Down|Next Down]]</td> | + | <td width=75>[[file:NextDown.png|link=#step2|alt=Next Down|Next Down]]</td> |
| | <td width=75>[[file:BackToBottom.png|link=#bottom|alt=Bottom|Bottom]]</td> | | <td width=75>[[file:BackToBottom.png|link=#bottom|alt=Bottom|Bottom]]</td> |
| | </tr> | | </tr> |
| Line 192: |
Line 99: |
| | </tr> | | </tr> |
| | <tr valign="top"> | | <tr valign="top"> |
| − | <td align="center" bgcolor="lightcyan">'''Step'''<br>[[image:DotPoint2Blue.JPG|link=]]</td> | + | <td align="center" bgcolor="lightcyan">'''Step'''<br>[[image:DotPoint1Blue.JPG|link=]]</td> |
| | <td> | | <td> |
| | <span style="font-weight: 700; font-size: 19px; background-color: black; color: white;"> Driving From Gladstone to Caltowie </span><br> | | <span style="font-weight: 700; font-size: 19px; background-color: black; color: white;"> Driving From Gladstone to Caltowie </span><br> |
| Line 280: |
Line 187: |
| | </tr> | | </tr> |
| | </table> <!-- END Instruction Set 2 --> | | </table> <!-- END Instruction Set 2 --> |
| − | <table width=1000> <!-- BEGIN Instruction Set 3 -->
| |
| − | <tr valign="top">
| |
| − | <td colspan=3> </td>
| |
| − | </tr>
| |
| − | <tr valign="top">
| |
| − | <td colspan=3>
| |
| − | <table> <!-- BEGIN Nav Buttons Table -->
| |
| − | <tr valign="top">
| |
| − | <td width=729><span id="step3"></span> </td>
| |
| − | <td width=46>[[file:BackToTop.png|link=#top|alt=Top|Top]]</td>
| |
| − | <td width=75>[[file:NextUp.png|link=#step2|alt=Next Up|Top]]</td>
| |
| − | <td width=75>[[file:NextDown.png|link=#step4|alt=Next Down|Next Down]]</td>
| |
| − | <td width=75>[[file:BackToBottom.png|link=#bottom|alt=Bottom|Bottom]]</td>
| |
| − | </tr>
| |
| − | </table> <!-- END Nav Buttons Table -->
| |
| − | -----
| |
| − | <br>
| |
| − | </tr>
| |
| − | <tr valign="top">
| |
| − | <td colspan=3 bgcolor="lightcyan"> </td>
| |
| − | </tr>
| |
| − | <tr valign="top">
| |
| − | <td align="center" bgcolor="lightcyan">'''Step'''<br>[[image:DotPoint3Blue.JPG|link=]]</td>
| |
| − | <td>
| |
| − | <span style="font-weight: 700; font-size: 19px; background-color: black; color: white;"> Using the Caltowie EIT </span><br><br>
| |
| − |
| |
| − | '''Caltowie''' does not have a coal stage or a fuel oil store in need of a refill so the consist will not be stopping here. A '''through path''' is the best option.<br><br>
| |
| − |
| |
| − | <table> <!-- BEGIN Bullet A -->
| |
| − | <tr valign-"top">
| |
| − | <td>[[image:Ablue.png|link=|alt=]] </td>
| |
| − | <td>You can set an EIT path without having to be directly in front of a '''Starting Signal'''. For example, you can set all the EIT paths for the train through '''Caltowie''' and into '''Jamestown''' before you even leave '''Gladstone'''.
| |
| − | </td>
| |
| − | </tr>
| |
| − | </table> <!-- END Bullet A -->
| |
| − |
| |
| − | <table cellpadding="4" bgcolor=#ffffb0> <!-- BEGIN Tip Table -->
| |
| − | <tr valign="top">
| |
| − | <td>[[file:PencilTips.PNG|link=]]</td>
| |
| − | <td>To set a path for a distant EIT, open the '''Driver Command Menu''' and select the <span style="font-weight: 700;"><span style="color: white; background-color: black;"> IT SetPath (TANE SP4 and later) </span></span> option. Then select the required '''EIT''' and path from the lists. This can be repeated for as many '''EITs''' as needed along the path of the train.</td>
| |
| − | </tr>
| |
| − | </table> <!-- END Tip Table -->
| |
| − | <br>
| |
| − |
| |
| − | <table> <!-- BEGIN Caltowie EIT paths 1 selection -->
| |
| − | <tr valign="top">
| |
| − | <td width=450>[[image:Caltowie EIT and Paths.png|link=|alt=Caltowie EIT]]</td>
| |
| − | <td>
| |
| − | Open the '''Driver Command Menu''' and select the <span style="font-weight: 700;"><span style="color: white; background-color: black;"> IT SetPath (TANE SP4 and later) </span></span> option. Then select the <span style="font-weight: 700; background-color: black; color: white;"> Caltowie EIT Interlocking Tower </span>. This will open a list of '''ALL''' the '''EIT paths''' controlled by the '''Caltowie EIT''', including any paths that will not be directly accessable to your consist.<br>
| |
| − |
| |
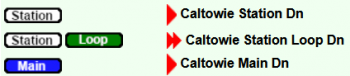
| − | On the '''Caltowie''' [[image:Tab_PH_Grey.png|link=|75px]] page (link via [[image:Line_Index_Label.png|link=SAR_Index|Location Index]] - link will open in this window) the path we will select is identified as:-<br><br>
| |
| − |
| |
| − | [[image:CT Path AtoB.png|link=|alt=A to B Path]]<br><br>
| |
| − |
| |
| − | Select the path <span style="font-weight: 700; background-color: black; color: white;"> Port Pirie to Broken Hill </span>. This will set a direct path, via the <span style="font-weight: 700;"><span style="color: white; background-color: blue;"> Main </span> Line</span>, through '''Caltowie Yard''' and out towards '''Broken Hill'''.<br>
| |
| − |
| |
| − | [[image:Caltowie AtoB Path.png|link=|alt=Caltowie AB]]<br>
| |
| − |
| |
| − | You could also select any of the <span style="font-weight: 700; background-color: black; color: white;"> Port Pirie to ... </span> paths. The only other through path is <span style="font-weight: 700; background-color: black; color: white;"> Port Pirie to Station to Broken Hill </span> which will take you through the yard via the '''Station'''. The other <span style="font-weight: 700; background-color: black; color: white;"> Port Pirie to ... </span> paths will take you into the yard but will not provide a set path out. You will need to select and set the appropriate <span style="font-weight: 700; background-color: black; color: white;"> ... to Broken Hill </span> path to exit the yard.
| |
| − | </td>
| |
| − | </tr>
| |
| − | </table> <!-- END Caltowie EIT paths 1 selection -->
| |
| − | <br>
| |
| − |
| |
| − | <table> <!-- BEGIN Bullet A -->
| |
| − | <tr valign-"top">
| |
| − | <td>[[image:Bblue.png|link=|alt=]] </td>
| |
| − | <td>If you have manually driven to the '''Caltowie Home Dn''' signal (or used the '''AI Drive To Trackmark Caltowie Main Approach Dn''' command) then open the '''Driver Command Menu'''. The name of the '''Start Signal''' <span style="font-weight: 700; background-color: black; color: white;"> Caltowie Home Dn </span> will appear in the '''EIT''' list.</td>
| |
| − | </tr>
| |
| − | </table> <!-- END Bullet A -->
| |
| − |
| |
| − | <table> <!-- BEGIN Caltowie EIT paths 2 selection -->
| |
| − | <tr valign="top">
| |
| − | <td width=450>[[image:Caltowie EIT Home Dn Paths.png|link=|alt=Caltowie Home EIT]]</td>
| |
| − | <td>
| |
| − | Select <span style="font-weight: 700; background-color: black; color: white;"> Caltowie Home Dn </span>. This will open a list of all its assigned paths.<br>
| |
| − |
| |
| − | Select the through path you want, for example <span style="font-weight: 700; background-color: black; color: white;"> Port Pirie to Broken Hill </span> or <span style="font-weight: 700; background-color: black; color: white;"> Port Pirie to Station to Broken Hill </span>.<br>
| |
| − |
| |
| − | [[image:Caltowie AtoCtoB Path.png|link=|alt=Caltowie AB]]<br>
| |
| − | Path via '''Caltowie Station'''<br>
| |
| − | </td>
| |
| − | </tr>
| |
| − | </table> <!-- END Caltowie EIT paths 2 selection -->
| |
| − | Once the path has been set, use the '''Driver Speed Dial''', the keyboard controls ('''W''', '''S''', '''X'''), advanced on screen controls, or the '''AI''' to drive the train through '''Caltowie Yard''' to '''Jamestown'''.
| |
| − | </td>
| |
| − | <td width=30 bgcolor="lightcyan"> </td>
| |
| − | </tr>
| |
| − | <tr valign="top">
| |
| − | <td colspan=3 bgcolor="lightcyan"> </td>
| |
| − | </tr>
| |
| − | </table> <!-- END Instruction Set 3 -->
| |
| | <table width=1000> <!-- BEGIN Instruction Set 4 --> | | <table width=1000> <!-- BEGIN Instruction Set 4 --> |
| | <tr valign="top"> | | <tr valign="top"> |
| Line 380: |
Line 195: |
| | <table> <!-- BEGIN Nav Buttons Table --> | | <table> <!-- BEGIN Nav Buttons Table --> |
| | <tr valign="top"> | | <tr valign="top"> |
| − | <td width=729><span id="step4"></span> </td> | + | <td width=729><span id="step2"></span> </td> |
| | <td width=46>[[file:BackToTop.png|link=#top|alt=Top|Top]]</td> | | <td width=46>[[file:BackToTop.png|link=#top|alt=Top|Top]]</td> |
| − | <td width=75>[[file:NextUp.png|link=#step3|alt=Next Up|Top]]</td> | + | <td width=75>[[file:NextUp.png|link=#step1|alt=Next Up|Top]]</td> |
| − | <td width=75>[[file:NextDown.png|link=#step5|alt=Next Down|Next Down]]</td> | + | <td width=75>[[file:NextDown.png|link=#step3|alt=Next Down|Next Down]]</td> |
| | <td width=75>[[file:BackToBottom.png|link=#bottom|alt=Bottom|Bottom]]</td> | | <td width=75>[[file:BackToBottom.png|link=#bottom|alt=Bottom|Bottom]]</td> |
| | </tr> | | </tr> |
| Line 394: |
Line 209: |
| | </tr> | | </tr> |
| | <tr valign="top"> | | <tr valign="top"> |
| − | <td align="center" bgcolor="lightcyan">'''Step'''<br>[[image:DotPoint4Blue.JPG|link=]]</td> | + | <td align="center" bgcolor="lightcyan">'''Step'''<br>[[image:DotPoint2Blue.JPG|link=]]</td> |
| | <td><span style="font-weight: 700; font-size: 19px; background-color: black; color: white;"> Driving Through Caltowie to Jamestown </span><br><br> | | <td><span style="font-weight: 700; font-size: 19px; background-color: black; color: white;"> Driving Through Caltowie to Jamestown </span><br><br> |
| | | | |
| Line 488: |
Line 303: |
| | </tr> | | </tr> |
| | </table> <!-- END Instruction Set 4 --> | | </table> <!-- END Instruction Set 4 --> |
| − | <table width=1000> <!-- BEGIN Instruction Set 5 -->
| |
| − | <tr valign="top">
| |
| − | <td colspan=3> </td>
| |
| − | </tr>
| |
| − | <tr valign="top">
| |
| − | <td colspan=3>
| |
| − | <table> <!-- BEGIN Nav Buttons Table -->
| |
| − | <tr valign="top">
| |
| − | <td width=729><span id="step5"></span> </td>
| |
| − | <td width=46>[[file:BackToTop.png|link=#top|alt=Top|Top]]</td>
| |
| − | <td width=75>[[file:NextUp.png|link=#step4|alt=Next Up|Top]]</td>
| |
| − | <td width=75>[[file:NextDown.png|link=#step6|alt=Next Down|Next Down]]</td>
| |
| − | <td width=75>[[file:BackToBottom.png|link=#bottom|alt=Bottom|Bottom]]</td>
| |
| − | </tr>
| |
| − | </table> <!-- END Nav Buttons Table -->
| |
| − | -----
| |
| − | <br>
| |
| − | </tr>
| |
| − | <tr valign="top">
| |
| − | <td colspan=3 bgcolor="lightcyan"> </td>
| |
| − | </tr>
| |
| − | <tr valign="top">
| |
| − | <td align="center" bgcolor="lightcyan">'''Step'''<br>[[image:DotPoint5Blue.JPG|link=]]</td>
| |
| − | <td><span style="font-weight: 700; font-size: 19px; background-color: black; color: white;"> Using the Jamestown EIT </span><br>
| |
| − | '''Jamestown''' is the final destination of this tutorial but the '''[[SAR Scenario Depot Fuel Run|Gladstone-Peterborough Depot Fuel]] Scenario''' continues on to '''Peterborough'''.<br>
| |
| − |
| |
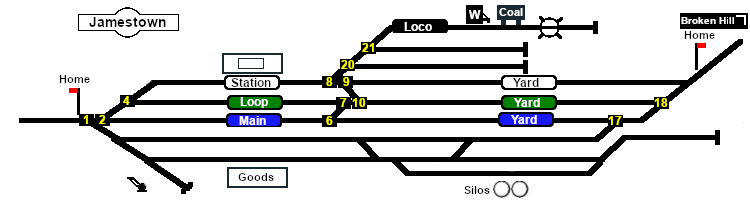
| − | In this tutorial scenario, we will be using the path into the <span style="font-weight: 700;"><span style="color: white; background-color: #008100;"> Loop </span> road</span>. The '''Jamestown''' [[image:Tab_PH_Grey.png|link=|75px]] page (link via [[image:Line_Index_Label.png|link=SAR_Index|Location Index]] - link will open in this window) shows all the '''EIT paths''' into and out of '''Jamestown'''.<br>
| |
| − |
| |
| − | The '''Jamestown''' [[image:Tab_PH_Grey.png|link=|75px]] page identifies the path as [[image:Jamestown PH AtoD.png|link=|alt=Jamestown AtoD]]<br>
| |
| − |
| |
| − | # Open the '''Driver Command Menu''' and select the <span style="font-weight: 700;"><span style="color: white; background-color: black;"> IT SetPath (TANE SP4 and later) </span></span> option.
| |
| − | #*If you prefer to set the path into '''Jamestown''' well before arriving, then <span style="font-weight: 700;"><span style="color: white; background-color: black;"> Jamestown EIT Interlocking Tower </span></span> will appear in the '''EIT''' list. Select this '''EIT'''.
| |
| − | #*If you have manually driven to the '''Jamestown Home Dn''' signal (or used the '''AI Drive To Trackmark Jamestown Main Approach Dn''' command) then the '''Start Signal''' <span style="font-weight: 700; background-color: black; color: white;"> Jamestown Home Dn </span> will appear in the '''EIT''' list. Select this '''Start Signal'''.
| |
| − | # In either case, the path name <span style="font-weight: 700;"><span style="color: white; background-color: black;"> Port Pirie to Loop </span></span> will appear in the list of available or assigned paths. Select this path.
| |
| − |
| |
| − | <table> <!-- BEGIN Jamestown EIT Path -->
| |
| − | <tr valign="top">
| |
| − | <td>[[image:Jamestown Map PH.png|link=|alt=Jamestown Loop Path]]</td>
| |
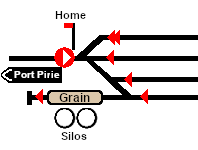
| − | <td>'''The path has now been set'''<br><br>
| |
| − | All that remains now is to use the '''Driver Speed Dial''', the keyboard controls ('''W''', '''S''', '''X'''), advanced on screen controls or the '''AI''' to drive the train into <span style="font-weight: 700;">Jamestown <span style="color: white; background-color: #008100;"> Loop </span></span> and halt at the end of the loop.<br>
| |
| − |
| |
| − | This ends the tutorial but you can continue the '''[[SAR Scenario Depot Fuel Run|Gladstone-Peterborough Depot Fuel]] Scenario'''.
| |
| − | </td>
| |
| − | </tr>
| |
| − | </table> <!-- END Jamestown EIT Path -->
| |
| − | </td>
| |
| − | <td width=30 bgcolor="lightcyan"> </td>
| |
| − | </tr>
| |
| − | <tr valign="top">
| |
| − | <td colspan=3 bgcolor="lightcyan"> </td>
| |
| − | </tr>
| |
| − | </table> <!-- END Instruction Set 5 -->
| |
| | <table width=1000> <!-- BEGIN Instruction Set 6 --> | | <table width=1000> <!-- BEGIN Instruction Set 6 --> |
| | <tr valign="top"> | | <tr valign="top"> |
| Line 548: |
Line 311: |
| | <table> <!-- BEGIN Nav Buttons Table --> | | <table> <!-- BEGIN Nav Buttons Table --> |
| | <tr valign="top"> | | <tr valign="top"> |
| − | <td width=729><span id="step6"></span> </td> | + | <td width=729><span id="step3"></span> </td> |
| | <td width=46>[[file:BackToTop.png|link=#top|alt=Top|Top]]</td> | | <td width=46>[[file:BackToTop.png|link=#top|alt=Top|Top]]</td> |
| − | <td width=75>[[file:NextUp.png|link=#step5|alt=Next Up|Top]]</td> | + | <td width=75>[[file:NextUp.png|link=#step2|alt=Next Up|Top]]</td> |
| | <td width=75> </td> | | <td width=75> </td> |
| | <td width=75>[[file:BackToBottom.png|link=#bottom|alt=Bottom|Bottom]]</td> | | <td width=75>[[file:BackToBottom.png|link=#bottom|alt=Bottom|Bottom]]</td> |
| Line 562: |
Line 325: |
| | </tr> | | </tr> |
| | <tr valign="top"> | | <tr valign="top"> |
| − | <td align="center" bgcolor="lightcyan">'''Step'''<br>[[image:DotPoint6Blue.JPG|link=]]</td> | + | <td align="center" bgcolor="lightcyan">'''Step'''<br>[[image:DotPoint3Blue.JPG|link=]]</td> |
| | <td><span style="font-weight: 700; font-size: 19px; background-color: black; color: white;"> Driving into Jamestown </span><br><br> | | <td><span style="font-weight: 700; font-size: 19px; background-color: black; color: white;"> Driving into Jamestown </span><br><br> |
| | '''Jamestown''' is the final destination of this tutorial but the '''[[SAR Scenario Depot Fuel Run|Gladstone-Peterborough Depot Fuel]] Scenario''' continues on to '''Peterborough'''. We will be using the <span style="font-weight: 700;"><span style="color: white; background-color: #008100;"> Loop </span> road</span> as the destination in '''Jamestown'''.<br><br> | | '''Jamestown''' is the final destination of this tutorial but the '''[[SAR Scenario Depot Fuel Run|Gladstone-Peterborough Depot Fuel]] Scenario''' continues on to '''Peterborough'''. We will be using the <span style="font-weight: 700;"><span style="color: white; background-color: #008100;"> Loop </span> road</span> as the destination in '''Jamestown'''.<br><br> |
 SAR Peterborough Narrow Gauge Scenarios Tutorial