| |
|
|
 |
 |
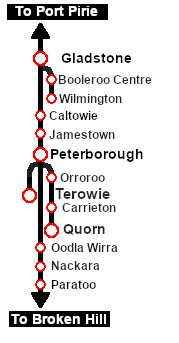
Enhanced Interlocking Towers (EITs) are included in the SAR Peterborough Base Session (they are not part of the route or layout) to provide easier navigation in some of the more complex yards in the layout. The EITs provide paths into and out of the yards. In some cases they also provide direct paths through the yards.
 |
EITs are optional, they do not have to be used |
EITs are setup at the following locations:-
- Gladstone Down - to provide paths out of Gladstone in the directions of Jamestown and the Wilmington Line.
- Gladstone Up - to provide paths into Gladstone from the directions of Jamestown and the Wilmington Line.
- Caltowie - to provide paths into, out of and through Caltowie from the directions of Gladstone and Peterborough.
- Jamestown - to provide paths into, out of and through Jamestown from the directions of Gladstone and Peterborough.
- Peterborough West - to provide paths into and out of Peterborough from the directions of Gladstone and Quorn.
- Peterborough East - to provide paths into and out of Peterborough from the directions of Terowie and Paratoo.
- Paratoo - to provide paths into and out of Paratoo from the direction of Peterborough.
- Terowie - to provide paths into and out of Terowie from the direction of Peterborough.
- Orroroo - to provide paths into, out of and through Orroroo from the directions of Peterborough and Quorn.
- Carrieton - to provide paths into, out of and through Carrieton from the directions of Peterborough and Quorn.
- Quorn - to provide paths into and out of Quorn from the direction of Peterborough.
Gladstone and Peterborough have each been split into two EITs because of the large number of paths at each location.
|
 |
Driver Commands are available for use in the session.
|
Driver Commands are optional, they do not have to be used |
Apart from the standard commands (Drive To, Load, Unload, Couple, Wait For, etc), additional commands have been added. Specifically:-
- IT SetPath (TANE SP4 and later) - to allow EIT paths to be set in the Driver Command Bar
- IT CancelEnhancedPath (TANE SP4 and later) - to cancel any set EIT path
- Instant Load Command - to instantly load all wagons (except locos) with the first item in their product queues
- InstantLoadLocos - to instantly load all locos (or their tenders) with water and either coal or bunker c oil
- InstantUnload - to instantly unload all wagons (except locos)
|
The Tutorial Scenario
The scenario used in this tutorial is  Gladstone-Peterborough Depot Fuel which has the consist already fully assembled with its locomotive (T 258) at the starting signal of the Gladstone EIT Goods Loop to Broken Hill path. This tutorial will follow the scenario until the consist arrives at Jamestown. Gladstone-Peterborough Depot Fuel which has the consist already fully assembled with its locomotive (T 258) at the starting signal of the Gladstone EIT Goods Loop to Broken Hill path. This tutorial will follow the scenario until the consist arrives at Jamestown.
Getting Started:
|
After starting the SAR Peterborough Base Session find the loco and its consist. Either:-
- Open the Finder Tool (press CTRL-F) and type, in the name field, the name of the loco, SAR T 258 (or just T 258 should be enough). Click the tick icon, OR
- Open the Driver List (bottom left of the screen) and select the loco from there - click the drivers Eye icon to jump to the loco.
|
|
The Driver Command Bar
|
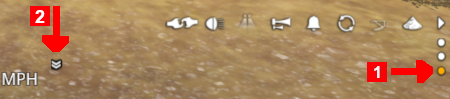
Make sure that the Driver Command Bar is visible on the screen. In Driver Mode the interactive driver controls are at the bottom right of the screen.
|
 |
 |
Cycle Through the Command States
Click the 3 dots on the extreme bottom right of the screen to cycle the control display through to the Driver Command Bar - stop when the last of the 3 dots is highlighted. |
|
 |
Open the Driver Command Menu
Click on the chevron icon to open the command menu. |
|
|
If you don't want to use EITs then go straight to Step 2 |
|
Step
 |
Using the Gladstone EIT
The first path to be set in this tutorial is from the Gladstone Goods Loop to Broken Hill . On the Gladstone  page (link via page (link via  - link will open in this window) this is identified on that page as:- - link will open in this window) this is identified on that page as:-

From the open Driver Command Menu, select the IT SetPath (TANE SP4 and later) option. This will open a list of all the EITs that have been placed in the Session. Because an EIT Starting Signal, in this case invisible signal GSX G27D, is directly in front of the loco, the signal will be included in the EIT list.
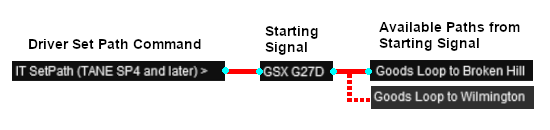 |
Select the starting signal GSX G27D . This will reveal that two different paths out of Gladstone start from this signal.
- Goods Loop to Broken Hill , and
- Goods Loop to Wilmington
|
Select the path Goods Loop to Broken Hill .
Every path is named according to its starting point (one of six "outside" locations or a track in the local yard) and its destination (one of six "outside" locations or a track in the local yard). The six "outside" locations are Port Pirie, Broken Hill, Terowie, Quorn, Wilmington and Peterborough. Those locations may not be the destination or starting point of the consist and they indicate the direction of travel only.
|
Selecting a path to or from an outside location will NOT set the entire path to/from that location (e.g. all the way to Broken Hill). It will only set the path between the Starting Signal and the Exit Signal. Either both signals will be just outside the yard or one will be within the yard and the other just outside |
 |
The path has now been set.
All junction switches and signals along the selected path from the Start Signal (GSX G27D) to the Exit Signal (Gladstone Home Up) are set to give loco T 258 the road out of Gladstone towards Broken Hill.
Note: not all signals will automatically show Proceed once the path has been set. Some signals, semaphore signals for example, will only show Proceed when a train starts moving towards the signal. |
Once the path has been set, use the Driver Speed Dial, the keyboard controls (W, S, X), advanced on screen controls, or the AI to drive the train out of Gladstone Yard to Caltowie.
Cancelling a Set EIT Path
Paths that have been set can be cancelled so that their signals and junction switches will be returned to their previous states.
Set paths are automatically returned to their initial states after the consist has cleared the Exit Signal, but if you change your mind and decide to take a different path or not use the EITs then a set path can be cancelled.
From the Driver Command Menu select the IT CancelEnhancedPath command.

You will have the option of cancelling ALL PATHS or selecting a particular EIT and path to cancel.
|
|
| |
| |
|
| |
Step
 |
Driving From Gladstone to Caltowie
|
There is a minor location, Yangya, between Gladstone and Caltowie but it has no EIT, minimal yard infrastructure, no visible signals and its switches are set for the main line through to Caltowie |
You have two options for driving to Caltowie, the next EIT location. Manual and AI control.
Manual Control
You can manually drive the train through to Caltowie without using the EIT (as described in Step 1 above). This requires that all the switches along the path are correctly set first. You can do this by manually using the information on the Gladstone  page (link via - link will open in this window). page (link via - link will open in this window).
|
 |
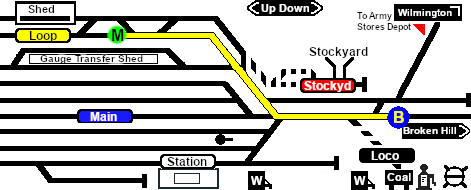
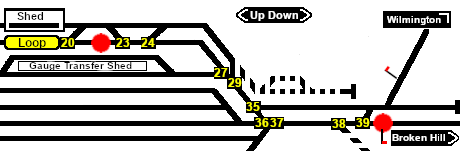
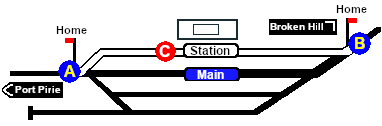
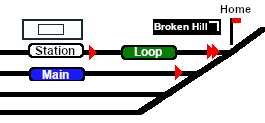
Part of this page is shown left with only those switches relevant to this tutorial scenario. The red dots indicate the yard Start and Exit positions for the train path.
Also shown left below is the Switch Set data, taken from the same page, for the path Gladstone Goods Loop to Broken Hill . The switch directions, L or R are the directions when facing the junction fork i.e. the L and R that determine which direction a train will take when passing over the junction.
Switch 20 does not need to be set as the consist is beyond the switch. |
You can now use the Driver Speed Dial or the keyboard controls (W, S, X) to drive the train out of Gladstone Yard to Caltowie. Alternatively, for those with advanced steam loco driving skills, you can take control of the throttle, brake and other various devices in the loco cab.
AI Control
You can also drive by adding Driver Commands directly into the Driver Command Bar on the bottom right of the screen. The Drive To, Drive to Trackmark, Drive via commands that will automatically set all the switches are available in all scenarios for your use. A large number of track marks and some industies have been added to provide destinations for these commands.
The approach to every location in the route has  Track Marks added to allow you to let the AI do most of the driving work. Track Marks added to allow you to let the AI do most of the driving work.
|
All locations in the route have Approach Track Marks placed a short distance ahead of the approach or Home signals, both visible and invisible, that protect the yard entry point |
|
Locations that do not have visible Home signals (and many of the locations do not) then a visible Caution track sign has been placed alongside the track at the position of the Approach Track Mark as a stopping guide if you are driving manually |
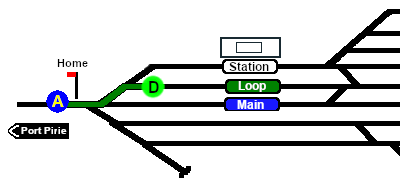
The Track Marks are shown on the Caltowie  page (link via - link will open in this window). page (link via - link will open in this window).
|
|
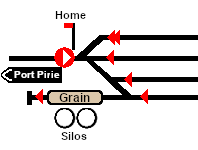
Part of this page is shown left. The approach track mark on the Port Pirie side is Caltowie Main Approach Dn. This is also identified in the data table, also copied from the same page, shown below.

From the Driver Command Menu select the command Drive To Trackmark then find and select the track mark Caltowie Main Approach Dn .
|
 |
Using the Drive commands in yards with many switches, such as Gladstone, will work but the consist will display a "stop-start" motion as it slowly navigates its way through the switches. If you use the EIT to set the path first then use the Drive commands, the consist will move without any delays. |
|
|
| |
| |
|
|
If you don't want to use EITs then go straight to Step 4 |
|
Step
 |
Using the Caltowie EIT
Caltowie does not have a coal stage or a fuel oil store in need of a refill so the consist will not be stopping here. A through path is the best option.
 |
You can set an EIT path without having to be directly in front of a Starting Signal. For example, you can set all the EIT paths for the train through Caltowie and into Jamestown before you even leave Gladstone.
|
|
To set a path for a distant EIT, open the Driver Command Menu and select the IT SetPath (TANE SP4 and later) option. Then select the required EIT and path from the lists. This can be repeated for as many EITs as needed along the path of the train. |
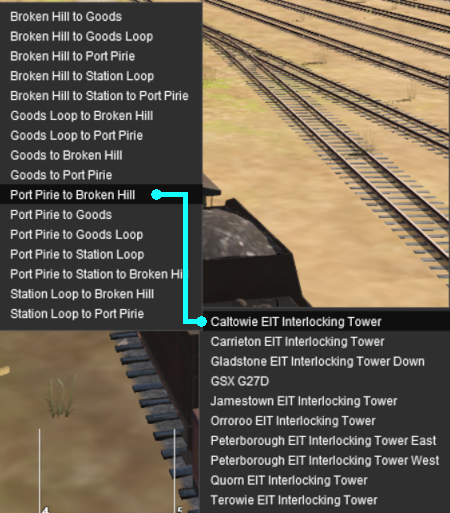 |
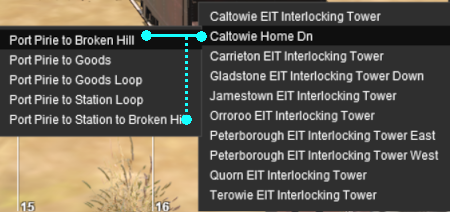
Open the Driver Command Menu and select the IT SetPath (TANE SP4 and later) option. Then select the Caltowie EIT Interlocking Tower . This will open a list of ALL the EIT paths controlled by the Caltowie EIT, including any paths that will not be directly accessable to your consist.
On the Caltowie page (link via - link will open in this window) the path we will select is identified as:-

Select the path Port Pirie to Broken Hill . This will set a direct path, via the Main Line, through Caltowie Yard and out towards Broken Hill.
You could also select any of the Port Pirie to ... paths. The only other through path is Port Pirie to Station to Broken Hill which will take you through the yard via the Station. The other Port Pirie to ... paths will take you into the yard but will not provide a set path out. You will need to select and set the appropriate ... to Broken Hill path to exit the yard.
|
 |
If you have manually driven to the Caltowie Home Dn signal (or used the AI Drive To Trackmark Caltowie Main Approach Dn command) then open the Driver Command Menu. The name of the Start Signal Caltowie Home Dn will appear in the EIT list. |
 |
Select Caltowie Home Dn . This will open a list of all its assigned paths.
Select the through path you want, for example Port Pirie to Broken Hill or Port Pirie to Station to Broken Hill .
Path via Caltowie Station
|
Once the path has been set, use the Driver Speed Dial, the keyboard controls (W, S, X), advanced on screen controls, or the AI to drive the train through Caltowie Yard to Jamestown.
|
|
| |
| |
|
| |
Step
 |
Driving Through Caltowie to Jamestown
Caltowie does not have a coal stage or a fuel oil store in need of a refill so the consist will not be stopping here. A through path is the best option.
Manual Control
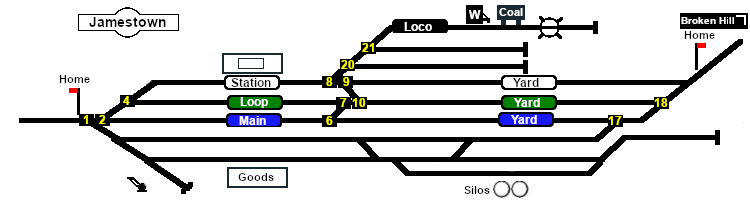
To manually drive the train through Caltowie to Jamestown without using the EIT you will have to manually set all the switches yourself using the information on the Caltowie page (link via - link will open in this window).
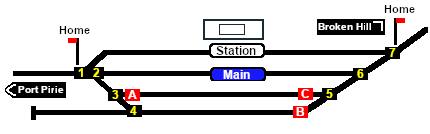 |
Because Caltowie is a fairly simple yard, the switch sets are not complex.
- Port Pirie to Broken Hill via Main - 1 -R 2 -L 6 -R 7 -L
- Port Pirie to Broken Hill via Station - 1 -L 7 -R
Once the switches have been set, use the Driver Speed Dial, the keyboard controls (W, S, X), advanced on screen controls, or the AI to drive the train through Caltowie.
|
Catchpoints
Notice that the Switch Track Diagram above shows three switches in red with letters as IDs - A B C .
These special switches are identified on the Caltowie page as Catch Points which are also known as Derails. They are designed to derail runaway wagons and prevent them from fouling the running lines. Most yards in the route have at least one Catch Point.

The information above shows that the default position of the Catch Points, the first direction setting shown as an (L) or an (R), is set to Catchpoint which is the Derail position.
|
If you are manually driving through a yard, then you MUST correctly set each Catchpoint on your path yourself otherwise your train will DERAIL |
|
If you are using EITs or the AI Drive commands to navigate through a yard, then any Catchpoints along the path of your train will be automatically set to allow the train to safely pass. |
 |
|
 |
|
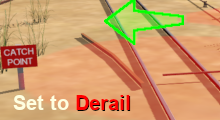 |
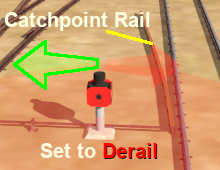
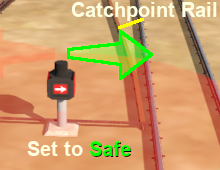
TheCatchpoint Indicator used in major yards have mechanical indicators. Smaller yards use a simplier version with just a static sign.
|
The Catchpoint switch green arrow MUST point to the opposite side of the track from the Catchpoint Rail for the Catchpoint to be safe to cross. |
|
AI Control
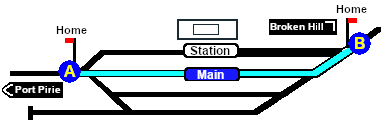
After reaching Caltowie you can use the Track Marks placed in the yard to navigate your way through. The track marks are shown on the Caltowie page (link via - link will open in this window) with a section containing a few that are relevant to this tutorial reproduced below with a secion of the Track Mark details from the same page.
 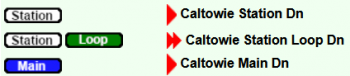
All stations on the route have track marks, including the passenger enabled stations. This allows you to use the Drive To Trackmark command to reach any passenger station. The track marks are named using the name of the station (e.g. Caltowie), the word Station and the direction of travel, Up or Dn. So Caltowie has the station track marks Caltowie Station Dn and Caltowie Station Up (not shown above).
|
Most stations on the route are NOT passenger enabled which reflects the level of passenger traffic that existed at those locations. The Drive To Trackmark command has to be used to bring a train alongside these stations when using the AI |
|
The  page at each location () will show the status of each station page at each location () will show the status of each station |
You have a number of options for using the AI to navigate through the yard to the other side:-
- Drive To Trackmark Jamestown Main Approach Dn which will ignore the Caltowie track marks and the AI will select its own logical route through the yard on its way to Jamestown
- Drive To Trackmark Caltowie Station Loop Dn will force the train to travel via the Station to the end of the Station Loop . This should be followed by a Drive To Trackmark Jamestown Main Approach Dn to reach Jamestown
- Drive To Trackmark Caltowie Main Dn will force the train to travel to the end of the Main Line. This should be followed by a Drive To Trackmark Jamestown Main Approach Dn to reach Jamestown
- The two options above could also use Drive Via Trackmark for their first command.
|
|
| |
| |
|
|
If you don't want to use EITs then go straight to Step 6 |
|
Step
 |
Using the Jamestown EIT
Jamestown is the final destination of this tutorial but the Gladstone-Peterborough Depot Fuel Scenario continues on to Peterborough.
In this tutorial scenario, we will be using the path into the Loop road. The Jamestown page (link via - link will open in this window) shows all the EIT paths into and out of Jamestown.
The Jamestown page identifies the path as 
- Open the Driver Command Menu and select the IT SetPath (TANE SP4 and later) option.
- If you prefer to set the path into Jamestown well before arriving, then Jamestown EIT Interlocking Tower will appear in the EIT list. Select this EIT.
- If you have manually driven to the Jamestown Home Dn signal (or used the AI Drive To Trackmark Jamestown Main Approach Dn command) then the Start Signal Jamestown Home Dn will appear in the EIT list. Select this Start Signal.
- In either case, the path name Port Pirie to Loop will appear in the list of available or assigned paths. Select this path.
 |
The path has now been set
All that remains now is to use the Driver Speed Dial, the keyboard controls (W, S, X), advanced on screen controls or the AI to drive the train into Jamestown Loop and halt at the end of the loop.
This ends the tutorial but you can continue the Gladstone-Peterborough Depot Fuel Scenario.
|
|
|
| |
| |
|
| |
Step
 |
Driving into Jamestown
Jamestown is the final destination of this tutorial but the Gladstone-Peterborough Depot Fuel Scenario continues on to Peterborough. We will be using the Loop road as the destination in Jamestown.
Manual Control
As at Gladstone and Caltowie, all the switches will have to be set manually. The Jamestown page (link via - link will open in this window) shows all the switches into Jamestown and their settings.
 |
The required Switch Set is identified on the Jamestown page as

Use the Driver Speed Dial, the keyboard controls (W, S, X) or the advanced on screen controls to drive the train into Jamestown Loop and halt at the end of the loop.
|
AI Control
The Jamestown page (link via - link will open in this window) shows all the Jamestown track marks.
 |
|
The important Track Marks for this tutorial scenario are identified on the Jamestown page as

From the open Driver Command Menu select the Drive To Trackmark command which will open up a long alphabetical list of track marks. Find and select the track mark Jamestown Loop Dn .
Use the Driver Speed Dial, the keyboard controls (W, S, X), the advanced on screen controls or the AI to drive the train into Jamestown Loop and halt at the end of the loop.
|
This ends the tutorial but you can continue the Gladstone-Peterborough Depot Fuel Scenario.
|
|
| |
| |
This page was created by Trainz user pware in March 2021 and was last updated as shown below.
|


