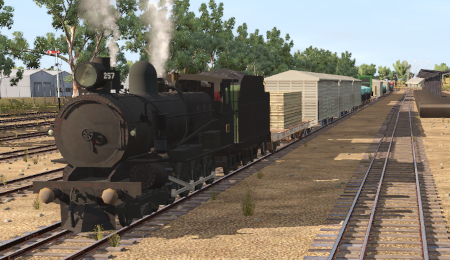
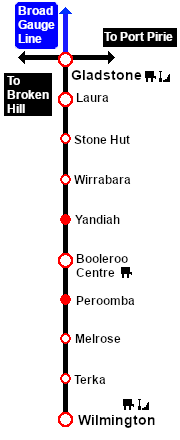
| A drop off and pickup freight service between Gladstone and Wilmington operating two days each week with an additional service terminating at Booleroo Centre. Options from the 1964 and 1982 timetables are available. |
 |
The Historical Bit
The 1964 Working Timetable for the Wilmington Line contained two weekly freight services through to Wilmington with an additional service terminating at Booleroo Centre. Additional services to Wilmington and Booleroo Centre would also run "when required".
The 1982 Working Timetable consisted of a single weekly freight service to Wilmington. By 1984 the freight and livestock facilities at most of the locations along the line had been permanently closed.
The line had no signals beyond Gladstone Yard and train order working was in operation. The line was closed in 1990 and the track has been removed. Most of the track right of way is now a walking and cycling Rail Trail. |
|

|
Each location in the layout has a detailed set of track diagrams that provide a variety of useful information
The Getting Started guide below gives a summary of what is available.
To display this information click any  graphic, or go to the bottom of the page for all the session links (all links will open in this window). graphic, or go to the bottom of the page for all the session links (all links will open in this window). |
Getting Started:
- If you have already closed the opening message window then the first step is to pause the session by pressing the P key.
- If you decide to set the session clock to a different starting time (for example: to match the train timetable shown below) then follow the instructions shown in the Orders section
- Next locate your loco. Either:-
- Open the Finder Tool (press Ctrl F ) and type, in the Name field, the name of the loco, in this case SAR T 257 or SAR 865 (or just T 257 or 865 should be enough). Click the tick icon, OR
- Open the Driver List (bottom left of the screen) and then scroll through the list to find either:-
- the loco name (SAR T 257 or SAR 865) OR
- the driver icon (named Driver 257 or Driver 868) - this is a non-animated icon
- then click the drivers Eye icon
 to take control of the loco to take control of the loco
- Take a few moments to get your bearings. Click
 (this link will open in this window) to show the location details and track plans for Gladstone. In each location details page:- (this link will open in this window) to show the location details and track plans for Gladstone. In each location details page:-
- the
 tab gives an overall summary of each location with a "potted" history (where available). tab gives an overall summary of each location with a "potted" history (where available).
- the
 tab reveals the invisible tab reveals the invisible  Track Marks for Drive To commands. Track Marks for Drive To commands.
- the
 tab lists all active industries and their commodities. tab lists all active industries and their commodities.
- the
 tab describes the names, locations and settings of all junction switches as well as some switch sets you may want to use. tab describes the names, locations and settings of all junction switches as well as some switch sets you may want to use.
- Each location details page has direct links to the adjacent locations so you can explore along the route.
- When you are ready to start, reload the Peterborough Base Session page (click the Scenarios button on your current location page) and select this Scenario again or just use the Back button on your browser - whichever is quicker.
- Switch back to Trainz Driver Mode
- Close the opening message window and, if Pause is shown on the screen, press the P key to start the session.
|
|
Tutorial:
 |
A tutorial on using these scenarios is provided in the link on the left. The link will open in this window |
|
Orders:
- Select a loco (SAR T 257 or SAR 865). For loco SAR 865 move to the Transfer Narrow Gauge Road and attach to the waiting consist
- Proceed onto the Wilmington Line stopping as required in the working timetable shown below
- Position QLX wagons at the Goods Sheds , MTW flat wagons at the Goods Cranes
- Leave each wagon at its unloading point
- Train 221 terminates at Booleroo Centre. Turn the loco on the WYE and take water if required
- Train 220 continues to Wilmington stopping as required. Turn the loco on the WYE and take coal and water if required
- Train 605 runs non-stop to Booleroo Centre then continues non-stop to Wilmington. At Wilmington turn the loco on the WYE
- Return to Gladstone stopping to collect wagons at each location
|
 |
| Gladstone-Wilmington Freight Timetable |
| |
Year
Days |
|
|
1964
M F |
1964
W |
|
|
1982
F |
|
|
|
|
| |
Loco
Train № |
T Class
220 |
T Class
221 |
D830
605 |
|
|
| Gladstone Depot |
CEFJØWX |
dep |
|
|
01:25 |
|
| Goods Transfer |
dep |
|
|
01:30A |
Attach to consist at Goods Transfer platform |
| Yard |
dep |
07:25 |
07:25 |
|
|
| Laura |
ΔUX |
arr |
07:44D |
07:44D |
.. |
Detach designated wagons |
| |
dep |
07:50 |
07:50 |
|
|
| Stone Hut |
X |
arr |
08:03 |
08:04D |
.. |
(221) Detach designated wagons |
| |
dep |
|
08:10 |
|
|
| Wirrabara |
X |
arr |
08:17D |
08:24D |
.. |
Detach designated wagons |
| |
dep |
08:23 |
08:30 |
|
|
| Yandiah |
|
arr |
8:39 |
08:46D |
.. |
(221) Detach designated wagons |
| |
dep |
|
08:52 |
|
|
| Booleroo Centre |
ΔWX |
arr |
08:55wD |
09:08wD |
02:35D |
Detach designated wagons. (221) Turn loco |
|
|
| dep |
09:05 |
|
02:55 |
| Peroomba |
|
arr |
09:18D |
|
.. |
Detach designated wagons |
| dep |
09:24 |
|
|
|
| Melrose |
X |
arr |
09:36D |
|
.. |
Detach designated wagons |
| dep |
09:42 |
|
|
|
| Terka |
|
arr |
10:01D |
|
.. |
Detach designated wagons |
| dep |
10:07 |
|
|
|
| Wilmington |
ΔCEWX |
arr |
10:17cwD |
|
03:45D |
Detach designated wagons, Turn loco |
|
| Train № |
620 |
621 |
668 |
|
|
| Wilmington |
A |
|
A |
Attach MTW and QLX wagons |
| dep |
14:10 |
|
17:00 |
|
| Terka |
arr |
14:21A |
|
.. |
Attach MTW and QLX wagons |
| |
dep |
14:27 |
|
|
|
| Melrose |
arr |
14:43A |
|
.. |
Attach MTW and QLX wagons |
| |
dep |
14:49 |
|
|
|
| Peroomba |
arr |
15:01A |
|
.. |
Attach MTW and QLX wagons |
| |
dep |
15:07 |
|
|
|
| Booleroo Centre |
arr |
15:19wA |
|
18:00A |
Attach MTW and QLX wagons |
|
|
| dep |
15:40 |
12:45A |
18:10 |
|
| Yandiah |
arr |
15:55 |
13:01A |
.. |
(621) Attach MTW and QLX wagons |
| |
dep |
|
13:07 |
|
|
| Wirrabara |
arr |
16:11A |
13:23A |
.. |
Attach MTW and QLX wagons |
| |
dep |
16:17 |
13:29 |
|
|
| Stone Hut |
arr |
16:31 |
13:43A |
.. |
(621) Attach MTW and QLX wagons |
| |
dep |
|
13:49 |
|
|
| Laura |
arr |
16:45A |
14:03A |
.. |
Attach MTW and QLX wagons |
| |
dep |
16:51 |
14:10 |
|
|
| Gladstone Yard |
arr |
17:10D |
14:30D |
19:30D |
Detach wagons |
| |
Depot |
arr |
cwS |
cwS |
S |
Service and stable loco |
|
|
|
| bold time = arrive/depart time |
plain time = timing point |
| Service Symbols: |
| L Load |
U Unload |
A Attach wagons |
D Detach wagons |
| S Stable loco |
a on request stop |
c coal (if required) |
w water (if required) |
| Location Symbols: |
| Δ = Turning Triangle |
C = Loco Coal Loader |
E = Engine Depot |
F = Fixed Signals |
| J = Junction |
Ø = Loco Turntable |
W = Loco Water Tank |
X = Crossing Loop |
|
|
|
This page was created by Trainz user pware in February 2021 and was last updated as shown below.