SAR Scenario Terowie Shunter
m |
m |
||
| (6 intermediate revisions by one user not shown) | |||
| Line 15: | Line 15: | ||
</tr> | </tr> | ||
</table> <!-- END Title and summary tables --> | </table> <!-- END Title and summary tables --> | ||
| + | ----- | ||
| + | <span style="font-weight: 700; font-size: 15px; color: white; background-color: black;"> The Historical Bit </span><br> | ||
| + | |||
| + | '''Terowie's''' only role was as a change of gauge location. Passengers and freight from '''Adelaide''' arrived from the south on the '''broad gauge (5ft 3in)''' line and were transferred to wagons on the '''narrow gauge (3ft 6in)''' line to continue north to '''Peterborough''' and onto destinations on the '''Broken Hill''', '''Trans Continental''' and '''Central Australia''' lines. The reverse arrangement applied to traffic travelling south to '''Adelaide'''.<br> | ||
| + | |||
| + | Passengers simply moved from one platform across to another at the station. Goods and livestock were manually moved from wagons of one gauge on one side of a transfer platform to wagons of the other gauge on the other side, or by gantry crane from one train to the other. Much later a bogie exchange system was introduced to help eliminate the manual handling of freight. By 1970 the broad gauge line was extended to '''Peterborough''' and the role and importance of '''Terowie''' was greatly reduced. By 1988 the line from '''Adelaide''' to '''Peterborough''' was closed. | ||
| + | |||
----- | ----- | ||
<table width=1000> <!-- BEGIN Scenario image and loco/consist table --> | <table width=1000> <!-- BEGIN Scenario image and loco/consist table --> | ||
| Line 32: | Line 39: | ||
<td><span style="font-size: 15px; font-weight: 700; color: white; background-color: black;"> Loco: </span></td> | <td><span style="font-size: 15px; font-weight: 700; color: white; background-color: black;"> Loco: </span></td> | ||
<td>'''[[SAR_Scenario_Rolling_Stock#SAR_T_Class|SAR T 198]]''' at <span style="font-weight: 700;">Terowie <span style="color: white; background-color: black;"> Loco </span> Depot</span><br> | <td>'''[[SAR_Scenario_Rolling_Stock#SAR_T_Class|SAR T 198]]''' at <span style="font-weight: 700;">Terowie <span style="color: white; background-color: black;"> Loco </span> Depot</span><br> | ||
| − | '''Other | + | '''Other Available Locos:''' [[image:Loco_Roster_Label.png|link=SAR Peterborough Division Loco Roster]] |
*'''[[SAR_Scenario_Rolling_Stock#SAR_T_Class|SAR T 231]]''' at <span style="font-weight: 700;">Terowie <span style="color: white; background-color: black;"> Loco </span> Depot</span></td> | *'''[[SAR_Scenario_Rolling_Stock#SAR_T_Class|SAR T 231]]''' at <span style="font-weight: 700;">Terowie <span style="color: white; background-color: black;"> Loco </span> Depot</span></td> | ||
</tr> | </tr> | ||
| Line 70: | Line 77: | ||
# Each location details page has direct links to the adjacent locations so you can explore along the route. | # Each location details page has direct links to the adjacent locations so you can explore along the route. | ||
# When you are ready to start, reload the '''Peterborough Base Session''' page (click the '''Scenarios''' button on your current location page) and select this '''Scenario''' again or just use the '''Back''' button on your browser - whichever is quicker. | # When you are ready to start, reload the '''Peterborough Base Session''' page (click the '''Scenarios''' button on your current location page) and select this '''Scenario''' again or just use the '''Back''' button on your browser - whichever is quicker. | ||
| − | # Switch back to ''' | + | # Switch back to '''Driver Mode''' and either close the opening message window or press the <span style="font-weight: 700; font-size: 15px; color: white; background-color: black;"> P </span> key to start the session. |
</td> | </td> | ||
</tr> | </tr> | ||
| Line 91: | Line 98: | ||
</table> <!-- END Blue Border for Tutorial table --> | </table> <!-- END Blue Border for Tutorial table --> | ||
<br> | <br> | ||
| − | <table width=1000> <!-- BEGIN Yard (if | + | <table width=1000> <!-- BEGIN Yard (if applicable), Orders, Strip Map and Driving Notes tables --> |
<tr valign="top"> | <tr valign="top"> | ||
<td> | <td> | ||
| − | <table bgcolor= | + | <table bgcolor=#000000 width=820 cellpadding=2> <!-- BEGIN Black Border for Yard Table --> |
<tr valign="top"> | <tr valign="top"> | ||
| − | <td> | + | <td><span style="font-size: 15px; font-weight: 700; color: white">Yard Map:</span><br> |
| − | <span style="font-size: 15px; font-weight: 700; color: white | + | <table bgcolor=#ffffff width=816> <!-- BEGIN Yard Table --> |
| − | < | + | |
<tr valign="top"> | <tr valign="top"> | ||
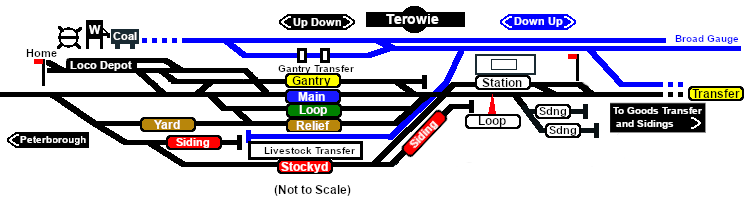
| − | <td align="center">[[image:SAR_Terowie.png|link=|alt=Terowie]]<br><br> | + | <td align="center">[[image:SAR_Terowie.png|link=|alt=Terowie Map]]<br><br> |
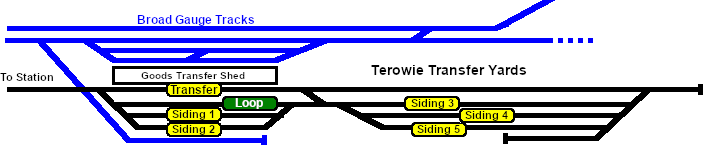
| − | [[image:SAR_Terowie_Yards.png|link=|alt=Yard map]]</td> | + | [[image:SAR_Terowie_Yards.png|link=|alt=Terowie Yard map]]</td> |
</tr> | </tr> | ||
<tr valign="top"> | <tr valign="top"> | ||
| Line 107: | Line 113: | ||
</tr> | </tr> | ||
</table> <!-- END Yard Map Table --> | </table> <!-- END Yard Map Table --> | ||
| + | </td> | ||
| + | </tr> | ||
| + | </table> <!-- END Black Border for Yard Table --> | ||
<br> | <br> | ||
| − | <table bgcolor=# | + | <table bgcolor=#000000 width=820 cellpadding=2> <!-- BEGIN Black Border for Orders Table --> |
<tr valign="top"> | <tr valign="top"> | ||
| − | <td> | + | <td><span style="font-size: 15px; font-weight: 700; color: white">Orders:</span><br> |
| − | <table width= | + | <table bgcolor=#e8e8e8 width=816> <!-- BEGIN Orders and Logo Table --> |
<tr valign="top"> | <tr valign="top"> | ||
| − | <td width= | + | <td width=716> |
# Move the loco out of the <span style="font-weight: 700;"><span style="color: white; background-color: black;"> Loco Depot </span></span> and run tender first past the <span style="font-weight: 700; color: black; background-color: white;"> Station </span> to the <span style="font-weight: 700;"><span style="color: black; background-color: yellow"> Goods Transfer </span> Sidings</span>. | # Move the loco out of the <span style="font-weight: 700;"><span style="color: white; background-color: black;"> Loco Depot </span></span> and run tender first past the <span style="font-weight: 700; color: black; background-color: white;"> Station </span> to the <span style="font-weight: 700;"><span style="color: black; background-color: yellow"> Goods Transfer </span> Sidings</span>. | ||
# Couple the loco to the rake of '''MTW''' flat wagons stored on the northern ('''Peterborough''') end of <span style="font-weight: 700; color: black; background-color: yellow;"> Goods Siding 2 </span>. | # Couple the loco to the rake of '''MTW''' flat wagons stored on the northern ('''Peterborough''') end of <span style="font-weight: 700; color: black; background-color: yellow;"> Goods Siding 2 </span>. | ||
| Line 128: | Line 137: | ||
<td width=100>[[image:SAR Train Order Rotated.png|100px|link=|alt=Logo]]</td> | <td width=100>[[image:SAR Train Order Rotated.png|100px|link=|alt=Logo]]</td> | ||
</tr> | </tr> | ||
| − | </table> | + | </table> <!-- END Orders and Logo Table --> |
</td> | </td> | ||
</tr> | </tr> | ||
| − | </table> | + | </table> <!-- END Black Border for Orders Table --> |
<br> | <br> | ||
<table cellpadding="2" bgcolor="black" width=820> <!-- BEGIN Black border for Driving Notes sub table --> | <table cellpadding="2" bgcolor="black" width=820> <!-- BEGIN Black border for Driving Notes sub table --> | ||
| Line 140: | Line 149: | ||
<td> | <td> | ||
*You have permission to pass semaphore signals at stop provided you are satisfied that the road ahead is clear. | *You have permission to pass semaphore signals at stop provided you are satisfied that the road ahead is clear. | ||
| + | *When driving manually in yards, you are responsible for correctly setting any '''catch points'''. | ||
</td> | </td> | ||
</tr> | </tr> | ||
Revision as of 17:30, 25 June 2022
| 14 Terowie Shunter | ||
| A scenario in the SAR Peterborough Base Session | ||
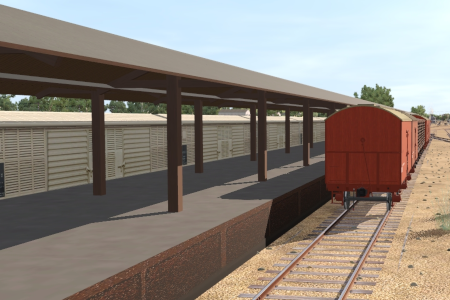
| Shunting operations in Terowie Yard. |
The Historical Bit
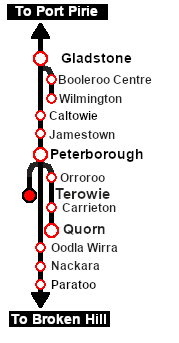
Terowie's only role was as a change of gauge location. Passengers and freight from Adelaide arrived from the south on the broad gauge (5ft 3in) line and were transferred to wagons on the narrow gauge (3ft 6in) line to continue north to Peterborough and onto destinations on the Broken Hill, Trans Continental and Central Australia lines. The reverse arrangement applied to traffic travelling south to Adelaide.
Passengers simply moved from one platform across to another at the station. Goods and livestock were manually moved from wagons of one gauge on one side of a transfer platform to wagons of the other gauge on the other side, or by gantry crane from one train to the other. Much later a bogie exchange system was introduced to help eliminate the manual handling of freight. By 1970 the broad gauge line was extended to Peterborough and the role and importance of Terowie was greatly reduced. By 1988 the line from Adelaide to Peterborough was closed.
 |
|
||||||||||
Getting Started:
|
Tutorial:
|
|
|


| Links: All links will open in this window | ||||||||
 Session Scenarios |
 Location List |
 Drive Tutorial |
 Rolling Stock |
 Loco Roster |
 Active Industries |
|||
This page was created by Trainz user pware in February 2021 and was last updated as shown below.