SAR Scenario Quorn-Peterborough Empty Fuel
From TrainzOnline
(Difference between revisions)
m |
m |
||
| (36 intermediate revisions by one user not shown) | |||
| Line 1: | Line 1: | ||
| − | <table width=1000> <!-- BEGIN Title | + | <!-- V1.0 --> |
| + | <table width=1000> <!-- BEGIN Title table --> | ||
<tr valign="top"> | <tr valign="top"> | ||
| − | <td width= | + | <td width=50 align="left">[[image:ArrowLeftBtn.png|link=SAR Scenario Quorn-Peterborough Freight|30px]]</td> |
| + | <td width=900 align="center"><span style="font-size: 21px; font-weight: 700;"> <span style="background-color: black; color: white;"> 8 </span> <span style="background-color: black; color: white;"> Quorn to Peterborough Empty Fuel </span></span></td> | ||
| + | <td width=50 align="right">[[image:ArrowRightBtn.png|link=SAR Scenario Paratoo Mixed Passenger Freight|30px]]</td> | ||
</tr> | </tr> | ||
<tr valign="top"> | <tr valign="top"> | ||
| − | <td align="center" colspan= | + | <td align="center" colspan=3>A scenario in the '''[[SAR Peterborough Base Session]]'''</td> |
</tr> | </tr> | ||
| + | </table> <!-- END Title table --> | ||
| + | <table width=1000> <!-- BEGIN Summary table --> | ||
<tr valign="top"> | <tr valign="top"> | ||
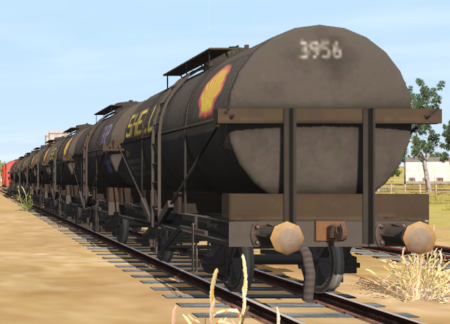
<td align="left">Through freight from '''Quorn''' to '''Peterborough''' moving empty fuel cars from '''Quorn''' and '''Port Augusta''' to '''Peterborough''' where they will be attached to a freight for return to '''Port Pirie'''.</td> | <td align="left">Through freight from '''Quorn''' to '''Peterborough''' moving empty fuel cars from '''Quorn''' and '''Port Augusta''' to '''Peterborough''' where they will be attached to a freight for return to '''Port Pirie'''.</td> | ||
<td align="right">[[file:BackToBottom.png|link=#bottom|alt=Bottom|Bottom]]</td> | <td align="right">[[file:BackToBottom.png|link=#bottom|alt=Bottom|Bottom]]</td> | ||
</tr> | </tr> | ||
| − | </table> <!-- END | + | </table> <!-- END Summary Tables --> |
----- | ----- | ||
<table width=1000> <!-- BEGIN Scenario image and loco/consist table --> | <table width=1000> <!-- BEGIN Scenario image and loco/consist table --> | ||
| Line 16: | Line 21: | ||
<td width=450>[[image:SAR Quorn Oil Run.png|link=|alt=Oil Run]]</td> | <td width=450>[[image:SAR Quorn Oil Run.png|link=|alt=Oil Run]]</td> | ||
<td> | <td> | ||
| − | <table width=550> <!-- BEGIN Loco/consist sub table --> | + | <table width=550 bgcolor="black"> <!-- BEGIN Loco/consist sub table --> |
<tr valign="top"> | <tr valign="top"> | ||
| − | <td width=75><span style="font-size: 15px; font-weight: 700; color: white; background-color: black;"> | + | <td> |
| − | <td> | + | <table width=546 bgcolor="white"> |
| + | <tr valign="top"> | ||
| + | <td width=75><span style="font-size: 15px; font-weight: 700; color: white; background-color: black;"> Era: </span></td> | ||
| + | <td>'''1920s to 1950s'''</td> | ||
</tr> | </tr> | ||
<tr valign="top"> | <tr valign="top"> | ||
| − | <td><span style="font-size: 15px; font-weight: 700; color: white; background-color: black;"> | + | <td><span style="font-size: 15px; font-weight: 700; color: white; background-color: black;"> Duration: </span></td> |
| − | <td>''' | + | <td>'''3 hours'''</td> |
| − | + | ||
| − | + | ||
</tr> | </tr> | ||
<tr valign="top"> | <tr valign="top"> | ||
| − | <td><span style="font-size: 15px; font-weight: 700; color: white; background-color: black;"> | + | <td><span style="font-size: 15px; font-weight: 700; color: white; background-color: black;"> Loco: </span></td> |
| − | <td> | + | <td>'''The [[image:Loco_Roster_Label.png|link=SAR Peterborough Division Loco Roster]] has locos available at the <span style="color: white; background-color: black;"> Quorn Loco Depot </span>''' |
| + | *'''[[SAR_Scenario_Rolling_Stock#SAR_T_Class|SAR T 51]]''' | ||
| + | *'''[[SAR_Scenario_Rolling_Stock#SAR_T_Class|SAR T 255]]''' | ||
| + | </td> | ||
</tr> | </tr> | ||
<tr valign="top"> | <tr valign="top"> | ||
| − | <td | + | <td><span style="font-size: 15px; font-weight: 700; color: white; background-color: black;"> Consist: </span></td> |
| − | < | + | <td>To be assembled into a consist |
| − | < | + | *8 '''[[SAR_Scenario_Rolling_Stock#Tank|Tank Fuel]]''' wagons at <span style="font-weight: 700;">Quorn <span style="color: black; background-color: yellow;"> Goods Sidings </span></span> |
| − | <td> | + | *1 '''[[SAR_Scenario_Rolling_Stock#Guard_Vans|Guard Van]]''' attached to wagons at <span style="font-weight: 700;">Quorn <span style="color: black; background-color: yellow;"> Goods Sidings </span></span> |
| − | [[ | + | *4 '''[[SAR_Scenario_Rolling_Stock#Tank|Tank Fuel]]''' wagons at <span style="font-weight: 700;">Quorn <span style="color: white; background-color: black;"> Fuel </span> Siding</span>. |
| − | + | </td> | |
| − | < | + | |
| − | + | ||
</tr> | </tr> | ||
| − | </table | + | </table> |
</td> | </td> | ||
</tr> | </tr> | ||
| Line 48: | Line 55: | ||
</tr> | </tr> | ||
</table> <!-- END Scenario image and loco/consist table --> | </table> <!-- END Scenario image and loco/consist table --> | ||
| − | + | <table bgcolor="lightcyan" width=1000> <!-- BEGIN Location Data table --> | |
| + | <tr> | ||
| + | <td> | ||
| + | [[Image:Location Index.png|link=SAR Index|alt=Location Index|Location Index]] | ||
| + | </td> | ||
| + | <td>'''Each location in the layout has a detailed set of track diagrams that provide a variety of useful information'''<br> | ||
| + | The <span style="font-weight: 700; color: white; background-color: black;"> Getting Started </span> guide below gives a summary of what is available.<br> | ||
| + | To display this information click any [[image:Line_Index_Label.png|link=SAR_Index|Location Index]] graphic, or go to the bottom of the page for all the session links (all links will open in this window).</td> | ||
| + | </tr> | ||
| + | </table> <!-- END Location Data table --> | ||
<table cellpadding="2" bgcolor="black" width=1000> <!-- BEGIN Black border for Getting Started table --> | <table cellpadding="2" bgcolor="black" width=1000> <!-- BEGIN Black border for Getting Started table --> | ||
<tr valign="top"> | <tr valign="top"> | ||
| Line 55: | Line 71: | ||
<tr valign="top"> | <tr valign="top"> | ||
<td> | <td> | ||
| − | # | + | # If you have already closed the opening message window then the first step is to pause the session by pressing the <span style="font-weight: 700; font-size: 15px; color: white; background-color: black;"> P </span> key. |
# Next locate your loco. '''Either''':- | # Next locate your loco. '''Either''':- | ||
| − | # | + | #*Open the '''Finder Tool''' (press <span style="font-weight: 700; font-size: 15px; color: white; background-color: black;"> Ctrl </span> <span style="font-weight: 700; font-size: 15px; color: white; background-color: black;"> F </span>) and type, in the '''Name''' field, the name of the loco, for example '''SAR T 51''' (or just '''T 51''' should be enough). Click the '''tick''' icon, '''OR''' |
| − | # | + | #*Open the '''Driver List''' (bottom left of the screen) and then scroll through the list to find the '''loco name''' ('''SAR T 51''') then click the drivers '''Eye''' icon [[image:Driver_Eye.png|link=]] to take control of the loco |
| − | # Take a few moments to get your bearings. | + | #*Open the '''Driver List''' (bottom left of the screen) and then scroll through the list to find '''either''':- |
| − | #*the [[image:Tab_TM_Grey.png|link=|75px]] tab | + | #:*the '''loco name''' ('''SAR T 51''') '''OR''' |
| − | #*the [[image:Tab_IN_Grey.png|link=|75px]] tab | + | #:*the '''driver''' icon (named '''Driver 51''') - this is a non-animated icon |
| − | #*the [[image:Tab_SW_Grey.png|link=|75px]] tab | + | #::then click the drivers '''Eye''' icon [[image:Driver_Eye.png|link=]] to take control of the loco |
| − | # Each location page has direct links to the | + | # Take a few moments to get your bearings. Click [[image:Line_Index_Quorn.png|link=SAR_Quorn|Quorn Data]] (this link will open in this window) to show the location details and track plans for '''Quorn'''. In each location details page:- |
| + | #*the [[image:Tab_HM_White.png|link=|75px]] tab gives an overall summary of each location with a "potted" history (where available). | ||
| + | #*the [[image:Tab_TM_Grey.png|link=|75px]] tab reveals the invisible [[image:Trackmark_Right.png|link=|alt=TM|8px]] '''Track Marks''' for '''Drive To''' commands. | ||
| + | #*the [[image:Tab_IN_Grey.png|link=|75px]] tab lists all active industries and their commodities. | ||
| + | #*the [[image:Tab_SW_Grey.png|link=|75px]] tab describes the names, locations and settings of all junction switches as well as some switch sets you may want to use. | ||
| + | # Each location details page has direct links to the adjacent locations so you can explore along the route. | ||
# When you are ready to start, reload the '''Peterborough Base Session''' page (click the '''Scenarios''' button on your current location page) and select this '''Scenario''' again or just use the '''Back''' button on your browser - whichever is quicker. | # When you are ready to start, reload the '''Peterborough Base Session''' page (click the '''Scenarios''' button on your current location page) and select this '''Scenario''' again or just use the '''Back''' button on your browser - whichever is quicker. | ||
| − | # Switch back to ''' | + | # Switch back to '''Driver Mode''' and either close the opening message window or press the <span style="font-weight: 700; font-size: 15px; color: white; background-color: black;"> P </span> key to start the session. |
</td> | </td> | ||
</tr> | </tr> | ||
| Line 77: | Line 98: | ||
<td><span style="font-size: 15px; font-weight: 700; color: white">Tutorial:</span><br> | <td><span style="font-size: 15px; font-weight: 700; color: white">Tutorial:</span><br> | ||
<table bgcolor="lightcyan" width=996> <!-- BEGIN Tutorial link table --> | <table bgcolor="lightcyan" width=996> <!-- BEGIN Tutorial link table --> | ||
| − | <tr valign=" | + | <tr valign="center"> |
<td width=70 align="right">[[image:SAR Tutorial.png|link=SAR Scenarios Tutorial|alt=Tutorial]]</td> | <td width=70 align="right">[[image:SAR Tutorial.png|link=SAR Scenarios Tutorial|alt=Tutorial]]</td> | ||
| − | <td width=750>A tutorial on using these scenarios is provided in the link on the left. The link will open in this window | + | <td width=750>'''A tutorial on using these scenarios is provided in the link on the left. The link will open in this window'''</td> |
</tr> | </tr> | ||
</table> <!-- END Tutorial link table --> | </table> <!-- END Tutorial link table --> | ||
| Line 86: | Line 107: | ||
</table> <!-- END Blue Border for Tutorial table --> | </table> <!-- END Blue Border for Tutorial table --> | ||
<br> | <br> | ||
| − | <table width=1000> <!-- BEGIN Yard (if | + | <table width=1000> <!-- BEGIN Yard (if applicable), Orders, Strip Map and Driving Notes tables --> |
<tr valign="top"> | <tr valign="top"> | ||
<td> | <td> | ||
| − | <table bgcolor= | + | <table bgcolor=#000000 width=820 cellpadding=2> <!-- BEGIN Black Border for Orders Table --> |
<tr valign="top"> | <tr valign="top"> | ||
| − | <td> | + | <td><span style="font-size: 15px; font-weight: 700; color: white">Orders:</span><br> |
| − | <span style="font-size: 15px; font-weight: 700; color: white | + | <table bgcolor=#e8e8e8 width=816> <!-- BEGIN Orders and Logo Table --> |
| + | <tr valign="top"> | ||
| + | <td width=716> | ||
# Move the loco from the <span style="font-weight: 700;"><span style="color: white; background-color: black;"> Loco </span> Depot</span> and onto the <span style="font-weight: 700;"><span style="color: white; background-color: black;"> Fuel </span> Siding</span> | # Move the loco from the <span style="font-weight: 700;"><span style="color: white; background-color: black;"> Loco </span> Depot</span> and onto the <span style="font-weight: 700;"><span style="color: white; background-color: black;"> Fuel </span> Siding</span> | ||
# Collect the 4 empty '''Tank''' wagons stored in the siding and move them to eastern ('''Peterborough''') end of the <span style="font-weight: 700;"><span style="color: black; background-color: white;"> Station </span></span> road. | # Collect the 4 empty '''Tank''' wagons stored in the siding and move them to eastern ('''Peterborough''') end of the <span style="font-weight: 700;"><span style="color: black; background-color: white;"> Station </span></span> road. | ||
| − | # Collect the 8 '''Tank''' wagons and the ''' | + | # Collect the 8 '''Tank''' wagons and the '''Guard Van''' stored in the <span style="font-weight: 700;"><span style="color: black; background-color: yellow;"> Goods Sidings </span></span>. |
| − | # Attach the 8 wagons and van to the western ('''Port Augusta''') end of the 4 wagons on the <span style="font-weight: 700;"><span style="color: black; background-color: white;"> Station </span></span> road so that the ''' | + | # Attach the 8 wagons and van to the western ('''Port Augusta''') end of the 4 wagons on the <span style="font-weight: 700;"><span style="color: black; background-color: white;"> Station </span></span> road so that the '''Guard Van''' is at the rear ('''Port Augusta''' end). |
| − | # Proceed to | + | # Proceed to <span style="font-weight: 700;">Peterborough <span style="color: black; background-color: cyan;"> Yard 1 </span></span>. Coal and water the loco at <span style="font-weight: 700;">Carrieton <span style="color: white; background-color: black;"> Loco Coal & Water </span> Stage</span> or other locations as required. |
| − | + | ||
</td> | </td> | ||
| + | <td width=100>[[image:SAR Train Order Rotated.png|100px|link=|alt=Logo]]</td> | ||
</tr> | </tr> | ||
| − | </table> <!-- END | + | </table> <!-- END Orders and Logo Table --> |
| + | </td> | ||
| + | </tr> | ||
| + | </table> <!-- END Black Border for Orders Table --> | ||
| + | <br> | ||
<table cellpadding="2" bgcolor="black" width=820> <!-- BEGIN Black border for Driving Notes sub table --> | <table cellpadding="2" bgcolor="black" width=820> <!-- BEGIN Black border for Driving Notes sub table --> | ||
<tr valign="top"> | <tr valign="top"> | ||
| Line 108: | Line 135: | ||
<tr valign="top"> | <tr valign="top"> | ||
<td> | <td> | ||
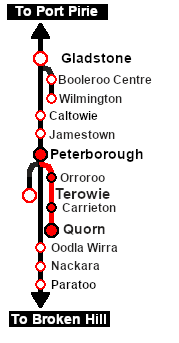
| + | A summary of the facilities and product loads at all locations along the line is provided in the link [[Image:SAR_Peterborough-Quorn_Line.png|link=SAR Peterborough-Quorn|alt=Port Peterborough-Quorn Line|Show Peterborough-Quorn Line]] | ||
*The approaches to all locations are protected by invisible signals to prevent the '''AI Half Speed Slowdown Problem''' when approaching a signal at stop. | *The approaches to all locations are protected by invisible signals to prevent the '''AI Half Speed Slowdown Problem''' when approaching a signal at stop. | ||
*Trackmarks and industries have been provided for AI '''Drive To Trackmark''', '''Drive via Trackmark''' and '''Drive to <span style="background-color: yellow;"> Industry </span>''' commands. Click [[image:Line_Index_Label.png|link=SAR_Index|Location Index]] for details. | *Trackmarks and industries have been provided for AI '''Drive To Trackmark''', '''Drive via Trackmark''' and '''Drive to <span style="background-color: yellow;"> Industry </span>''' commands. Click [[image:Line_Index_Label.png|link=SAR_Index|Location Index]] for details. | ||
| − | *Manual (no AI) driving is possible. | + | *Manual (no AI) driving is possible. As a visual driving aid, a '''Caution''' warning sign has been placed at the location of the '''Main Approach Dn''' and '''Main Approach Up''' trackmarks. Click [[image:Line_Index_Label.png|link=SAR_Index|Location Index]] for details. |
| + | *If driving manually in yards, you are responsible for correctly setting any '''catch points'''. | ||
</td> | </td> | ||
</tr> | </tr> | ||
| Line 122: | Line 151: | ||
<tr valign="top"> | <tr valign="top"> | ||
<td> | <td> | ||
| − | <td align="center">[[image:SAR Scenario Peterborough-Quorn Strip Map.png|link=|alt=Strip Map]]</td> | + | <td align="center">[[image:SAR Scenario Peterborough-Quorn Strip Map.png|link=|alt=Strip Map]]<br>[[image:SAR Scenario Route.png|link=|alt=Route Key]]</td> |
</tr> | </tr> | ||
</table> <!-- END Strip Map Table --> | </table> <!-- END Strip Map Table --> | ||
| Line 131: | Line 160: | ||
<table width=1000> <!-- BEGIN End Links Table --> | <table width=1000> <!-- BEGIN End Links Table --> | ||
<tr valign="top"> | <tr valign="top"> | ||
| − | <td colspan= | + | <td colspan=9>'''Links:''' All links will open in this window</td> |
| − | <tr> | + | </tr> |
| − | <tr valign=" | + | <tr valign="center"> |
| − | <td width= | + | <td width=63 align="left">[[image:ArrowLeftBtn.png|link=SAR Scenario Quorn-Peterborough Freight|30px]]</td> |
| − | <td width= | + | <td width=125 align="center">[[image:Session Scenario Index.png|link=SAR Peterborough Base Session|alt=Scenarios|Scenario Index]]<br>'''[[SAR Peterborough Base Session|Session Scenarios]]'''</td> |
| − | <td width= | + | <td width=125 align="center">[[Image:Location Index.png|link=SAR Index|alt=Location Index|Location Index]]<br>'''[[SAR Index|Location List]]'''</td> |
| − | <td width= | + | <td width=125 align="center">[[image:SAR Tutorial.png|link=SAR Scenarios Tutorial|alt=Tutorial]]<br>'''[[SAR Scenarios Tutorial|Drive Tutorial]]'''</td> |
| − | <td width= | + | <td width=125 align="center">[[image:Rolling Stock Index.png|link=SAR Scenario Rolling Stock|alt=Rolling Stock]]<br>'''[[SAR Scenario Rolling Stock|Rolling Stock]]'''</td> |
| + | <td width=125 align="center">[[image:Loco Index.png|link=SAR Peterborough Division Loco Roster|alt=Loco Roster]]<br>'''[[SAR Peterborough Division Loco Roster|Loco Roster]]'''</td> | ||
| + | <td width=125 align="center">[[image:Industry Index.png|link=SAR Scenario Industries|alt=Industries]]<br>'''[[SAR Scenario Industries|Active Industries]]'''</td> | ||
| + | <td width=125 align="center">[[image:BackToTop.png|link=#top|alt=Top|Top]]</td> | ||
| + | <td width=65 align="left">[[image:ArrowRightBtn.png|link=SAR Scenario Paratoo Mixed Passenger Freight|30px]]</td> | ||
</tr> | </tr> | ||
</table> <!-- END End Links Table --> | </table> <!-- END End Links Table --> | ||
Latest revision as of 16:54, 19 October 2022
| 8 Quorn to Peterborough Empty Fuel | ||
| A scenario in the SAR Peterborough Base Session | ||
| Through freight from Quorn to Peterborough moving empty fuel cars from Quorn and Port Augusta to Peterborough where they will be attached to a freight for return to Port Pirie. |
 |
|
|
|
Each location in the layout has a detailed set of track diagrams that provide a variety of useful information The Getting Started guide below gives a summary of what is available. |
Getting Started:
|
Tutorial:
|
|
|


| Links: All links will open in this window | ||||||||
 Session Scenarios |
 Location List |
 Drive Tutorial |
 Rolling Stock |
 Loco Roster |
 Active Industries |
|||
This page was created by Trainz user pware in February 2021 and was last updated as shown below.