SAR Scenario Peterborough Shunter
From TrainzOnline
(Difference between revisions)
m |
m |
||
| Line 54: | Line 54: | ||
<tr valign="top"> | <tr valign="top"> | ||
<td colspan=2> | <td colspan=2> | ||
| − | <table> | + | <table cellpadding="2" bgcolor="black"> <!-- black border --> |
| + | <tr valign="top"> | ||
| + | <td> | ||
| + | <table bgcolor="lightyellow"> | ||
<tr valign="top"> | <tr valign="top"> | ||
<td> | <td> | ||
<span style="font-size: 15px; font-weight: 700;">Getting Started:</span><br> | <span style="font-size: 15px; font-weight: 700;">Getting Started:</span><br> | ||
# The first step is to pause the session by pressing the '''P''' key. | # The first step is to pause the session by pressing the '''P''' key. | ||
| − | # Next locate your loco. Open the '''Finder''' (press '''CTRL-F''') and type, in the '''name''' field, the name of the loco. For example '''SAR T 233''' (or just '''T 233''' should be enough). Click the '''tick''' icon. | + | # Next locate your loco. '''Either''':- |
| − | # Take a few moments to get your bearings. Use the [[image:Line_Index_Label.png|link=SAR_Index]] (this link will open in this window) and click on '''Peterborough''' to load its location details and track plans. The [[image:Tab_PH_Grey.png|link=|75px]] tab will give you the '''EIT Paths''' that are available if you wish to use them but | + | ## Open the '''Finder''' (press '''CTRL-F''') and type, in the '''name''' field, the name of the loco. For example '''SAR T 233''' (or just '''T 233''' should be enough). Click the '''tick''' icon, '''OR''' |
| + | ## Open the '''Driver List''' (bottom left of the screen) and select the loco from there - click the drivers '''Eye''' icon to jump to the loco. | ||
| + | # Take a few moments to get your bearings. Use the [[image:Line_Index_Label.png|link=SAR_Index]] (this link will open in this window) and click on '''Peterborough''' to load its location details and track plans. The [[image:Tab_PH_Grey.png|link=|75px]] tab will give you the '''EIT Paths''' that are available if you wish to use them but they will not be needed in this scenario. The [[image:Tab_TM_Grey.png|link=|75px]] tab will give you the location and names of the invisible '''Track Marks''' for '''Drive To''' commands. The [[image:Tab_IN_Grey.png|link=|75px]] tab will show the names and locations of all active industries and their commodities. The [[image:Tab_SW_Grey.png|link=|75px]] tab will give the names and locations of all junction switches as well as some switch sets you may want to use. | ||
| + | # Each location page has a direct link to the next location page, in all directions, so you can explore along the route. | ||
# When you are ready to start, reload the '''Peterborough Base Session''' page (click the '''Scenarios''' button on your current location page) and select this '''Scenario''' again or just use the '''Back''' button on your browser - whichever is quicker. | # When you are ready to start, reload the '''Peterborough Base Session''' page (click the '''Scenarios''' button on your current location page) and select this '''Scenario''' again or just use the '''Back''' button on your browser - whichever is quicker. | ||
| − | # Press the '''P''' key to start the | + | # Press the '''P''' key to start the session. |
| + | </td> | ||
| + | </tr> | ||
| + | </table> | ||
</td> | </td> | ||
</tr> | </tr> | ||
Revision as of 11:06, 19 February 2021
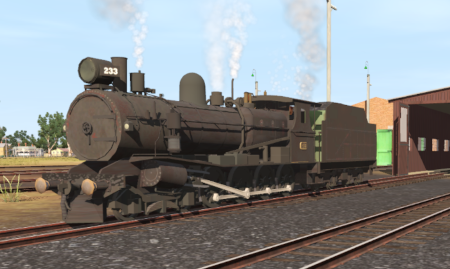
Peterborough Shunter
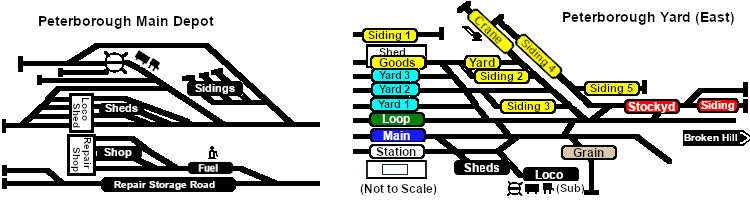
Shunting operations that cover the length of Peterborough Yard and Peterborough Depot.
 |
|
|||||||||

| Duration: | 1 hour | ||
| Loco: | SAR T 233 on Peterborough Depot Shed Road 1 Other Unrostered Locos:
| ||
|
|||
| Yard Map: | |||
 |
|||
Tasks:
|
|||
Driving Notes:
|
|||