SAR Scenario Peterborough Shunter
From TrainzOnline
(Difference between revisions)
m |
m |
||
| (9 intermediate revisions by one user not shown) | |||
| Line 1: | Line 1: | ||
<table width=1000> <!-- BEGIN Title table --> | <table width=1000> <!-- BEGIN Title table --> | ||
<tr valign="top"> | <tr valign="top"> | ||
| − | <td width=50 align="left">[[image: | + | <td width=50 align="left">[[image:ArrowLeftBtn.png|link=SAR Scenario Orroroo Grain|30px]]</td> |
<td width=900 align="center"><span style="font-size: 21px; font-weight: 700;"> <span style="background-color: black; color: white;"> 12 </span> <span style="background-color: black; color: white;"> Peterborough Shunter </span></span></td> | <td width=900 align="center"><span style="font-size: 21px; font-weight: 700;"> <span style="background-color: black; color: white;"> 12 </span> <span style="background-color: black; color: white;"> Peterborough Shunter </span></span></td> | ||
| − | <td width=50 align="right">[[image: | + | <td width=50 align="right">[[image:ArrowRightBtn.png|link=SAR Scenario Gladstone Shunter|30px]]</td> |
</tr> | </tr> | ||
<tr valign="top"> | <tr valign="top"> | ||
| Line 22: | Line 22: | ||
<table> <!-- BEGIN Loco/consist sub table --> | <table> <!-- BEGIN Loco/consist sub table --> | ||
<tr valign="top"> | <tr valign="top"> | ||
| − | <td width=75><span style="font-size: 15px; font-weight: 700; color: white; background-color: black;"> Duration: </span></td> | + | <td width=75><span style="font-size: 15px; font-weight: 700; color: white; background-color: black;"> Era: </span></td> |
| + | <td>'''1920s to 1980s'''</td> | ||
| + | </tr> | ||
| + | <tr valign="top"> | ||
| + | <td><span style="font-size: 15px; font-weight: 700; color: white; background-color: black;"> Duration: </span></td> | ||
<td>1 hour</td> | <td>1 hour</td> | ||
</tr> | </tr> | ||
| Line 28: | Line 32: | ||
<td><span style="font-size: 15px; font-weight: 700; color: white; background-color: black;"> Loco: </span></td> | <td><span style="font-size: 15px; font-weight: 700; color: white; background-color: black;"> Loco: </span></td> | ||
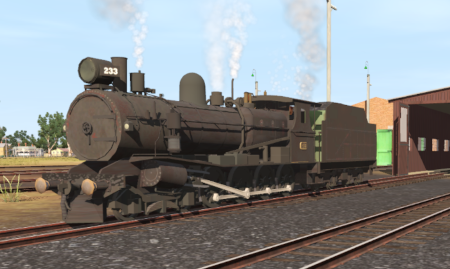
<td>'''[[SAR_Scenario_Rolling_Stock#SAR_T_Class|SAR T 233]]''' on <span style="font-weight: 700;">Peterborough Depot <span style="color: white; background-color: black;"> Loco Road 1 </span></span><br> | <td>'''[[SAR_Scenario_Rolling_Stock#SAR_T_Class|SAR T 233]]''' on <span style="font-weight: 700;">Peterborough Depot <span style="color: white; background-color: black;"> Loco Road 1 </span></span><br> | ||
| − | '''Other | + | '''Other Available Locos:''' [[image:Loco_Roster_Label.png|link=SAR Peterborough Division Loco Roster]] |
*'''[[SAR_Scenario_Rolling_Stock#SAR_T_Class|SAR T 23]]''' on <span style="font-weight: 700;">Peterborough Depot <span style="color: white; background-color: black;"> Siding 1 </span></span> | *'''[[SAR_Scenario_Rolling_Stock#SAR_T_Class|SAR T 23]]''' on <span style="font-weight: 700;">Peterborough Depot <span style="color: white; background-color: black;"> Siding 1 </span></span> | ||
</td> | </td> | ||
| Line 49: | Line 53: | ||
</tr> | </tr> | ||
</table> <!-- END Scenario image and loco/consist table --> | </table> <!-- END Scenario image and loco/consist table --> | ||
| − | + | <br> | |
<table cellpadding="2" bgcolor="black" width=1000> <!-- BEGIN Black border for Getting Started table --> | <table cellpadding="2" bgcolor="black" width=1000> <!-- BEGIN Black border for Getting Started table --> | ||
<tr valign="top"> | <tr valign="top"> | ||
| Line 60: | Line 64: | ||
## Open the '''Finder Tool''' (press <span style="font-weight: 700; font-size: 15px; color: white; background-color: black;"> Ctrl </span> <span style="font-weight: 700; font-size: 15px; color: white; background-color: black;"> F </span>) and type, in the '''Name''' field, the name of the loco. For example '''SAR T 233''' (or just '''T 233''' should be enough). Click the '''tick''' icon, '''OR''' | ## Open the '''Finder Tool''' (press <span style="font-weight: 700; font-size: 15px; color: white; background-color: black;"> Ctrl </span> <span style="font-weight: 700; font-size: 15px; color: white; background-color: black;"> F </span>) and type, in the '''Name''' field, the name of the loco. For example '''SAR T 233''' (or just '''T 233''' should be enough). Click the '''tick''' icon, '''OR''' | ||
## Open the '''Driver List''' (bottom left of the screen) and select the loco from there - click the drivers '''Eye''' icon to jump to the loco. | ## Open the '''Driver List''' (bottom left of the screen) and select the loco from there - click the drivers '''Eye''' icon to jump to the loco. | ||
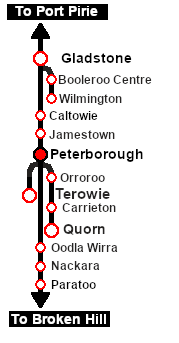
| − | # Take a few moments to get your bearings. | + | # Take a few moments to get your bearings. Click [[image:Line_Index_Peterborough.png|link=SAR_Peterborough|Peterborough Data]] (this link will open in this window) to show the location details and track plans for '''Peterborough'''. In each location details page:- |
#*the [[image:Tab_HM_White.png|link=|75px]] tab gives an overall summary of each location with a "potted" history (where available). | #*the [[image:Tab_HM_White.png|link=|75px]] tab gives an overall summary of each location with a "potted" history (where available). | ||
#*the [[image:Tab_TM_Grey.png|link=|75px]] tab reveals the invisible [[image:Trackmark_Right.png|link=|alt=TM|8px]] '''Track Marks''' for '''Drive To''' commands. | #*the [[image:Tab_TM_Grey.png|link=|75px]] tab reveals the invisible [[image:Trackmark_Right.png|link=|alt=TM|8px]] '''Track Marks''' for '''Drive To''' commands. | ||
| Line 67: | Line 71: | ||
# Each location details page has direct links to the adjacent locations so you can explore along the route. | # Each location details page has direct links to the adjacent locations so you can explore along the route. | ||
# When you are ready to start, reload the '''Peterborough Base Session''' page (click the '''Scenarios''' button on your current location page) and select this '''Scenario''' again or just use the '''Back''' button on your browser - whichever is quicker. | # When you are ready to start, reload the '''Peterborough Base Session''' page (click the '''Scenarios''' button on your current location page) and select this '''Scenario''' again or just use the '''Back''' button on your browser - whichever is quicker. | ||
| − | # Switch back to ''' | + | # Switch back to '''Driver Mode''' and either close the opening message window or press the <span style="font-weight: 700; font-size: 15px; color: white; background-color: black;"> P </span> key to start the session. |
</td> | </td> | ||
</tr> | </tr> | ||
| Line 88: | Line 92: | ||
</table> <!-- END Blue Border for Tutorial table --> | </table> <!-- END Blue Border for Tutorial table --> | ||
<br> | <br> | ||
| − | <table width=1000> <!-- BEGIN Yard (if | + | <table width=1000> <!-- BEGIN Yard (if applicable), Orders, Strip Map and Driving Notes tables --> |
<tr valign="top"> | <tr valign="top"> | ||
<td> | <td> | ||
| − | <table bgcolor= | + | <table bgcolor=#000000 width=820 cellpadding=2> <!-- BEGIN Black Border for Yard Table --> |
<tr valign="top"> | <tr valign="top"> | ||
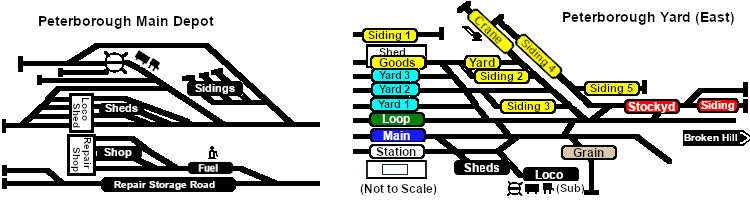
| − | <td> | + | <td><span style="font-size: 15px; font-weight: 700; color: white">Yard Map:</span><br> |
| − | <span style="font-size: 15px; font-weight: 700; color: white | + | <table bgcolor=#ffffff width=816> <!-- BEGIN Yard Table --> |
| − | < | + | |
<tr valign="top"> | <tr valign="top"> | ||
<td align="center">[[image:SAR_Peterborough_Yards.png|link=|alt=Yard map]]</td> | <td align="center">[[image:SAR_Peterborough_Yards.png|link=|alt=Yard map]]</td> | ||
</tr> | </tr> | ||
| − | |||
| − | |||
| − | |||
<tr valign="top"> | <tr valign="top"> | ||
| − | <td width=820>< | + | <td> </td> |
| − | <span style="font-size: 15px; font-weight: 700; color: white | + | </tr> |
| + | </table> <!-- END Yard Table --> | ||
| + | </td> | ||
| + | </tr> | ||
| + | </table> <!-- END Black Border for Yard Table --> | ||
| + | <br> | ||
| + | <table bgcolor=#000000 width=820 cellpadding=2> <!-- BEGIN Black Border for Orders Table --> | ||
| + | <tr valign="top"> | ||
| + | <td><span style="font-size: 15px; font-weight: 700; color: white">Orders:</span><br> | ||
| + | <table bgcolor=#e8e8e8 width=816> <!-- BEGIN Orders and Logo Table --> | ||
| + | <tr valign="top"> | ||
| + | <td width=716> | ||
# Move the loco out of the <span style="font-weight: 700;"><span style="color: white; background-color: black;"> Loco </span> Depot</span> and navigate through to the other side of '''Peterborough Yard''' onto the <span style="font-weight: 700; color: white; background-color: red;"> Stockyard </span> road. | # Move the loco out of the <span style="font-weight: 700;"><span style="color: white; background-color: black;"> Loco </span> Depot</span> and navigate through to the other side of '''Peterborough Yard''' onto the <span style="font-weight: 700; color: white; background-color: red;"> Stockyard </span> road. | ||
# Reverse onto <span style="font-weight: 700; color: black; background-color: yellow;"> Goods Siding 4 </span> and attach to the rake of empty '''MTW''' flat wagons stored there. | # Reverse onto <span style="font-weight: 700; color: black; background-color: yellow;"> Goods Siding 4 </span> and attach to the rake of empty '''MTW''' flat wagons stored there. | ||
| Line 110: | Line 121: | ||
# Shunt the loaded wagons to <span style="font-weight: 700; color: black; background-color: yellow;"> Goods Siding 3 </span> and stable. | # Shunt the loaded wagons to <span style="font-weight: 700; color: black; background-color: yellow;"> Goods Siding 3 </span> and stable. | ||
# Move the loco to <span style="font-weight: 700; color: black; background-color: yellow;"> Goods Siding 5 </span> and attach to the rake of empty '''Livestock''' wagons stored there. | # Move the loco to <span style="font-weight: 700; color: black; background-color: yellow;"> Goods Siding 5 </span> and attach to the rake of empty '''Livestock''' wagons stored there. | ||
| − | # Shunt the empty wagons to the <span style="font-weight: 700; color: white; background-color: red;"> Stockyard Siding </span> at the far end of the <span style="font-weight: 700; color: white; background-color: red;"> Stockyard </span> road for pickup by | + | # Shunt the empty wagons to the <span style="font-weight: 700; color: white; background-color: red;"> Stockyard Siding </span> at the far end of the <span style="font-weight: 700; color: white; background-color: red;"> Stockyard </span> road for pickup by another service. |
| − | # Move the loco back into the main depot to the <span style="font-weight: 700; color: white; background-color: black;"> Loco Depot Sidings </span> next to the tall water tower. There are empty coal ('''CCC''') and fuel (''' | + | # Move the loco back into the main depot to the <span style="font-weight: 700; color: white; background-color: black;"> Loco Depot Sidings </span> next to the tall water tower. There are empty coal ('''CCC''') and fuel ('''Tank''') wagons stored on two of the siding roads. |
| − | # Shunt the two wagon sets into a single consist and stable on one of the empty <span style="font-weight: 700; color: white; background-color: black;"> Loco Depot Sidings </span> roads for | + | # Shunt the two wagon sets into a single consist and stable on one of the empty <span style="font-weight: 700; color: white; background-color: black;"> Loco Depot Sidings </span> roads for pickup by another service. |
# Move the loco to the back of the workshop area at the end of the <span style="font-weight: 700;"> Depot <span style="color: white; background-color: black;"> Repair Storage Road </span></span>. | # Move the loco to the back of the workshop area at the end of the <span style="font-weight: 700;"> Depot <span style="color: white; background-color: black;"> Repair Storage Road </span></span>. | ||
| − | # Attach to loco '''SAR T 229''' (not in steam) and move it into the repair shop on <span style="font-weight: 700;"> Depot <span style="color: white; background-color: black;"> Repair Shop Road </span> 2</span> or '''3'''. Detach the loco. | + | # Attach to loco '''SAR T 229''' (not in steam) and move it dead attached into the repair shop on <span style="font-weight: 700;"> Depot <span style="color: white; background-color: black;"> Repair Shop Road </span> 2</span> or '''3'''. Detach the loco. |
# Return the loco to its starting position on <span style="font-weight: 700;"> Depot <span style="color: white; background-color: black;"> Shed Road </span> 1</span>. | # Return the loco to its starting position on <span style="font-weight: 700;"> Depot <span style="color: white; background-color: black;"> Shed Road </span> 1</span>. | ||
| − | |||
</td> | </td> | ||
| + | <td width=100>[[image:SAR Train Order Rotated.png|100px|link=|alt=Logo]]</td> | ||
</tr> | </tr> | ||
| − | </table> <!-- END | + | </table> <!-- END Orders and Logo Table --> |
| + | </td> | ||
| + | </tr> | ||
| + | </table> <!-- END Black Border for Orders Table --> | ||
| + | <br> | ||
<table cellpadding="2" bgcolor="black" width=820> <!-- BEGIN Black border for Driving Notes sub table --> | <table cellpadding="2" bgcolor="black" width=820> <!-- BEGIN Black border for Driving Notes sub table --> | ||
<tr valign="top"> | <tr valign="top"> | ||
| Line 127: | Line 142: | ||
<td> | <td> | ||
*You have permission to pass semaphore signals at stop provided you are satisfied that the road ahead is clear. | *You have permission to pass semaphore signals at stop provided you are satisfied that the road ahead is clear. | ||
| + | *When driving manually in yards, you are responsible for correctly setting any '''catch points'''. | ||
</td> | </td> | ||
</tr> | </tr> | ||
| Line 150: | Line 166: | ||
</tr> | </tr> | ||
<tr valign="center"> | <tr valign="center"> | ||
| − | <td width=63 align="left">[[image: | + | <td width=63 align="left">[[image:ArrowLeftBtn.png|link=SAR Scenario Orroroo Grain|30px]]</td> |
<td width=125 align="center">[[image:Session Scenario Index.png|link=SAR Peterborough Base Session|alt=Scenarios|Scenario Index]]<br>'''[[SAR Peterborough Base Session|Session Scenarios]]'''</td> | <td width=125 align="center">[[image:Session Scenario Index.png|link=SAR Peterborough Base Session|alt=Scenarios|Scenario Index]]<br>'''[[SAR Peterborough Base Session|Session Scenarios]]'''</td> | ||
<td width=125 align="center">[[Image:Location Index.png|link=SAR Index|alt=Location Index|Location Index]]<br>'''[[SAR Index|Location List]]'''</td> | <td width=125 align="center">[[Image:Location Index.png|link=SAR Index|alt=Location Index|Location Index]]<br>'''[[SAR Index|Location List]]'''</td> | ||
| Line 158: | Line 174: | ||
<td width=125 align="center">[[image:Industry Index.png|link=SAR Scenario Industries|alt=Industries]]<br>'''[[SAR Scenario Industries|Active Industries]]'''</td> | <td width=125 align="center">[[image:Industry Index.png|link=SAR Scenario Industries|alt=Industries]]<br>'''[[SAR Scenario Industries|Active Industries]]'''</td> | ||
<td width=125 align="center">[[image:BackToTop.png|link=#top|alt=Top|Top]]</td> | <td width=125 align="center">[[image:BackToTop.png|link=#top|alt=Top|Top]]</td> | ||
| − | <td width=62 align="left">[[image: | + | <td width=62 align="left">[[image:ArrowRightBtn.png|link=SAR Scenario Gladstone Shunter|30px]]</td> |
</tr> | </tr> | ||
</table> <!-- END End Links Table --> | </table> <!-- END End Links Table --> | ||
Revision as of 17:24, 25 June 2022
| 12 Peterborough Shunter | ||
| A scenario in the SAR Peterborough Base Session | ||
| Shunting operations that cover the length of Peterborough Yard and Peterborough Depot. |
 |
|
||||||||||
Getting Started:
|
Tutorial:
|
|
|


| Links: All links will open in this window | ||||||||
 Session Scenarios |
 Location List |
 Drive Tutorial |
 Rolling Stock |
 Loco Roster |
 Active Industries |
|||
This page was created by Trainz user pware in February 2021 and was last updated as shown below.