SAR Scenario Peterborough Dieselisation
m |
|||
| Line 4: | Line 4: | ||
<tr valign="top"> | <tr valign="top"> | ||
<td width=50 align="left">[[image:ArrowLeftBtn.png|link=SAR Scenario Rail Car Inspection Run|30px]]</td> | <td width=50 align="left">[[image:ArrowLeftBtn.png|link=SAR Scenario Rail Car Inspection Run|30px]]</td> | ||
| − | <td width=900 align="center"><span style="font-size: 21px; font-weight: 700;">& | + | <td width=900 align="center"><span style="font-size: 21px; font-weight: 700;"> <span style="background-color: black; color: white;"> 24 </span> <span style="background-color: black; color: white;"> Peterborough Dieselisation </span></span></td> |
<td width=50 align="right">[[image:ArrowRightBtn.png|link=SAR Scenario Coffee Pot Special|30px]]</td> | <td width=50 align="right">[[image:ArrowRightBtn.png|link=SAR Scenario Coffee Pot Special|30px]]</td> | ||
</tr> | </tr> | ||
| Line 13: | Line 13: | ||
<table width=1000> <!-- BEGIN Summary table --> | <table width=1000> <!-- BEGIN Summary table --> | ||
<tr valign="top"> | <tr valign="top"> | ||
| − | <td align="left">Diesel services on the <span style="color: white; background-color: black; font-weight: 700;;">& | + | <td align="left">Diesel services on the <span style="color: white; background-color: black; font-weight: 700;;"> Peterborough-Quorn Line </span> in the 1970s and 80s.</td> |
<td align="right">[[file:BackToBottom.png|link=#bottom|alt=Bottom|Bottom]]</td> | <td align="right">[[file:BackToBottom.png|link=#bottom|alt=Bottom|Bottom]]</td> | ||
</tr> | </tr> | ||
</table> <!-- END Summary table --> | </table> <!-- END Summary table --> | ||
----- | ----- | ||
| − | <span style="font-weight: 700; font-size: 15px; color: white; background-color: black;">& | + | <span style="font-weight: 700; font-size: 15px; color: white; background-color: black;"> The Historical Bit </span><br> |
| − | By 1970 the main <span style="color: white; background-color: black; font-weight: 700;;">& | + | By 1970 the main <span style="color: white; background-color: black; font-weight: 700;;"> Port Pirie-Broken  Hill Line </span> had been converted to standard gauge (4ft 8½in - 1435mm) which isolated the <span style="color: white; background-color: black; font-weight: 700;;"> Peterborough-Quorn Line </span> from the rest of the narrow gauge network. |
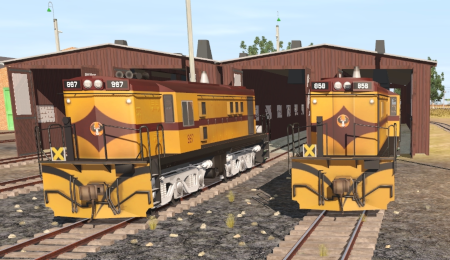
1970 also saw the removal of steam from '''Peterborough''' and all remaining narrow gauge services were operated by '''SAR 830 class''' narrow gauge diesels, initially '''SAR 858, 865, 866''' and '''867''' which were based at '''Peterborough'''. By the end of 1970 '''SAR 865''' and '''866''' were transferred to '''Gladstone''' and in 1973 '''SAR 867''' was converted, by bogie exchange, to broad gauge (5ft 3in - 1600mm). This left '''SAR 858''' as the only narrow gauge loco at '''Peterborough''' from 1973 to 1988.<br> | 1970 also saw the removal of steam from '''Peterborough''' and all remaining narrow gauge services were operated by '''SAR 830 class''' narrow gauge diesels, initially '''SAR 858, 865, 866''' and '''867''' which were based at '''Peterborough'''. By the end of 1970 '''SAR 865''' and '''866''' were transferred to '''Gladstone''' and in 1973 '''SAR 867''' was converted, by bogie exchange, to broad gauge (5ft 3in - 1600mm). This left '''SAR 858''' as the only narrow gauge loco at '''Peterborough''' from 1973 to 1988.<br> | ||
| Line 39: | Line 39: | ||
<table width=546 bgcolor="white"> <!-- BEGIN Loco/consist Table --> | <table width=546 bgcolor="white"> <!-- BEGIN Loco/consist Table --> | ||
<tr valign="top"> | <tr valign="top"> | ||
| − | <td width=75><span style="font-size: 15px; font-weight: 700; color: white; background-color: black;">& | + | <td width=75><span style="font-size: 15px; font-weight: 700; color: white; background-color: black;"> Era: </span></td> |
<td>'''1970s, 1980s'''</td> | <td>'''1970s, 1980s'''</td> | ||
</tr> | </tr> | ||
<tr valign="top"> | <tr valign="top"> | ||
| − | <td><span style="font-size: 15px; font-weight: 700; color: white; background-color: black;">& | + | <td><span style="font-size: 15px; font-weight: 700; color: white; background-color: black;"> Duration: </span></td> |
<td>'''XXXXXXXX'''</td> | <td>'''XXXXXXXX'''</td> | ||
</tr> | </tr> | ||
<tr valign="top"> | <tr valign="top"> | ||
| − | <td><span style="font-size: 15px; font-weight: 700; color: white; background-color: black;">& | + | <td><span style="font-size: 15px; font-weight: 700; color: white; background-color: black;"> Loco: </span></td> |
<td>Available at '''Peterborough Loco Depot''':-</td> | <td>Available at '''Peterborough Loco Depot''':-</td> | ||
</tr> | </tr> | ||
| Line 66: | Line 66: | ||
</tr> | </tr> | ||
<tr valign="top"> | <tr valign="top"> | ||
| − | <td><span style="font-size: 15px; font-weight: 700; color: white; background-color: black;">& | + | <td><span style="font-size: 15px; font-weight: 700; color: white; background-color: black;"> Consist: </span></td> |
| − | <td>Stored on <span style="font-weight: 700;">Peterborough <span style="background-color: cyan;">& | + | <td>Stored on <span style="font-weight: 700;">Peterborough <span style="background-color: cyan;"> Yard 3 </span></span> to be attached to the selected loco:-</td> |
</tr> | </tr> | ||
<tr valign="top"> | <tr valign="top"> | ||
| Line 104: | Line 104: | ||
</td> | </td> | ||
<td>'''Each location in the layout has a detailed set of track diagrams that provide a variety of useful information'''<br> | <td>'''Each location in the layout has a detailed set of track diagrams that provide a variety of useful information'''<br> | ||
| − | The <span style="font-weight: 700; color: white; background-color: black;">& | + | The <span style="font-weight: 700; color: white; background-color: black;"> Getting Started </span> guide below gives a summary of what is available.<br> |
To display this information click any [[image:Line_Index_Label.png|link=SAR_Index|Location Index]] graphic, or go to the bottom of the page for all the session links (all links will open in this window).</td> | To display this information click any [[image:Line_Index_Label.png|link=SAR_Index|Location Index]] graphic, or go to the bottom of the page for all the session links (all links will open in this window).</td> | ||
</tr> | </tr> | ||
| Line 115: | Line 115: | ||
<tr valign="top"> | <tr valign="top"> | ||
<td> | <td> | ||
| − | # If you have already closed the opening message window then the first step is to pause the session by pressing the <span style="font-weight: 700; font-size: 15px; color: white; background-color: black;">& | + | # If you have already closed the opening message window then the first step is to pause the session by pressing the <span style="font-weight: 700; font-size: 15px; color: white; background-color: black;"> P </span> key. |
# If you decide to set the session clock to a different starting time then follow the instructions shown in the '''Orders''' section | # If you decide to set the session clock to a different starting time then follow the instructions shown in the '''Orders''' section | ||
# Next locate your loco. '''Either''':- | # Next locate your loco. '''Either''':- | ||
| − | #*Open the '''Finder Tool''' (press <span style="font-weight: 700; font-size: 15px; color: white; background-color: black;">& | + | #*Open the '''Finder Tool''' (press <span style="font-weight: 700; font-size: 15px; color: white; background-color: black;"> Ctrl </span> <span style="font-weight: 700; font-size: 15px; color: white; background-color: black;"> F </span>) and type, in the '''Name''' field, the name of the selected loco - e.g. '''SAR 858'''. Click the '''tick''' icon, '''OR''' |
#*Open the '''Driver List''' (bottom left of the screen) and then scroll through the list to find '''either''':- | #*Open the '''Driver List''' (bottom left of the screen) and then scroll through the list to find '''either''':- | ||
#:*the '''loco name''' ('''SAR 858''') '''OR''' | #:*the '''loco name''' ('''SAR 858''') '''OR''' | ||
| Line 124: | Line 124: | ||
#::then click the drivers '''Eye''' icon [[image:Driver_Eye.png|link=]] to take control of the loco | #::then click the drivers '''Eye''' icon [[image:Driver_Eye.png|link=]] to take control of the loco | ||
# Take a few moments to get your bearings. Click [[image:Line_Index_Peterborough.png|link=SAR_Peterborough|Peterborough Data]] (this link will open in this window) to show the location details and track plans for '''Peterborough'''. In each location details page:- | # Take a few moments to get your bearings. Click [[image:Line_Index_Peterborough.png|link=SAR_Peterborough|Peterborough Data]] (this link will open in this window) to show the location details and track plans for '''Peterborough'''. In each location details page:- | ||
| − | #*the [[image:Tab_HM_White.png|link=|75px]]& | + | #*the [[image:Tab_HM_White.png|link=|75px]] tab gives an overall summary of each location with a "potted" history (where available). |
| − | #*the [[image:Tab_TM_Grey.png|link=|75px]]& | + | #*the [[image:Tab_TM_Grey.png|link=|75px]] tab reveals the invisible [[image:Trackmark_Right.png|link=|alt=TM|8px]] '''Track Marks''' for '''Drive To''' commands. |
| − | #*the [[image:Tab_IN_Grey.png|link=|75px]]& | + | #*the [[image:Tab_IN_Grey.png|link=|75px]] tab lists all active industries and their commodities. |
| − | #*the [[image:Tab_SW_Grey.png|link=|75px]]& | + | #*the [[image:Tab_SW_Grey.png|link=|75px]] tab describes the names, locations and settings of all junction switches as well as some switch sets you may want to use. |
# Each location details page has direct links to the adjacent locations so you can explore along the route. | # Each location details page has direct links to the adjacent locations so you can explore along the route. | ||
# When you are ready to start, reload the '''Peterborough Base Session''' page (click the '''Scenarios''' button on your current location page) and select this '''Scenario''' again or just use the '''Back''' button on your browser - whichever is quicker. | # When you are ready to start, reload the '''Peterborough Base Session''' page (click the '''Scenarios''' button on your current location page) and select this '''Scenario''' again or just use the '''Back''' button on your browser - whichever is quicker. | ||
# Switch back to '''Trainz Driver Mode''' | # Switch back to '''Trainz Driver Mode''' | ||
| − | # Close the opening message window and, if '''Pause''' is shown on the screen, press the <span style="font-weight: 700; font-size: 15px; color: white; background-color: black;">& | + | # Close the opening message window and, if '''Pause''' is shown on the screen, press the <span style="font-weight: 700; font-size: 15px; color: white; background-color: black;"> P </span> key to start the session. |
</td> | </td> | ||
</tr> | </tr> | ||
| Line 162: | Line 162: | ||
<td width=716> | <td width=716> | ||
# Move the selected loco out of the depot and into the yard | # Move the selected loco out of the depot and into the yard | ||
| − | # The consist waiting on the <span style="font-weight: 700;">Peterborough <span style="background-color: cyan;">& | + | # The consist waiting on the <span style="font-weight: 700;">Peterborough <span style="background-color: cyan;"> Yard 3 </span> Road</span> is in '''three''' parts:- |
| − | #* For '''train 197''' select the first 4 wagons only. Shunt these wagons to an empty <span style="font-weight: 700;"><span style="background-color: cyan;">& | + | #* For '''train 197''' select the first 4 wagons only. Shunt these wagons to an empty <span style="font-weight: 700;"><span style="background-color: cyan;"> Yard </span> Road</span>. Attach a '''Guard Van''' to the rear of the consist. The '''Guard Van''' can be taken from the rear of the remaining wagons or from the nearby <span style="font-weight: 700; color: white; background-color: black;"> Car Shed </span> |
| − | #* For '''train 3''' terminating at '''Carrieton''', shunt to combine the first two consists into a single consist. Shunt these wagons to an empty <span style="font-weight: 700;"><span style="background-color: cyan;">& | + | #* For '''train 3''' terminating at '''Carrieton''', shunt to combine the first two consists into a single consist. Shunt these wagons to an empty <span style="font-weight: 700;"><span style="background-color: cyan;"> Yard </span> Road</span>. Attach a '''Guard Van''' to the rear of the consist. |
#* For '''train 3''' continuing through to '''Quorn''', shunt all three consists into a single consist with the '''Guard Van''' at the rear | #* For '''train 3''' continuing through to '''Quorn''', shunt all three consists into a single consist with the '''Guard Van''' at the rear | ||
| − | # Proceed onto the <span style="font-weight: 700; color: white; background-color: black;">& | + | # Proceed onto the <span style="font-weight: 700; color: white; background-color: black;"> Peterborough-Quorn Line </span> |
# Detach and shunt wagons at each location according to the '''working timetable''' shown below. All wagons have been placed in the consist in destination order from the front | # Detach and shunt wagons at each location according to the '''working timetable''' shown below. All wagons have been placed in the consist in destination order from the front | ||
# Deliver:- | # Deliver:- | ||
| − | #* '''MTW''' flat wagons to <span style="font-weight: 700; color: black; background-color: yellow;">& | + | #* '''MTW''' flat wagons to <span style="font-weight: 700; color: black; background-color: yellow;"> Goods Cranes </span> |
| − | #* '''QLX''' wagons to <span style="font-weight: 700; color: black; background-color: yellow;">& | + | #* '''QLX''' wagons to <span style="font-weight: 700; color: black; background-color: yellow;"> Goods Sheds </span> |
# Leave each wagon at its loading/unloading point | # Leave each wagon at its loading/unloading point | ||
| − | # For '''train 197''' turn the loco on the <span style="font-weight: 700; color: white; background-color: black;">& | + | # For '''train 197''' turn the loco on the <span style="font-weight: 700; color: white; background-color: black;"> WYE </span> at '''Orroroo''' |
| − | #:'''Note:''' The <span style="font-weight: 700; color: white; background-color: black;">& | + | #:'''Note:''' The <span style="font-weight: 700; color: white; background-color: black;"> WYE </span> was actually removed in the 1930s so in reality the loco would have to run "long nose first" back to '''Peterborough''' (or "long nose first" up to '''Orroroo'''). As '''SAR 858''' was the only narrow gauge loco based at '''Peterborough''' from 1973, this problem could not be solved by double-heading with another locomotive, but it is still an option in this scenario |
# For '''train 3''' you may take the option to terminate at '''Carrieton''' | # For '''train 3''' you may take the option to terminate at '''Carrieton''' | ||
</td> | </td> | ||
| Line 191: | Line 191: | ||
<table width=820 bgcolor="black"> <!-- BEGIN Working Timetable black border Table --> | <table width=820 bgcolor="black"> <!-- BEGIN Working Timetable black border Table --> | ||
<tr valign="top"> | <tr valign="top"> | ||
| − | <td align="center"><span style="font-weight: 700; font-size: 17px; color: white;">& | + | <td align="center"><span style="font-weight: 700; font-size: 17px; color: white;"> 1970s/80s Peterborough-Quorn Freight Timetable </span></td> |
</tr> | </tr> | ||
<tr valign="top"> | <tr valign="top"> | ||
| Line 197: | Line 197: | ||
<table bgcolor="white" width=816> <!-- BEGIN Working Timetable contents Table --> | <table bgcolor="white" width=816> <!-- BEGIN Working Timetable contents Table --> | ||
<tr valign="top"> | <tr valign="top"> | ||
| − | <td width=140>& | + | <td width=140> </td> |
<td align="right" width=100 colspan=2>'''Frequency'''<br>'''Train №'''</td> | <td align="right" width=100 colspan=2>'''Frequency'''<br>'''Train №'''</td> | ||
<td rowspan=20 width=1></td> <!-- Row count --> | <td rowspan=20 width=1></td> <!-- Row count --> | ||
| Line 216: | Line 216: | ||
<td align="center">'''08:00'''</td> | <td align="center">'''08:00'''</td> | ||
<td align="center">'''08:00'''</td> | <td align="center">'''08:00'''</td> | ||
| − | <td>& | + | <td> </td> |
</tr> | </tr> | ||
<tr valign="top"> | <tr valign="top"> | ||
| − | <td>& | + | <td> </td> |
<td>'''Yard'''</td> | <td>'''Yard'''</td> | ||
<td align="right">'''dep'''</td> | <td align="right">'''dep'''</td> | ||
<td align="center">'''08:mm'''</td> | <td align="center">'''08:mm'''</td> | ||
<td align="center">'''08:mm'''</td> | <td align="center">'''08:mm'''</td> | ||
| − | <td>& | + | <td> </td> |
</tr> | </tr> | ||
<tr> | <tr> | ||
| Line 232: | Line 232: | ||
<td>'''Minvalara'''</td> | <td>'''Minvalara'''</td> | ||
<td align="right">'''UX'''</td> | <td align="right">'''UX'''</td> | ||
| − | <td>& | + | <td> </td> |
<td align="center">hh:mm</td> | <td align="center">hh:mm</td> | ||
<td align="center">hh:mm</td> | <td align="center">hh:mm</td> | ||
| Line 261: | Line 261: | ||
<td colspan=3 align="right">'''dep'''</td> | <td colspan=3 align="right">'''dep'''</td> | ||
<td align="center">'''hh:mm'''</td> | <td align="center">'''hh:mm'''</td> | ||
| − | <td>& | + | <td> </td> |
</tr> | </tr> | ||
<tr> | <tr> | ||
| Line 269: | Line 269: | ||
<td>'''Wallaway'''</td> | <td>'''Wallaway'''</td> | ||
<td align="right">'''U'''</td> | <td align="right">'''U'''</td> | ||
| − | <td>& | + | <td> </td> |
<td align="center">hh:mm</td> | <td align="center">hh:mm</td> | ||
| − | <td>& | + | <td> </td> |
| − | <td>& | + | <td> </td> |
</tr> | </tr> | ||
<tr valign="top"> | <tr valign="top"> | ||
| Line 279: | Line 279: | ||
<td align="right">'''arr'''</td> | <td align="right">'''arr'''</td> | ||
<td align="center">'''hh:mm'''</td> | <td align="center">'''hh:mm'''</td> | ||
| − | <td>& | + | <td> </td> |
<td>Deliver 1 MTW wagon</td> | <td>Deliver 1 MTW wagon</td> | ||
</tr> | </tr> | ||
| Line 287: | Line 287: | ||
<td align="right">'''arr'''</td> | <td align="right">'''arr'''</td> | ||
<td align="center">'''hh:mm'''</td> | <td align="center">'''hh:mm'''</td> | ||
| − | <td>& | + | <td> </td> |
<td>Option to terminate. Deliver 1 QLX van (or 2 if terminating)</td> | <td>Option to terminate. Deliver 1 QLX van (or 2 if terminating)</td> | ||
</tr> | </tr> | ||
| Line 296: | Line 296: | ||
<td>'''Moockra'''</td> | <td>'''Moockra'''</td> | ||
<td align="right">'''UX'''</td> | <td align="right">'''UX'''</td> | ||
| − | <td>& | + | <td> </td> |
<td align="center">'''hh:mm'''</td> | <td align="center">'''hh:mm'''</td> | ||
| − | <td>& | + | <td> </td> |
<td>Deliver 1 QLX van</td> | <td>Deliver 1 QLX van</td> | ||
</tr> | </tr> | ||
| Line 306: | Line 306: | ||
<td align="right">'''arr'''</td> | <td align="right">'''arr'''</td> | ||
<td align="center">'''hh:mm'''</td> | <td align="center">'''hh:mm'''</td> | ||
| − | <td>& | + | <td> </td> |
<td>Deliver 1 QLX van</td> | <td>Deliver 1 QLX van</td> | ||
</tr> | </tr> | ||
| Line 314: | Line 314: | ||
<td align="right">'''arr'''</td> | <td align="right">'''arr'''</td> | ||
<td align="center">'''hh:mm'''</td> | <td align="center">'''hh:mm'''</td> | ||
| − | <td>& | + | <td> </td> |
<td>Deliver 1 MTW wagon</td> | <td>Deliver 1 MTW wagon</td> | ||
</tr> | </tr> | ||
| Line 322: | Line 322: | ||
<td align="right">'''arr'''</td> | <td align="right">'''arr'''</td> | ||
<td align="center">'''hh:mm'''</td> | <td align="center">'''hh:mm'''</td> | ||
| − | <td>& | + | <td> </td> |
<td>Deliver 1 QLX van</td> | <td>Deliver 1 QLX van</td> | ||
</tr> | </tr> | ||
| Line 330: | Line 330: | ||
<td align="right">'''arr'''</td> | <td align="right">'''arr'''</td> | ||
<td align="center">'''hh:mm'''</td> | <td align="center">'''hh:mm'''</td> | ||
| − | <td>& | + | <td> </td> |
<td>Deliver 2 QLX vans</td> | <td>Deliver 2 QLX vans</td> | ||
</tr> | </tr> | ||
| Line 387: | Line 387: | ||
*All trains are restricted to 20mph on the curves between '''Wallaway''' and '''Eurelia'''. | *All trains are restricted to 20mph on the curves between '''Wallaway''' and '''Eurelia'''. | ||
*The approaches to all locations are protected by invisible signals to prevent the '''AI Half Speed Slowdown Problem''' when approaching a signal at stop. | *The approaches to all locations are protected by invisible signals to prevent the '''AI Half Speed Slowdown Problem''' when approaching a signal at stop. | ||
| − | *Trackmarks and industries have been provided for AI '''Drive To Trackmark''', '''Drive via Trackmark''' and '''Drive to <span style="background-color: yellow;">& | + | *Trackmarks and industries have been provided for AI '''Drive To Trackmark''', '''Drive via Trackmark''' and '''Drive to <span style="background-color: yellow;"> Industry </span>''' commands. Click [[image:Line_Index_Label.png|link=SAR_Index|Location Index]] for details. |
*Manual (no AI) driving is possible. As a visual driving aid, a '''Caution''' warning sign has been placed at the location of the '''Main Approach Dn''' and '''Main Approach Up''' trackmarks. Click [[image:Line_Index_Label.png|link=SAR_Index|Location Index]] for details. | *Manual (no AI) driving is possible. As a visual driving aid, a '''Caution''' warning sign has been placed at the location of the '''Main Approach Dn''' and '''Main Approach Up''' trackmarks. Click [[image:Line_Index_Label.png|link=SAR_Index|Location Index]] for details. | ||
*If driving manually in yards, you are responsible for correctly setting any '''catch points'''. | *If driving manually in yards, you are responsible for correctly setting any '''catch points'''. | ||
Revision as of 17:25, 22 November 2022
| 24 Peterborough Dieselisation | ||
| A scenario in the SAR Peterborough Base Session v2.0 | ||
| Diesel services on the Peterborough-Quorn Line in the 1970s and 80s. |
The Historical Bit
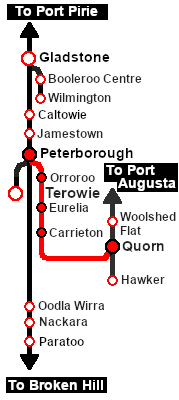
By 1970 the main Port Pirie-Broken Hill Line had been converted to standard gauge (4ft 8½in - 1435mm) which isolated the Peterborough-Quorn Line from the rest of the narrow gauge network.
1970 also saw the removal of steam from Peterborough and all remaining narrow gauge services were operated by SAR 830 class narrow gauge diesels, initially SAR 858, 865, 866 and 867 which were based at Peterborough. By the end of 1970 SAR 865 and 866 were transferred to Gladstone and in 1973 SAR 867 was converted, by bogie exchange, to broad gauge (5ft 3in - 1600mm). This left SAR 858 as the only narrow gauge loco at Peterborough from 1973 to 1988.
The Working Timetable for the 1970s and 80s saw only two narrow gauge return freight services each week. One to Quorn and one to Orroroo.
The Quorn service often terminated at Carrieton due to the lack of goods to transport. The service to Quorn also required a crew change on the return trip at Bruce or Hammond. The relief crew were transported from Peterborough by a rail inspection car (see the scenario Rail Car Inspection Run) with the relieved crew transported back by the same vehicle.
In March 1987 the line from Eurelia to Quorn was closed. This was followed in November 1988 by the closure of line from Peterborough to Eurelia to regular services. The last scheduled revenue runs on the line were to remove grain from the silos at Orroroo in October 1988 (see the scenario Orroroo Grain Run). Special excrusion trains from the Steamtown Peterborough Railway Preservation Society continued to use the line from Peterborough to Eurelia until 2002.
 |
|
|||||||||||||||||||||||
|
|
Each location in the layout has a detailed set of track diagrams that provide a variety of useful information The Getting Started guide below gives a summary of what is available. |
Getting Started:
|
Tutorial:
|
|
|
||||||||||||||||||||||||||||||||||||||||||||||||||||||||||||||||||||||||||||||||||||||||||||||||||||||||||||||||||||||||||||||||||||||||||||||||||||||||||||||||||||||||||||||||


Driving Notes:
|
| Links: All links will open in this window | ||||||||
 Session Scenarios |
 Location List |
 Drive Tutorial |
 Rolling Stock |
 Loco Roster |
 Active Industries |
|||
This page was created by Trainz user pware in October 2022 and was last updated as shown below.