SAR Scenario Paratoo-Gladstone/Terowie Express Freight
From TrainzOnline
(Difference between revisions)
m |
m |
||
| Line 1: | Line 1: | ||
<table width=1000> <!-- BEGIN Title table --> | <table width=1000> <!-- BEGIN Title table --> | ||
<tr valign="top"> | <tr valign="top"> | ||
| − | <td width=50 align="left">[[image:ArrowLeft.png|link=SAR Scenario | + | <td width=50 align="left">[[image:ArrowLeft.png|link=SAR Scenario Quorn Shunter|30px]]</td> |
| − | <td width=900 align="center"><span style="font-size: 21px; font-weight: 700;"> <span style="background-color: black; color: white;"> | + | <td width=900 align="center"><span style="font-size: 21px; font-weight: 700;"> <span style="background-color: black; color: white;"> 1 </span> <span style="background-color: black; color: white;"> Gladstone to Peterborough Depot Fuel Run </span></span></td> |
| − | <td width=50 align="right">[[image:ArrowRight.png|link=SAR Scenario | + | <td width=50 align="right">[[image:ArrowRight.png|link=SAR Scenario East-West Express|30px]]</td> |
</tr> | </tr> | ||
<tr valign="top"> | <tr valign="top"> | ||
| Line 11: | Line 11: | ||
<table width=1000> <!-- BEGIN Summary table --> | <table width=1000> <!-- BEGIN Summary table --> | ||
<tr valign="top"> | <tr valign="top"> | ||
| − | <td align="left"> | + | <td align="left">Loco coal stages and fuel-oil points need to be refilled regularly. This service delivers '''coal''' to the loco coal stages at '''Jamestown''' and '''Peterborough''', and '''bunker c oil''' (for the '''SAR 400''' class Garrett locos) to the loco (main) depot at '''Peterborough'''.</td> |
<td align="right">[[file:BackToBottom.png|link=#bottom|alt=Bottom|Bottom]]</td> | <td align="right">[[file:BackToBottom.png|link=#bottom|alt=Bottom|Bottom]]</td> | ||
</tr> | </tr> | ||
| − | </table> | + | </table> <!-- END Summary tables --> |
----- | ----- | ||
<table width=1000> <!-- BEGIN Scenario image and loco/consist table --> | <table width=1000> <!-- BEGIN Scenario image and loco/consist table --> | ||
<tr valign="top"> | <tr valign="top"> | ||
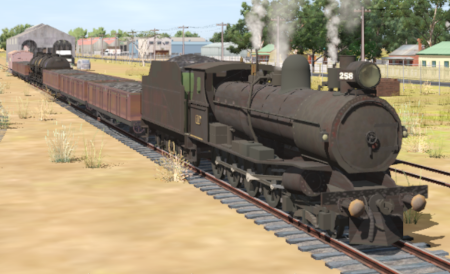
| − | <td width=450>[[image:SAR T | + | <td width=450>[[image:SAR T 258 Fuel Run.png|link=|alt=Fuel Run]]</td> |
<td> | <td> | ||
<table width=550> <!-- BEGIN Loco/consist sub table --> | <table width=550> <!-- BEGIN Loco/consist sub table --> | ||
<tr valign="top"> | <tr valign="top"> | ||
<td width=75><span style="font-size: 15px; font-weight: 700; color: white; background-color: black;"> Duration: </span></td> | <td width=75><span style="font-size: 15px; font-weight: 700; color: white; background-color: black;"> Duration: </span></td> | ||
| − | <td> | + | <td>2 hours</td> |
| − | + | ||
</tr> | </tr> | ||
<tr valign="top"> | <tr valign="top"> | ||
<td><span style="font-size: 15px; font-weight: 700; color: white; background-color: black;"> Loco: </span></td> | <td><span style="font-size: 15px; font-weight: 700; color: white; background-color: black;"> Loco: </span></td> | ||
| − | <td>'''SAR T | + | <td>'''SAR T 258''' on '''Gladstone Goods Loop'''<br> |
| − | + | '''Other Unrostered Locos:''' | |
| − | *'''SAR T | + | *'''SAR T 210''' at '''Gladstone Depot'''</td> |
| − | + | ||
| − | + | ||
</tr> | </tr> | ||
<tr valign="top"> | <tr valign="top"> | ||
<td><span style="font-size: 15px; font-weight: 700; color: white; background-color: black;"> Consist: </span></td> | <td><span style="font-size: 15px; font-weight: 700; color: white; background-color: black;"> Consist: </span></td> | ||
| − | <td>Attached to '''SAR T | + | <td>Attached to '''SAR T 258'''. 5 '''CCC''' gondola wagons, 3 '''Tank''' wagons, 1 '''DB''' Guard Van. Each wagon has its destination as part of its name e.g. '''Bunker Tank Peterborough 3''' indicating it is the 3rd tanker wagon for '''Peterborough'''.</td> |
</tr> | </tr> | ||
<tr valign="top"> | <tr valign="top"> | ||
<td colspan=2> | <td colspan=2> | ||
| − | <table bgcolor="lightcyan" | + | <table bgcolor="lightcyan"> <!-- BEGIN Location Data table --> |
<tr> | <tr> | ||
<td> | <td> | ||
| Line 59: | Line 56: | ||
<tr valign="top"> | <tr valign="top"> | ||
<td><span style="font-size: 15px; font-weight: 700; color: white">Getting Started:</span><br> | <td><span style="font-size: 15px; font-weight: 700; color: white">Getting Started:</span><br> | ||
| − | <table bgcolor="lightyellow"> <!-- BEGIN Getting Started table --> | + | <table bgcolor="lightyellow" width=996> <!-- BEGIN Getting Started table --> |
<tr valign="top"> | <tr valign="top"> | ||
<td> | <td> | ||
# The first step is to pause the session by pressing the '''P''' key. | # The first step is to pause the session by pressing the '''P''' key. | ||
# Next locate your loco. '''Either''':- | # Next locate your loco. '''Either''':- | ||
| − | ## Open the '''Finder Tool''' (press '''CTRL-F''') and type, in the '''name''' field, the name of the loco. For example '''SAR T | + | ## Open the '''Finder Tool''' (press '''CTRL-F''') and type, in the '''name''' field, the name of the loco. For example '''SAR T 258''' (or just '''T 258''' should be enough). Click the '''tick''' icon, '''OR''' |
## Open the '''Driver List''' (bottom left of the screen) and select the loco from there - click the drivers '''Eye''' icon to jump to the loco. | ## Open the '''Driver List''' (bottom left of the screen) and select the loco from there - click the drivers '''Eye''' icon to jump to the loco. | ||
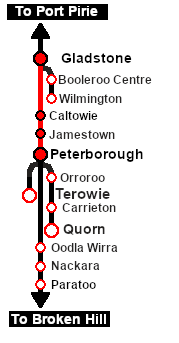
| − | # Take a few moments to get your bearings. Use the [[image:Line_Index_Label.png|link=SAR_Index|Location Index]] (this link will open in this window) and click on ''' | + | # Take a few moments to get your bearings. Use the [[image:Line_Index_Label.png|link=SAR_Index|Location Index]] (this link will open in this window) and click on '''Gladstone''' to load its location details and track plans. In each location details page:- |
| − | #*the [[image:Tab_PH_Grey.png|link=|75px]] tab will reveal the optional ''' | + | #*the [[image:Tab_PH_Grey.png|link=|75px]] tab will reveal the optional '''Interlocking Tower''' paths into and out of each location (where available). |
#*the [[image:Tab_TM_Grey.png|link=|75px]] tab will reveal the invisible [[image:Trackmark_Right.png|link=|alt=TM|8px]] '''Track Marks''' for '''Drive To''' commands. | #*the [[image:Tab_TM_Grey.png|link=|75px]] tab will reveal the invisible [[image:Trackmark_Right.png|link=|alt=TM|8px]] '''Track Marks''' for '''Drive To''' commands. | ||
#*the [[image:Tab_IN_Grey.png|link=|75px]] tab will show all active industries and their commodities. | #*the [[image:Tab_IN_Grey.png|link=|75px]] tab will show all active industries and their commodities. | ||
| Line 101: | Line 98: | ||
<td> | <td> | ||
<span style="font-size: 15px; font-weight: 700; color: white; background-color: black;"> Tasks: </span><br> | <span style="font-size: 15px; font-weight: 700; color: white; background-color: black;"> Tasks: </span><br> | ||
| − | # | + | # Run the loco light engined to the <span style="font-weight: 700; color: black; background-color: yellow;"> Goods Loop Yard </span> and couple to the train. |
| − | # | + | # Take the train to '''Jamestown''' and unload the '''Jamestown CCC''' (coal) wagon at the <span style="font-weight: 700;"><span style="color: white; background-color: black;"> Loco Coal & Water </span> Stage</span>. Store the empty wagon on one of the <span style="font-weight: 700; color: white; background-color: black;"> Loco Depot Siding </span> roads. |
| − | + | # Take the train to '''Peterborough''' and unload one of the '''Peterborough CCC''' (coal) wagons at the <span style="font-weight: 700;">Sub Depot <span style="color: white; background-color: black;"> Loco Coal </span> Stage</span> and the remaining '''CCC''' wagons at the <span style="font-weight: 700;">Main Depot <span style="color: white; background-color: black;"> Loco Coal & Water </span> Stage</span>. Store the empty coal wagons on one of the <span style="font-weight: 700; color: white; background-color: black;"> Loco Depot Siding </span> roads. | |
| − | # | + | # Unload the '''Tank''' wagons at the <span style="font-weight: 700;">Main Depot <span style="color: white; background-color: black;"> Loco Fuel & Water </span> Point</span>. Store the empty '''Tank''' wagons on one of the <span style="font-weight: 700; color: white; background-color: black;"> Loco Depot Siding </span> roads. |
| − | + | ||
| − | + | ||
| − | # | + | |
| − | + | ||
| − | + | ||
| − | + | ||
<br> | <br> | ||
</td> | </td> | ||
| Line 122: | Line 113: | ||
<td> | <td> | ||
*The approaches to all locations are protected by invisible signals to prevent the '''AI Half Speed Slowdown Problem''' when approaching a signal at stop. | *The approaches to all locations are protected by invisible signals to prevent the '''AI Half Speed Slowdown Problem''' when approaching a signal at stop. | ||
| − | *''' | + | *'''Interlocking Towers''' are available for use. These are located at '''Gladstone''' (depart), '''Caltowie''' (arrive and depart), '''Jamestown''' (arrive and depart) and '''Peterborough''' (arrive). Click [[image:Line_Index_Label.png|link=SAR_Index|Location Index]] for details. |
| − | *Trackmarks and industries have been provided for AI '''Drive To Trackmark''', '''Drive via Trackmark''' and | + | *Trackmarks and industries have been provided for AI '''Drive To Trackmark''', '''Drive via Trackmark''' and <span style="font-weight: 700;">Drive to <span style="background-color: yellow; color: black;"> Industry </span></span> commands. Click [[image:Line_Index_Label.png|link=SAR_Index|Location Index]] for details. |
*Manual (no AI) driving is possible. As a visual driving aid, a '''Caution''' warning sign has been placed at the location of the '''Main Approach Dn''' and '''Main Approach Up''' trackmarks. Click [[image:Line_Index_Label.png|link=SAR_Index|Location Index]] for details. | *Manual (no AI) driving is possible. As a visual driving aid, a '''Caution''' warning sign has been placed at the location of the '''Main Approach Dn''' and '''Main Approach Up''' trackmarks. Click [[image:Line_Index_Label.png|link=SAR_Index|Location Index]] for details. | ||
</td> | </td> | ||
| Line 136: | Line 127: | ||
<tr valign="top"> | <tr valign="top"> | ||
<td> | <td> | ||
| − | <td align="center">[[image:SAR Scenario Gladstone- | + | <td align="center">[[image:SAR Scenario Gladstone-Peterborough Strip Map.png|link=|alt=Strip Map]]</td> |
</tr> | </tr> | ||
</table> <!-- END Strip Map Table --> | </table> <!-- END Strip Map Table --> | ||
| Line 148: | Line 139: | ||
</tr> | </tr> | ||
<tr valign="center"> | <tr valign="center"> | ||
| − | <td width=40 align="left">[[image:ArrowLeft.png|link=SAR Scenario | + | <td width=40 align="left">[[image:ArrowLeft.png|link=SAR Scenario Quorn Shunter|30px]]</td> |
<td width=184 align="center">[[image:Session Scenario Index.png|link=SAR Peterborough Base Session|alt=Scenarios|Scenario Index]]<br>'''[[SAR Peterborough Base Session|Session Scenarios List]]'''</td> | <td width=184 align="center">[[image:Session Scenario Index.png|link=SAR Peterborough Base Session|alt=Scenarios|Scenario Index]]<br>'''[[SAR Peterborough Base Session|Session Scenarios List]]'''</td> | ||
<td width=184 align="center">[[Image:Location Index.png|link=SAR Index|alt=Location Index|Location Index]]<br>'''[[SAR Index|Location List]]'''</td> | <td width=184 align="center">[[Image:Location Index.png|link=SAR Index|alt=Location Index|Location Index]]<br>'''[[SAR Index|Location List]]'''</td> | ||
| Line 154: | Line 145: | ||
<td width=184 align="center">[[image:Industry Index.png|link=SAR Scenario Industries|alt=Industries]]<br>'''[[SAR Scenario Industries|Active Industries]]'''</td> | <td width=184 align="center">[[image:Industry Index.png|link=SAR Scenario Industries|alt=Industries]]<br>'''[[SAR Scenario Industries|Active Industries]]'''</td> | ||
<td width=184 align="center">[[image:BackToTop.png|link=#top|alt=Top|Top]]</td> | <td width=184 align="center">[[image:BackToTop.png|link=#top|alt=Top|Top]]</td> | ||
| − | <td width=40 align="left">[[image:ArrowRight.png|link=SAR Scenario | + | <td width=40 align="left">[[image:ArrowRight.png|link=SAR Scenario East-West Express|30px]]</td> |
</tr> | </tr> | ||
</table> <!-- END End Links Table --> | </table> <!-- END End Links Table --> | ||
Revision as of 11:20, 28 March 2021
| 1 Gladstone to Peterborough Depot Fuel Run | ||
| A scenario in the SAR Peterborough Base Session | ||
| Loco coal stages and fuel-oil points need to be refilled regularly. This service delivers coal to the loco coal stages at Jamestown and Peterborough, and bunker c oil (for the SAR 400 class Garrett locos) to the loco (main) depot at Peterborough. |
 |
|
||||||||||
Getting Started:
|
Tutorial:
|

|
|
| Links: All links will open in this window | ||||||
 Session Scenarios List |
 Location List |
 Rolling Stock |
 Active Industries |
|||
This page was created by Trainz user pware in February 2021 and was last updated as shown below.