SAR Scenario Livestock Shuttle
From TrainzOnline
(Difference between revisions)
m |
m |
||
| Line 2: | Line 2: | ||
<table width=1000> <!-- BEGIN Title table --> | <table width=1000> <!-- BEGIN Title table --> | ||
<tr valign="top"> | <tr valign="top"> | ||
| − | <td width=50 align="left">[[image:ArrowLeftBtn.png|link=SAR Scenario | + | <td width=50 align="left">[[image:ArrowLeftBtn.png|link=SAR Scenario Laura Test Run|30px]]</td> |
| − | <td width=900 align="center"><span style="font-size: 21px; font-weight: 700;"> <span style="background-color: black; color: white;"> | + | <td width=900 align="center"><span style="font-size: 21px; font-weight: 700;"> <span style="background-color: black; color: white;"> 23 </span> <span style="background-color: black; color: white;"> Peterborough Livestock Shuttle </span></span></td> |
| − | <td width=50 align="right">[[image:ArrowRightBtn.png|link=SAR Scenario | + | <td width=50 align="right">[[image:ArrowRightBtn.png|link=SAR Scenario Rail Car Inspection Run|30px]]</td> |
</tr> | </tr> | ||
<tr valign="top"> | <tr valign="top"> | ||
| Line 12: | Line 12: | ||
<table width=1000> <!-- BEGIN Summary table --> | <table width=1000> <!-- BEGIN Summary table --> | ||
<tr valign="top"> | <tr valign="top"> | ||
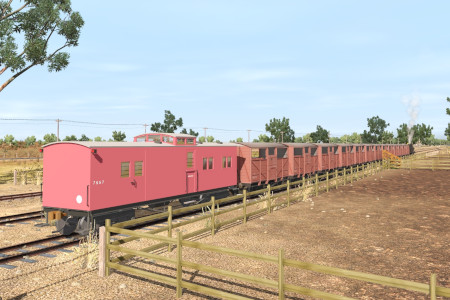
| − | <td align="left"> | + | <td align="left">Livestock transfers between the stockyards at '''Terowie''' and '''Peterborough'''.</td> |
<td align="right">[[file:BackToBottom.png|link=#bottom|alt=Bottom|Bottom]]</td> | <td align="right">[[file:BackToBottom.png|link=#bottom|alt=Bottom|Bottom]]</td> | ||
</tr> | </tr> | ||
| Line 19: | Line 19: | ||
<table width=1000> <!-- BEGIN Scenario image and loco/consist table --> | <table width=1000> <!-- BEGIN Scenario image and loco/consist table --> | ||
<tr valign="top"> | <tr valign="top"> | ||
| − | <td width=450>[[image:SAR | + | <td width=450>[[image:SAR Livestock Shuttle.png|link=|alt=Livestock Shuttle]]</td> |
<td> | <td> | ||
<table width=550 bgcolor="black"> <!-- BEGIN Loco/consist sub table --> | <table width=550 bgcolor="black"> <!-- BEGIN Loco/consist sub table --> | ||
| Line 31: | Line 31: | ||
<tr valign="top"> | <tr valign="top"> | ||
<td><span style="font-size: 15px; font-weight: 700; color: white; background-color: black;"> Duration: </span></td> | <td><span style="font-size: 15px; font-weight: 700; color: white; background-color: black;"> Duration: </span></td> | ||
| − | <td>''' | + | <td>'''Peterborough: 45 minutes'''<br> |
| + | '''Return: 100 minutes'''</td> | ||
</tr> | </tr> | ||
<tr valign="top"> | <tr valign="top"> | ||
<td><span style="font-size: 15px; font-weight: 700; color: white; background-color: black;"> Loco: </span></td> | <td><span style="font-size: 15px; font-weight: 700; color: white; background-color: black;"> Loco: </span></td> | ||
| − | <td>'''The [[image:Loco_Roster_Label.png|link=SAR Peterborough Division Loco Roster]] has locos available at the <span style="color: white; background-color: black;"> | + | <td>'''The [[image:Loco_Roster_Label.png|link=SAR Peterborough Division Loco Roster]] has locos available at the <span style="color: white; background-color: black;"> Terowie Loco Depot </span>''' |
| − | *'''[[SAR_Scenario_Rolling_Stock#SAR_T_Class|SAR T | + | *'''[[SAR_Scenario_Rolling_Stock#SAR_T_Class|SAR T 198]]''' |
| − | *'''[[SAR_Scenario_Rolling_Stock#SAR_T_Class|SAR T | + | *'''[[SAR_Scenario_Rolling_Stock#SAR_T_Class|SAR T 231]]''' |
| − | *'''[[SAR_Scenario_Rolling_Stock#SAR_830_Class|SAR | + | '''and at the <span style="color: white; background-color: black;"> Peterborough Loco Depot </span> for an optional loco swap''' |
| + | *'''[[SAR_Scenario_Rolling_Stock#SAR_T_Class|SAR T 23]] at <span style="color: white; background-color: black;"> Loco Sidings </span>''' | ||
| + | *'''[[SAR_Scenario_Rolling_Stock#SAR_T_Class|SAR T 233]] at <span style="color: white; background-color: black;"> Loco Sheds </span>''' | ||
| + | *'''[[SAR_Scenario_Rolling_Stock#SAR_400_Class|SAR 407]] at <span style="color: white; background-color: black;"> Repair Shop Sheds </span>''' | ||
| + | *'''[[SAR_Scenario_Rolling_Stock#SAR_830_Class|SAR 837]] at <span style="color: white; background-color: black;"> Loco Sheds </span>''' | ||
| + | *'''[[SAR_Scenario_Rolling_Stock#SAR_830_Class|SAR 840]] at <span style="color: white; background-color: black;"> Loco Sheds </span>''' | ||
</td> | </td> | ||
</tr> | </tr> | ||
<tr valign="top"> | <tr valign="top"> | ||
<td><span style="font-size: 15px; font-weight: 700; color: white; background-color: black;"> Consist: </span></td> | <td><span style="font-size: 15px; font-weight: 700; color: white; background-color: black;"> Consist: </span></td> | ||
| − | <td>''' | + | <td> |
| + | *'''[[SAR_Scenario_Rolling_Stock#8T|8T Cattle Wagons]]''' | ||
| + | *'''[[SAR_Scenario_Rolling_Stock#SAR_Brake_Van|Brake Van]]''' | ||
| + | on the <span style="font-weight: 700;">Terowie <span style=" color: white; background-color: red;"> Stockyard Siding </span></span>. | ||
</td> | </td> | ||
</tr> | </tr> | ||
| Line 71: | Line 80: | ||
# If you have already closed the opening message window then the first step is to pause the session by pressing the <span style="font-weight: 700; font-size: 15px; color: white; background-color: black;"> P </span> key. | # If you have already closed the opening message window then the first step is to pause the session by pressing the <span style="font-weight: 700; font-size: 15px; color: white; background-color: black;"> P </span> key. | ||
# Next locate your loco. '''Either''':- | # Next locate your loco. '''Either''':- | ||
| − | #* Open the '''Finder Tool''' (press <span style="font-weight: 700; font-size: 15px; color: white; background-color: black;"> Ctrl </span> <span style="font-weight: 700; font-size: 15px; color: white; background-color: black;"> F </span>) and type, in the '''Name''' field, the name of your selected loco, for example '''SAR T | + | #* Open the '''Finder Tool''' (press <span style="font-weight: 700; font-size: 15px; color: white; background-color: black;"> Ctrl </span> <span style="font-weight: 700; font-size: 15px; color: white; background-color: black;"> F </span>) and type, in the '''Name''' field, the name of your selected loco, for example '''SAR T 198''' (or just '''T 198''' which should be enough), then click the '''tick''' icon, '''OR''' |
#*Open the '''Driver List''' (bottom left of the screen) and then scroll through the list to find '''either''':- | #*Open the '''Driver List''' (bottom left of the screen) and then scroll through the list to find '''either''':- | ||
| − | #:*the '''loco name''' ('''SAR T | + | #:*the '''loco name''' ('''SAR T 198''') '''OR''' |
| − | #:*the '''driver''' icon (named '''Driver | + | #:*the '''driver''' icon (named '''Driver 198''') - this is a non-animated icon |
#::then click the drivers '''Eye''' icon [[image:Driver_Eye.png|link=]] to take control of the loco. | #::then click the drivers '''Eye''' icon [[image:Driver_Eye.png|link=]] to take control of the loco. | ||
| − | # Take a few moments to get your bearings. Click [[image: | + | # Take a few moments to get your bearings. Click [[image:Line_Index_Terowie.png|link=SAR_Terowie|Terowie Data]] (this link will open in this window) to show the location details and track plans for '''Terowie'''. In each location details page:- |
#*the [[image:Tab_HM_White.png|link=|75px]] tab gives an overall summary of each location with a "potted" history (where available). | #*the [[image:Tab_HM_White.png|link=|75px]] tab gives an overall summary of each location with a "potted" history (where available). | ||
#*the [[image:Tab_TM_Grey.png|link=|75px]] tab reveals the invisible [[image:Trackmark_Right.png|link=|alt=TM|8px]] '''Track Marks''' for '''Drive To''' commands. | #*the [[image:Tab_TM_Grey.png|link=|75px]] tab reveals the invisible [[image:Trackmark_Right.png|link=|alt=TM|8px]] '''Track Marks''' for '''Drive To''' commands. | ||
| Line 113: | Line 122: | ||
<tr valign="top"> | <tr valign="top"> | ||
<td width=716> | <td width=716> | ||
| − | # Reverse the loco and tender out of the <span style="font-weight: 700; color: white; background-color: black;"> Loco Depot </span> yard and onto the | + | # Reverse the loco and tender out of the <span style="font-weight: 700; color: white; background-color: black;"> Loco Depot </span> yard and onto the <span style="font-weight: 700; color: white; background-color: red;"> Stockyard Siding </span> |
| − | # | + | # Couple to the livestock consist stored in the <span style="font-weight: 700; color: white; background-color: red;"> Stockyard Siding </span> |
| − | # At ''' | + | # Load livestock at the <span style="font-weight: 700;">Terowie <span style="color: white; background-color: red;"> Stockyard Transfer </span> platform</span> |
| − | + | # Proceed to '''Peterborough''' Stockyard sidings | |
| − | + | # Unload at the appropriate stockyard - <span style="font-weight: 700;">Peterborough <span style="color: white; background-color: red;"> Stockyard 1 </span> (Cattle)</span> or <span style="font-weight: 700;">Peterborough <span style="color: white; background-color: red;"> Stockyard 2 </span> (Sheep)</span> | |
| + | At this point you can return empty to '''Terowie''' or:- | ||
| + | # Proceeed to either <span style="font-weight: 700;">Peterborough <span style="color: white; background-color: red;"> Stockyard 1 </span> (Cattle)</span> or <span style="font-weight: 700;">Peterborough <span style="color: white; background-color: red;"> Stockyard 2 </span> (Sheep)</span> | ||
| + | # Load with livestock | ||
| + | # Return to '''Terowie''' and unload at the <span style="font-weight: 700;">Terowie <span style="color: white; background-color: red;"> Stockyard Transfer </span> platform</span> | ||
</td> | </td> | ||
<td width=100>[[image:SAR Train Order Rotated.png|100px|link=|alt=Logo]]</td> | <td width=100>[[image:SAR Train Order Rotated.png|100px|link=|alt=Logo]]</td> | ||
| Line 132: | Line 145: | ||
<tr valign="top"> | <tr valign="top"> | ||
<td> | <td> | ||
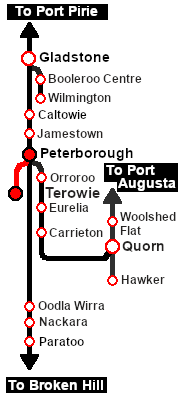
| − | A summary of the facilities and product loads at all locations along the line is provided in the link [[Image: | + | A summary of the facilities and product loads at all locations along the line is provided in the link [[Image:SAR_Peterborough-Terowie_Line.png|link=SAR Peterborough-Terowie|alt=Peterborough-Terowie Line|Show Peterborough-Terowie Line]] |
| − | + | ||
| − | + | ||
| − | + | ||
*The approaches to all locations are protected by invisible signals to prevent the '''AI Half Speed Slowdown Problem''' when approaching a signal at stop. | *The approaches to all locations are protected by invisible signals to prevent the '''AI Half Speed Slowdown Problem''' when approaching a signal at stop. | ||
*Trackmarks and industries have been provided for AI '''Drive To Trackmark''', '''Drive via Trackmark''' and '''Drive to <span style="background-color: yellow;"> Industry </span>''' commands. Click [[image:Line_Index_Label.png|link=SAR_Index|Location Index]] for details. | *Trackmarks and industries have been provided for AI '''Drive To Trackmark''', '''Drive via Trackmark''' and '''Drive to <span style="background-color: yellow;"> Industry </span>''' commands. Click [[image:Line_Index_Label.png|link=SAR_Index|Location Index]] for details. | ||
| Line 151: | Line 161: | ||
<tr valign="top"> | <tr valign="top"> | ||
<td> | <td> | ||
| − | <td align="center">[[image:SAR Scenario | + | <td align="center">[[image:SAR Scenario Peterborough-Terowie Strip Map.png|link=|alt=Strip Map]]<br>[[image:SAR Scenario Route.png|link=|alt=Route Key]]</td> |
</tr> | </tr> | ||
</table> <!-- END Strip Map Table --> | </table> <!-- END Strip Map Table --> | ||
| Line 163: | Line 173: | ||
</tr> | </tr> | ||
<tr valign="center"> | <tr valign="center"> | ||
| − | <td width=50 align="left">[[image:ArrowLeftBtn.png|link=SAR Scenario | + | <td width=50 align="left">[[image:ArrowLeftBtn.png|link=SAR Scenario Laura Test Run|30px]]</td> |
<td width=125 align="center">[[image:Session Scenario Index.png|link=SAR Peterborough Base Session|alt=Scenarios|Scenario Index]]<br>'''[[SAR Peterborough Base Session|Session Scenarios]]'''</td> | <td width=125 align="center">[[image:Session Scenario Index.png|link=SAR Peterborough Base Session|alt=Scenarios|Scenario Index]]<br>'''[[SAR Peterborough Base Session|Session Scenarios]]'''</td> | ||
<td width=125 align="center">[[Image:Location Index.png|link=SAR Index|alt=Location Index|Location Index]]<br>'''[[SAR Index|Location List]]'''</td> | <td width=125 align="center">[[Image:Location Index.png|link=SAR Index|alt=Location Index|Location Index]]<br>'''[[SAR Index|Location List]]'''</td> | ||
| Line 171: | Line 181: | ||
<td width=125 align="center">[[image:Industry Index.png|link=SAR Scenario Industries|alt=Industries]]<br>'''[[SAR Scenario Industries|Active Industries]]'''</td> | <td width=125 align="center">[[image:Industry Index.png|link=SAR Scenario Industries|alt=Industries]]<br>'''[[SAR Scenario Industries|Active Industries]]'''</td> | ||
<td width=125 align="center">[[image:BackToTop.png|link=#top|alt=Top|Top]]</td> | <td width=125 align="center">[[image:BackToTop.png|link=#top|alt=Top|Top]]</td> | ||
| − | <td width=50 align="right">[[image:ArrowRightBtn.png|link=SAR Scenario | + | <td width=50 align="right">[[image:ArrowRightBtn.png|link=SAR Scenario Rail Car Inspection Run|30px]]</td> |
</tr> | </tr> | ||
</table> <!-- END End Links Table --> | </table> <!-- END End Links Table --> | ||
<span id="bottom"></span> | <span id="bottom"></span> | ||
---- | ---- | ||
| − | This page was created by Trainz user '''<span class="plainlinks">[http://online.ts2009.com/mediaWiki/index.php/User:Pware pware]</span>''' in | + | This page was created by Trainz user '''<span class="plainlinks">[http://online.ts2009.com/mediaWiki/index.php/User:Pware pware]</span>''' in June 2022 and was last updated as shown below. |
---- | ---- | ||
Revision as of 18:05, 24 August 2022
| 23 Peterborough Livestock Shuttle | ||
| A scenario in the SAR Peterborough Base Session v2.0 | ||
| Livestock transfers between the stockyards at Terowie and Peterborough. |
 |
|
|
|
Each location in the layout has a detailed set of track diagrams that provide a variety of useful information The Getting Started guide below gives a summary of what is available. |
Getting Started:
|
Tutorial:
|
|
|


| Links: All links will open in this window | ||||||||
 Session Scenarios |
 Location List |
 Drive Tutorial |
 Rolling Stock |
 Loco Roster |
 Active Industries |
|||
This page was created by Trainz user pware in June 2022 and was last updated as shown below.