SAR Scenario Livestock Shuttle
From TrainzOnline
(Difference between revisions)
m |
|||
| Line 43: | Line 43: | ||
*'''[[SAR_Scenario_Rolling_Stock#SAR_T_Class|SAR T 233]] at <span style="color: white; background-color: black;"> Loco Sheds </span>''' | *'''[[SAR_Scenario_Rolling_Stock#SAR_T_Class|SAR T 233]] at <span style="color: white; background-color: black;"> Loco Sheds </span>''' | ||
*'''[[SAR_Scenario_Rolling_Stock#SAR_400_Class|SAR 407]] at <span style="color: white; background-color: black;"> Repair Shop Sheds </span>''' | *'''[[SAR_Scenario_Rolling_Stock#SAR_400_Class|SAR 407]] at <span style="color: white; background-color: black;"> Repair Shop Sheds </span>''' | ||
| − | *'''[[SAR_Scenario_Rolling_Stock#SAR_830_Class|SAR | + | *'''[[SAR_Scenario_Rolling_Stock#SAR_830_Class|SAR 858]] at <span style="color: white; background-color: black;"> Loco Sheds </span>''' |
| − | *'''[[SAR_Scenario_Rolling_Stock#SAR_830_Class|SAR | + | *'''[[SAR_Scenario_Rolling_Stock#SAR_830_Class|SAR 867]] at <span style="color: white; background-color: black;"> Loco Sheds </span>''' |
</td> | </td> | ||
</tr> | </tr> | ||
| Line 123: | Line 123: | ||
<tr valign="top"> | <tr valign="top"> | ||
<td width=716> | <td width=716> | ||
| − | # Reverse the loco and tender out of the <span style="font-weight: 700; color: white; background-color: black;"> Loco Depot </span> yard and onto the <span style="font-weight: 700; color: white; background-color: red;"> Stockyard | + | # Reverse the loco and tender out of the <span style="font-weight: 700; color: white; background-color: black;"> Loco Depot </span> yard and onto the <span style="font-weight: 700; color: white; background-color: red;"> Stockyard Road </span> |
# Couple to the livestock consist stored in either:- | # Couple to the livestock consist stored in either:- | ||
| − | #* <span style="font-weight: 700; color: white; background-color: red;"> Stockyard Siding 1 </span> (cattle), or | + | #* <span style="font-weight: 700; color: white; background-color: red;"> Stockyard Siding 1 </span> (cattle wagons), or |
| − | #* <span style="font-weight: 700; color: white; background-color: red;"> Stockyard Siding 2 </span> (sheep) | + | #* <span style="font-weight: 700; color: white; background-color: red;"> Stockyard Siding 2 </span> (sheep wagons) |
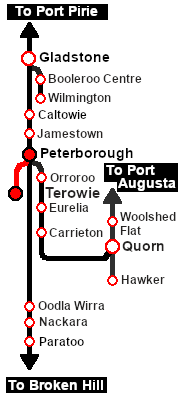
| − | # Proceed | + | # Proceed to the <span style="font-weight: 700;">Terowie <span style="color: white; background-color: red;"> Stockyard Transfer </span> platform</span> and load livestock |
| − | # Shunt the | + | # Proceed to '''Peterborough''' Yards. Take coal and water when required |
| − | # | + | # Shunt the train to either the <span style="font-weight: 700;">Peterborough <span style="color: white; background-color: red;"> Stockyard 1 </span> (Cattle)</span> or <span style="font-weight: 700;">Peterborough <span style="color: white; background-color: red;"> Stockyard 2 </span> (Sheep)</span> and unload |
| − | + | # Pull the wagons back to '''Peterborough''' Yards and run the loco around the train | |
| − | # Return to ''' | + | # Proceed to '''Ucolta''', '''Oodla Wirra''', '''Nackara''' and '''Paratoo''' delivering wagos to the stockyards at each location. Take water when required |
| + | # At '''Paratoo''' take coal and water. Turn the loco on the <span style="font-weight: 700; color: white; background-color: black;"> WYE </span> | ||
| + | # Return to '''Peterborough''' yard collecting the loaded livestock wagons at each location | ||
| + | # Unload the livestock at the <span style="font-weight: 700;">Peterborough <span style="color: white; background-color: red;"> Stockyard 1 </span> (Cattle)</span> or <span style="font-weight: 700;">Peterborough <span style="color: white; background-color: red;"> Stockyard 2 </span> (Sheep)</span> | ||
| + | # Shunt the wagons to '''Peterborough''' Yards. Coal and water when required. You may perform an optional loco swap | ||
| + | # Return empty to '''Terowie''' | ||
| + | # Stable the wagons in a vacant <span style="font-weight: 700; color: white; background-color: red;"> Stockyard Sidings </span> | ||
| + | # Coal, water and stable the loco | ||
</td> | </td> | ||
<td width=100>[[image:SAR Train Order Rotated.png|100px|link=|alt=Logo]]</td> | <td width=100>[[image:SAR Train Order Rotated.png|100px|link=|alt=Logo]]</td> | ||
| Line 146: | Line 153: | ||
<tr valign="top"> | <tr valign="top"> | ||
<td> | <td> | ||
| − | A summary of the facilities and product loads at all locations along the line is provided in the | + | A summary of the facilities and product loads at all locations along the line is provided in the links<br> |
| + | [[Image:SAR_Peterborough-Terowie_Line.png|link=SAR Peterborough-Terowie|alt=Peterborough-Terowie Line|Show Peterborough-Terowie Line]] and [[Image:SAR_PortPirie-BrokenHill_Line.png|link=SAR Port Pirie-Broken Hill|alt=Port Pirie-Broken Hill Line|Show Port Pirie-Broken Hill Line]] | ||
*The approaches to all locations are protected by invisible signals to prevent the '''AI Half Speed Slowdown Problem''' when approaching a signal at stop. | *The approaches to all locations are protected by invisible signals to prevent the '''AI Half Speed Slowdown Problem''' when approaching a signal at stop. | ||
*Trackmarks and industries have been provided for AI '''Drive To Trackmark''', '''Drive via Trackmark''' and '''Drive to <span style="background-color: yellow;"> Industry </span>''' commands. Click [[image:Line_Index_Label.png|link=SAR_Index|Location Index]] for details. | *Trackmarks and industries have been provided for AI '''Drive To Trackmark''', '''Drive via Trackmark''' and '''Drive to <span style="background-color: yellow;"> Industry </span>''' commands. Click [[image:Line_Index_Label.png|link=SAR_Index|Location Index]] for details. | ||
Revision as of 20:21, 19 October 2022
| 21 Peterborough Livestock Shuttle | ||
| A scenario in the SAR Peterborough Base Session v2.0 | ||
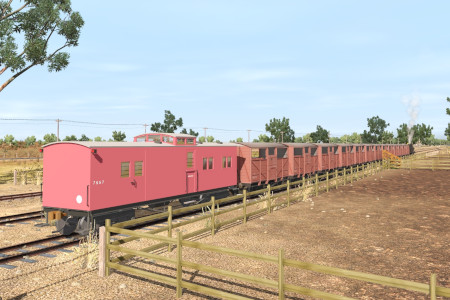
| Livestock transfer between the stockyards at Terowie and Peterborough. |
 |
|
|
|
Each location in the layout has a detailed set of track diagrams that provide a variety of useful information The Getting Started guide below gives a summary of what is available. |
Getting Started:
|
Tutorial:
|
|
|


| Links: All links will open in this window | ||||||||
 Session Scenarios |
 Location List |
 Drive Tutorial |
 Rolling Stock |
 Loco Roster |
 Active Industries |
|||
This page was created by Trainz user pware in June 2022 and was last updated as shown below.