SAR Scenario Livestock Shuttle

From TrainzOnline
(Difference between revisions)
Jump to: navigation, search
m
m
Line 170: Line 170:
 
<td rowspan=39 width=1></td> <!-- row count -->
 
<td rowspan=39 width=1></td> <!-- row count -->
 
<td rowspan=39 bgcolor="black" width=1></td> <!-- row count -->
 
<td rowspan=39 bgcolor="black" width=1></td> <!-- row count -->
<td align="center" width=70>'''(M) W (F)'''<br>'''TL18'''</td>
+
<td align="center" width=70>'''(M) W (F)'''<br>'''360'''</td>
 
<td align="center" width=70>'''(M F)'''<br>'''TL17'''</td>
 
<td align="center" width=70>'''(M F)'''<br>'''TL17'''</td>
 
<td align="center" bgcolor="lightcyan" width=70>'''W'''<br>'''PL18'''</td>
 
<td align="center" bgcolor="lightcyan" width=70>'''W'''<br>'''PL18'''</td>
Line 192: Line 192:
 
<td align="right">'''Livestock Siding'''</td>
 
<td align="right">'''Livestock Siding'''</td>
 
<td colspan=2>&nbsp;</td>
 
<td colspan=2>&nbsp;</td>
<td align="center">'''08:mm'''</td>
+
<td align="center">'''A'''</td>
 
<td align="center">&nbsp;</td>
 
<td align="center">&nbsp;</td>
 
<td align="center">&nbsp;</td>
 
<td align="center">&nbsp;</td>
<td>Collect livestock wagons from Siding 1 or Siding 2</td>
+
<td>Attach livestock wagons from Siding 1 or Siding 2</td>
 
</tr>
 
</tr>
 
<tr valign="top">
 
<tr valign="top">
Line 209: Line 209:
 
<td>&nbsp;</td>
 
<td>&nbsp;</td>
 
<td align="right">'''dep'''</td>
 
<td align="right">'''dep'''</td>
<td align="center">'''08:mm'''</td>
+
<td align="center">'''08:15'''</td>
 
<td align="center">&nbsp;</td>
 
<td align="center">&nbsp;</td>
 
<td align="center">&nbsp;</td>
 
<td align="center">&nbsp;</td>
Line 221: Line 221:
 
<td align="right">'''FUX'''</td>
 
<td align="right">'''FUX'''</td>
 
<td>&nbsp;</td>
 
<td>&nbsp;</td>
<td align="center">hh:mm</td>
+
<td align="center">08:26</td>
 
<td align="center">&nbsp;</td>
 
<td align="center">&nbsp;</td>
 
<td align="center">&nbsp;</td>
 
<td align="center">&nbsp;</td>
Line 233: Line 233:
 
<td align="right">'''CEFJOWX'''</td>
 
<td align="right">'''CEFJOWX'''</td>
 
<td align="right">'''arr'''</td>
 
<td align="right">'''arr'''</td>
<td align="center">'''hh:mm'''</td>
+
<td align="center">'''08:40'''</td>
 
<td align="center">&nbsp;</td>
 
<td align="center">&nbsp;</td>
 
<td align="center">&nbsp;</td>
 
<td align="center">&nbsp;</td>

Revision as of 16:16, 6 November 2022

ArrowLeftBtn.png   
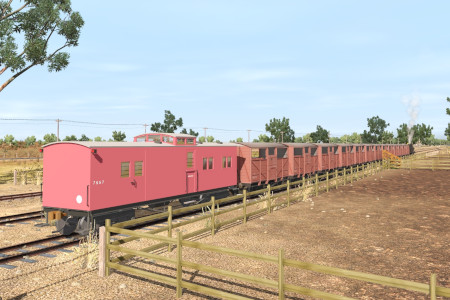
21   Peterborough Livestock Shuttle  ArrowRightBtn.png
A scenario in the SAR Peterborough Base Session v2.0
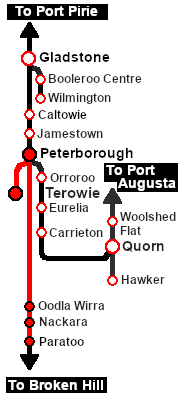
Livestock movements to Peterborough from Terowie and other locations from Paratoo to Ucolta. Bottom

Livestock Shuttle
 Era:  1920s to 1960s
 Duration:  Peterborough: 45 minutes
Return: 100 minutes
 Loco:  The Loco Roster Label.png has locos available at the  Terowie Loco Depot 

and at the  Peterborough Loco Depot  for an optional loco swap

 Consist: 

on the Terowie  Stockyard Siding .

Location Index

Each location in the layout has a detailed set of track diagrams that provide a variety of useful information

The  Getting Started  guide below gives a summary of what is available.

To display this information click any Location Index graphic, or go to the bottom of the page for all the session links (all links will open in this window).
Getting Started:
  1. If you have already closed the opening message window then the first step is to pause the session by pressing the  P  key.
  2. Next locate your loco. Either:-
    • Open the Finder Tool (press  Ctrl   F ) and type, in the Name field, the name of your selected loco, for example SAR T 198 (or just T 198 which should be enough), then click the tick icon, OR
    • Open the Driver List (bottom left of the screen) and then scroll through the list to find either:-
    • the loco name (SAR T 198) OR
    • the driver icon (named Driver 198) - this is a non-animated icon
    then click the drivers Eye icon Driver Eye.png to take control of the loco.
  3. Take a few moments to get your bearings. Click Terowie Data (this link will open in this window) to show the location details and track plans for Terowie. In each location details page:-
    • the Tab HM White.png tab gives an overall summary of each location with a "potted" history (where available).
    • the Tab TM Grey.png tab reveals the invisible TM Track Marks for Drive To commands.
    • the Tab IN Grey.png tab lists all active industries and their commodities.
    • the Tab SW Grey.png tab describes the names, locations and settings of all junction switches as well as some switch sets you may want to use.
  4. Each location details page has direct links to the adjacent locations so you can explore along the route.
  5. When you are ready to start, reload the Peterborough Base Session page (click the Scenarios button on your current location page) and select this Scenario again or just use the Back button on your browser - whichever is quicker.
  6. Switch back to Trainz Driver Mode
  7. Close the opening message window and, if Pause is shown on the screen, press the  P  key to start the session.


Tutorial:
Tutorial A tutorial on using these scenarios is provided in the link on the left. The link will open in this window


Orders:
  1. Reverse the loco and tender out of the  Loco Depot  yard and onto the  Stockyard Road 
  2. Couple to the livestock consist stored in either:-
    •  Stockyard Siding 1  (cattle wagons), or
    •  Stockyard Siding 2  (sheep wagons)
  3. Proceed to the Terowie  Stockyard Transfer  platform and load livestock
  4. Proceed to Peterborough Yards according to the working timetable shown below
  5. Shunt the train to either the Peterborough  Stockyard 1  (Cattle) or Peterborough  Stockyard 2  (Sheep) and unload
  6. Pull the empty wagons to Peterborough Yards. Take coal and water if required. Turn or swap the loco
  7. If running to Paratoo:-
    • deliver empty wagons to stockyards along the route as specified in the timetable
    • take coal and water if required
    • at Paratoo turn the loco on the  WYE 
    • return to Peterborough collecting loaded wagons to unload at the  Stockyard 1  (Cattle) or  Stockyard 2  (Sheep)
  8. Proceed to Terowie with empty wagons
  9. Stable the wagons in a vacant  Stockyard Siding 
  10. Coal, water and stable the loco
Logo
The Base Session has the clock set to start at 08:00.
This can be changed to any required time. For the details see SAR Scenario Session Time Change
 Terowie-Peterborough-Paratoo Livestock Timetable 
  Frequency
Train №
(M) W (F)
360
(M F)
TL17
W
PL18
(when required)
Terowie Depot CEFJOWX dep 08:00      
Livestock Siding   A     Attach livestock wagons from Siding 1 or Siding 2
Livestock Transfer   L     Load livestock
Yard   dep 08:15      
Gumbowie FUX   08:26      
Peterborough Yard CEFJOWX arr 08:40      
Stockyard     UL     UnLoad livestock
Yard     CW     Turn loco or swap loco and Coal/Water if required. On Wed continues as PL18
Peterborough Yard dep     hh:mm  
Ucolta UWX arr     hh:mmW Water loco if required. Deliver X wagons to stockyard
Oodla Wirra UWX arr     hh:mmW Water loco if required. Deliver X wagons to stockyard
Peechara Loop X       hh:mm  
Nackara UWX arr     hh:mmW Water loco if required. Deliver X wagons to stockyard
Methuen Loop X       hh:mm  
Paratoo ΔCFWX arr     hh:mmCW Deliver X wagons to stockyard. Turn loco on WYE and Coal/Water if required
Paratoo Stockyard dep     hh:mm Collect loaded livestock wagons
Paratoo dep     hh:mm  
Methuen Loop         hh:mm  
Nackara   arr     hh:mmW Water loco if required. Collect wagons from stockyard
Peechara Loop         hh:mm  
Oodla Wirra   arr     hh:mmW Water loco if required. Collect wagons from stockyard
Ucolta   arr     hh:mmW Water loco if required. Collect wagons from stockyard
Peterborough Yard arr     hh:mm  
Stockyard       UL UnLoad livestock
Yard         CW Turn or swap loco and Coal/Water if required
Peterborough Yard dep   hh:mm hh:mm  
Gumbowie   hh:mm hh:mm  
Terowie Livestock Transfer arr   hh:mm hh:mm Unload wagons. Stable in siding
Depot       CW CW Coal/Water and stable loco
bold time = arrive/depart time plain time = timing point
Location Symbols:
Δ = Turning Triangle C = Loco Coal Loader E = Engine Depot F = Fixed Signals J = Junction
O = Loco Turntable U = Unattended W = Loco Water Tank X = Crossing Loop
Strip Map
Route Key
Driving Notes:

A summary of the facilities and product loads at all locations along the lines is provided in the links

Port Pirie-Broken Hill Line and Peterborough-Terowie Line
  • The approaches to all locations are protected by invisible signals to prevent the AI Half Speed Slowdown Problem when approaching a signal at stop.
  • Trackmarks and industries have been provided for AI Drive To Trackmark, Drive via Trackmark and Drive to  Industry  commands. Click Location Index for details.
  • Industry active stations (where you can use the Drive To industry command) are only at Gladstone, Jamestown, Peterborough and Terowie. Industry active stations will have a longer than expected wait time.
  • Manual (no AI) driving is possible. As a visual driving aid, a Caution warning sign has been placed at the location of the Main Approach Dn and Main Approach Up trackmarks. Click Location Index for details.
  • If driving manually in yards, you are responsible for correctly setting any catch points.

Links: All links will open in this window
ArrowLeftBtn.png Scenarios
Session Scenarios
Location Index
Location List
Tutorial
Drive Tutorial
Rolling Stock
Rolling Stock
Loco Roster
Loco Roster
Industries
Active Industries
Top ArrowRightBtn.png


This page was created by Trainz user pware in June 2022 and was last updated as shown below.


Personal tools