SAR Scenario Hawker Freight
m |
m |
||
| Line 4: | Line 4: | ||
<tr valign="top"> | <tr valign="top"> | ||
<td width=50 align="left">[[image:ArrowLeftBtn.png|link=SAR Scenario Coffee Pot Special|30px]]</td> | <td width=50 align="left">[[image:ArrowLeftBtn.png|link=SAR Scenario Coffee Pot Special|30px]]</td> | ||
| − | <td width=900 align="center"><span style="font-size: 21px; font-weight: 700;">& | + | <td width=900 align="center"><span style="font-size: 21px; font-weight: 700;"> <span style="background-color: black; color: white;"> 26 </span> <span style="background-color: black; color: white;"> Quorn - Hawker Weekly Freight </span></span></td> |
<td width=50 align="right">[[image:ArrowRightBtn.png|link=SAR Scenario Depot Fuel Run|30px]]</td> | <td width=50 align="right">[[image:ArrowRightBtn.png|link=SAR Scenario Depot Fuel Run|30px]]</td> | ||
</tr> | </tr> | ||
| Line 18: | Line 18: | ||
</table> <!-- END Summary table --> | </table> <!-- END Summary table --> | ||
----- | ----- | ||
| − | <span style="font-weight: 700; font-size: 15px; color: white; background-color: black;">& | + | <span style="font-weight: 700; font-size: 15px; color: white; background-color: black;"> The Historical Bit </span><br> |
Up until 1956 the narrow gauge (3ft6in, 1067mm) '''Central Australia Railway''' from '''Port Augusta''' north to '''Maree''' and on to '''Alice Springs''' ran via '''Quorn''' and '''Hawker'''. In 1956 a new standard gauge (4ft8½inch, 1435mm) line to '''Maree''' was opened which followed a more direct route bypassing the difficult '''Flinders Ranges''', '''Quorn''' and '''Hawker'''. The narrow gauge line sections from '''Port Augusta''' to '''Quorn''' and from '''Hawker''' to '''Maree''' were closed leaving only the section between '''Quorn''' and '''Hawker''' open for traffic. This section survived because a mine near '''Hawker''' needed to send its ore for processing and the local dirt roads were totally unsuitable for the task.<br> | Up until 1956 the narrow gauge (3ft6in, 1067mm) '''Central Australia Railway''' from '''Port Augusta''' north to '''Maree''' and on to '''Alice Springs''' ran via '''Quorn''' and '''Hawker'''. In 1956 a new standard gauge (4ft8½inch, 1435mm) line to '''Maree''' was opened which followed a more direct route bypassing the difficult '''Flinders Ranges''', '''Quorn''' and '''Hawker'''. The narrow gauge line sections from '''Port Augusta''' to '''Quorn''' and from '''Hawker''' to '''Maree''' were closed leaving only the section between '''Quorn''' and '''Hawker''' open for traffic. This section survived because a mine near '''Hawker''' needed to send its ore for processing and the local dirt roads were totally unsuitable for the task.<br> | ||
| Line 32: | Line 32: | ||
<table width=546 bgcolor="white"> | <table width=546 bgcolor="white"> | ||
<tr valign="top"> | <tr valign="top"> | ||
| − | <td width=75><span style="font-size: 15px; font-weight: 700; color: white; background-color: black;">& | + | <td width=75><span style="font-size: 15px; font-weight: 700; color: white; background-color: black;"> Era: </span></td> |
<td>'''1956 to 1972'''</td> | <td>'''1956 to 1972'''</td> | ||
</tr> | </tr> | ||
<tr valign="top"> | <tr valign="top"> | ||
| − | <td><span style="font-size: 15px; font-weight: 700; color: white; background-color: black;">& | + | <td><span style="font-size: 15px; font-weight: 700; color: white; background-color: black;"> Duration: </span></td> |
<td>'''Hawker: x hours xx minutes'''<br> | <td>'''Hawker: x hours xx minutes'''<br> | ||
'''Return: y hours yy minutes'''</td> | '''Return: y hours yy minutes'''</td> | ||
</tr> | </tr> | ||
<tr valign="top"> | <tr valign="top"> | ||
| − | <td><span style="font-size: 15px; font-weight: 700; color: white; background-color: black;">& | + | <td><span style="font-size: 15px; font-weight: 700; color: white; background-color: black;"> Loco: </span></td> |
| − | <td>'''[[SAR_Scenario_Rolling_Stock#SAR_T_Class|SAR T 44]] at Quorn <span style="color: white; background-color: black;">& | + | <td>'''[[SAR_Scenario_Rolling_Stock#SAR_T_Class|SAR T 44]] at Quorn <span style="color: white; background-color: black;"> Loco Depot </span>'''<br> |
| − | '''The [[image:Loco_Roster_Label.png|link=SAR Peterborough Division Loco Roster]] has other suitable locos available at the <span style="color: white; background-color: black;">& | + | '''The [[image:Loco_Roster_Label.png|link=SAR Peterborough Division Loco Roster]] has other suitable locos available at the <span style="color: white; background-color: black;"> Quorn Loco Depot </span>''' |
<table> | <table> | ||
<tr valign="top"> | <tr valign="top"> | ||
| Line 55: | Line 55: | ||
</tr> | </tr> | ||
<tr valign="top"> | <tr valign="top"> | ||
| − | <td><span style="font-size: 15px; font-weight: 700; color: white; background-color: black;">& | + | <td><span style="font-size: 15px; font-weight: 700; color: white; background-color: black;"> Consist: </span></td> |
<td> | <td> | ||
<table> | <table> | ||
| Line 80: | Line 80: | ||
</tr> | </tr> | ||
<tr valign="top"> | <tr valign="top"> | ||
| − | <td colspan=2>The consist is stabled on <span style="font-weight: 700;">Quorn <span style="color: black; background-color: cyan;">& | + | <td colspan=2>The consist is stabled on <span style="font-weight: 700;">Quorn <span style="color: black; background-color: cyan;"> Yard 1 </span></span>. The wagons have been placed in the order of their destinations with '''Willochra''' at the front (loco) end and '''Hawker''' at the rear (guard van) end. Each wagon has its destination as part of its name e.g. '''NGS Gordon''' indicating that its destination is '''Gordon'''. |
</td> | </td> | ||
</tr> | </tr> | ||
| Line 96: | Line 96: | ||
</td> | </td> | ||
<td>'''Each location in the layout has a detailed set of track diagrams that provide a variety of useful information'''<br> | <td>'''Each location in the layout has a detailed set of track diagrams that provide a variety of useful information'''<br> | ||
| − | The <span style="font-weight: 700; color: white; background-color: black;">& | + | The <span style="font-weight: 700; color: white; background-color: black;"> Getting Started </span> guide below gives a summary of what is available.<br> |
To display this information click any [[image:Line_Index_Label.png|link=SAR_Index|Location Index]] graphic, or go to the bottom of the page for all the session links (all links will open in this window).</td> | To display this information click any [[image:Line_Index_Label.png|link=SAR_Index|Location Index]] graphic, or go to the bottom of the page for all the session links (all links will open in this window).</td> | ||
</tr> | </tr> | ||
| Line 106: | Line 106: | ||
<tr valign="top"> | <tr valign="top"> | ||
<td> | <td> | ||
| − | # If you have already closed the opening message window then the first step is to pause the session by pressing the <span style="font-weight: 700; font-size: 15px; color: white; background-color: black;">& | + | # If you have already closed the opening message window then the first step is to pause the session by pressing the <span style="font-weight: 700; font-size: 15px; color: white; background-color: black;"> P </span> key. |
# If you decide to set the session clock to a different starting time then follow the instructions shown in the '''Orders''' section | # If you decide to set the session clock to a different starting time then follow the instructions shown in the '''Orders''' section | ||
# Next locate your loco. '''Either''':- | # Next locate your loco. '''Either''':- | ||
| − | #* Open the '''Finder Tool''' (press <span style="font-weight: 700; font-size: 15px; color: white; background-color: black;">& | + | #* Open the '''Finder Tool''' (press <span style="font-weight: 700; font-size: 15px; color: white; background-color: black;"> Ctrl </span> <span style="font-weight: 700; font-size: 15px; color: white; background-color: black;"> F </span>) and type, in the '''Name''' field, the name of your selected loco, for example '''SAR T 44''' (or just '''T 44''' which should be enough), then click the '''tick''' icon, '''OR''' |
#*Open the '''Driver List''' (bottom left of the screen) and then scroll through the list to find '''either''':- | #*Open the '''Driver List''' (bottom left of the screen) and then scroll through the list to find '''either''':- | ||
#:*the '''loco name''' ('e.g. ''SAR T 44''') '''OR''' | #:*the '''loco name''' ('e.g. ''SAR T 44''') '''OR''' | ||
| Line 115: | Line 115: | ||
#::then click the drivers '''Eye''' icon [[image:Driver_Eye.png|link=]] to take control of the loco. | #::then click the drivers '''Eye''' icon [[image:Driver_Eye.png|link=]] to take control of the loco. | ||
# Take a few moments to get your bearings. Click [[image:Line_Index_Quorn.png|link=SAR_Quorn|Quorn Data]] (this link will open in this window) to show the location details and track plans for '''Quorn'''. In each location details page:- | # Take a few moments to get your bearings. Click [[image:Line_Index_Quorn.png|link=SAR_Quorn|Quorn Data]] (this link will open in this window) to show the location details and track plans for '''Quorn'''. In each location details page:- | ||
| − | #*the [[image:Tab_HM_White.png|link=|75px]]& | + | #*the [[image:Tab_HM_White.png|link=|75px]] tab gives an overall summary of each location with a "potted" history (where available). |
| − | #*the [[image:Tab_TM_Grey.png|link=|75px]]& | + | #*the [[image:Tab_TM_Grey.png|link=|75px]] tab reveals the invisible [[image:Trackmark_Right.png|link=|alt=TM|8px]] '''Track Marks''' for '''Drive To''' commands. |
| − | #*the [[image:Tab_IN_Grey.png|link=|75px]]& | + | #*the [[image:Tab_IN_Grey.png|link=|75px]] tab lists all active industries and their commodities. |
| − | #*the [[image:Tab_SW_Grey.png|link=|75px]]& | + | #*the [[image:Tab_SW_Grey.png|link=|75px]] tab describes the names, locations and settings of all junction switches as well as some switch sets you may want to use. |
# Each location details page has direct links to the adjacent locations so you can explore along the route. | # Each location details page has direct links to the adjacent locations so you can explore along the route. | ||
# When you are ready to start, reload the '''Peterborough Base Session''' page (click the '''Scenarios''' button on your current location page) and select this '''Scenario''' again or just use the '''Back''' button on your browser - whichever is quicker. | # When you are ready to start, reload the '''Peterborough Base Session''' page (click the '''Scenarios''' button on your current location page) and select this '''Scenario''' again or just use the '''Back''' button on your browser - whichever is quicker. | ||
# Switch back to '''Trainz Driver Mode''' | # Switch back to '''Trainz Driver Mode''' | ||
| − | # Close the opening message window and, if '''Pause''' is shown on the screen, press the <span style="font-weight: 700; font-size: 15px; color: white; background-color: black;">& | + | # Close the opening message window and, if '''Pause''' is shown on the screen, press the <span style="font-weight: 700; font-size: 15px; color: white; background-color: black;"> P </span> key to start the session. |
</td> | </td> | ||
</tr> | </tr> | ||
| Line 152: | Line 152: | ||
<tr valign="top"> | <tr valign="top"> | ||
<td width=716> | <td width=716> | ||
| − | # Move the loco from the depot <span style="font-weight: 700; color: white; background-color: black;">& | + | # Move the loco from the depot <span style="font-weight: 700; color: white; background-color: black;"> Loco Shed </span> and couple to the consist on '''Yard x'''. |
# Pull the consist into the station yard area and run the loco around the train. | # Pull the consist into the station yard area and run the loco around the train. | ||
# Proceed to each stopping location, '''Willochra''', '''Wilson''', '''Gordon''' and '''Hawker''' dropping off wagons as required. | # Proceed to each stopping location, '''Willochra''', '''Wilson''', '''Gordon''' and '''Hawker''' dropping off wagons as required. | ||
# Deliver wagons according to their destination names and types:- | # Deliver wagons according to their destination names and types:- | ||
| − | #* '''QLX Vans''', '''CR NGS''' open wagons and '''CR Flat''' wagons are delivered to <span style="font-weight: 700; color: black; background-color: yellow;">& | + | #* '''QLX Vans''', '''CR NGS''' open wagons and '''CR Flat''' wagons are delivered to <span style="font-weight: 700; color: black; background-color: yellow;"> Loading Banks </span> and <span style="font-weight: 700; color: black; background-color: yellow;"> Goods Sheds </span> |
| − | #* '''K Cattle''' wagons and '''Sheep''' vans to <span style="font-weight: 700; color: white; background-color: red;">& | + | #* '''K Cattle''' wagons and '''Sheep''' vans to <span style="font-weight: 700; color: white; background-color: red;"> Stockyards </span> |
| − | #* '''CCC''' gondola wagon loaded with coal to the <span style="font-weight: 700; color: white; background-color: black;">& | + | #* '''CCC''' gondola wagon loaded with coal to the <span style="font-weight: 700; color: white; background-color: black;"> Loco Depot </span> at '''Hawker''' |
| − | #* Empty '''CCC''' gondola wagons to the <span style="color: white; background-color: #a1810b; font-weight: 700;">& | + | #* Empty '''CCC''' gondola wagons to the <span style="color: white; background-color: #a1810b; font-weight: 700;"> Loading Bank </span> at '''Hawker''' |
#* The '''Water Tank''' wagon stays with the train | #* The '''Water Tank''' wagon stays with the train | ||
# At '''Hawker''' coal and water as needed | # At '''Hawker''' coal and water as needed | ||
| − | # Turn the loco on the <span style="color: white; background-color: black; font-weight: 700;">& | + | # Turn the loco on the <span style="color: white; background-color: black; font-weight: 700;"> WYE </span> |
# '''Option:''' Return to '''Quorn''' picking up the wagons on the way. | # '''Option:''' Return to '''Quorn''' picking up the wagons on the way. | ||
</td> | </td> | ||
| Line 195: | Line 195: | ||
*The water tank wagon is to be coupled directly behind the tender to replemish the loco as there are often no guaranteed water supplies on the line. | *The water tank wagon is to be coupled directly behind the tender to replemish the loco as there are often no guaranteed water supplies on the line. | ||
*The approaches to all locations are protected by invisible signals to prevent the '''AI Half Speed Slowdown Problem''' when approaching a signal at stop. | *The approaches to all locations are protected by invisible signals to prevent the '''AI Half Speed Slowdown Problem''' when approaching a signal at stop. | ||
| − | *Trackmarks and industries have been provided for AI '''Drive To Trackmark''', '''Drive via Trackmark''' and '''Drive to <span style="background-color: yellow;">& | + | *Trackmarks and industries have been provided for AI '''Drive To Trackmark''', '''Drive via Trackmark''' and '''Drive to <span style="background-color: yellow;"> Industry </span>''' commands. Click [[image:Line_Index_Label.png|link=SAR_Index|Location Index]] for details. |
*Manual (no AI) driving is possible. As a visual driving aid, a '''Caution''' warning sign has been placed at the location of the '''Main Approach Dn''' and '''Main Approach Up''' trackmarks. Click [[image:Line_Index_Label.png|link=SAR_Index|Location Index]] for details. | *Manual (no AI) driving is possible. As a visual driving aid, a '''Caution''' warning sign has been placed at the location of the '''Main Approach Dn''' and '''Main Approach Up''' trackmarks. Click [[image:Line_Index_Label.png|link=SAR_Index|Location Index]] for details. | ||
*If driving manually in yards, you are responsible for correctly setting any '''catch points'''. | *If driving manually in yards, you are responsible for correctly setting any '''catch points'''. | ||
Revision as of 17:28, 22 November 2022
| 26 Quorn - Hawker Weekly Freight | ||
| A scenario in the SAR Peterborough Base Session v2.0 | ||
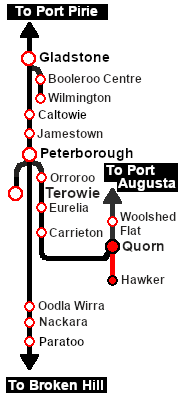
| The weekly Commonwealth Railways freight service from Quorn to Hawker. |
The Historical Bit
Up until 1956 the narrow gauge (3ft6in, 1067mm) Central Australia Railway from Port Augusta north to Maree and on to Alice Springs ran via Quorn and Hawker. In 1956 a new standard gauge (4ft8½inch, 1435mm) line to Maree was opened which followed a more direct route bypassing the difficult Flinders Ranges, Quorn and Hawker. The narrow gauge line sections from Port Augusta to Quorn and from Hawker to Maree were closed leaving only the section between Quorn and Hawker open for traffic. This section survived because a mine near Hawker needed to send its ore for processing and the local dirt roads were totally unsuitable for the task.
The Commonwealth Railways (CR), the operator of the Central Australia Railway, ran a weekly freight service between Quorn and Hawker using SAR locos and a mixture of CR and SAR rolling stock. SAR T 44 was based at Quorn and was a regular sight on this run. It was the only scheduled service running on the line although a second "when required" freight service was provided in the timetable. In 1972 the service was cancelled and the line was closed.
| File:SAR Hawker Freight.png |
|
|||||||||||||||||||
|
|
Each location in the layout has a detailed set of track diagrams that provide a variety of useful information The Getting Started guide below gives a summary of what is available. |
Getting Started:
|
Tutorial:
|
|
|
|||||||||||


| Links: All links will open in this window | ||||||||
 Session Scenarios |
 Location List |
 Drive Tutorial |
 Rolling Stock |
 Loco Roster |
 Active Industries |
|||
This page was created by Trainz user pware in October 2021 and was last updated as shown below.