SAR Scenario Hawker Freight
m |
m |
||
| Line 19: | Line 19: | ||
----- | ----- | ||
<span style="font-weight: 700; font-size: 15px; color: white; background-color: black;"> The Historical Bit </span><br> | <span style="font-weight: 700; font-size: 15px; color: white; background-color: black;"> The Historical Bit </span><br> | ||
| − | Up until 1956 the narrow gauge (3ft6in, 1067mm) '''Central Australia Railway''' from '''Port Augusta''' north to '''Maree''' and on to '''Alice Springs''' ran via '''Quorn''' and '''Hawker'''. In 1956 a new standard gauge (4ft8& | + | Up until 1956 the narrow gauge (3ft6in, 1067mm) '''Central Australia Railway''' from '''Port Augusta''' north to '''Maree''' and on to '''Alice Springs''' ran via '''Quorn''' and '''Hawker'''. In 1956 a new standard gauge (4ft8½inch, 1435mm) line to '''Maree''' was opened which followed a more direct route bypassing the difficult '''Flinders Ranges''', '''Quorn''' and '''Hawker'''. The narrow gauge line sections from '''Port Augusta''' to '''Quorn''' and from '''Hawker''' to '''Maree''' were closed leaving only the section between '''Quorn''' and '''Hawker''' open for traffic. This section survived because a mine near '''Hawker''' needed to send its ore for processing and the local dirt roads were totally unsuitable for the task.<br> |
The '''Commonwealth Railways (CR)''', the operator of the '''Central Australia Railway''', ran a weekly freight service between '''Quorn''' and '''Hawker''' using '''SAR''' locos and a mixture of '''CR''' and '''SAR''' rolling stock. '''SAR T 44''' was based at '''Quorn''' and was a regular sight on this run. It was the only scheduled service running on the line although a second "when required" freight service was provided in the timetable. In 1972 the service was cancelled and the line was closed. | The '''Commonwealth Railways (CR)''', the operator of the '''Central Australia Railway''', ran a weekly freight service between '''Quorn''' and '''Hawker''' using '''SAR''' locos and a mixture of '''CR''' and '''SAR''' rolling stock. '''SAR T 44''' was based at '''Quorn''' and was a regular sight on this run. It was the only scheduled service running on the line although a second "when required" freight service was provided in the timetable. In 1972 the service was cancelled and the line was closed. | ||
| Line 142: | Line 142: | ||
</tr> | </tr> | ||
</table> <!-- END Blue Border for Tutorial table --> | </table> <!-- END Blue Border for Tutorial table --> | ||
| − | + | ||
| − | <table width=1000> <!-- BEGIN Yard | + | <table width=1000> <!-- BEGIN nested Yard, Orders, Strip Map tables --> |
<tr valign="top"> | <tr valign="top"> | ||
<td> | <td> | ||
| Line 149: | Line 149: | ||
<tr valign="top"> | <tr valign="top"> | ||
<td><span style="font-size: 15px; font-weight: 700; color: white">Orders:</span><br> | <td><span style="font-size: 15px; font-weight: 700; color: white">Orders:</span><br> | ||
| − | <table bgcolor=#e8e8e8 width= | + | <table bgcolor=#e8e8e8 width=716> <!-- BEGIN Orders and Logo Table --> |
<tr valign="top"> | <tr valign="top"> | ||
<td width=716> | <td width=716> | ||
| Line 169: | Line 169: | ||
<tr valign="top"> | <tr valign="top"> | ||
<td colspan=2> | <td colspan=2> | ||
| + | <table width=816 bgcolor="white" cellpadding=4> <!-- BEGIN White Border for Session Change Times Table --> | ||
| + | <tr valign="top"> | ||
| + | <td> | ||
<table width=812 bgcolor="white"> <!-- BEGIN Session Change Times Table --> | <table width=812 bgcolor="white"> <!-- BEGIN Session Change Times Table --> | ||
<tr valign="top"> | <tr valign="top"> | ||
| Line 177: | Line 180: | ||
</tr> | </tr> | ||
</table> <!-- END Session Change Times Table --> | </table> <!-- END Session Change Times Table --> | ||
| + | </td> | ||
| + | </tr> | ||
| + | </table> <!-- END White Border for Session Change Times Table --> | ||
| + | |||
| + | <table width=820 bgcolor="black"> <!-- BEGIN Working Timetable black border Table --> | ||
| + | <tr valign="top"> | ||
| + | <td align="center"><span style="font-weight: 700; font-size: 17px; color: white;"> East-West Express Timetable </span></td> | ||
| + | </tr> | ||
| + | <tr valign="top"> | ||
| + | <td> | ||
| + | <table bgcolor="white" width=816> <!-- BEGIN Working Timetable contents Table --> | ||
| + | <tr valign="top"> | ||
| + | <td width=120> </td> | ||
| + | <td align="right" width=100 colspan=2>'''Days'''<br>'''Train №'''</td> | ||
| + | <td rowspan=23 width=1></td> <!-- Row count --> | ||
| + | <td rowspan=23 bgcolor="black" width=1></td> <!-- Row count --> | ||
| + | <td width=70>  '''Te (F)'''<br>  '''XXX'''</td> | ||
| + | <td rowspan=23 bgcolor="black" width=1></td> <!-- Row count --> | ||
| + | <td rowspan=23 width=1></td> <!-- Row count --> | ||
| + | <td width=200> </td> | ||
| + | </tr> | ||
| + | <tr> | ||
| + | <td colspan=9 bgcolor="black"></td> | ||
| + | </tr> | ||
| + | <tr valign="top"> | ||
| + | <td>'''Quorn Depot'''</td> | ||
| + | <td align="right" width=70>'''CEFJØWX'''</td> | ||
| + | <td align="right" width=30>'''dep'''</td> | ||
| + | <td align="center">'''08:30'''</td> | ||
| + | <td width=200> </td> | ||
| + | </tr> | ||
| + | <tr valign="top"> | ||
| + | <td align="right">'''Goods Sidings'''</td> | ||
| + | <td> </td> | ||
| + | <td> </td> | ||
| + | <td align="center">'''A'''</td> | ||
| + | <td width=200>Attach wagons waiting in '''Siding 1'''</td> | ||
| + | </tr> | ||
| + | <tr valign="top"> | ||
| + | <td align="right">'''Yard'''</td> | ||
| + | <td align="right" colspan=2>'''dep'''</td> | ||
| + | <td> '''hh:mm'''</td> | ||
| + | <td> </td> | ||
| + | </tr> | ||
| + | <tr> | ||
| + | <td colspan=9 bgcolor="black"></td> | ||
| + | </tr> | ||
| + | <tr valign="top"> | ||
| + | <td>'''Willochra'''</td> | ||
| + | <td align="right">'''X'''</td> | ||
| + | <td align="right">'''arr'''</td> | ||
| + | <td> '''hh:mm'''</td> | ||
| + | <td rowspan=2> </td> | ||
| + | </tr> | ||
| + | <tr valign="top"> | ||
| + | <td colspan=3 align="right">'''dep'''</td> | ||
| + | <td> '''hh:mm'''</td> | ||
| + | <td> </td> | ||
| + | </tr> | ||
| + | <tr valign="top"> | ||
| + | <td>'''Wilson'''</td> | ||
| + | <td align="right">'''X'''</td> | ||
| + | <td align="right">'''arr'''</td> | ||
| + | <td> '''hh:mm'''</td> | ||
| + | <td rowspan=2> </td> | ||
| + | </tr> | ||
| + | <tr valign="top"> | ||
| + | <td colspan=3 align="right">'''dep'''</td> | ||
| + | <td> '''hh:mm'''</td> | ||
| + | <td> </td> | ||
| + | </tr> | ||
| + | <tr valign="top"> | ||
| + | <td>'''Gordon'''</td> | ||
| + | <td align="right">'''X'''</td> | ||
| + | <td align="right">'''arr'''</td> | ||
| + | <td> '''hh:mm'''</td> | ||
| + | <td rowspan=2> </td> | ||
| + | </tr> | ||
| + | <tr valign="top"> | ||
| + | <td colspan=3 align="right">'''dep'''</td> | ||
| + | <td> '''hh:mm'''</td> | ||
| + | <td> </td> | ||
| + | </tr> | ||
| + | <tr valign="top"> | ||
| + | <td>'''Hawker'''</td> | ||
| + | <td align="right">'''ΔCWX'''</td> | ||
| + | <td align="right">'''arr'''</td> | ||
| + | <td> '''hh:mm'''</td> | ||
| + | <td rowspan=2> </td> | ||
| + | </tr> | ||
| + | <tr> | ||
| + | <td colspan=9 bgcolor="black"></td> | ||
| + | </tr> | ||
| + | <tr valign="top"> | ||
| + | <td colspan=3 align="right">'''Train №'''</td> | ||
| + | <td>  '''XXX'''</td> | ||
| + | <td> </td> | ||
| + | <tr> | ||
| + | <td colspan=9 bgcolor="black"></td> | ||
| + | </tr> | ||
| + | <tr valign="top"> | ||
| + | <td colspan=2>'''Gordon'''</td> | ||
| + | <td align="right">'''arr'''</td> | ||
| + | <td> '''hh:mm'''</td> | ||
| + | <td rowspan=2> </td> | ||
| + | </tr> | ||
| + | <tr valign="top"> | ||
| + | <td colspan=3 align="right">'''dep'''</td> | ||
| + | <td> '''hh:mm'''</td> | ||
| + | <td> </td> | ||
| + | </tr> | ||
| + | <tr valign="top"> | ||
| + | <td colspan=2>'''Wilson'''</td> | ||
| + | <td align="right">'''arr'''</td> | ||
| + | <td> '''hh:mm'''</td> | ||
| + | <td rowspan=2> </td> | ||
| + | </tr> | ||
| + | <tr valign="top"> | ||
| + | <td colspan=3 align="right">'''dep'''</td> | ||
| + | <td> '''hh:mm'''</td> | ||
| + | <td> </td> | ||
| + | </tr> | ||
| + | <tr valign="top"> | ||
| + | <td colspan=2>'''Willocra'''</td> | ||
| + | <td align="right">'''arr'''</td> | ||
| + | <td> '''hh:mm'''</td> | ||
| + | <td rowspan=2> </td> | ||
| + | </tr> | ||
| + | <tr valign="top"> | ||
| + | <td colspan=3 align="right">'''dep'''</td> | ||
| + | <td> '''hh:mm'''</td> | ||
| + | <td> </td> | ||
| + | </tr> | ||
| + | <tr valign="top"> | ||
| + | <td colspan=2>'''Quorn'''</td> | ||
| + | <td align="right">'''arr'''</td> | ||
| + | <td align="center">'''hh:mmcw'''</td> | ||
| + | <td> </td> | ||
| + | </tr> | ||
| + | </table> <!-- END Working Timetable contents Table --> | ||
| + | </td> | ||
| + | </tr> | ||
| + | </table> <!-- END Working Timetable black border Table --> | ||
</td> | </td> | ||
</tr> | </tr> | ||
| Line 183: | Line 329: | ||
</tr> | </tr> | ||
</table> <!-- END Black Border for Orders Table --> | </table> <!-- END Black Border for Orders Table --> | ||
| − | <br> | + | <table width=820> <!-- BEGIN Symbol Table --> |
| − | <table cellpadding="2" bgcolor="black" width= | + | <tr valign="top"> |
| + | <td colspan=2>'''bold time''' = arrive/depart time</td> | ||
| + | <td colspan=2>plain time = timing point</td> | ||
| + | </tr> | ||
| + | <tr valign="top"> | ||
| + | <td colspan=4><span style="font-weight: 700; font-size: 15px;">Service Symbols:</span></td> | ||
| + | </tr> | ||
| + | <tr valign="top"> | ||
| + | <td width=205>'''a''' on request stop</td> | ||
| + | <td width=205>'''c''' coal (if required)</td> | ||
| + | <td width=205>'''w''' water (if required)</td> | ||
| + | <td width=205></td> | ||
| + | </tr> | ||
| + | <tr valign="top"> | ||
| + | <td colspan=4><span style="font-weight: 700; font-size: 15px;">Location Symbols:</span></td> | ||
| + | </tr> | ||
| + | <tr valign="top"> | ||
| + | <td>'''Δ = Turning Triangle'''</td> | ||
| + | <td>'''C = Loco Coal Loader'''</td> | ||
| + | <td>'''E = Engine Depot'''</td> | ||
| + | <td>'''F = Fixed Signals'''</td> | ||
| + | </tr> | ||
| + | <tr valign="top"> | ||
| + | <td>'''J = Junction'''</td> | ||
| + | <td>'''Ø = Loco Turntable'''</td> | ||
| + | <td>'''W = Loco Water Tank'''</td> | ||
| + | <td>'''X = Crossing Loop'''</td> | ||
| + | </tr> | ||
| + | <tr valign="top"> | ||
| + | <td colspan=4 bgcolor="black"></td> | ||
| + | </tr> | ||
| + | </table> <!-- END Symbol Table --> | ||
| + | </td> | ||
| + | <td> | ||
| + | <table width=180> <!-- BEGIN Strip Map Table --> | ||
| + | <tr valign="top"> | ||
| + | <td align="center">[[image:SAR Scenario Hawker Strip Map.png|link=|alt=Strip Map]]<br>[[image:SAR Scenario Route.png|link=|alt=Route Key]]</td> | ||
| + | </tr> | ||
| + | </table> <!-- END Strip Map Table --> | ||
| + | </td> | ||
| + | </tr> | ||
| + | </table> <!-- END Yard, Orders, Strip Map tables --> | ||
| + | <table cellpadding="2" bgcolor="black" width=1000> <!-- BEGIN Black border for Driving Notes table --> | ||
<tr valign="top"> | <tr valign="top"> | ||
<td><span style="font-size: 15px; font-weight: 700; color: white">Driving Notes:</span><br> | <td><span style="font-size: 15px; font-weight: 700; color: white">Driving Notes:</span><br> | ||
| − | <table bgcolor="lightyellow" width= | + | <table bgcolor="lightyellow" width=996> <!-- BEGIN Driving Notes table --> |
<tr valign="top"> | <tr valign="top"> | ||
<td> | <td> | ||
| Line 204: | Line 392: | ||
</tr> | </tr> | ||
</table> <!-- END Black border for Driving Notes sub table --> | </table> <!-- END Black border for Driving Notes sub table --> | ||
| − | |||
| − | |||
| − | |||
| − | |||
| − | |||
| − | |||
| − | |||
| − | |||
| − | |||
| − | |||
| − | |||
----- | ----- | ||
<table width=1000> <!-- BEGIN End Links Table --> | <table width=1000> <!-- BEGIN End Links Table --> | ||
Revision as of 08:25, 26 November 2022
| 26 Quorn - Hawker Weekly Freight | ||
| A scenario in the SAR Peterborough Base Session v2.0 | ||
| The weekly Commonwealth Railways freight service from Quorn to Hawker. |
The Historical Bit
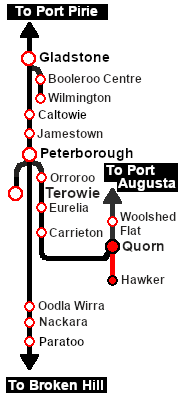
Up until 1956 the narrow gauge (3ft6in, 1067mm) Central Australia Railway from Port Augusta north to Maree and on to Alice Springs ran via Quorn and Hawker. In 1956 a new standard gauge (4ft8½inch, 1435mm) line to Maree was opened which followed a more direct route bypassing the difficult Flinders Ranges, Quorn and Hawker. The narrow gauge line sections from Port Augusta to Quorn and from Hawker to Maree were closed leaving only the section between Quorn and Hawker open for traffic. This section survived because a mine near Hawker needed to send its ore for processing and the local dirt roads were totally unsuitable for the task.
The Commonwealth Railways (CR), the operator of the Central Australia Railway, ran a weekly freight service between Quorn and Hawker using SAR locos and a mixture of CR and SAR rolling stock. SAR T 44 was based at Quorn and was a regular sight on this run. It was the only scheduled service running on the line although a second "when required" freight service was provided in the timetable. In 1972 the service was cancelled and the line was closed.
| File:SAR Hawker Freight.png |
|
|||||||||||||||||||
|
|
Each location in the layout has a detailed set of track diagrams that provide a variety of useful information The Getting Started guide below gives a summary of what is available. |
Getting Started:
|
Tutorial:
|
|
|
||||||||||||||||||||||||||||||||||||||||||||||||||||||||||||||||||||||||||||||||||||||||||||||||||||||||||||||||||||||||||||||||||||||||||||||||||||||||||||||||||||||||||||||


Driving Notes:
|
| Links: All links will open in this window | ||||||||
 Session Scenarios |
 Location List |
 Drive Tutorial |
 Rolling Stock |
 Loco Roster |
 Active Industries |
|||
This page was created by Trainz user pware in October 2021 and was last updated as shown below.