SAR Scenario Gladstone Shunter
From TrainzOnline
(Difference between revisions)
m |
m |
||
| Line 1: | Line 1: | ||
| + | <!-- V2.0 variations in "Locos", "Consists", "Getting Started" --> | ||
<table width=1000> <!-- BEGIN Title table --> | <table width=1000> <!-- BEGIN Title table --> | ||
<tr valign="top"> | <tr valign="top"> | ||
| Line 20: | Line 21: | ||
<td width=450>[[image:SAR Gladstone Shunter.png|link=|alt=Shunter]]</td> | <td width=450>[[image:SAR Gladstone Shunter.png|link=|alt=Shunter]]</td> | ||
<td> | <td> | ||
| − | <table width=550> | + | <table width=550 bgcolor="black"> <!-- BEGIN Loco/consist sub table --> |
| + | <tr valign="top"> | ||
| + | <td> | ||
| + | <table width=546 bgcolor="white"> | ||
<tr valign="top"> | <tr valign="top"> | ||
<td width=75><span style="font-size: 15px; font-weight: 700; color: white; background-color: black;"> Era: </span></td> | <td width=75><span style="font-size: 15px; font-weight: 700; color: white; background-color: black;"> Era: </span></td> | ||
| Line 27: | Line 31: | ||
<tr valign="top"> | <tr valign="top"> | ||
<td><span style="font-size: 15px; font-weight: 700; color: white; background-color: black;"> Duration: </span></td> | <td><span style="font-size: 15px; font-weight: 700; color: white; background-color: black;"> Duration: </span></td> | ||
| − | <td>40 minutes</td> | + | <td>'''40 minutes'''</td> |
</tr> | </tr> | ||
<tr valign="top"> | <tr valign="top"> | ||
| Line 34: | Line 38: | ||
*'''[[SAR_Scenario_Rolling_Stock#SAR_T_Class|SAR T 201]]''' | *'''[[SAR_Scenario_Rolling_Stock#SAR_T_Class|SAR T 201]]''' | ||
*'''[[SAR_Scenario_Rolling_Stock#SAR_T_Class|SAR T 210]]''' | *'''[[SAR_Scenario_Rolling_Stock#SAR_T_Class|SAR T 210]]''' | ||
| + | <!-- BEGIN V2.0 | ||
| + | Also available in <span style="font-weight: 700; background-color: yellow;"> Base Session v2.0 </span> | ||
| + | *'''[[SAR_Scenario_Rolling_Stock#SAR_830_Class|SAR 837/840]] at <span style="color: white; background-color: black;"> Loco Sheds </span>''' | ||
| + | END V2.0 --> | ||
</td> | </td> | ||
</tr> | </tr> | ||
<tr valign="top"> | <tr valign="top"> | ||
| − | <td | + | <td><span style="font-size: 15px; font-weight: 700; color: white; background-color: black;"> Consist: </span></td> |
| − | < | + | <td>To be shunted by the selected loco to/from various locations |
| − | + | *'''[[SAR_Scenario_Rolling_Stock#QR_QLX|QLX Box]]''' vans | |
| − | + | *'''[[SAR_Scenario_Rolling_Stock#QR_MTW|MTW Flat]]''' wagons | |
| − | + | *'''[[SAR_Scenario_Rolling_Stock#TGR_CCC|CCC Gondola]]''' wagons | |
| − | + | *'''[[SAR_Scenario_Rolling_Stock#Tank|Tank Fuel]]''' wagons | |
| − | + | </td> | |
| − | To | + | |
</tr> | </tr> | ||
| − | </table | + | </table> |
</td> | </td> | ||
</tr> | </tr> | ||
| Line 53: | Line 60: | ||
</tr> | </tr> | ||
</table> <!-- END Scenario image and loco/consist table --> | </table> <!-- END Scenario image and loco/consist table --> | ||
| − | <br> | + | <table bgcolor="lightcyan" width=1000> <!-- BEGIN Location Data table --> |
| + | <tr> | ||
| + | <td> | ||
| + | [[Image:Location Index.png|link=SAR Index|alt=Location Index|Location Index]] | ||
| + | </td> | ||
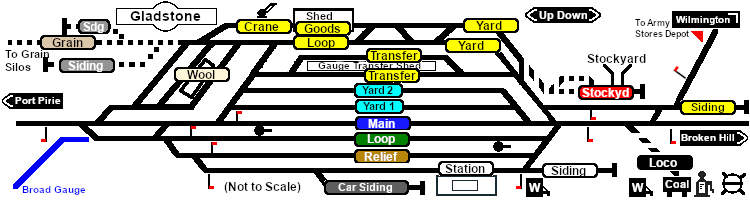
| + | <td>'''Each location in the layout has a detailed set of track diagrams that provide a variety of useful information'''<br> | ||
| + | The <span style="font-weight: 700; color: white; background-color: black;"> Getting Started </span> guide below gives a summary of what is available.<br> | ||
| + | To display this information click any [[image:Line_Index_Label.png|link=SAR_Index|Location Index]] graphic, or go to the bottom of the page for all the session links (all links will open in this window).</td> | ||
| + | </tr> | ||
| + | </table> <!-- END Location Data table --> | ||
<table cellpadding="2" bgcolor="black" width=1000> <!-- BEGIN Black border for Getting Started table --> | <table cellpadding="2" bgcolor="black" width=1000> <!-- BEGIN Black border for Getting Started table --> | ||
<tr valign="top"> | <tr valign="top"> | ||
| Line 62: | Line 78: | ||
# If you have already closed the opening message window then the first step is to pause the session by pressing the <span style="font-weight: 700; font-size: 15px; color: white; background-color: black;"> P </span> key. | # If you have already closed the opening message window then the first step is to pause the session by pressing the <span style="font-weight: 700; font-size: 15px; color: white; background-color: black;"> P </span> key. | ||
# Next locate your loco. '''Either''':- | # Next locate your loco. '''Either''':- | ||
| − | ## Open the '''Finder Tool''' (press <span style="font-weight: 700; font-size: 15px; color: white; background-color: black;"> Ctrl </span> <span style="font-weight: 700; font-size: 15px; color: white; background-color: black;"> F </span>) and type, in the '''Name''' field, the name of | + | ## Open the '''Finder Tool''' (press <span style="font-weight: 700; font-size: 15px; color: white; background-color: black;"> Ctrl </span> <span style="font-weight: 700; font-size: 15px; color: white; background-color: black;"> F </span>) and type, in the '''Name''' field, the name of your selected loco. For example '''SAR T 201''' (or just '''T 201''' should be enough). Click the '''tick''' icon, '''OR''' |
| − | ## Open the '''Driver List''' (bottom left of the screen) and | + | <!-- BEGIN V1.0 --> |
| + | ## Open the '''Driver List''' (bottom left of the screen) and find the '''loco name''' (e.g. '''SAR T 201'''). Click the drivers '''Eye''' icon [[image:Driver_Eye.png|link=]] to take control of the loco. | ||
| + | <!-- END V1.0 --> | ||
| + | <!-- BEGIN V2.0 | ||
| + | ## Open the '''Driver List''' (bottom left of the screen) and find the '''loco name''' (e.g. '''SAR T 201''') '''OR''' in <span style="font-weight: 700; background-color: yellow;"> Base Session v2.0 </span> find the '''driver''' of your selected loco (e.g. '''Driver 201''' for '''SAR T 201'''). Click the drivers '''Eye''' icon [[image:Driver_Eye.png|link=]] to take control of the loco. | ||
| + | END V2.0 --> | ||
# Take a few moments to get your bearings. Click [[image:Line_Index_Gladstone.png|link=SAR_Gladstone|Gladstone Data]] (this link will open in this window) to show the location details and track plans for '''Gladstone'''. In each location details page:- | # Take a few moments to get your bearings. Click [[image:Line_Index_Gladstone.png|link=SAR_Gladstone|Gladstone Data]] (this link will open in this window) to show the location details and track plans for '''Gladstone'''. In each location details page:- | ||
#*the [[image:Tab_HM_White.png|link=|75px]] tab gives an overall summary of each location with a "potted" history (where available). | #*the [[image:Tab_HM_White.png|link=|75px]] tab gives an overall summary of each location with a "potted" history (where available). | ||
| Line 140: | Line 161: | ||
<tr valign="top"> | <tr valign="top"> | ||
<td> | <td> | ||
| − | *You have been issued with an authority ticket for the '''Wilmington Line''' which is valid to the '''Army Siding | + | *You have been issued with the orders and an authority ticket for the '''Wilmington Line''' which is valid to the '''Army Siding'''. |
| − | *The '''Wilmington Line''' is '''not signalled'''. | + | *The '''Wilmington Line''' is '''not signalled''' beyond '''Gladstone Yard'''. Train order working is in operation on the line. |
*You have permission to pass semaphore signals at stop provided you are satisfied that the road ahead is clear. | *You have permission to pass semaphore signals at stop provided you are satisfied that the road ahead is clear. | ||
*When driving manually in yards, you are responsible for correctly setting any '''catch points'''. | *When driving manually in yards, you are responsible for correctly setting any '''catch points'''. | ||
Revision as of 09:58, 24 August 2022
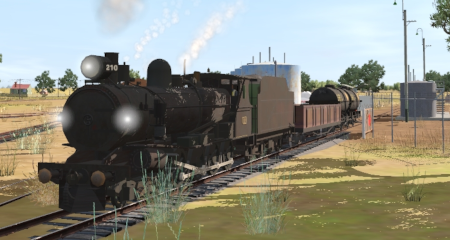
| 13 Gladstone Shunter | ||
| A scenario in the SAR Peterborough Base Session | ||
| Shunting operations in Gladstone Yard and nearby sidings. |
 |
|
|
|
Each location in the layout has a detailed set of track diagrams that provide a variety of useful information The Getting Started guide below gives a summary of what is available. |
Getting Started:
|
Tutorial:
|
|
|

| Links: All links will open in this window | ||||||||
 Session Scenarios |
 Location List |
 Drive Tutorial |
 Rolling Stock |
 Loco Roster |
 Active Industries |
|||
This page was created by Trainz user pware in February 2021 and was last updated as shown below.