SAR Scenario Gladstone Bulk Ore
m |
m |
||
| (9 intermediate revisions by one user not shown) | |||
| Line 1: | Line 1: | ||
<table width=1000> <!-- BEGIN Title table --> | <table width=1000> <!-- BEGIN Title table --> | ||
<tr valign="top"> | <tr valign="top"> | ||
| − | <td width=50 align="left">[[image: | + | <td width=50 align="left">[[image:ArrowLeftBtn.png|link=SAR Scenario Gladstone-Terowie Passenger|30px]]</td> |
<td width=900 align="center"><span style="font-size: 21px; font-weight: 700;"> <span style="background-color: black; color: white;"> 5 </span> <span style="background-color: black; color: white;"> Paratoo to Peterborough Bulk Ore </span></span><br> | <td width=900 align="center"><span style="font-size: 21px; font-weight: 700;"> <span style="background-color: black; color: white;"> 5 </span> <span style="background-color: black; color: white;"> Paratoo to Peterborough Bulk Ore </span></span><br> | ||
<span style="font-size: 21px; font-weight: 700; background-color: black; color: white;"> Paratoo to Gladstone Bulk Ore </span></td> | <span style="font-size: 21px; font-weight: 700; background-color: black; color: white;"> Paratoo to Gladstone Bulk Ore </span></td> | ||
| − | <td width=50 align="right">[[image: | + | <td width=50 align="right">[[image:ArrowRightBtn.png|link=SAR Scenario Paratoo Empty Ore|30px]]</td> |
</tr> | </tr> | ||
<tr valign="top"> | <tr valign="top"> | ||
| Line 19: | Line 19: | ||
<span style="font-weight: 700; font-size: 15px; color: white; background-color: black;"> The Historical Bit </span><br> | <span style="font-weight: 700; font-size: 15px; color: white; background-color: black;"> The Historical Bit </span><br> | ||
| − | The line from '''Port Pirie''' to '''Cockburn''' on the '''South Australia - New South Wales''' border was built in stages from 1875 to 1888 largely to capture the lead, zinc and silver ore traffic from the mines at '''Broken Hill''' just over the border in '''New South Wales'''. Because the '''SAR''' was not allowed to operate into '''New South Wales''', a private railway, the '''Silverton Tramway''', was created to carry the ore across the border. The '''SAR''' and '''Silverton Tramway''' simply swapped locos at '''Cockburn''' on the border. It was called a "tramway" to get around a NSW law banning private railways but not private tramways. Despite the title it was a fully operating heavy haul | + | The line from '''Port Pirie''' to '''Cockburn''' on the '''South Australia - New South Wales''' border was built in stages from 1875 to 1888 largely to capture the lead, zinc and silver ore traffic from the mines at '''Broken Hill''' just over the border in '''New South Wales'''. Because the '''SAR''' was not allowed to operate into '''New South Wales''', a private railway, the '''Silverton Tramway''', was created to carry the ore across the border. The '''SAR''' and '''Silverton Tramway''' simply swapped locos at '''Cockburn''' on the border. It was called a "tramway" to get around a NSW law banning private railways but not private tramways. Despite the title it was a fully operating heavy haul railway, and one of the most profitable in the country. |
| − | The '''SAR''' had a monopoly on the ore traffic until 1919 when the '''NSWGR''' (New South Wales Government Railways) completed its own line to '''Broken Hill''' but the '''SAR''' continued to carry the bulk of the ore because the port and smelter at '''Port Pirie''' was much closer to '''Broken Hill'''. | + | The '''SAR''' had a monopoly on the ore traffic until 1919 when the '''NSWGR''' (New South Wales Government Railways) completed its own standard gauge (4ft 8.5in) line from '''Sydney''' to '''Broken Hill''' but the '''SAR''' continued to carry the bulk of the ore because the port and smelter at '''Port Pirie''' was much closer to '''Broken Hill'''. |
| − | By 1970 the narrow gauge line had been converted to standard gauge and the '''Silverton Tramway''' ceased its ore hauling operations | + | By 1970 the narrow gauge line from '''Port Pirie''' to '''Broken Hill''' had been converted to standard gauge and the '''Silverton Tramway''' ceased its ore hauling operations but continues to operate today providing standard gauge shunting services and leases locos to rail operators. |
----- | ----- | ||
<table width=1000> <!-- BEGIN Scenario image and loco/consist table --> | <table width=1000> <!-- BEGIN Scenario image and loco/consist table --> | ||
| Line 41: | Line 41: | ||
<tr valign="top"> | <tr valign="top"> | ||
<td><span style="font-size: 15px; font-weight: 700; color: white; background-color: black;"> Loco: </span></td> | <td><span style="font-size: 15px; font-weight: 700; color: white; background-color: black;"> Loco: </span></td> | ||
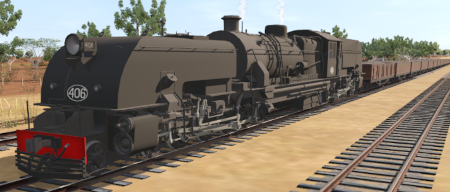
| − | <td>'''[[SAR_Scenario_Rolling_Stock#SAR_400_Class|SAR 406]]''' (Garrett) on the <span style="font-weight: 700;"><span style="color: white; background-color: blue;"> Main </span> line</span> approaching '''Paratoo''' | + | <td>'''[[SAR_Scenario_Rolling_Stock#SAR_400_Class|SAR 406]]''' (Garrett) on the <span style="font-weight: 700;"><span style="color: white; background-color: blue;"> Main </span> line</span> approaching '''Paratoo''' from the '''East'''<br> |
| − | '''Other | + | '''Other Available Locos:''' [[image:Loco_Roster_Label.png|link=SAR Peterborough Division Loco Roster]] |
*'''[[SAR_Scenario_Rolling_Stock#SAR_T_Class|SAR T 23]]''' on <span style="font-weight: 700;">Peterborough Depot <span style="color: white; background-color: black;"> Siding 1 </span></span> | *'''[[SAR_Scenario_Rolling_Stock#SAR_T_Class|SAR T 23]]''' on <span style="font-weight: 700;">Peterborough Depot <span style="color: white; background-color: black;"> Siding 1 </span></span> | ||
*'''[[SAR_Scenario_Rolling_Stock#SAR_T_Class|SAR T 233]]''' on <span style="font-weight: 700;">Peterborough Depot <span style="color: white; background-color: black;"> Loco Road 1 </span></span> | *'''[[SAR_Scenario_Rolling_Stock#SAR_T_Class|SAR T 233]]''' on <span style="font-weight: 700;">Peterborough Depot <span style="color: white; background-color: black;"> Loco Road 1 </span></span> | ||
| Line 49: | Line 49: | ||
<tr valign="top"> | <tr valign="top"> | ||
<td><span style="font-size: 15px; font-weight: 700; color: white; background-color: black;"> Consist: </span></td> | <td><span style="font-size: 15px; font-weight: 700; color: white; background-color: black;"> Consist: </span></td> | ||
| − | <td>Attached to '''[[SAR_Scenario_Rolling_Stock#SAR_400_Class|SAR 406]]''': 23 '''[[SAR_Scenario_Rolling_Stock#TGR_CCC| | + | <td>Attached to '''[[SAR_Scenario_Rolling_Stock#SAR_400_Class|SAR 406]]''': 23 '''[[SAR_Scenario_Rolling_Stock#TGR_CCC|CCC Gondola]]''' wagons, 1 '''[[SAR_Scenario_Rolling_Stock#TGR_DB|Guard Van]]'''. |
| − | + | ||
| − | + | ||
</td> | </td> | ||
</tr> | </tr> | ||
| Line 71: | Line 69: | ||
</tr> | </tr> | ||
</table> <!-- END Scenario image and loco/consist table --> | </table> <!-- END Scenario image and loco/consist table --> | ||
| − | + | <br> | |
<table cellpadding="2" bgcolor="black" width=1000> <!-- BEGIN Black border for Getting Started table --> | <table cellpadding="2" bgcolor="black" width=1000> <!-- BEGIN Black border for Getting Started table --> | ||
<tr valign="top"> | <tr valign="top"> | ||
| Line 89: | Line 87: | ||
# Each location details page has direct links to the adjacent locations so you can explore along the route. | # Each location details page has direct links to the adjacent locations so you can explore along the route. | ||
# When you are ready to start, reload the '''Peterborough Base Session''' page (click the '''Scenarios''' button on your current location page) and select this '''Scenario''' again or just use the '''Back''' button on your browser - whichever is quicker. | # When you are ready to start, reload the '''Peterborough Base Session''' page (click the '''Scenarios''' button on your current location page) and select this '''Scenario''' again or just use the '''Back''' button on your browser - whichever is quicker. | ||
| − | # Switch back to ''' | + | # Switch back to '''Driver Mode''' and either close the opening message window or press the <span style="font-weight: 700; font-size: 15px; color: white; background-color: black;"> P </span> key to start the session. |
</td> | </td> | ||
</tr> | </tr> | ||
| Line 110: | Line 108: | ||
</table> <!-- END Blue Border for Tutorial table --> | </table> <!-- END Blue Border for Tutorial table --> | ||
<br> | <br> | ||
| − | <table width=1000> <!-- BEGIN Yard (if | + | <table width=1000> <!-- BEGIN Yard (if applicable), Orders, Strip Map and Driving Notes tables --> |
<tr valign="top"> | <tr valign="top"> | ||
<td> | <td> | ||
| − | <table bgcolor=# | + | <table bgcolor=#000000 width=820 cellpadding=2> <!-- BEGIN Black Border for Orders Table --> |
<tr valign="top"> | <tr valign="top"> | ||
| − | <td> | + | <td><span style="font-size: 15px; font-weight: 700; color: white">Orders:</span><br> |
| − | <table width= | + | <table bgcolor=#e8e8e8 width=816> <!-- BEGIN Orders and Logo Table --> |
<tr valign="top"> | <tr valign="top"> | ||
| − | <td width= | + | <td width=716> |
# Move the train into '''Paratoo Yard''' on the <span style="font-weight: 700;"><span style="color: white; background-color: blue;"> Main </span> Line</span> | # Move the train into '''Paratoo Yard''' on the <span style="font-weight: 700;"><span style="color: white; background-color: blue;"> Main </span> Line</span> | ||
# Fill the tender with '''water''' at the <span style="font-weight: 700;"><span style="color: white; background-color: blue;"> Water </span> Column</span> or proceed to '''Nackara''' and fill with '''water''' at the <span style="font-weight: 700;"><span style="color: white; background-color: blue;"> Water </span> Column</span> located there. | # Fill the tender with '''water''' at the <span style="font-weight: 700;"><span style="color: white; background-color: blue;"> Water </span> Column</span> or proceed to '''Nackara''' and fill with '''water''' at the <span style="font-weight: 700;"><span style="color: white; background-color: blue;"> Water </span> Column</span> located there. | ||
# Proceed to <span style="font-weight: 700;">Peterborough <span style="color: white; background-color: #008100;"> Loop </span></span> or <span style="font-weight: 700;">Peterborough <span style="color: black; background-color: cyan;"> Yard 1 </span></span>. | # Proceed to <span style="font-weight: 700;">Peterborough <span style="color: white; background-color: #008100;"> Loop </span></span> or <span style="font-weight: 700;">Peterborough <span style="color: black; background-color: cyan;"> Yard 1 </span></span>. | ||
# Detach the loco and proceed to <span style="font-weight: 700;">Peterborough Main <span style="color: white; background-color: black;"> Loco Fuel & Water </span> Point</span> to refuel the tender with '''bunker c oil''' and '''water'''. | # Detach the loco and proceed to <span style="font-weight: 700;">Peterborough Main <span style="color: white; background-color: black;"> Loco Fuel & Water </span> Point</span> to refuel the tender with '''bunker c oil''' and '''water'''. | ||
| − | # '''Option:''' Reattach the loco to the train and proceed by 09:30 to | + | # '''Option:''' Reattach the loco, or another available loco, to the train and proceed by 09:30 to <span style="font-weight: 700;">Gladstone <span style="color: black; background-color: cyan;"> Yard </span></span>. |
</td> | </td> | ||
<td width=100>[[image:SAR Train Order Rotated.png|100px|link=|alt=Logo]]</td> | <td width=100>[[image:SAR Train Order Rotated.png|100px|link=|alt=Logo]]</td> | ||
</tr> | </tr> | ||
| − | </table> | + | </table> <!-- END Orders and Logo Table --> |
</td> | </td> | ||
</tr> | </tr> | ||
| − | </table> | + | </table> <!-- END Black Border for Orders Table --> |
| − | + | <br> | |
<table cellpadding="2" bgcolor="black" width=820> <!-- BEGIN Black border for Driving Notes sub table --> | <table cellpadding="2" bgcolor="black" width=820> <!-- BEGIN Black border for Driving Notes sub table --> | ||
<tr valign="top"> | <tr valign="top"> | ||
| Line 138: | Line 136: | ||
tr valign="top"> | tr valign="top"> | ||
<td> | <td> | ||
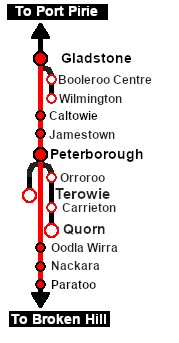
| + | A summary of the facilities and product loads at all locations along the line is provided in the link [[Image:SAR_PortPirie-BrokenHill_Line.png|link=SAR Port Pirie-Broken Hill|alt=Port Pirie-Broken Hill Line|Show Port Pirie-Broken Hill Line]] | ||
*Fuel oil level is low, but sufficient to reach '''Peterborough''' where it can be refilled | *Fuel oil level is low, but sufficient to reach '''Peterborough''' where it can be refilled | ||
*Water is very low and you will need to refill either here at '''Paratoo''' or at '''Nackara''' | *Water is very low and you will need to refill either here at '''Paratoo''' or at '''Nackara''' | ||
| Line 155: | Line 154: | ||
*Trackmarks and industries have been provided for AI '''Drive To Trackmark''', '''Drive via Trackmark''' and '''Drive to <span style="background-color: yellow;"> Industry </span>''' commands. Click [[image:Line_Index_Label.png|link=SAR_Index|Location Index]] for details. | *Trackmarks and industries have been provided for AI '''Drive To Trackmark''', '''Drive via Trackmark''' and '''Drive to <span style="background-color: yellow;"> Industry </span>''' commands. Click [[image:Line_Index_Label.png|link=SAR_Index|Location Index]] for details. | ||
*Manual (no AI) driving is possible. As a visual driving aid, a '''Caution''' warning sign has been placed at the location of the '''Main Approach Dn''' and '''Main Approach Up''' trackmarks. Click [[image:Line_Index_Label.png|link=SAR_Index|Location Index]] for details. | *Manual (no AI) driving is possible. As a visual driving aid, a '''Caution''' warning sign has been placed at the location of the '''Main Approach Dn''' and '''Main Approach Up''' trackmarks. Click [[image:Line_Index_Label.png|link=SAR_Index|Location Index]] for details. | ||
| + | *If driving manually in yards, you are responsible for correctly setting any '''catch points'''. | ||
</td> | </td> | ||
</tr> | </tr> | ||
| Line 178: | Line 178: | ||
</tr> | </tr> | ||
<tr valign="center"> | <tr valign="center"> | ||
| − | <td width=63 align="left">[[image: | + | <td width=63 align="left">[[image:ArrowLeftBtn.png|link=SAR Scenario Gladstone-Terowie Passenger|30px]]</td> |
<td width=125 align="center">[[image:Session Scenario Index.png|link=SAR Peterborough Base Session|alt=Scenarios|Scenario Index]]<br>'''[[SAR Peterborough Base Session|Session Scenarios]]'''</td> | <td width=125 align="center">[[image:Session Scenario Index.png|link=SAR Peterborough Base Session|alt=Scenarios|Scenario Index]]<br>'''[[SAR Peterborough Base Session|Session Scenarios]]'''</td> | ||
<td width=125 align="center">[[Image:Location Index.png|link=SAR Index|alt=Location Index|Location Index]]<br>'''[[SAR Index|Location List]]'''</td> | <td width=125 align="center">[[Image:Location Index.png|link=SAR Index|alt=Location Index|Location Index]]<br>'''[[SAR Index|Location List]]'''</td> | ||
| Line 186: | Line 186: | ||
<td width=125 align="center">[[image:Industry Index.png|link=SAR Scenario Industries|alt=Industries]]<br>'''[[SAR Scenario Industries|Active Industries]]'''</td> | <td width=125 align="center">[[image:Industry Index.png|link=SAR Scenario Industries|alt=Industries]]<br>'''[[SAR Scenario Industries|Active Industries]]'''</td> | ||
<td width=125 align="center">[[image:BackToTop.png|link=#top|alt=Top|Top]]</td> | <td width=125 align="center">[[image:BackToTop.png|link=#top|alt=Top|Top]]</td> | ||
| − | <td width=63 align="left">[[image: | + | <td width=63 align="left">[[image:ArrowRightBtn.png|link=SAR Scenario Paratoo Empty Ore|30px]]</td> |
</tr> | </tr> | ||
</table> <!-- END End Links Table --> | </table> <!-- END End Links Table --> | ||
Revision as of 11:14, 3 August 2022
| 5 Paratoo to Peterborough Bulk Ore Paratoo to Gladstone Bulk Ore |
||
| A scenario in the SAR Peterborough Base Session | ||
| Express bulk ore freight from Broken Hill to Port Pirie. |
The Historical Bit
The line from Port Pirie to Cockburn on the South Australia - New South Wales border was built in stages from 1875 to 1888 largely to capture the lead, zinc and silver ore traffic from the mines at Broken Hill just over the border in New South Wales. Because the SAR was not allowed to operate into New South Wales, a private railway, the Silverton Tramway, was created to carry the ore across the border. The SAR and Silverton Tramway simply swapped locos at Cockburn on the border. It was called a "tramway" to get around a NSW law banning private railways but not private tramways. Despite the title it was a fully operating heavy haul railway, and one of the most profitable in the country.
The SAR had a monopoly on the ore traffic until 1919 when the NSWGR (New South Wales Government Railways) completed its own standard gauge (4ft 8.5in) line from Sydney to Broken Hill but the SAR continued to carry the bulk of the ore because the port and smelter at Port Pirie was much closer to Broken Hill.
By 1970 the narrow gauge line from Port Pirie to Broken Hill had been converted to standard gauge and the Silverton Tramway ceased its ore hauling operations but continues to operate today providing standard gauge shunting services and leases locos to rail operators.
 |
|
||||||||||||
Getting Started:
|
Tutorial:
|
|
|


| Links: All links will open in this window | ||||||||
 Session Scenarios |
 Location List |
 Drive Tutorial |
 Rolling Stock |
 Loco Roster |
 Active Industries |
|||
This page was created by Trainz user pware in February 2021 and was last updated as shown below.