SAR Scenario East-West Express
m |
m |
||
| Line 1: | Line 1: | ||
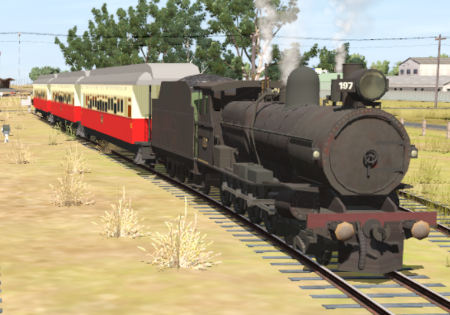
| − | <span style="font-size: 19px; font-weight: 700; background-color: black; color: white;"> | + | <span style="font-size: 19px; font-weight: 700; background-color: black; color: white;"> Vintage East-West Express: Terowie to Quorn Passenger </span><br> |
| − | + | ||
| − | + | Between 1917 and 1932 the '''Peterborough-Quorn Line''' was a vital link in the Transcontinental Railway between '''Sydney''' on the east coast and '''Perth''' on the west coast.<br> | |
| − | + | ||
| + | The '''South Australian Railways''' provided an express passenger service, the '''East-West Express''', that ran between '''Terowie''' and '''Port Augusta''' via '''Quorn'''. At '''Terowie''' it connected with broad gauge services from '''Adelaide'''. At '''Peterborough''' it connected with narrow gauge services from '''Broken Hill''' where there was a standard gauge connection from '''Sydney'''. At '''Quorn''' it connected with narrow gauge services from the '''Central Australian Line'''. At '''Port Augusta''' it connected with standard gauge services to '''Kalgoolie''', where there was a narrow gauge connection to '''Perth'''. | ||
| + | |||
| + | Passengers making the entire trip from '''Sydney NSW''' to '''Perth WA''' would change trains 5 times - '''Parkes NSW''', '''Broken Hill NSW''', '''Peterborough SA''', '''Port Augusta SA''' and '''Kalgoolie WA'''. They would change track gauges 3 times (standard to narrow to standard to narrow) and have to navigate through 5 different rail systems ('''NSWGR''', '''Silverton Tramway''', '''SAR''', '''Commonwealth Railways''' and '''WAGR''') plus a taxi between two stations in '''Broken Hill'''. The entire journey from coast to coast would take 6 days, if all the connections were made. | ||
| + | |||
| + | Today passengers can board a luxury train, the '''Indian Pacific''', in '''Sydney''' and travel the entire distance to '''Perth''' in 3 days without leaving the train. | ||
<table> | <table> | ||
<tr valign="top"> | <tr valign="top"> | ||
| − | <td>[[image:SAR T | + | <td>[[image:SAR T 197 East-West.png|link=|alt=East West Express]]</td> |
<td> | <td> | ||
<table> | <table> | ||
| Line 43: | Line 47: | ||
</tr> | </tr> | ||
</table> | </table> | ||
| + | <br> | ||
<table bgcolor="LightYellow"> | <table bgcolor="LightYellow"> | ||
<tr valign="top"> | <tr valign="top"> | ||
<td width=75><span style="font-size: 15px; font-weight: 700;">Duration:</span></td> | <td width=75><span style="font-size: 15px; font-weight: 700;">Duration:</span></td> | ||
| − | <td> | + | <td>3 hours</td> |
| − | + | ||
</tr> | </tr> | ||
<tr valign="top"> | <tr valign="top"> | ||
<td><span style="font-size: 15px; font-weight: 700;">Loco:</span></td> | <td><span style="font-size: 15px; font-weight: 700;">Loco:</span></td> | ||
| − | <td>'''SAR T | + | <td>'''SAR T 197''' at '''Terowie Station Sidings'''<br> |
'''Other Unrostered Locos:''' | '''Other Unrostered Locos:''' | ||
| − | |||
*'''SAR T 23''' on '''Peterborough Depot Siding 1''' | *'''SAR T 23''' on '''Peterborough Depot Siding 1''' | ||
| + | *'''SAR T 231''' at '''Terowie Depot''' | ||
*'''SAR T 233''' on '''Peterborough Depot Loco Road 1''' | *'''SAR T 233''' on '''Peterborough Depot Loco Road 1''' | ||
*'''SAR 407''' on '''Peterborough Depot Repair Shop Road 4'''</td> | *'''SAR 407''' on '''Peterborough Depot Repair Shop Road 4'''</td> | ||
| Line 60: | Line 64: | ||
<tr valign="top"> | <tr valign="top"> | ||
<td><span style="font-size: 15px; font-weight: 700;">Consist:</span></td> | <td><span style="font-size: 15px; font-weight: 700;">Consist:</span></td> | ||
| − | <td>Attached to '''SAR T | + | <td>Attached to '''SAR T 197'''. 3 '''Kuranda BL1''' coaches</td> |
</tr> | </tr> | ||
<tr valign="top"> | <tr valign="top"> | ||
<td colspan=2> | <td colspan=2> | ||
| − | <table> | + | <table cellpadding="2" bgcolor="black"> <!-- black border --> |
| + | <tr valign="top"> | ||
| + | <td> | ||
| + | <table bgcolor="lightyellow"> | ||
<tr valign="top"> | <tr valign="top"> | ||
<td> | <td> | ||
<span style="font-size: 15px; font-weight: 700;">Getting Started:</span><br> | <span style="font-size: 15px; font-weight: 700;">Getting Started:</span><br> | ||
# The first step is to pause the session by pressing the '''P''' key. | # The first step is to pause the session by pressing the '''P''' key. | ||
| − | # Next locate your loco. Open the '''Finder''' (press '''CTRL-F''') and type, in the '''name''' field, the name of the loco. For example '''SAR T | + | # Next locate your loco. '''Either''':- |
| − | # Take a few moments to get your bearings. Use the [[image:Line_Index_Label.png|link=SAR_Index]] (this link will open in this window) and click on ''' | + | ## Open the '''Finder''' (press '''CTRL-F''') and type, in the '''name''' field, the name of the loco. For example '''SAR T 197''' (or just '''T 197''' should be enough). Click the '''tick''' icon, '''OR''' |
| + | ## Open the '''Driver List''' (bottom left of the screen) and select the loco from there - click the drivers '''Eye''' icon to jump to the loco. | ||
| + | # Take a few moments to get your bearings. Use the [[image:Line_Index_Label.png|link=SAR_Index]] (this link will open in this window) and click on '''Terowie''' to load its location details and track plans. The [[image:Tab_PH_Grey.png|link=|75px]] tab will give you the '''EIT Paths''' that are available if you wish to use them. The [[image:Tab_TM_Grey.png|link=|75px]] tab will give you the location and names of the invisible '''Track Marks''' for '''Drive To''' commands. The [[image:Tab_IN_Grey.png|link=|75px]] tab will show the names and locations of all active industries and their commodities. The [[image:Tab_SW_Grey.png|link=|75px]] tab will give the names and locations of all junction switches as well as some switch sets you may want to use. | ||
# Each location page has a direct link to the next location page, in all directions, so you can explore along the route. | # Each location page has a direct link to the next location page, in all directions, so you can explore along the route. | ||
# When you are ready to start, reload the '''Peterborough Base Session''' page (click the '''Scenarios''' button on your current location page) and select this '''Scenario''' again or just use the '''Back''' button on your browser - whichever is quicker. | # When you are ready to start, reload the '''Peterborough Base Session''' page (click the '''Scenarios''' button on your current location page) and select this '''Scenario''' again or just use the '''Back''' button on your browser - whichever is quicker. | ||
# Press the '''P''' key to start the session. | # Press the '''P''' key to start the session. | ||
| + | </td> | ||
| + | </tr> | ||
| + | </table> | ||
</td> | </td> | ||
</tr> | </tr> | ||
| Line 81: | Line 93: | ||
<tr valign="top"> | <tr valign="top"> | ||
<td colspan=2><span style="font-size: 15px; font-weight: 700;">Tasks:</span> | <td colspan=2><span style="font-size: 15px; font-weight: 700;">Tasks:</span> | ||
| − | # | + | # Shunt train into the narrow gauge platform at '''Terowie'''. |
| − | # | + | # Proceed according to the timetable.<br> |
| − | + | <table> | |
| − | + | <tr valign="top"> | |
| + | <td width=75>'''Terowie'''</td> | ||
| + | <td>dep 08:05<td> | ||
| + | </tr> | ||
| + | <tr> | ||
| + | <td>'''Peterborough'''</td> | ||
| + | <td>dep 08:30</td> | ||
| + | </tr> | ||
| + | <tr> | ||
| + | <td>'''Black Rock'''</td> | ||
| + | <td>dep 08:58</td> | ||
| + | </tr> | ||
| + | <tr> | ||
| + | <td>'''Orroroo'''</td> | ||
| + | <td>dep 09:14</td> | ||
| + | </tr> | ||
| + | <tr> | ||
| + | <td>'''Eurelia'''</td> | ||
| + | <td>arr 09:38 (water)</td> | ||
| + | </tr> | ||
| + | <tr> | ||
| + | <td> </td> | ||
| + | <td>dep 09:42</td> | ||
| + | </tr> | ||
| + | <tr> | ||
| + | <td>'''Carrieton'''</td> | ||
| + | <td>arr 09:57 (coal)</td> | ||
| + | </tr> | ||
| + | <tr> | ||
| + | <td> </td> | ||
| + | <td>dep 10:07</td> | ||
| + | </tr> | ||
| + | <tr> | ||
| + | <td>'''Moockra'''</td> | ||
| + | <td>dep 10:21</td> | ||
| + | </tr> | ||
| + | <tr> | ||
| + | <td>'''Hammond'''</td> | ||
| + | <td>dep 10:35</td> | ||
| + | </tr> | ||
| + | <tr> | ||
| + | <td>'''Bruce'''</td> | ||
| + | <td>dep 10:49</td> | ||
| + | </tr> | ||
| + | <tr> | ||
| + | <td>'''Quorn'''</td> | ||
| + | <td>arr 11:15</td> | ||
| + | </tr> | ||
| + | </table> | ||
| + | </td> | ||
</tr> | </tr> | ||
<tr valign="top"> | <tr valign="top"> | ||
<td colspan=2><span style="font-size: 15px; font-weight: 700;">Driving Notes:</span> | <td colspan=2><span style="font-size: 15px; font-weight: 700;">Driving Notes:</span> | ||
*The approaches to all locations are protected by invisible signals to prevent the '''AI Half Speed Slowdown Problem''' when approaching a signal at stop. | *The approaches to all locations are protected by invisible signals to prevent the '''AI Half Speed Slowdown Problem''' when approaching a signal at stop. | ||
| − | *'''Enhanced Interlocking Towers''' with set paths are available for your optional use at ''' | + | *'''Enhanced Interlocking Towers''' with set paths are available for your optional use at '''Terowie''' (departure), '''Peterborough''' (arrival and departure), '''Orroroo''' (arrival and departure), '''Carrieton''' (arrival and departure) and at '''Quorn''' (arrival). Details of all available '''EIT Paths''' are provided in the [[image:Tab_PH_Grey.png|link=|75px]] tab at each location with '''EITs'''. Click [[image:Line_Index_Label.png|link=SAR_Index]] for details. |
*Trackmarks and industries have been provided for AI '''Drive To Trackmark''', '''Drive via Trackmark''' and '''Drive to <span style="background-color: yellow;"> Industry </span>''' commands. Details of all available '''Trackmarks''' and '''Industries''' are provided in the [[image:Tab_TM_Grey.png|link=|75px]] and [[image:Tab_IN_Grey.png|link=|75px]] tabs at each location. Click [[image:Line_Index_Label.png|link=SAR_Index]] for details. | *Trackmarks and industries have been provided for AI '''Drive To Trackmark''', '''Drive via Trackmark''' and '''Drive to <span style="background-color: yellow;"> Industry </span>''' commands. Details of all available '''Trackmarks''' and '''Industries''' are provided in the [[image:Tab_TM_Grey.png|link=|75px]] and [[image:Tab_IN_Grey.png|link=|75px]] tabs at each location. Click [[image:Line_Index_Label.png|link=SAR_Index]] for details. | ||
*Manual (no AI) driving is possible. For those locations without home or approach semaphore signals, a '''Caution''' warning sign has been placed at the location of the '''Main Approach Dn''' and '''Main Approach Up''' trackmarks. Details on all switches and suggested switch paths are provided in the [[image:Tab_SW_Grey.png|link=|75px]] tab at each location. Click [[image:Line_Index_Label.png|link=SAR_Index]] for details. | *Manual (no AI) driving is possible. For those locations without home or approach semaphore signals, a '''Caution''' warning sign has been placed at the location of the '''Main Approach Dn''' and '''Main Approach Up''' trackmarks. Details on all switches and suggested switch paths are provided in the [[image:Tab_SW_Grey.png|link=|75px]] tab at each location. Click [[image:Line_Index_Label.png|link=SAR_Index]] for details. | ||
Revision as of 11:21, 19 February 2021
Vintage East-West Express: Terowie to Quorn Passenger
Between 1917 and 1932 the Peterborough-Quorn Line was a vital link in the Transcontinental Railway between Sydney on the east coast and Perth on the west coast.
The South Australian Railways provided an express passenger service, the East-West Express, that ran between Terowie and Port Augusta via Quorn. At Terowie it connected with broad gauge services from Adelaide. At Peterborough it connected with narrow gauge services from Broken Hill where there was a standard gauge connection from Sydney. At Quorn it connected with narrow gauge services from the Central Australian Line. At Port Augusta it connected with standard gauge services to Kalgoolie, where there was a narrow gauge connection to Perth.
Passengers making the entire trip from Sydney NSW to Perth WA would change trains 5 times - Parkes NSW, Broken Hill NSW, Peterborough SA, Port Augusta SA and Kalgoolie WA. They would change track gauges 3 times (standard to narrow to standard to narrow) and have to navigate through 5 different rail systems (NSWGR, Silverton Tramway, SAR, Commonwealth Railways and WAGR) plus a taxi between two stations in Broken Hill. The entire journey from coast to coast would take 6 days, if all the connections were made.
Today passengers can board a luxury train, the Indian Pacific, in Sydney and travel the entire distance to Perth in 3 days without leaving the train.
 |
|
|||||||||

| Duration: | 3 hours | |||||||||||||||||||||||||
| Loco: | SAR T 197 at Terowie Station Sidings Other Unrostered Locos:
|
|||||||||||||||||||||||||
| Consist: | Attached to SAR T 197. 3 Kuranda BL1 coaches | |||||||||||||||||||||||||
|
||||||||||||||||||||||||||
Tasks:
|
||||||||||||||||||||||||||
Driving Notes:
|
||||||||||||||||||||||||||