SAR Scenario Depot Fuel Run V1
From TrainzOnline
(Difference between revisions)
(Created page with "<!-- V1.0 --> <table width=1000> <tr valign="top"> <td width=50 align="left">30px</td> <td width=900 align="center">...") |
m |
||
| Line 2: | Line 2: | ||
<table width=1000> | <table width=1000> | ||
<tr valign="top"> | <tr valign="top"> | ||
| − | <td width=50 align="left">[[image:ArrowLeftBtn.png|link=SAR Scenario Quorn Shunter|30px]]</td> | + | <td width=50 align="left">[[image:ArrowLeftBtn.png|link=SAR Scenario Quorn Shunter V1|30px]]</td> |
<td width=900 align="center"><span style="font-size: 21px; font-weight: 700;"> <span style="background-color: black; color: white;"> 1 </span> <span style="background-color: black; color: white;"> Gladstone to Peterborough Depot Fuel Run </span></span></td> | <td width=900 align="center"><span style="font-size: 21px; font-weight: 700;"> <span style="background-color: black; color: white;"> 1 </span> <span style="background-color: black; color: white;"> Gladstone to Peterborough Depot Fuel Run </span></span></td> | ||
| − | <td width=50 align="right">[[image:ArrowRightBtn.png|link=SAR Scenario East-West Express|30px]]</td> | + | <td width=50 align="right">[[image:ArrowRightBtn.png|link=SAR Scenario East-West Express V1|30px]]</td> |
</tr> | </tr> | ||
<tr valign="top"> | <tr valign="top"> | ||
| Line 35: | Line 35: | ||
<tr valign="top"> | <tr valign="top"> | ||
<td><span style="font-size: 15px; font-weight: 700; color: white; background-color: black;"> Loco: </span></td> | <td><span style="font-size: 15px; font-weight: 700; color: white; background-color: black;"> Loco: </span></td> | ||
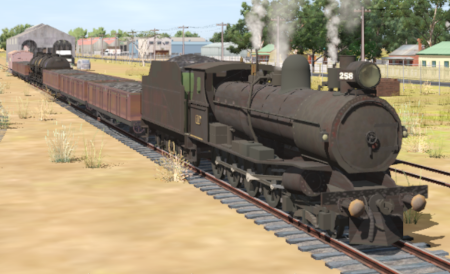
| − | <td>'''[[ | + | <td>'''[[SAR_Scenario_Rolling_Stock_V1#SAR_T_Class|SAR T 258]] on Gladstone <span style="color: black; background-color: yellow;"> Goods Loop </span>'''<br> |
| − | See [[image:Loco_Roster_Label.png|link=SAR Peterborough Division Loco | + | See [[image:Loco_Roster_Label.png|link=SAR Peterborough Division Loco Roster_V1]] for a full list of locos.</td> |
</tr> | </tr> | ||
<tr valign="top"> | <tr valign="top"> | ||
<td><span style="font-size: 15px; font-weight: 700; color: white; background-color: black;"> Consist: </span></td> | <td><span style="font-size: 15px; font-weight: 700; color: white; background-color: black;"> Consist: </span></td> | ||
<td>Attached to '''SAR T 258''' | <td>Attached to '''SAR T 258''' | ||
| − | *5 '''[[ | + | *5 '''[[SAR_Scenario_Rolling_Stock_V1#TGR_CCC|CCC Gondola]]''' wagons loaded with '''coal''' |
| − | *3 '''[[ | + | *3 '''[[SAR_Scenario_Rolling_Stock_V1#Tank|Tank Fuel]]''' wagons loaded with '''bunker c oil''' |
| − | *1 '''[[ | + | *1 '''[[SAR_Scenario_Rolling_Stock_V1#Guard_Vans|Guard Van]]'''</td> |
</tr> | </tr> | ||
<tr valign="top"> | <tr valign="top"> | ||
| Line 56: | Line 56: | ||
</tr> | </tr> | ||
</table> | </table> | ||
| + | |||
<table bgcolor="lightcyan" width=1000> | <table bgcolor="lightcyan" width=1000> | ||
<tr> | <tr> | ||
| Line 62: | Line 63: | ||
<td>'''Each location in the layout has a detailed set of track diagrams that provide a variety of useful information'''<br> | <td>'''Each location in the layout has a detailed set of track diagrams that provide a variety of useful information'''<br> | ||
The <span style="font-weight: 700; color: white; background-color: black;"> Getting Started </span> guide below gives a summary of what is available.<br> | The <span style="font-weight: 700; color: white; background-color: black;"> Getting Started </span> guide below gives a summary of what is available.<br> | ||
| − | To display this information click any [[image:Line_Index_Label.png|link=SAR_Index|Location Index]] graphic, or go to the bottom of the page for all the session links (all links will open in this window).</td> | + | To display this information click any [[image:Line_Index_Label.png|link=SAR_Index V1|Location Index]] graphic, or go to the bottom of the page for all the session links (all links will open in this window).</td> |
</tr> | </tr> | ||
</table> | </table> | ||
| + | |||
<table cellpadding="2" bgcolor="black" width=1000> | <table cellpadding="2" bgcolor="black" width=1000> | ||
<tr valign="top"> | <tr valign="top"> | ||
| Line 75: | Line 77: | ||
#*Open the '''Finder Tool''' (press <span style="font-weight: 700; font-size: 15px; color: white; background-color: black;"> Ctrl </span> <span style="font-weight: 700; font-size: 15px; color: white; background-color: black;"> F </span>) and type, in the '''Name''' field, the name of the loco, in this case '''SAR T 258''' (or just '''T 258''' should be enough). Click the '''tick''' icon, '''OR''' | #*Open the '''Finder Tool''' (press <span style="font-weight: 700; font-size: 15px; color: white; background-color: black;"> Ctrl </span> <span style="font-weight: 700; font-size: 15px; color: white; background-color: black;"> F </span>) and type, in the '''Name''' field, the name of the loco, in this case '''SAR T 258''' (or just '''T 258''' should be enough). Click the '''tick''' icon, '''OR''' | ||
#*Open the '''Driver List''' (bottom left of the screen) and then scroll through the list to find the '''loco name''' ('''SAR T 258''') then click the drivers '''Eye''' icon [[image:Driver_Eye.png|link=]] to take control of the loco | #*Open the '''Driver List''' (bottom left of the screen) and then scroll through the list to find the '''loco name''' ('''SAR T 258''') then click the drivers '''Eye''' icon [[image:Driver_Eye.png|link=]] to take control of the loco | ||
| − | # Take a few moments to get your bearings. Click [[image:Line_Index_Gladstone.png|link= | + | # Take a few moments to get your bearings. Click [[image:Line_Index_Gladstone.png|link=SAR_Gladstone_V1|Gladstone Data]] (this link will open in this window) to show the location details and track plans for '''Gladstone'''. In each location details page:- |
#*the [[image:Tab_HM_White.png|link=|75px]] tab gives an overall summary of each location with a "potted" history (where available). | #*the [[image:Tab_HM_White.png|link=|75px]] tab gives an overall summary of each location with a "potted" history (where available). | ||
#*the [[image:Tab_TM_Grey.png|link=|75px]] tab reveals the invisible [[image:Trackmark_Right.png|link=|alt=TM|8px]] '''Track Marks''' for '''Drive To''' commands. | #*the [[image:Tab_TM_Grey.png|link=|75px]] tab reveals the invisible [[image:Trackmark_Right.png|link=|alt=TM|8px]] '''Track Marks''' for '''Drive To''' commands. | ||
| Line 146: | Line 148: | ||
<table width=180> | <table width=180> | ||
<tr valign="top"> | <tr valign="top"> | ||
| − | |||
<td align="center">[[image:SAR Scenario Gladstone-Peterborough Strip Map.png|link=|alt=Strip Map]]<br>[[image:SAR Scenario Route.png|link=|alt=Route Key]]</td> | <td align="center">[[image:SAR Scenario Gladstone-Peterborough Strip Map.png|link=|alt=Strip Map]]<br>[[image:SAR Scenario Route.png|link=|alt=Route Key]]</td> | ||
</tr> | </tr> | ||
| Line 159: | Line 160: | ||
</tr> | </tr> | ||
<tr valign="center"> | <tr valign="center"> | ||
| − | <td width=50 align="left">[[image:ArrowLeftBtn.png|link=SAR Scenario Quorn Shunter|30px]]</td> | + | <td width=50 align="left">[[image:ArrowLeftBtn.png|link=SAR Scenario Quorn Shunter V1|30px]]</td> |
| − | <td width=125 align="center">[[image:Session Scenario Index.png|link=SAR Peterborough Base Session|alt=Scenarios|Scenario Index]]<br>'''[[SAR Peterborough Base Session|Session Scenarios]]'''</td> | + | <td width=125 align="center">[[image:Session Scenario Index.png|link=SAR Peterborough Base Session V1|alt=Scenarios|Scenario Index]]<br>'''[[SAR Peterborough Base Session V1|Session Scenarios]]'''</td> |
| − | <td width=125 align="center">[[Image:Location Index.png|link=SAR Index|alt=Location Index|Location Index]]<br>'''[[SAR Index|Location List]]'''</td> | + | <td width=125 align="center">[[Image:Location Index.png|link=SAR Index V1|alt=Location Index|Location Index]]<br>'''[[SAR Index V1|Location List]]'''</td> |
| − | <td width=125 align="center">[[image:SAR Tutorial.png|link=SAR Scenarios Tutorial|alt=Tutorial]]<br>'''[[SAR Scenarios Tutorial|Drive Tutorial]]'''</td> | + | <td width=125 align="center">[[image:SAR Tutorial.png|link=SAR Scenarios Tutorial V1|alt=Tutorial]]<br>'''[[SAR Scenarios Tutorial V1|Drive Tutorial]]'''</td> |
| − | <td width=125 align="center">[[image:Rolling Stock Index.png|link=SAR Scenario Rolling Stock|alt=Rolling Stock]]<br>'''[[SAR Scenario Rolling Stock|Rolling Stock]]'''</td> | + | <td width=125 align="center">[[image:Rolling Stock Index.png|link=SAR Scenario Rolling Stock V1|alt=Rolling Stock]]<br>'''[[SAR Scenario Rolling Stock V1|Rolling Stock]]'''</td> |
| − | <td width=125 align="center">[[image:Loco Index.png|link=SAR Peterborough Division Loco Roster|alt=Loco Roster]]<br>'''[[SAR Peterborough Division Loco Roster|Loco Roster]]'''</td> | + | <td width=125 align="center">[[image:Loco Index.png|link=SAR Peterborough Division Loco Roster V1|alt=Loco Roster]]<br>'''[[SAR Peterborough Division Loco Roster V1|Loco Roster]]'''</td> |
| − | <td width=125 align="center">[[image:Industry Index.png|link=SAR Scenario Industries|alt=Industries]]<br>'''[[SAR Scenario Industries|Active Industries]]'''</td> | + | <td width=125 align="center">[[image:Industry Index.png|link=SAR Scenario Industries V1|alt=Industries]]<br>'''[[SAR Scenario Industries V1|Active Industries]]'''</td> |
<td width=125 align="center">[[image:BackToTop.png|link=#top|alt=Top|Top]]</td> | <td width=125 align="center">[[image:BackToTop.png|link=#top|alt=Top|Top]]</td> | ||
| − | <td width=62 align="left">[[image:ArrowRightBtn.png|link=SAR Scenario East-West Express|30px]]</td> | + | <td width=62 align="left">[[image:ArrowRightBtn.png|link=SAR Scenario East-West Express V1|30px]]</td> |
</tr> | </tr> | ||
</table> | </table> | ||
Latest revision as of 22:18, 23 April 2024
| 1 Gladstone to Peterborough Depot Fuel Run | ||
| A scenario in the SAR Peterborough Base Session | ||
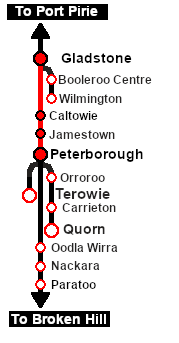
| Loco coal stages and fuel-oil points need to be refilled regularly. This service delivers coal to the loco coal stages at Jamestown and Peterborough, and bunker c oil (for the SAR 400 class Garrett locos) to the loco (main) depot at Peterborough. |
 |
|
|||||||||||
 |
Each location in the layout has a detailed set of track diagrams that provide a variety of useful information The Getting Started guide below gives a summary of what is available. |
Getting Started:
|
Tutorial:
|
|
|


| Links: All links will open in this window | ||||||||
 Session Scenarios |
Location List |
 Drive Tutorial |
 Rolling Stock |
 Loco Roster |
 Active Industries |
|||
This page was created by Trainz user pware in February 2021 and was last updated as shown below.