SAR Scenario Broad Gauge Express
From TrainzOnline
(Difference between revisions)
m |
m |
||
| Line 1: | Line 1: | ||
| − | <!-- V2.0 only --> | + | <!-- V2.0 only (no V1.0 version) --> |
<table width=1000> <!-- BEGIN Title table --> | <table width=1000> <!-- BEGIN Title table --> | ||
<tr valign="top"> | <tr valign="top"> | ||
| Line 69: | Line 69: | ||
<td> | <td> | ||
# If you have already closed the opening message window then the first step is to pause the session by pressing the <span style="font-weight: 700; font-size: 15px; color: white; background-color: black;"> P </span> key. | # If you have already closed the opening message window then the first step is to pause the session by pressing the <span style="font-weight: 700; font-size: 15px; color: white; background-color: black;"> P </span> key. | ||
| + | # If you decide to set the session clock to a different starting time then follow the instructions shown in the '''Orders''' section | ||
# Next locate your loco. '''Either''':- | # Next locate your loco. '''Either''':- | ||
#* Open the '''Finder Tool''' (press <span style="font-weight: 700; font-size: 15px; color: white; background-color: black;"> Ctrl </span> <span style="font-weight: 700; font-size: 15px; color: white; background-color: black;"> F </span>) and type, in the '''Name''' field, the name of the loco, in this case '''SAR 621''' (or just '''621''' which should be enough), then click the '''tick''' icon, '''OR''' | #* Open the '''Finder Tool''' (press <span style="font-weight: 700; font-size: 15px; color: white; background-color: black;"> Ctrl </span> <span style="font-weight: 700; font-size: 15px; color: white; background-color: black;"> F </span>) and type, in the '''Name''' field, the name of the loco, in this case '''SAR 621''' (or just '''621''' which should be enough), then click the '''tick''' icon, '''OR''' | ||
| Line 103: | Line 104: | ||
</table> <!-- END Blue Border for Tutorial table --> | </table> <!-- END Blue Border for Tutorial table --> | ||
<br> | <br> | ||
| − | <table width=1000> <!-- BEGIN Yard | + | <table width=1000> <!-- BEGIN nested Yard, Orders, Driving Notes, Strip Map tables --> |
<tr valign="top"> | <tr valign="top"> | ||
<td> | <td> | ||
| Line 109: | Line 110: | ||
<tr valign="top"> | <tr valign="top"> | ||
<td><span style="font-size: 15px; font-weight: 700; color: white">Orders:</span><br> | <td><span style="font-size: 15px; font-weight: 700; color: white">Orders:</span><br> | ||
| − | <table bgcolor=#e8e8e8 width= | + | <table bgcolor=#e8e8e8 width=716> <!-- BEGIN Orders and Logo Table --> |
<tr valign="top"> | <tr valign="top"> | ||
<td width=716> | <td width=716> | ||
| Line 120: | Line 121: | ||
<td width=100>[[image:SAR Train Order Rotated.png|100px|link=|alt=Logo]]</td> | <td width=100>[[image:SAR Train Order Rotated.png|100px|link=|alt=Logo]]</td> | ||
</tr> | </tr> | ||
| − | </table> | + | <tr valign="top"> |
| + | <td colspan=2> | ||
| + | <table width=812 bgcolor="white"> <!-- BEGIN Session Change Times Table --> | ||
| + | <tr valign="top"> | ||
| + | <td>The '''Base Session''' has the clock set to start at [[image:Clock_0800.png|link=]]</td> | ||
| + | </tr> | ||
| + | <tr valign="top"> | ||
| + | <td>This can be changed to any required time. For the details see [[image:WikiLink.PNG|link=]]'''[[SAR Scenario Session Time Change]]'''</td> | ||
| + | </tr> | ||
| + | </table> <!-- END Session Change Times Table --> | ||
</td> | </td> | ||
</tr> | </tr> | ||
| − | </table> | + | </table> <!-- END Orders and Logo Table --> |
| + | </td> | ||
| + | </tr> | ||
| + | </table> <!-- END Black Border for Orders Table --> | ||
<br> | <br> | ||
| − | <table cellpadding="2" bgcolor="black" width=820> <!-- BEGIN Black border for Driving Notes | + | <table cellpadding="2" bgcolor="black" width=820> <!-- BEGIN Black border for Driving Notes table --> |
<tr valign="top"> | <tr valign="top"> | ||
| − | <td><span style="font-size: 15px; font-weight: 700; color: white">Driving Notes:</span><br> | + | <td><span style="font-size: 15px; font-weight: 700; color: white;">Driving Notes:</span><br> |
| − | <table bgcolor="lightyellow" width=816> <!-- BEGIN Driving Notes | + | <table bgcolor="lightyellow" width=816> <!-- BEGIN Driving Notes table --> |
<tr valign="top"> | <tr valign="top"> | ||
<td> | <td> | ||
| − | *Yard | + | *The Broad Gauge Yard has no set track marks for AI commands. All switching is under manual control. |
*Movements in the yard are restricted to 15 mph between the Station and the Depot and 10 mph at and beyond the Depot. | *Movements in the yard are restricted to 15 mph between the Station and the Depot and 10 mph at and beyond the Depot. | ||
| − | * | + | *You are responsible for correctly setting any '''catch points'''. |
</td> | </td> | ||
</tr> | </tr> | ||
| − | </table> <!-- END Driving Notes | + | </table> <!-- END Driving Notes table --> |
</td> | </td> | ||
</tr> | </tr> | ||
| − | </table> <!-- END Black border for Driving Notes | + | </table> <!-- END Black border for Driving Notes table --> |
</td> | </td> | ||
<td> | <td> | ||
<table width=180> <!-- BEGIN Strip Map Table --> | <table width=180> <!-- BEGIN Strip Map Table --> | ||
<tr valign="top"> | <tr valign="top"> | ||
| − | |||
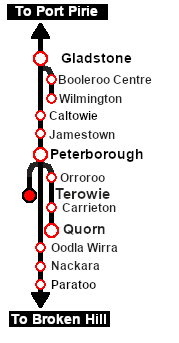
<td align="center">[[image:SAR Scenario Terowie Strip Map.png|link=|alt=Strip Map]]<br>[[image:SAR Scenario Route.png|link=|alt=Route Key]]</td> | <td align="center">[[image:SAR Scenario Terowie Strip Map.png|link=|alt=Strip Map]]<br>[[image:SAR Scenario Route.png|link=|alt=Route Key]]</td> | ||
</tr> | </tr> | ||
| Line 150: | Line 162: | ||
</td> | </td> | ||
</tr> | </tr> | ||
| − | </table> | + | </table> <!-- END Yard, Orders, Driving Notes, Strip Map tables --> |
----- | ----- | ||
<table width=1000> <!-- BEGIN End Links Table --> | <table width=1000> <!-- BEGIN End Links Table --> | ||
Revision as of 20:36, 15 November 2022
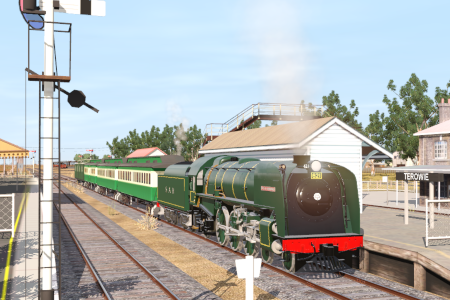
| 19 Broad Gauge Adelaide Express Refuel and Shunt | ||
| A scenario in the SAR Peterborough Base Session v2.0 | ||
| The Terowie Express from Adelaide has arrived on Platform 2 at Terowie. Passengers continuing onto Peterborough (with a connection to Broken Hill and Sydney), Quorn (with a connection to the Central Australia Line ) and Port Augusta (with a connection to the Trans Australia Line service to Kalgoolie and Perth) change trains here to the narrow gauge East-West Express service leaving from Platform 3. The loco must be watered and coaled at the Loco Depot and turned. The guard van must be repositioned on the consist in preparation for the return Adelaide Express service. |
 |
|
|
|
Each location in the layout has a detailed set of track diagrams that provide a variety of useful information The Getting Started guide below gives a summary of what is available. |
Getting Started:
|
Tutorial:
|
|
|
||||||||||


| Links: All links will open in this window | ||||||||
 Session Scenarios |
 Location List |
 Drive Tutorial |
 Rolling Stock |
 Loco Roster |
 Active Industries |
|||
This page was created by Trainz user pware in May 2022 and was last updated as shown below.