SAR Scenario Booleroo Passenger
From TrainzOnline
(Difference between revisions)
m |
m |
||
| (20 intermediate revisions by one user not shown) | |||
| Line 1: | Line 1: | ||
<table width=1000> <!-- BEGIN Title table --> | <table width=1000> <!-- BEGIN Title table --> | ||
<tr valign="top"> | <tr valign="top"> | ||
| − | <td width=50 align="left">[[image: | + | <td width=50 align="left">[[image:ArrowLeftBtn.png|link=SAR Scenario Quorn Shunter|30px]]</td> |
<td width=900 align="center"><span style="font-size: 21px; font-weight: 700;"> <span style="background-color: black; color: white;"> 16 </span> <span style="background-color: black; color: white;"> Gladstone - Booleroo Centre Passenger </span></span></td> | <td width=900 align="center"><span style="font-size: 21px; font-weight: 700;"> <span style="background-color: black; color: white;"> 16 </span> <span style="background-color: black; color: white;"> Gladstone - Booleroo Centre Passenger </span></span></td> | ||
| − | <td width=50 align="right">[[image: | + | <td width=50 align="right">[[image:ArrowRightBtn.png|link=SAR Scenario Hawker Freight|30px]]</td> |
</tr> | </tr> | ||
<tr valign="top"> | <tr valign="top"> | ||
| − | <td align="center" colspan=3>A scenario in the '''[[SAR Peterborough Base Session]]'''</td> | + | <td align="center" colspan=3>A scenario in the '''[[SAR Peterborough Base Session|SAR Peterborough Base Session v2.0]]'''</td> |
</tr> | </tr> | ||
</table> <!-- END Title table --> | </table> <!-- END Title table --> | ||
<table width=1000> <!-- BEGIN Summary table --> | <table width=1000> <!-- BEGIN Summary table --> | ||
<tr valign="top"> | <tr valign="top"> | ||
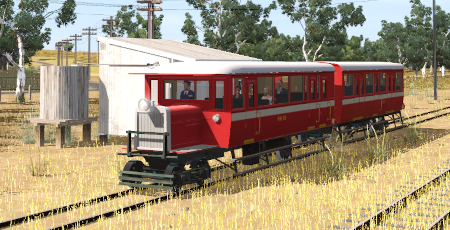
| − | <td align="left">A morning passenger run from '''Gladstone''' to '''Booleroo Centre''' and return | + | <td align="left">A morning passenger run from '''Gladstone''' to '''Booleroo Centre''' and return using a Rail Motor and Trailer.</td> |
<td align="right">[[file:BackToBottom.png|link=#bottom|alt=Bottom|Bottom]]</td> | <td align="right">[[file:BackToBottom.png|link=#bottom|alt=Bottom|Bottom]]</td> | ||
</tr> | </tr> | ||
| Line 22: | Line 22: | ||
<table width=550> <!-- BEGIN Loco/consist sub table --> | <table width=550> <!-- BEGIN Loco/consist sub table --> | ||
<tr valign="top"> | <tr valign="top"> | ||
| − | <td width=75><span style="font-size: 15px; font-weight: 700; color: white; background-color: black;"> Duration: </span></td> | + | <td width=75><span style="font-size: 15px; font-weight: 700; color: white; background-color: black;"> Era: </span></td> |
| + | <td>'''1930s to 1969'''</td> | ||
| + | </tr> | ||
| + | <tr valign="top"> | ||
| + | <td><span style="font-size: 15px; font-weight: 700; color: white; background-color: black;"> Duration: </span></td> | ||
<td>'''Booleroo Run''' 1 hour 5 minutes<br> | <td>'''Booleroo Run''' 1 hour 5 minutes<br> | ||
'''Booleroo and return''' 2 hours 30 minutes</td> | '''Booleroo and return''' 2 hours 30 minutes</td> | ||
| Line 28: | Line 32: | ||
<tr valign="top"> | <tr valign="top"> | ||
<td><span style="font-size: 15px; font-weight: 700; color: white; background-color: black;"> Loco: </span></td> | <td><span style="font-size: 15px; font-weight: 700; color: white; background-color: black;"> Loco: </span></td> | ||
| − | <td>'''[[SAR Scenario Rolling Stock#QR RM| | + | <td>'''[[SAR Scenario Rolling Stock#QR RM|RM55 (Rail Motor)]]''' at '''Gladstone Depot <span style="color: white; background-color: black;"> Loco Shed </span>'''<br> |
| − | '''Other | + | '''Other Available Locos:''' '''None'''</td> |
</tr> | </tr> | ||
<tr valign="top"> | <tr valign="top"> | ||
<td><span style="font-size: 15px; font-weight: 700; color: white; background-color: black;"> Consist: </span></td> | <td><span style="font-size: 15px; font-weight: 700; color: white; background-color: black;"> Consist: </span></td> | ||
| − | <td>Attached to '''RM55'''. '''[[SAR Scenario Rolling Stock#QR RM|PL | + | <td>Attached to '''RM55'''. '''[[SAR Scenario Rolling Stock#QR RM|PL Rail Motor Trailer]]'''</td> |
</tr> | </tr> | ||
<tr valign="top"> | <tr valign="top"> | ||
| Line 52: | Line 56: | ||
</tr> | </tr> | ||
</table> <!-- END Scenario image and loco/consist table --> | </table> <!-- END Scenario image and loco/consist table --> | ||
| − | + | <br> | |
<table cellpadding="2" bgcolor="black" width=1000> <!-- BEGIN Black border for Getting Started table --> | <table cellpadding="2" bgcolor="black" width=1000> <!-- BEGIN Black border for Getting Started table --> | ||
<tr valign="top"> | <tr valign="top"> | ||
| Line 61: | Line 65: | ||
# If you have already closed the opening message window then the first step is to pause the session by pressing the <span style="font-weight: 700; font-size: 15px; color: white; background-color: black;"> P </span> key. | # If you have already closed the opening message window then the first step is to pause the session by pressing the <span style="font-weight: 700; font-size: 15px; color: white; background-color: black;"> P </span> key. | ||
# Next locate your loco. '''Either''':- | # Next locate your loco. '''Either''':- | ||
| − | ## Open the '''Finder Tool''' (press <span style="font-weight: 700; font-size: 15px; color: white; background-color: black;"> Ctrl </span> <span style="font-weight: 700; font-size: 15px; color: white; background-color: black;"> F </span>) and type, in the '''Name''' field, the name of the loco. For example ''' | + | ## Open the '''Finder Tool''' (press <span style="font-weight: 700; font-size: 15px; color: white; background-color: black;"> Ctrl </span> <span style="font-weight: 700; font-size: 15px; color: white; background-color: black;"> F </span>) and type, in the '''Name''' field, the name of the loco. For example '''RM55'''. Click the '''tick''' icon, '''OR''' |
## Open the '''Driver List''' (bottom left of the screen) and select the loco from there - click the drivers '''Eye''' icon to jump to the loco. | ## Open the '''Driver List''' (bottom left of the screen) and select the loco from there - click the drivers '''Eye''' icon to jump to the loco. | ||
| − | # Take a few moments to get your bearings. | + | # Take a few moments to get your bearings. Click [[image:Line_Index_Gladstone.png|link=SAR_Gladstone|Gladstone Data]] (this link will open in this window) to show the location details and track plans for '''Gladstone'''. In each location details page:- |
#*the [[image:Tab_HM_White.png|link=|75px]] tab gives an overall summary of each location with a "potted" history (where available). | #*the [[image:Tab_HM_White.png|link=|75px]] tab gives an overall summary of each location with a "potted" history (where available). | ||
#*the [[image:Tab_TM_Grey.png|link=|75px]] tab reveals the invisible [[image:Trackmark_Right.png|link=|alt=TM|8px]] '''Track Marks''' for '''Drive To''' commands. | #*the [[image:Tab_TM_Grey.png|link=|75px]] tab reveals the invisible [[image:Trackmark_Right.png|link=|alt=TM|8px]] '''Track Marks''' for '''Drive To''' commands. | ||
| Line 70: | Line 74: | ||
# Each location details page has direct links to the adjacent locations so you can explore along the route. | # Each location details page has direct links to the adjacent locations so you can explore along the route. | ||
# When you are ready to start, reload the '''Peterborough Base Session''' page (click the '''Scenarios''' button on your current location page) and select this '''Scenario''' again or just use the '''Back''' button on your browser - whichever is quicker. | # When you are ready to start, reload the '''Peterborough Base Session''' page (click the '''Scenarios''' button on your current location page) and select this '''Scenario''' again or just use the '''Back''' button on your browser - whichever is quicker. | ||
| − | # Switch back to ''' | + | # Switch back to '''Driver Mode''' and either close the opening message window or press the <span style="font-weight: 700; font-size: 15px; color: white; background-color: black;"> P </span> key to start the session. |
</td> | </td> | ||
</tr> | </tr> | ||
| Line 91: | Line 95: | ||
</table> <!-- END Blue Border for Tutorial table --> | </table> <!-- END Blue Border for Tutorial table --> | ||
<br> | <br> | ||
| − | <table width=1000> <!-- BEGIN Yard (if | + | <table width=1000> <!-- BEGIN Yard (if applicable), Orders, Strip Map and Driving Notes tables --> |
<tr valign="top"> | <tr valign="top"> | ||
<td> | <td> | ||
| − | <table bgcolor= | + | <table bgcolor=#000000 width=820 cellpadding=2> <!-- BEGIN Black Border for Orders Table --> |
<tr valign="top"> | <tr valign="top"> | ||
| − | <td> | + | <td><span style="font-size: 15px; font-weight: 700; color: white">Orders:</span><br> |
| − | <span style="font-size: 15px; font-weight: 700; color: white | + | <table bgcolor=#e8e8e8 width=816> <!-- BEGIN Orders and Logo Table --> |
| + | <tr valign="top"> | ||
| + | <td width=716> | ||
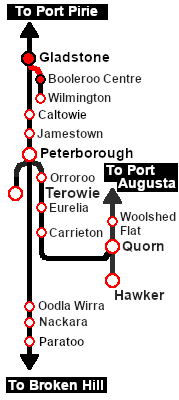
# Reverse the train from the '''Gladstone''' Depot <span style="color: white; background-color: black; font-weight: 700;"> Loco Shed </span> into '''Gladstone''' <span style="font-weight: 700; color: black; background-color: white;"> Station </span>. | # Reverse the train from the '''Gladstone''' Depot <span style="color: white; background-color: black; font-weight: 700;"> Loco Shed </span> into '''Gladstone''' <span style="font-weight: 700; color: black; background-color: white;"> Station </span>. | ||
# Drive to '''Booleroo Centre''' stopping at '''Laura''', '''Stone Hut''' and '''Wirrabara''' as shown in the timetable. | # Drive to '''Booleroo Centre''' stopping at '''Laura''', '''Stone Hut''' and '''Wirrabara''' as shown in the timetable. | ||
| Line 113: | Line 119: | ||
<td width=85>'''Booleroo Centre'''</td> | <td width=85>'''Booleroo Centre'''</td> | ||
<td width=25>dep</td> | <td width=25>dep</td> | ||
| − | <td width=100>09: | + | <td width=100>09:30</td> |
</tr> | </tr> | ||
<tr valign="top"> | <tr valign="top"> | ||
<td>''Army Depot Junct.''</td> | <td>''Army Depot Junct.''</td> | ||
<td>''pass''</td> | <td>''pass''</td> | ||
| − | <td>08: | + | <td>08:10</td> |
<td> </td> | <td> </td> | ||
<td>''Yandiah''</td> | <td>''Yandiah''</td> | ||
<td>''pass''</td> | <td>''pass''</td> | ||
| − | <td>09: | + | <td>09:45</td> |
</tr> | </tr> | ||
<tr valign="top"> | <tr valign="top"> | ||
<td>'''Laura'''</td> | <td>'''Laura'''</td> | ||
<td>dep</td> | <td>dep</td> | ||
| − | <td>08: | + | <td>08:25</td> |
<td> </td> | <td> </td> | ||
<td>'''Wirrabara'''</td> | <td>'''Wirrabara'''</td> | ||
<td>dep</td> | <td>dep</td> | ||
| − | <td> | + | <td>10:00</td> |
</tr> | </tr> | ||
<tr valign="top"> | <tr valign="top"> | ||
<td>'''Stone Hut'''</td> | <td>'''Stone Hut'''</td> | ||
<td>dep</td> | <td>dep</td> | ||
| − | <td>08: | + | <td>08:40</td> |
<td> </td> | <td> </td> | ||
<td>'''Stone Hut'''</td> | <td>'''Stone Hut'''</td> | ||
<td>dep</td> | <td>dep</td> | ||
| − | <td>10: | + | <td>10:14</td> |
</tr> | </tr> | ||
<tr valign="top"> | <tr valign="top"> | ||
<td>'''Wirrabara'''</td> | <td>'''Wirrabara'''</td> | ||
<td>dep</td> | <td>dep</td> | ||
| − | <td>08: | + | <td>08:54</td>p |
<td> </td> | <td> </td> | ||
<td>'''Laura'''</td> | <td>'''Laura'''</td> | ||
<td>dep</td> | <td>dep</td> | ||
| − | <td>10: | + | <td>10:29</td> |
</tr> | </tr> | ||
<tr valign="top"> | <tr valign="top"> | ||
<td>''Yandiah''</td> | <td>''Yandiah''</td> | ||
<td>''pass''</td> | <td>''pass''</td> | ||
| − | <td>09: | + | <td>09:09</td> |
<td> </td> | <td> </td> | ||
<td>''Army Depot Junct.''</td> | <td>''Army Depot Junct.''</td> | ||
<td>''pass''</td> | <td>''pass''</td> | ||
| − | <td>10: | + | <td>10:44</td> |
</tr> | </tr> | ||
<tr valign="top"> | <tr valign="top"> | ||
<td>'''Booleroo Centre</td> | <td>'''Booleroo Centre</td> | ||
<td>arr</td> | <td>arr</td> | ||
| − | <td>09: | + | <td>09:24</td> |
<td> </td> | <td> </td> | ||
<td>'''Gladstone'''</td> | <td>'''Gladstone'''</td> | ||
<td>arr</td> | <td>arr</td> | ||
| − | <td>10: | + | <td>10:47</td> |
</tr> | </tr> | ||
</table> <!-- END Timetable table --> | </table> <!-- END Timetable table --> | ||
| Line 174: | Line 180: | ||
</table> <!-- END Timetable black border --> | </table> <!-- END Timetable black border --> | ||
</td> | </td> | ||
| + | <td width=100>[[image:SAR Train Order Rotated.png|100px|link=|alt=Logo]]</td> | ||
</tr> | </tr> | ||
| − | </table> <!-- END | + | </table> <!-- END Orders and Logo Table --> |
| + | </td> | ||
| + | </tr> | ||
| + | </table> <!-- END Black Border for Orders Table --> | ||
| + | <br> | ||
<table cellpadding="2" bgcolor="black" width=820> <!-- BEGIN Black border for Driving Notes sub table --> | <table cellpadding="2" bgcolor="black" width=820> <!-- BEGIN Black border for Driving Notes sub table --> | ||
<tr valign="top"> | <tr valign="top"> | ||
| Line 182: | Line 193: | ||
<tr valign="top"> | <tr valign="top"> | ||
<td> | <td> | ||
| − | *The '''Wilmington Line''' is '''not signalled'''. | + | A summary of the facilities and product loads at all locations along the line is provided in the link [[Image:SAR_Gladstone-Wilmington_Line.png|link=SAR Gladstone-Wilmington|alt=Gladstone-Wilmington Line|Show Gladstone-Wilmington Line]] |
| − | *You have been issued with | + | *The '''Wilmington Line''' is '''not signalled''' beyond '''Gladstone Yard'''. Train Order working is in operation on the line. |
| + | *You have been issued with orders and the authorisation for the '''Wilmington Line''' as far as '''Booleroo Centre''' and return. | ||
| + | *All facing junctions on the '''Wilmington Line''' have a speed limit of 15mph. | ||
*The approaches to all locations are protected by invisible signals to prevent the '''AI Half Speed Slowdown Problem''' when approaching a signal at stop. | *The approaches to all locations are protected by invisible signals to prevent the '''AI Half Speed Slowdown Problem''' when approaching a signal at stop. | ||
*Trackmarks and industries have been provided for AI '''Drive To Trackmark''', '''Drive via Trackmark''' and '''Drive to <span style="background-color: yellow;"> Industry </span>''' commands. Click [[image:Line_Index_Label.png|link=SAR_Index|Location Index]] for details. | *Trackmarks and industries have been provided for AI '''Drive To Trackmark''', '''Drive via Trackmark''' and '''Drive to <span style="background-color: yellow;"> Industry </span>''' commands. Click [[image:Line_Index_Label.png|link=SAR_Index|Location Index]] for details. | ||
*Manual (no AI) driving is possible. As a visual driving aid, a '''Caution''' warning sign has been placed at the location of the '''Main Approach Dn''' and '''Main Approach Up''' trackmarks. Click [[image:Line_Index_Label.png|link=SAR_Index|Location Index]] for details. | *Manual (no AI) driving is possible. As a visual driving aid, a '''Caution''' warning sign has been placed at the location of the '''Main Approach Dn''' and '''Main Approach Up''' trackmarks. Click [[image:Line_Index_Label.png|link=SAR_Index|Location Index]] for details. | ||
| + | *If driving manually in yards, you are responsible for correctly setting any '''catch points'''. | ||
</td> | </td> | ||
</tr> | </tr> | ||
| Line 210: | Line 224: | ||
</tr> | </tr> | ||
<tr valign="center"> | <tr valign="center"> | ||
| − | <td width=63 align="left">[[image: | + | <td width=63 align="left">[[image:ArrowLeftBtn.png|link=SAR Scenario Quorn Shunter|30px]]</td> |
<td width=125 align="center">[[image:Session Scenario Index.png|link=SAR Peterborough Base Session|alt=Scenarios|Scenario Index]]<br>'''[[SAR Peterborough Base Session|Session Scenarios]]'''</td> | <td width=125 align="center">[[image:Session Scenario Index.png|link=SAR Peterborough Base Session|alt=Scenarios|Scenario Index]]<br>'''[[SAR Peterborough Base Session|Session Scenarios]]'''</td> | ||
<td width=125 align="center">[[Image:Location Index.png|link=SAR Index|alt=Location Index|Location Index]]<br>'''[[SAR Index|Location List]]'''</td> | <td width=125 align="center">[[Image:Location Index.png|link=SAR Index|alt=Location Index|Location Index]]<br>'''[[SAR Index|Location List]]'''</td> | ||
| Line 218: | Line 232: | ||
<td width=125 align="center">[[image:Industry Index.png|link=SAR Scenario Industries|alt=Industries]]<br>'''[[SAR Scenario Industries|Active Industries]]'''</td> | <td width=125 align="center">[[image:Industry Index.png|link=SAR Scenario Industries|alt=Industries]]<br>'''[[SAR Scenario Industries|Active Industries]]'''</td> | ||
<td width=125 align="center">[[image:BackToTop.png|link=#top|alt=Top|Top]]</td> | <td width=125 align="center">[[image:BackToTop.png|link=#top|alt=Top|Top]]</td> | ||
| − | <td width=62 align="left">[[image: | + | <td width=62 align="left">[[image:ArrowRightBtn.png|link=SAR Scenario Hawker Freight|30px]]</td> |
</tr> | </tr> | ||
</table> <!-- END End Links Table --> | </table> <!-- END End Links Table --> | ||
Revision as of 13:55, 3 August 2022
| 16 Gladstone - Booleroo Centre Passenger | ||
| A scenario in the SAR Peterborough Base Session v2.0 | ||
| A morning passenger run from Gladstone to Booleroo Centre and return using a Rail Motor and Trailer. |
 |
|
||||||||||||
Getting Started:
|
Tutorial:
|
|
|


| Links: All links will open in this window | ||||||||
 Session Scenarios |
 Location List |
 Drive Tutorial |
 Rolling Stock |
 Loco Roster |
 Active Industries |
|||
This page was created by Trainz user pware in February 2021 and was last updated as shown below.