SAR Gladstone V2
m |
m |
||
| Line 1: | Line 1: | ||
<!-- V2.0 (seperate V1.0 file) --> | <!-- V2.0 (seperate V1.0 file) --> | ||
| − | <table> | + | <!-- added link to Peterborough West and additional scenarios --> |
| + | <table width=1000> | ||
<tr valign="top"> | <tr valign="top"> | ||
<td width=750> | <td width=750> | ||
| Line 9: | Line 10: | ||
</tr> | </tr> | ||
<tr valign="top"> | <tr valign="top"> | ||
| − | <td align="center">[[image:Tab_HM_White.png|link=]] [[image:Tab_IN_Grey.png|link= | + | <td align="center">[[image:Tab_HM_White.png|link=]] [[image:Tab_IN_Grey.png|link=SAR_Peterborough_Industry_V2]] [[image:Tab_TM_Grey.png|link=SAR_Peterborough_TrackMarks_V2]] [[image:Tab_SW_Grey.png|link=SAR_Peterborough_Switches_V2]] [[image:Tab_Blank_Grey.png|link=]]</td> |
</tr> | </tr> | ||
<tr valign="top"> | <tr valign="top"> | ||
| Line 19: | Line 20: | ||
<tr valign="middle"> | <tr valign="middle"> | ||
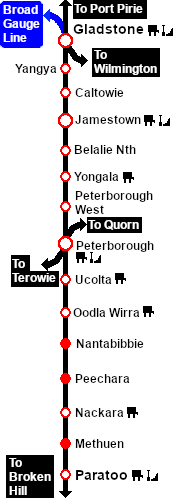
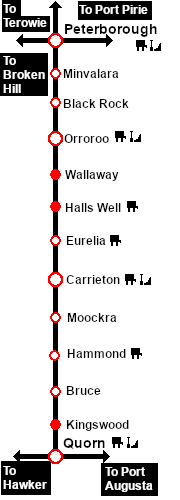
| − | <td width=220 align="right">[[Image:SAR_PortPirie- | + | <td width=220 align="right">[[Image:SAR_PortPirie-BrokenHill_Line.png|link=SAR_Port_Pirie-Broken_Hill_V2|alt=PortPirie-BrokenHill|Show Port Pirie-Broken Hill]]<br>[[Image:SAR_Peterborough-Quorn_Line.png|link=SAR Peterborough-Quorn_V2|alt=Peterborough-Quorn|Show Peterborough-Quorn]]</td> |
| − | [[Image: | + | <td width=110 align="center">[[Image:Next Left.png|link=|alt=]]<br>[[Image:SAR_Peterborough_West_Name.png|link=SAR Peterborough_West_V2|alt=Peterborough_West|Next Up Location]]<br> |
| − | <td width=110 align="center"> | + | [[Image:SAR_Minvalara_Name.png|link=SAR Minvalara_V2|alt=Minvalara|Next Down Location]]</td> |
<td width=90 align="center">[[Image:Location Index.png|link=SAR Index_V2|alt=Location Index|Location Index]]<br>[[image:Scenario Index.png|link=SAR Peterborough Base Session_V2|alt=Scenarios|Scenario Index]]</td> | <td width=90 align="center">[[Image:Location Index.png|link=SAR Index_V2|alt=Location Index|Location Index]]<br>[[image:Scenario Index.png|link=SAR Peterborough Base Session_V2|alt=Scenarios|Scenario Index]]</td> | ||
| − | <td width=110 align="center">[[Image:Next Right.png|link=|alt=]]<br>[[Image: | + | <td width=110 align="center">[[Image:Next Right.png|link=|alt=]]<br>[[Image:SAR_Ucolta_Name.png|link=SAR Ucolta_V2|alt=Ucolta|Next Down Location]]<br>[[Image:SAR_Gumbowie_Name.png|link=SAR Gumbowie_V2|alt=Gumbowie|Next Down Location]]</td> |
| − | <td width=220 align="left">[[Image:SAR_PortPirie- | + | <td width=220 align="left">[[Image:SAR_PortPirie-BrokenHill_Line.png|link=SAR_Port_Pirie-Broken_Hill_V2|alt=PortPirie-BrokenHill|Show Port Pirie-Broken Hill]]<br> |
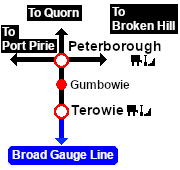
| − | [[Image: | + | [[Image:SAR_Peterborough-Terowie_Line.png|link=SAR_Peterborough-Terowie_V2|alt=Peterborough-Terowie|Show Peterborough-Terowie]]</td> |
</tr> | </tr> | ||
| Line 32: | Line 33: | ||
<table width=750> | <table width=750> | ||
<tr valign="top"> | <tr valign="top"> | ||
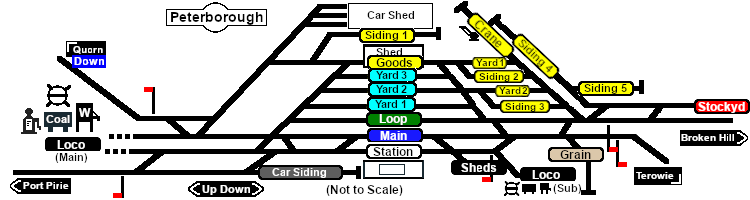
| − | <td>[[image: | + | <td>[[image:SAR_Peterborough.png|link=|alt=Peterborough map]]</td> |
</tr> | </tr> | ||
<tr valign="top"> | <tr valign="top"> | ||
| − | <td align="center"><span style="font-weight: 700;">For <span style="color: blue;">SAR Peterborough Narrow Gauge Division v2.0</span>. For the original <span style="color: blue;">V1.0</span> click <span style="background-color: yellow;">[[ | + | <td align="center"><span style="font-weight: 700;">For <span style="color: blue;">SAR Peterborough Narrow Gauge Division v2.0</span>. For the original <span style="color: blue;">V1.0</span> click <span style="background-color: yellow;">[[SAR_Peterborough_V1|here]]</span></span></td> |
</tr> | </tr> | ||
</table> | </table> | ||
| Line 57: | Line 58: | ||
<td align="center" width=50>[[Image:Grain_Icon.png|link=|alt=Grain]]<br><span style="font-size: 10px; font-weight: 700;">Grain</span><br>[[image:Grain_Label.png|link=]]</td> | <td align="center" width=50>[[Image:Grain_Icon.png|link=|alt=Grain]]<br><span style="font-size: 10px; font-weight: 700;">Grain</span><br>[[image:Grain_Label.png|link=]]</td> | ||
<td align="center" width=50>[[Image:Livestock_Icon.png|link=|alt=Livestock]]<br><span style="font-size: 10px; font-weight: 700;">Livestock</span><br>[[image:Stockyard_Label.png|link=]]</td> | <td align="center" width=50>[[Image:Livestock_Icon.png|link=|alt=Livestock]]<br><span style="font-size: 10px; font-weight: 700;">Livestock</span><br>[[image:Stockyard_Label.png|link=]]</td> | ||
| − | <td align="center" width=50> | + | <td align="center" width=50> </td> |
</tr> | </tr> | ||
| Line 70: | Line 71: | ||
<td align="center" width=50>[[image:Bunker_Oil_Icon.png|link=|alt=Fuel]]<br><span style="font-size: 10px; color: white; font-weight: 700;">Bunker Oil</span><br>[[image:Loco_Label.png|link=]]</td> | <td align="center" width=50>[[image:Bunker_Oil_Icon.png|link=|alt=Fuel]]<br><span style="font-size: 10px; color: white; font-weight: 700;">Bunker Oil</span><br>[[image:Loco_Label.png|link=]]</td> | ||
<td align="center" width=50>[[Image:Coal_Icon.png|link=|alt=Coal]]<br><span style="font-size: 10px; color: white; font-weight: 700;">Coal</span><br>[[image:Loco_Label.png|link=]]</td> | <td align="center" width=50>[[Image:Coal_Icon.png|link=|alt=Coal]]<br><span style="font-size: 10px; color: white; font-weight: 700;">Coal</span><br>[[image:Loco_Label.png|link=]]</td> | ||
| − | <td align="center" width=50>[[Image:Water_Icon.png|link=|alt=Water]]<br><span style="font-size: 10px; color: white; font-weight: 700;">Water</span><br>[[image:Loco_Label | + | <td align="center" width=50>[[Image:Water_Icon.png|link=|alt=Water]]<br><span style="font-size: 10px; color: white; font-weight: 700;">Water</span><br>[[image:Loco_Label.png|link=]]</td> |
</tr> | </tr> | ||
| Line 84: | Line 85: | ||
<td align="center" width=50>[[Image:Loop_Icon.png|link=|alt=Loop]]<br><span style="font-size: 10px; font-weight: 700;">Loop</span><br>[[image:Loop_Label.png|link=]]</td> | <td align="center" width=50>[[Image:Loop_Icon.png|link=|alt=Loop]]<br><span style="font-size: 10px; font-weight: 700;">Loop</span><br>[[image:Loop_Label.png|link=]]</td> | ||
<td align="center" width=50>[[Image:Turntable_Icon.png|link=|alt=Turntable]]<br><span style="font-size: 10px; font-weight: 700;">Turntable</span><br>[[image:Loco_Label.png|link=]]</td> | <td align="center" width=50>[[Image:Turntable_Icon.png|link=|alt=Turntable]]<br><span style="font-size: 10px; font-weight: 700;">Turntable</span><br>[[image:Loco_Label.png|link=]]</td> | ||
| − | <td align="center" width=50> </td> | + | <td align="center" width=50> </td> |
</tr> | </tr> | ||
| Line 91: | Line 92: | ||
</td> | </td> | ||
</tr> | </tr> | ||
| + | |||
</table> | </table> | ||
<table bgcolor="lightcyan" width=750> | <table bgcolor="lightcyan" width=750> | ||
<tr valign="top"> | <tr valign="top"> | ||
| − | <td colspan=2><span style="font-weight: 700;"><span style="background-color: black; color: white;"> Scenario Sessions Starting at | + | <td colspan=2><span style="font-weight: 700;"><span style="background-color: black; color: white;"> Scenario Sessions with Trains Starting at Peterborough: </span></span></td> |
</tr> | </tr> | ||
| + | |||
<tr valign="top"> | <tr valign="top"> | ||
| − | <td width=375>[[image: | + | <td width=375>[[image:No_4.png|link=|alt=4]] '''[[SAR Scenario Gladstone-Terowie Passenger_V2|Gladstone to Terowie Passenger]]'''</td> |
| − | <td width=375>[[image: | + | <td width=375>[[image:No_9.png|link=|alt=1]] '''[[SAR Scenario Paratoo Mixed Passenger Freight|Peterborough-Paratoo Mixed Service]]'''</td> |
</tr> | </tr> | ||
<tr valign="top"> | <tr valign="top"> | ||
| − | <td>[[image: | + | <td>[[image:No_11.png|link=|alt=1]] '''[[SAR Scenario Orroroo Grain|Orroroo Grain Run]]'''</td> |
| − | <td>[[image: | + | <td>[[image:No_12.png|link=|alt=1]] '''[[SAR Scenario Peterborough Shunter|Peterborough Shunter]]'''</td> |
</tr> | </tr> | ||
<tr valign="top"> | <tr valign="top"> | ||
| − | <td>[[image: | + | <td>[[image:No_19.png|link=|alt=1]] '''[[SAR Scenario Quorn Passenger|Quorn Local Passenger]]'''</td> |
| − | <td>[[image: | + | <td>[[image:No_20.png|link=|alt=1]] '''[[SAR Scenario Gladstone Pickup Grain|Gladstone Pickup Grain]]'''</td> |
</tr> | </tr> | ||
<tr valign="top"> | <tr valign="top"> | ||
| − | <td>[[image: | + | <td>[[image:No_21.png|link=|alt=1]] '''[[SAR Scenario Livestock Shuttle|Peterborough Livestock Shuttle]]'''</td> |
| − | <td>[[image: | + | <td>[[image:No_23.png|link=|alt=1]] '''[[SAR Scenario Rail Car Inspection Run|Rail Car Inspection Run]]'''</td> |
</tr> | </tr> | ||
<tr valign="top"> | <tr valign="top"> | ||
| − | <td>[[image: | + | <td>[[image:No_24.png|link=|alt=1]] '''[[SAR Scenario Peterborough Dieselisation|Peterborough Dieselisation (1970-88)]]'''</td> |
<td> </td> | <td> </td> | ||
</tr> | </tr> | ||
| Line 125: | Line 128: | ||
<tr valign="top"> | <tr valign="top"> | ||
<td> | <td> | ||
| − | <span style="font-weight: 700;"><span style="color: white; background-color: black;"> Distance from | + | <span style="font-weight: 700;"><span style="color: white; background-color: black;"> Distance from Gladstone: </span> 65½ kms, 40¾ miles</span><br> |
| − | A major manned station, junction | + | A major manned station, servicing depot and junction on the narrow gauge (3ft6in - 1067mm) <span style="font-weight: 700; color: white; background-color: black;"> Port Pirie-Broken Hill Line </span>, <span style="font-weight: 700; color: white; background-color: black;"> Peterborough-Quorn Line </span> and the <span style="font-weight: 700; color: white; background-color: black;"> Peterborough-Terowie Line </span>.<br> |
| − | Multiple loops | + | Multiple loops and sidings for the station, goods, grain facility and two stockyards. Two loco servicing facilities, including a major maintenance workshop, both with turntables. <br> |
| − | + | From the 1880s to the late 1970s '''Peterborough''' was the busiest railway hub in '''South Australia'''. It was the headquarters for the Northern Division and responsible for train control and maintenance. The maintenance centre employed over 1,000 workers to service and maintain over 100 train movements each day.<br> | |
| − | + | The '''Port Pirie-Broken Hill Line''' was converted to standard gauge (4ft8½in - 1435mm) during 1969-1970 and the '''Peterborough-Terowie Line''' was converted to dual gauge by the addition of broad gauge (5ft3in - 1600mm) in 1970. The '''Peterborough-Quorn Line''' was left as a narrow gauge line making Peterborough a triple gauge location until the closure of the non-standard gauge lines in 1988.<br> | |
| − | ''' | + | '''Peterborough''' is now just a crossing loop. The main loco depot is now a static museum for the '''[https://www.steamtown.com.au/ Steamtown Peterborough Railway Preservation Society]''' and most other facilities have been removed. The railway station has been retained and until a few years ago was serviced by the luxury '''Indian-Pacific''' passenger train running between '''Sydney''', '''Adelaide''' and '''Perth'''. That service no longer stops at '''Peterborough''' and there are no other rail passenger services. |
</td> | </td> | ||
</tr> | </tr> | ||
<tr valign="top"> | <tr valign="top"> | ||
| − | <td align="center">[[Image: | + | <td align="center">[[Image:Peterborough_Image.png|link=|alt=Peterborough Yard]]</td> |
</tr> | </tr> | ||
<tr valign="top"> | <tr valign="top"> | ||
<td align="center">[[Image:line740.png|link=]]</td> | <td align="center">[[Image:line740.png|link=]]</td> | ||
</tr> | </tr> | ||
| + | |||
</table> | </table> | ||
| + | |||
| + | </td> | ||
| + | <td>[[Image:SAR_PortPirie-BrokenHill_Line.png|link=SAR_Port_Pirie-Broken_Hill_V2|alt=PortPirie-BrokenHill|Show Port Pirie-Broken Hill]]<br> | ||
| + | [[Image:SAR_Gladstone-Paratoo Strip Map_V2.png|link=|alt=Gladstone-Paratoo Strip Map]]<br><br>[[Image:SAR_Peterborough-Terowie_Line.png|link=SAR_Peterborough-Terowie_V2|alt=Peterborough-Terowie|Show Peterborough-Terowie]]<br>[[Image:SAR_Peterborough-Terowie Strip Map.png|link=|alt=Peterborough-Terowie Strip Map]]<br><br> | ||
| + | [[Image:SAR_Peterborough-Quorn_Line.png|link=SAR Peterborough-Quorn_V2|alt=Peterborough-Quorn|Show Peterborough-Quorn]]<br>[[Image:SAR_Peterborough-Quorn Strip Map.png|link=|alt=Peterborough-Quorn Strip Map]] | ||
</td> | </td> | ||
| − | |||
| − | |||
| − | |||
</tr> | </tr> | ||
</table> | </table> | ||
Revision as of 17:05, 8 May 2024
|
|
||||||||||||||||||||||||||||||||||||||||||