Route and Session Basics
The information in this Wiki Page applies to TRS19 and Trainz Plus. This page is intended to provide you with an overview of the properties and features of Routes and Sessions when creating layouts for Trainz. More detailed descriptions of these various features plus instructions on getting you started with creating Routes and Sessions can be found in the Trainz Wiki How To Guides - a link is provided at the end of this document.
Contents |
What is a Route?
A Route (also known as a "Layout") consists of most of what you will see on the screen when using Surveyor and Driver. A Route consists of two parts:-
- Route Data and
- Route Layers.
| When you save a Route, all the items in the Route Data and Route Layers will be saved |
Route Data:
This covers all those assets that are "painted" into the Surveyor environment.
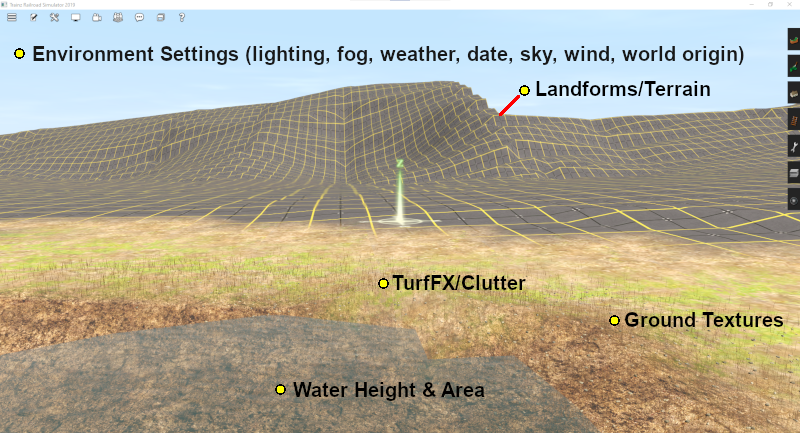
Route Data consists of:-
- Landforms or Terrain - the baseboards and ground height
- Water
- Ground Textures
- TurfFX and Clutter - found in the TurfFX/Clutter Effects Layers
Route Layers:
Layers give you a way of organising or grouping the assets displayed in your Route.
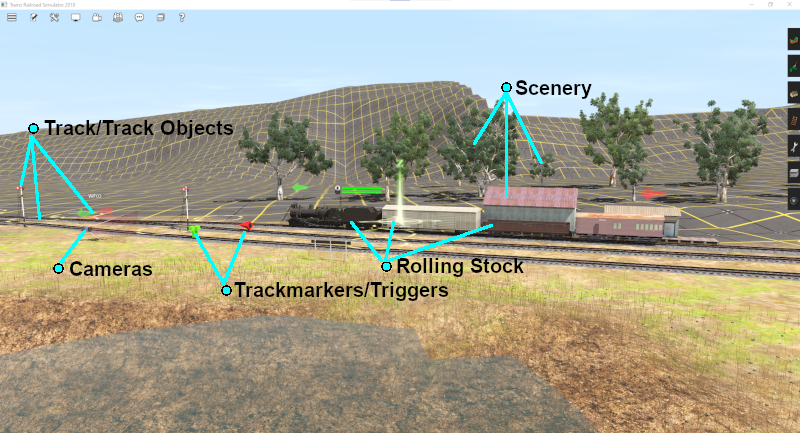
Route Layers have those scenery items that you want to always appear. Route Layers contain:-
- Track and Track Objects (such as signals, switches, bridges, tunnels, speed signs, etc)
- Most (or all) scenery items
- Rolling Stock (including locos)
- Lineside and Fixed Cameras
- Trackmarks, Triggers, Direction and Priority Marks
- Measuring Rulers
 |
A detailed description of Layers can be found on the Trainz Wiki Page at:- |
Loading (and Creating) a Route
Creating a New Route
From the Driver/Surveyor screen the Route options are shown as a set of buttons at the bottom of the screen.
![]()
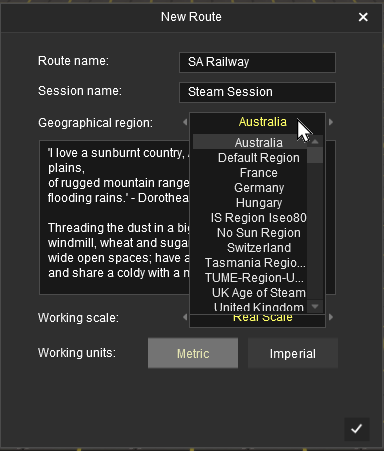
Click Create Route . This will start Trainz Surveyor and open the New Route Dialogue Window.
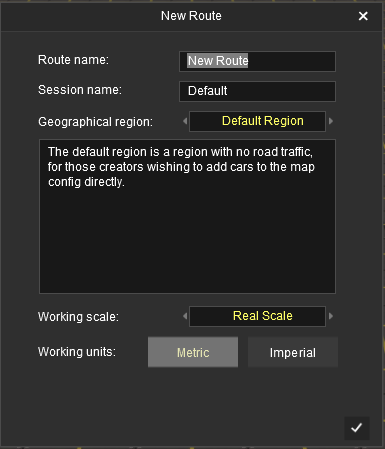
It is strongly advised that you enter some details before clicking the tick icon the create the new route. This will save you time and hassle later.
 |
|
Loading an Existing Route
You must first find and select the Route to load from those already installed. At the top of the Driver/Surveyor screen the Route search options are shown as a set of buttons.
![]()
| Type: | ROUTES is the default selection. No need to change this. |
| Source: | PURCHASED is the default selection, Click and change to MY CONTENT for a Route you have created (or already modified) or to INSTALLED for one you have downloaded from the DLS. |
| Region: | ALL is the default selection. You can select a particular geographic region if required. |
| Search: | You can narrow down the list of Routes by typing the first few letters of its name (e.g. SA) as shown in the image above. |
This will produce a display of thumbnails at the bottom of the screen.
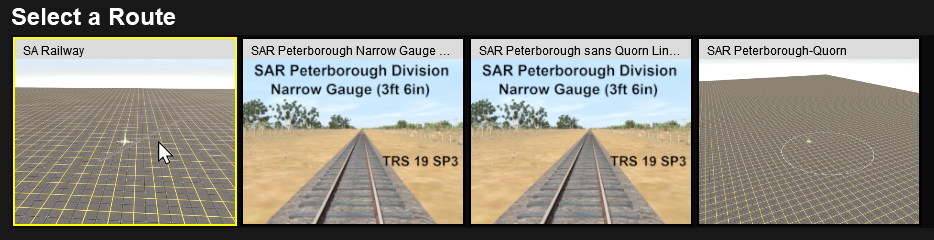
Click on the thumbnail for the Route you want to load, end then click on the EDIT ROUTE button to load the Route into Surveyor.
![]()
What is a Session?
| A Session is always a part of an existing Route - you cannot have a Session that does not belong to a Route |
A single Route can have multiple Sessions, or none. A Session must belong to a Route. To put it into Trainz terminology, a Route is a dependency of a Session. A Session is useless without its Route.
In general the Route provides the physical structures (or "hardware") while the Session provides the services (or "software") for the Route. While you can easily have a Route without creating a Session, it could be a very limited (or even a boring) experience.
| If you create a Route without a Session ALL the industry and rolling stock settings, lighting and environmental conditions, etc will revert to their original (default) values. There will be no AI and drivers will have a very limited set of available commands for manual driving |
A Session consists of two parts:-
- Session Data and
- Session Layers.
| When you save a Session, all the items in the Session Data and Session Layers will be saved |
Session Data:
Session Data are often the "invisibles" that control the operation of a Session.
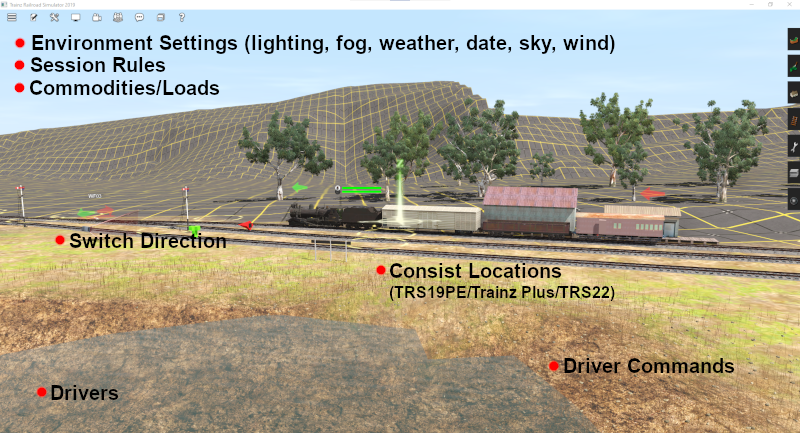
Session Data contains:-
- Drivers (names, AI commands and assigned locos)
- Driver Commands - those available for AI and manual driving
- Session Rules
- Environment Settings (weather, lighting, time of day)
- Industry Settings (commodities consumed and produced)
- Consist Settings (commodities carried)
- Consist Locations (TRS19 Platinium Edition and Trainz Plus only)
- Switch Settings (left or right) - but the default switch direction is stored in the Route
Session Layers:
Session Layers have those scenery items that you want to appear in that particular Session only.
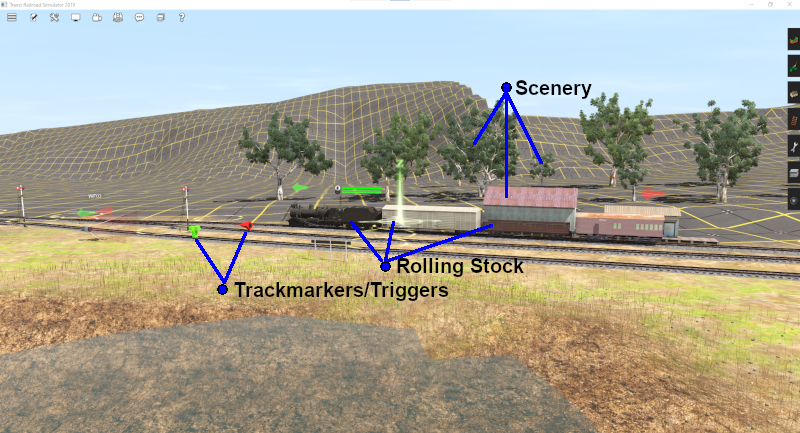
Session Layers can contain:-
- Scenery
- Rolling Stock - Note: In TRS19 Platinum Edition and Trainz Plus it is recommended that all rolling stock be placed into a Session Layer
- Trackmarks, Triggers, Direction and Priority Marks
A Session Layer can be left empty.
|
A detailed description of Layers can be found on the Trainz Wiki Page at:- |
| Notes: Scenery, Rolling Stock, Triggers and Markers (Track, Direction, Priority) can be used in both Route Layers and Session Layers. When placed in a Route Layer assets will appear in all Sessions that are based on the Route. The vast majority of (if not all) scenery items will be placed in Route Layers. Assets placed in a Session Layer will only appear in the Session where they have been saved. Examples of assets that would be placed in a Session Layer instead of a Route Layer would include:-
|
Loading (and Creating) a Session
Creating a New Session
| To creating a new Session you must first create a new Route or identify an existing Route |
A new Session can be created in two ways:-
- automatically when a new Route is created. Follow the steps shown in the section
 Creating a New Route above by entering a Session name for the new Session.
- from an existing Route (remember that a Route can have many individual Sessions). The first step is to find and load the Route as described in the section Loading an Existing Route above.
In either case you can then proceed by adding or editing the Session Data or adding assets to the Session Layers.
Loading an Existing Session
![]() The easiest way to load an existing Session is to use the search tools at the top of the Driver/Surveyor screen.
The easiest way to load an existing Session is to use the search tools at the top of the Driver/Surveyor screen.
![]()
| Type: | ROUTES is the default selection. Change this to SESSIONS . |
| Source: | PURCHASED is the default selection, Click and change to MY CONTENT for a Session you have created (or already modified) or to INSTALLED for one you have downloaded from the DLS. |
| Gameplay: | ALL is the default selection. There is no need to change this |
| Search: | If required you can narrow down the list of Sessions by typing the first few letters of its name. |
This will produce a display of thumbnails at the bottom of the screen.
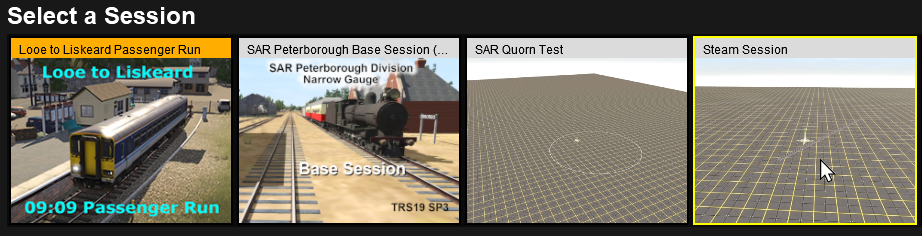
Click on the thumbnail for the Session you want to load and then click on the EDIT SESSION button. This will load BOTH the Route and the Session into Surveyor.
![]()
![]() Alternatively, you can also select the Route first as described in the section
Alternatively, you can also select the Route first as described in the section ![]() Loading an Existing Route above.
Loading an Existing Route above.
Then click the VIEW SESSIONS button.
![]()
This will display a list thumbnails for all the Sessions in that Route. Select the Session thumbnail you need and then click the EDIT SESSION button.
![]()
Again, both the selected Route and its Session will be loaded into Surveyor.
Saving a Route and a Session
This is a Work In Progress
Trainz Wiki
 |
More Tutorials and Guides to Using Trainz |
This page was created by Trainz user pware in September 2021 and was last updated as shown below.