How to Use Track Priority Markers
m |
m |
||
| Line 272: | Line 272: | ||
[[file:PriorityMap_P13a.png|link=|alt=Priority Map - excluding 2]]<br> | [[file:PriorityMap_P13a.png|link=|alt=Priority Map - excluding 2]]<br> | ||
<span style="text-decoration: underline; font-weight: 700;">Figure 8</span><br> | <span style="text-decoration: underline; font-weight: 700;">Figure 8</span><br> | ||
| + | ---- | ||
| + | The situation shown in '''Figure 8''' above only works up to a point. '''Figure 9''' below shows what will happen when ALL paths are set to a blocking priority level. The green train (priority level <span style="text-decoration: underline; font-weight: 700;">2</span>) will ignore all the priority <span style="text-decoration: underline; font-weight: 700;">1</span> markers and choose its own shortest path. ''Track Priority Markers''' will only make a path '''*look*''' longer or shorter. When all paths have conflicting markers then the AI will go back to selecting the actual shortest physical path.<br> | ||
| + | |||
| + | [[file:PriorityMap_P111.png|link=|alt=Priority Map - all conflicted]]<br> | ||
| + | <span style="text-decoration: underline; font-weight: 700;">Figure 9</span><br> | ||
---- | ---- | ||
<br> | <br> | ||
Revision as of 09:53, 1 October 2022
The information in this Wiki Page applies to TANE, TRS19, Trainz Plus and TRS22.
Contents |
What are Track Priority Markers?
| In Summary: | |
| Track Priority Markers are purple coloured track markers that are invisible in Driver Mode but visible in Surveyor Mode. They are used to direct specific trains under AI control through the track section where they are placed | |
| Track Priority Markers only work on AI controlled trains. They have no effect on manually controlled trains | |
| The direction that the marker is pointing has absolutely NO EFFECT on its operation | |
| Track Priority Markers are used with Priority Levels that are assigned to each train | |
| Track Priority Markers are NOT a substitute for Driver Commands or Interlocking Towers | |
|
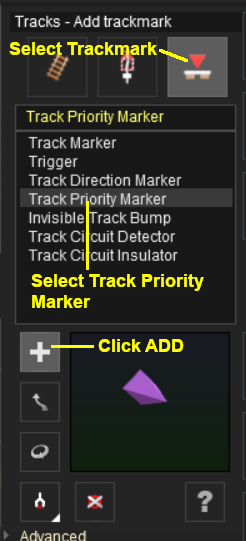
Adding a Track Priority Marker
|
 |
|
||||||
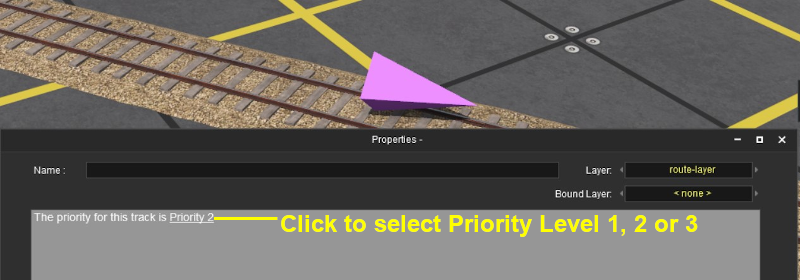
| Priority levels have no set meanings but can be assigned to specific AI trains to force them through selected sections of track (the track sections are defined as between consecutive junction sets) |
Assigning Priority Levels to Trains
|
| A higher priority level does not mean that one consist is more important than another. A priority 1 consist will not be given first access to a junction, for example, or be the first one to depart. The priority levels have no set meaning beyond what you decide they will mean. |
For example you could assign priority 1 to express trains and 3 to slow general "all stops" freight trains, or you could assign priority 3 to express trains and 1 to slow general "all stops" freight trains, it is up to you. These values will not alter the speed or importance of these trains but will only decide which paths they should take.
|
|
|
 |
Steps:
|
|
|
|
Priority Marker Operation
| Main Points: | |
| Track Priority Markers only work on AI controlled trains. They have no effect on manually controlled trains | |
| Track Priority Markers fool an AI train that has the same priority level into thinking that the path containing the marker is the shortest possible path, even when it is not | |
| AI trains will avoid, where possible, a path containing a Track Priority Marker that does not match its own priority level | |
| If the specified path is blocked, then the AI will ignore the Track Priority Marker and find another path | |
| The direction that the Track Priority Marker is pointing has NO effect on its operation | |
Consider the situation represented in the diagrams below. Three trains - Red, Green, Yellow - have been given priority levels of 1, 2 and 3 as shown. Each is given the driver command Drive to Trackmark or Navigate to Trackmark. The destination trackmark is shown on the right.
In Figure 1 below, no Track Priority Markers have been set. All three trains will take the shortest path, assuming there are no blockages.

Figure 1
In Figure 2 below, a Track Priority Marker has been placed on the top loop line and has been given a priority level of 1. The red train will now take the priority 1 path because it will "see" that as being the shortest of the three possible paths. The green and yellow trains will still "see" the middle path as the shortest.

Figure 2
In Figure 3 below, a Track Priority Marker has been placed on the lower loop line and has been given a priority level of 3. For the same reasons as explained above, the yellow train will now take the priority 3 path because it now sees that as the shortest.

Figure 3
In Figure 4 below, Track Priority Markers have been placed on the upper and lower loop lines and set as shown. The red and yellow trains will take their respective loop paths while the green train is unaffected.

Figure 4
An exception, shown in Figure 5 below, will occur when one or more of the Track Priority Marker paths have been blocked, for example by a consist under AI or manual control. In the figure the lower loop path has been blocked. The red train will take its assigned path, the green train takes it shortest path and yellow train will be forced to take what it "sees" as the next shortest path.

Figure 5
|
Another exception, shown in Figure 6 below, will occur when a driver command overrides a Track Priority Marker. In the figure the yellow train, with priority 3, has been given the driver command "Drive To Station" followed by "Drive to Trackmark". As the station is not on the priority 3 path, that path will be ignored to reach the station and then the trackmark. After stopping at the station the train will not reverse back onto the main line to then use the priority 3 track.

Figure 6
The Special Case of Priority 2
Figure 7 below shows a situation that does not fit the points made above. A Track Priority Marker has been set to priority level 2 and placed on the lower loop. The green train has been given the command to drive to the trackmark but ignores its assigned path and proceeds via the shortest actual path. Track that has not been assigned a Track Priority Marker will have a default priority level of 2. In this situation, the green train "sees" two paths that match its priority level so it takes the shorter of the two.

Figure 7
Track Priority Markers can also be used to direct trains away from specific paths. Figure 8 below shows how this can be done. A Track Priority Marker set to priority level 1 has been prositioned on the shortest physical path. This will block all trains of priority level 2 and 3 from using this path - they will see it as the longest available path. A second Track Priority Marker set to priority level 3 has been prositioned on the 2nd shortest physical path. This will block all trains of priority level 1 and 2 from using this path. The end result is that the green train (priority level 2) has only one path available - the longest physical path.

Figure 8
The situation shown in Figure 8' above only works up to a point. Figure 9 below shows what will happen when ALL paths are set to a blocking priority level. The green train (priority level 2) will ignore all the priority 1 markers and choose its own shortest path. Track Priority Markers will only make a path *look* longer or shorter. When all paths have conflicting markers then the AI will go back to selecting the actual shortest physical path.

Figure 9
Modifying Train Priority Levels
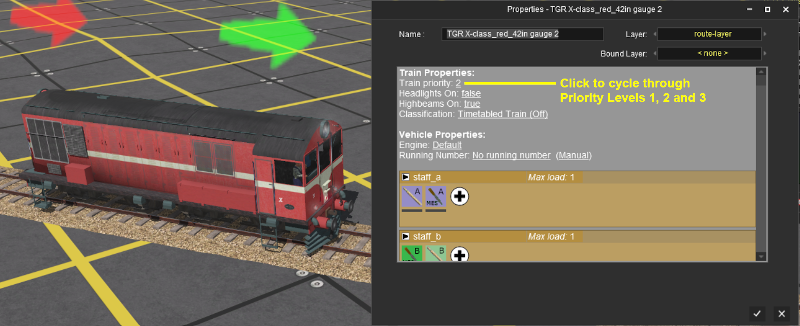
| You can alter the Priority Level of a train in Driver mode |
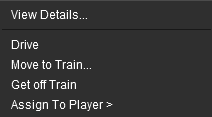
![]() Manually in Driver Mode
Manually in Driver Mode
This can be done "on the fly" using the mouse.
|
|
|||||||
![]() Using a Driver Command
Using a Driver Command
This can be done in Surveyor in the session ![]() Driver Setup Rule or by adding a driver command to the command bar in Driver.
Driver Setup Rule or by adding a driver command to the command bar in Driver.
- Insert the driver command
 Priorityz into the driver command bar and set it to the new level
 |
Information on adding driver commands can be found on the Trainz Wiki Page at:- |
Track Priority in Map View
In Surveyor when using Map View or zooming the camera right out, the tracks will be shown colour coded according to their assigned track priority level. If the track layout shown in Figure 4 above, with the priority markers as used in that figure, was shown in Map View then this would be the result.
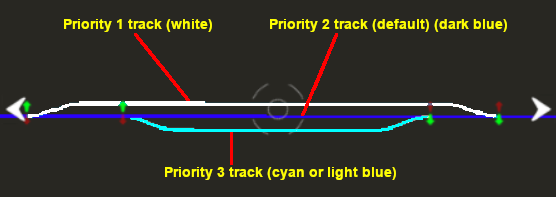
Tracks that have not been given a priority marker will be shown as dark blue indicating that they have the default priority level 2.
Related Links
|
Trainz Wiki
 |
More Tutorials and Guides to Using Trainz |
This page was created by Trainz user pware in September 2019 and was last updated as shown below.