The information in this Wiki Page applies to TANE, TRS19, Trainz Plus and TRS22.
|
|
 |
Track Marks are red coloured track objects that are invisible in Driver but visible in Surveyor |
|
They are used as destinations or waypoints for AI driver commands |
|
They only work on AI controlled trains and have no effect on manually controlled trains |
|
The direction that the markers point has absolutely NO EFFECT on their operation |
|
What are Track Marks?
|
The Trainz AI relies heavily on Track Marks to direct trains around a layout. They are only visible in Surveyor |
| Track Marks are the targets for:- |
 |
destinations using Drive To Trackmark and Navigate To Trackmark driver commands |
|
waypoints using Drive Via Trackmark and Navigate Via Trackmark driver commands |
| They can also be used to:- |
|
hold Navigation Points |
|
set locations for Coupling operations |
Route or Session?
|
Track Marks can be placed in a Route Layer or in a Session Layer |
 |
Notes:
|
Placing Track Marks in a Route layer (e.g. in the same layer as the track) will save them with the Route and they will be available in all Sessions created using that particular Route |
|
Placing Track Marks in a Session layer will save them with the Session and they will only be available in that particular Session. This can be useful if two or more Sessions are being created and you want to use different Track Marks (destinations and waypoints) in each Session.
|
|
|
 |
Information on Route and Session layers can be found at:-
|
Adding a Track Mark
In Surveyor Classic (S10)
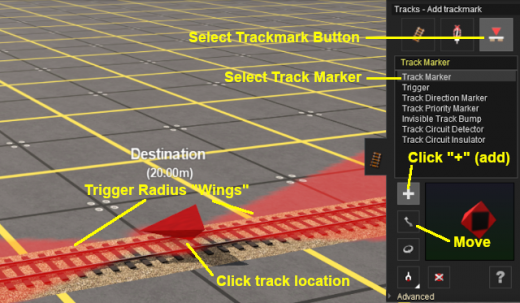
Setting the Track Mark (S10)
 |
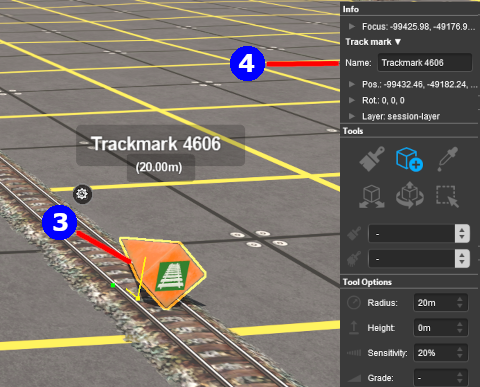
Enter a useful name for each Track Mark - the name will be needed for driver commands. Most creators base the name on the location (e.g. "Maintown Track 1 North")
|
|
Set the Trigger Radius (S10)
At the bottom of the Track Tools flyout menu is an Advanced button. Left Click this button to open the Track Mark advanced tool set.
 |
 |
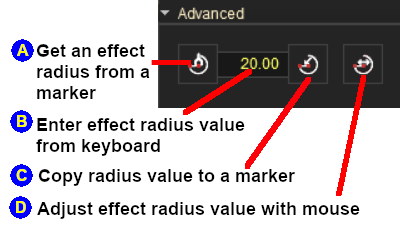
Left Click the Advanced button. You will have a choice of methods to set and adjust the Trigger Radius of Track Marks |
| Options: Choose one of:- |
 |
To copy the current Trigger Radius of an existing Track Mark
 |
Left Click the Get Trigger Radius icon |
 |
Left Click the Track Mark whose radius you want to copy - the radius will be copied into the Trigger Radius value box (the default value is 20.00 metres) |
 |
To apply the new value see option  below below |
|
 |
To manually alter the Trigger Radius
|
Type the new value (in metres) into the Trigger Radius value box |
|
To apply the new value see option below |
|
|
To apply a value in the Trigger Radius value box (from methods , or  ) to another Track Mark ) to another Track Mark
|
Left Click the Set Trigger Radius icon |
|
Left Click on the Track Mark that is to receive the new value (you can click on more than one) |
|
|
To adjust the value up or down
|
Left Click the Adjust Trigger Radius button |
|
Select the Track Mark |
|
Left Click and Drag Forward (to increase the value) or Backward (to reduce the value) |
 |
The new value will be immediately applied to the selected Track Mark as the mouse moves (but only one marker at a time) |
|
|
|
|
|
Once you have a Trigger Radius entered in the value box, you can apply it to any number of Track Marks by using method shown above
|
|
In Surveyor 2.0 (S20)
Surveyor 2.0 is currently only available for Trainz Plus Standard and Trainz Plus Gold subscription members.
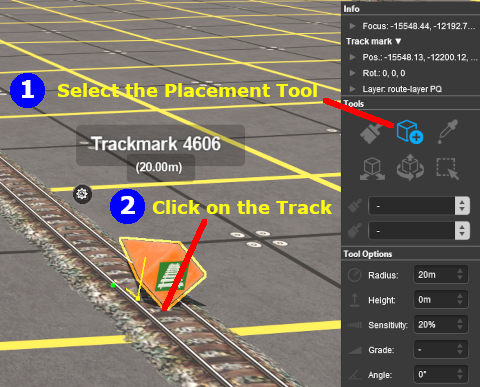
Adding a Track Mark (S20)
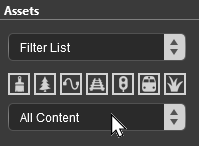
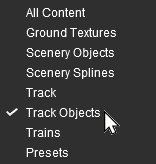
In the Asset Palette either:-
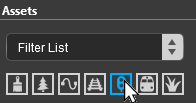
Left Click on the Track Mesh Filter icon
|
|
OR |
|
|
Shortcut
If you already have a Track Marker placed in your route then:- |
 |
move the tool pointer over the existing track marker object and hold down the Alt key. The object name will appear in a ToolTip attached to the pointer |
 |
while holding down the Alt key Left Click on the track marker to identify it in the Assets Palette and to select the Placement Tool. Release the key. |
| Jump to Step below. |
|
To narrow down the filter list, type "mark" (UPPER/lower case does not matter) in the Search Text Box
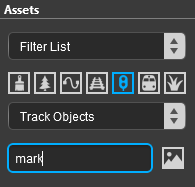 |
This will list all the Track Objects containing the text "mark" in the filter list.
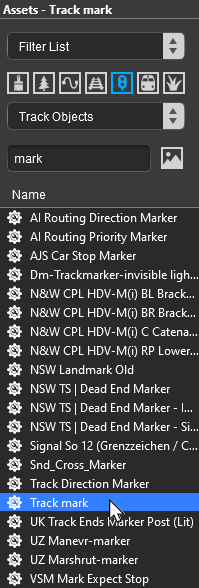 |
Left Click on the item name Track Mark.
If you are not sure about an asset then Double Left Click on the name to bring up its image and description. |
|
Place the Track Mark on the track.
 |
|
Notes:
|
|
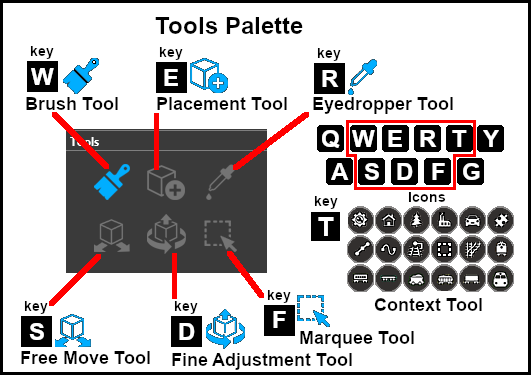
To add a track mark, or any object, you will need to select the Placement Tool |
|
To edit a track mark once it has been placed you will usually use either the Free Move Tool or the Fine Adjustment Tool |
|
|
|
|
If you need to rotate the Track Mark to face the opposite direction then:-
| Steps: |
|
Left Click on its Context Menu Icon (or press the T key if the asset has already been selected) |
|
from the popup menu select Rotate Trackside |
|
| Note: the direction it faces has no effect on its operation |
|
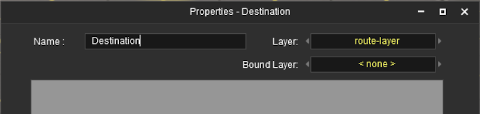
Set the Track Mark Properties (S20)
Track Marks have properties that control their operations.
 |
| Steps: To change the name of a Track Mark:- |
 |
using either the Free Move Tool or the Fine Adjustment Tool select (Left Click on) the Track Mark to be renamed |
 |
in the Info Palette (you may need to make this palette visible - see the Notes: for Step 1 above) Left Click in the Name: entry box. Enter a name for the Track Mark and press the Enter key |
|
|
To Set its Trigger Radius
The Trigger Radius controls how closely an AI train has to approach the marker to activate it (smaller radius = closer to the Track Mark).
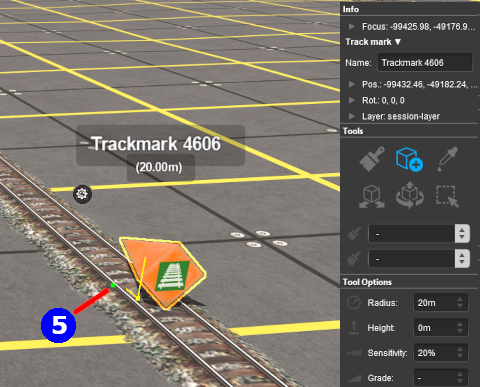 |
Steps: To adjust the trigger radius of a Track Mark (Dot  ):- ):- |
|
Left Click and Drag Forward or Backward on the Green Dot next to the Track Mark to increase or reduce its Trigger Radius |
|
|
Move the Track Mark Along the Track(S20)
Track Marks can be moved along the track or to other tracks.
 |
| Steps: To move the Track Mark:- |
 |
Left Click and Drag Forward or Backward on the Yellow Dot next to the Track Mark to move the Track Mark along the track or to another track |
|
|
Move the Track Mark Vertically (S20)
Track Marks can be physically placed above (or below) the track.
 |
| Steps: To move a Track Mark vertically:- |
|
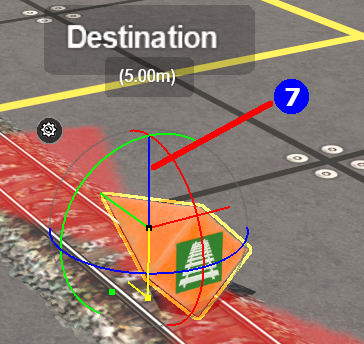
This option is only available with the Fine Adjustment Tool - the D key |
|
 |
Left Click and Drag Forward or Backward on the Blue Vertical Axis Line above the Track Mark to it up or down |
|
If you need to return the Track Mark to its original position then:-
| Steps: To correctly reattach the Track Mark to the track:- |
|
select the object and open (Left Click on) its Context Menu Icon (or press the T key) |
|
from the popup menu select Reattach to Track |
|
|
|
|
Move the Track Mark Horizontally (S20)
Track Marks can be physically placed left or right alongside the track.
 |
| Steps: To move a Track Mark horizontally:- |
|
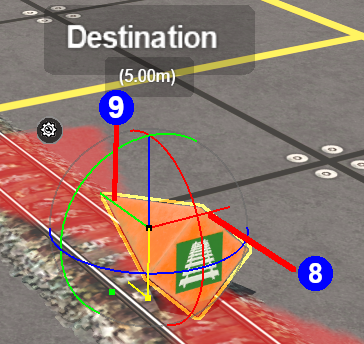
This option is only available with the Fine Adjustment Tool - the D key |
|
 |
Left Click and Drag Forward or Backward on the Red Horizontal Axis Line attached to the Track Mark to move it left or right |
|
If you need to return the Track Mark to its original position then:-
| Steps: To correctly reattach the Track Mark to the track:- |
|
select the object and open (Left Click on) its Context Menu Icon (or press the T key) |
|
from the popup menu select Reattach to Track |
|
|
|
|
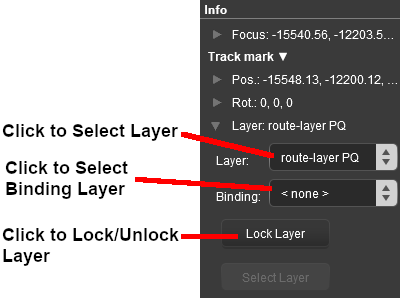
Assign a Track Mark to Another Layer (S20)
Track Mark Operation
The most common use for Track Marks is as destinations for driver commands or as "way points" to direct a train to a destination via one or more intermediate places. They can also be used as the targets for Navigation Points and coupling operations.
Driver Navigation Commands
|
Information on adding driver commands can be found at:-
|
|
Notes:
|
|
Drive To Trackmark and Drive Via Trackmark commands will NOT force the AI to find an alternative clear path to the Track Mark if the shortest path is blocked |
|
Navigate To Trackmark and Navigate Via Trackmark commands will force the AI to find an alternative clear path to the Track Mark if the shortest path is blocked. The path chosen may not be prototypical |
|
 |
Drive To Trackmark
Instructs the AI driver to Drive, via the shortest available path, to the designated Track Mark. The AI will noticeably slow the train as it approaches the Track Mark. Switches ahead of the train that are not locked against the AI will be set to allow the train to proceed and reset after the train has cleared the switch. The AI driver will NOT attempt to find a way around blockages when calculating the shortest path to the Track Mark. All signals and speed signs along the route are obeyed.
This command is built in to Trainz
|
|
Drive Via Trackmark
Instructs the AI driver to Drive, via the shortest available path, to and through the designated Track Mark. If there are no further navigation commands (e.g. Drive To, etc) then the AI will halt the train after passing the Track Mark. If there are further navigation commands then the AI will proceed through the Track Mark to the next Track Mark or Industry at normal speed. Switches ahead of the train that are not locked against the AI will be set to allow the train to proceed and reset after the train has cleared the switch. The AI driver will NOT attempt to find a way around blockages when calculating the shortest path to the Track Mark. All signals and speed signs along the route are obeyed.
This command is built in to Trainz
|
|
Navigate To Trackmark
Instructs the AI driver to Drive, via the shortest available path, to the designated Track Mark. The AI will noticeably slow the train as it approaches the Track Mark. Switches ahead of the train that are not locked against the AI will be set to allow the train to proceed and reset after the train has cleared the switch. The AI driver will attempt to find a way around blockages when calculating the shortest path to the Track Mark. All signals and speed signs along the route are obeyed.
This command is built in to Trainz
|
|
Navigate Via Trackmark
Instructs the AI driver to Drive, via the shortest available path, to and through the designated Track Mark. If there are no further navigation commands (e.g. Navigate To, etc) then the AI will halt the train after passing the Track Mark. If there are further navigation commands then the AI will proceed through the Track Mark to the next Track Mark or Industry at normal speed. Switches ahead of the train that are not locked against the AI will be set to allow the train to proceed and reset after the train has cleared the switch. The AI driver will attempt to find a way around blockages when calculating the shortest path to the Track Mark. All signals and speed signs along the route are obeyed.
This command is built in to Trainz
|
Navigation Points
Navigation Points can be attached to Track Marks to provide users with session instructions.
|
Information on navigation points can be found at:-
|
Coupling Operations
An AI controlled train can be issued with a driver command to couple with the consist located at a specified Track Mark.
 |
The AI driver moves the train (or just the locomotive if it is by itself) to couple with the wagon that is closest to a specified trackmark. More information on this command can be found at  Couple At Trackmark Couple At Trackmark
This command must be downloaded from the DLS and installed in Trainz
|
|
Information on adding driver commands can be found at:-
|
Related Links
Trainz Wiki
 |
More Tutorials and Guides to Using Trainz
|
This page was created by Trainz user pware in September 2019 and was last updated as shown below.