How to Use Track Direction Markers
m |
m |
||
| (75 intermediate revisions by 2 users not shown) | |||
| Line 1: | Line 1: | ||
| − | The information in this Wiki Page applies to '''TANE''', '''TRS19''' | + | The information in this Wiki Page applies to '''TANE''', '''TRS19''', '''Trainz Plus''' and '''TRS22'''. |
| + | <table width=1000> <!-- BEGIN Nav Buttons Table NO SKIPS --> | ||
| + | <tr valign="top"> | ||
| + | <td width=629> </td> | ||
| + | <td width=50> </td> <!-- Skip Down --> | ||
| + | <td width=50> </td> <!-- Skip Up --> | ||
| + | <td width=46> </td> | ||
| + | <td width=75> </td> | ||
| + | <td width=75>[[image:NextDown.png|link=#stepWhat|alt=Next Down|Next Down]]</td> | ||
| + | <td width=75>[[image:BackToBottom.png|link=#bottom|alt=Bottom|Bottom]]</td> | ||
| + | </tr> | ||
| + | </table> <!-- END Nav Buttons Table --> | ||
| + | <table width=1000> | ||
| + | <tr valign="top"> | ||
| + | <td width=400> | ||
__TOC__ | __TOC__ | ||
| − | + | </td> | |
| − | <table | + | <td> |
| + | <table width=600 bgcolor="lightcyan" cellpadding=2> | ||
<tr valign="top"> | <tr valign="top"> | ||
| − | <td | + | <td width=10>[[image:BlueDot10x10.png|link=]]</td> |
| + | <td>'''Track Direction Marks''' are yellow coloured markers that are invisible in '''Driver''' but visible in '''Surveyor'''</td> | ||
</tr> | </tr> | ||
<tr valign="top"> | <tr valign="top"> | ||
| − | <td>[[ | + | <td>[[image:BlueDot10x10.png|link=]]</td> |
| − | <td> | + | <td>They are "One Way" signs that force trains under AI control to travel in a specific direction through the track section where they are placed</td> |
</tr> | </tr> | ||
<tr valign="top"> | <tr valign="top"> | ||
| − | <td>[[ | + | <td>[[image:BlueDot10x10.png|link=]]</td> |
| − | <td> | + | <td>They only work on AI controlled trains and have no effect on manually controlled trains</td> |
| − | + | ||
| − | + | ||
| − | + | ||
| − | + | ||
</tr> | </tr> | ||
</table> | </table> | ||
<br> | <br> | ||
| − | + | </td> | |
| − | + | ||
| − | + | ||
</tr> | </tr> | ||
</table> | </table> | ||
| − | =''' | + | <table width=1000> <!-- BEGIN Nav Buttons Table NO SKIPS --> |
| + | <tr valign="top"> | ||
| + | <td width=629><span id="stepWhat"></span> | ||
| + | ='''What are Track Direction Marks?'''= | ||
| + | </td> | ||
| + | <td width=50> </td> <!-- Skip Down --> | ||
| + | <td width=50> </td> <!-- Skip Up --> | ||
| + | <td width=46>[[image:BackToTop.png|link=#top|alt=Top|Top]]</td> | ||
| + | <td width=75> </td> | ||
| + | <td width=75>[[image:NextDown.png|link=#stepRoute|alt=Next Down|Next Down]]</td> | ||
| + | <td width=75>[[image:BackToBottom.png|link=#bottom|alt=Bottom|Bottom]]</td> | ||
| + | </tr> | ||
| + | </table> <!-- END Nav Buttons Table --> | ||
| − | <table> | + | <table width=1000> |
<tr valign="top"> | <tr valign="top"> | ||
| − | |||
<td> | <td> | ||
| − | <table | + | <table width=600> |
| − | <tr> | + | <tr valign="top"> |
| − | <td | + | <td>While '''Track Marks''' can be used to direct trains around a layout, they must be added to the '''Driver Commands''' in the form of '''Drive Via''' commands, and similar, to individual train drivers to work.<br> |
| − | + | <br> | |
| + | '''Direction Marks''' can perform some of the same work without needing to be added to the command lists of the drivers. Their disadvantage is that '''Direction Marks''' will affect all AI controlled trains while '''Track Marks''' will only affect those AI trains where they appear in the driver command lists.<br> | ||
| + | <br> | ||
| + | '''Direction Marks''' force AI drivers to follow a particular path. They only work on AI controlled trains and have no effect on manually controlled trains.</td> | ||
</tr> | </tr> | ||
| + | </table> | ||
| + | </td> | ||
| + | <td width=300>[[image:DirectionMarkImage.png|300px|link=]]</td> | ||
| + | </tr> | ||
| + | </table> | ||
| + | <br> | ||
| + | <table width=1000> <!-- BEGIN Nav Buttons Table NO SKIPS --> | ||
<tr valign="top"> | <tr valign="top"> | ||
| − | <td | + | <td width=629><span id="stepRoute"></span> |
| − | + | ='''Route or Session?'''= | |
| − | + | ||
| − | + | ||
| − | + | ||
| − | + | ||
| − | + | ||
</td> | </td> | ||
| + | <td width=50> </td> <!-- Skip Down --> | ||
| + | <td width=50> </td> <!-- Skip Up --> | ||
| + | <td width=46>[[image:BackToTop.png|link=#top|alt=Top|Top]]</td> | ||
| + | <td width=75>[[image:NextUp.png|link=#stepWhat|alt=Next Up|Next Up]]</td> | ||
| + | <td width=75>[[image:NextDown.png|link=#stepAdding|alt=Next Down|Next Down]]</td> | ||
| + | <td width=75>[[image:BackToBottom.png|link=#bottom|alt=Bottom|Bottom]]</td> | ||
</tr> | </tr> | ||
| − | < | + | </table> <!-- END Nav Buttons Table --> |
| − | < | + | |
| − | + | <table width=1000 bgcolor="lightcyan" cellpadding=2> | |
| + | <tr valign="top"> | ||
| + | <td width=10>[[image:BlueDot10x10.png|link=]]</td> | ||
| + | <td>Direction Marks can be placed in a '''Route Layer''' or in a '''Session Layer'''</td> | ||
</tr> | </tr> | ||
</table> | </table> | ||
<br> | <br> | ||
| − | + | <table width=1000 bgcolor=#000000 cellpadding=2> | |
| − | [[ | + | <tr valign="top"> |
| − | + | <td> | |
| + | <table width=996 bgcolor=#ffffb0 cellpadding=2> | ||
| + | <tr valign="top"> | ||
| + | <td>[[image:NotePad.PNG|link=]]</td> | ||
| + | <td><span style="font-size: 17px; font-weight: 700;">Notes:'''</span><br> | ||
| + | ---- | ||
| + | <table cellpadding=2> | ||
| + | <tr valign="top"> | ||
| + | <td width=10>[[image:DotPoint.JPG|10px|link=]]</td> | ||
| + | <td>Placing '''Direction Marks''' in a '''Route layer''' (e.g. in the same layer as the track) means that they will be available in '''all Sessions''' created using that particular Route. | ||
| + | </td> | ||
| + | </tr> | ||
| + | <tr valign="top"> | ||
| + | <td>[[image:DotPoint.JPG|10px|link=]]</td> | ||
| + | <td>Placing '''Direction Marks''' in a '''Session layer''' means that they will only be available in that particular Session. This can be useful if two or more Sessions are being created and you want to use different '''Direction Marks''' in each Session. | ||
| + | </td> | ||
| + | </tr> | ||
| + | </table> | ||
| + | </td> | ||
| + | </tr> | ||
| + | </table> | ||
| + | </td> | ||
</tr> | </tr> | ||
</table> | </table> | ||
<br> | <br> | ||
| − | <table cellpadding= | + | <table cellpadding=2 bgcolor="Aquamarine"> |
<tr valign="top"> | <tr valign="top"> | ||
| − | <td>[[ | + | <td>[[image:LinkWiki.PNG|link=]]</td> |
| − | <td> | + | <td>Information on Route and Session layers can be found at:-<br> |
| + | * '''[[How to Use Layers]]''' | ||
| + | </td> | ||
</tr> | </tr> | ||
</table> | </table> | ||
<br> | <br> | ||
| − | <table width= | + | <table width=1000> <!-- BEGIN Nav Buttons Table SECTION w SKIPS --> |
<tr valign="top"> | <tr valign="top"> | ||
| − | <td | + | <td width=629><span id="stepAdding"></span> |
| + | ='''Adding a Track Direction Mark'''= | ||
| + | </td> | ||
| + | <td width=50>[[image:SkipDown.png|link=#skipAddS10|Skip Down]]</td> | ||
| + | <td width=50> </td> | ||
| + | <td width=46>[[image:BackToTop.png|link=#top|alt=Top|Top]]</td> | ||
| + | <td width=75>[[image:NextUp.png|link=#stepRoute|alt=Next Up|Next Up]]</td> | ||
| + | <td width=75>[[image:NextDown.png|link=#stepOperation|alt=Next Down|Next Down]]</td> | ||
| + | <td width=75>[[image:BackToBottom.png|link=#bottom|alt=Bottom|Bottom]]</td> | ||
</tr> | </tr> | ||
| − | </table> | + | </table> <!-- END Nav Buttons Table --> |
| − | + | ||
| − | + | ||
| − | <table | + | <table bgcolor=#000000> |
<tr valign="top"> | <tr valign="top"> | ||
| − | <td>[[ | + | <td> |
| + | <table bgcolor=#ffffb0> | ||
| + | <tr valign="top"> | ||
| + | <td>[[image:NotePad.PNG|link=]]</td> | ||
<td><span style="font-size: 17px; font-weight: 700;">Notes:'''</span><br> | <td><span style="font-size: 17px; font-weight: 700;">Notes:'''</span><br> | ||
| − | + | ---- | |
| + | The only important property of a '''Direction Mark''' is the direction it is pointing. This is the direction that all '''AI controlled trains''' will be forced to take. | ||
| + | </td> | ||
</tr> | </tr> | ||
| − | + | </table> | |
| − | + | </td> | |
| − | + | ||
</tr> | </tr> | ||
</table> | </table> | ||
<br> | <br> | ||
| − | <table | + | |
| + | <table width=1000> <!-- BEGIN Nav Buttons Table SKIPS NO SECTIONS --> | ||
<tr valign="top"> | <tr valign="top"> | ||
| − | <td>[[ | + | <td width=629><span id="skipAddS10"></span> |
| − | <td> | + | =='''In Surveyor Classic (S10)'''== |
| + | </td> | ||
| + | <td width=50>[[image:SkipDown.png|link=#skipAddingS20|Skip Down]]</td> <!-- skip Down --> | ||
| + | <td width=50>[[image:SkipUp.png|link=#stepAdding|Skip Up]]</td> <!-- skip Up --> | ||
| + | <td width=46> </td> | ||
| + | <td width=75> </td> | ||
| + | <td width=75> </td> | ||
| + | <td width=75> </td> | ||
</tr> | </tr> | ||
</table> | </table> | ||
| − | < | + | <!-- END Nav Buttons Table --> |
| − | + | ===Adding a Direction Mark (S10)=== | |
| − | <table cellpadding=" | + | <table width=1000> |
| − | <tr> | + | <tr valign="top"> |
| − | <td colspan= | + | <td width=550>[[image:TrackDirectionTools.png|link=]]</td> |
| − | + | <td> | |
| + | <table bgcolor=#000000 cellpadding=2> | ||
| + | <tr valign="top"> | ||
| + | <td> | ||
| + | <table bgcolor=#ffffff cellpadding=2> | ||
| + | <tr valign="top"> | ||
| + | <td colspan=2><span style="font-weight: 700; font-size: 15px;">Steps:</span> To add a Track Direction Mark:-</td> | ||
</tr> | </tr> | ||
<tr valign="top"> | <tr valign="top"> | ||
| − | <td>[[ | + | <td width=25>[[image:DotPoint1.JPG|link=]]</td> |
| − | <td><span style="font-size: | + | <td>Open the '''Track Tool''' flyout or press the <span style="font-weight: 700; font-size: 15px; color: white; background-color: black;"> F4 </span> key</td> |
| − | + | </tr> | |
| − | + | <tr valign="top"> | |
| − | + | <td>[[image:DotPoint2.JPG|link=]]</td> | |
| + | <td><span style="font-weight: 700; font-size: 15px; background-color: lightcyan;">Left Click</span> on the '''Trackmark button''' or press the <span style="font-weight: 700; font-size: 15px; color: white; background-color: black;"> V </span> key</td> | ||
| + | </tr> | ||
| + | <tr valign="top"> | ||
| + | <td>[[image:DotPoint3.JPG|link=]]</td> | ||
| + | <td><span style="font-weight: 700; font-size: 15px; background-color: lightcyan;">Left Click</span> the item named '''Track Direction Marker''' in the asset list</td> | ||
| + | </tr> | ||
| + | <tr valign="top"> | ||
| + | <td>[[image:DotPoint4.JPG|link=]]</td> | ||
| + | <td><span style="font-weight: 700; font-size: 15px; background-color: lightcyan;">Left Click</span> the <span style="font-weight: 700; font-size: 15px; color: white; background-color: black;"> + </span> '''Add''' button - it may already be selected - or press the <span style="font-weight: 700; font-size: 15px; color: white; background-color: black;"> A </span> key</td> | ||
| + | </tr> | ||
| + | <tr valign="top"> | ||
| + | <td>[[image:DotPoint5.JPG|link=]]</td> | ||
| + | <td><span style="font-weight: 700; font-size: 15px; background-color: lightcyan;">Left Click</span> on the track location where the Track Mark is to be placed</td> | ||
| + | </tr> | ||
| + | <tr valign="top"> | ||
| + | <td>[[image:DotPoint6.JPG|link=]]</td> | ||
| + | <td>if it is not facing the right direction then <span style="font-weight: 700; font-size: 15px; background-color: lightcyan;">Left Click</span> on the '''Rotate Trackmark''' button or press the <span style="font-weight: 700; font-size: 15px; color: white; background-color: black;"> R </span> key</td> | ||
| + | </tr> | ||
| + | <tr valign="top"> | ||
| + | <td colspan=2>If necessary, you can adjust the position of the marker by dragging it along the track using the '''Move''' tool</td> | ||
| + | </tr> | ||
| + | </table> | ||
</td> | </td> | ||
</tr> | </tr> | ||
| − | < | + | </table> |
| − | + | </td> | |
| − | + | ||
</tr> | </tr> | ||
</table> | </table> | ||
| − | |||
| − | |||
<br> | <br> | ||
| − | <table width= | + | <table width=1000 bgcolor=#000000 cellpadding=2> |
<tr valign="top"> | <tr valign="top"> | ||
| − | <td | + | <td> |
| + | <table width=996 bgcolor=#ffffb0 cellpadding=2> | ||
| + | <tr valign="top"> | ||
| + | <td width=25>[[image:NotePad.PNG|link=]]</td> | ||
| + | <td><span style="font-size: 17px; font-weight: 700;">Notes:'''</span><br> | ||
| + | ---- | ||
| + | To edit a '''Direction Mark''' after it has been placed you will need to manually open its Properties Window to:- | ||
| + | <table> | ||
| + | <tr valign="top"> | ||
| + | <td width=10>[[image:DotPoint.JPG|10px|link=]]</td> | ||
| + | <td>enter a '''Name''' for the Direction Mark, and</td> | ||
| + | </tr> | ||
| + | <tr valign="top"> | ||
| + | <td>[[image:DotPoint.JPG|10px|link=]]</td> | ||
| + | <td>if needed, select a '''Layer''' and a '''Bound Layer''' - see the '''Trainz Wiki Page''' [[image:WikiLink.PNG|link=]] '''[[How_to_Use_Layers|How to Use layers]]''' for the details</td> | ||
</tr> | </tr> | ||
</table> | </table> | ||
| + | The direction that it faces is its only important property</td> | ||
| + | </tr> | ||
| + | </table> | ||
| + | </td> | ||
| + | </tr> | ||
| + | </table> | ||
| + | <br> | ||
| + | ===Set its Effect Radius (S10)=== | ||
| − | + | At the bottom of the '''Track Tools''' flyout menu is an '''Advanced''' button. <span style="font-weight: 700; font-size: 15px; background-color: lightcyan;">Left Click</span> this button to open the advanced tools.<br> | |
| − | <table | + | The '''Effect Radius''' sets the size of green "effect wings" attached to both ends of the marker. |
| + | |||
| + | <table width=1000 bgcolor=#000000 cellpadding=2> | ||
<tr valign="top"> | <tr valign="top"> | ||
| − | <td | + | <td> |
| + | <table width=996 bgcolor=#ffffb0 cellpadding=2> | ||
| + | <tr valign="top"> | ||
| + | <td width=25>[[image:NotePad.PNG|link=]]</td> | ||
| + | <td><span style="font-size: 17px; font-weight: 700;">Notes:'''</span><br> | ||
| + | ---- | ||
| + | The '''Effect Radius''' has no effect on the operation of a '''Direction Mark''' but it allows you to keep its "visibility" clear of other track objects such as junctions and other markers.</td> | ||
</tr> | </tr> | ||
| + | </table> | ||
| + | </td> | ||
| + | </tr> | ||
| + | </table> | ||
| + | <br> | ||
| + | <table width=1000> | ||
| + | <tr valign="middle"> | ||
| + | <td width=400>[[image:TrackMarkRadiusTools.png|link=]]</td> | ||
| + | <td> | ||
| + | <table width=600 bgcolor=#000000 cellpadding=2> | ||
<tr valign="top"> | <tr valign="top"> | ||
| − | <td> | + | <td> |
| − | <td> | + | <table bgcolor=#ffffff cellpadding=2> |
| + | <tr valign="top"> | ||
| + | <td colspan=2><span style="font-weight: 700; font-size: 15px;">Steps:</span> To set a Direction Mark Effect Radius:-</td> | ||
</tr> | </tr> | ||
<tr valign="top"> | <tr valign="top"> | ||
| − | <td>[[ | + | <td width=25>[[image:DotPoint1.JPG|link=]]</td> |
| − | <td>Track | + | <td>In the '''Track Tools''' flyout, <span style="font-weight: 700; font-size: 15px; background-color: lightcyan;">Left Click</span> on the '''Advanced''' button to open the Radius tools and properties. You will have a choice of 4 methods to set and adjust the Effect Radius</td> |
</tr> | </tr> | ||
<tr valign="top"> | <tr valign="top"> | ||
| − | <td | + | <td colspan=2> |
| − | <td> | + | <table> |
| + | <tr valign="top"> | ||
| + | <td colspan=2><span style="font-weight: 700; font-size: 15px;">Options:</span> Choose one of:-</td> | ||
</tr> | </tr> | ||
<tr valign="top"> | <tr valign="top"> | ||
| − | <td>[[ | + | <td width=25>[[image:Ablue.png|link=]]</td> |
| − | <td> | + | <td>To copy the '''Effect Radius''' of an existing '''Direction Mark''' |
| + | <table> | ||
| + | <tr valign="top"> | ||
| + | <td width=25>[[image:DotPoint2.JPG|link=]]</td> | ||
| + | <td><span style="font-weight: 700; font-size: 15px; background-color: lightcyan;">Left Click</span> the '''Get Effect Radius''' icon</td> | ||
</tr> | </tr> | ||
<tr valign="top"> | <tr valign="top"> | ||
| − | <td>[[ | + | <td>[[image:DotPoint3.JPG|link=]]</td> |
| − | <td> | + | <td><span style="font-weight: 700; font-size: 15px; background-color: lightcyan;">Left Click</span> on the '''Direction Mark''' whose radius you want to copy - the radius will be copied into the Effect Radius Value text box (the default value is 20.00 metres)</td> |
| + | </tr> | ||
| + | <tr valign="top"> | ||
| + | <td>[[image:DotPoint4.JPG|link=]]</td> | ||
| + | <td>To apply the new value see option [[image:Cblue.png|link=]] below</td> | ||
</tr> | </tr> | ||
</table> | </table> | ||
| + | </td> | ||
| + | </tr> | ||
| + | <tr valign="top"> | ||
| + | <td>[[image:Bblue.png|link=]]</td> | ||
| + | <td>To manually alter the '''Effect Radius''' value | ||
| + | <table> | ||
| + | <tr valign="top"> | ||
| + | <td width=25>[[image:DotPoint2.JPG|link=]]</td> | ||
| + | <td>Type the new value (in metres) into the Effect Radius Value text box</td> | ||
| + | </tr> | ||
| + | <tr valign="top"> | ||
| + | <td>[[image:DotPoint3.JPG|link=]]</td> | ||
| + | <td>To apply the new value see option [[image:Cblue.png|link=]] below</td> | ||
| + | </tr> | ||
| + | </table> | ||
| + | </td> | ||
| + | </tr> | ||
| + | <tr valign="top"> | ||
| + | <td>[[image:Cblue.png|link=]]</td> | ||
| + | <td>To apply a value in the '''Effect Radius Value''' text box (from methods [[image:Ablue.png|link=]], [[image:Bblue.png|link=]] or [[image:Dblue.png|link=]]) to another '''Direction Mark''' | ||
| + | <table> | ||
| + | <tr valign="top"> | ||
| + | <td width=25>[[image:DotPoint2.JPG|link=]]</td> | ||
| + | <td><span style="font-weight: 700; font-size: 15px; background-color: lightcyan;">Left Click</span> the '''Copy Radius Value''' icon</td> | ||
| + | </tr> | ||
| + | <tr valign="top"> | ||
| + | <td>[[image:DotPoint3.JPG|link=]]</td> | ||
| + | <td><span style="font-weight: 700; font-size: 15px; background-color: lightcyan;">Left Click</span> on the '''Direction Mark''' that is to receive the new value (you can click on more than one)</td> | ||
| + | </tr> | ||
| + | </table> | ||
| + | </td> | ||
| + | </tr> | ||
| + | <tr valign="top"> | ||
| + | <td>[[image:Dblue.png|link=]]</td> | ||
| + | <td>To adjust the Effect Radius value up or down | ||
| + | <table> | ||
| + | <tr valign="top"> | ||
| + | <td width=25>[[image:DotPoint2.JPG|link=]]</td> | ||
| + | <td><span style="font-weight: 700; font-size: 15px; background-color: lightcyan;">Left Click</span> the '''Adjust Effect Radius''' button</td> | ||
| + | </tr> | ||
| + | <tr valign="top"> | ||
| + | <td>[[image:DotPoint3.JPG|link=]]</td> | ||
| + | <td>Select the '''Direction Mark'''</td> | ||
| + | </tr> | ||
| + | <tr valign="top"> | ||
| + | <td>[[image:DotPoint4.JPG|link=]]</td> | ||
| + | <td><span style="font-weight: 700; font-size: 15px; background-color: lightcyan;">Left Click and Drag</span> '''Forward''' (to increase the value) or '''Backward''' (to reduce the value)</td> | ||
| + | </tr> | ||
| + | <tr valign="top"> | ||
| + | <td>[[image:DotPoint5.JPG|link=]]</td> | ||
| + | <td>The new value will be immediately applied to the selected Direction Mark as the mouse moves (but only one Direction Mark at a time)</td> | ||
| + | </tr> | ||
| + | </table> | ||
| + | </td> | ||
| + | </tr> | ||
| + | </table> | ||
| + | </td> | ||
| + | </tr> | ||
| + | </table> | ||
| + | </td> | ||
| + | </tr> | ||
| + | </table> | ||
| + | </td> | ||
| + | </tr> | ||
| + | </table> | ||
| + | <br> | ||
| + | <table bgcolor=#000000 width=900> | ||
| + | <tr valign="top"> | ||
| + | <td> | ||
| + | <table bgcolor=#ffffe0 width=896> | ||
| + | <tr valign="top"> | ||
| + | <td>[[image:PencilTips.PNG|link=]]</td> | ||
| + | <td>Once you have an Effect Radius entered in the value box, you can apply it to any number of Direction Marks by using method [[image:Cblue.png|link=]] shown above | ||
| + | </td> | ||
| + | </tr> | ||
| + | </table> | ||
| + | </td> | ||
| + | </tr> | ||
| + | </table> | ||
| + | <br> | ||
| + | <table width=1000> <!-- BEGIN Nav Buttons Table SKIPS NO SECTIONS --> | ||
| + | <tr valign="top"> | ||
| + | <td width=629><span id="skipAddingS20"></span> | ||
| + | =='''In Surveyor 2.0 (S20)'''== | ||
| + | </td> | ||
| + | <td width=50>[[image:SkipDown.png|link=#stepOperation|Skip Down]]</td> <!-- skip Down --> | ||
| + | <td width=50>[[image:SkipUp.png|link=#skipAddS10|Skip Up]]</td> <!-- skip Up --> | ||
| + | <td width=46> </td> | ||
| + | <td width=75> </td> | ||
| + | <td width=75> </td> | ||
| + | <td width=75> </td> | ||
| + | </tr> | ||
| + | </table> <!-- END Nav Buttons Table --> | ||
| − | + | '''Surveyor 2.0''' is currently only available in '''Trainz Plus''' and '''TRS22 Platinum'''.<br> | |
| − | + | ===Adding a Direction Mark (S20)=== | |
| − | [[ | + | [[image:DotPoint1.JPG|link=]] In the '''Asset Palette''' either:- |
| − | <span style=" | + | <table width=1000> |
| + | <tr valign="top"> | ||
| + | <td> | ||
| + | <table border=1> | ||
| + | <tr valign="top"> | ||
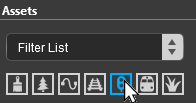
| + | <td width=250 align="center">[[image:Ablue.png|link=]] <span style="font-weight: 700; font-size: 15px; background-color: lightcyan;">Left Click</span> on the '''Track Mesh Filter''' icon<br> | ||
| + | [[image:TrackMeshFilter.png|link=|alt=Track mesh]] | ||
| + | </td> | ||
| + | </tr> | ||
| + | </table> | ||
| + | </td> | ||
| + | <td width=50 align="center"><span style="font-size: 17px; font-weight: 700;">OR</span></td> | ||
| + | <td> | ||
| + | <table border=1> | ||
| + | <tr valign="top"> | ||
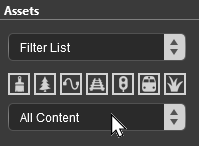
| + | <td align="center">[[image:Bblue.png|link=]] <span style="font-weight: 700; font-size: 15px; background-color: lightcyan;">Left Click</span> on the '''Content Drop-down Box'''<br> | ||
| + | [[image:FilterSelect.png|link=|alt=Filter List]]<br> | ||
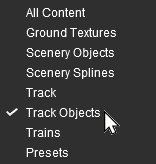
| + | Then select '''Track Objects'''<br> | ||
| + | [[image:FilterSelectTrackType.png|link=|alt=Track Objects]] | ||
| + | </td> | ||
| + | </tr> | ||
| + | </table> | ||
| + | </td> | ||
| + | <td> | ||
| + | <table bgcolor=#000000 width=400 cellpadding=2> | ||
| + | <tr valign="top"> | ||
| + | <td> | ||
| + | <table bgcolor=#ffffb0 width=396 cellpadding=2> | ||
| + | <tr valign="top"> | ||
| + | <td width=22>[[image:NotePad.PNG|link=]]</td> | ||
| + | <td width=374><span style="font-size: 17px; font-weight: 700;">Notes:'''</span><br> | ||
---- | ---- | ||
| − | + | </td> | |
| + | </tr> | ||
| + | <tr valign="top"> | ||
| + | <td colspan=2> | ||
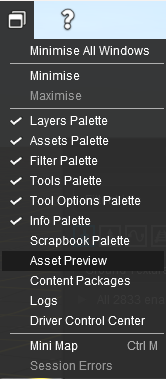
| + | If the '''Assets Palette''' is not shown on the screen, then:- | ||
| + | <table> | ||
| + | <tr valign="top"> | ||
| + | <td width=175>[[image:WindowsMenu_S20.png|link=|alt=Windows Menu]]</td> | ||
| + | <td> | ||
| + | <table bgcolor=#ffffff> | ||
| + | <tr valign="top"> | ||
| + | <td colspan=2><span style="font-weight: 700; font-size: 15px;;">Steps:</span> To display palettes:-</td> | ||
| + | </tr> | ||
| + | <tr valign="top"> | ||
| + | <td width=20>[[image:DotPoint1.JPG|link=]]</td> | ||
| + | <td>open the [[image:SurveyorWindowIcon.png|link=]] '''Window Menu''' from the menu icons at the top of the screen</td> | ||
| + | </tr> | ||
| + | <tr valign="top"> | ||
| + | <td> </td> | ||
| + | <td> | ||
| + | <table> | ||
| + | <tr valign="top"> | ||
| + | <td width=10>[[image:BulletTick.png|link=]]</td> | ||
| + | <td>visible palettes have ticks next to their names</td> | ||
| + | </tr> | ||
| + | <tr valign="top"> | ||
| + | <td>[[image:BulletNoTick.png|link=]]</td> | ||
| + | <td>invisible (hidden) palettes have no ticks next to their names</td> | ||
| + | </tr> | ||
| + | </table> | ||
| + | </td> | ||
| + | </tr> | ||
| + | <tr valign="top"> | ||
| + | <td>[[image:DotPoint2.JPG|link=]]</td> | ||
| + | <td>if the '''Assets Palette''', or any required palette, does not have a tick next to its name then <span style="font-weight: 700; font-size: 15px; background-color: lightcyan;">Left Click</span> on the name of the palette or on the empty [[image:BulletNoTick.png|link=]] box next to its name. This will add a [[image:BulletTick.png|link=]] and make the palette visible</td> | ||
| + | </tr> | ||
| + | </table> | ||
| + | </td> | ||
| + | </tr> | ||
| + | </table> | ||
| + | There is a '''Trainz Wiki Page''' specifically covering the '''S20 Palettes''' at<br>[[image:WikiLink.PNG|link=]] '''[[How_to_Use_S20_Palettes|How to Use the Surveyor 2.0 Palettes]]''' | ||
| + | </td> | ||
| + | </tr> | ||
| + | </table> | ||
| + | </td> | ||
| + | </tr> | ||
| + | </table> | ||
| + | </td> | ||
| + | </tr> | ||
| + | </table> | ||
| − | [[ | + | <table width=1000 bgcolor=#000000 cellpadding=2> |
| − | <span style=" | + | <tr valign="top"> |
| + | <td> | ||
| + | <table bgcolor=#ffffe0 cellpadding=2> | ||
| + | <tr valign="top"> | ||
| + | <td colspan=2>[[image:PencilTips.PNG|link=]] <span style="font-size: 15px; font-weight: 700; color: white; background-color: blue;"> Shortcut </span><br> | ||
| + | If you already have a '''Direction Mark''' placed in your route then:-</td> | ||
| + | </tr> | ||
| + | <tr valign="top"> | ||
| + | <td width=20>[[image:DotPoint1Blue.png|link=]]</td> | ||
| + | <td>move the tool pointer over the existing direction marker object and hold down the <span style="font-weight: 700; font-size: 15px; color: white; background-color: black;"> Alt </span> key. The object name will appear in a '''ToolTip''' attached to the pointer</td> | ||
| + | </tr> | ||
| + | <tr valign="top"> | ||
| + | <td>[[image:DotPoint2Blue.png|link=]]</td> | ||
| + | <td><span style="font-weight: 700; font-size: 15px;"><span style="color: white; background-color: black;"> Alt </span> + <span style="color: black; background-color: lightcyan;">Left Click</span></span> (hold down the <span style="font-weight: 700; font-size: 15px; color: white; background-color: black;"> Alt </span> key and <span style="font-weight: 700; font-size: 15px; background-color: lightcyan;">Left Click</span>) on the direction marker to identify it in the '''Assets Palette''' and to select the '''Placement Tool'''. Release the key.</td> | ||
| + | </tr> | ||
| + | <tr valign="top"> | ||
| + | <td colspan=2>Jump to '''Step [[image:DotPoint5.JPG|link=]]''' below.</td> | ||
| + | </tr> | ||
| + | </table> | ||
| + | </td> | ||
| + | </tr> | ||
| + | </table> | ||
| + | <br> | ||
| + | [[image:DotPoint2.JPG|link=]] To narrow down the filter list, type "mark" ('''UPPER/lower''' case does not matter) in the '''Search Text Box'''<br> | ||
| + | <table width=1000> | ||
| + | <tr valign="top"> | ||
| + | <td>[[image:FilterSelectSearch.png|link=|alt=Text search]]</td> | ||
| + | <td><br>[[image:DotPoint3.JPG|link=]] This will list all the '''Track Objects''' containing the text "mark" in the filter list.<br> | ||
| + | <table> | ||
| + | <tr valign="top"> | ||
| + | <td>[[image:FilterSelectDirectionMark.png|link=|alt=Filtered list]]</td> | ||
| + | <td valign="middle">[[image:DotPoint4.JPG|link=]] <span style="font-weight: 700; font-size: 15px; background-color: lightcyan;">Left Click</span> on the item name '''AI Routing Direction Marker''' or '''Track Direction Marker'''.<br> | ||
| + | <br> | ||
| + | <table bgcolor=#000000 width=560 cellpadding=2> | ||
| + | <tr valign="top"> | ||
| + | <td> | ||
| + | <table bgcolor=#ffffb0 width=556 cellpadding=2> | ||
| + | <tr valign="top"> | ||
| + | <td>[[image:NotePad.PNG|link=]]</td> | ||
| + | <td><span style="font-size: 17px; font-weight: 700;">Notes:'''</span><br> | ||
---- | ---- | ||
| − | + | There are '''two''' separate '''Direction Marks''' available.<br> | |
| − | + | <table> | |
| − | [[ | + | <tr valign="top"> |
| − | <span style=" | + | <td width=10>[[image:DotPoint.JPG|10px|link=]]</td> |
| + | <td>'''Track Direction Marker''' - this is the original version</td> | ||
| + | </tr> | ||
| + | <tr valign="top"> | ||
| + | <td>[[image:DotPoint.JPG|10px|link=]]</td> | ||
| + | <td>'''AI Routing Direction Marker''' - this is similar to the original but it does not affect signal operations</td> | ||
| + | </tr> | ||
| + | </table> | ||
| + | </td> | ||
| + | </tr> | ||
| + | </table> | ||
| + | </td> | ||
| + | </tr> | ||
| + | </table> | ||
| + | <br> | ||
| + | If you are not sure about an object then <span style="font-weight: 700; font-size: 15px; background-color: lightcyan;">Double Left Click</span> on the name to bring up its image and description.</td> | ||
| + | </tr> | ||
| + | </table> | ||
| + | </td> | ||
| + | </tr> | ||
| + | </table> | ||
| + | [[image:DotPoint5.JPG|link=]] Place the '''Direction Mark''' on the track.<br> | ||
| + | <table width=1000> | ||
| + | <tr valign="top"> | ||
| + | <td colspan=2> | ||
| + | <table> | ||
| + | <tr valign="top"> | ||
| + | <td width=535>[[image:Tools_S20.png|link=|alt=Tools and keymap for S20]]</td> | ||
| + | <td> | ||
| + | <table bgcolor=#000000 cellpadding=2> | ||
| + | <tr valign="top"> | ||
| + | <td> | ||
| + | <table bgcolor=#ffffb0 cellpadding=2> | ||
| + | <tr valign="top"> | ||
| + | <td width=25>[[image:NotePad.PNG|link=]]</td> | ||
| + | <td><span style="font-size: 17px;">'''Notes:'''</span><br> | ||
---- | ---- | ||
| − | + | </td> | |
| + | </tr> | ||
| + | <tr valign="top"> | ||
| + | <td>[[image:DotPoint.JPG|10px|link=]]</td> | ||
| + | <td>To add a direction mark, or any object, you will need to select the '''Placement Tool'''</td> | ||
| + | </tr> | ||
| + | <tr valign="top"> | ||
| + | <td>[[image:DotPoint.JPG|10px|link=]]</td> | ||
| + | <td>To edit a direction mark once it has been placed you will usually use either the '''Free Move Tool''' or the '''Fine Adjustment Tool'''</td> | ||
| + | </tr> | ||
| + | </table> | ||
| + | </td> | ||
| + | </tr> | ||
| + | </table> | ||
| + | </td> | ||
| + | </tr> | ||
| + | </table> | ||
| + | </td> | ||
| + | </tr> | ||
| + | </table> | ||
| − | [[ | + | <table width=1000> |
| − | <span style=" | + | <tr valign="top"> |
| + | <td width=480>[[image:DirectionmarkAdd_S20.png|link=|alt=Add direction marker]]</td> | ||
| + | <td> | ||
| + | <table bgcolor=#000000 cellpadding=2> | ||
| + | <tr valign="top"> | ||
| + | <td> | ||
| + | <table bgcolor=#ffffff cellpadding=2> | ||
| + | <tr valign="top"> | ||
| + | <td colspan=2><span style="font-weight: 700; font-size: 15px;">Steps:</span> To add a Direction Mark:-</td> | ||
| + | </tr> | ||
| + | <tr valign="top"> | ||
| + | <td width=25>[[image:DotPoint1Blue.png|link=]]</td> | ||
| + | <td>Select the '''Placement Tool''' (or press the <span style="font-weight: 700; font-size: 17px; color: white; background-color: black;"> E </span> key) from the '''Tools Palette'''</td> | ||
| + | </tr> | ||
| + | <tr valign="top"> | ||
| + | <td>[[image:DotPoint2Blue.png|link=]]</td> | ||
| + | <td><span style="font-weight: 700; font-size: 15px; background-color: lightcyan;">Left Click</span> on the track at the position where you want to place the '''Direction Mark'''</td> | ||
| + | </tr> | ||
| + | </table> | ||
| + | </td> | ||
| + | </tr> | ||
| + | </table> | ||
| + | <br> | ||
| + | <table bgcolor=#000000 cellpadding=2> | ||
| + | <tr valign="top"> | ||
| + | <td> | ||
| + | <table bgcolor=#ffffb0 cellpadding=2> | ||
| + | <tr valign="top"> | ||
| + | <td>[[image:NotePad.PNG|link=]]</td> | ||
| + | <td><span style="font-size: 17px; font-weight: 700;">Notes:'''</span><br> | ||
---- | ---- | ||
| − | + | To delete a '''Direction Mark''' (or any object):- | |
| + | <table bgcolor=#ffffff> | ||
| + | <tr valign="top"> | ||
| + | <td colspan=2"><span style="font-weight: 700; font-size: 15px;">Steps:</span></td> | ||
| + | </tr> | ||
| + | <tr valign="top"> | ||
| + | <td width=25>[[image:DotPoint1.JPG|link=]]</td> | ||
| + | <td>select either the:- | ||
| + | <table> | ||
| + | <tr valign="top"> | ||
| + | <td width=25>[[image:Ablue.png|link=]]</td> | ||
| + | <td>'''Free Move Tool''' (or press <span style="font-weight: 700; font-size: 17px; color: white; background-color: black;"> S </span>) <span style="font-weight: 700; font-size: 15px;">OR</span></td> | ||
| + | </tr> | ||
| + | <tr valign="top"> | ||
| + | <td>[[image:Bblue.png|link=]]</td> | ||
| + | <td>'''Fine Adjustment Tool''' (or press <span style="font-weight: 700; font-size: 17px; color: white; background-color: black;"> D </span>)</td> | ||
| + | </tr> | ||
| + | </table> | ||
| + | </td> | ||
| + | </tr> | ||
| + | <tr valign="top"> | ||
| + | <td>[[image:DotPoint2.JPG|link=]]</td> | ||
| + | <td><span style="font-weight: 700; font-size: 15px; background-color: lightcyan;">Left Click</span> on the '''Direction Mark'''</td> | ||
| + | </tr> | ||
| + | <tr valign="top"> | ||
| + | <td>[[image:DotPoint3.JPG|link=]]</td> | ||
| + | <td>press the <span style="font-weight: 700; font-size: 17px; color: white; background-color: black;"> Delete </span> key</td> | ||
| + | </tr> | ||
| + | </table> | ||
| + | </td> | ||
| + | </tr> | ||
| + | </table> | ||
| + | </td> | ||
| + | </tr> | ||
| + | </table> | ||
| + | </td> | ||
| + | </tr> | ||
| + | </table> | ||
| − | + | ===Set the Marker Direction (S20)=== | |
| − | + | ||
| − | + | ||
| − | + | ||
| − | [[ | + | The direction that the marker points is its '''ONLY''' important property.<br> |
| − | <span style=" | + | <table width=1000> |
| − | --- | + | <tr valign="top"> |
| − | + | <td width=480>[[image:DirectionmarkReverse_S20.png|link=]]</td> | |
| + | <td> | ||
| + | <table bgcolor=#000000 cellpadding=2> | ||
| + | <tr valign="top"> | ||
| + | <td> | ||
| + | <table bgcolor=#ffffff cellpadding=2> | ||
| + | <tr valign="top"> | ||
| + | <td colspan=2><span style="font-weight: 700; font-size: 15px;">Steps:</span> To reverse its direction:-</td> | ||
| + | </tr> | ||
| + | <tr valign="top"> | ||
| + | <td width=25>[[image:DotPoint3Blue.png|link=]]</td> | ||
| + | <td>select the Direction Mark and <span style="font-weight: 700; font-size: 15px; background-color: lightcyan;">Left Click</span> on its '''Context Menu Icon''' (or press the <span style="font-weight: 700; font-size: 17px; color: white; background-color: black;"> T </span> key). From the popup '''Context Menu''' select the <span style="font-weight: 700; font-size: 15px; color: white; background-color: black;"> Rotate Trackside </span> option</td> | ||
| + | </tr> | ||
| + | </table> | ||
| + | </td> | ||
| + | </tr> | ||
| + | </table> | ||
| + | </td> | ||
| + | </tr> | ||
| + | </table> | ||
| − | [[ | + | ===Change its Name (S20)=== |
| − | < | + | |
| − | + | The name of the marker is only useful for finding it in the route. It is not needed for any operational purpose. | |
| − | < | + | <table width=1000> |
| − | <table | + | <tr valign="top"> |
| + | <td width=480>[[image:DirectionmarkName_S20.png|link=]]</td> | ||
| + | <td> | ||
| + | <table bgcolor=#000000 cellpadding=2> | ||
| + | <tr valign="top"> | ||
| + | <td> | ||
| + | <table bgcolor=#ffffff cellpadding=2> | ||
<tr valign="top"> | <tr valign="top"> | ||
| − | <td | + | <td colspan=2><span style="font-weight: 700; font-size: 15px;">Steps:</span> To change the name of a Direction Mark:-</td> |
| + | </tr> | ||
| + | <tr valign="top"> | ||
| + | <td width=25>[[image:DotPoint4Blue.png|link=]]</td> | ||
| + | <td>using either the '''Free Move Tool''' or the '''Fine Adjustment Tool''' select (<span style="font-weight: 700; font-size: 15px; background-color: lightcyan;">Left Click</span> on) the '''Direction Mark''' to be renamed</td> | ||
| + | </tr> | ||
| + | <tr valign="top"> | ||
| + | <td>[[image:DotPoint5Blue.png|link=]]</td> | ||
| + | <td>in the '''Info Palette''' (you may need to make this palette visible - see the '''Notes:''' for '''Step''' <span style="font-weight: 700; font-size: 15px; color: white; background-color: red;"> 1 </span> above) <span style="font-weight: 700; font-size: 15px; background-color: lightcyan;">Left Click</span> in the '''Name:''' entry box. Enter a name for the '''Direction Mark''' and press the <span style="font-weight: 700; font-size: 15px; color: white; background-color: black;"> Enter </span> key</td> | ||
</tr> | </tr> | ||
</table> | </table> | ||
| + | </td> | ||
| + | </tr> | ||
| + | </table> | ||
| + | </td> | ||
| + | </tr> | ||
| + | </table> | ||
| + | <br> | ||
| − | = | + | ===Set its Effect Radius (S20)=== |
| − | + | <table width=1000> | |
| + | <tr valign="top"> | ||
| + | <td>The Effect Radius sets the size of green "effect wings" attached to both ends of the marker. It has no effect on its operation but allows you to keep its "visibility" clear of other track objects such as junctions and other markers.</td> | ||
| + | </tr> | ||
| + | </table> | ||
| + | <br> | ||
| + | <table width=1000 cellpadding=4 bgcolor=#ffffff> | ||
| + | <tr valign="top"> | ||
| + | <td width=480>[[image:DirectionmarkRadius_S20.png|link=]]</td> | ||
| + | <td> | ||
| + | <table bgcolor=#000000 cellpadding=2> | ||
| + | <tr valign="top"> | ||
| + | <td> | ||
| + | <table bgcolor=#ffffff cellpadding=2> | ||
| + | <tr valign="top"> | ||
| + | <td colspan=2><span style="font-weight: 700; font-size: 15px;">Steps:</span> To adjust the effect radius of a Direction Mark:-</td> | ||
| + | </tr> | ||
| + | <tr valign="top"> | ||
| + | <td width=25>[[image:DotPoint6Blue.png|link=]]</td> | ||
| + | <td><span style="font-weight: 700; font-size: 15px; background-color: lightcyan;">Left Click and Drag</span> '''Forward''' or '''Backward''' on the '''Green Dot''' next to the '''Track Mark''' to increase or reduce its '''Trigger Radius'''</td> | ||
| + | </tr> | ||
| + | </table> | ||
| + | </td> | ||
| + | </tr> | ||
| + | </table> | ||
| + | </td> | ||
| + | </tr> | ||
| + | </table> | ||
| + | <br> | ||
| + | ===Move the Direction Mark Along the Track (S20)=== | ||
| − | [[ | + | Direction Marks can be moved along the track or to other tracks.<br> |
| + | <table width=1000 cellpadding=4 bgcolor=#ffffff> | ||
| + | <tr valign="top"> | ||
| + | <td width=480>[[image:DirectionmarkMove_S20.png|link=]]</td> | ||
| + | <td> | ||
| + | <table bgcolor=#000000 cellpadding=2> | ||
| + | <tr valign="top"> | ||
| + | <td> | ||
| + | <table bgcolor=#ffffff cellpadding=2> | ||
| + | <tr valign="top"> | ||
| + | <td colspan=2><span style="font-weight: 700; font-size: 15px;">Steps:</span> To move the Direction Mark:-</td> | ||
| + | </tr> | ||
| + | <tr valign="top"> | ||
| + | <td width=25>[[image:DotPoint7Blue.png|link=]]</td> | ||
| + | <td><span style="font-weight: 700; font-size: 15px; background-color: lightcyan;">Left Click and Drag</span> '''Forward''' or '''Backward''' on the '''Yellow Dot''' next to the '''Direction Mark''' to move it along the track or to another track</td> | ||
| + | </tr> | ||
| + | </table> | ||
| + | </td> | ||
| + | </tr> | ||
| + | </table> | ||
| + | </td> | ||
| + | </tr> | ||
| + | </table> | ||
| + | <br> | ||
| + | ===Move the Direction Mark Vertically (S20)=== | ||
| − | + | <table width=1000> | |
| + | <tr valign="top"> | ||
| + | <td>Direction Marks can be physically placed above (or below) the track. This feature allows them to be placed, for example, above the track so that they will not be hidden in Surveyor if a consist is parked on a marker.</td> | ||
| + | </tr> | ||
| + | </table> | ||
| − | <table> | + | <table width=1000> |
| + | <tr valign="top"> | ||
| + | <td width=480>[[image:DirectionmarkFineAdjustVertical_S20.png|link=]]</td> | ||
| + | <td> | ||
| + | <table bgcolor=#000000 cellpadding=2> | ||
| + | <tr valign="top"> | ||
| + | <td> | ||
| + | <table bgcolor=#ffffff cellpadding=2> | ||
<tr valign="top"> | <tr valign="top"> | ||
| − | <td>< | + | <td colspan=2><span style="font-weight: 700; font-size: 15px;">Steps:</span> To move a Direction Mark vertically:-</td> |
| − | < | + | |
| − | + | ||
| − | + | ||
</tr> | </tr> | ||
<tr valign="top"> | <tr valign="top"> | ||
| − | <td>[[ | + | <td colspan=2> |
| − | <td><span style="font-size: 17px; | + | <table bgcolor=#ffffb0 cellpadding=2> |
| − | + | <tr valign="top"> | |
| − | + | <td width=25>[[image:NotePad.PNG|link=]]</td> | |
| − | + | <td>This option is only available with the '''Fine Adjustment Tool''' - the <span style="font-weight: 700; font-size: 17px; color: white;background-color: black;"> D </span> key</td> | |
| + | </tr> | ||
| + | </table> | ||
</td> | </td> | ||
| + | </tr> | ||
<tr valign="top"> | <tr valign="top"> | ||
| − | <td | + | <td width=25>[[image:DotPoint8Blue.png|link=]]</td> |
| − | ----</td> | + | <td><span style="font-weight: 700; font-size: 15px; background-color: lightcyan;">Left Click and Drag</span> '''Forward''' or '''Backward''' on the <span style="font-weight: 700; font-size: 15px; color: white; background-color: blue;"> Blue </span> '''Vertical Axis Line''' above the Direction Mark to it up or down</td> |
</tr> | </tr> | ||
| − | |||
| − | |||
<tr valign="top"> | <tr valign="top"> | ||
| − | <td>[[ | + | <td colspan=2> |
| + | <table bgcolor=#ffffe0 cellpadding=2> | ||
| + | <tr valign="top"> | ||
| + | <td>[[image:PencilTips.PNG|link=]]</td> | ||
| + | <td>If you need to return the '''Direction Mark''' to its original position then:- | ||
| + | <table bgcolor=#ffffff cellpadding=2> | ||
| + | <tr valign="top"> | ||
| + | <td colspan=2><span style="font-weight: 700; font-size: 15px;">Steps:</span> To correctly reattach the Direction Mark to the track:-</td> | ||
</tr> | </tr> | ||
| − | </table></td> | + | <tr valign="top"> |
| − | </table>< | + | <td width=25>[[image:DotPoint1.JPG|link=]]</td> |
| + | <td>select the object and open (<span style="font-weight: 700; font-size: 15px; background-color: lightcyan;">Left Click</span> on) its '''Context Menu Icon''' (or press the <span style="font-weight: 700; font-size: 17px; color: white; background-color: black;"> T </span> key)</td> | ||
| + | </tr> | ||
| + | <tr valign="top"> | ||
| + | <td>[[image:DotPoint2.JPG|link=]]</td> | ||
| + | <td>from the popup menu select <span style="font-weight: 700; font-size: 15px; color: white; background-color: black;"> Reattach to Track </span></td> | ||
| + | </tr> | ||
| + | </table> | ||
| + | </td> | ||
| + | </tr> | ||
| + | </table> | ||
| + | </td> | ||
| + | </tr> | ||
| + | </table> | ||
| + | </td> | ||
| + | </tr> | ||
| + | </table> | ||
| + | </td> | ||
| + | </tr> | ||
| + | </table> | ||
| − | + | ===Move the Direction Mark Horizontally (S20)=== | |
| − | + | <table width=1000> | |
| − | + | <tr valign="top"> | |
| − | + | <td>Direction Marks can be physically placed left or right alongside the track. This feature allows them to be placed, for example, beside the track so that they will not be hidden in Surveyor if a consist is parked on a marker.</td> | |
| + | </tr> | ||
| + | </table> | ||
| − | <table | + | <table width=1000> |
<tr valign="top"> | <tr valign="top"> | ||
| − | <td>[[ | + | <td width=480>[[image:DirectionmarkFineAdjustHorizontal_S20.png|link=]]</td> |
| − | <td> | + | <td> |
| − | + | <table bgcolor=#000000 cellpadding=2> | |
| + | <tr valign="top"> | ||
| + | <td> | ||
| + | <table bgcolor=#ffffff cellpadding=2> | ||
| + | <tr valign="top"> | ||
| + | <td colspan=2><span style="font-weight: 700; font-size: 15px;">Steps:</span> To move a Direction Mark horizontally:-</td> | ||
| + | </tr> | ||
| + | <tr valign="top"> | ||
| + | <td colspan=2> | ||
| + | <table bgcolor=#ffffb0 cellpadding=2> | ||
| + | <tr valign="top"> | ||
| + | <td width=25>[[image:NotePad.PNG|link=]]</td> | ||
| + | <td>This option is only available with the '''Fine Adjustment Tool''' - the <span style="font-weight: 700; font-size: 17px; color: white;background-color: black;"> D </span> key</td> | ||
| + | </tr> | ||
| + | </table> | ||
| + | </td> | ||
| + | </tr> | ||
| + | <tr valign="top"> | ||
| + | <td width=25>[[image:DotPoint9Blue.png|link=]]</td> | ||
| + | <td><span style="font-weight: 700; font-size: 15px; background-color: lightcyan;">Left Click and Drag</span> '''Forward''' or '''Backward''' on the <span style="font-weight: 700; font-size: 15px; color: white; background-color: red;"> Red </span> '''Horizontal Axis Line''' attached to the Direction Mark to move it left or right</td> | ||
| + | </tr> | ||
| + | <tr valign="top"> | ||
| + | <td>[[image:DotPoint10Blue.png|link=]]</td> | ||
| + | <td><span style="font-weight: 700; font-size: 15px; background-color: lightcyan;">Left Click and Drag</span> '''Forward''' or '''Backward''' on the <span style="font-weight: 700; font-size: 15px; color: white; background-color: green;"> Green </span> '''Horizontal Axis Line''' attached to the Direction Mark to move it forward or back</td> | ||
| + | </tr> | ||
| + | <tr valign="top"> | ||
| + | <td colspan=2> | ||
| + | <table bgcolor=#ffffe0 cellpadding=2> | ||
| + | <tr valign="top"> | ||
| + | <td>[[image:PencilTips.PNG|link=]]</td> | ||
| + | <td>If you need to return the Track Mark to its original position then:- | ||
| + | <table bgcolor=#ffffff cellpadding=2> | ||
| + | <tr valign="top"> | ||
| + | <td colspan=2><span style="font-weight: 700; font-size: 15px;">Steps:</span> To correctly reattach the Track Mark to the track:-</td> | ||
| + | </tr> | ||
| + | <tr valign="top"> | ||
| + | <td width=25>[[image:DotPoint1.JPG|link=]]</td> | ||
| + | <td>select the object and open (<span style="font-weight: 700; font-size: 15px; background-color: lightcyan;">Left Click</span> on) its '''Context Menu Icon''' (or press the <span style="font-weight: 700; font-size: 17px; color: white; background-color: black;"> T </span> key)</td> | ||
| + | </tr> | ||
| + | <tr valign="top"> | ||
| + | <td>[[image:DotPoint2.JPG|link=]]</td> | ||
| + | <td>from the popup menu select <span style="font-weight: 700; font-size: 15px; color: white; background-color: black;"> Reattach to Track </span></td> | ||
| + | </tr> | ||
| + | </table> | ||
| + | </td> | ||
| + | </tr> | ||
| + | </table> | ||
| + | </td> | ||
| + | </tr> | ||
| + | </table> | ||
| + | </td> | ||
| + | </tr> | ||
| + | </table> | ||
</td> | </td> | ||
</tr> | </tr> | ||
</table> | </table> | ||
<br> | <br> | ||
| − | <table width= | + | <table width=1000 bgcolor=#000000> |
<tr valign="top"> | <tr valign="top"> | ||
| − | <td | + | <td> |
| + | <table bgcolor=#ffffb0> | ||
| + | <tr valign="top"> | ||
| + | <td>[[image:NotePad.PNG|link=]]</td> | ||
| + | <td><span style="font-size: 17px; font-weight: 700;">Notes:'''</span><br> | ||
| + | ---- | ||
| + | The <span style="font-weight: 700; font-size: 15px; color: white; background-color: green;"> Green </span> '''Horizontal Axis Line''' shown as [[image:DotPoint10Blue.png|link=]] in the image pointing forward from the '''Track Mark''' will move it forward/backward regardless of whether it is on the track or not. It has the same effect as [[image:DotPoint7Blue.png|link=]] <span style="font-weight: 700; font-size: 15px;">Move a Direction Mark Along the Track</span>. However, by using this tool it is possible to move the '''Track Mark''' beyond the end of the track if that is ever required.</td> | ||
</tr> | </tr> | ||
</table> | </table> | ||
| + | </td> | ||
| + | </tr> | ||
| + | </table> | ||
| + | <br> | ||
| − | = | + | ===Assign a Direction Mark to Another Layer (S20)=== |
| − | <table cellpadding= | + | <table width=1000 cellpadding=4 bgcolor=#ffffff> |
<tr valign="top"> | <tr valign="top"> | ||
| − | <td>[[ | + | <td colspan=2>The '''Info Palette''' will show the layer assigned to the currently selected object. To the left of the layer name is a small arrowhead object.</td> |
| + | </tr> | ||
| + | <tr valign="top"> | ||
| + | <td>[[image:TrackmarkInfo_S20.png|link=|alt=Info palette]]<br><br> | ||
| + | [[image:TrackmarkLayerInfo_S20.png|link=|alt=Layer control]]</td> | ||
<td> | <td> | ||
| − | + | <table bgcolor=#000000 cellpadding=2> | |
| − | + | <tr valign="top"> | |
| − | + | <td> | |
| + | <table bgcolor=#ffffff cellpadding=2> | ||
| + | <tr valign="top"> | ||
| + | <td colspan=2><span style="font-weight: 700; font-size: 15px;">Steps:</span> To assign a Direction Mark to a layer:-</td> | ||
| + | </tr> | ||
| + | <tr valign="top"> | ||
| + | <td colspan=2>In the '''Info Palette''':-</td> | ||
| + | </tr> | ||
| + | <tr valign="top"> | ||
| + | <td width=25>[[image:DotPoint1.JPG|link=]]</td> | ||
| + | <td><span style="font-weight: 700; font-size: 15px; background-color: lightcyan;">Left Click</span> the small arrowhead next to the layer name. This will open the layer properties for the selected object</td> | ||
| + | </tr> | ||
| + | <tr valign="top"> | ||
| + | <td>[[image:DotPoint2.JPG|link=]]</td> | ||
| + | <td><span style="font-weight: 700; font-size: 15px; background-color: lightcyan;">Left Click</span> the '''Layer''' drop down box to select a new layer for the object</td> | ||
| + | </tr> | ||
| + | <tr valign="top"> | ||
| + | <td>[[image:DotPoint3.JPG|link=]]</td> | ||
| + | <td>if required, <span style="font-weight: 700; font-size: 15px; background-color: lightcyan;">Left Click</span> the '''Binding''' drop down box to select a new binding layer for the object. It cannot be bound to its own layer</td> | ||
| + | </tr> | ||
| + | <tr valign="top"> | ||
| + | <td>[[image:DotPoint4.JPG|link=]]</td> | ||
| + | <td>if required, <span style="font-weight: 700; font-size: 15px; background-color: lightcyan;">Left Click</span> the <span style="font-weight: 700; font-size: 17px; color: white; background-color: black;"> Lock Layer </span> button to lock the selected layer. If the layer is already locked then this will be shown as an <span style="font-weight: 700; font-size: 17px; color: white; background-color: black;"> Unlock Layer </span> button</td> | ||
| + | </tr> | ||
| + | </table> | ||
</td> | </td> | ||
</tr> | </tr> | ||
</table> | </table> | ||
<br> | <br> | ||
| − | <table | + | <table bgcolor=#ff0000 cellpadding=2> |
<tr valign="top"> | <tr valign="top"> | ||
| − | <td | + | <td> |
| + | <table bgcolor=#fcbcbc cellpadding=2> | ||
| + | <tr valign="top"> | ||
| + | <td>[[image:Stop.PNG|link=]]</td> | ||
| + | <td><span style="font-size: 15px; font-weight: 700;">WARNING:</span> | ||
| + | <table> | ||
| + | <tr valign="top"> | ||
| + | <td width=10>[[image:DotPoint.JPG|10px|link=]]</td> | ||
| + | <td>You will not be allowed to place a track object in a layer that is higher up the list than the layer containing the track</td> | ||
| + | </tr> | ||
| + | <tr valign="top"> | ||
| + | <td>[[image:DotPoint.JPG|10px|link=]]</td> | ||
| + | <td>Moving an object from one layer group to another (e.g. from the '''Route Layer Group''' to the '''Session Layer Group''') will change where the object is saved (in the Route or in the Session)</td> | ||
</tr> | </tr> | ||
</table> | </table> | ||
| + | </td> | ||
| + | </tr> | ||
| + | </table> | ||
| + | </td> | ||
| + | </tr> | ||
| + | </table> | ||
| + | <br> | ||
| + | <table cellpadding=4 bgcolor="Aquamarine"> | ||
| + | <tr valign="top"> | ||
| + | <td>[[image:LinkWiki.PNG|link=]]</td> | ||
| + | <td>Information on layers can be found at:-<br> | ||
| + | * '''[[How to Use Layers]]''' | ||
| + | </td> | ||
| + | </tr> | ||
| + | </table> | ||
| + | </td> | ||
| + | </tr> | ||
| + | </table> | ||
| + | <br> | ||
| + | <table width=1000> <!-- BEGIN Nav Buttons Table SECTION w SKIPS --> | ||
| + | <tr valign="top"> | ||
| + | <td width=629><span id="stepOperation"></span> | ||
| + | ='''Direction Mark Operation'''= | ||
| + | </td> | ||
| + | <td width=50> </td> | ||
| + | <td width=50>[[image:SkipUp.png|link=#skipAddingS20|Skip Up]]</td> | ||
| + | <td width=46>[[image:BackToTop.png|link=#top|alt=Top|Top]]</td> | ||
| + | <td width=75>[[image:NextUp.png|link=#stepAdding|alt=Next Up|Next Up]]</td> | ||
| + | <td width=75> </td> | ||
| + | <td width=75>[[image:BackToBottom.png|link=#bottom|alt=Bottom|Bottom]]</td> | ||
| + | </tr> | ||
| + | </table> <!-- END Nav Buttons Table --> | ||
| + | |||
| + | <table width=1000 bgcolor="lightcyan" cellpadding=2> | ||
| + | <tr valign="top"> | ||
| + | <td width=10>[[image:BlueDot10x10.png|link=]]</td> | ||
| + | <td>'''Track Direction Marks only work on AI controlled trains.''' They have no effect on manually controlled trains</td> | ||
| + | </tr> | ||
| + | <tr valign="top"> | ||
| + | <td>[[image:BlueDot10x10.png|link=]]</td> | ||
| + | <td>If the set path is blocked, then the AI will '''NOT''' attempt to find another path</td> | ||
| + | </tr> | ||
| + | <tr valign="top"> | ||
| + | <td>[[image:BlueDot10x10.png|link=]]</td> | ||
| + | <td>A set path will be ignored if a shorter path is available</td> | ||
| + | </tr> | ||
| + | </table> | ||
| + | <br> | ||
| + | <table width=1000> | ||
| + | <tr valign="top"> | ||
| + | <td>Consider the situation represented in the diagrams below. An AI controlled train is moving left to right towards a junction and a loop line. A '''Direction Mark''' (yellow triangle) has been set on the main line which only allows AI trains traveling right-to-left to pass along that section of track.</td> | ||
| + | </tr> | ||
| + | </table> | ||
| + | <br> | ||
| + | |||
| + | <table width=1000> | ||
| + | <tr valign="top"> | ||
| + | <td>In '''Figure 1''' below, The train approaches the junction at the start of the one way section.</td> | ||
| + | </tr> | ||
| + | </table> | ||
| + | <br> | ||
| + | |||
| + | [[image:DirectionMap1.png|link=|alt=Direction Map - approach]]<br> | ||
| + | <span style="text-decoration: underline; font-weight: 700;">Figure 1</span><br> | ||
---- | ---- | ||
| + | <table width=1000> | ||
| + | <tr valign="top"> | ||
| + | <td>In '''Figure 2''' below, the train has been forced to take the loop line to avoid the section controlled by the '''Direction Mark'''.</td> | ||
| + | </tr> | ||
| + | </table> | ||
| + | <br> | ||
| + | |||
| + | [[image:DirectionMap2.png|link=|alt=Direction Map - bypass]]<br> | ||
| + | <span style="text-decoration: underline; font-weight: 700;">Figure 2</span><br> | ||
---- | ---- | ||
| + | <table width=1000> | ||
| + | <tr valign="top"> | ||
| + | <td>In '''Figure 3''' below, the loop line has been blocked by another train. The moving train will attempt to use the loop line but it will be halted and will not attempt to find another path.</td> | ||
| + | </tr> | ||
| + | </table> | ||
| + | <br> | ||
| + | [[image:DirectionMap3.png|link=|alt=Direction Map - blocked]]<br> | ||
| + | <span style="text-decoration: underline; font-weight: 700;">Figure 3</span><br> | ||
| + | ---- | ||
| + | <table width=1000> | ||
| + | <tr valign="top"> | ||
| + | <td>'''Direction Marks can be ignored by the AI'''<br> | ||
| + | In '''Figure 4''' below, the marker has been placed on the loop line and is pointing in the same direction as the moving train. However, the mainline path represents the shorter route for the consist so the "preferred" direction, as indicated by the '''Direction Mark''', is ignored. Placing a '''Direction Mark''' is no guarantee that the path will be followed if more suitable paths are available.</td> | ||
| + | </tr> | ||
| + | </table> | ||
| + | <br> | ||
| + | |||
| + | [[image:DirectionMap4.png|link=|alt=Direction Map - path ignored]]<br> | ||
| + | <span style="text-decoration: underline; font-weight: 700;">Figure 4</span><br> | ||
| + | <br> | ||
| + | ---- | ||
| + | ---- | ||
| + | <br> | ||
| + | <table width=1000> <!-- BEGIN Nav Buttons Table SECTION w SKIPS --> | ||
| + | <tr valign="top"> | ||
| + | <td width=629><span id="bottom"></span> | ||
='''Trainz Wiki'''= | ='''Trainz Wiki'''= | ||
| − | < | + | </td> |
| + | <td width=50> </td> | ||
| + | <td width=50> </td> | ||
| + | <td width=46>[[image:BackToTop.png|link=#top|alt=Top|Top]]</td> | ||
| + | <td width=75>[[image:NextUp.png|link=#stepOperation|alt=Next Up|Next Up]]</td> | ||
| + | <td width=75> </td> | ||
| + | <td width=75> </td> | ||
| + | </tr> | ||
| + | </table> <!-- END Nav Buttons Table --> | ||
| + | <table width=1000> | ||
<tr valign="top"> | <tr valign="top"> | ||
| − | <td>[[ | + | <td> |
| + | <table width=500 cellpadding=2 bgcolor=#ffffff> | ||
| + | <tr valign="top"> | ||
| + | <td width=80>[[image:TrainzWiki.png|link=]]</td> | ||
<td> | <td> | ||
<span style="font-size: 17px;">'''More Tutorials and Guides to Using Trainz'''</span><br> | <span style="font-size: 17px;">'''More Tutorials and Guides to Using Trainz'''</span><br> | ||
| Line 284: | Line 1,108: | ||
</tr> | </tr> | ||
</table> | </table> | ||
| − | + | </td> | |
| + | <td> | ||
| + | <table width=500 cellpadding=4 bgcolor="aquamarine"> | ||
| + | <tr valign="top"> | ||
| + | <td width=50>[[image:LinkWiki.PNG|link=]]</td> | ||
| + | <td> | ||
| + | <span style="font-size: 17px;">'''Related Links'''</span><br> | ||
| + | * '''[[How to Use Track Markers]]''' | ||
| + | * '''[[How to Use Track Priority Markers]]''' | ||
| + | * '''[[How to Use Track Triggers]]''' | ||
| + | </td> | ||
| + | </tr> | ||
| + | </table> | ||
| + | </td> | ||
| + | </tr> | ||
| + | </table> | ||
| + | ---- | ||
| + | This page was created by Trainz user '''<span class="plainlinks">[http://online.ts2009.com/mediaWiki/index.php/User:Pware pware]</span>''' in September 2019 and was last updated as shown below. | ||
| + | ---- | ||
[[Category:How-to guides]] | [[Category:How-to guides]] | ||
Latest revision as of 15:51, 28 November 2023
The information in this Wiki Page applies to TANE, TRS19, Trainz Plus and TRS22.
|
[edit] What are Track Direction Marks? |
|
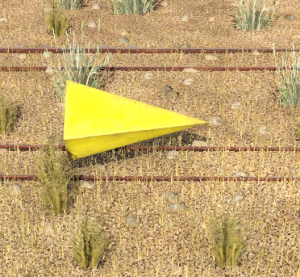 |
[edit] Route or Session? |
| Direction Marks can be placed in a Route Layer or in a Session Layer |
|
 |
Information on Route and Session layers can be found at:- |
[edit] Adding a Track Direction Mark |
|
[edit] In Surveyor Classic (S10) |
[edit] Adding a Direction Mark (S10)
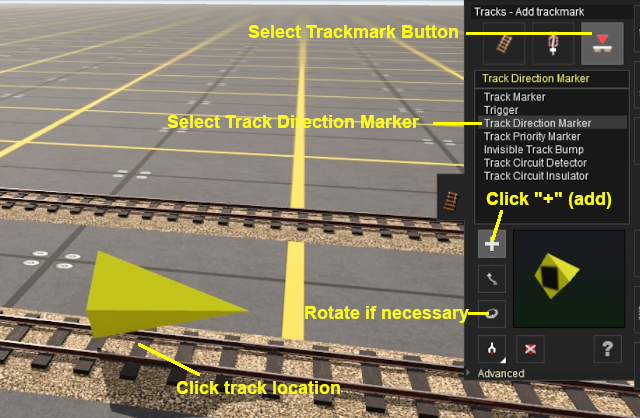 |
|
|||||||||||||||||
|
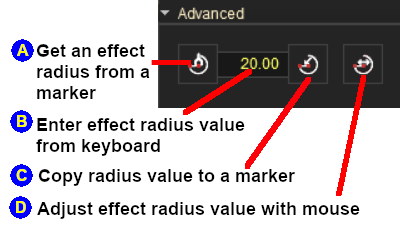
[edit] Set its Effect Radius (S10)
At the bottom of the Track Tools flyout menu is an Advanced button. Left Click this button to open the advanced tools.
The Effect Radius sets the size of green "effect wings" attached to both ends of the marker.
|
 |
|
|||||||||||||||||||||||||||||||||||||||
|
[edit] In Surveyor 2.0 (S20) |
Surveyor 2.0 is currently only available in Trainz Plus and TRS22 Platinum.
[edit] Adding a Direction Mark (S20)
In the Asset Palette either:-
|
OR |
|
|
|||||||||||||||||||||
|
||||||||
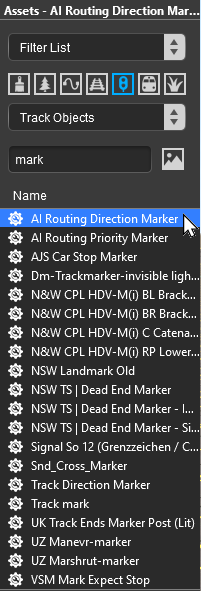
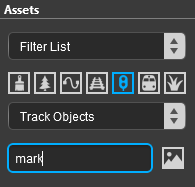
To narrow down the filter list, type "mark" (UPPER/lower case does not matter) in the Search Text Box
 |
|
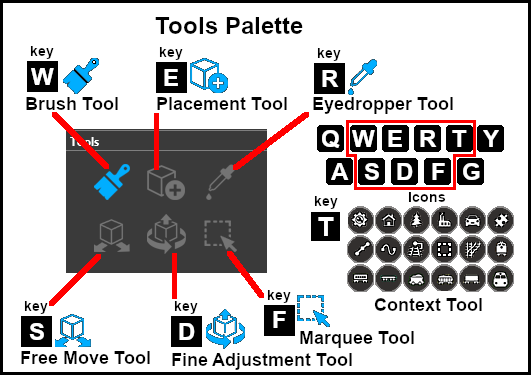
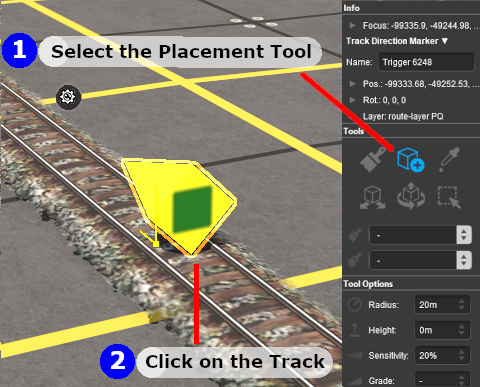
Place the Direction Mark on the track.
|
||||||||||
 |
|
|||||||||||||||||||||
[edit] Set the Marker Direction (S20)
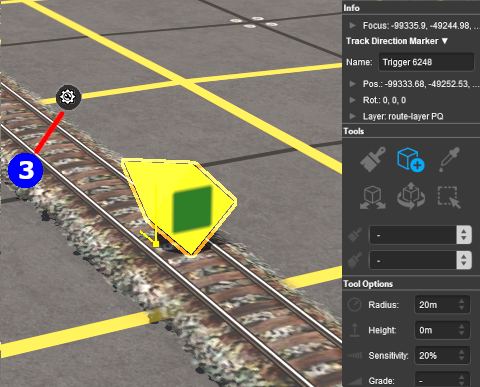
The direction that the marker points is its ONLY important property.
 |
|
|||||
[edit] Change its Name (S20)
The name of the marker is only useful for finding it in the route. It is not needed for any operational purpose.
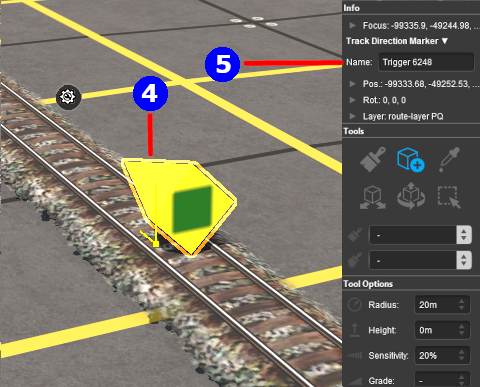 |
|
|||||||
[edit] Set its Effect Radius (S20)
| The Effect Radius sets the size of green "effect wings" attached to both ends of the marker. It has no effect on its operation but allows you to keep its "visibility" clear of other track objects such as junctions and other markers. |
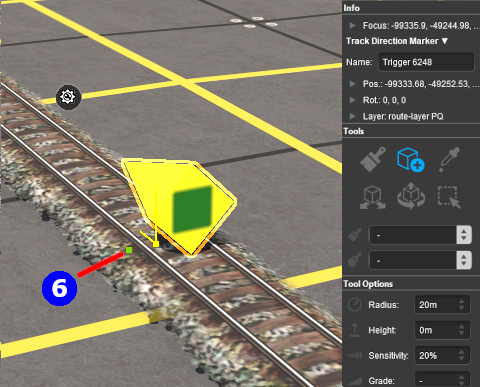 |
|
|||||
[edit] Move the Direction Mark Along the Track (S20)
Direction Marks can be moved along the track or to other tracks.
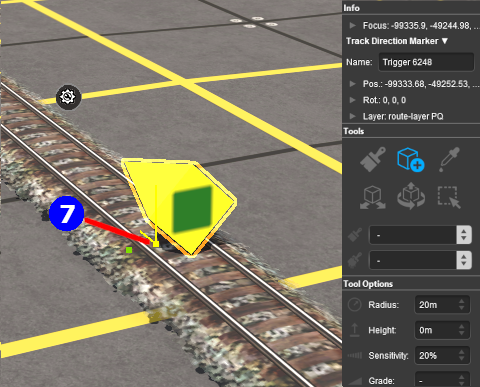 |
|
|||||
[edit] Move the Direction Mark Vertically (S20)
| Direction Marks can be physically placed above (or below) the track. This feature allows them to be placed, for example, above the track so that they will not be hidden in Surveyor if a consist is parked on a marker. |
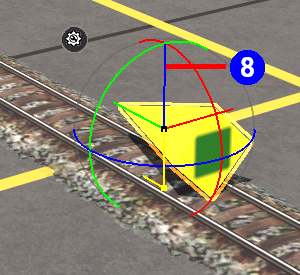 |
|
|||||||||||||||||||
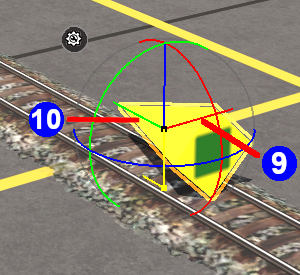
[edit] Move the Direction Mark Horizontally (S20)
| Direction Marks can be physically placed left or right alongside the track. This feature allows them to be placed, for example, beside the track so that they will not be hidden in Surveyor if a consist is parked on a marker. |
 |
|
|||||||||||||||||||||
|
[edit] Assign a Direction Mark to Another Layer (S20)
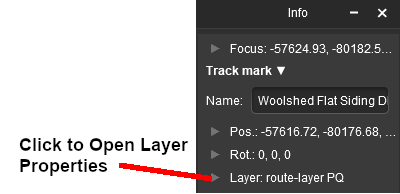
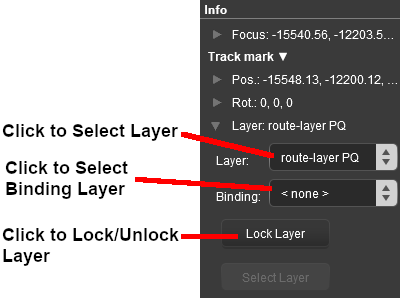
| The Info Palette will show the layer assigned to the currently selected object. To the left of the layer name is a small arrowhead object. | |||||||||||||||||||||||
  |
|
||||||||||||||||||||||
[edit] Direction Mark Operation |
| Track Direction Marks only work on AI controlled trains. They have no effect on manually controlled trains | |
| If the set path is blocked, then the AI will NOT attempt to find another path | |
| A set path will be ignored if a shorter path is available |
| Consider the situation represented in the diagrams below. An AI controlled train is moving left to right towards a junction and a loop line. A Direction Mark (yellow triangle) has been set on the main line which only allows AI trains traveling right-to-left to pass along that section of track. |
| In Figure 1 below, The train approaches the junction at the start of the one way section. |

Figure 1
| In Figure 2 below, the train has been forced to take the loop line to avoid the section controlled by the Direction Mark. |

Figure 2
| In Figure 3 below, the loop line has been blocked by another train. The moving train will attempt to use the loop line but it will be halted and will not attempt to find another path. |

Figure 3
| Direction Marks can be ignored by the AI In Figure 4 below, the marker has been placed on the loop line and is pointing in the same direction as the moving train. However, the mainline path represents the shorter route for the consist so the "preferred" direction, as indicated by the Direction Mark, is ignored. Placing a Direction Mark is no guarantee that the path will be followed if more suitable paths are available. |

Figure 4
[edit] Trainz Wiki |
|
|
This page was created by Trainz user pware in September 2019 and was last updated as shown below.
