How to Use Track Direction Markers
m |
m |
||
| Line 76: | Line 76: | ||
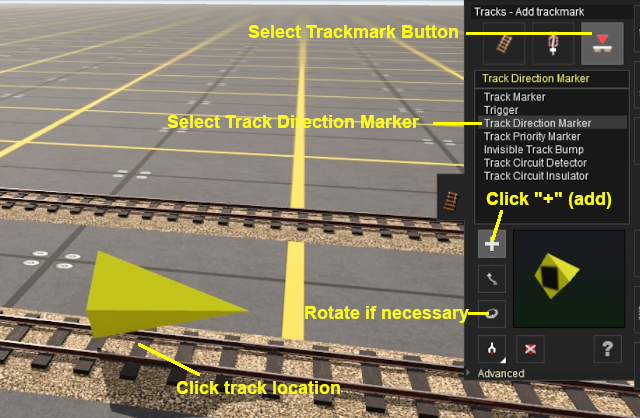
# Select the '''Track Direction Marker''' | # Select the '''Track Direction Marker''' | ||
# Select the '''+''' (add) button - it may already be selected | # Select the '''+''' (add) button - it may already be selected | ||
| − | # | + | # '''Left''' click on the track location where the direction marker is to be placed |
# If it is not facing the correct direction, rotate the marker to point in the opposite direction | # If it is not facing the correct direction, rotate the marker to point in the opposite direction | ||
</td> | </td> | ||
| Line 99: | Line 99: | ||
<table border=1> | <table border=1> | ||
<tr valign="top"> | <tr valign="top"> | ||
| − | <td width=250 align="center">[[image:Ablue.png|link=]] '''Left''' | + | <td width=250 align="center">[[image:Ablue.png|link=]] '''Left''' click the '''Track Mesh Filter''' icon<br> |
[[image:TrackMeshFilter.png|link=|alt=Track mesh]] | [[image:TrackMeshFilter.png|link=|alt=Track mesh]] | ||
</td> | </td> | ||
| Line 109: | Line 109: | ||
<table border=1> | <table border=1> | ||
<tr valign="top"> | <tr valign="top"> | ||
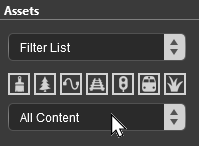
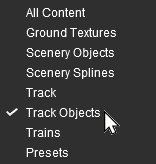
| − | <td align="center">[[image:Bblue.png|link=]] '''Left''' | + | <td align="center">[[image:Bblue.png|link=]] '''Left''' click the '''Content Drop-down Box'''<br> |
[[image:FilterSelect.png|link=|alt=Filter List]]<br> | [[image:FilterSelect.png|link=|alt=Filter List]]<br> | ||
Then select '''Track Objects'''<br> | Then select '''Track Objects'''<br> | ||
| Line 124: | Line 124: | ||
<tr valign="top"> | <tr valign="top"> | ||
<td>[[image:PencilTips.PNG|link=]] <span style="font-size: 15px; font-weight: 700; color: white; background-color: blue;"> Shortcut </span><br> | <td>[[image:PencilTips.PNG|link=]] <span style="font-size: 15px; font-weight: 700; color: white; background-color: blue;"> Shortcut </span><br> | ||
| − | If you already have a '''Direction Marker''' in your route then select the '''Eyedropper Tool''' in the '''Tools Palette''' (or press the <span style="font-weight: 700; font-size: 17px; color: white; background-color: black;"> R </span> key) | + | If you already have a '''Direction Marker''' in your route then:- |
| + | # select the '''Eyedropper Tool''' in the '''Tools Palette''' (or press the <span style="font-weight: 700; font-size: 17px; color: white; background-color: black;"> R </span> key) | ||
| + | # '''Left''' click on the existing '''Track Mark''' object | ||
| + | This will instantly select the '''Direction Marker''' in the filter list.<br> | ||
| − | + | Jump straight down to '''Step [[image:DotPoint5.JPG|link=]] below'''.</td> | |
</tr> | </tr> | ||
</table> | </table> | ||
| Line 185: | Line 188: | ||
---- | ---- | ||
To delete a '''Direction Marker''' (or any asset):- | To delete a '''Direction Marker''' (or any asset):- | ||
| − | # select the '''Free Move Tool''' (or press <span style="font-weight: 700; font-size: 17px; color: white; background-color: black;"> S </span>) or | + | # select either the:- |
| − | # '''Left''' | + | #* '''Free Move Tool''' (or press <span style="font-weight: 700; font-size: 17px; color: white; background-color: black;"> S </span>) or |
| + | #* '''Fine Adjustment Tool''' (or press <span style="font-weight: 700; font-size: 17px; color: white; background-color: black;"> D </span>) | ||
| + | # '''Left''' click on the '''Track Mark''' | ||
# press the <span style="font-weight: 700; font-size: 17px; color: white; background-color: black;"> Delete </span> key | # press the <span style="font-weight: 700; font-size: 17px; color: white; background-color: black;"> Delete </span> key | ||
</td> | </td> | ||
| Line 205: | Line 210: | ||
<td><span style="font-size: 17px; font-weight: 700;">Steps:</span><br> | <td><span style="font-size: 17px; font-weight: 700;">Steps:</span><br> | ||
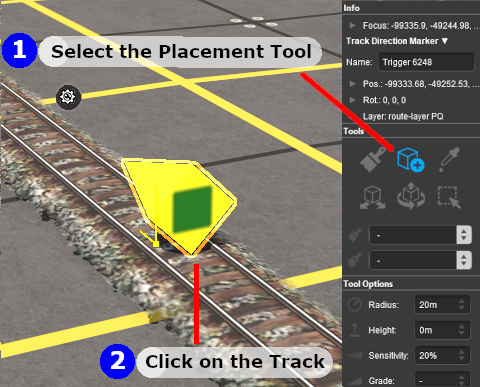
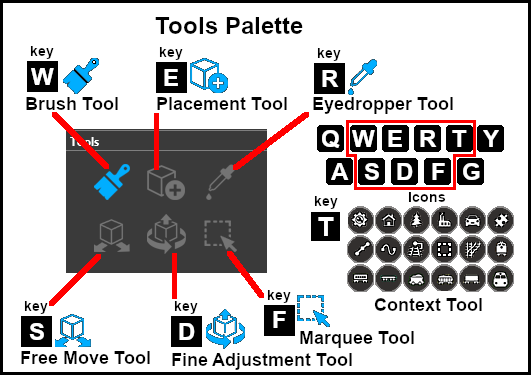
# Select the '''Placement Tool''' (or press the <span style="font-weight: 700; font-size: 17px; color: white; background-color: black;"> E </span> key) from the '''Tools Palette''' | # Select the '''Placement Tool''' (or press the <span style="font-weight: 700; font-size: 17px; color: white; background-color: black;"> E </span> key) from the '''Tools Palette''' | ||
| − | # '''Left''' | + | # '''Left''' click on the track at the position where you want to place the '''Direction Marker''' |
<br> | <br> | ||
The '''Direction Marker''' can be easily moved if needed - see below. | The '''Direction Marker''' can be easily moved if needed - see below. | ||
| Line 249: | Line 254: | ||
<td>[[image:Steps.PNG|link=]]</td> | <td>[[image:Steps.PNG|link=]]</td> | ||
<td><span style="font-size: 17px; font-weight: 700;">Steps:</span><br> | <td><span style="font-size: 17px; font-weight: 700;">Steps:</span><br> | ||
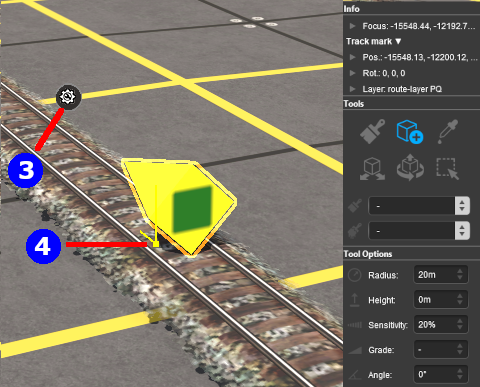
| − | # '''Left''' | + | # '''Left''' click on the '''Context Tool''' ([[image:DotPoint1Blue.png|link=]] in the image on the left or press the <span style="font-weight: 700; font-size: 17px; color: white; background-color: black;"> T </span> key) to open up the object property and control menu |
| − | # '''Left''' | + | # '''Left''' click on '''Edit Properties''' |
# Enter a name for the '''Direction Marker''' | # Enter a name for the '''Direction Marker''' | ||
</td> | </td> | ||
| Line 271: | Line 276: | ||
<td>[[image:Steps.PNG|link=]]</td> | <td>[[image:Steps.PNG|link=]]</td> | ||
<td><span style="font-size: 17px; font-weight: 700;">Steps:</span><br> | <td><span style="font-size: 17px; font-weight: 700;">Steps:</span><br> | ||
| − | # '''Left''' | + | # '''Left''' click and hold down the mouse button on the '''Yellow Dot''' next to the '''Direction Marker''' ([[image:DotPoint2Blue.png|link=]] in the image above) |
# While holding down the '''Left''' mouse button, move the mouse '''Forward''' or '''Backward''' to drag the '''Direction Marker''' along the track | # While holding down the '''Left''' mouse button, move the mouse '''Forward''' or '''Backward''' to drag the '''Direction Marker''' along the track | ||
</td> | </td> | ||
Revision as of 15:14, 22 December 2022
The information in this Wiki Page applies to TANE, TRS19, Trainz Plus and TRS22.
Contents |
What are Track Direction Markers?
| In Summary: | |
| Track Direction Markers are yellow coloured track markers that are invisible in Driver Mode but visible in Surveyor Mode. They are used as "One Way" signs to force trains under AI control to travel in a specific direction through the track section where they are placed | |
| Track Direction Markers only work on AI controlled trains. They have no effect on manually controlled trains | |
| Track direction markers are NOT a substitute for Driver Commands or Interlocking Towers | |
Adding a Track Direction Marker
|
In Surveyor Classic (S10)
 |
|
||||||
In Surveyor 2.0 (S20)
Adding a Direction Marker
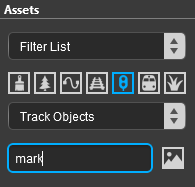
![]() In the Asset Palette either:-
In the Asset Palette either:-
|
OR |
|
|
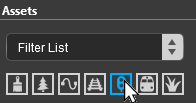
![]() To narrow down the filter list, type "mark" (UPPER/lower case does not matter) in the Search Text Box
To narrow down the filter list, type "mark" (UPPER/lower case does not matter) in the Search Text Box
 |
|

![]() Place the Direction Marker on the track.
Place the Direction Marker on the track.
|
|
|||||||||
Set the Direction Marker Properties
 |
The direction the marker points is its ONLY important property.
|
||||||||||||
![]() Move the Direction Marker Along the Track
Move the Direction Marker Along the Track
|
|
|
 |
Steps:
|
|
|
|
Direction Marker Operation
| Main Points: | |
| Track Direction Markers only work on AI controlled trains. They have no effect on manually controlled trains | |
| If the set path is blocked, then the AI will NOT attempt to find another path | |
| A set path will be ignored if a shorter path is available | |
Consider the situation represented in the diagrams below. An AI controlled train is moving left to right towards a junction and a loop line. A Track Direction Marker (yellow triangle) has been set on the main line which only allows AI trains traveling right-to-left to pass along that section of track.
In Figure 1 below, The train approaches the junction at the start of the one way section.

Figure 1
In Figure 2 below, the train has been forced to take the loop line to avoid the section controlled by the direction marker.

Figure 2
In Figure 3 below, the loop line has been blocked by another train. The moving train will attempt to use the loop line but it will be halted and will not attempt to find another path.

Figure 3
Direction Markers can be ignored by the AI
In Figure 4 below, the marker has been placed on the loop line and is pointing in the same direction as the moving train. However, the mainline path represents the shorter route for the consist so the "preferred" direction, as indicated by the direction marker, is ignored. Placing a direction marker is no guarantee that the path will be followed if more suitable paths are available.

Figure 4
Related Links
 |
Trainz Wiki
 |
More Tutorials and Guides to Using Trainz |