How to Use Track Direction Markers
m (→Related Links) |
m |
||
| (4 intermediate revisions by one user not shown) | |||
| Line 1: | Line 1: | ||
| − | The information in this Wiki Page applies to | + | The information in this Wiki Page applies to '''TANE''', '''TRS19''' and '''Trainz Plus'''. |
__TOC__ | __TOC__ | ||
| Line 18: | Line 18: | ||
<td>[[file:DotPoint.JPG|link=]]</td> | <td>[[file:DotPoint.JPG|link=]]</td> | ||
<td>Track direction markers are '''NOT''' a substitute for '''Driver Commands''' or '''Interlocking Towers'''</td> | <td>Track direction markers are '''NOT''' a substitute for '''Driver Commands''' or '''Interlocking Towers'''</td> | ||
| + | </tr> | ||
| + | </table> | ||
| + | <br> | ||
| + | <table width="100%"> | ||
| + | <tr valign="top"> | ||
| + | <td align="right">[[file:BackToTop.png|link=#top|alt=Top|Top]]</td> | ||
</tr> | </tr> | ||
</table> | </table> | ||
| Line 59: | Line 65: | ||
</table> | </table> | ||
<br> | <br> | ||
| + | <table width="100%"> | ||
| + | <tr valign="top"> | ||
| + | <td align="right">[[file:BackToTop.png|link=#top|alt=Top|Top]]</td> | ||
| + | </tr> | ||
| + | </table> | ||
='''Direction Marker Operation'''= | ='''Direction Marker Operation'''= | ||
| Line 92: | Line 103: | ||
[[file:DirectionMap3.png|link=|alt=Direction Map - blocked]]<br> | [[file:DirectionMap3.png|link=|alt=Direction Map - blocked]]<br> | ||
<span style="text-decoration: underline; font-weight: 700;">Figure 3</span><br> | <span style="text-decoration: underline; font-weight: 700;">Figure 3</span><br> | ||
| + | <br> | ||
| + | <table width="100%"> | ||
| + | <tr valign="top"> | ||
| + | <td align="right">[[file:BackToTop.png|link=#top|alt=Top|Top]]</td> | ||
| + | </tr> | ||
| + | </table> | ||
='''Related Links'''= | ='''Related Links'''= | ||
| Line 105: | Line 122: | ||
</tr> | </tr> | ||
</table> | </table> | ||
| − | + | <br> | |
| + | <table width="100%"> | ||
| + | <tr valign="top"> | ||
| + | <td align="right">[[file:BackToTop.png|link=#top|alt=Top|Top]]</td> | ||
| + | </tr> | ||
| + | </table> | ||
---- | ---- | ||
---- | ---- | ||
| − | |||
='''Trainz Wiki'''= | ='''Trainz Wiki'''= | ||
Revision as of 11:31, 27 November 2019
The information in this Wiki Page applies to TANE, TRS19 and Trainz Plus.
Contents |
What are Track Direction Markers?
| In Summary: | |
| Track Direction Markers are yellow coloured track markers that are invisible in Driver Mode but visible in Surveyor Mode. They are used as "One Way" signs to force trains under AI control to travel in a specific direction through the track section where they are placed | |
| Track Direction Markers only work on AI controlled trains. They have no effect on manually controlled trains | |
| Track direction markers are NOT a substitute for Driver Commands or Interlocking Towers | |
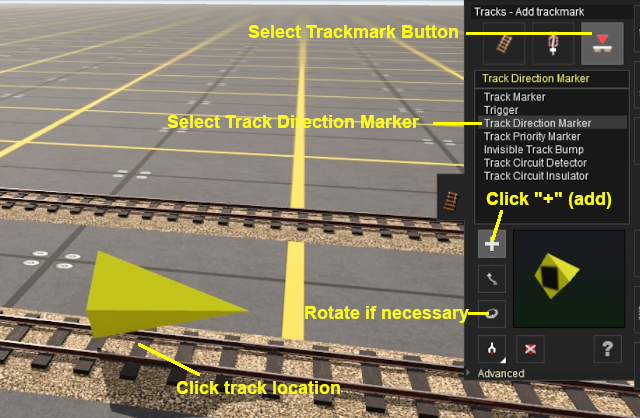
Adding a Track Direction Marker
| Notes: A Track Direction Marker has no properties other than the direction it is pointing. This is the direction that all AI controlled trains will be forced to take. |
 |
|
||||||

Direction Marker Operation
| Main Points: | |
| Track Direction Markers only work on AI controlled trains. They have no effect on manually controlled trains | |
| If the set path is blocked, then the AI will NOT attempt to find another path | |
Consider the situation represented in the diagrams below. An AI controlled train is moving left to right towards a junction and a loop line. A Track Direction Marker (yellow triangle) has been set on the main line which only allows AI trains traveling right-to-left to pass along that section of track.
In Figure 1 below, The train approaches the junction at the start of the one way section.

Figure 1
In Figure 2 below, the train has been forced to take the loop line to avoid the section controlled by the direction marker.

Figure 2
In Figure 3 below, the loop line has been blocked by another train. The moving train will attempt to use the loop line but it will be halted and will not attempt to find another path.

Figure 3
Related Links
 |
Trainz Wiki
 |
More Tutorials and Guides to Using Trainz |