How to Use S20 Tools
m (→The Brush Tool) |
(→Narrowing the Search) |
||
| Line 884: | Line 884: | ||
Sometimes (or often) a scene will be too crowded with different scenery assets to be able to use the '''Eyedropper Tool''' to easily select a single object. In these cases additional options are available to help "remove the clutter".<br> | Sometimes (or often) a scene will be too crowded with different scenery assets to be able to use the '''Eyedropper Tool''' to easily select a single object. In these cases additional options are available to help "remove the clutter".<br> | ||
| + | |||
| + | At the top of the '''Assets Palette''' is a drop down box which controls how the '''Eyedropper Tool''' works with the filters that you set.<br> | ||
| + | |||
| + | [[image:AssetsPalette_S20.png|link=|alt=Assets palette]]<br> | ||
| + | |||
| + | The drp down box will privide three options:-<br> | ||
| + | |||
| + | <table width=350> | ||
| + | <tr valign="top"> | ||
| + | <td width=150> | ||
| + | *'''Filter List''' | ||
| + | *'''Filter Selection''' | ||
| + | *'''Filter Visibility''' | ||
| + | </td> | ||
| + | <td width=200>[[image:AssetsPaletteFilterOptions_S20.png|link=]]</td> | ||
| + | </tr> | ||
| + | </table> | ||
| + | <br> | ||
| + | These three options work with the '''Asset Filters''' to help narrow the search for a specific asset or type of asset.<br> | ||
| + | |||
| + | <table width=900 bgcolor=#000000> | ||
| + | <tr valign="top"> | ||
| + | <td> | ||
| + | <table width=896 bgcolor=#ffffff> | ||
| + | <tr valign="top"> | ||
| + | <td width=120><span style="font-weight: 700; font-size: 15ps; color: white; background-color: black;"> Filter List </span></td> | ||
| + | <td>this option will have no effect on the operation of the '''Eyedropper Tool''' or on the assets displayed on the screen. It is the default setting and any selections made with the eyedropper will be shown in the '''Assets Palette''' as described in the section '''Quick Steps''' above.</td> | ||
| + | </tr> | ||
| + | <tr valign="top"> | ||
| + | <td><span style="font-weight: 700; font-size: 15ps; color: white; background-color: black;"> Filter Selection </span></td> | ||
| + | <td>this option will restrict the '''Eyedropper Tool''' to only working on those assets that are in the filtered list. Assets that are not in the filtered list cannot be selected and will not have their details (name, <kuid>, author) displayed on the screen. </td> | ||
| + | </tr> | ||
| + | <tr valign="top"> | ||
| + | <td><span style="font-weight: 700; font-size: 15ps; color: white; background-color: black;"> Filter Visibility </span></td> | ||
| + | <td>this option will '''hide''' all assets that are not in the filtered list. The only exceptions are '''Ground Textures''' and '''Effect layers''' which will be visible but, unless they are also in the filtered list, cannot be selected.</td> | ||
| + | </tr> | ||
| + | </table> | ||
| + | </td> | ||
| + | </tr> | ||
| + | </table> | ||
| + | |||
<table> <!-- BEGIN Nav Buttons Table --> | <table> <!-- BEGIN Nav Buttons Table --> | ||
Revision as of 20:23, 8 January 2023
The information in this Wiki Page applies to Surveyor 2.0 (S20) as found in Trainz Plus.
This document is under development
|
|
|||||||||
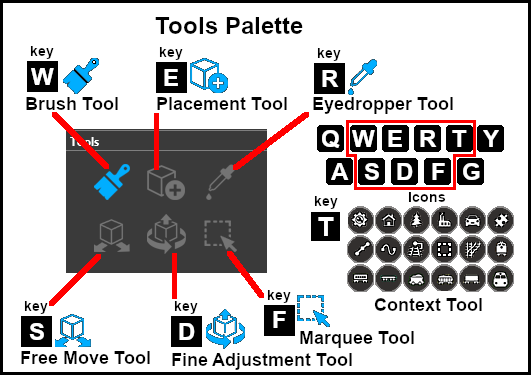
The Tools Palette
 |
|
|||||||||||||||||
The Brush Tool
The Brush Tool is used for painting the route. It can:-
When selected, the Brush Tool will show two drop down menu lists. |
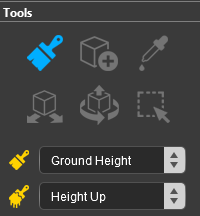 |
| The first drop down menu will set the Brush Target, the type of brush. The Targets are:- |
|||||
|
 |
|
|||
Ground Height
This brush tool uses the Tools Options Palette. If this palette is not visible on the screen then refer to Notes: Palettes at the top of this document.
| When the Ground Height Target is selected, the second drop down box will give a choice of several Ground Height tools. The choices are:- |
|
|
 |
| The available brush tool options are shown in the Tools Options Palette with a Gold coloured icon next to their names. Those options that have their icon greyed out will be ignored, but they can still be edited. | ||||||||||||||||||||||||||||||||||||
Height Up/Height Down 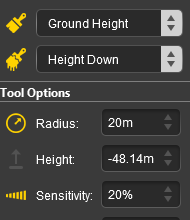 |
Set Height 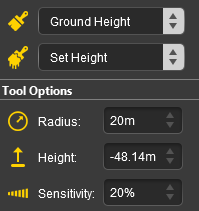 |
Grade  |
|
|||||||||||||||||||||||||||||||||
|
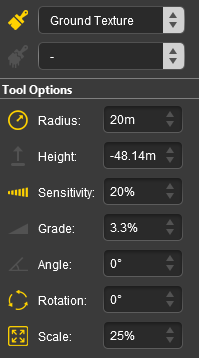
Ground Texture
This brush tool uses the Tools Options Palette. If this palette is not visible on the screen then refer to Notes: Palettes at the top of this document.
When the Ground Texture Target is selected, the second drop down box will be disabled - there are no brush texture tool choices.
The available brush tool options are shown in the Tools Options Palette with a Gold coloured icon next to their names. Those options that have their icon greyed out will be ignored, but they can still be edited.
 |
|
||||||||||||||||||||||||||||
|
Scrapbook Data
This brush tool uses both the Tools Options Palette and the Scrapbook Palette. If these palettes are not visible on the screen then refer to Notes: Palettes at the top of this document.
| The Scrapbook Brush When the Scrapbook Data Target is selected, the second drop down box will give a choice of two Scrapbook Data tools. |
|
|
|
|
| The available brush tool options are shown in the Tools Options Palette with a Gold coloured icon next to their names. Those options that have their icon greyed out will be ignored, but they can still be edited. | |||||||||||||||||||||||||||||||
Scrapbook Brush 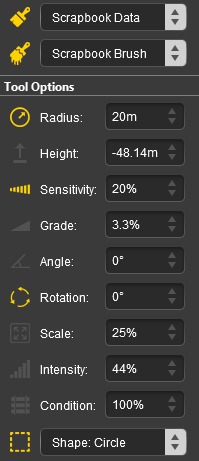 |
Scrapbook Clone 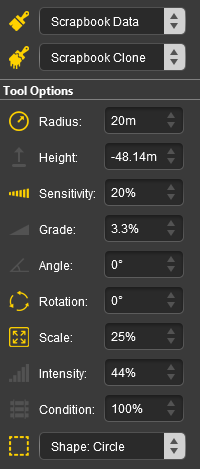 |
|
|||||||||||||||||||||||||||||
|
The Scrapbook Palette 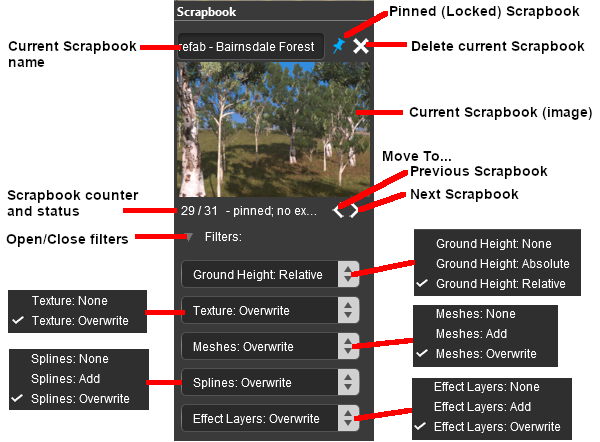 |
|
|||||||||||||||||||||||||||||||||||||||||||
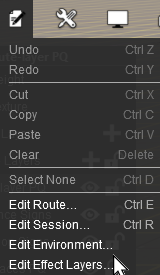
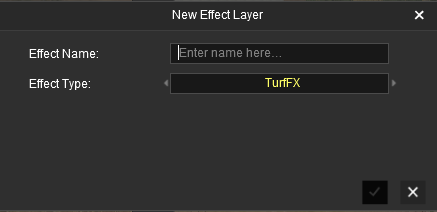
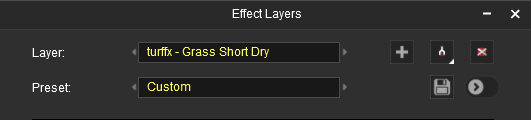
Edit Effect Layers...
When this Target is selected, the Edit Effect Layers options will appear. This is the same as selecting Edit Effect Layers ... from the Trainz Edit Menu.
 |
 |
 |
 |
More information on creating and editing Effect Layers can be found on the Trainz Wiki at:- |
The Placement Tool
| Keyboard Shortcut: E |
The Placement Tool is used to add assets to the route.
This tool uses the Assets Palette. If this palette is not visible on the screen then refer to Notes: Palettes at the top of this document.
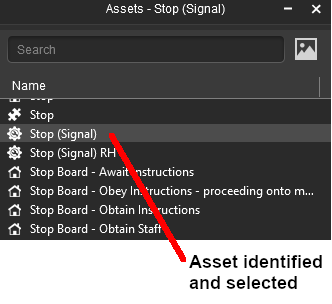
The first step is to identify and select the particular asset that you want to add to the route.
![]() In the Asset Palette either:-
In the Asset Palette either:-
|
OR |
|
|
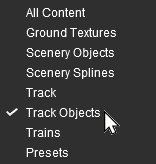
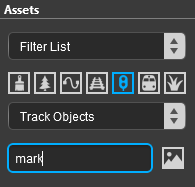
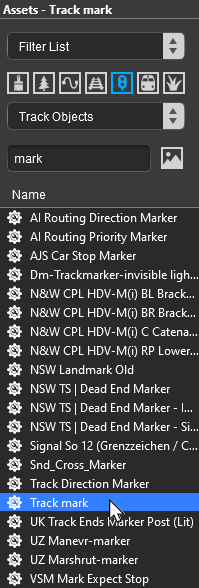
![]() To narrow down the filter list type part of the asset name into the Search Text Box. For example if you have selected Track Objects and want to find "Trackmarks", then type "mark" (UPPER/lower case does not matter).
To narrow down the filter list type part of the asset name into the Search Text Box. For example if you have selected Track Objects and want to find "Trackmarks", then type "mark" (UPPER/lower case does not matter).
 |
|
|
|
|
The Eyedropper Tool
| Keyboard Shortcut: R |
The Eyedropper Tool is used to identify objects that are in the route. The objects can be textures, effect layers, scenery, rolling stock, track. track equipment, and splines.
This tool uses the Assets Palette. If this palette is not visible on the screen then refer to Notes: Palettes at the top of this document.
Quick Steps
With the Eyedropper Tool selected, move the mouse pointer (which will now be an eyedropper symbol) onto any object in view.
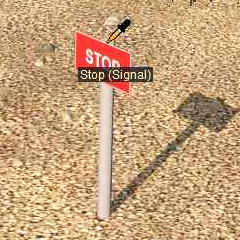 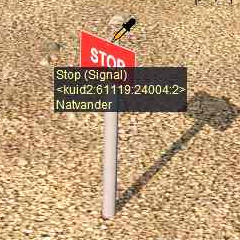 |
The object will be identified by its asset name appearing in a ToolTip below the mouse pointer (image shown left).
|
Narrowing the Search
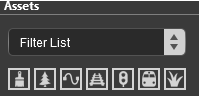
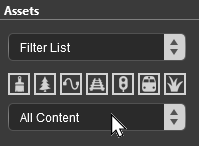
Sometimes (or often) a scene will be too crowded with different scenery assets to be able to use the Eyedropper Tool to easily select a single object. In these cases additional options are available to help "remove the clutter".
At the top of the Assets Palette is a drop down box which controls how the Eyedropper Tool works with the filters that you set.
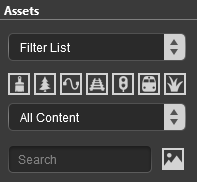
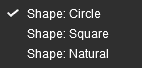
The drp down box will privide three options:-
|
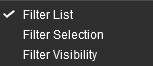 |
These three options work with the Asset Filters to help narrow the search for a specific asset or type of asset.
|
The Free Move Tool
| Keyboard Shortcut: S |
The Free Move Tool is used to move objects in the route.
The Fine Adjustment Tool
| Keyboard Shortcut: D |
The Fine Adjustment Tool is used to make fine adjustments (XYZ axis, rotation, tilt) to objects in the route.
The Marquee Tool
| Keyboard Shortcut: F |
The Marquee Tool is used to select areas of the route.
Trainz Wiki
 |
More Tutorials and Guides to Using Trainz |
This page was created by Trainz user pware in January 2023 and was last updated as shown below.