|
|
| Line 590: |
Line 590: |
| | ===<span style="color: white; background-color: blue;"> Edit Effect Layers... </span>=== | | ===<span style="color: white; background-color: blue;"> Edit Effect Layers... </span>=== |
| | | | |
| | + | When this '''Target''' is selected, the '''Edit Effect Layers''' options will appear. This is the same as selecting '''Edit Effect Layers ...''' from the '''Trainz Edit Menu'''. |
| | + | |
| | + | <table> |
| | + | <tr valign="top"> |
| | + | <td>[[image:EditMenuSelectEffectLayers.png|link=|alt=Open effect layers]]</td> |
| | + | <td> |
| | + | * If no Effect Layers are present then you can create a new one<br> |
| | + | [[image:NewEffectLayerEntry.png|link=|alt=New effect layer]]</td> |
| | + | <td> |
| | + | * If Effect Layers are present then select one to edit<br> |
| | + | [[image:EditEffectLayersMenu.png|link=|alt=Edit effect alyers]]</td> |
| | + | </tr> |
| | + | </table> |
| | + | <br> |
| | | | |
| | =='''The Placement Tool'''== | | =='''The Placement Tool'''== |
Revision as of 22:49, 7 January 2023
The information in this Wiki Page applies to Surveyor 2.0 (S20) as found in Trainz Plus.
This document is under development
|
|
| In Summary: |
 |
|
|
|
|
|
|
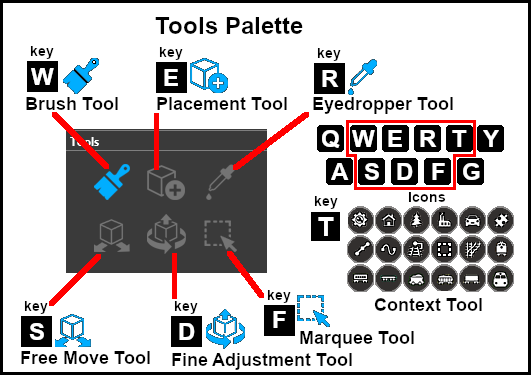
The Tools Palette
The Brush Tool
 |
Keyboard Shortcut: W |
The Brush Tool is used for painting the route. It can:-
- adjust the height of the terrain
- add ground textures
- add Effect Layers
- add Scrapbook scenes
When selected, the Brush Tool will show two drop down menu lists.
|
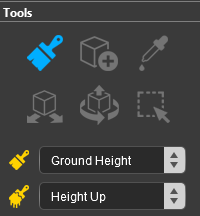 |
The first drop down menu will set the Brush Target, the type of brush.
The Targets are:- |
- Ground Height
- Ground Texture
- Scrapbook Data
- <Effect Layers>
- Edit Effect Layers
|
 |
 |
If you have any Effect Layers then they will appear as Targets in this drop down list. Select an Effect Layer to use the brush to paint with that effect. |
|
|
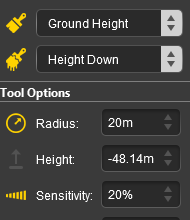
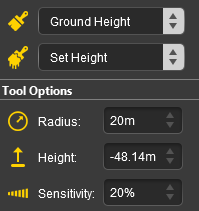
Ground Height
When this Target is selected, the second drop down box will give a choice of several Ground Height tools.
The choices are:- |
- Height Up
- Height Down
- Set Height
- Grade
|
 |
The different control options available with this brush tool are shown in the Tools Options Palette. If this palette is not visible on the screen then refer to Notes: Palettes at the top of this document.
The available brush tool options are shown in the Tools Options Palette with a Gold coloured icon next to their names. Those options that have their icon greyed out will be ignored, but they can still be edited. |
Height Up/Height Down
 |
Set Height
 |
Grade
 |
| Radius |
the brush radius (metres) - see Notes: below |
|
|
| Height |
the brush height (metres) |
|
|
| Sensitivity |
the rate at which the height changes |
| Range: |
1% (very slowly) to 100% (very fast) |
|
| Grade |
slope gradient - see Notes: below |
| Range: |
0% = flat ("Plateau" in Classic) to |
| |
±100% = steep (but not vertical) |
|
| Angle |
grade direction (compass degrees) |
| Range: |
0° (North) to ±359°
a negative value reverses the grade |
|
|
|
|
Notes:
|
|
Unlike Surveyor Classic, there appears to be no upper limit to the brush Radius . Brushes of hundreds of metres (even kilometres) in size are possible. However, if you are using the brush to set an entire baseboard, or many baseboards, to a specific height then the Marquee Tool may be a better choice. |
|
The Grade may cause some confusion. It is defined as height (vertical) over distance (horizontal) converted to a percentage figure. So a grade of 100% (the maximum allowed) would mean a slope formed by the height and distance both being the same value (e.g. a height increase of 50m over a distance of 50m). A vertical slope (a cliff) would have an infinite grade which is currently impossible in Surveyor. |
|
Ground Texture
When this Target is selected, the second drop down box will be disabled - there are no brush texture tool choices. The different control options available with this brush tool are shown in the Tools Options Palette. If this palette is not visible on the screen then refer to Notes: Palettes at the top of this document.
The available brush tool options are shown in the Tools Options Palette with a Gold coloured icon next to their names. Those options that have their icon greyed out will be ignored, but they can still be edited.
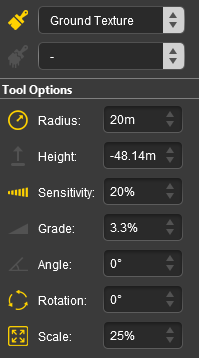 |
| Radius |
the brush radius (metres) - see Notes: below |
|
|
| Sensitivity |
texture transparency |
| Range: |
1% = almost transparent to |
| |
100% = solid (opaque) |
|
| Rotation |
initial rotation angle - see Notes: below |
| Range: |
0° to ±360° (larger angles can be entered) |
|
| Scale |
the texture pattern size (scale) |
| Range: |
0.01% = smallest to 100% = full size |
|
|
|
|
|
Notes:
|
|
Unlike Surveyor Classic, there appears to be no upper limit to the brush Radius . Brushes of hundreds of metres (even kilometres) in size are possible. If you are using the brush to paint an entire baseboard, or many baseboards, then the Marquee Tool will be quicker but it will not give the options of changing the scale and rotation. |
|
The Rotation controls the starting angle for the texture when painting and is often used to avoid pattern repetition. As in Surveyor Classic, holding down the [ or ] keys while painting will continuously change the angle.
 |
Warning: Changing the rotation angle during painting is not recommended for PBR Textures as this will significantly increase the memory useage (each rotation will load in another copy of the PBR texture). |
|
|
Scrapbook Data
When this Target is selected, the second drop down box will give a choice of two Scrapbook Data tools.
The choices are:- |
- Scrapbook Clone
- Scrapbook Brush
|
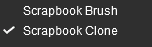 |
The different control options available with this brush tool are shown in the Tools Options Palette. This brush tool also uses the Scrapbook Palette. If both of these palettes are not visible on the screen then refer to Notes: Palettes at the top of this document.
The available brush tool options are shown in the Tools Options Palette with a Gold coloured icon next to their names. Those options that have their icon greyed out will be ignored, but they can still be edited. |
Scrapbook Clone
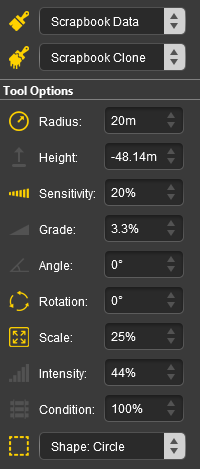 |
Scrapbook Brush
 |
| Radius |
the brush radius (metres) - see Notes: below |
|
|
| Rotation |
initial rotation angle (degrees) - see Notes: below |
| Range: |
0° to ±360° (larger angles can be entered) |
|
| Scale |
the texture pattern size (scale) |
| Range: |
0.01% = smallest to 100% = full size |
|
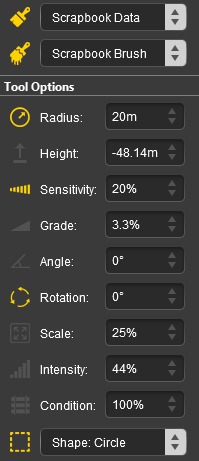
| Shape |
brush shape |
| Options: |
 |
|
|
|
|
Notes:
|
|
Unlike Surveyor Classic, there appears to be no upper limit to the brush Radius . Brushes of hundreds of metres (even kilometres) in size are possible. |
|
The Rotation controls the starting angle for pasting the scrapbook objects. In Surveyor Classic you could only rotate and paste in 90° increments. In S20 you can rotate and paste at any angle. |
|
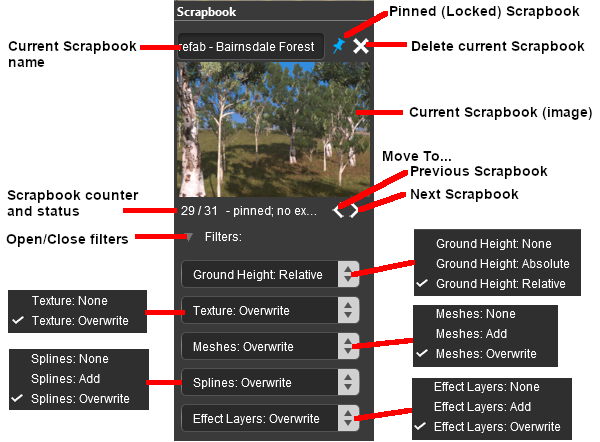
The Scrapbook Palette
 |
|
Scrapbook Pasting Options |
| What Features to Paste |
| |
Ground Height |
terrain height(s) used in the scrapbook |
| |
Texture |
textures used in the scrapbook |
| |
Meshes |
scenery assets (e.g. trees, buildings) used in the scrapbook |
| |
Splines |
spline assets used in the scrapbook |
| |
Effect Layers |
effect layers (TurfFX, Clutter) used in the scrapbook |
| How to Paste Each Feature |
| |
None |
do not paste this feature |
| |
Add |
add this feature to those already present |
| |
Overwrite |
use this feature to replace those already present |
| For the Ground Height feature:- |
| |
Absolute |
use the ground heights in the scrapbook to replace the existing ground heights |
| |
Relative |
ignore the ground heights in the scrapbook and use the existing ground heights |
|
|
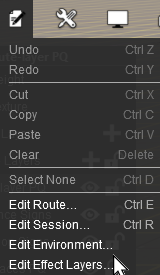
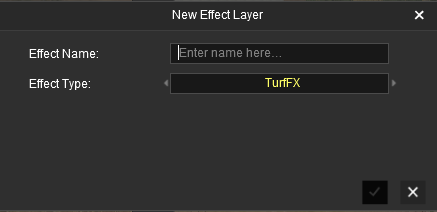
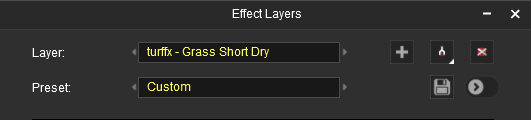
Edit Effect Layers...
When this Target is selected, the Edit Effect Layers options will appear. This is the same as selecting Edit Effect Layers ... from the Trainz Edit Menu.
 |
- If no Effect Layers are present then you can create a new one
 |
- If Effect Layers are present then select one to edit
 |
The Placement Tool
 |
Keyboard Shortcut: E |
The Placement Tool is used to add assets to the route.
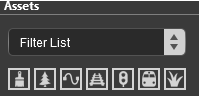
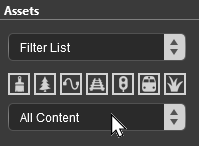
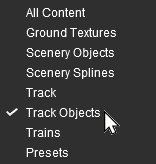
The first step is to identify and select the particular asset that you want to add to the route.
 In the Asset Palette either:-
|
|
OR |
|
|
Notes:
|
|
If the Assets Palette is not shown on the screen, then:-
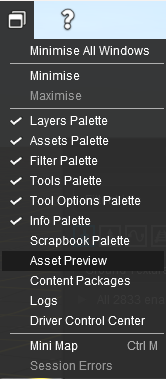 |
| 1. |
open the Window Menu from the menu icons at the top of the screen |
| 2. |
Left click on the Assets Palette name |
| to add a tick and make it visible. |
|
|
|
|
 Shortcut Shortcut
If you already have the same asset placed in your route then:-
- select the Eyedropper Tool in the Tools Palette (or press the R key)
- Left click on the existing asset object
This will instantly select that particular asset in the filter list.
Jump to Step  below. below. |
|
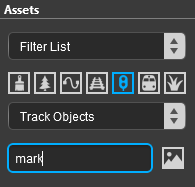
 To narrow down the filter list type part of the asset name into the Search Text Box. For example if you have selected Track Objects and want to find "Trackmarks", then type "mark" (UPPER/lower case does not matter).
 |
 This will list all the Track Objects containing the text "mark" in the filter list. This will list all the Track Objects containing the text "mark" in the filter list.
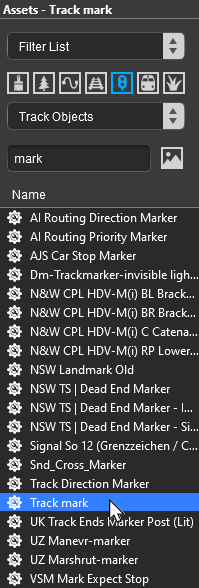 |
 Select the item Track Mark. Select the item Track Mark.
If you are not sure about an asset then double-click on the name to bring up its image and description. |
|
The final step is to place the selected object into the route.
- Click the Placement Tool or press the E key
- Click on the spot where you want to place the object
|
|
The Placement Tool will remain on and active until another tool has been selected. So everytime you click another copy of the asset (or another asset if you change your selection) will be added to the route. |
|
|
|
Notes:
To delete an asset:-
- if the asset is not already selected (highlighted in green) then:-
- select either the:-
- Free Move Tool (or press S ) or
- Fine Adjustment Tool (or press D )
- Left click on the asset to be deleted
- press the Delete key
|
|
The Eyedropper Tool
 |
Keyboard Shortcut: R |
The Eyedropper Tool is used to identify objects that are in the route. The objects can be textures, effect layers, scenery, rolling stock, track and track equipment, and splines.
The Free Move Tool
 |
Keyboard Shortcut: S |
The Free Move Tool is used to move objects in the route.
The Fine Adjustment Tool
 |
Keyboard Shortcut: D |
The Fine Adjustment Tool is used to make fine adjustments (XYZ axis, rotation, tilt) to objects in the route.
The Marquee Tool
 |
Keyboard Shortcut: F |
The Marquee Tool is used to select areas of the route.
Trainz Wiki
 |
More Tutorials and Guides to Using Trainz
|
This page was created by Trainz user pware in January 2023 and was last updated as shown below.