How to Use S20 Tools
m |
m (→The Placement Tool) |
||
| Line 550: | Line 550: | ||
The '''Placement Tool''' is used to add assets to the landscape. | The '''Placement Tool''' is used to add assets to the landscape. | ||
| + | |||
| + | <table bgcolor=#000000 width=480 cellpadding=2> | ||
| + | <tr valign="top"> | ||
| + | <td> | ||
| + | <table bgcolor=#ffffb0 width=476 cellpadding=2> | ||
| + | <tr valign="top"> | ||
| + | <td>[[image:NotePad.PNG|link=]]</td> | ||
| + | <td><span style="font-size: 17px; font-weight: 700;">Notes:'''</span><br> | ||
| + | ---- | ||
| + | To delete an asset:- | ||
| + | * if the asset is not already selected (highlighted in green) then:- | ||
| + | *# select either the:- | ||
| + | *#* '''Free Move Tool''' (or press <span style="font-weight: 700; font-size: 17px; color: white; background-color: black;"> S </span>) or | ||
| + | *#* '''Fine Adjustment Tool''' (or press <span style="font-weight: 700; font-size: 17px; color: white; background-color: black;"> D </span>) | ||
| + | *# '''Left''' click on the asset to be deleted | ||
| + | * press the <span style="font-weight: 700; font-size: 17px; color: white; background-color: black;"> Delete </span> key | ||
| + | </td> | ||
| + | </tr> | ||
| + | </table> | ||
| + | </td> | ||
| + | </tr> | ||
| + | </table> | ||
=='''The Eyedropper Tool'''== | =='''The Eyedropper Tool'''== | ||
Revision as of 10:49, 7 January 2023
The information in this Wiki Page applies to Surveyor 2.0 (S20) as found in Trainz Plus.
This document is under development
|
|
|||||||||
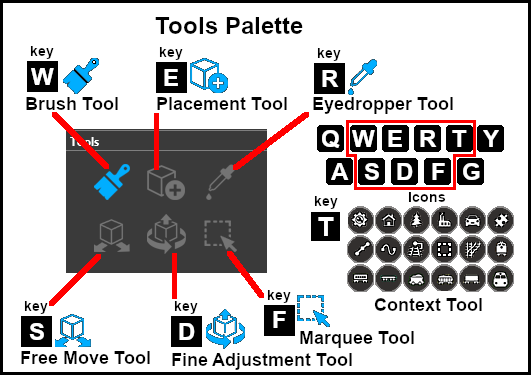
The Tools Palette
 |
|
|||||||||||||||||
The Brush Tool
The Brush Tool is used for painting the landscape. It can:-
When selected, the Brush Tool will show two drop down menu lists. |
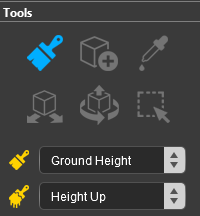 |
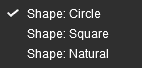
The first drop down menu will set the Brush Target, the type of brush. The Targets are:-
|
 |
Ground Height
When this Target is selected, the second drop down box will give a choice of several Ground Height tools. The choices are:-
|
 |
| The different control options available with this brush tool are shown in the Tools Options Palette. If this palette is not visible on the screen then refer to Notes: Palettes at the top of this document. The available brush tool options are shown with a Gold coloured icon next to their names. Those options that have their icon greyed out will be ignored, but they can still be edited. |
|||||||||||||||||||||||||||||||||||
Height Up/Height Down  |
Set Height 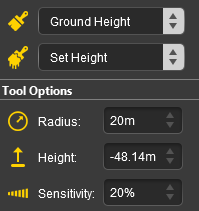 |
Grade  |
|
||||||||||||||||||||||||||||||||
|
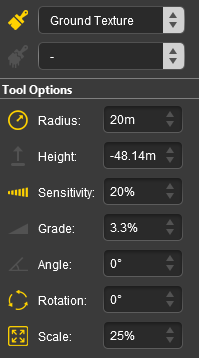
Ground Texture
When this Target is selected, the second drop down box will be disabled - there are no brush texture tool choices. The different control options available with this brush tool are shown in the Tools Options Palette. If this palette is not visible on the screen then refer to Notes: Palettes at the top of this document.
The available brush tool options are shown with a Gold coloured icon next to their names. Those options that have their icon greyed out will be ignored, but they can still be edited.
 |
|
||||||||||||||||||||||||||
|
Scrapbook Data
When this Target is selected, the second drop down box will give a choice of two Scrapbook Data tools. The choices are:-
|
| The different control options available with this brush tool are shown in the Tools Options Palette. This brush tool also uses the Scrapbook Palette. If both of these palettes are not visible on the screen then refer to Notes: Palettes at the top of this document. The available brush tool options are shown with a Gold coloured icon next to their names. Those options that have their icon greyed out will be ignored, but they can still be edited. |
||||||||||||||||||||||||||
Scrapbook Clone 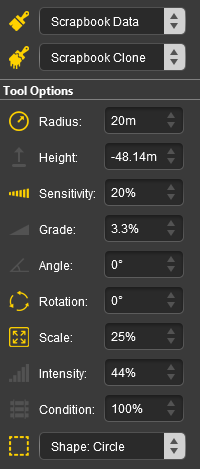 |
Scrapbook Brush 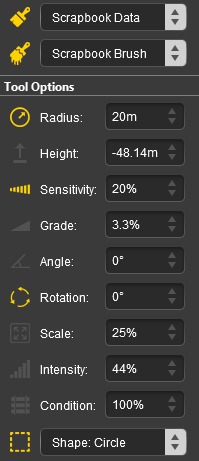 |
|
||||||||||||||||||||||||
|
The Srapbook Palette 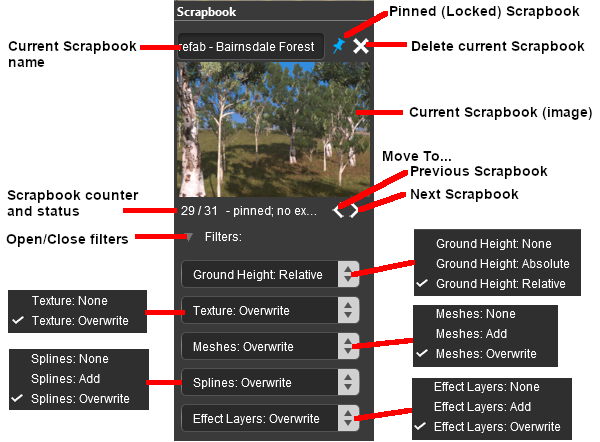 |
|
|||||||||||||||||||||||||||||||||||||||
Edit Effect Layers...
The Placement Tool
| Keyboard Shortcut: E |
The Placement Tool is used to add assets to the landscape.
|
The Eyedropper Tool
| Keyboard Shortcut: R |
The Eyedropper Tool is used to identify objects that are in the landscape. The objects can be textures, effect layers, scenery, rolling stock, track and track equipment, and splines.
The Free Move Tool
| Keyboard Shortcut: S |
The Free Move Tool is used to move objects in the landscape.
The Fine Adjustment Tool
| Keyboard Shortcut: D |
The Fine Adjustment Tool is used to make fine adjustments (XYZ axis, rotation, tilt) to objects in the landscape.
The Marquee Tool
| Keyboard Shortcut: F |
The Marquee Tool is used to select areas of the landscape.
Trainz Wiki
 |
More Tutorials and Guides to Using Trainz |
This page was created by Trainz user pware in January 2023 and was last updated as shown below.